catalogue
About image segmentation and several methods:
The whole process of watershed algorithm:
Disadvantages of traditional watershed algorithm:
About image segmentation and several methods:
Image segmentation is a process of dividing an image into several disjoint small local areas according to certain principles. It is one of the most basic research fields in image processing.
At present, there are many image segmentation methods, among which watershed algorithm is a region based image segmentation algorithm. In addition, there are threshold segmentation method and edge extraction segmentation method.
Principle:
The traditional watershed segmentation method is a mathematical morphology segmentation method based on topology theory. Its basic idea is to regard the image as a topological landform in geodesy. The gray value of each pixel in the image represents the altitude of the point. Each local minimum and its affected area are called catchment basin, and the boundary of catchment basin forms watershed. The concept and formation of the watershed can be illustrated by simulating the immersion process.
When the horizontal plane rises to a certain height, the water will overflow the current valley. By building a dam on the watershed, the water collection of the two valleys can be avoided. In this way, the image is divided into two pixel sets, one is the flooded Valley pixel set, and the other is the watershed line pixel set. Finally, the lines formed by these dams partition the whole image to realize the image segmentation.

In this algorithm, spatially adjacent pixels with similar gray values are divided into a region.
The whole process of watershed algorithm:
- All pixels in the gradient image are classified according to the gray value, and a geodesic distance (geodesic distance is the distance of the shortest path (executable path) between two points on the earth surface) threshold is set.
- Find the pixel points with the lowest gray value (marked as the lowest gray value by default), and let the threshold increase from the minimum value. These points are the starting points.
- During the growth of the horizontal plane, it will encounter the surrounding neighborhood pixels. Measure the geodesic distance from these pixels to the starting point (the lowest gray value). If it is less than the set threshold, these pixels will be submerged. Otherwise, a dam will be set on these pixels, so these neighborhood pixels are classified
- As the horizontal plane gets higher and higher, more and higher dams will be set until the maximum gray value, and all regions meet on the watershed line. These dams partition the pixels of the whole image.
effect:
Disadvantages of traditional watershed algorithm:
However, due to the interference of noise points or other factors, dense small areas may be obtained. The direct watershed algorithm based on gradient image is easy to lead to over segmentation of the image, and dense small areas may be obtained, that is, the image is over segmented, because there are many local minimum points in the image, Each point will form a small area. There are too many small areas in the input image, resulting in many small catchment basins, so that the segmented image can not represent the meaningful areas in the image. Therefore, the similar regions of the segmentation results must be merged.
resolvent:
- Gaussian smoothing is performed on the image to erase many small minimum values, and these small partitions will be merged.
- Instead of increasing from the minimum value, pixels with relatively high gray value can be used as the starting point (which needs to be marked manually by the user), and many small areas will be merged into one area, which is called watershed algorithm based on image mark.
Improved watershed algorithm
The traditional watershed segmentation algorithm will produce over segmentation results due to noise or other irregularities in the image. Therefore, OpenCV implements a marker based watershed algorithm, which can specify which valley points to merge and which are not. This is an interactive image segmentation.
What we do is give different labels to the objects we know. Mark the area we determine as the foreground or object with one color (or intensity), mark the area we determine as the background or non object with another color, and finally mark the area we are not sure with 0. This is our mark. Then watershed algorithm is applied. Then our tag will be updated with the tag we give, and the boundary value of the object will be - 1.
The following three figures are the original figure, the figure of watershed over segmentation and the figure obtained by marker based watershed algorithm:
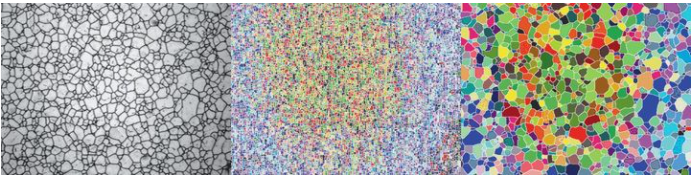
Each marked point is equivalent to the water injection point in the watershed. Water injection from these points makes the horizontal plane rise. However, as shown in the above figure, there are too many areas to be segmented in the image and manual marking is too troublesome. We can use the distance conversion method for marking, which is used in OpenCV.
Watershed algorithm in OpenCV
In OpenCV, we need to label different areas. An integer greater than 1 is used to represent the area we determine as the foreground or object, 1 is used to represent the area we determine as the background or non object, and finally 0 is used to represent the area we cannot determine. Then, using the watershed algorithm, our marker image will be updated, and the boundary pixel value of the updated marker image is - 1.
Correlation function:
void watershed( InputArray image, InputOutputArray markers );
The first parameter image must be an 8bit 3-channel color image matrix sequence. The first parameter has nothing to say. The key is the second parameter, markers
Before the watershed function watershed is executed, the second parameter markers must be processed. It should contain the contours of different regions. Each contour has its own unique number. The positioning of the contour can be realized by the findContours method in Opencv, which is the requirement before the watershed is executed.
What happens next when you execute the watershed? The algorithm will take the contour passed in by the markers as the seed (that is, the so-called water injection point), judge other pixels on the image according to the watershed algorithm rules, and delimit the regional ownership of each pixel until all pixels on the image are processed. The value at the boundary between regions is set to "- 1" to distinguish.
To sum up, the second input marker must contain the seed point information. Using the mouse to mark in the official Opencv routine is actually defining the seed, but it needs manual operation, and using findContours can automatically mark the seed points. After the watershed method is completed, the segmented image will not be generated directly, and further display processing is needed. Therefore, the watershed with only two parameters is not simple.
Test:
Test picture:

C + + test code:
#include "opencv2/imgproc/imgproc.hpp"
#include "opencv2/highgui/highgui.hpp"
#include <iostream>
using namespace cv;
using namespace std;
Vec3b RandomColor(int value); //Generate random color function
int main(int argc, char* argv[])
{
Mat image = imread("2.jpg"); //Load RGB color image
imshow("Source Image", image);
//Grayscale, filtering, Canny edge detection
Mat imageGray;
cvtColor(image, imageGray, COLOR_BGR2GRAY);//Gray conversion
GaussianBlur(imageGray, imageGray, Size(5, 5), 2); //Gaussian filtering
imshow("Gray Image", imageGray);
Canny(imageGray, imageGray, 80, 150);
imshow("Canny Image", imageGray);
//Find profile
vector<vector<Point>> contours;
vector<Vec4i> hierarchy;
findContours(imageGray, contours, hierarchy, RETR_TREE, CHAIN_APPROX_SIMPLE, Point());
Mat imageContours = Mat::zeros(image.size(), CV_8UC1); //outline
Mat marks(image.size(), CV_32S); //Opencv watershed second matrix parameter
marks = Scalar::all(0);
int index = 0;
int compCount = 0;
for (; index >= 0; index = hierarchy[index][0], compCount++)
{
//Mark marks and number the contours of different areas, which is equivalent to setting water injection points. There are as many water injection points as there are contours
drawContours(marks, contours, index, Scalar::all(compCount + 1), 1, 8, hierarchy);
drawContours(imageContours, contours, index, Scalar(255), 1, 8, hierarchy);
}
//Let's look at what's in the incoming matrix marks
Mat marksShows;
convertScaleAbs(marks, marksShows);
imshow("marksShow", marksShows);
imshow("outline", imageContours);
watershed(image, marks);
//Let's take a look at what is in the matrix marks after the watershed algorithm
Mat afterWatershed;
convertScaleAbs(marks, afterWatershed);
imshow("After Watershed", afterWatershed);
//Color fill each area
Mat PerspectiveImage = Mat::zeros(image.size(), CV_8UC3);
for (int i = 0; i < marks.rows; i++)
{
for (int j = 0; j < marks.cols; j++)
{
int index = marks.at<int>(i, j);
if (marks.at<int>(i, j) == -1)
{
PerspectiveImage.at<Vec3b>(i, j) = Vec3b(255, 255, 255);
}
else
{
PerspectiveImage.at<Vec3b>(i, j) = RandomColor(index);
}
}
}
imshow("After ColorFill", PerspectiveImage);
//The result of segmentation and color filling is fused with the original image
Mat wshed;
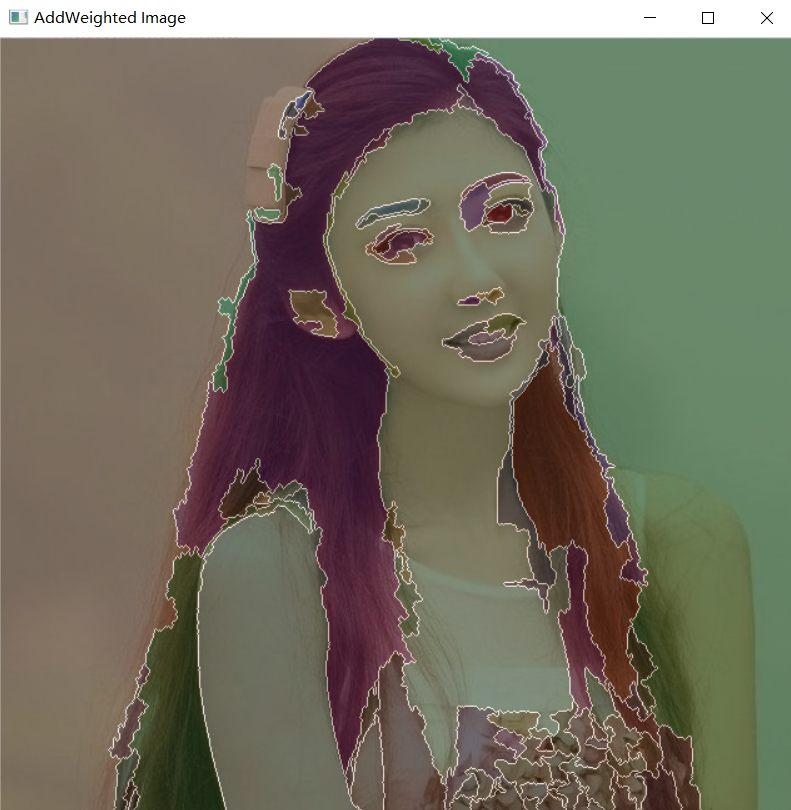
addWeighted(image, 0.4, PerspectiveImage, 0.6, 0, wshed);
imshow("AddWeighted Image", wshed);
waitKey();
}
Vec3b RandomColor(int value)//Generate random color function</span>
{
value = value % 255; //Generate random numbers from 0 to 255
RNG rng;
int aa = rng.uniform(0, value);
int bb = rng.uniform(0, value);
int cc = rng.uniform(0, value);
return Vec3b(aa, bb, cc);
}effect: