This article attempts to explain why it is "trying" according to the permission design principle and actual combat in Vue system? Because this is also groping for understanding, not necessarily accurate
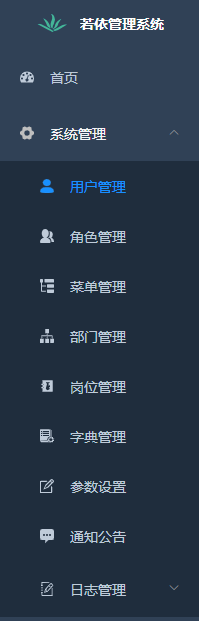
According to Vue, the functions of permission management in the system are concentrated in the system management menu module, as shown in the following figure. The authority part mainly involves four parts: user management, role management, menu management and department management.
1, If classified by permissions in Vue system
According to the observation, according to the permissions in Vue system, it can be divided into the following categories:
- Menu authority: what menus can users see after logging in to the system
- Button permissions: which buttons can users see on a page, such as add, delete and so on
- Interface permission: the user requests the back-end interface with authentication information. Whether the user has permission to access the interface corresponds to the buttons on the front-end page one by one
- Data permission: users have permission to access a back-end interface, but different users have the same interface and the same input parameters. According to the size of permission, the returned results should be different - those with large permission can see more data.
1. Menu permissions
This is easy to understand. Users with different permissions see different menus after logging into the system. From creating a new menu to assigning menu permissions to a user, it has been mentioned in the previous article and will not be repeated.
After logging in, the user will request the back-end com ruoyi. web. controller. system. The syslogincontroller#getroutes interface obtains the menu data of the login user:
select distinct m.menu_id, m.parent_id, m.menu_name, m.path, m.component, m.visible, m.status, ifnull(m.perms,'') as perms, m.is_frame, m.is_cache, m.menu_type, m.icon, m.order_num, m.create_time
		from sys_menu m
			 left join sys_role_menu rm on m.menu_id = rm.menu_id
			 left join sys_user_role ur on rm.role_id = ur.role_id
			 left join sys_role ro on ur.role_id = ro.role_id
			 left join sys_user u on ur.user_id = u.user_id
		where u.user_id = #{userId} and m.menu_type in ('M', 'C') and m.status = 0  AND ro.status = 0
		order by m.parent_id, m.order_num
SQL
Copy
Menu type (M directory C menu F button); Menu status (0 show 1 hide)
This is a typical user role menu model.
The front end will render different menus according to the data returned by the interface.
2. Button authority
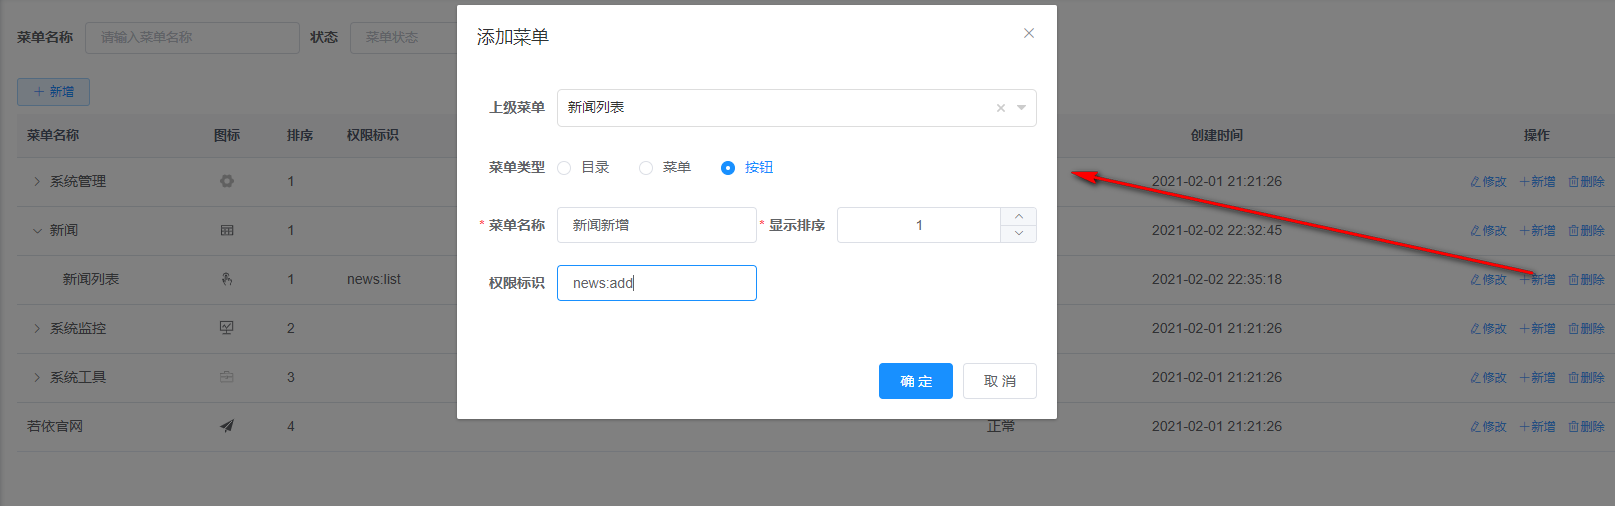
The permission of the new button is similar to that of the new menu. In the following figure, I added a new button on the news list page called news new. The permission allocation method of this button is the same as that of the menu.
3. Interface authority
Each button basically corresponds to a back-end interface. The front-end will display or hide the button according to the permission flag. But what if the user does not click the button and directly requests the back-end through the http request tool? Therefore, the interface permission is also required, which is completely consistent with the permission on the button.
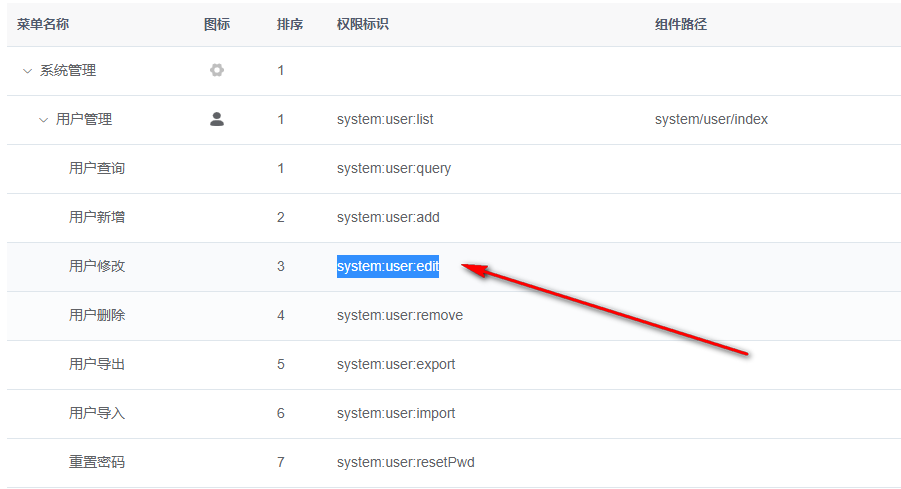
If the spring security framework is used in the system, the interface permissions are implemented based on the annotation @ PreAuthorize. For example, the back-end interface corresponding to the modify user button in the user management page looks like this
    @PreAuthorize("@ss.hasPermi('system:user:edit')")
    @Log(title = "user management ", businessType = BusinessType.UPDATE)
    @PutMapping
    public AjaxResult edit(@Validated @RequestBody SysUser user)
    {
        ...
    }
Java
Copy
It is the same as the corresponding front button permission flag
If you do not have permission to access the interface, the following information will be returned:
{
"msg": "Request access:/system/user/list,Authentication failed, unable to access system resources",
"code": 401
}
JSON
Copy
4. Data authority
Users have the right to access a back-end interface, but different users have the same interface and the same input parameters. According to the size of permission, the returned results should be different - those with large permission can see more data.
Reflected in the ruoyi Vue system, for example, now there are two users in the system, one is the super administrator admin and the other is the ordinary user kdyzm
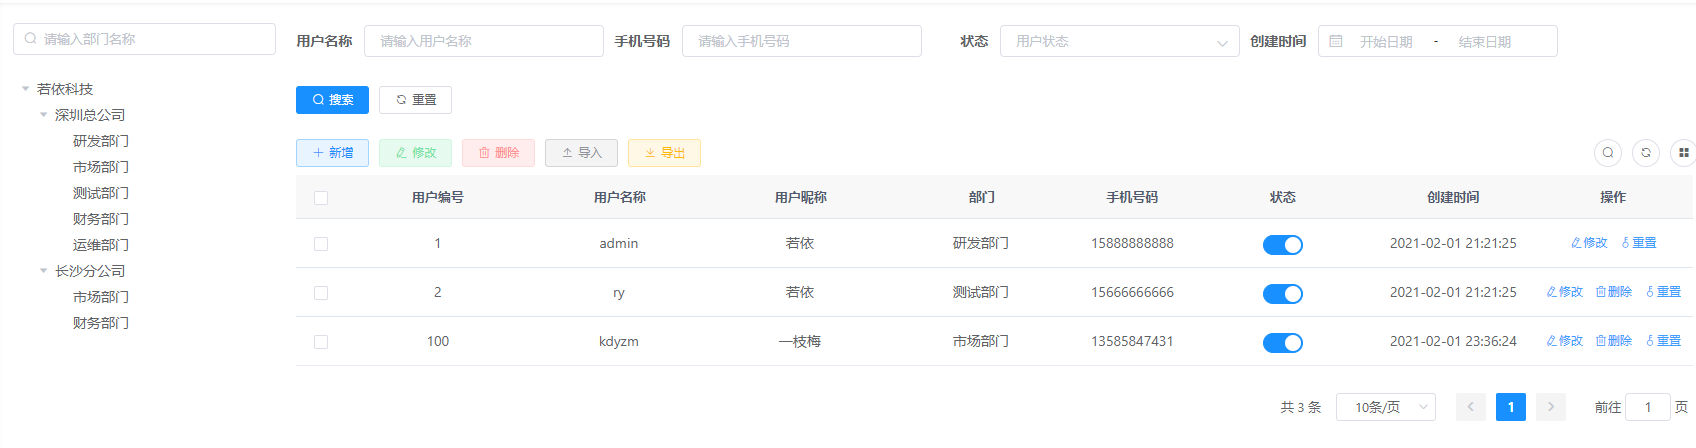
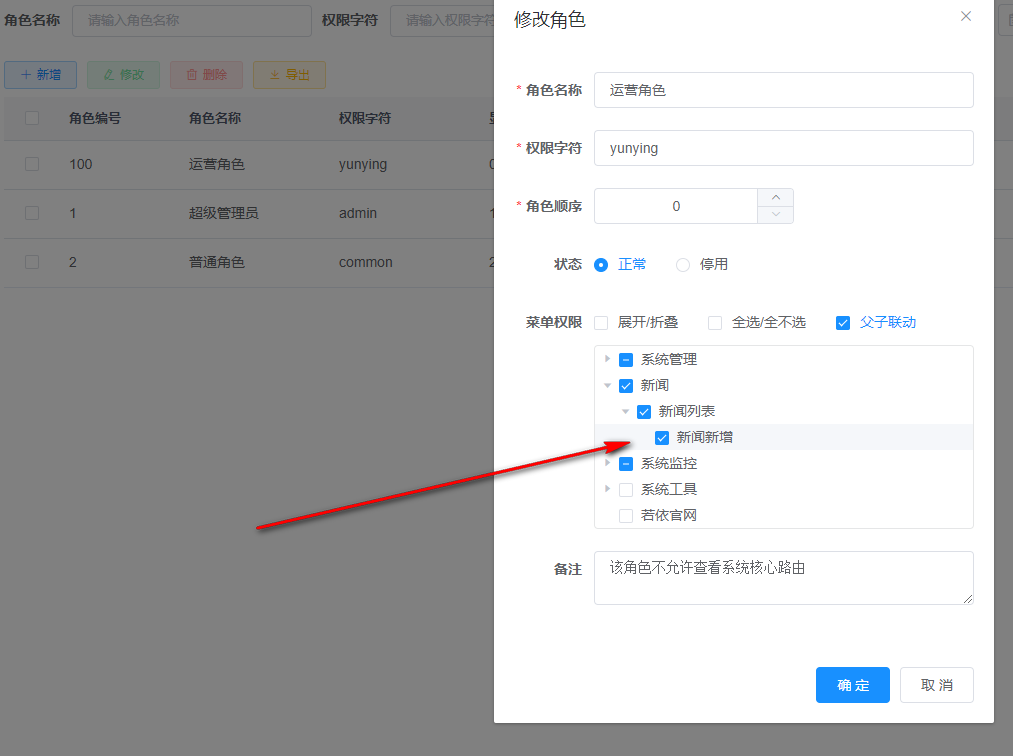
Both of them have user management, menu management and role management permissions, so they can see the corresponding menu and make corresponding operations, such as delete, add, modify, etc. There is a problem here. kdyzm should only see part of the data, while super administrator should be able to see all the data. In the ruoyi system, it is controlled by modifying the role data permission.

Therefore, with the same permissions, the number of users that super administrators can see is different from that that ordinary users kdyzm can see.
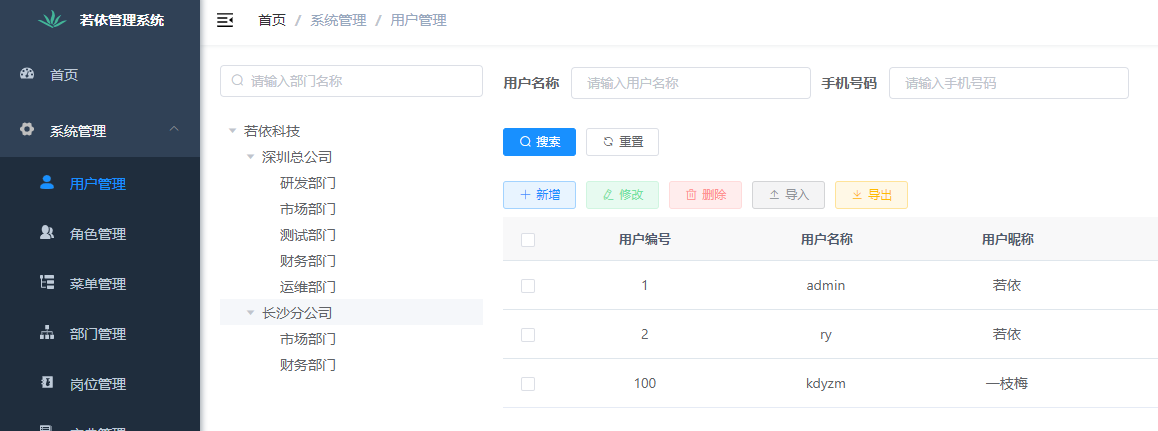
User management page seen by super administrator:
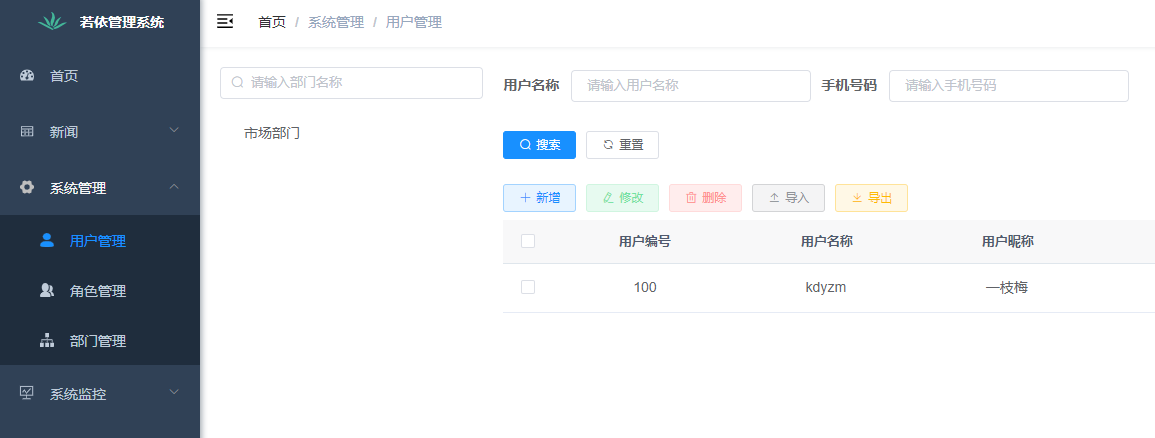
User management page kdyzm seen by ordinary users:
2, Implementation principle of various types of permissions
1. Menu permissions
Menu permission is very simple. In fact, it is a simple user role menu model. When is the menu loaded? ruoyi-uisrcpermission.js, the loaded logic is in this file.
permission.js file Navigation guard , the router will be triggered every time the route changes The callback function of beforeeach.
router.beforeEach((to, from, next) => {
  NProgress.start()
  if (getToken()) {
    /* has token*/
    if (to.path === '/login') {
      next({ path: '/' })
      NProgress.done()
    } else {
      if (store.getters.roles.length === 0) {
        // Judge whether the current user has pulled the user_info information
        store.dispatch('GetInfo').then(res => {
          // Pull user_info
          const roles = res.roles
          store.dispatch('GenerateRoutes', { roles }).then(accessRoutes => {
            // Generate an accessible routing table according to roles permissions
            router.addRoutes(accessRoutes) // Dynamically add accessible routing table
            next({ ...to, replace: true }) // The hack method ensures that addRoutes is complete
          })
        }).catch(err => {
            store.dispatch('LogOut').then(() => {
              Message.error(err)
              next({ path: '/' })
            })
          })
      } else {
        next()
      }
    }
  } else {
    // No token
    if (whiteList.indexOf(to.path) !== -1) {
      // In the login free white list, enter directly
      next()
    } else {
      next(`/login?redirect=${to.fullPath}`) // Otherwise, redirect all to the login page
      NProgress.done()
    }
  }
})
JavaScript
Copy
Note the logic if (store.getters.roles.length === 0) {it can be seen that if the current page is not refreshed, the user will not see the new menu even if new menu permissions are added to the user.
2. Button authority
Button permissions are basically the same as menu permissions, which are fine-grained permissions attached to the page. Button permissions are reflected in that if the user does not have corresponding permissions, the relevant buttons cannot be seen. How did this happen?
First look at the front vue code of modify, add and delete buttons in the menu management under system management
<el-table-column label="operation" align="center" class-name="small-padding fixed-width">
        <template slot-scope="scope">
          <el-button size="mini"
            type="text"
            icon="el-icon-edit"
            @click="handleUpdate(scope.row)"
            v-hasPermi="['system:menu:edit']"
          >modify</el-button>
          <el-button
            size="mini"
            type="text"
            icon="el-icon-plus"
            @click="handleAdd(scope.row)"
            v-hasPermi="['system:menu:add']"
          >newly added</el-button>
          <el-button
            size="mini"
            type="text"
            icon="el-icon-delete"
            @click="handleDelete(scope.row)"
            v-hasPermi="['system:menu:remove']"
          >delete</el-button>
        </template>
      </el-table-column>
Vue
Copy
There is an attribute v-hasPermi on El button, which is actually a user-defined instruction of vue. The attribute value is the permission flag defined when creating the button. It is defined in Src / directive / permission / index JS file
import hasRole from './hasRole'
import hasPermi from './hasPermi'

const install = function(Vue) {
  Vue.directive('hasRole', hasRole)
  Vue.directive('hasPermi', hasPermi)
}

if (window.Vue) {
  window['hasRole'] = hasRole
  window['hasPermi'] = hasPermi
  Vue.use(install); // eslint-disable-line
}

export default install
JavaScript
Copy
The specific implementation logic is in haspermi. Com of the same directory JS file
import store from '@/store'

export default {
  inserted(el, binding, vnode) {
    const { value } = binding
    const all_permission = "*:*:*";
    const permissions = store.getters && store.getters.permissions

    if (value && value instanceof Array && value.length > 0) {
      const permissionFlag = value

      const hasPermissions = permissions.some(permission => {
        return all_permission === permission || permissionFlag.includes(permission)
      })

      if (!hasPermissions) {
        el.parentNode && el.parentNode.removeChild(el)
      }
    } else {
      throw new Error(`Please set the operation permission label value`)
    }
  }
}
JavaScript
Copy
Pay attention to the code? el. parentNode && el. parentNode. Removechild (EL), you can see that if you do not have button permission, the button itself will be removed from the dom.
3. Interface authority
The interface permissions correspond to the button permissions on the front end one by one. The purpose is to prevent users from bypassing the button and directly requesting the back-end interface to obtain data. In the ruoyi Vue system, it is implemented using the annotation @ PreAuthorize of spring security.
Although it's just an annotation, it's the crystallization of spring Security + JWT integration ~ we'll talk about it later.
4. Data authority
The key to the realization of data authority lies in com ruoyi. framework. aspectj. Datascopeaspect class. This class is a faceted class, usually with com ruoyi. common. annotation. The methods annotated by datascope will be intercepted when executed.
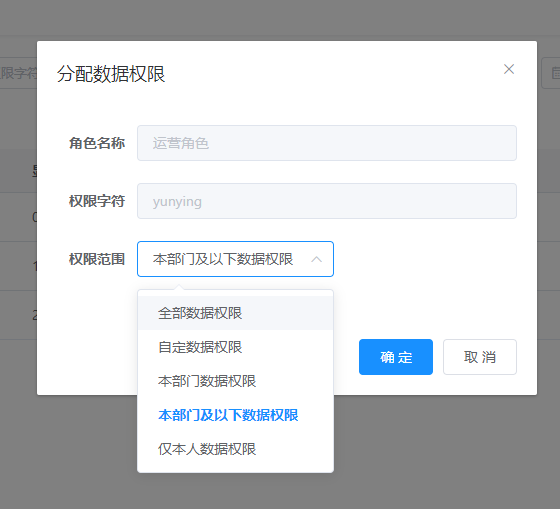
This section defines five permission ranges
name
code
desc
DATA_SCOPE_ALL
1
All data permissions
DATA_SCOPE_CUSTOM
2
Custom data permission
DATA_SCOPE_DEPT
3
Department data authority
DATA_SCOPE_DEPT_AND_CHILD
4
Data authority of department and below
DATA_SCOPE_SELF
5
Only personal data permission
The core logic of this aspect is "spell SQL". Before the method is executed, a dataScope key value pair will be added to a params attribute of the parameter. The key is "dataScope" and the value is and ("+ sqlstring. Substring (4) +)" style SQL. This SQL will change according to the Department of the current user and the permission range of the current user role.
StringBuilder sqlString = new StringBuilder();
        for (SysRole role : user.getRoles())
        {
            String dataScope = role.getDataScope();
            if (DATA_SCOPE_ALL.equals(dataScope))
            {
                sqlString = new StringBuilder();
                break;
            }
            else if (DATA_SCOPE_CUSTOM.equals(dataScope))
            {
                sqlString.append(StringUtils.format(
                        " OR {}.dept_id IN ( SELECT dept_id FROM sys_role_dept WHERE role_id = {} ) ", deptAlias,
                        role.getRoleId()));
            }
            else if (DATA_SCOPE_DEPT.equals(dataScope))
            {
                sqlString.append(StringUtils.format(" OR {}.dept_id = {} ", deptAlias, user.getDeptId()));
            }
            else if (DATA_SCOPE_DEPT_AND_CHILD.equals(dataScope))
            {
                sqlString.append(StringUtils.format(
                        " OR {}.dept_id IN ( SELECT dept_id FROM sys_dept WHERE dept_id = {} or find_in_set( {} , ancestors ) )",
                        deptAlias, user.getDeptId(), user.getDeptId()));
            }
            else if (DATA_SCOPE_SELF.equals(dataScope))
            {
                if (StringUtils.isNotBlank(userAlias))
                {
                    sqlString.append(StringUtils.format(" OR {}.user_id = {} ", userAlias, user.getUserId()));
                }
                else
                {
                    // The data permission is only myself and there is no userAlias alias. No data will be queried
                    sqlString.append(" OR 1=0 ");
                }
            }
        }
Java
Copy
In short, the logic of this code is that the higher the authority of the user's Department, the larger the data authority range, and the larger the result set will be found.

The DataScope annotation is added to the interfaces of Department list query, role list query and user list query respectively. Obviously, these interfaces need to find different results according to different people.
Taking user list query as an example, execute sql as
<select id="selectUserList" parameterType="SysUser" resultMap="SysUserResult">
select u.user_id, u.dept_id, u.nick_name, u.user_name, u.email, u.avatar, u.phonenumber, u.password, u.sex, u.status, u.del_flag, u.login_ip, u.login_date, u.create_by, u.create_time, u.remark, d.dept_name, d.leader from sys_user u
left join sys_dept d on u.dept_id = d.dept_id
where u.del_flag = '0'
<if test="userName != null and userName != ''">
AND u.user_name like concat('%', #{userName}, '%')
</if>
<if test="status != null and status != ''">
AND u.status = #{status}
</if>
<if test="phonenumber != null and phonenumber != ''">
AND u.phonenumber like concat('%', #{phonenumber}, '%')
</if>
<if test="params.beginTime != null and params.beginTime != ''"><!-- Start time retrieval -->
AND date_format(u.create_time,'%y%m%d') >= date_format(#{params.beginTime},'%y%m%d')
</if>
<if test="params.endTime != null and params.endTime != ''"><!-- End time retrieval -->
AND date_format(u.create_time,'%y%m%d') <= date_format(#{params.endTime},'%y%m%d')
</if>
<if test="deptId != null and deptId != 0">
AND (u.dept_id = #{deptId} OR u.dept_id IN ( SELECT t.dept_id FROM sys_dept t WHERE find_in_set(#{deptId}, ancestors) ))
</if>
<!-- Data range filtering -->
${params.dataScope}
</select>
SQL
Copy
Among them, there is such a piece of code
<!-- Data range filtering -->
${params.dataScope}
SQL
Copy
In fact, the dataScope aspect only does the filling of the dataScope attribute of params.
3, According to Vue system SpringSecurity+JWT
In Vue system, permission verification from user login to back-end interface is implemented based on SpringSecurity+JWT. Among them, SpringSecurity is the core, and jwt is only a means to ensure the legitimacy of token (signature to prevent tampering). The relevant code of spring security integration is on the com. Of ruoyi framework module ruoyi. framework. Security package and com ruoyi. framework. config. Securityconfig class.
SecurityConfig is the core configuration class. All configurations are in this class.
1. User login
The logic of user login is in method com ruoyi. web. controller. system. In syslogincontroller #login, a typical login request body is as follows
{
	"username": "admin",
	"password": "admin123",
	"code": "0",
	"uuid": "a9fdbcbcb28748b796b5b77ad71bbb97"
}
JSON
Copy
username and password are the user name and password respectively, code is the verification code, and uuid is the unique identification of the verification code. After successful login, a jwt token will be returned to the front end
{
	"msg": "Operation successful",
	"code": 200,
	"token": "eyJhbGciOiJIUzUxMiJ9.eyJsb2dpbl91c2VyX2tleSI6IjIzZjRhNjJjLTY5NzMtNDcxZS04ZmU4LWJmYWQ4YzllNWFkMiJ9.9d3iIaNq62CkjTXlxFOQgdDMOAZiu5tAsEn0cEuV23opT6PAqu_CiaN7kQY8_XhlQrHX5RgZ2bH7LpsiKLLcSw"
}
JSON
Copy
In the login method, the following things are done
- Obtain the verification code in redis according to uuid and verify the requested verification code
- If the verification code is OK, verify the user name and password
- If the user name and password are verified successfully, the token is used as the key to save the user information to redis
- Use jwt to sign the token and return to the front end
In the whole process, some custom exceptions will be thrown, such as
throw new CaptchaExpireException();
throw new CaptchaException();
throw new UserPasswordNotMatchException();
throw new CustomException(e.getMessage());
Java
Copy
These exceptions will eventually be handled by the global exception handler: com ruoyi. framework. web. exception. GlobalExceptionHandler
2. Interface authority verification
After the front-end request completes the login interface, the token will be stored in the cookie. The key is admin token and the value is jwt token. Login logic: user actions. Login.
After that, the Authentication Header will be brought every time the backend interface is requested
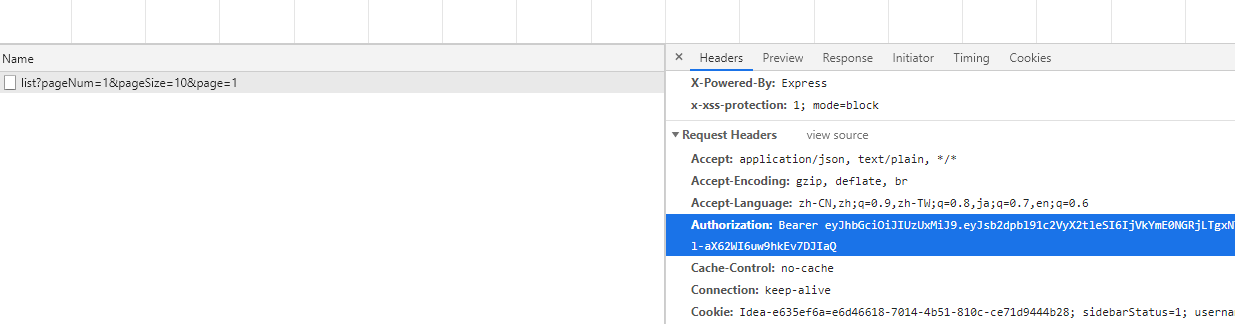
This is actually achieved through axios's request Interceptor: for details, see Src / utils / request JS file
When a request with Authentication Header reaches the backend, it will pass through the filter com ruoyi. framework. security. filter. Jwtauthenticationtokenfilter, which does the following things
- Take out the jwt token from the request header and perform jwt signature verification. If the signature verification is successful, take out the original token
- Retrieve user data from redis according to the token
- Encapsulate the user information into a UsernamePasswordAuthenticationToken object and populate the object into the Spring Security context
The @ PreAuthorize annotation on the Controller interface can only work if it is filled into the spring security context (doubt, if the author here does not use the spel expression provided by the native spring security, nor does he use the authorities, but uses the PermissionService class).
Then, before the formal implementation of the Controller interface, it will enter com ruoyi. framework. web. service. Permissionservice#haspermi method determines the permission. Here, take out the user data from redis again and verify the permission. If the permission verification fails, the logic in the interface will no longer be executed (doubt, the user data in the context of spring security is not used here, so what is the purpose of filling the code in the context with the user information in JwtAuthenticationTokenFilter).
4, Actual combat
The previous article explained how to create a menu and create a page, but it was an empty page
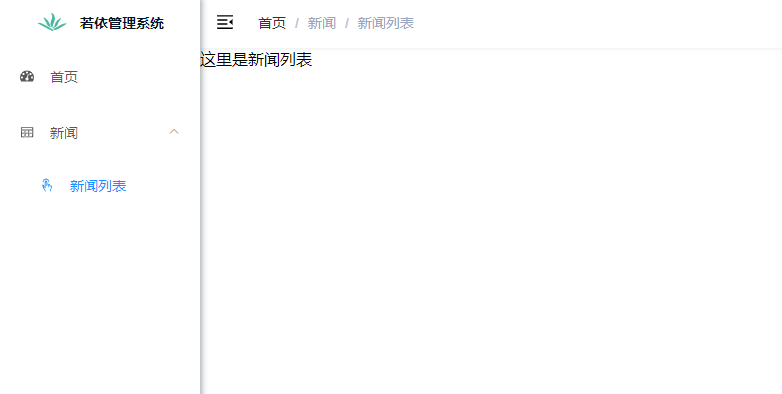
This article will explain how to realize the function of adding, deleting, checking and modifying.
Before everything starts, create a new table news, and the SQL table is as follows
CREATE TABLE `news` (
  `id` int(11) NOT NULL AUTO_INCREMENT COMMENT 'Primary key',
  `title` varchar(128) NOT NULL COMMENT 'News headlines',
  `brief` varchar(256) DEFAULT NULL COMMENT 'News overview',
  `content` text COMMENT 'News text',
  `create_time` datetime DEFAULT NULL,
  `create_by` varchar(64) DEFAULT NULL,
  `update_time` datetime DEFAULT NULL,
  `update_by` varchar(64) DEFAULT NULL,
  `delete_flag` tinyint(1) DEFAULT NULL,
  PRIMARY KEY (`id`)
) ENGINE=InnoDB DEFAULT CHARSET=utf8mb4
SQL
Copy
1. Front end page modification
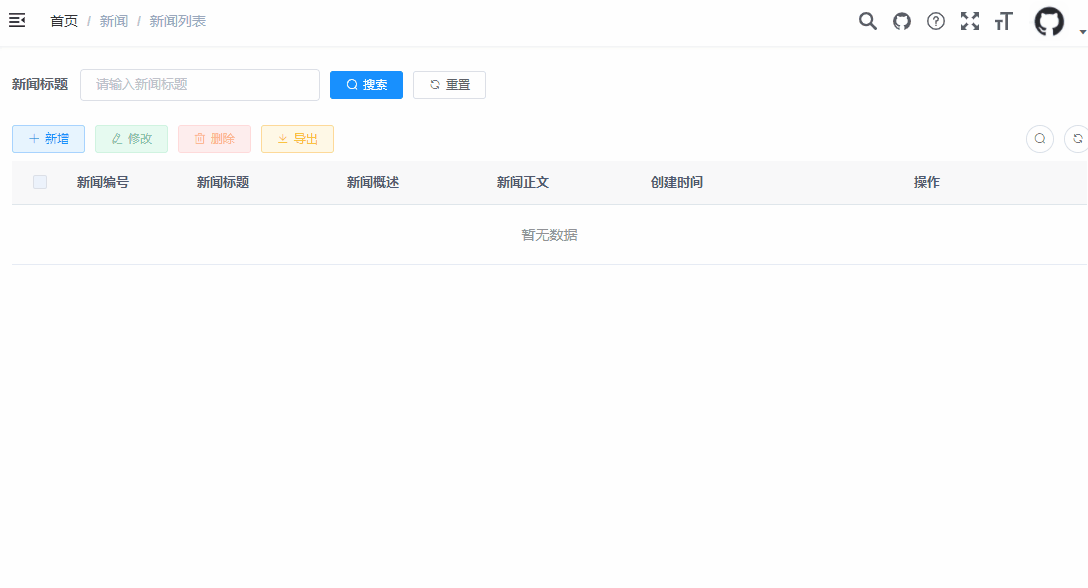
You can copy the code of the role management page directly to the news file by imitating the role management page. The effect is as follows

Yes, the title of the news list, the page of role management...

Then modify the elements in the page to make it consistent with the table structure created above, and the modified page will look like
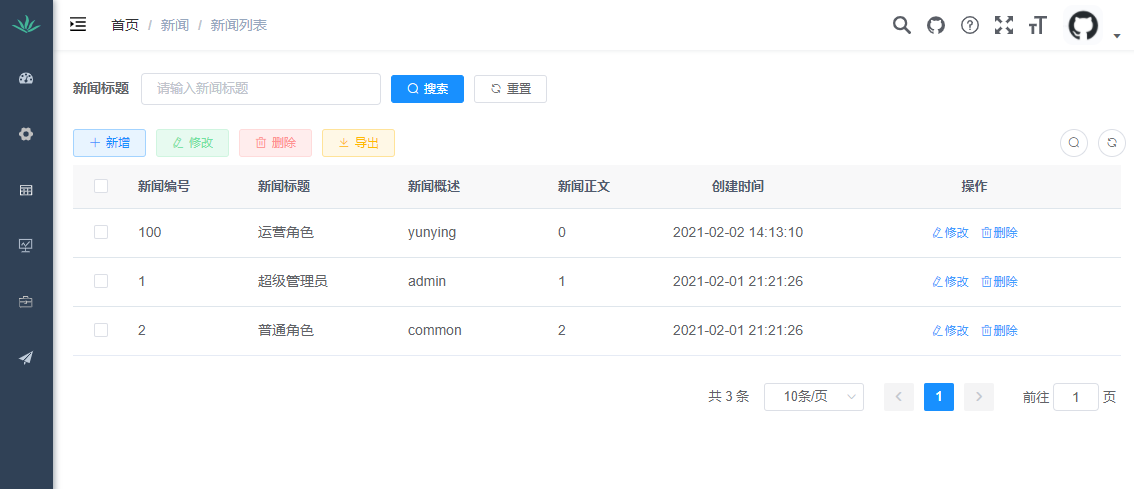
This is expected, but the content is still the content of the role management page.
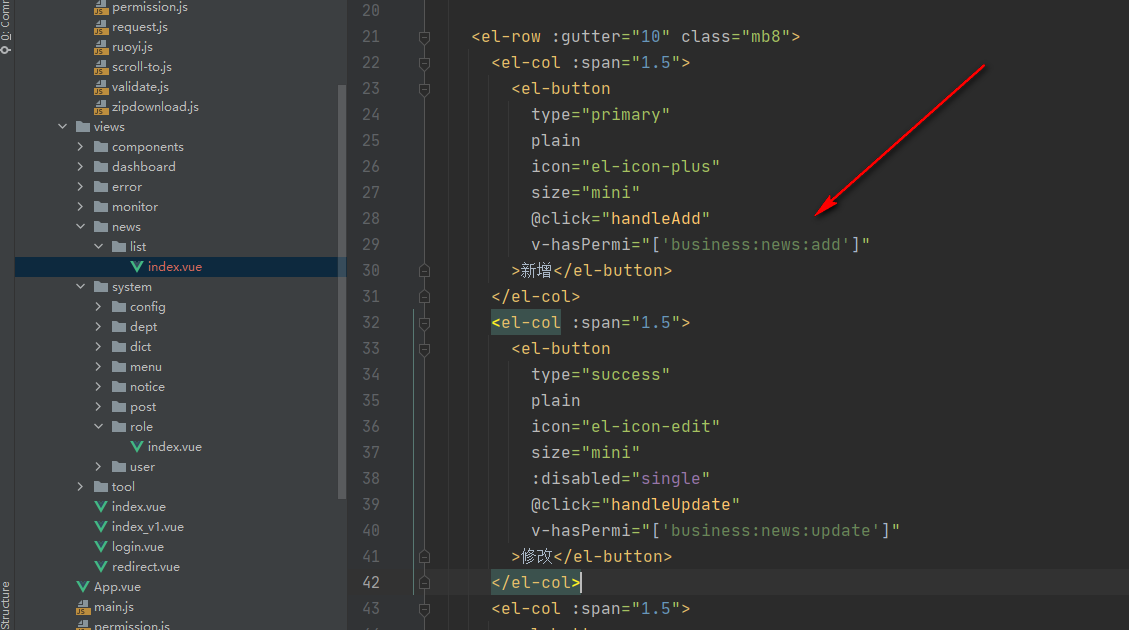
2. Create button permissions
In the previous step, we have completed the transformation of the page appearance. Next, we need to modify the page content. First, we need to add the button permission to the page
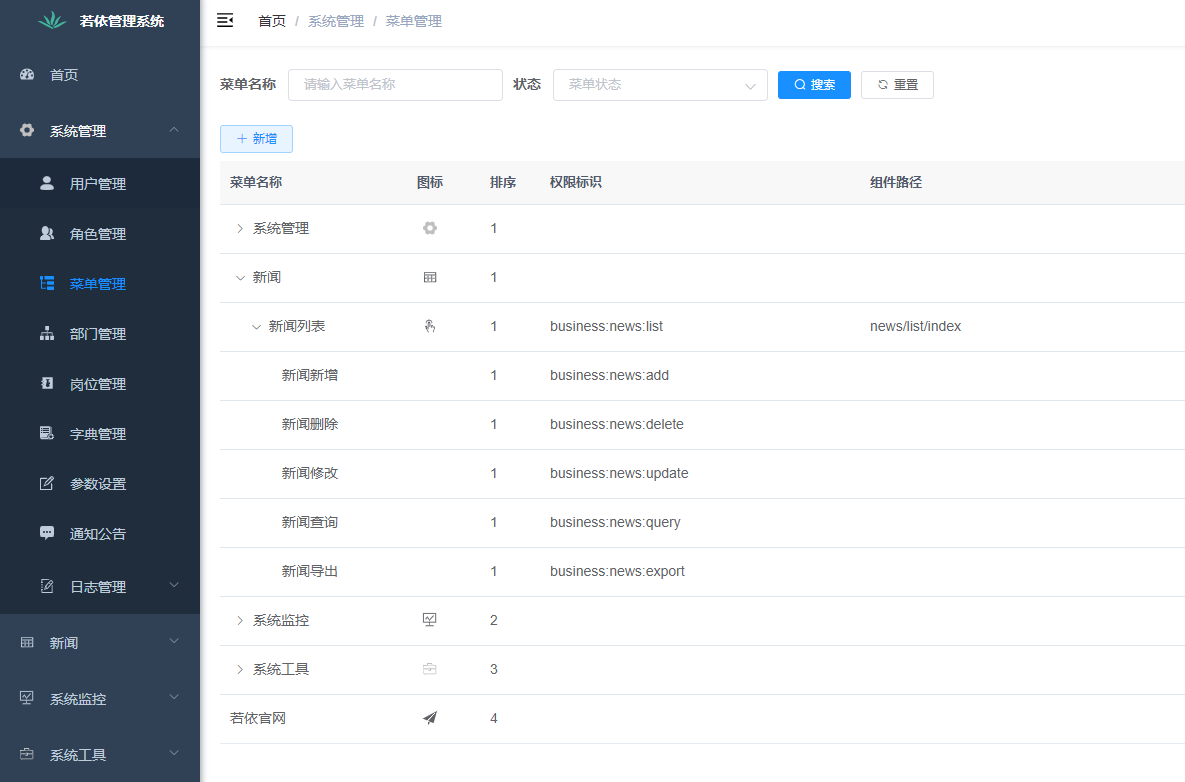
Add button permissions like this, and then assign the permission flag to the front page
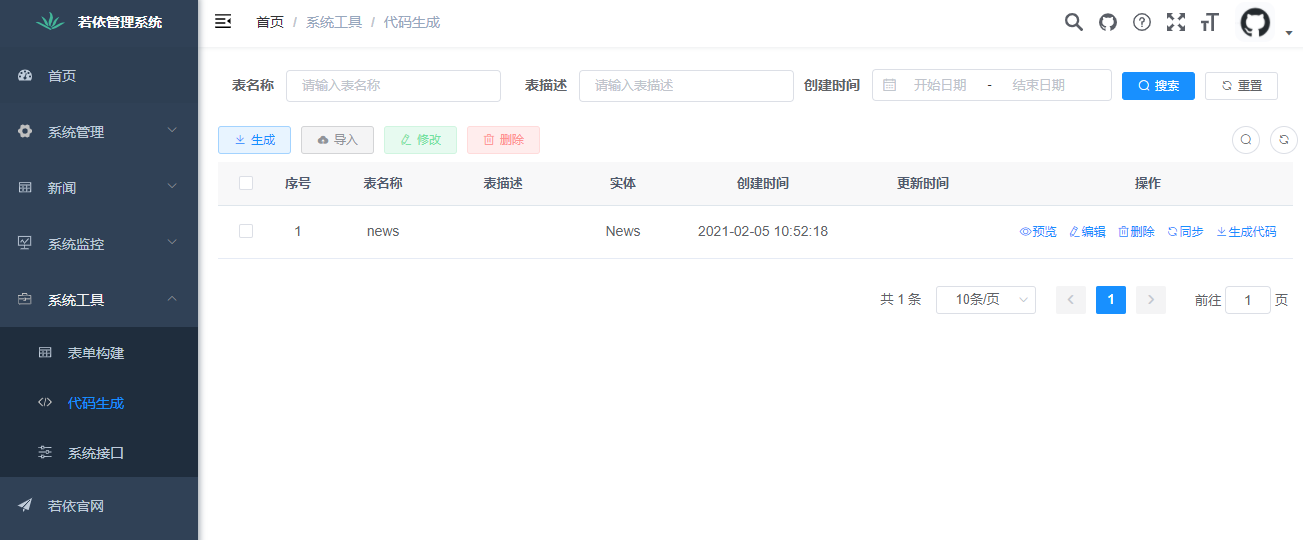
3. Use code to generate code
Generating relevant entity classes, mapper s, xml objects, etc. corresponding to the news table in the system tool code generation page can greatly simplify the development process.
4. Prepare the back-end interface
Just take the NewsController generated by the code generator in the previous step and change it. The modified code is as follows:
package com.ruoyi.web.controller.business;

import com.ruoyi.common.annotation.Log;
import com.ruoyi.common.core.controller.BaseController;
import com.ruoyi.common.core.domain.AjaxResult;
import com.ruoyi.common.core.page.TableDataInfo;
import com.ruoyi.common.enums.BusinessType;
import com.ruoyi.common.utils.SecurityUtils;
import com.ruoyi.common.utils.poi.ExcelUtil;
import com.ruoyi.system.domain.News;
import com.ruoyi.system.mapper.NewsMapper;
import org.springframework.beans.factory.annotation.Autowired;
import org.springframework.security.access.prepost.PreAuthorize;
import org.springframework.validation.annotation.Validated;
import org.springframework.web.bind.annotation.*;

import java.util.Date;
import java.util.List;

/**
 * @author kdyzm
 */
@RestController
@RequestMapping("/business/news")
public class NewsController extends BaseController {


    @Autowired
    private NewsMapper newsMapper;

    /**
     * Get news list
     */
    @PreAuthorize("@ss.hasPermi('business:news:list')")
    @GetMapping("/list")
    public TableDataInfo list(News post) {
        startPage();
        List<News> list = newsMapper.selectNewsList(post);
        return getDataTable(list);
    }

    @Log(title = "News management", businessType = BusinessType.EXPORT)
    @PreAuthorize("@ss.hasPermi('business:news:export')")
    @GetMapping("/export")
    public AjaxResult export(News post) {
        List<News> list = newsMapper.selectNewsList(post);
        ExcelUtil<News> util = new ExcelUtil<>(News.class);
        return util.exportExcel(list, "News data");
    }

    /**
     * Get details by news number
     */
    @PreAuthorize("@ss.hasPermi('business:news:query')")
    @GetMapping(value = "/{postId}")
    public AjaxResult getInfo(@PathVariable Long postId) {
        return AjaxResult.success(newsMapper.selectNewsById(postId));
    }

    /**
     * New news
     */
    @PreAuthorize("@ss.hasPermi('business:news:add')")
    @Log(title = "News management", businessType = BusinessType.INSERT)
    @PostMapping
    public AjaxResult add(@Validated @RequestBody News post) {
        post.setCreateBy(SecurityUtils.getUsername());
        post.setCreateTime(new Date());
        return toAjax(newsMapper.insertNews(post));
    }

    /**
     * Modify news
     */
    @PreAuthorize("@ss.hasPermi('business:news:update')")
    @Log(title = "News management", businessType = BusinessType.UPDATE)
    @PutMapping
    public AjaxResult edit(@Validated @RequestBody News post) {
        post.setUpdateBy(SecurityUtils.getUsername());
        return toAjax(newsMapper.updateNews(post));
    }

    /**
     * Delete news
     */
    @PreAuthorize("@ss.hasPermi('business:news:delete')")
    @Log(title = "News management", businessType = BusinessType.DELETE)
    @DeleteMapping("/{postIds}")
    public AjaxResult remove(@PathVariable Long[] postIds) {
        return toAjax(newsMapper.deleteNewsByIds(postIds));
    }
}
Java
Copy
5. Modify the front page request address
News. In the generated code Put the JS file into the api directory and modify the interface path to correspond to the back-end interface address one by one.
import request from '@/utils/request'

// Query role list
export function listNews(query) {
  return request({
    url: '/business/news/list',
    method: 'get',
    params: query
  })
}

// Query role details
export function getNews(roleId) {
  return request({
    url: '/business/news/' + roleId,
    method: 'get'
  })
}

// New role
export function addNews(data) {
  return request({
    url: '/business/news',
    method: 'post',
    data: data
  })
}

// Modify role
export function updateNews(data) {
  return request({
    url: '/business/news',
    method: 'put',
    data: data
  })
}


// Delete role
export function delNews(roleId) {
  return request({
    url: '/business/news/' + roleId,
    method: 'delete'
  })
}

// Export role
export function exportNews(query) {
  return request({
    url: '/business/news/export',
    method: 'get',
    params: query
  })
}
JavaScript
Copy
Then modify the request address in the page and use the address here.
5, Testing
1. Super administrator test
The super administrator has the maximum permission. All permission verification will skip the permission verification of the super administrator. Here, the super administrator is used to test first, which can avoid the permission problem. Generally, let's see whether it can run smoothly.
The following is a demonstration of the CRUD operation of the super administrator.
2. Ordinary user test
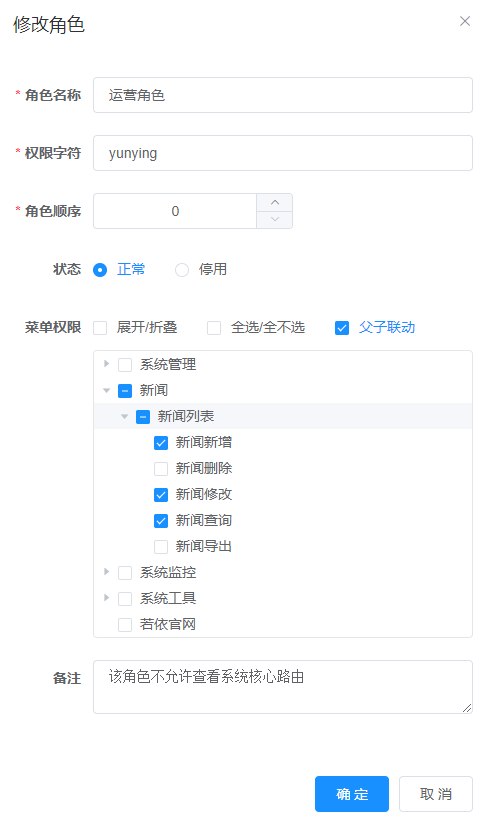
Here we use user kdyzm for testing. Before testing, let's take a look at the role of kdyzm
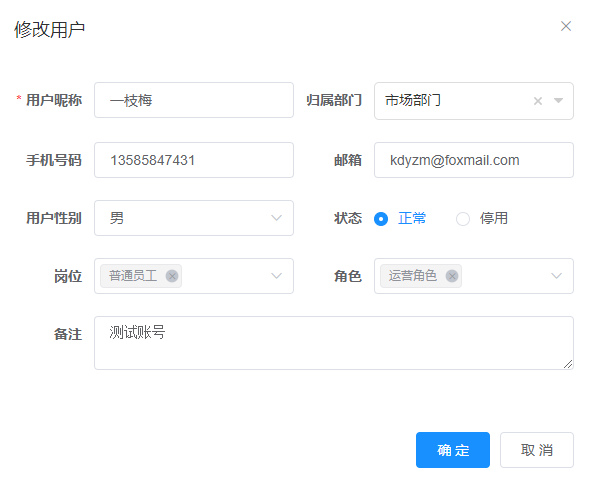
You can see that the user is an operation role. If you modify the role permissions, only query, modify and add permissions are given, and export and delete permissions are not given, as shown below
At this time, switch the login user to kdyzm and look at the news list page
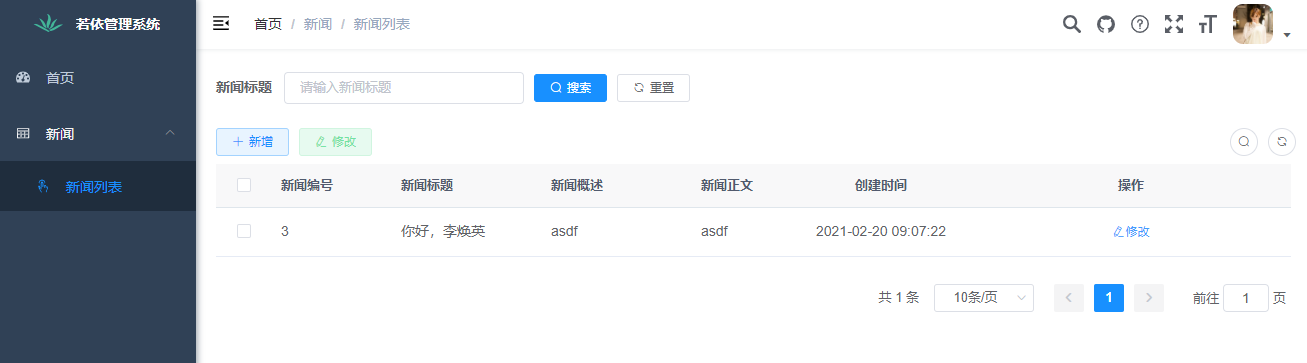
As you can see, kdyzm in the news list page, you can't see the Export button and delete button, which is in line with the expectation.
Well, if you follow Vue permission, this is the end of the detailed explanation