1, kubectl command
kubectl is the command line tool of Kubernetes cluster. kubectl can manage the cluster itself and install and deploy container applications on the cluster
The command format is as follows
kubectl [command] [type] [name] [flags]
parameter
- command: Specifies the operations to be performed on the resource, such as create, get, describe, and delete
- Type: Specifies the resource type. Resource types are case sensitive. Developers can use singular, plural and abbreviated forms
For example:
kubectl get pod pod1
kubectl get pods pod1
kubectl get po pod1

- Name: Specifies the name of the resource. The name is case sensitive. If the name is omitted, all resources will be displayed
- flags: specify optional parameters. For example, you can specify the address and port of Kubernetes API server with - s or - server parameters
2, Basic command
Basic command
| command | introduce |
|---|---|
| create | Create a resource by file name or standard input |
| expose | Expose a resource as a new Service |
| run | Running a specific mirror in a cluster |
| set | Set specific functions on the object |
| get | Displays one or more resources |
| explain | Document references |
| edit | Edit an asset using the default editor |
| delete | Delete resources by file name, standard input, resource name or label |
Deployment command
| command | introduce |
|---|---|
| rollout | Manage publishing of resources |
| rolling-update | Rolling updates for a given replication controller |
| scale | Expansion or reduction of Pod quantity, Deployment, ReplicaSet, RC or Job |
| autoscale | Create an automatic selection of capacity expansion or reduction and set the number of pods |
Cluster management command
| command | introduce |
|---|---|
| certificate | Modify certificate resource |
| cluster-info | Display cluster information |
| top | Display resources (CPU/M) |
| cordon | Marked node is not schedulable |
| uncordon | Marked nodes can be scheduled |
| drain | Expel the application on the node and prepare for offline maintenance |
| taint | Modify node taint tag |
Fault and commissioning commands
| command | introduce |
|---|---|
| describe | Displays the details of a specific resource or resource group |
| logs | Print a container log in a Pod. If the Pod has only one container, the container name is optional |
| attach | Attach to a running container |
| exec | Execute command to container |
| port-forward | Forward one or more |
| proxy | Run a proxy to the Kubernetes API Server |
| cp | Copy files or directories to the container |
| auth | Check authorization |
Other commands
| command | introduce |
|---|---|
| apply | Apply configuration to resources by file name or standard input |
| patch | Use the patch to modify and update the fields of resources |
| replace | Replace a resource with a file name or standard input |
| convert | Converting profiles between different API versions |
| label | Update labels on resources |
| annotate | Update comments on resources |
| completion | It is used to realize automatic completion of kubectl tool |
| api-versions | Print supported API versions |
| config | Modify kubeconfig file (used to access API, such as configuring authentication information) |
| help | All command help |
| plugin | Run a command line plug-in |
| version | Print client and service version information |
3, YAML file
In k8s cluster, both resource management and resource object arrangement and deployment can be realized through declaration style (YAML) file, that is, we can edit the operation of resource objects into YAML format files. We call this file resource list file. We can arrange and deploy a large number of resource objects by directly using the resource list file through kubectl command. Generally, when we develop, we deploy clusters by configuring YAML files.
- YAML: still a markup language. To emphasize that the language is data centric rather than markup language focused.
- YAML file: it is a resource list file used for resource arrangement
- YAML is a highly readable format used to express data sequences. Code chips are inserted here
Basic syntax:
- Use spaces as indents
- The number of indented spaces is not important, as long as the elements of the same level are aligned to the left
- The Tab key is not allowed when indenting in lower versions, and only spaces are allowed
- Using # identification annotation, the interpreter will ignore the character from this character to the end of the line
- Use --- indicates the beginning of a new yaml file
Data structures supported by yaml:
- Object: a collection of key value pairs, also known as mapping / hashes / dictionary
# Object type: a set of key value pairs of an object, represented by a colon structure
name: Tom
age: 18

# yaml also allows another way to write all key value pairs as an inline object
hash: {name: Tom, age: 18}
- array
# Array type: a set of lines beginning with a conjunction line to form an array
People
- Tom
- Jack

# Arrays can also use inline representation
People: [Tom, Jack]
YAML file component, one is the definition of the controller and the controlled object
| Attribute name | introduce |
|---|---|
| apiVersion | API version |
| kind | Resource type |
| metadata | Resource metadata |
| spec | Resource specification |
| replicas | Number of copies |
| selector | tag chooser |
| template | Pod template |
| metadata | Pod metadata |
| spec | Pod specification |
| containers | Container configuration |
Generally speaking, we seldom write YAML files by ourselves, because it involves a lot of content, and we usually create them with the help of tools
Using the kubectl create command
This method is generally used when resources are not deployed. We can directly create a YAML configuration file
# Trying to run does not actually create an image
kubectl create deployment web --image=nginx -o yaml --dry-run > nginx.yaml

[root@k8s-master ~]# cat nginx.yaml
apiVersion: apps/v1
kind: Deployment
metadata:
  creationTimestamp: null
  labels:
    app: web
  name: web
spec:
  replicas: 1
  selector:
    matchLabels:
      app: web
  strategy: {}
  template:
    metadata:
      creationTimestamp: null
      labels:
        app: web
    spec:
      containers:
      - image: nginx
        name: nginx
        resources: {}
status: {}
For an already running pod establish
kubectl get deploy nginx -o=yaml --export > nginx.yaml
4, Pod introduction
Pod is the smallest unit for running and deploying applications or services in the K8S cluster. It can support multiple containers. The design concept of pod is to support multiple containers to share network address and file system in one pod. Services can be combined through simple and efficient way of inter process communication and file sharing. At the same time, pod's support for multiple containers is the most basic design concept in K8S. In the production environment, different teams usually develop and build their own container images, which are combined into a micro service to provide services.
Other resource objects are used to support or extend the functions of Pod objects. For example, controller objects are used to control Pod objects, Service or progress resource objects are used to expose Pod reference objects, PersistentVolume resource objects are used to provide storage for Pod, etc. K8S does not directly process containers, but Pod, which is composed of one or more containers.
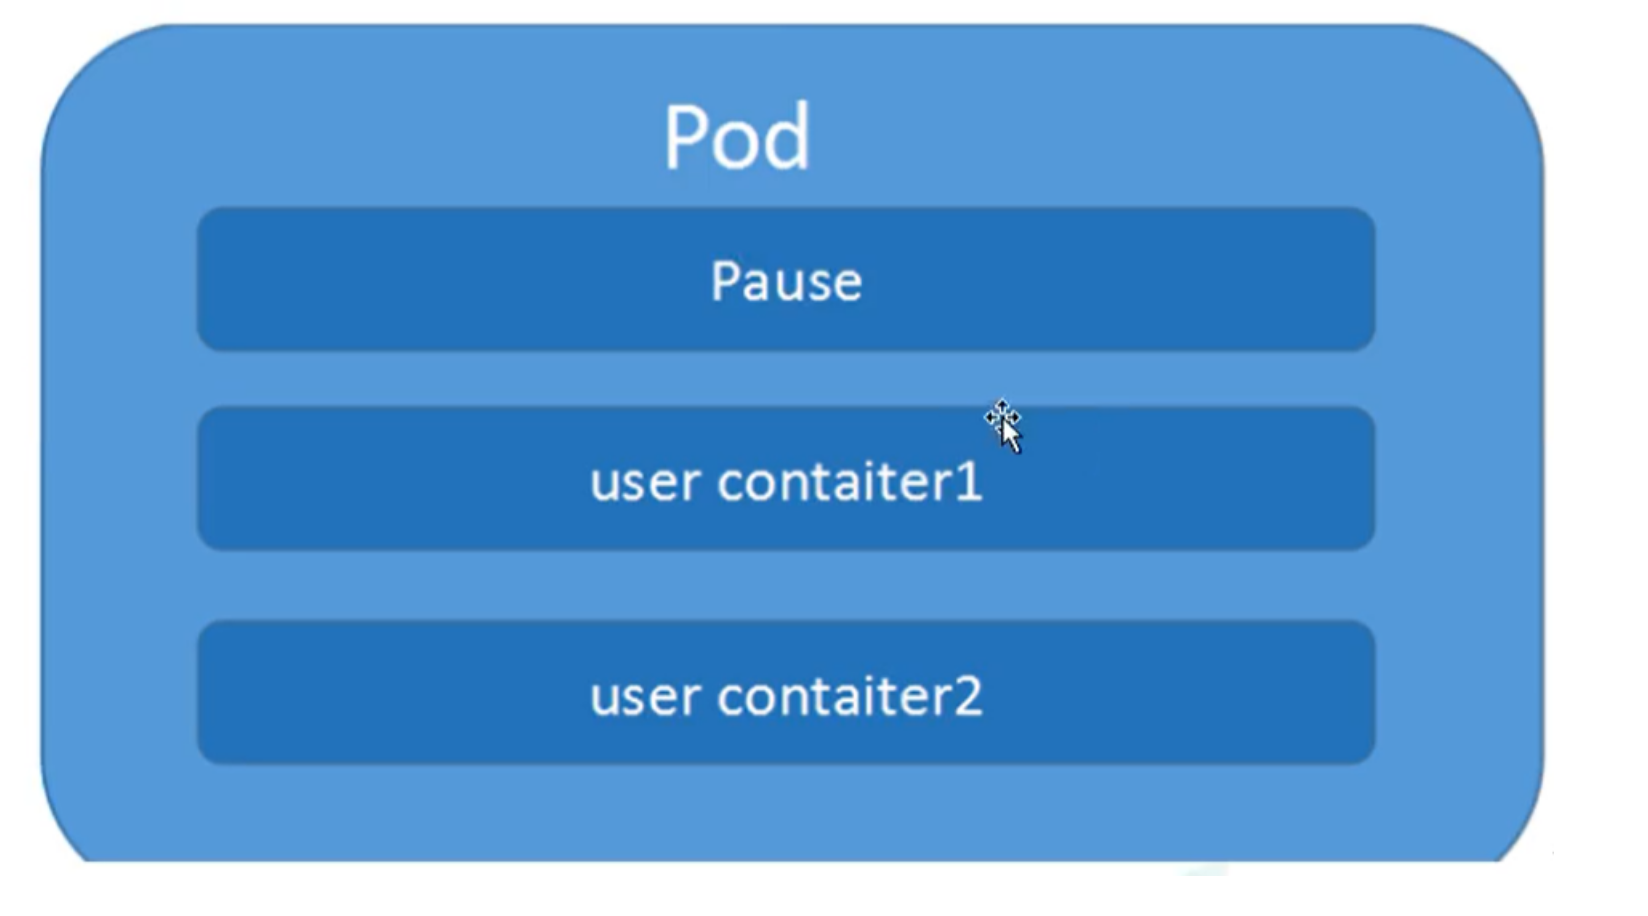
Pod is the most important concept of Kubernetes. Each pod has a special Pause container called "root container". The image corresponding to the Pause container belongs to the Kubernetes platform. In addition to the Pause container, each pod also contains one or more closely related user business containers.
Summary:
Minimum deployed unit
Pod consists of one or more containers [a set of containers]
Containers in a pod are shared network namespaces
Pod is short
Each Pod contains one or more closely related user business containers
4.1 significance of pod
Dockers are used to create containers. One docker corresponds to one container, and one container runs an application process
Pod is a multi process design that uses multiple applications, that is, there are multiple containers in a pod, and one application runs in a container
Pod exists mainly for more convenient interaction of intimate applications
- Interaction between two or more applications
- Call between networks [through 127.0.0.1 or socket]
- Frequent calls are required between two applications
Pod is the basis of all business types in K8S cluster. Pod can be regarded as a small robot running on K8S cluster. Different types of businesses need different types of small robots to execute. At present, K8S business can be divided into the following types:
- Long term servo type: long running
- Batch type: batch
- Node background support type: node daemon
- stateful application
The corresponding small robot controllers of the above types are Deployment, Job, daemon set and stateful set (controllers will be introduced later)
4.2 Pod implementation mechanism
Shared network
The same pod content sharing network
Through the Pause container, add other business containers to the Pause container, so that all business containers can be shared in the same namespace
pod1 and pod2 are not on the same host
Flannel network model solution:

pod communication solution in the same host
The docker0 bridge directly forwards the request to pod2 without going through Flannal
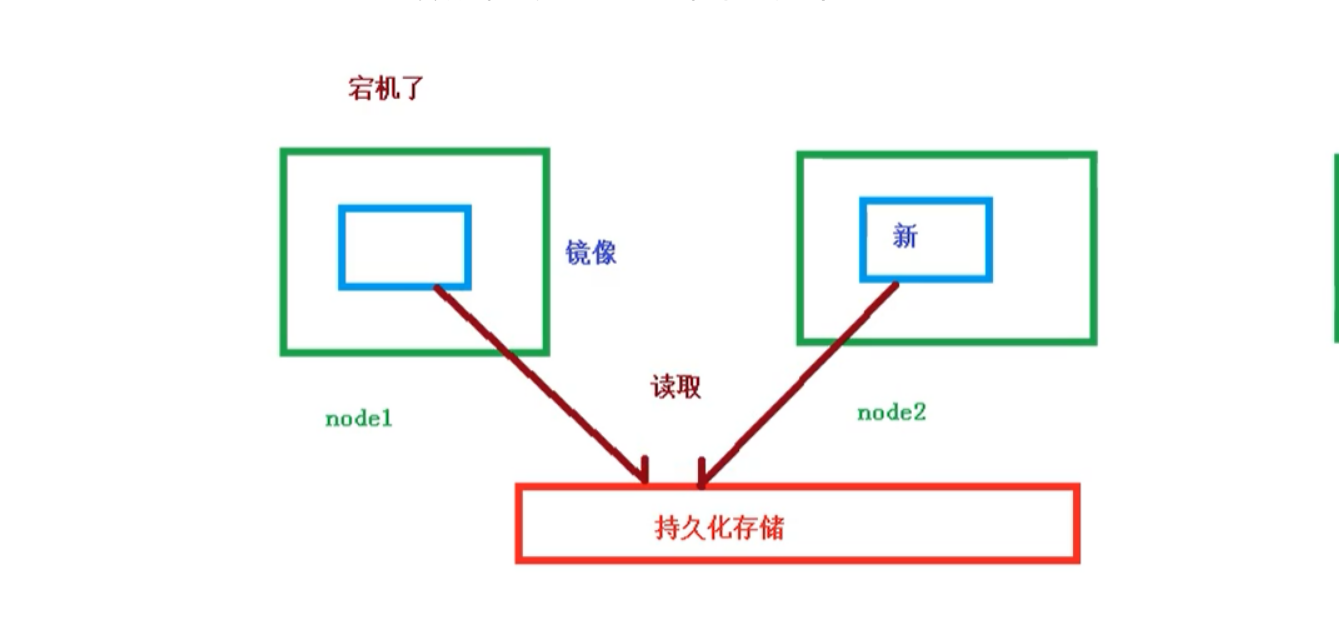
Shared storage
Multiple containers in a Pod can share a storage volume, which will be defined as a part of the Pod and can be mounted on the file systems of all containers in the Pod.
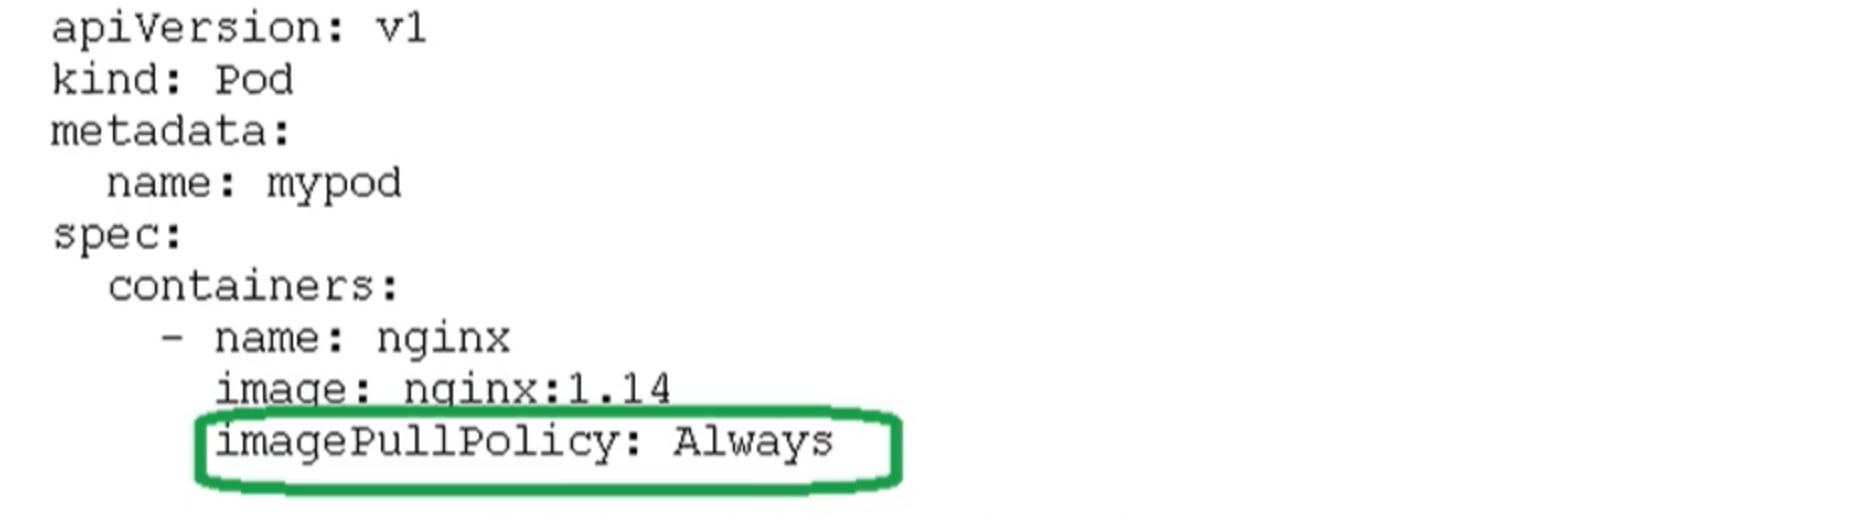
4.3 image pull strategy in pod
Pull strategies are mainly divided into the following types:
- IfNotPresent: the default value. The image cannot be pulled until it does not exist on the host
- Always: every time you create a Pod, you will pull the image again
- Never: Pod will never actively pull this image
4.4 Pod resource constraints
When scheduling a Pod, we can limit the scheduled resources. For example, we limit that the resources used for Pod scheduling are 2C4G. When scheduling the corresponding node node, only the corresponding resources will be occupied, and the nodes that do not meet the resources will not be adjusted.
Example:
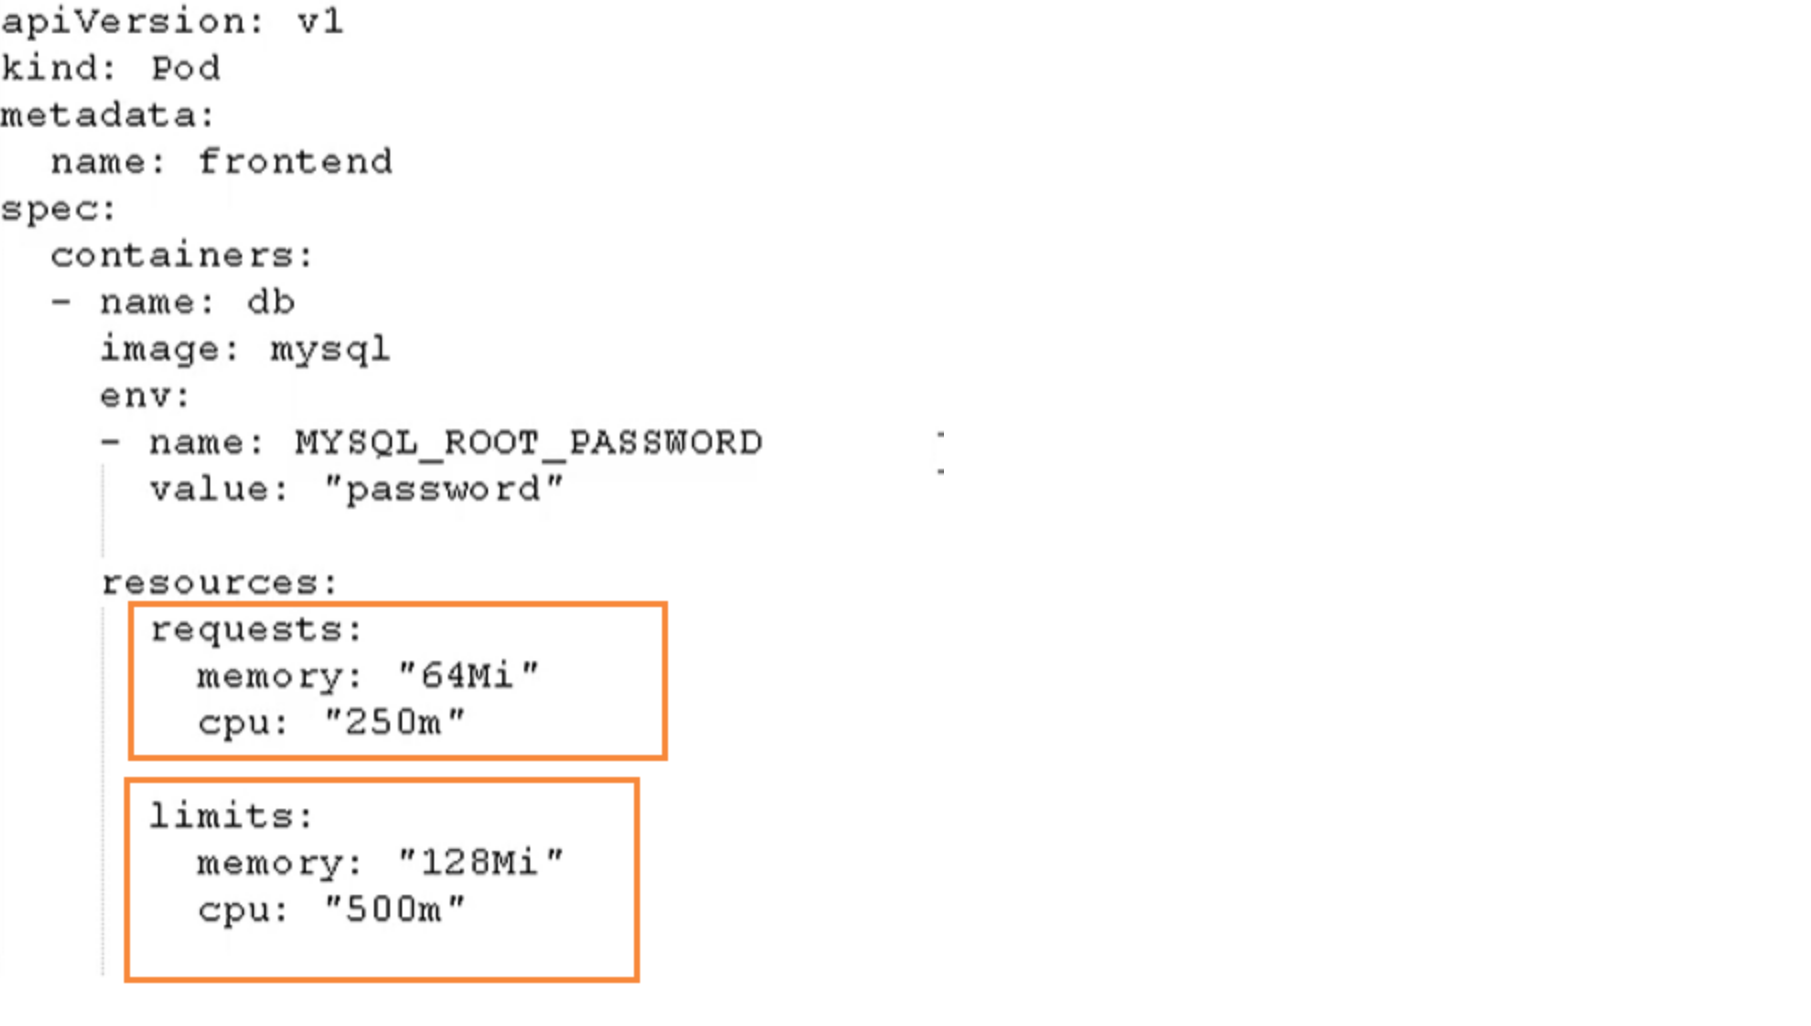
- request: indicates the resources required for scheduling
- limits: indicates the maximum resources occupied
4.5 Pod restart strategy
restartPolicy
The Pod contains many containers. If a container has a problem, the Pod restart mechanism will be triggered
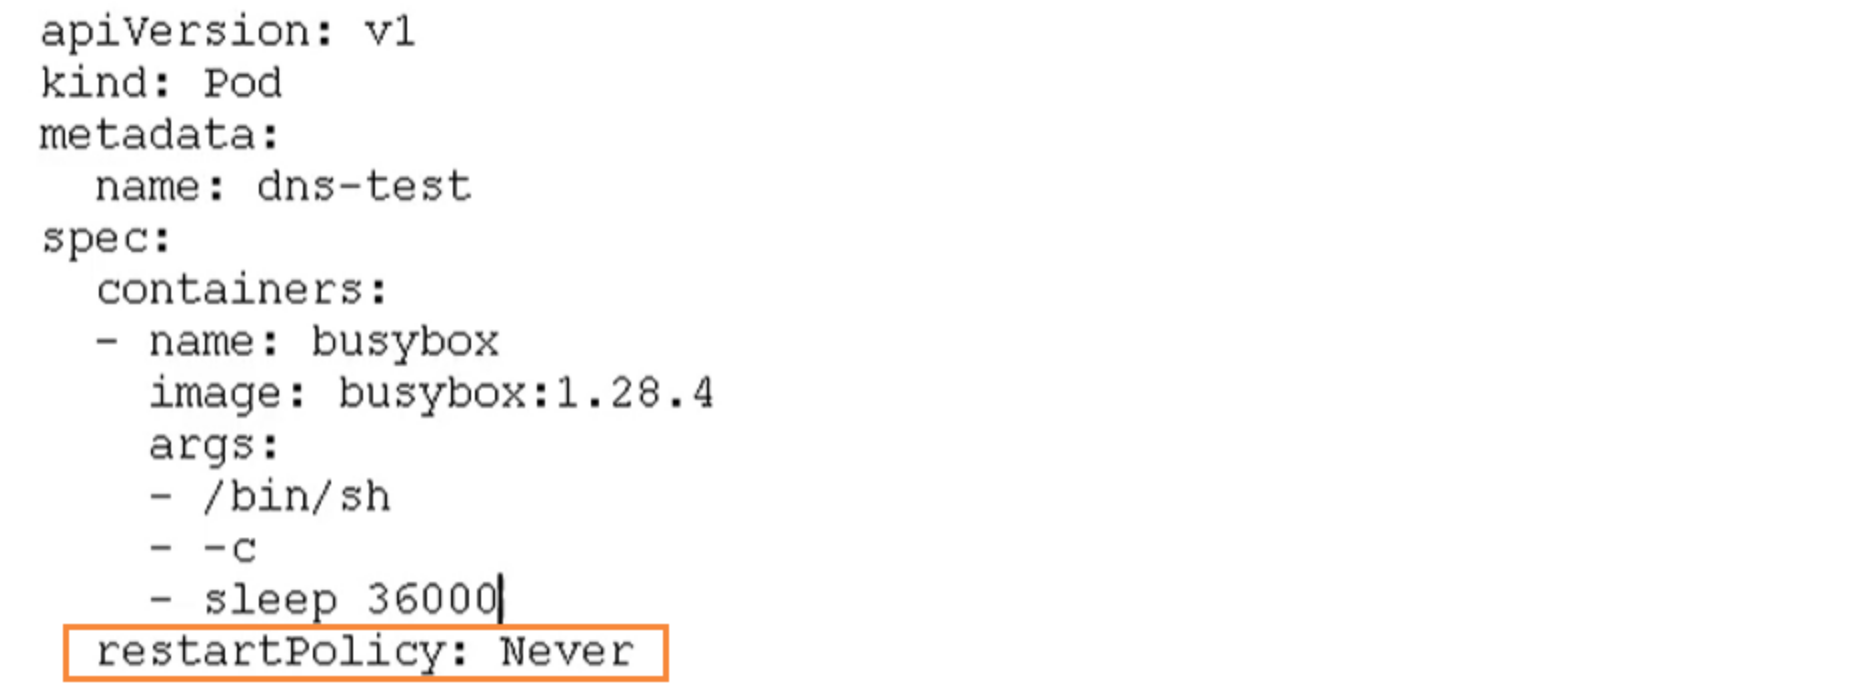
Restart strategies are mainly divided into the following three types
- Always: always restart the container after the container terminates and exits. The default policy is [nginx, etc., which needs to provide services continuously]
- OnFailure: restart the container only when the container exits abnormally (the exit status code is not 0). When it exits normally, it will not be restarted.
- Never: never restart the container [batch task] when the container terminates and exits
4.6 Pod health check
Through the container check, we used the following command to check
kubectl get pod
However, sometimes, the program may overflow Java heap memory, and the program is still running, but it cannot provide external services. At this time, it is not possible to judge whether the service is available through container inspection. At this time, application level inspection can be used.

- livenessProbe
Survival check. If the check fails, the container will be killed. Operate the livenesprobe according to the restart policy of Pod - readinessProbe
Readiness check. If the check fails, Kubernetes will remove the Pod from the Service endpoints
Probe supports the following three inspection methods
- http Get: sends an HTTP request and returns the status code in the range of 200 - 400 as success
- exec: execute the Shell command and return the status code of 0 as success
- tcpSocket: the TCP Socket initiated is successfully established
4.7 Pod creation process
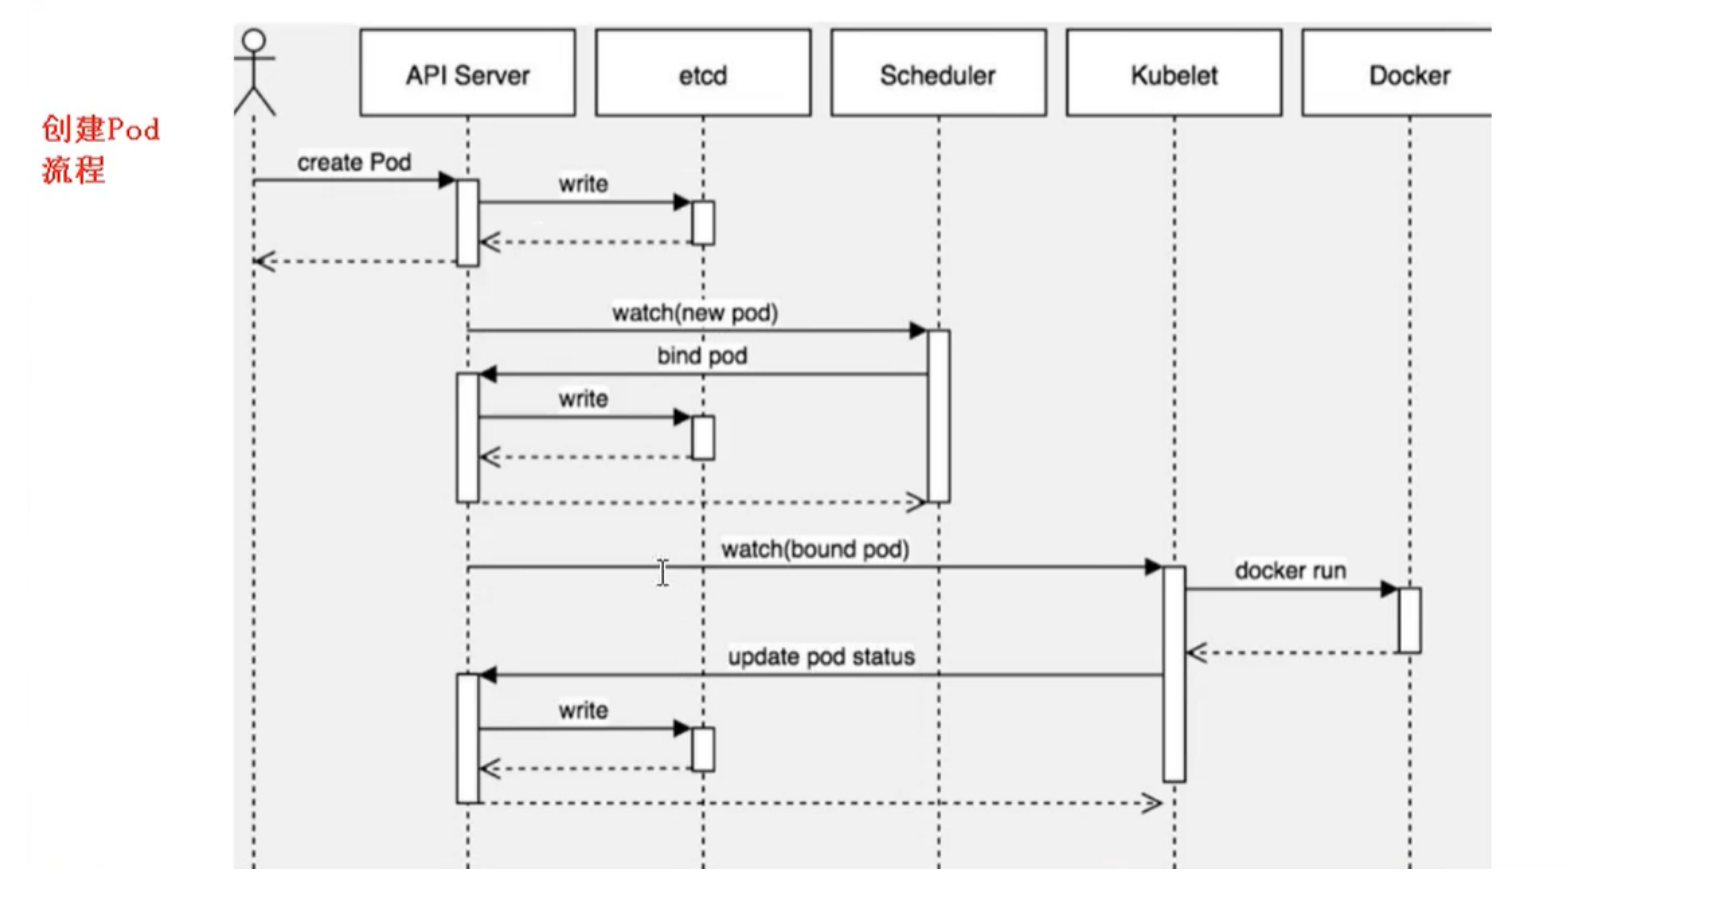
On the Master node:
- When creating a pod, first save the pod information in etcd through apiserver
- The scheduler will always monitor the apiserver. When a new pod is created, it will read the pod information from etcd through the apiserver, allocate the pod to a node according to the scheduling algorithm, and store it in etcd.
node:
- Access apiserver through kubelet, read etcd information, get the pod assigned to the current node, create a container through docker, then return the result status to apiserver, and write it to etcd through apiserver.
4.8 create the scheduling policy of Pod
Attributes affecting pod scheduling
- pod resource restrictions (resources.requests)
- Node selector labels affect Pod scheduling
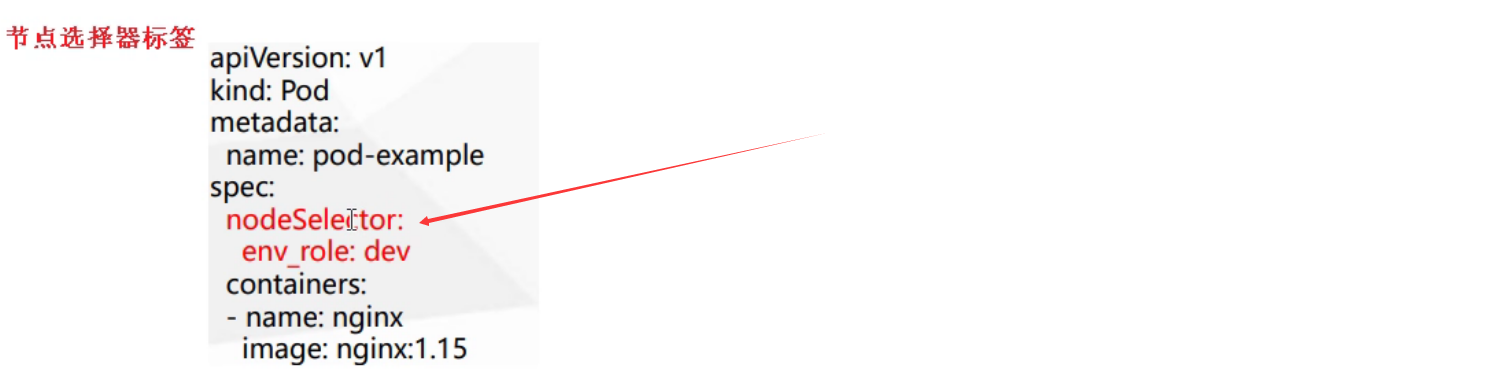
For example, you can schedule the pod to the development environment according to the production environment and development environment
You can add labels to our nodes through the following commands, and then the node selector can schedule according to the specified labels.
[root@k8s-master ~]# kubectl label node k8s-node1 env_role=dev
node/k8s-node1 labeled

# View node labels
root@k8s-master ~]# kubectl get nodes k8s-node1 --show-labels
NAME        STATUS   ROLES    AGE   VERSION   LABELS
k8s-node1   Ready    <none>   18h   v1.20.1   beta.kubernetes.io/arch=amd64,beta.kubernetes.io/os=linux,env_role=dev,kubernetes.io/arch=amd64,kubernetes.io/hostname=k8s-node1,kubernetes.io/os=linux
- Node affinity
The node affinity is basically the same as that of the previous nodeSelector. The nodes to which the Pod is scheduled are determined according to the label constraints on the nodes- Hard affinity: constraints must be met
- Soft affinity: try to meet, not guaranteed
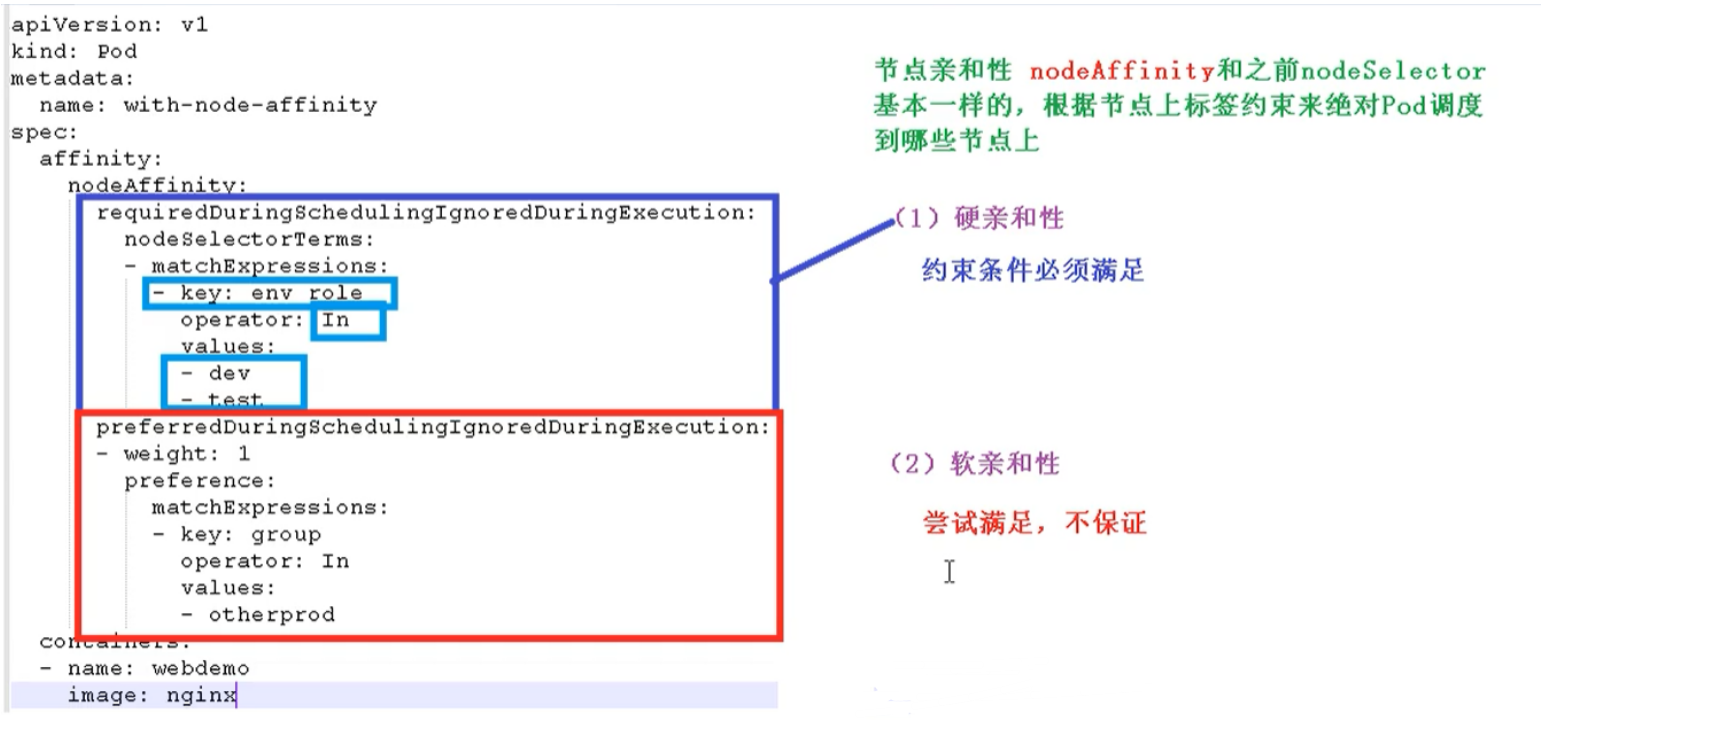
Support common operators: in, NotIn, Exists, Gt, Lt, DoesNotExists
Anti affinity: just opposite to affinity, such as NotIn, DoesNotExists, etc
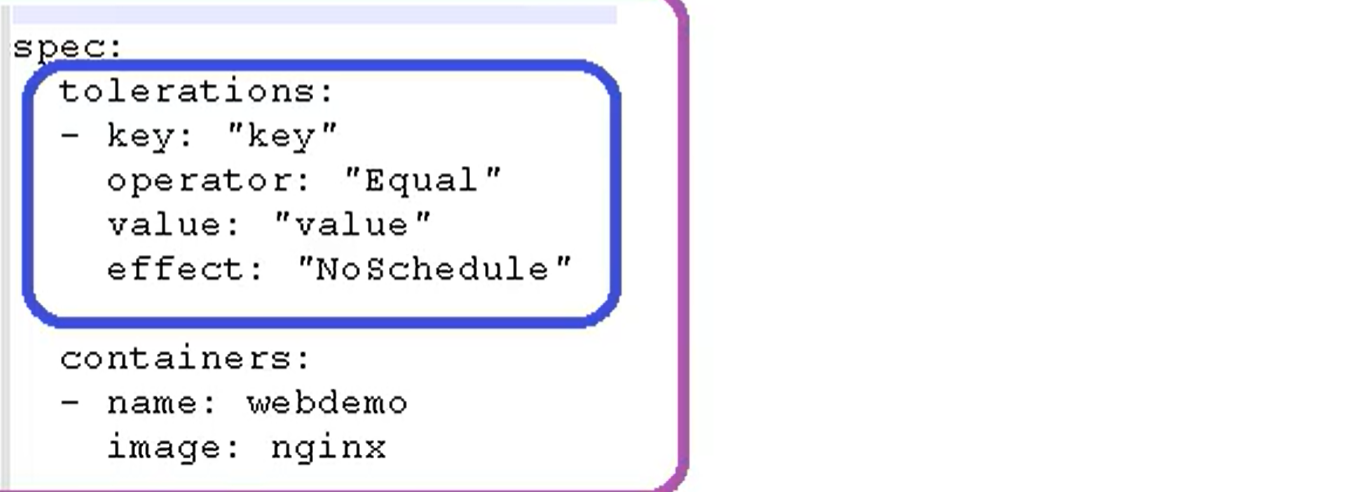
- Taint and stain tolerance
nodeSelector and NodeAffinity are attributes of Pod that Prod schedules to some nodes. They are implemented during scheduling.
Taint stain: nodes do not perform normal allocation scheduling, but are node attributes
scene
- Private node [restricted ip]
- Node configuring specific hardware [solid state drive]
- Expulsion based on Taint [not on node1, not on node2]
View node stain
kubectl describe node k8smaster | grep Taint
[root@k8s-master ~]# kubectl describe node k8s-master | grep Taint
Taints:             node-role.kubernetes.io/master:NoSchedule

[root@k8s-master ~]# kubectl describe node k8s-node1 | grep Taint
Taints:             <none>
There are three stain values
- NoSchedule: must not be scheduled
- PreferNoSchedule: try not to be scheduled [there is also a chance of being scheduled]
- NoExecute: it will not be scheduled, and the existing Pod of the Node will be expelled
Stain the specified node:
kubectl taint node [nodename] key=value:Three values of stain
Example:
kubectl taint node k8s-node1 env_role=yes:NoSchedule
Remove stains
kubectl taint node k8s-node1 env_role:NoSchedule-
Example: first create multiple pods to view the allocation to node s
[root@k8s-master ~]# kubectl create deployment  web --image=nginx
deployment.apps/web created

[root@k8s-master ~]# kubectl get pods -o wide
NAME                     READY   STATUS    RESTARTS   AGE   IP           NODE        NOMINATED NODE   READINESS GATES
nginx-6799fc88d8-zzdqb   1/1     Running   1          20h   10.244.1.3   k8s-node2   <none>           <none>
web-96d5df5c8-x2thn      1/1     Running   0          59s   10.244.3.6   k8s-node1   <none>           <none>
You can see that the web has been created on node1, and we are copying 5 copies
[root@k8s-master ~]# kubectl scale deployment web --replicas=5
deployment.apps/web scaled
[root@k8s-master ~]# kubectl get pods -o wide
NAME                     READY   STATUS    RESTARTS   AGE     IP           NODE        NOMINATED NODE   READINESS GATES
nginx-6799fc88d8-zzdqb   1/1     Running   1          20h     10.244.1.3   k8s-node2   <none>           <none>
web-96d5df5c8-d857s      1/1     Running   0          113s    10.244.1.4   k8s-node2   <none>           <none>
web-96d5df5c8-k8mgg      1/1     Running   0          113s    10.244.3.7   k8s-node1   <none>           <none>
web-96d5df5c8-n54tf      1/1     Running   0          113s    10.244.1.5   k8s-node2   <none>           <none>
web-96d5df5c8-txbwz      1/1     Running   0          113s    10.244.3.8   k8s-node1   <none>           <none>
web-96d5df5c8-x2thn      1/1     Running   0          5m18s   10.244.3.6   k8s-node1   <none>           <none>
You can see that node1 and node2 nodes are allocated.
Delete all newly created pod s
kubectl delete deployment web
Now that we've given a better demonstration of the use of stains, let's stain the node1 node
kubectl taint node k8s-node1 env_role=yes:NoSchedule
[root@k8s-master ~]# kubectl taint node k8s-node1 env_role=yes:NoSchedule
node/k8s-node1 tainted

[root@k8s-master ~]# kubectl describe node k8s-node1 | grep Taint
Taints:             env_role=yes:NoSchedule
Then we recreate a pod
# Create nginx pod
kubectl create deployment web --image=nginx
# Copy five times
kubectl scale deployment web --replicas=5
Looking again, you can see that all pods have been created to node2
[root@k8s-master ~]# kubectl get pods -o wide
NAME                     READY   STATUS    RESTARTS   AGE     IP            NODE        NOMINATED NODE   READINESS GATES
nginx-6799fc88d8-zzdqb   1/1     Running   1          21h     10.244.1.3    k8s-node2   <none>           <none>
web-96d5df5c8-4nqsz      1/1     Running   0          2m29s   10.244.1.8    k8s-node2   <none>           <none>
web-96d5df5c8-57vfn      1/1     Running   0          2m29s   10.244.1.7    k8s-node2   <none>           <none>
web-96d5df5c8-g8nvl      1/1     Running   0          2m51s   10.244.1.6    k8s-node2   <none>           <none>
web-96d5df5c8-jhwlh      1/1     Running   0          2m29s   10.244.1.10   k8s-node2   <none>           <none>
web-96d5df5c8-zq6g9      1/1     Running   0          2m29s   10.244.1.9    k8s-node2   <none>           <none>
Delete stain, delete web
kubectl delete deployment web
kubectl taint node k8s-node1 env_role:NoSchedule-
Stain tolerance
Stain tolerance means that a node may or may not be scheduled