service (intelligent load balancer)
Service mainly provides load balancing and automatic service discovery. It is one of the core resources in k8s, and every service is what we usually call a "micro service".
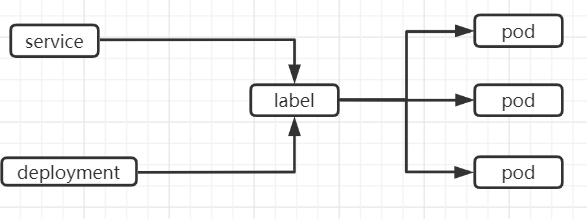
As shown in the figure above, Kubernetes Service defines a Service access portal. The front-end application (Pod) accesses a group of cluster instances composed of Pod replicas behind it through this portal address. The Service is associated with its back-end Pod replica cluster through Label, Deployment is to ensure that the Service capability and quality of Service are always in the expected standard.
Through analysis, all services in the system are identified and modeled as microservices. Finally, our system is composed of multiple microservice units that provide different business capabilities and are independent of each other. The services communicate through TCP/IP, forming a powerful and flexible elastic network with strong distribution capability, elastic expansion capability and fault tolerance.
vim service.yaml
apiVersion: v1
kind: Service
metadata:
  name: service
spec:
  selector:
    release: stable
  ports:
    - name: http
      port: 80
      targetPort: 80
      protocol: "TCP"
    - name: https
      port: 443
      targetPort: 443
      protocol: "TCP"
How to make our services accessible to the outside world?
How to find the corresponding POD?
Found by tag
Which pods are associated
How to expose services
How service works
During the Kubernetes iteration, three working modes are set for the Service: Userspace mode, Iptables and IPv6. Up to now, IPVS is officially recommended. When the cluster does not support IPVS, the cluster will be degraded to Iptables.
userspace
When the Client Pod wants to access the Server Pod, it first sends the request to the service rule in the local kernel space, and then transfers the request to the Kube proxy listening on the specified socket. After the Kube proxy processes the request and distributes the request to the specified Server Pod, it submits the request to the service in the kernel space, and the service transfers the request to the specified Server Pod. Because it needs to communicate back and forth between user space and kernel space, its efficiency is very poor
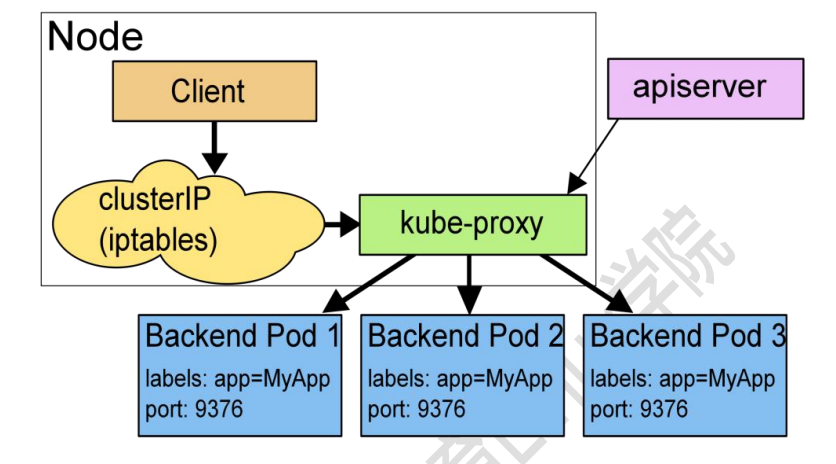
Iptables model (similar to software forwarding)
The iptables rules in the kernel directly accept the request from the Client Pod and forward it to the specified ServerPod after processing. In this way, requests are no longer forwarded to Kube proxy, and the performance is improved a lot.
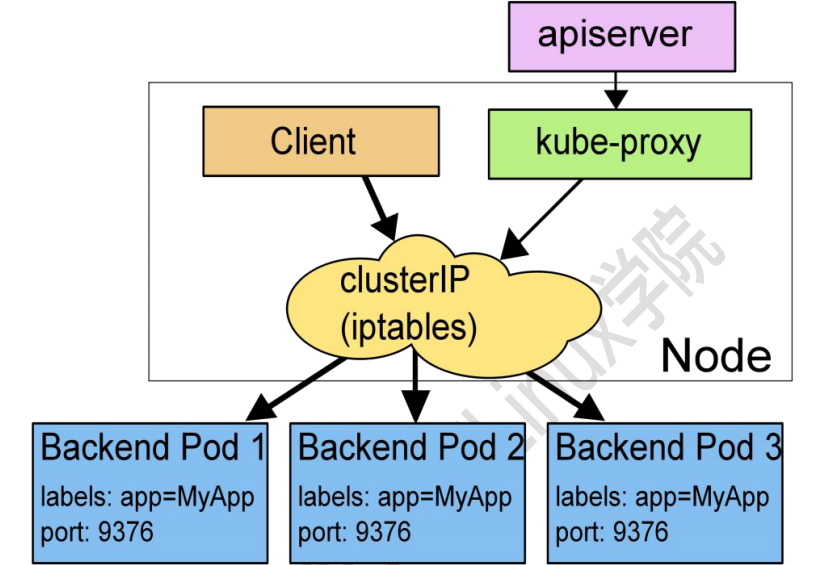
IPv6 model (similar to kernel forwarding)
In IPVS mode, Kube proxy monitors Kubernetes services and endpoints, calls netlink interface to create IPVS rules accordingly, and periodically synchronizes IPVS rules with Kubernetes services and endpoints. This control cycle ensures that the IPVS state matches the desired state. When accessing a service, IPVS directs traffic to one of the back-end pods. IPVS proxy mode is based on netfilter hook function similar to iptables mode, but uses hash table as the basic data structure and works in kernel space. This means that compared with Kube proxy in iptables mode, Kube proxy in IPVS mode has shorter redirection communication delay and better performance when synchronizing proxy rules. Compared with other proxy modes, IPVS mode also supports higher network traffic throughput.
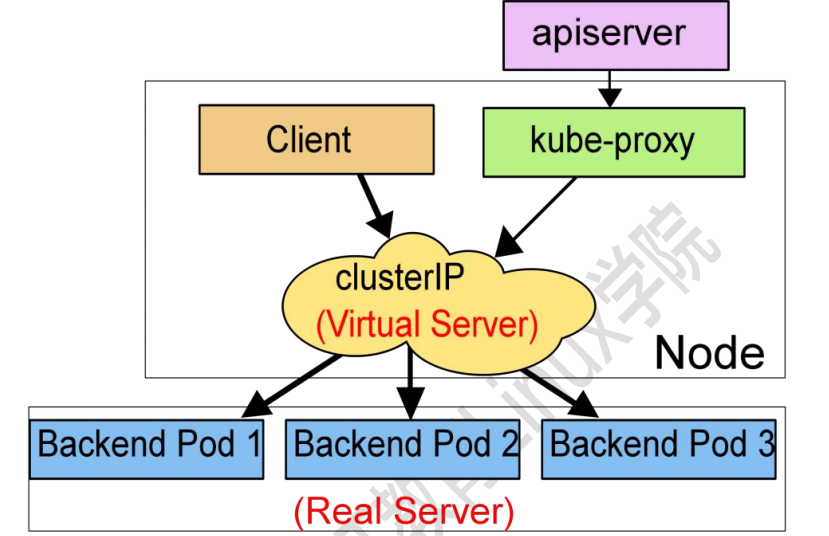
Summary: Kube proxy monitors the latest status information about Pod written by Kube apiserver to etcd through watch. Once it checks that a Pod resource has been deleted or newly created, it will immediately reflect these changes in iptables or ipvs rules, so that iptables and ipvs can schedule Clinet Pod requests to Server Pod, The Server Pod does not exist. From k8s1 After 1, the service uses the ipvs rule by default. If ipvs is not activated, the iptables rule will be degraded However, before 1.1, the default mode used by the service was userspace.
Type of service
Service is the external access window of kubernetes. For different scenarios, kubernetes sets four types of services for us.
cluster ip (expose an ip to the inside of the cluster)
kubernetes is this way by default. It is the internal access mode of the cluster, and it is inaccessible from the outside. It is mainly used to provide the fixed access address for Pod access in the cluster. By default, the address is automatically assigned. You can use the ClusterIP keyword to specify the fixed IP.
[root@kubernetes-master-01 test]# cat clusterip.yaml
kind: Service
apiVersion: v1
metadata:
  name: my-svc
spec:
  type: ClusterIP
  selector:
    app: nginx
  ports:
    - port: 80
      targetPort: 80
[root@kubernetes-master-01 test]# vim clusterip.yaml
[root@kubernetes-master-01 test]# kubectl apply -f clusterip.yaml
service/my-svc created

[root@kubernetes-master-01 test]# kubectl get svc

NAME          TYPE           CLUSTER-IP        EXTERNAL-IP        PORT(S)       AGE
kubernetes   ClusterIP       10.96.0.1           <none>           443/TCP       11d
my-svc       ClusterIP      10.96.222.172        <none>           80/TCP        21s
nginx         NodePort        10.96.6.147        <none>          80:42550/TCP   11m

[root@kubernetes-master-01 test]# curl 10.96.6.147
<!DOCTYPE html>
<html>
<head>
<title>Welcome to nginx!</title>
<style>
	body {
	width: 35em;
	margin: 0 auto;
	font-family: Tahoma, Verdana, Arial, sans-serif;
	}
</style>
</head>
<body> <h1>Welcome to nginx!</h1>
<p>If you see this page, the nginx web server is successfully installed and working. Further configuration is required.</p>

<p>For online documentation and support please refer to <a href="http://nginx.org/">nginx.org</a>.<br/> Commercial support is available at
<a href="http://nginx.com/">nginx.com</a>.</p>

<p><em>Thank you for using nginx.</em></p>
</body
</html>
headless service
There is also a service type in kubernates: headless services function, which literally means no service. In fact, changing the service to provide no IP. It is generally used when providing domain name services
Usage scenario of headless service?
This type can only be used in scenarios that need to be associated with Pod, that is, it can be used without providing load balancing
2. Relationship between Service and Pod
service -> endpoints -> pod
Create and delete endpoint and service synchronously
Example:
#Edit profile
[root@m01 ~]# vim headless.yaml
kind: Service
apiVersion: v1
metadata:
  name: nginx-svc
spec:
  clusterIP: None
  selector:
    app: test-svc
  ports:
    - port: 80
      targetPort: 80
      name: http


#deploy
[root@m01 ~]# kubectl apply -f headless.yaml

#see
[root@m01 ~]# kubectl get svc
NAME         TYPE           CLUSTER-IP       EXTERNAL-IP      PORT(S)          AGE
baidu        ExternalName   <none>           www.taobao.com   <none>           23h
kubernetes   ClusterIP      10.96.0.1        <none>           443/TCP          22d
nginx-svc    ClusterIP      None             <none>           80/TCP           9s
service      ClusterIP      10.101.126.130   <none>           80/TCP,443/TCP   46h
#View resource details
kubectl describe [resource type] [resource name]
node port
Open a port in the host host to correspond to the port of the load balancing IP one by one. The outside world can use the port of the host to access the internal services of the cluster
LoadBalancer (dependent on public ip)
It is another solution to implement exposed services, which relies on the implementation of public cloud elastic IP
ExternalName
ExternalName Service is a special case of Service. It has no selectors and does not define any ports or Endpoints
Setting other connections to an internal alias of the cluster actually means that the cluster DNS server resolves the CNAME to an external address, that is, an alias is used to realize the unconscious migration of two items
For example, we now have two projects,
Item 1: a.abc Com project 2: b.abc.com com
C.abc.abc with externalname Com to a.abc.com Com. If you want to migrate the project to project 2, you can directly transfer c.abc.com Com to b.abc.com COM, at this time, the user will be unaware of the project migration
Example: move Baidu senseless to Taobao
vim externalname.yaml

apiVersion: v1
kind: Service
metadata:
  name: baidu
spec:
  externalName: www.baidu.com
  type: ExternalName

kubectl apply -f externalname.yaml
kubectl run test -it --rm --image=busybox:1.28.3
nslookup baidu

[root@m01 ~]# vim externalname.yaml
apiVersion: v1
kind: Service
metadata:
  name: baidu
spec:
  externalName: www.taobao.com
  type: ExternalName
kubectl apply -f externalname.yaml
kubectl run test -it --rm --image=busybox:1.28.3
nslookup baidu
ingress
Inress is a domain name based network forwarding resource. Inress is an API object that manages the external access of services in the cluster. The typical access methods are HTTP and HTTPS.
Ingress provides load balancing, SSL, and name based virtual hosting.
You must have an ingress controller [such as ingress nginx] to meet the requirements of ingress. Creating only an ingress resource is not valid.
The commonly used Ingress in the production environment include Treafik, Nginx, HAProxy, Istio, etc
nginx ingress: high performance
traefik: native support k8s
istio: service grid, governance of service traffic
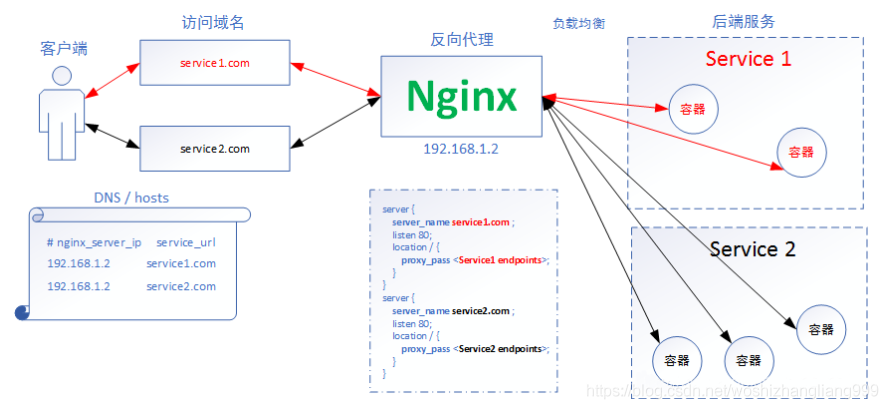
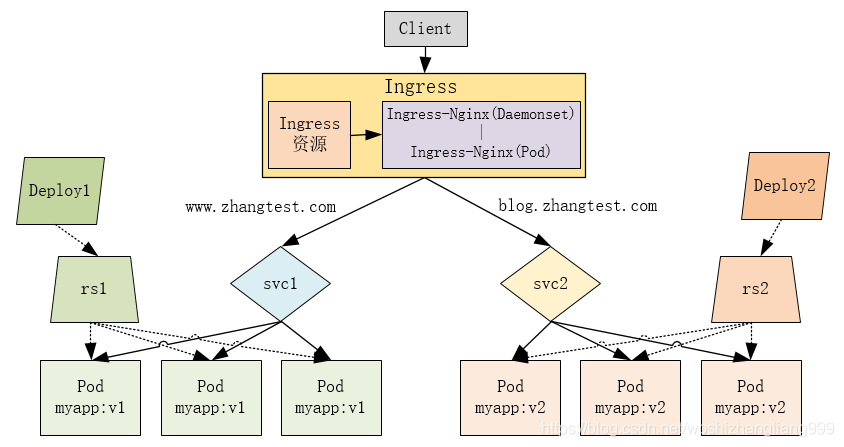
Ingress exposes HTTP and HTTPS routes from outside the cluster to services within the cluster. Traffic routing is controlled by rules defined on the ingress resource.
Ingress can be configured to provide externally accessible URL s, load balancing traffic, SSL / TLS, and name based virtual hosts. The ingress controller is usually responsible for achieving ingress through the load balancer, although it can also configure edge routers or other front ends to help handle traffic.
Ingress does not expose any ports or protocols. If you expose services other than HTTP and HTTPS to the Internet, you usually use service Type = nodeport or service Type = service of type loadbalancer. Details are shown in the figure below
ingress architecture diagram

Deploy ingress nginx
1,Download deployment file
wget https://raw.githubusercontent.com/kubernetes/ingress-nginx/controller-v0.44.0/deploy/static/provider/baremetal/deploy.yaml

2,Modify mirror
sed -i 's#k8s.gcr.io/ingress-nginx/controller:v0.44.0@sha256:3dd0fac48073beaca2d67a78c746c7593f9c575168a17139a9955a82c63c4b9a#registry.cn-hangzhou.aliyuncs.com/k8sos/ingress-controller:v0.44.0#g'  deploy.yaml

3,deploy
[root@k8s-m-01 ~]# kubectl apply -f deploy.yaml

4,Start editing ingress Configure inventory and deploy
vim ingress.yaml

kind: Ingress
apiVersion: extensions/v1beta1
metadata:
  name: ingress-ingress
  namespace: default
  annotations:
    kubernetes.io/ingress.class: "nginx"
spec:
  rules:
    - host: www.test.com
      http:
        paths:
          - path: /
            backend:
              serviceName: service
              servicePort: 80

[root@m01 ~]# kubectl apply -f ingress.yaml

#Check whether the configuration is successful
[root@m01 ~]# kubectl get ingress
NAME              CLASS    HOSTS          ADDRESS        PORTS   AGE
ingress-ingress   <none>   www.test.com   192.168.1.56   80      50s

#Resource type
kind: Ingress
#Version number
apiVersion: extensions/v1beta1
#metadata
metadata:
#name
  name: ingress-ingress
#Namespace
  namespace: default
#annotation
  annotations:
    kubernetes.io/ingress.class: "nginx"

spec:
rules:
#Specify domain name
- host: www.test.com
  http:
    paths:
      - path: /
        backend:
          serviceName: service
          servicePort: 80


5,modify hosts analysis
192.168.1.56 www.test.com

6,Test using domain name access
[root@m01 ~]#  kubectl get svc -n ingress-nginx
NAME                                 TYPE        CLUSTER-IP       EXTERNAL-IP   PORT(S)                      AGE
ingress-nginx-controller             NodePort    10.106.156.132   <none>        80:30156/TCP,443:32452/TCP   28m
ingress-nginx-controller-admission   ClusterIP   10.105.74.237    <none>        443/TCP                      28m

Web access
www.test.com:30156,Success is when the page appears
Check whether ingress is successfully installed
[root@m01 ~]# kubectl get pods -n ingress-nginx
NAME READY STATUS RESTARTS AGE
ingress-nginx-admission-create-ddljh 0/1 Completed 0 49m
ingress-nginx-admission-patch-ttp8c 0/1 Completed 0 49m
ingress-nginx-controller-796fb56fb5-gsngx 1/1 Running 0 49m
apiVersion: v1
kind: Namespace
metadata:
  name: wordpress
---
apiVersion: v1
kind: Service
metadata:
  name: wordpress
  namespace: wordpress
spec:
  ports:
    - name: http
      port: 80
      targetPort: 80
  selector:
    app: wordpress
  clusterIP: None
---
kind: Deployment
apiVersion: apps/v1
metadata:
  name: wordpress
  namespace: wordpress
spec:
  selector:
    matchLabels:
      app: wordpress
  template:
    metadata:
      labels:
        app: wordpress
    spec:
      containers:
        - name: php
          image: alvinos/php:wordpress-v2
        - name: nginx
          image: alvinos/nginx:wordpress-v2
---
kind: Ingress
apiVersion: extensions/v1beta1
metadata:
  name: wordpress
  namespace: wordpress