ViewModel is life-cycle aware and will automatically store and manage UI related data. Even if the device configuration changes, the data will still exist. We don't need to save the data in onSaveInstanceState and restore the data in onCreate. We don't need to do this part of using ViewModel to separate the view from logic.
- ViewModel lifecycle
- Source code analysis of ViewModel
- What is ViewModelStore
- What is ViewModelStoreOwner
- How to simplify communication between fragments
Lifecycle of ViewModel
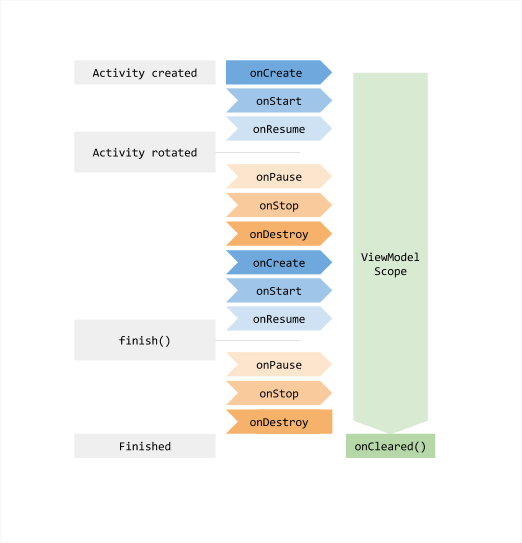
After the ViewModel is obtained from OnCreate, it will exist until the View bound by the ViewModel is completely onDestory.
Source code analysis of ViewModel
The project created this time is to upgrade Android Studio to 3.2.1, so directly replace the dependent packages in the project with the corresponding packages under Android X. The main configurations are as follows:
// gradle plug-in
dependencies {
    classpath 'com.android.tools.build:gradle:3.2.1'
}

// ViewModel and LiveData version
def lifecycle_version = "2.0.0"
implementation "androidx.lifecycle:lifecycle-extensions:$lifecycle_version"

// gradle-wrapper.properties file
distributionUrl=https\://services.gradle.org/distributions/gradle-4.6-all.zip
Create a ViewModel as follows:
/**
 * If you need to use Context, you can choose to inherit AndroidViewModel
 */
public class MViewModel extends ViewModel {

    private MutableLiveData<List<Article>> data;

    public LiveData<List<Article>> getData(){
        if (data == null){
            data = new MutableLiveData<>();
            data.postValue(DataUtil.getData());
        }
        return data;
    }
}
If you need to use Context, you can choose to inherit the AndroidViewModel. Here, you can inherit the ViewModel, and then use it in the Activity, as follows:
MViewModel mViewModel = ViewModelProviders.of(this).get(MViewModel.class);
mViewModel.getData().observe(this, new Observer<List<Article>>() {
    @Override
    public void onChanged(List<Article> articles) {
        for (Article article : articles) {
            Log.i(TAG,article.getDesc());
        }
    }
});
Let's take a look at the calling process. Starting from ViewModelProviders, ViewModelProviders mainly provides four static methods to obtain the corresponding ViewModelProvider. The four static methods are as follows:
public static ViewModelProvider of(@NonNull Fragment fragment)
public static ViewModelProvider of(@NonNull FragmentActivity activity)
public static ViewModelProvider of(@NonNull Fragment fragment, @Nullable Factory factory)
public static ViewModelProvider of(@NonNull FragmentActivity activity, @Nullable Factory factory)
Taking the second method as an example, its implementation is as follows:
@NonNull
@MainThread
public static ViewModelProvider of(@NonNull FragmentActivity activity,
        @Nullable Factory factory) {
    Application application = checkApplication(activity);
    if (factory == null) {
        factory = ViewModelProvider.AndroidViewModelFactory.getInstance(application);
    }
    return new ViewModelProvider(activity.getViewModelStore(), factory);
}
You can use the default AndroidViewModelFactory or customize the Factory, and directly call any of the above methods to create a ViewModelProvider.
Let's take a look at ViewModelProvider. There are two key attributes in ViewModelProvider:
private final Factory mFactory;
private final ViewModelStore mViewModelStore;
When the ViewModelProvider is created, mFactory and mViewModelStore have been initialized, followed by the get() method. The source code is as follows:
@NonNull
@MainThread
public <T extends ViewModel> T get(@NonNull Class<T> modelClass) {
    // Get the class name, which is different from getName when getting the internal class name
    // getCanonicalName-->xx.TestClass.InnerClass
    // getName-->xx.TestClass$InnerClass
    String canonicalName = modelClass.getCanonicalName();
    if (canonicalName == null) {
        throw new IllegalArgumentException("Local and anonymous classes can not be ViewModels");
    }
    return get(DEFAULT_KEY + ":" + canonicalName, modelClass);
}
Then we call the get method with parameter key as follows:
public <T extends ViewModel> T get(@NonNull String key, @NonNull Class<T> modelClass) {
        ViewModel viewModel = mViewModelStore.get(key);
        if (modelClass.isInstance(viewModel)) {
            // noinspection unchecked
            return (T) viewModel;
        } else {
            // noinspection StatementWithEmptyBody
            if (viewModel != null) {
                // TODO: log a warning.
            }
        }
        // Create ViewModel
        viewModel = mFactory.create(modelClass);
        // Get the corresponding ViewModel from mViewModelStore according to the key and return
        mViewModelStore.put(key, viewModel);
        // noinspection unchecked
        return (T) viewModel;
    }
At this time, the VIewModel is created. How is the VIewModel created? The specific implementation of mFactory here is the default AndroidViewModelFactory, which is created through the reflection acquisition construction method. The key code is as follows:
@NonNull
@Override
public <T extends ViewModel> T create(@NonNull Class<T> modelClass) {
    // Judge whether AndroidViewModel is the parent class or interface of modelClass
    if (AndroidViewModel.class.isAssignableFrom(modelClass)) {
        //...
        // Create a ViewModel with reflection and return
        return modelClass.getConstructor(Application.class).newInstance(mApplication);
    }
    return super.create(modelClass);
}
After the specific ViewModel object is created, you can call the methods in the specific ViewModel at will. When following the source code, you will encounter various encapsulated classes, such as ViewModelStore, ViewModelStoreOwner, AndroidViewModelFactory, etc., which will be introduced below.
What is ViewModelStore
ViewModelStore is mainly used to save the state of the ViewModel when the device configuration changes, such as the current interface is recreated or destroyed. The corresponding new ViewModelStore should save all the information of the corresponding ViewModel like the old ViewModelStore. Only when the corresponding clear() method is called will it notify that the ViewModel is not in use, The corresponding ViewModelStore will not store relevant information.
This class actually uses HashMap to store the corresponding ViewModel, which is very simple:
public class ViewModelStore {

    private final HashMap<String, ViewModel> mMap = new HashMap<>();

    final void put(String key, ViewModel viewModel) {
        ViewModel oldViewModel = mMap.put(key, viewModel);
        if (oldViewModel != null) {
            oldViewModel.onCleared();
        }
    }

    final ViewModel get(String key) {
        return mMap.get(key);
    }

    public final void clear() {
        for (ViewModel vm : mMap.values()) {
            vm.onCleared();
        }
        mMap.clear();
    }
}
What is ViewModelStoreOwner
This is an interface that defines a method getViewModelStore() to obtain the ViewModelStore of the corresponding ViewModel. If the clear() method of ViewModelStoreOwner is also called, the corresponding ViewModelStore cannot be obtained. The source code is as follows:
public interface ViewModelStoreOwner {
    /**
     * Returns owned {@link ViewModelStore}
     *
     * @return a {@code ViewModelStore}
     */
    @NonNull
    ViewModelStore getViewModelStore();
}
Of course, the specific implementation class must be implemented. In fact, FragmentActivity and Fragment implement this interface indirectly or directly. Like lifecycle owner, the source code reference is as follows:
- Indirect implementation of Activity: `` ` Java public viewmodelstore getviewmodelstore() {if (getapplication() = = null) {throw new IllegalStateException ("your Activity is not yet attached to the" + "application instance. You can't request ViewModel before oncreate call.);} if (mViewModelStore == null) { NonConfigurationInstances nc = (NonConfigurationInstances) getLastNonConfigurationInstance(); if (nc != null) { // Restore the ViewModelStore from NonConfigurationInstances mViewModelStore = nc.viewModelStore; } if (mViewModelStore == null) { mViewModelStore = new ViewModelStore(); } } return mViewModelStore; }
- Fragment Direct implementation:
```java
@Override
public ViewModelStore getViewModelStore() {
    if (mFragmentManager == null) {
        throw new IllegalStateException("Can't access ViewModels from detached fragment");
    }
    return mFragmentManager.getViewModelStore(this);
}
The process of saving ViewModelStore is completed in the upper implementation of activity or Fragment. It is OK to know the ViewModelStoreOwner interface here.
How to simplify the communication between fragments
Previously, the communication between fragments was realized by using the interface through the host Activity forwarding. Now, the same ViewModel can be used to complete the communication between two fragments. Remember that when using the ViewModel to communicate between two fragments, the ViewModel is created using its host Activity. The implementation process is as follows, First create a ViewModel as follows:
public class FViewModel extends ViewModel {

    private MutableLiveData<String> mSelect = new MutableLiveData<>();

    public void selectItem(String item) {
        mSelect.postValue(item);
    }

    public LiveData<String> getSelect() {
        return mSelect;
    }
}
Then, create the LeftFragment as follows:
public class LeftFragment extends Fragment {

    private FViewModel mViewModel;
    private FragmentTitleBinding titleBinding;

    public LeftFragment() {

    }

    @Override
    public View onCreateView(LayoutInflater inflater, ViewGroup container,
                             Bundle savedInstanceState) {
        View view = inflater.inflate(R.layout.fragment_title, container, false);
        titleBinding = DataBindingUtil.bind(view);
        mViewModel = ViewModelProviders.of(getActivity()).get(FViewModel.class);
        RvAdapter adapter = new RvAdapter(getActivity(), new RvAdapter.OnRecycleItemClickListener() {
            @Override
            public void onRecycleItemClick(String info) {
                mViewModel.selectItem(info);
            }
        });

        titleBinding.rvData.setLayoutManager(new LinearLayoutManager(getActivity()));
        titleBinding.rvData.setAdapter(adapter);

        return view;
    }
}
The LeftFragment layout file is a RecycleView, and its Item layout file is as follows:
<?xml version="1.0" encoding="utf-8"?><layout xmlns:android="http://schemas.android.com/apk/res/android">
    <data>
        <variable
           name="itemData"
            type="String" />
        <variable
            name="onItemClick"
            type="com.manu.archsamples.fragment.RvAdapter.OnRecycleItemClickListener" />
    </data>
    <LinearLayout
        android:orientation="vertical"
        android:layout_width="match_parent"
        android:layout_height="match_parent"
        android:gravity="center"
        android:onClick="@{() -> onItemClick.onRecycleItemClick(itemData)}">
        <TextView
            android:layout_width="match_parent"
            android:layout_height="wrap_content"
            android:text="@{itemData}"
            android:padding="10dp" />
    </LinearLayout>
</layout>
The RecyclerView Adapter is as follows:
public class RvAdapter extends RecyclerView.Adapter<RecyclerView.ViewHolder> {

    private Context mContext;    private List<String> mData;
    private OnRecycleItemClickListener mOnRecycleItemClickListener;

    public RvAdapter(Context mContext,OnRecycleItemClickListener itemClickListener) {
        this.mContext = mContext;
        mData = DataUtil.getDataList();
        mOnRecycleItemClickListener = itemClickListener;
    }

    @NonNull
    @Override
    public RecyclerView.ViewHolder onCreateViewHolder(@NonNull ViewGroup parent, int viewType) {
        View view = LayoutInflater.from(mContext).inflate(R.layout.recycle_item,null);
        view.setLayoutParams(new ViewGroup.LayoutParams(ViewGroup.LayoutParams.MATCH_PARENT, ViewGroup.LayoutParams.WRAP_CONTENT));
        return new MViewHolder(view);
    }

    @Override
    public void onBindViewHolder(@NonNull RecyclerView.ViewHolder holder, int position) {
        MViewHolder mHolder = (MViewHolder) holder;
        mHolder.bind(mData.get(position),mOnRecycleItemClickListener);
    }

    @Override
    public int getItemCount() {
        return mData.size();
    }

    private static class MViewHolder extends RecyclerView.ViewHolder {
        RecycleItemBinding itemBinding;

        MViewHolder(@NonNull View itemView) {
            super(itemView);
            itemBinding = DataBindingUtil.bind(itemView);
        }

        void bind(String info, OnRecycleItemClickListener itemClickListener) {
            itemBinding.setItemData(info);
            itemBinding.setOnItemClick(itemClickListener);
        }
    }

    public interface OnRecycleItemClickListener {
        void onRecycleItemClick(String info);
    }
}
Then, create the RightFragment as follows:
public class RightFragment extends Fragment {
    private static final String TAG = RightFragment.class.getName();
    private FragmentContentBinding contentBinding;
    private FViewModel mViewModel;

    public RightFragment() {

    }

    @Override
    public View onCreateView(LayoutInflater inflater, ViewGroup container, Bundle savedInstanceState) {
        View view = inflater.inflate(R.layout.fragment_content, container, false);
        contentBinding = DataBindingUtil.bind(view);
        mViewModel = ViewModelProviders.of(getActivity()).get(FViewModel.class);

        mViewModel.getSelect().observe(this, new Observer<String>() {
            @Override
            public void onChanged(String s) {
                // Receive the value of the LeftFragment Item click event
                contentBinding.setData(s);
            }
        });

        return view;
    }
}
The layout file of RightFragment is as follows:
<?xml version="1.0" encoding="utf-8"?><layout xmlns:android="http://schemas.android.com/apk/res/android">
    <data>
        <variable
            name="data"
            type="String" />
    </data>
    <FrameLayout
        xmlns:tools="http://schemas.android.com/tools"
        android:layout_width="match_parent"
        android:layout_height="match_parent"
        tools:context=".fragment.LeftFragment">
        <TextView
            android:layout_width="wrap_content"
            android:layout_height="wrap_content"
            android:textSize="18sp"
            android:layout_marginStart="12dp"
            android:layout_marginTop="10dp"
            android:text="@{data,default=def}" />
    </FrameLayout>
</layout>
The implementation method is relatively simple. There is nothing to say. After using ViewModel, the host Activity is very refreshing and is only responsible for the switching of fragments.
The advantages of using ViewModel are as follows:
- Activity is no longer involved in the communication between sub fragments, and its responsibility is more single.
- Fragments are different from each other except that they use the same ViewModel instance. Any Fragment can work independently.
- Each Fragment has its own life cycle, which can be replaced and removed at will without affecting the normal work of another Fragment.