Detailed explanation of vux advanced module splitting
If we are a vue project built with scaffolding, there is a store folder in the default directory, and there is only one index.js below. If it is a small project, we don't need to split the module and write it directly in it
2.
If it is a slightly larger project, we will help vux split it by module for later maintenance
Directly on the code, concise and clear.
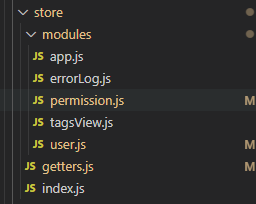
Create the modules folder under the store,
modules Below the folder is the module you need to split. Here I give an example user Module, the user login module, which establishes the required information according to their own business js
Create getters.js under the store
First look at the directory structure

First, let's look at the code of index.js. We only have the user module as an example, so we only need to import user and getters
index.js
import Vue from 'vue'
import Vuex from 'vuex'
import getters from './getters'
import user from './modules/user'
Vue.use(Vuex)

const store = new Vuex.Store({
  modules: {
    user
  },
  getters
})

export default store
getters.js code is as follows
const getters = {
    img:state=>state.user.img,
    token:state=>state.user.token,
}
export default getters
Finally, let's look at the user.js file
The user.js file is as follows
import { loginByUsername } from '@/api/login'

const user = {
  state: {
    token: "",
    img:"https://scpic.chinaz.net/files/pic/pic9/201709/zzpic6330.jpg"
  },

  mutations: {

    SET_TOKEN: (state, token) => {
      state.token = token
    },

  },

  actions: {
    // User name login
    LoginByUsername({ commit }, userInfo) {
      return new Promise((resolve, reject) => {
        loginByUsername(userInfo.username, userInfo.password).then(response => {
            const data = response.data
            commit('SET_TOKEN', data.token)
            resolve()
        }).catch(error => {
          reject(error)
        })
      })
    },


  }
}

export default user
If we log in on the login page, we will save the token
login.vue your own login page
methods:{
	    let parms={
	        username:"admin",
	        password:"123456"
	      }
          this.$store.dispatch('LoginByUsername', parms).then(() => {

          }).catch(() => {

          })

}
In this way, we call the LoginByUsername method under actions in the user.js module, and then submit it to the set under the above changes through commit('SET_TOKEN', data.token)_ Token thus modifies the token value used for the pair
Maybe some people in the above paragraph don't know what it means. In fact, they ask for help to pull out
 return new Promise((resolve, reject) => {
        loginByUsername(userInfo.username, userInfo.password).then(response => {
            const data = response.data
            commit('SET_TOKEN', data.token)
            resolve()
        }).catch(error => {
          reject(error)
        })
      })
Mainly look at loginByUsername. In fact, import {loginByUsername} from '@ / API / Login' is introduced from the above
Here, you can structure the method you need. For example, there is another XXXfn method, which is written like this
import { loginByUsername,XXXfn } from '@/api/login'
Let's take a look at the api/login.js file
import request from '@/utils/request'
//Login method
export function loginByUsername(username, password) {
    const data = {
        username,
        password
    }
    return request({
        url: '/login/login',
        method: 'post',
        data
    })
}

//If other methods are needed, write it according to the format
/*export function XXXfn(token) {
    return request({
        url: '/user/info',
        method: 'get',
        params: { token }
    })
}/*
A request.js is introduced in the above section
As for request.js, it is our encapsulation of axiso. There is a large amount of online code
import axios from 'axios'
import store from '@/store'

const service = axios.create({
  baseURL: "",
  timeout: 5000
})

// Before interception
service.interceptors.request.use(
  config => {
    if (store.getters.token) {
      // Let each request carry a token-- ['X-Token '] as a user-defined key. Please modify it according to the actual situation
      config.headers['X-Token'] = ""  //It can be used in combination with cache
    }
    return config
  },
  error => {
    console.log(error)
    Promise.reject(error)
  }
)
//After interception
service.interceptors.response.use( response => response,
  response => {
    const res = response.data
    if (res.code== 200) { //The corresponding processing is performed according to the status specified in the background
      return response.data
    }
  },
  error => {
    return Promise.reject(error)
  }
)

export default service
Finally, let's talk about how to use the data in the store,
index.vue is taken as an example in any component
<template>
  <div >
     {{token}}
     <img :src="img" alt="">
  </div>
</template>

<script>
import { mapGetters } from 'vuex'

export default {
  name: '',
  data() {
    return {

    }
  },
  computed: {
    ...mapGetters([
      "token",
      "img"
    ])
  },
  created() {

  }
}
</script>
<style rel="stylesheet/scss" lang="scss" scoped>

}
</style>
import { mapGetters } from 'vuex' If you don't understand, you can go and see for yourself,
Note that we use auxiliary functions here. Of course, you can also use this.$store.state.user.token to get the value
As shown below
