Today, let's record the detailed process of installing oracle11 under ubuntu.The installation process was recorded when I installed it myself and is a viable solution.
One: Environment
Ubuntu:ubuntu 14.04 LTS amd64 bit
oracle: oracle11
jdk: jdk1.7
Memory: 1G
Hard Disk: 20G
CPU:1
2: Installation
1. Download oracle11
Download oracle11 on the official website at the following address:
oracle11: http://www.oracle.com/technetwork/database/enterprise-edition/downloads/index.html
Download to / home with two compressed files and unzip them with the following command:
sudo tar -zxvf linux.x64_11gR2_database_1of2.zipsudo tar -zxvf linux.x64_11gR2_database_2of2.zip- 1
- 2
After unzipping, a database folder is generated in the home directory, which is the installation directory of oracle.
2. Install jdk1.7
The way to install jdk can refer to another of my posts Uninstall and install multiple jdk versions, 1.6, 1.7, and 1.8 under ubuntu or linux
You don't need to install that many, just install jdk1.7.
Or you can use ubuntu linux directly to have your own OpenJdk by default:
sudo apt-get install openjdk-7-jre sudo apt-get install openjdk-7-jdk - 1
- 2
3. Install Remote Visual Desktop
Because the installation of oracle involves installing using the installation wizard, you must install the Visual Remote Desktop.Installation method see my other post:
Windows Remote Connection to Ubuntu 14.04 Desktop , do this to start the installation.
4. Update Source Files
Because the official source of ubuntu is not complete, especially when installing the ia32-libs package, first we backup the source files, then add the following sources to the source list: (delete all the original sources, then paste the following sources in):
sudo cp /etc/apt/sources.list /etc/apt/sources.list_back- 1
Replace the contents of the /etc/apt/sources.list source file with the following sources:
deb http://mirrors.163.com/ubuntu/ precise main restricted universe multiversedeb http://mirrors.163.com/ubuntu/ precise-security main restricted universe multiversedeb http://mirrors.163.com/ubuntu/ precise-updates main restricted universe multiversedeb http://mirrors.163.com/ubuntu/ precise-proposed main restricted universe multiversedeb http://mirrors.163.com/ubuntu/ precise-backports main restricted universe multiversedeb-src http://mirrors.163.com/ubuntu/ precise main restricted universe multiversedeb-src http://mirrors.163.com/ubuntu/ precise-security main restricted universe multiversedeb-src http://mirrors.163.com/ubuntu/ precise-updates main restricted universe multiversedeb-src http://mirrors.163.com/ubuntu/ precise-proposed main restricted universe multiversedeb-src http://mirrors.163.com/ubuntu/ precise-backports main restricted universe multiversedeb http://extras.ubuntu.com/ubuntu trusty maindeb-src http://extras.ubuntu.com/ubuntu trusty maindeb http://archive.ubuntu.com/ubuntu/ raring main restricted universe multiverse#163 Source:deb http://mirrors.163.com/ubuntu/ trusty main restricted universe multiversedeb http://mirrors.163.com/ubuntu/ trusty-security main restricted universe multiversedeb http://mirrors.163.com/ubuntu/ trusty-updates main restricted universe multiversedeb http://mirrors.163.com/ubuntu/ trusty-proposed main restricted universe multiversedeb http://mirrors.163.com/ubuntu/ trusty-backports main restricted universe multiversedeb-src http://mirrors.163.com/ubuntu/ trusty main restricted universe multiversedeb-src http://mirrors.163.com/ubuntu/ trusty-security main restricted universe multiversedeb-src http://mirrors.163.com/ubuntu/ trusty-updates main restricted universe multiversedeb-src http://mirrors.163.com/ubuntu/ trusty-proposed main restricted universe multiversedeb-src http://mirrors.163.com/ubuntu/ trusty-backports main restricted universe multiverse#Aliyuan:deb http://mirrors.aliyun.com/ubuntu/ trusty main restricted universe multiversedeb http://mirrors.aliyun.com/ubuntu/ trusty-security main restricted universe multiversedeb http://mirrors.aliyun.com/ubuntu/ trusty-updates main restricted universe multiversedeb http://mirrors.aliyun.com/ubuntu/ trusty-proposed main restricted universe multiversedeb http://mirrors.aliyun.com/ubuntu/ trusty-backports main restricted universe multiversedeb-src http://mirrors.aliyun.com/ubuntu/ trusty main restricted universe multiversedeb-src http://mirrors.aliyun.com/ubuntu/ trusty-security main restricted universe multiversedeb-src http://mirrors.aliyun.com/ubuntu/ trusty-updates main restricted universe multiversedeb-src http://mirrors.aliyun.com/ubuntu/ trusty-proposed main restricted universe multiversedeb-src http://mirrors.aliyun.com/ubuntu/ trusty-backports main restricted universe multiversedeb http://mirrors.aliyuncs.com/ubuntu/ trusty main restricted universe multiversedeb http://mirrors.aliyuncs.com/ubuntu/ trusty-security main restricted universe multiversedeb http://mirrors.aliyuncs.com/ubuntu/ trusty-updates main restricted universe multiversedeb http://mirrors.aliyuncs.com/ubuntu/ trusty-proposed main restricted universe multiversedeb http://mirrors.aliyuncs.com/ubuntu/ trusty-backports main restricted universe multiversedeb-src http://mirrors.aliyuncs.com/ubuntu/ trusty main restricted universe multiversedeb-src http://mirrors.aliyuncs.com/ubuntu/ trusty-security main restricted universe multiversedeb-src http://mirrors.aliyuncs.com/ubuntu/ trusty-updates main restricted universe multiversedeb-src http://mirrors.aliyuncs.com/ubuntu/ trusty-proposed main restricted universe multiversedeb-src http://mirrors.aliyuncs.com/ubuntu/ trusty-backports main restricted universe multiverse- 1
- 2
- 3
- 4
- 5
- 6
- 7
- 8
- 9
- 10
- 11
- 12
- 13
- 14
- 15
- 16
- 17
- 18
- 19
- 20
- 21
- 22
- 23
- 24
- 25
- 26
- 27
- 28
- 29
- 30
- 31
- 32
- 33
- 34
- 35
- 36
- 37
- 38
- 39
- 40
- 41
- 42
- 43
- 44
- 45
- 46
- 47
- 48
- 49
- 50
- 51
5. Install dependent packages
After replacing, execute a command to update:
sudo apt-get updatesudo apt-get upgrade- 1
- 2
Then install the following dependent packages, each of which must be installed successfully or the oracle installation may not be successful.
sudo apt-get install bzip2 sudo apt-get install elfutils sudo apt-get install automake sudo apt-get install autotools-dev sudo apt-get install binutils sudo apt-get install expat sudo apt-get install gawk sudo apt-get install gcc sudo apt-get install gcc-multilib sudo apt-get install g++-multilib sudo apt-get install ia32-libs sudo apt-get install ksh sudo apt-get install less sudo apt-get install lesstif2 sudo apt-get install lesstif2-dev sudo apt-get install lib32z1 sudo apt-get install libaio1 sudo apt-get install libaio-dev sudo apt-get install libc6-dev sudo apt-get install libc6-dev-i386 sudo apt-get install libc6-i386 sudo apt-get install libelf-dev sudo apt-get install libltdl-dev sudo apt-get install libmotif4 sudo apt-get install libodbcinstq4-1 libodbcinstq4-1:i386 sudo apt-get install libpth-dev sudo apt-get install libpthread-stubs0 sudo apt-get install libpthread-stubs0-dev sudo apt-get install libstdc++5 sudo apt-get install lsb-cxx sudo apt-get install make sudo apt-get install openssh-server sudo apt-get install pdksh sudo apt-get install rlwrap sudo apt-get install rpm sudo apt-get install sysstat sudo apt-get install unixodbc sudo apt-get install unixodbc-dev sudo apt-get install unzip sudo apt-get install x11-utils sudo apt-get install zlibc- 1
- 2
- 3
- 4
- 5
- 6
- 7
- 8
- 9
- 10
- 11
- 12
- 13
- 14
- 15
- 16
- 17
- 18
- 19
- 20
- 21
- 22
- 23
- 24
- 25
- 26
- 27
- 28
- 29
- 30
- 31
- 32
- 33
- 34
- 35
- 36
- 37
- 38
- 39
- 40
- 41
6. Check system variables
sudo /sbin/sysctl -a | grep sem sudo /sbin/sysctl -a | grep shm sudo /sbin/sysctl -a | grep file-max sudo /sbin/sysctl -a | grep aio-max sudo /sbin/sysctl -a | grep ip_local_port_range sudo /sbin/sysctl -a | grep rmem_default sudo /sbin/sysctl -a | grep rmem_max sudo /sbin/sysctl -a | grep wmem_default sudo /sbin/sysctl -a | grep wmem_max - 1
- 2
- 3
- 4
- 5
- 6
- 7
- 8
- 9
Then add the corresponding data in/etc/sysctl.conf based on the parameter values obtained in the above command to open two terminals for easy filling:
sudo vim /etc/sysctl.conf- 1
Fill in the following with the values found in sysctl.conf
fs.aio-max-nr = ? fs.file-max = ? kernel.shmall = ? kernel.shmmax = ? kernel.shmmni = ? kernel.sem = ? net.ipv4.ip_local_port_range = ? net.core.rmem_default = ? net.core.rmem_max = ? net.core.wmem_default = ? net.core.wmem_max = ?- 1
- 2
- 3
- 4
- 5
- 6
- 7
- 8
- 9
- 10
- 11
Run the command to update the kernel parameters:
sudo sysctl -p - 1
7. Add a Kernel Limit for the current user Add the following data to the / etc/security/limits.conf file (XXX is your current user name)
XXX soft nproc 2047XXX hard nproc 16384 XXX soft nofile 1024 XXX hard nofile 65536 XXX soft stack 10240- 1
- 2
- 3
- 4
- 5
8. Check/etc/pam.d/login to add the following lines (without adding):
session required pam_limits.so
Check/etc/pam.d/su and add yourself without the following lines:
session required pam_limits.so
9.oracle does not support ubuntu by default. You need to trick the oracle installer to execute the following commands:
sudo mkdir /usr/lib64 sudo ln -s /etc /etc/rc.d sudo ln -s /lib/x86_64-linux-gnu/libgcc_s.so.1 /lib64/ sudo ln -s /usr/bin/awk /bin/awk sudo ln -s /usr/bin/basename /bin/basename sudo ln -s /usr/bin/rpm /bin/rpm sudo ln -s /usr/lib/x86_64-linux-gnu/libc_nonshared.a /usr/lib64/ sudo ln -s /usr/lib/x86_64-linux-gnu/libpthread_nonshared.a /usr/lib64/ sudo ln -s /usr/lib/x86_64-linux-gnu/libstdc++.so.6 /lib64/ sudo ln -s /usr/lib/x86_64-linux-gnu/libstdc++.so.6 /usr/lib64/ echo 'Ubuntu Linux release 14.04′ > /etc/ubuntu-release - 1
- 2
- 3
- 4
- 5
- 6
- 7
- 8
- 9
- 10
- 11
If the last command cannot be executed, the following commands can be used:
sudo vim /etc/ubuntu-release- 1
Add Ubuntu Linux release 14.04 to the ubuntu-release text and save to exit.
10. Configuring environment variables for oracle
sudo gedit ~/.profile
Open the.profile file and add the following lines to it:
Replace xxx with your current user name
export ORACLE_BASE=/home/xxx/app/xxx export ORACLE_HOME=${ORACLE_BASE}/product/11.2.0/dbhome_1 export ORACLE_SID=orcl export ORACLE_UNQNAME=orcl export PATH=PATH:${ORACLE_HOME}/bin/; - 1
- 2
- 3
- 4
- 5
11. Launch oracle installer to start installation
First check if you set the environment variable for oracle:?
echo $ORACLE_BASE echo $ORACLE_HOME echo $PATH- 1
- 2
- 3
If not, re-open a terminal, it should be OK.Or execute the following command:
source ~/.profile- 1
The purpose of this command is to make the environment variable you set effective.
Next, execute the following command to open Remote Desktop Services:
vncservser :1- 1
Remember not to precede this command with sudo, otherwise the root user's remote desktop is opened, not the user you want to install. The output after opening is as follows:
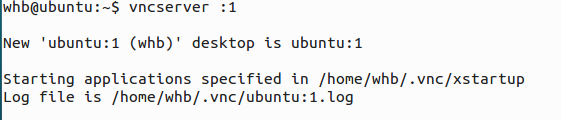
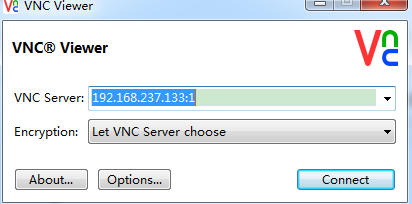
You can now connect on window s using the VNC-Viewer software:
Note: The next 1 number must match the port you open.
After opening the remote desktop, open the terminal on the desktop, and my installer unzips in the home directory: /home/database
So CD goes in: cd/home/database
In order not to scramble, terminal export LANG=US first.
Run the runInstaller under the directory again:. /runInstaller
You can enter the graphical installation interface and follow the instructions of the installation wizard.
Prerequisite check will prompt a bunch of fails, ignore it, just pick ignore All and finish
One thing to mention here is that if you don't have enough swap space, you'll be prompted that there isn't enough swap space to continue.
Solution:
You can open another terminal to temporarily elevate the swap space with the following command, and recheck it again, that's it:
free -m mkdir /swapfile cd /swapfile sudo dd if=/dev/zero of=swap bs=1024 count=400000 sudo mkswap -f swap sudo swapon swap - 1
- 2
- 3
- 4
- 5
- 6
12. Error installing to 68%
Error prompt in ins_ctx.mk, skip directly contiue
Later returns error:
make file'/...Error in emagent.mk'
Solution:
Open another terminal and type the command line:
sudo sed -i 's/^\(\s*\$(MK_EMAGENT_NMECTL)\)\s*$/\1 -lnnz11/g' $ORACLE_HOME/sysman/lib/ins_emagent.mk - 1
Click retry on the installation interface to continue.
Similarly, you will be prompted four times later to execute the following commands as they are from the following command line.
sudo sed -i 's/^\(\$LD \$LD_RUNTIME\) \(\$LD_OPT\)/\1 -Wl,--no-as-needed \2/g' $ORACLE_HOME/bin/genorasdksh sudo sed -i 's/^\(\s*\)\(\$(OCRLIBS_DEFAULT)\)/\1 -Wl,--no-as-needed \2/g' $ORACLE_HOME/srvm/lib/ins_srvm.mk sudo sed -i 's/^\(TNSLSNR_LINKLINE.*\$(TNSLSNR_OFILES)\) \(\$(LINKTTLIBS)\)/\1 -Wl,--no-as-needed \2/g' $ORACLE_HOME/network/lib/env_network.mk sudo sed -i 's/^\(ORACLE_LINKLINE.*\$(ORACLE_LINKER)\) \(\$(PL_FLAGS)\)/\1 -Wl,--no-as-needed \2/g' $ORACLE_HOME/rdbms/lib/env_rdbms.mk - 1
- 2
- 3
- 4
13. When the installation is complete, two sh files are prompted to run:
Or open another terminal:
sudo /home/xxx/app/xxx/oracle/oraInventory/orainstRoot.sh sudo /home/xxx/app/xxx/oracle/Oracle11gee/product/11.2.0/dbhome_1/root.sh - 1
- 2
Installation complete!
Three: Testing
1, run sqlplus
Test oracle's environment variables before running sqlplus:
echo $ORACLE_BASE echo $ORACLE_HOME echo $PATH - 1
- 2
- 3
If the value you configured is shown, you can proceed with the following steps.
2. View the listening status of the database
Use a command to see if you are listening. Normally, a lot of listening information is displayed.
If there is no output here, it means there is no monitoring and you need to configure it yourself:
lsnrctl status
- 1
Solutions without listening:
Run netca to create a monitor, call out GUI to set up a monitor
If you do not create a library, you can create a database in dbca.
Repair dbconsole by running the following code
emca -repos drop
emca -repos create
emca -config dbcontrol db
emca start dbconsole
This database should be ready to run
If there is no listening, execute a command to start listening:
lsnrctl start- 1
3. Start oracle Database
Enter the following command to start sqlplus:
sqlpus / as sysdba- 1
The oracle start and stop commands are:
SQL>startupSQL>shutdown- 1
- 2
startup will show that the orcl instance you created has loaded properly.
4..sqldeveloper can't connect to oracle:
If you need to connect to an oracle database remotely, you need to modify the oracle listening address:
Modify the contents of the / home/oracle/app/oracle/product/11.2.0/dbhome_1/network/admin/listener.ora file to: 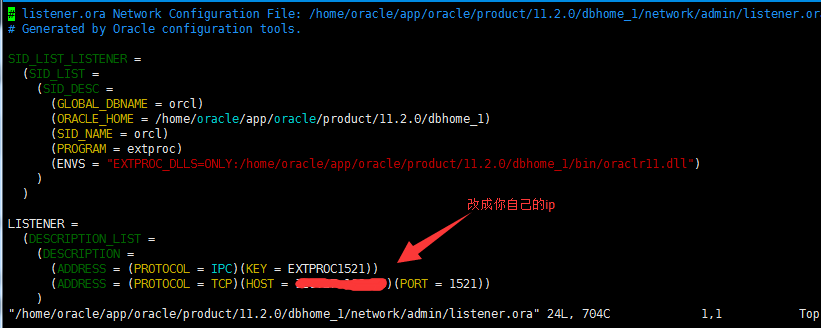
Change/home/oracle/app/oracle/product/11.2.0/dbhome_1/network/admin/tnsnames.ora to the following: 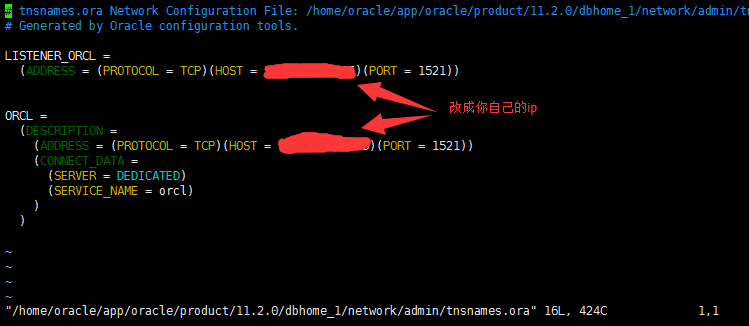
After modifying the above files, close listening and restart listening without stopping and starting the database:
lsnrctl stoplsnrctl start- 1
- 2
So you can connect to your oracle remotely.
End.......