Read the catalogue:
Read the text:
Preface
Using SpringBoot to create timing tasks is very simple. There are three main ways to create timing tasks at present:
- 1. Annotation-based (@Scheduled)
- Secondly, Scheduling Configurer believes that everyone is familiar with the former, but in practice, we often want to read the specified time from the database to dynamically perform the timing task. At this time, the timing task based on the interface comes into use.
- Setting Multithread Timing Tasks Based on Annotations
I. Static: Annotation-based
By default, annotation @Scheduled is single-threaded. When multiple tasks are opened, the execution time of the task is affected by the execution time of the previous task.
1. Create timers
Using SpringBoot to create timing tasks based on annotations is very simple and can be done in a few lines of code. The code is as follows:
@Component
@Configuration      //1. Mainly used for marking up configuration classes, with the effect of Component.
@EnableScheduling   // 2. Open Timing Tasks
public class SaticScheduleTask {
    //3. Adding Timing Tasks
    @Scheduled(cron = "0/5 * * * * ?")
    //Or specify a time interval directly, for example: 5 seconds
    //@Scheduled(fixedRate=5000)
    private void configureTasks() {
        System.err.println("Execution of Static Timing Task Time: " + LocalDateTime.now());
    }
}
Cron expression parameters represent:
- Seconds (0-59), e.g. 0/5 for every 5 seconds
- Scores (0-59)
- Time (0-23)
- On a day (0-31), it needs to be calculated.
- Month (0-11)
- Weekly (1-7 or SUN/MON/TUE/WED/THU/FRI/SAT)
@ Scheduled: In addition to supporting flexible parameter expression cron, it also supports simple delay operations, such as fixedDelay, fixedRate, to fill in the corresponding milliseconds.
2. Start-up test
Starting the application, you can see that the console prints the following information:

Obviously, it's convenient to use the @Scheduled annotation, but the disadvantage is that when we adjust the execution cycle, we need to restart the application to take effect, which is somewhat inconvenient. In order to achieve real-time effect, the interface can be used to complete the timing task.
II. Dynamics: Interface-based
Scheduling Configurer
1. Import dependency packages:
  <parent>
        <groupId>org.springframework.boot</groupId>
        <artifactId>spring-boot-starter</artifactId>
        <version>2.0.4.RELEASE</version>
    </parent>

    <dependencies>
        <dependency><!--Add to Web rely on -->
            <groupId>org.springframework.boot</groupId>
            <artifactId>spring-boot-starter-web</artifactId>
        </dependency>
        <dependency><!--Add to MySql rely on -->
             <groupId>mysql</groupId>
            <artifactId>mysql-connector-java</artifactId>
        </dependency>
        <dependency><!--Add to Mybatis Dependency configuration mybatis Something initialized-->
            <groupId>org.mybatis.spring.boot</groupId>
            <artifactId>mybatis-spring-boot-starter</artifactId>
            <version>1.3.1</version>
        </dependency>
        <dependency><!-- Add to mybatis rely on -->
            <groupId>org.mybatis</groupId>
            <artifactId>mybatis</artifactId>
            <version>3.4.5</version>
            <scope>compile</scope>
        </dependency>
    </dependencies>
2. Add database records:
Open the local database mysql, open the query window at will, and then execute the script content, as follows:
DROP DATABASE IF EXISTS `socks`;
CREATE DATABASE `socks`;
USE `SOCKS`;
DROP TABLE IF EXISTS `cron`;
CREATE TABLE `cron`  (
  `cron_id` varchar(30) NOT NULL PRIMARY KEY,
  `cron` varchar(30) NOT NULL
);
INSERT INTO `cron` VALUES ('1', '0/5 * * * * ?');

Then add data sources to application.yml in the project:
spring:
  datasource:
    url: jdbc:mysql://localhost:3306/socks
    username: root
    password: 123456
3. Create timers
When the database is ready for data, we write a timing task. Note that TriggerTask is added here. The purpose is to read the execution cycle we set in the database and to perform the relevant timing tasks.
The code is as follows:
@Component
@Configuration      //1. Mainly used for marking up configuration classes, with the effect of Component.
@EnableScheduling   // 2. Open Timing Tasks
public class DynamicScheduleTask implements SchedulingConfigurer {

    @Mapper
    public interface CronMapper {
        @Select("select cron from cron limit 1")
        public String getCron();
    }

    @Autowired      //Injection mapper
    @SuppressWarnings("all")
    CronMapper cronMapper;

    /**
     * Perform scheduled tasks.
     */
    @Override
    public void configureTasks(ScheduledTaskRegistrar taskRegistrar) {

        taskRegistrar.addTriggerTask(
                //1. Adding task content (Runnable)
                () -> System.out.println("Perform dynamic timing tasks: " + LocalDateTime.now().toLocalTime()),
                //2. Setting up the execution cycle (Trigger)
                triggerContext -> {
                    //2.1 Get execution cycles from the database
                    String cron = cronMapper.getCron();
                    //2.2 Verification of Legitimacy.
                    if (StringUtils.isEmpty(cron)) {
                        // Omitted Code ..
                    }
                    //2.3 Return to execution cycle (Date)
                    return new CronTrigger(cron).nextExecutionTime(triggerContext);
                }
        );
    }

}
4. Start-up test
After launching the application, look at the console and print every 10 seconds as we expected:
Then open Navicat and change the execution cycle to run every 6 seconds, as shown in the figure: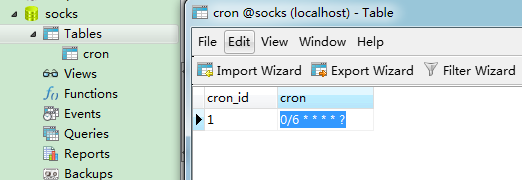
Looking at the console, it is very convenient to find that the execution cycle has changed and we do not need to restart the application. As shown in the figure: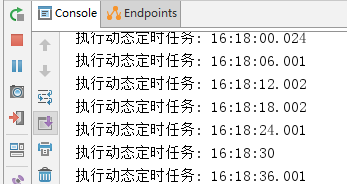
Note: If a format error occurs when the database is modified, the timing task will stop, even if the modification is correct; only restarting the project can restore at this time.
Multithread Timing Tasks
Setting Multithread Timing Tasks Based on Annotations
1. Create multithreaded timing tasks
//@ Component annotations are used to annotate more neutral classes.
//Relatively, classes in the hierarchy are annotated by @Repository,@Service and @Controller in the persistence layer, business layer and control layer, respectively.
@Component
@EnableScheduling   // 1. Open Timing Tasks
@EnableAsync        // 2. Open multithreading
public class MultithreadScheduleTask {

        @Async
        @Scheduled(fixedDelay = 1000)  //Interval of 1 second
        public void first() throws InterruptedException {
            System.out.println("The first scheduled task begins : " + LocalDateTime.now().toLocalTime() + "\r\n thread : " + Thread.currentThread().getName());
            System.out.println();
            Thread.sleep(1000 * 10);
        }

        @Async
        @Scheduled(fixedDelay = 2000)
        public void second() {
            System.out.println("The second scheduled task begins : " + LocalDateTime.now().toLocalTime() + "\r\n thread : " + Thread.currentThread().getName());
            System.out.println();
        }
    }
2. Start-up test
After starting the application, check the console:
From the console, it can be seen that the first timing task and the second timing task do not affect each other.
Moreover, since multithreading is enabled and the execution time of the first task is not limited by its own execution time, it should be noted that duplicate operations may lead to data anomalies.
Code address: https://github.com/mmzsblog/springboot-schedule