**
I would like to dedicate this article to those friends like me who are confused about linux system servers! Don't be afraid, be bold and patient. If you can't, reset the server and start from scratch
**
*Huawei has tried to use the cloud image server yum for 8 months. As a result, Huawei has not been able to use the cloud image for the most time Decisively changed to 7, which was introduced in the previous article centos's stability is well known. The packages are too old. They compile and install by themselves. They have a lot of problems. They feel tired and don't like it. So they decided to test the configuration of ubuntu as a server again. They don't know until they try. They know that it's really fragrant after they try. The python version of ubuntu is actually 3.8. It's really young. A set of configuration is just flowing Forgive me for my shameless spelling* Attach a screenshot of deepin system:
 Beautiful don't don't want, is the memory burning hard, 16g used half of it
The installation process is as follows:
-
If it's win10, it's best to install openssh for remote management. Since I'm currently using deepin system, I don't need to install it. For partners who need to install, you can see my last article, which has the link address Click the centos configuration article directly
-
Connect to the server through ssh and update the system
-
Install Django, pilot library, sub text plug-in Django ckedit, database operation module mysqlclient,uwsgi,
-
Upload local project files
-
Install mysql, configure the database password, connect to django and test whether it is connected Database migration
-
Configure uwsgi, install nginx and configure, and test connectivity
-
The project layout is completed
First of all, I'm not very proficient in the operation of linux system. I can only be said to be a novice, so this article will be more inclined to friends like me who look confused after finishing the server
 First, connect to the remote server through ssh
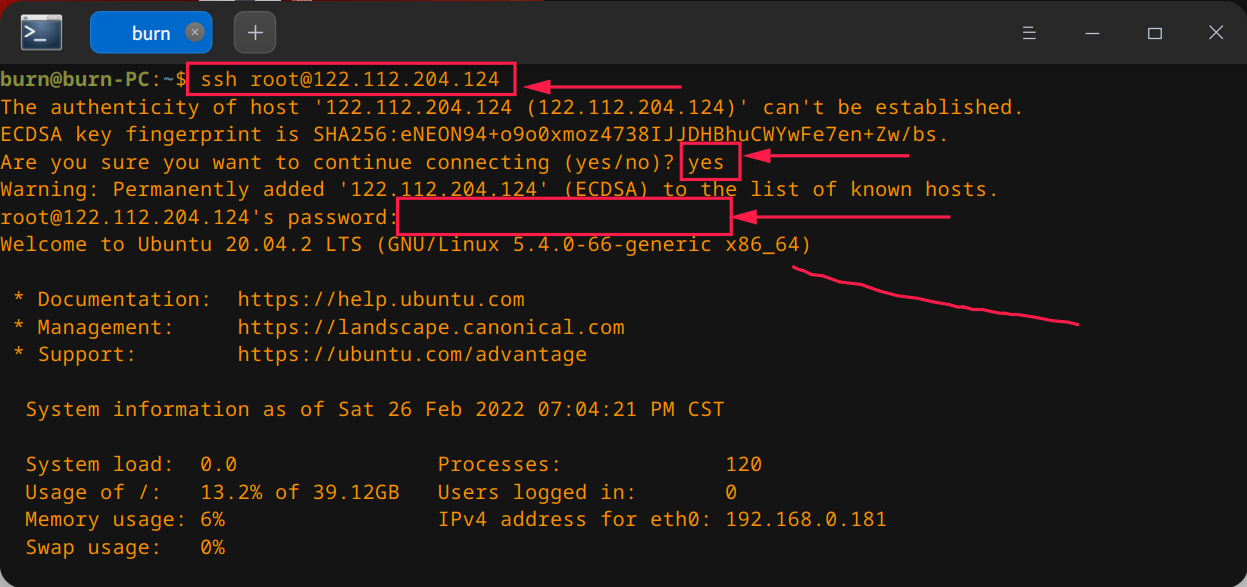 The connection command is: ssh login user name @ server ip
The first connection will let you confirm, and then enter the password Then enter the server
Regardless of 3721, upgrade the system first and enter the following command
apt update
apt upgrade
After a meal of output, we need to configure pip source switching Because the official source is too slow
#Create a folder in the root directory pip folder
mkdir /root/.pip
Then create a new text file pip The contents of conf are as follows:
[global]
index-url = https://pypi.tuna.tsinghua.edu.cn/simple
[install]
trusted-host = https://pypi.tuna.tsinghua.edu.cn
Next, let's focus. We don't install ftp service, but we can upload local files to the server with ssh scp command We need to reopen a shell, because we operate locally

scp Local file path server user name@The server ip:Server destination address
After the above operations, PIP source change is completed. The next step is to update pip. You need to log in to the server for operation The command is as follows:
python3 -m pip install --upgrade pip
After the update is completed, install Django, uwsgi, pilot, Django ckedit and mysqlclient
pip3 install django
pip3 install django-ckeditor
pip3 install pillow
pip3 install uwsgi
All the above are very smooth, but when centos is configured, many dependencies need to be installed. It can be seen that ubantu is still very suitable for Xiaobai
Install the mysql client module to connect to the mysql database
The installation must follow the following two steps, otherwise an error will be reported. I have stepped on the pit
apt install libmysqlclient-dev
pip3 install mysqlclient
So far, we have installed all the modules required by python and djago. Next, we will install nginx and mysql
One step
apt install nginx
apt install mysql-server
Configure mysql
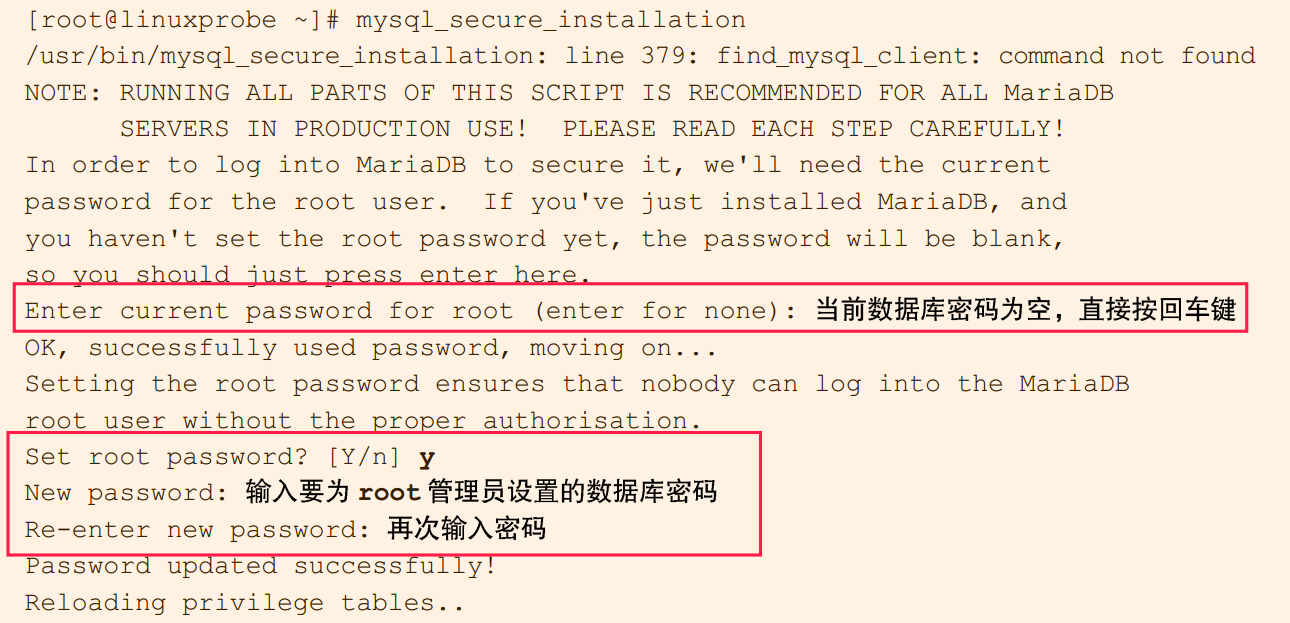
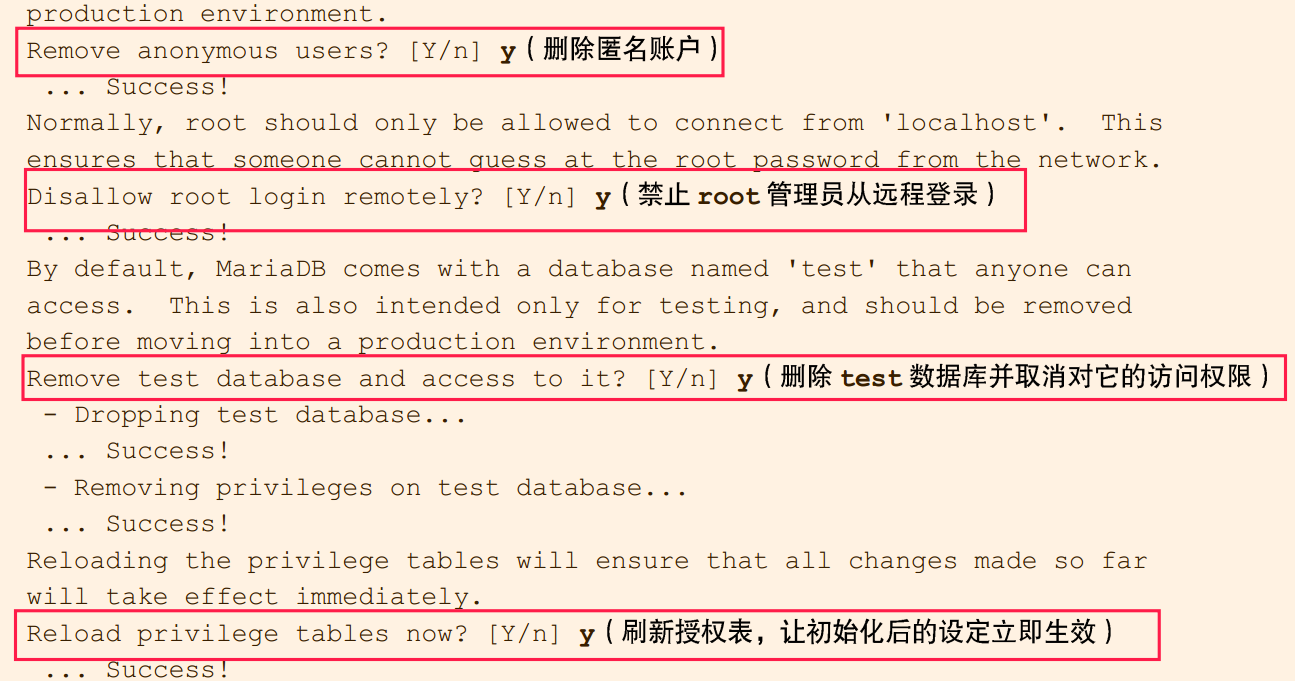
Although we are Xiaobai, we still need to configure mysql based on basic security
Enter the following command
mysql_secure_installation
 The book is good and easy to understand. I recommend it here!!
Next is the key point. Success or failure is here
First, create a project folder on the server, and then upload the project folder to the server locally through scp command
Server side:
mkdir /home/www
Local end
Enter our project folder and create a new file uwsgi Ini. To facilitate configuration, we now configure uwsgi locally and create an nginx configuration file Django Conf, and then upload it to the server at one time
uwsgi.ini configuration is as follows
[uwsgi]
socket = 127.0.0.1:8001#Establish communication port with nginx
chdir = /home/www/shopsite#The full path of the project on the server
wsgi-file = shopsite/wsgi.py#Relative to chdir, we WSGI Path to py file
module = shopsite.wsgi#Replace the / on the top with '.' Just do it
master=true#No, it's okay
processes = 4#Number of open processes
threads = 2#Number of open threads
pidfile=uwsgi.pid
daemonize=uwsgi.log
vacuum = true
log-maxsize=50000000
disable-logging=true
static-map = /static=/home/www/shopsite/static
#uid=
#gid=
The following two articles explain the configuration of uwsgi in detail:
https://blog.csdn.net/qq_36564503/article/details/106449315
https://www.cnblogs.com/mensiler/p/11889546.html
Next, write the nginx configuration file Django The contents of conf are as follows:
server {
	listen 80;#Listening port
	server_name  122.112.204.124;#Server address or domain name
	charset utf-8;
	client_max_body_size 75m;
	location /media {
		alias /home/www/shopsite/media;#Folder for uploading,
	}
	location /static {
		alias /home/www/shopsite/static;#Static writer
	}
location / {
	uwsgi_pass 127.0.0.1:8001;#Here we want to talk to uwsgi The socket of ini is the same
	include /etc/nginx/uwsgi_params;
	}
}
After the above configuration is completed, you need to modify django's settings Py to deploy the production environment. One is to change debug to False, and the other is to configure the user name and password to connect to the database. The following is the modification part:
DEBUG = True

ALLOWED_HOSTS = ["*"]

DATABASES = {
     'default': {
         'ENGINE': 'django.db.backends.mysql',
         'NAME': 'django_db',
         "USER":"root",
         "PASSWORD":"Fill in the password you set here",
         "HOST":"127.0.0.1",
         "PORT":"3306",
     }
}
So far, the preparation work is completed, and the project folder is uploaded to the server as a whole through the scp command
Execute the following command locally and replace it with your project folder path,
scp -r /home/burn/Downloads/shopsite root@122.112.204.124:/home/www
Switch to the server and enter the uploaded project folder
cd /home/www/shopsite
Perform database migration, collect static files,
python3 manage.py collectstatic
python3 manage.py makemigrations
**
Nothing unexpected will go wrong
**
Because mysql5 7 the above encryption method has become cha2. We need to configure it and change it back to the original method, otherwise our MySQL client cannot operate mysql So there's a mistake. It doesn't matter. Let's solve it
Enter the command to enter the mysql shell
mysql -u root -p
Note that the new password part is replaced by your database password, and don't forget the last semicolon
ALTER USER 'root'@'localhost' IDENTIFIED WITH mysql_native_password BY 'newpassword';
Then refresh the permissions and exit
FLUSH PRIVILEGES;
exit
Then continue the unfinished operation, which should be very smooth
python3 manage.py makemigrations
python3 manage.py migrate
In our project folder, we just created uwsgi Ini, execute the following command
uwsgi uwsgi.ini#Start uwsgi with configuration file
Copy the nginx configuration file to the nginx configuration folder as required
cat /etc/nginx/nginx.conf
 Then there's a lot of output,Pay attention to this http part
http {
#conf.d here is the destination address of our configuration file
        **include /etc/nginx/conf.d/*.conf;**
        include /etc/nginx/sites-enabled/*;
}
Then copy the written nginx configuration file into the folder
cp django.conf /etc/nginx/conf.d
nginx -t #After the copy is completed, run the next test to see if it passes
If successful, it will output:
nginx: the configuration file /etc/nginx/nginx.conf syntax is ok
nginx: configuration file /etc/nginx/nginx.conf test is successful
The basic configuration is supported. The following is the final work
killall -9 nginx#Kill all nginx processes
systemctl start nginx#start nginx
systemctl enable nginx#Set startup
systemctl enable mysql#mqsql startup
Now you can enter the server ip address in the browser
 The remaining configuration is to optimize the server, configure the firewall and port, or install ftp service to upload files, update applications, write a script to automatically back up the database, and so on
If you encounter problems, search more, try again and again, and master some basic linux commands I believe you will be better and better!