preface
Learn about Chrome plug-ins
The chrome extension can add additional functions to the chrome browser. It can inject css into a web page or execute js methods. At the same time, it can also realize a separate function. At the same time, it will not be affected by cross domain when making network requests. So what it can achieve mainly depends on your imagination

After installing the plug-in, the icon of the plug-in you installed will appear on the right side of the browser's input box
How to install plug-ins
At present, there are only two ways to install plug-ins:
- stay Chrome online app store To choose to install plug-ins. This installation mode is based on crx package. At present, it is prohibited to directly load existing external crx files to install plug-ins
- To install the self-developed plug-ins, click to open the developer mode on the right in the browser extension settings, and then click to load the decompressed extension to install the plug-ins. It should be noted that in this mode, the source code project folder of the extension is selected for installation, and direct installation of external crx is not supported

Plug in development
Development directory structure
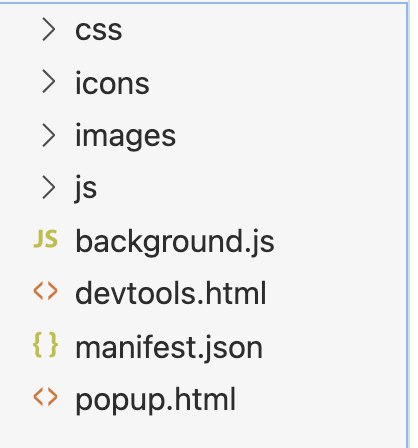
Screenshots seem a little too many, but in fact, the most important and most important thing is manifset JSON file
manifset.json: the core configuration file of the plug-in
The following is a brief description of the configuration contents in the file. More configuration items and details can be viewed Official documents
{
   //essential
  // Specifies the version of the rule used by the manifest. Required
  "manifest_version": 3,
  // Plug in name
  "name": "My Extension",
  // The version of the plug-in, such as "1.0.0"
  "version": "versionString",

  // Recommended
  // Controls the icon style that the plug-in displays in the chrome action bar
  "action": {
        "default_icon": { // optional
            "16": "images/icon16.png", // optional
            "24": "images/icon24.png", // optional
            "32": "images/icon32.png" // optional
        },
        "default_title": "Click Me", // optional, shown in tooltip
        "default_popup": "popup.html" // optional, pop is the small window page that appears when you click the plug-in
   }
  "default_locale": "zh_CN", // If the language pack is not provided and there is no need to switch languages, you can delete this item, otherwise an error will be reported if the language pack is not provided
  "description": "A plain text description", // A brief description
  "icons": {  // Icons displayed in the chrome online store or extension management
    "16": "icon16.png",
    "48": "icon48.png",
    "128": "icon128.png"
   },

  // Optional
  "author": "author",
  "automation": ..., // The official document does not explain what this is. It seems that the word is related to automation
  "background": { // background is a very important concept in plug-in development. Of course, the functions you want to develop may not be used
    // Required
    "service_worker": "background.js",
  },
  "content_scripts": [
    {
      "matches": ["https://www.baidu.com/*"],
      "run_at": "document_start", // "document_idle" when the web page is idle_ Start "and" document_end "start loading for the web page and end loading
      "css": ["css/contentStyle.css"], // The css style is applied globally to the active address
      "js": ["js/contentScript.js"]
    }
  ],
  "devtools_page": "devtools.html" // The contents related to f12 debugging have not been used at present. For details, please refer to the official documents for more details
}
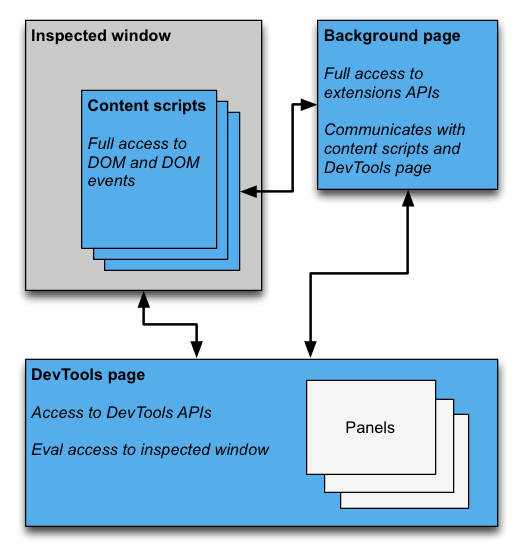
- The following figure shows the official content_ Diagram of script, background and devtools
After the plug-in development is completed, load the decompressed extension in the extension management of chrome. Select the project root directory to see the plug-in
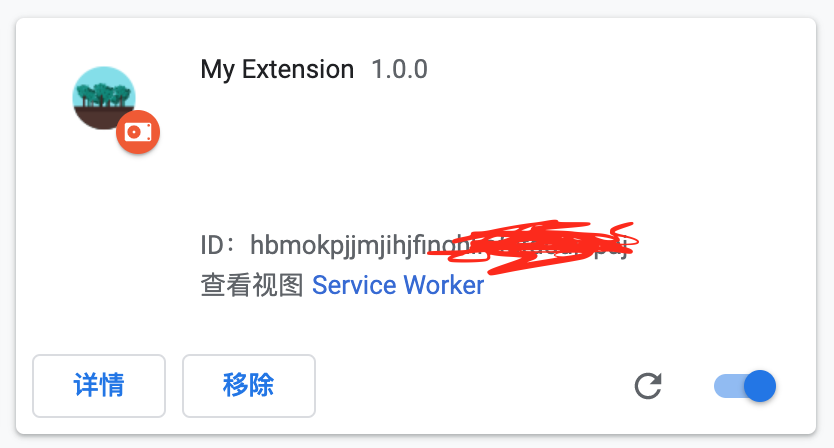
After clicking the plug-in button in the browser navigation bar, you can choose to fix the plug-in in the navigation bar
When the icons are different, the picture resources of the two settings in the manifset are different
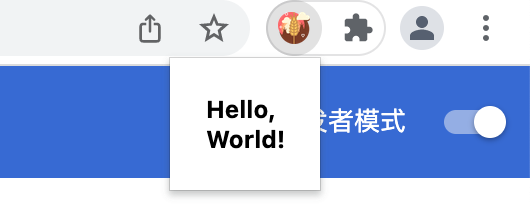
popup.html
When we click the plug-in in the browser navigation bar, a small window page can be displayed, and the style of the page corresponds to the configuration file manifest Default in JSON file_ Pop item
"action": {
        "default_icon": { // optional
            "16": "images/icon16.png", // optional
            "24": "images/icon24.png", // optional
            "32": "images/icon32.png" // optional
        },
        "default_title": "Click Me", // optional, shown in tooltip
        "default_popup": "popup.html" // optional, pop is the small window page that appears when you click the plug-in
   }
For example, it corresponds to pop The content of HTML is
<!DOCTYPE html>
<html lang="en">
<head>
    <meta charset="UTF-8">
    <meta http-equiv="X-UA-Compatible" content="IE=edge">
    <meta name="viewport" content="width=device-width, initial-scale=1.0">
    <title>popup</title>
</head>
<body>
    <div style="font-weight: bold; padding: 10px;">Hello, World!</div>
</body>
</html>
Display effect
It should be noted that the page is regenerated every time it is clicked, and will be destroyed when it is cancelled. Therefore, if you need to keep any resident variables or status variables in js, you can define them in background js
background
"background": { // background is a very important concept in plug-in development. Of course, the functions you want to develop may not be used
    // Required
    "service_worker": "background.js",
    // Optional
    "type": ...
  }
background.js is a js that stays in the background after the plug-in runs. Suppose pop You want to implement a counter in HTML, but because each time you cancel popup After HTML, the page will be destroyed, so the count will be cleared every time it is opened. At this time, it can be displayed in background js to define a variable in popup Html is directly used in the corresponding js, so that the count variable will not be regenerated each time it is opened.
content_scripts
js and css injected for some or all url addresses can be configured in the "content_scripts" item in the configuration table
"content_scripts": [
    {
      "matches": ["https://www.baidu.com/*"],
      "run_at": "document_end", // "document_idle" when the web page is idle_ Start "and" document_end "start loading for the web page and end loading
      "css": ["css/contentStyle.css"], // The css style is applied globally to the active address
      "js": ["js/contentScript.js"]
    }
  ],
For example, in contentscript JS, then“ https://www.baidu.com/ *"An alert will be displayed at the beginning of the record under the path. At the same time, you can overwrite the style based on the elements in this page in CSS. For example, when Baidu click the button in Baidu, you can see that the class name of the button is s_btn through F12. Then write this in the contentStyle.css file
.s_btn {
    background-color: orange !important;
}
Display effect
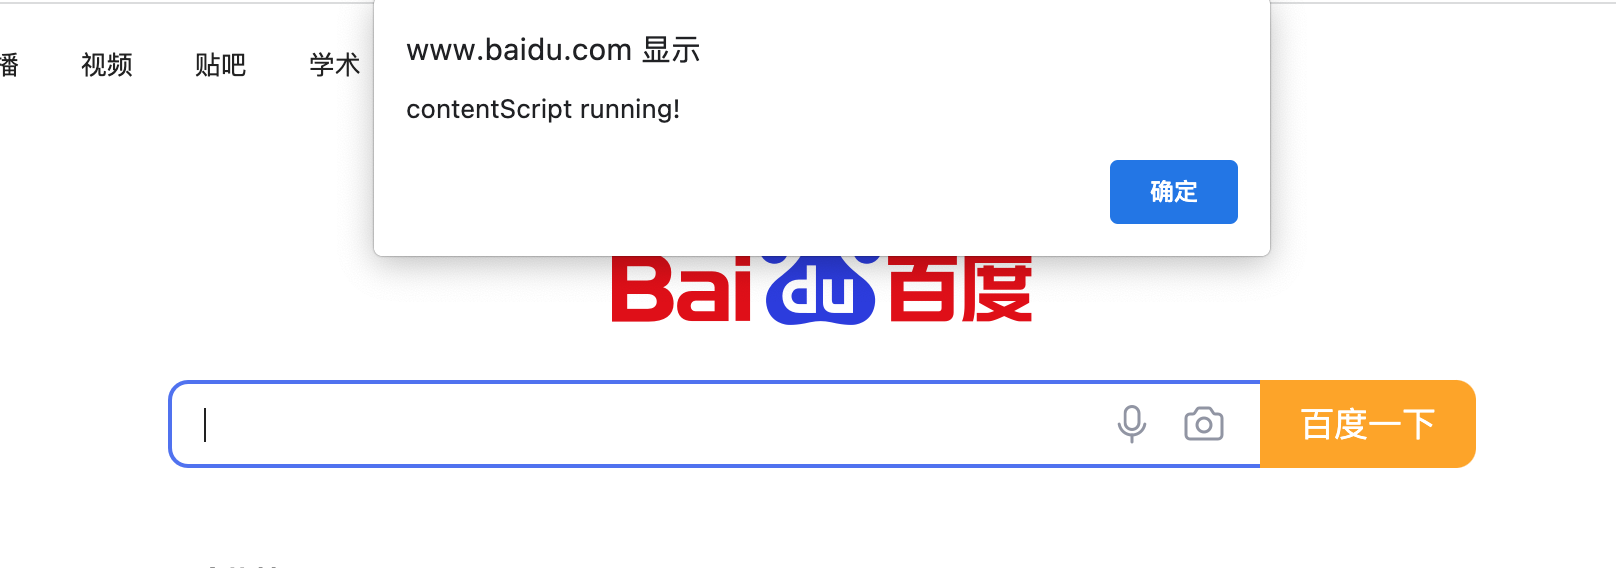
You can see that the color of the button has changed and the contentscript has been run alert in JS
last
The above is just a brief summary of some main usage contents. Most of the small functions can be realized with the above ones, but there are still many awesome APIs in the chrome extension api that can realize many awesome functions. Those who are interested can Official extension development guide View api in
in addition
If you want to upload an extension to the Chrome app store
- Click to enter https://chrome.google.com/webstore/devconsole/register?hl=zh-CN And log in to Google account. If you don't have a Google account, you need to register one
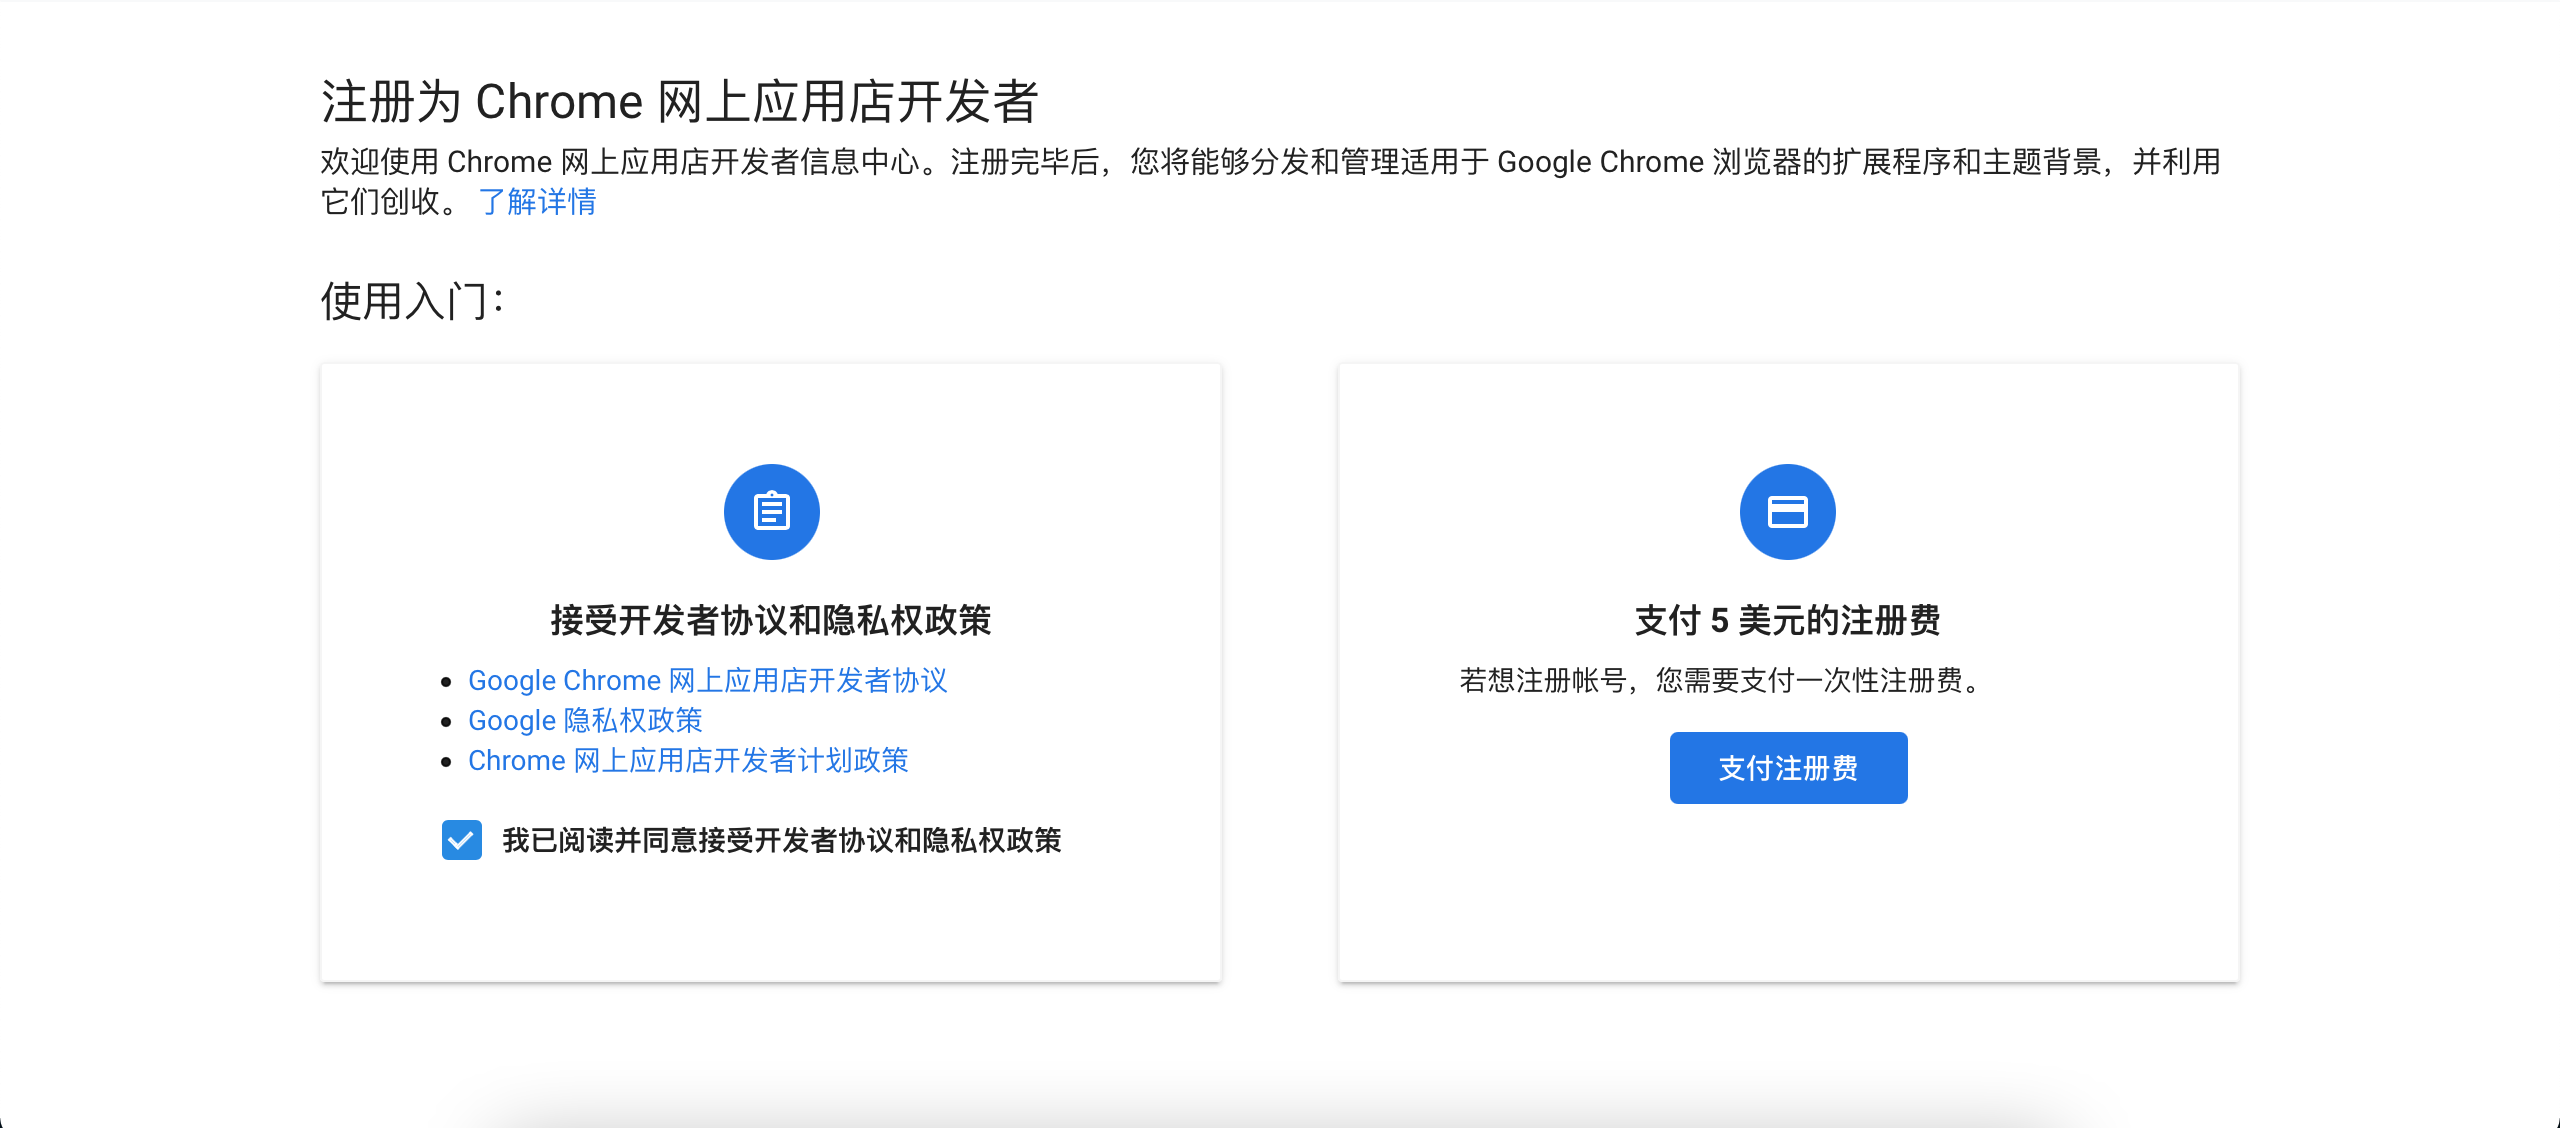
After successful login, you need to check the privacy agreement and pay a $5 registration fee to register as a developer. If you don't have a card, you can consider the omnipotent taobao
- After successful purchase, enter the developer workbench
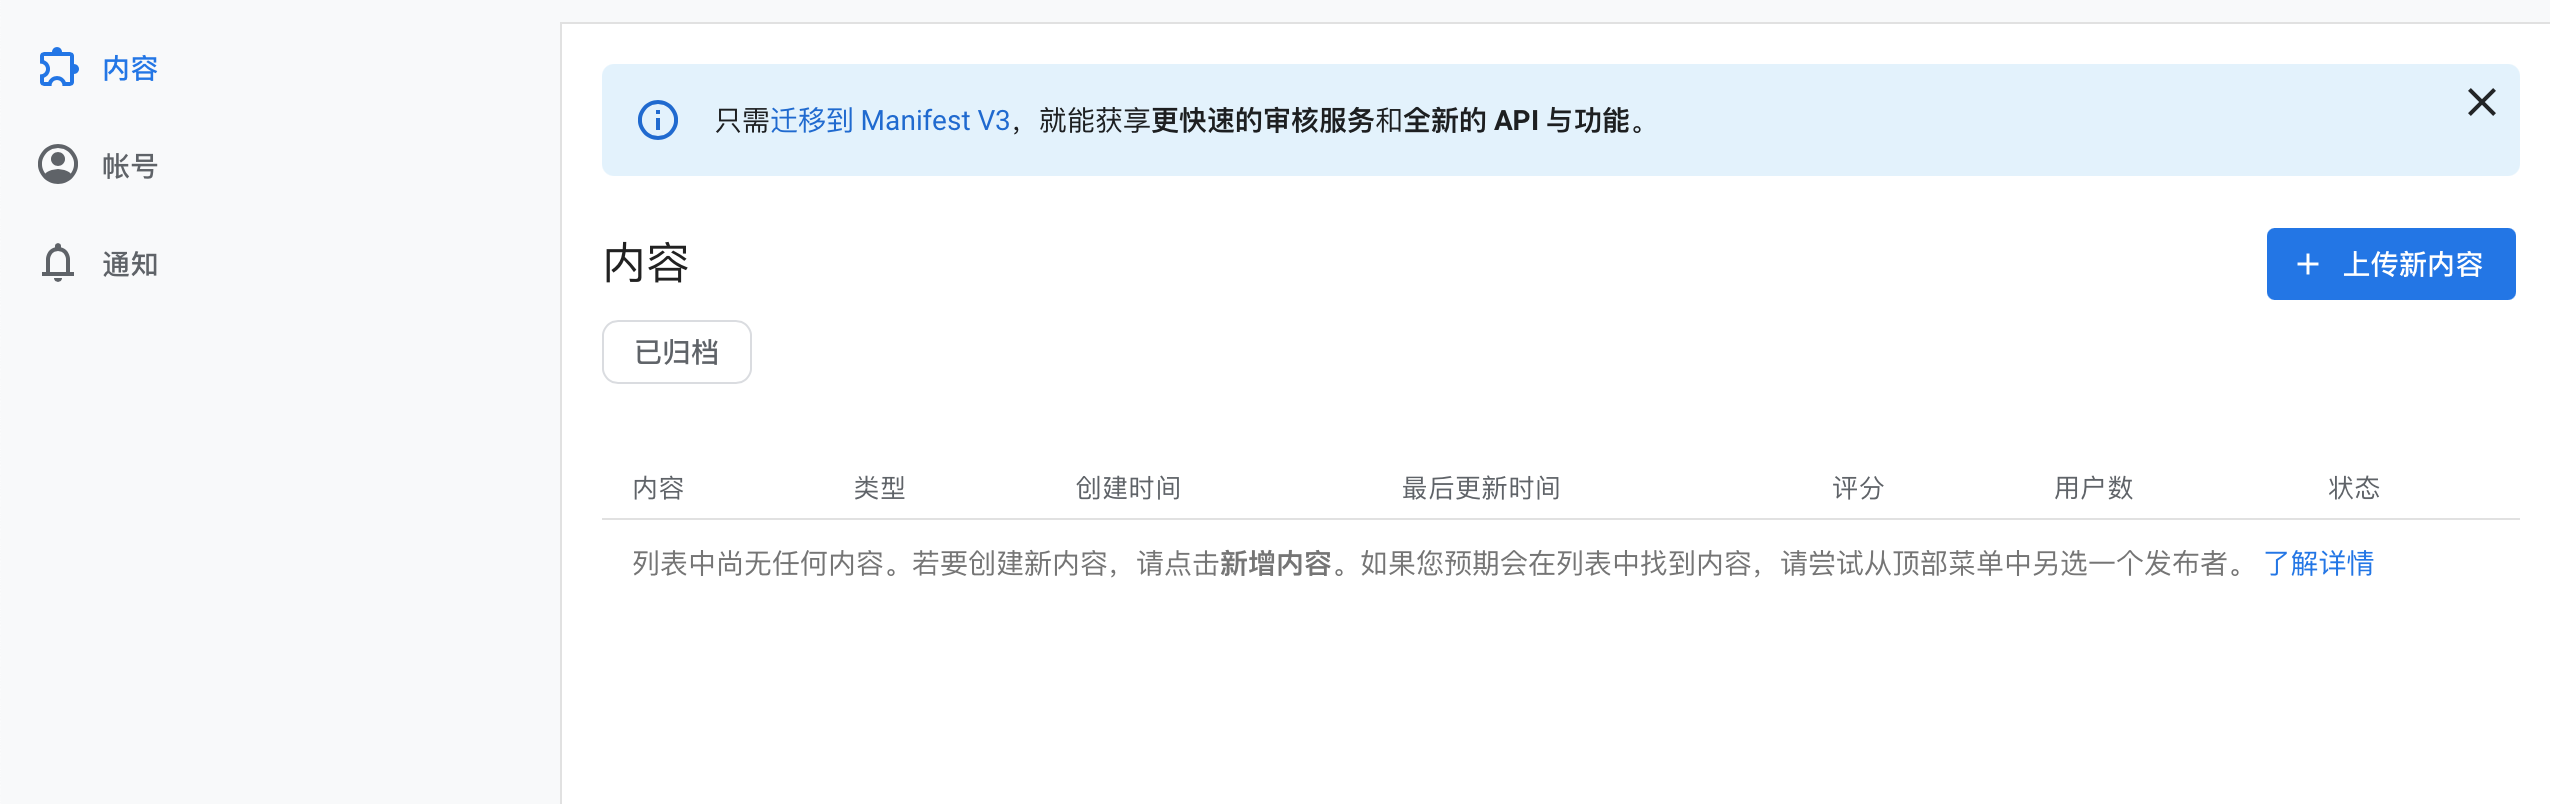
Click to upload new content, and then select the source code project that has been compressed into zip. Then there will be a series of such as Google double verification, screenshots, etc. follow the prompts step by step
Finally, when you return to the dependent interface, you can see the submit for approval button. If you can't click it, you can click the next button. Why can't I submit for approval to view the problem and deal with it
If it is a test project, it can be submitted for review. There is no practical function, and there is no need to submit it for review. You can try to develop some interesting or practical extension projects. If you can solve it with tools and code, you don't need to deal with it manually. Laziness is the first productivity