CI/CD actual combat based on Docker+Jenkins+Git
Same as the previous essay: Research on CI process based on Jenkins+Docker+Git Different, this content is more inclined to the basic requirements of the actual business.
There are several points to note:
- The actual combat does not involve the image warehouse, so the image push phase is omitted, which can be used for reference Research on CI process based on Jenkins+Docker+Git.
- Compared with the previous article, the actual combat is based on the Internet server, so Jenkins automatically triggers the pull code and sends the build report.
- Jenkins in actual combat also runs based on docker. Jenkins data persistence is realized through VOLUME.
- Instead of building your own git code warehouse, choose Gitee to manage your code.
- The experimental environment has been prepared in advance.
1. Jenkins start
docker run \
 -u root \
 -d \
 -p 8080:8080 \
 -p 50000:50000 \
 -v jenkins-data:/var/jenkins_home \
 -v /etc/localtime:/etc/localtime:ro \
 -v /var/run/docker.sock:/var/run/docker.sock \
 --restart=always \
 jenkinsci/blueocean
Set user and password after startup
2. New item
Name: Java Devops demo
Create pipeline
Select save
Jenkins pipeline workflow:
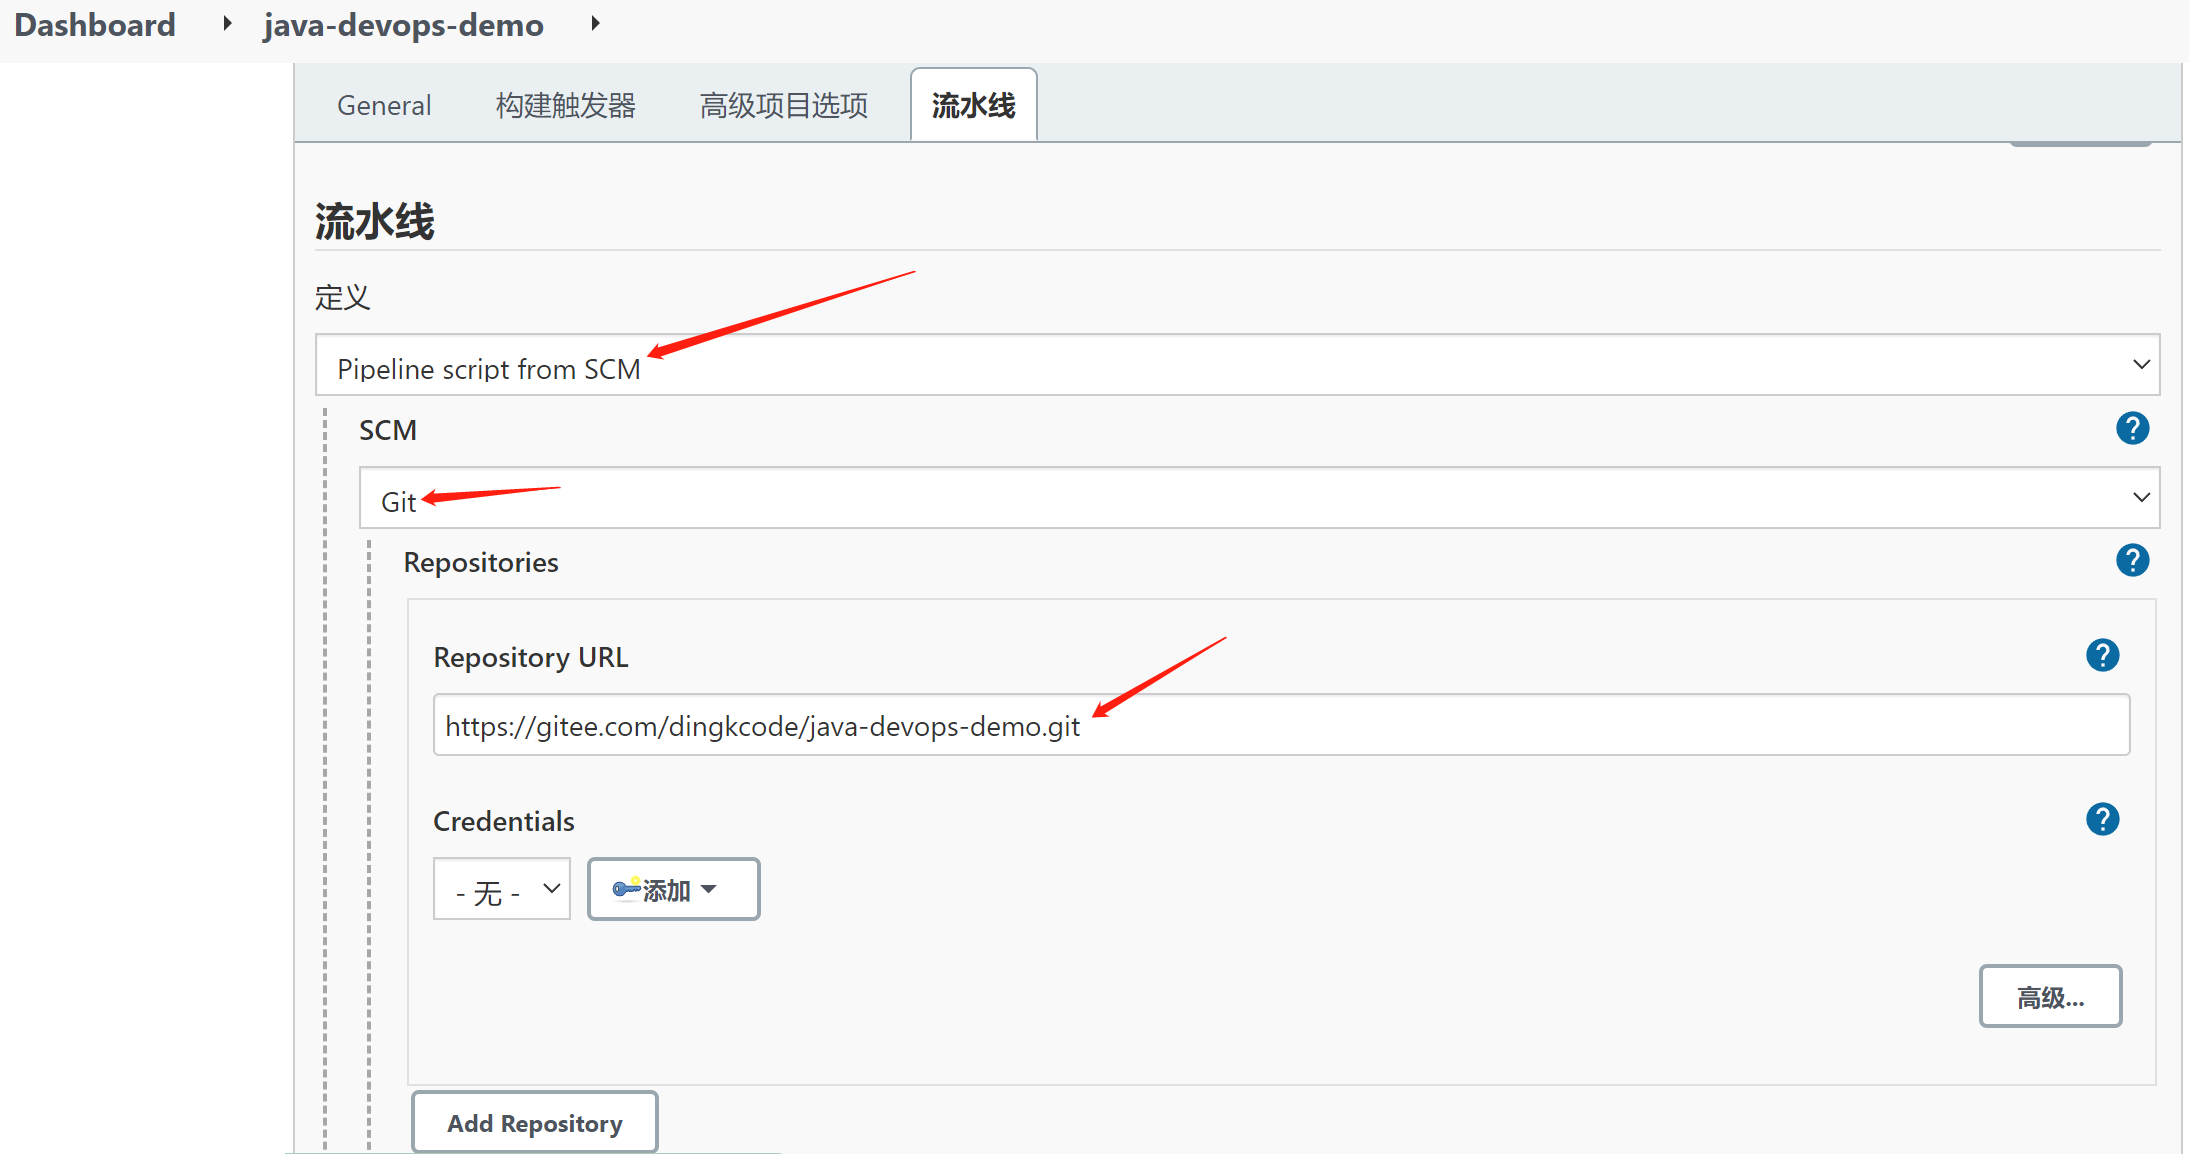
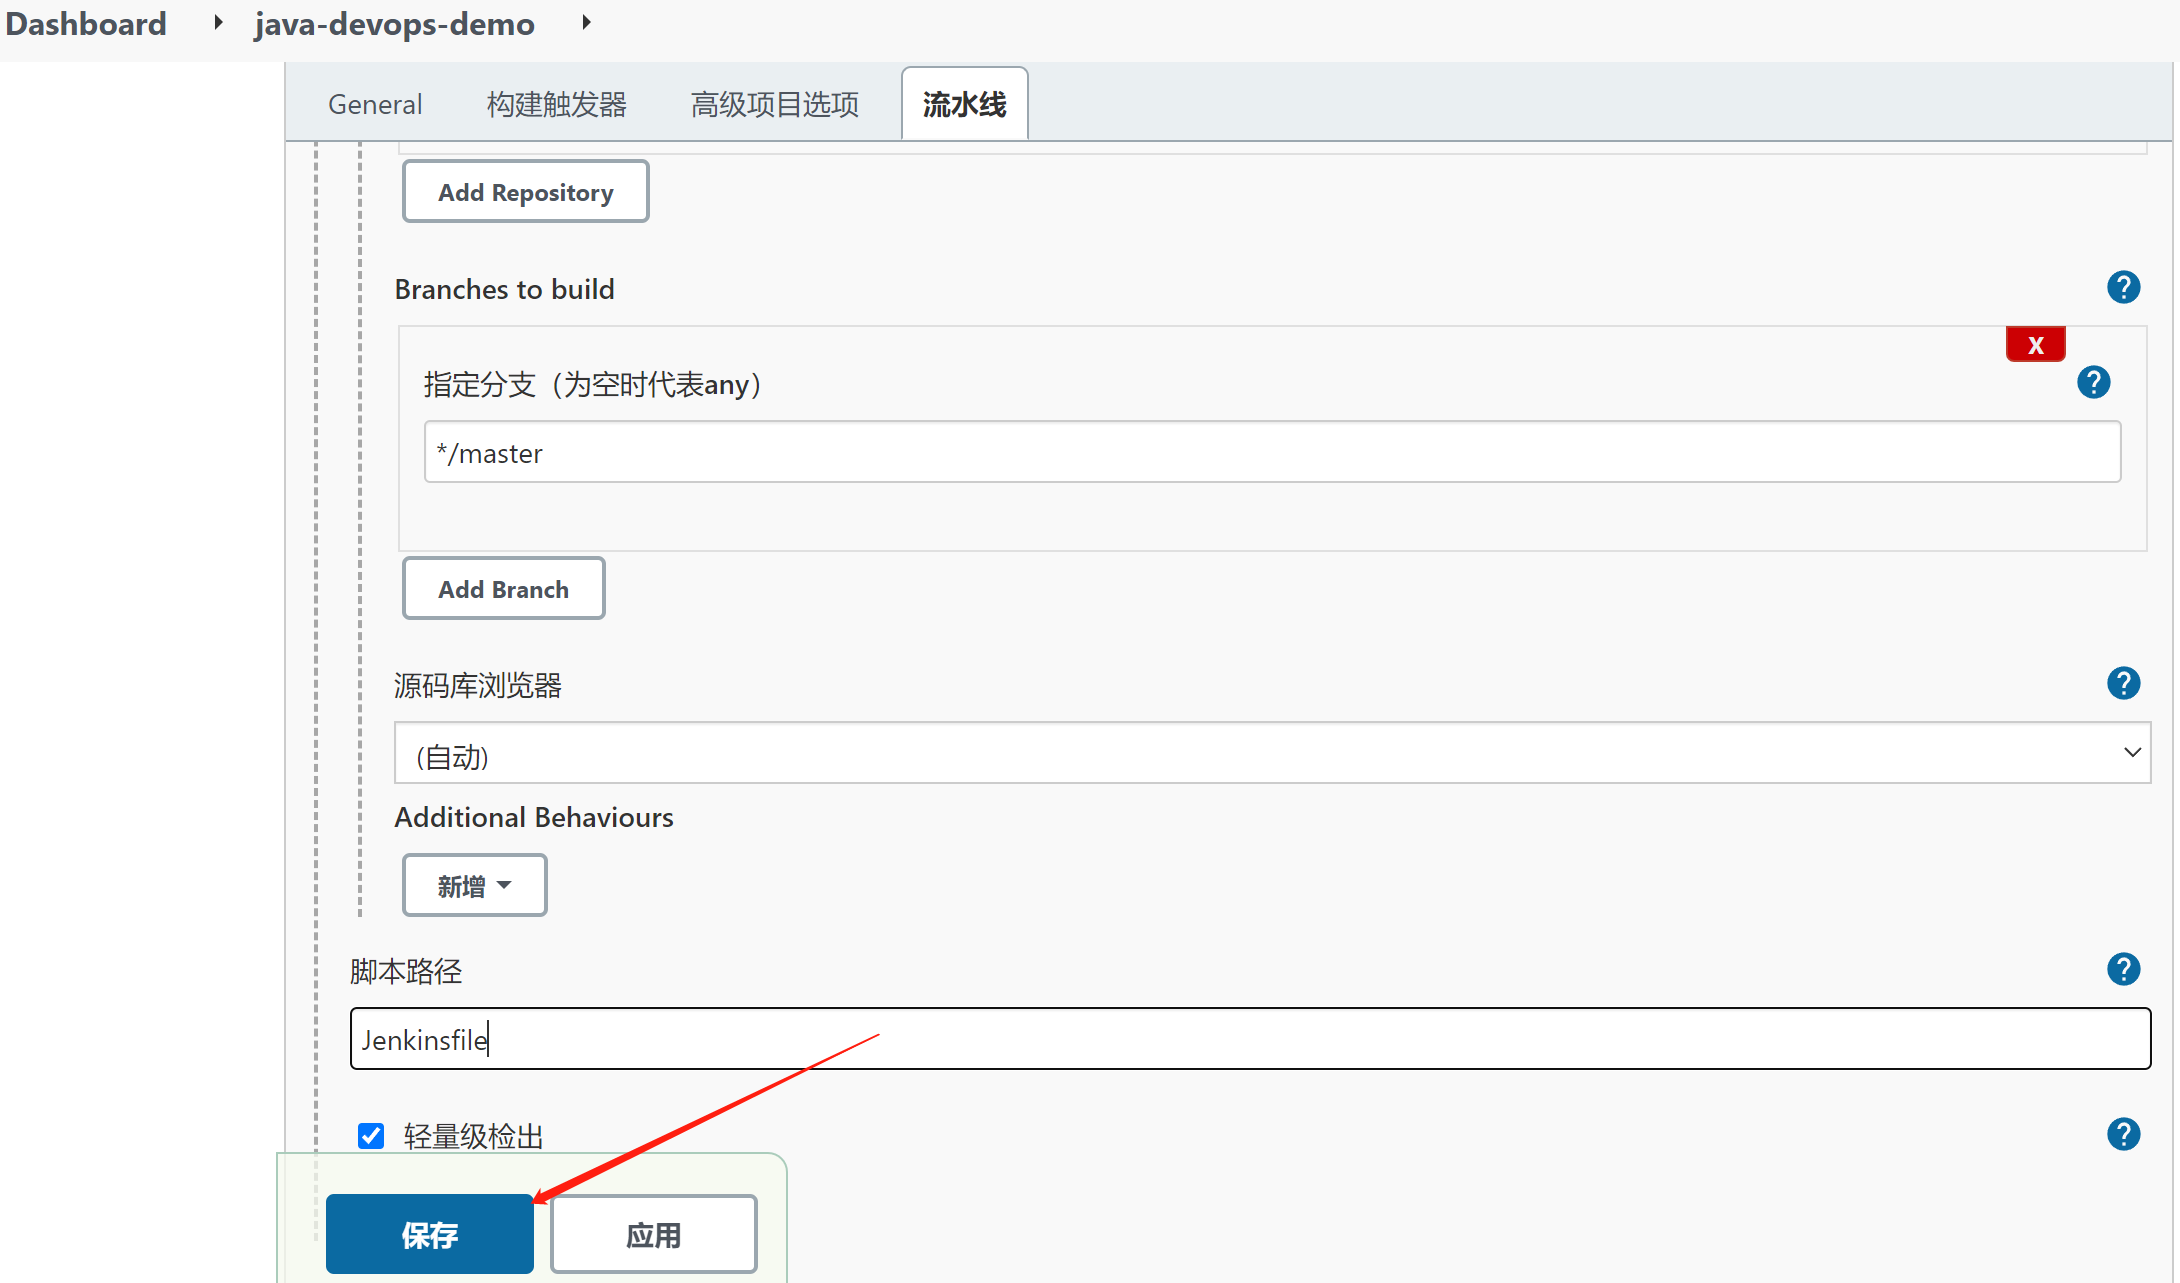
First define a pipeline project and specify the git location of the project
Pipeline start
a. go to the git position to automatically pull the code
b. parse the Jenkinsfile file in the pull code
c. start the processing project according to the assembly line specified by Jenkinsfile
Jenkins, important point
1) jenkins home directory / var/jenkins_home has been externally mounted by / var / lib / docker / volumes / Jenkins data/_ data
2) WORKSPACE = / var / jenkins_home / WORKSPACE / Java Devops demo each pipeline project occupies a folder location
3)BUILD_NUMBER=5; What is the current build time
4)WORKSPACE_TMP (temporary directory) = / var / jenkins_home / workspace / Java Devops- demo@tmp
3. Define the specific contents of Jenkinsfile and Dockerfile
The Jenkinsfile section is a step-by-step test, written in stages.
pipeline{ //all-out CI/CD Processes need to be defined here //Any agent available can be executed agent any //Define some environmental information environment { WS = "${WORKSPACE}" } //Define the processing flow of the pipeline stages{ stage('Environmental inspection'){ steps { sh 'printenv' echo "Detecting basic information" sh 'java -version' sh 'git --version' sh 'docker version' sh 'pwd && ls -alh' } } //1,compile "abc" stage('maven compile'){ agent { docker { image 'maven:3-alpine' args '-v /var/jenkins_home/appconfig/maven/.m2:/root/.m2' //docker run -v /var/jenkins_home/appconfig/maven/.m2:/root/.m2 } } //Everything to do //jenkins Applicable only if no environment is configured docker Compatible with all scenarios steps{ echo "compile..." sh 'pwd && ls -alh' sh 'cd ${WS} && mvn clean package -s "/var/jenkins_home/appconfig/maven/settings.xml" -Dmaven.test.skip=true' } } //2,pack stage('Generate image'){ steps{ sh 'pwd && ls -alh' sh 'docker version' sh 'docker build -t java-devops-demo .' } } //3,deploy stage('deploy'){ steps{ echo "deploy..." sh 'docker rm -f java-devops-demo-dev' sh 'docker run -d -p 80:8080 --name java-devops-demo-dev java-devops-demo' } } //4,Push Report stage("Send Report"){ steps { //SMS notification, purchase api Interface is enough // sh 'curl -i -k -X POST 'https://gyytz.market.alicloudapi.com/sms/smsSend?mobile=mobile¶m=**code**%3A12345%2C**minute**%3A5&smsSignId=2e65b1bb3d054466b82f0c9d125465e2&templateId=908e94ccf08b4476ba6c876d13f084ad' -H 'Authorization:APPCODE dddddddd'' //REST API All right // sh 'curl ' echo 'Prepare to send report' emailext body: '''<!DOCTYPE html> <html> <head> <meta charset="UTF-8"> <title>${ENV, var="JOB_NAME"}-The first ${BUILD_NUMBER}Secondary build log</title> </head> <body leftmargin="8" marginwidth="0" topmargin="8" marginheight="4" offset="0"> <table width="95%" cellpadding="0" cellspacing="0" style="font-size: 11pt; font-family: Tahoma, Arial, Helvetica, sans-serif"> <h3>This email is sent automatically by the system. Please do not reply!</h3> <tr> <br/> Hello, colleagues, the following is ${PROJECT_NAME }Project construction information</br> <td><font color="#CC0000">Construction results - ${BUILD_STATUS}</font></td> </tr> <tr> <td><br /> <b><font color="#0B610B">Build information</font></b> <hr size="2" width="100%" align="center" /></td> </tr> <tr> <td> <ul> <li>Project Name: ${PROJECT_NAME}</li> <li>Build No.: page ${BUILD_NUMBER}Secondary construction</li> <li>Trigger reason: ${CAUSE}</li> <li>Build status: ${BUILD_STATUS}</li> <li>Build log: <a href="${BUILD_URL}console">${BUILD_URL}console</a></li> <li>structure Url : <a href="${BUILD_URL}">${BUILD_URL}</a></li> <li>Working directory: <a href="${PROJECT_URL}ws">${PROJECT_URL}ws</a></li> <li>project Url : <a href="${PROJECT_URL}">${PROJECT_URL}</a></li> </ul> <h4><font color="#0B610B">Recently submitted</font></h4> <ul> <hr size="2" width="100%" /> ${CHANGES_SINCE_LAST_SUCCESS, reverse=true, format="%c", changesFormat="<li>%d [%a] %m</li>"} </ul> Detailed submission: <a href="${PROJECT_URL}changes">${PROJECT_URL}changes</a><br/> </td> </tr> </table> </body> </html>''', subject: '${ENV, var="JOB_NAME"}-The first ${BUILD_NUMBER}Secondary build log', to: 'xxxxx@163.com' } } } //Post process post { failure { echo "This stage is over.... $currentBuild.result" } success { echo "This stage has become.... $currentBuild.result" } } }
Dockerfile:
#You have to have this, too
FROM openjdk:8-jre-alpine
LABEL maintainer="xxxxxxx@qq.com"
#Copy the jar package
COPY target/*.jar /app.jar
RUN  apk add -U tzdata; \
ln -sf /usr/share/zoneinfo/Asia/Shanghai /etc/localtime; \
echo 'Asia/Shanghai' >/etc/timezone; \
touch /app.jar;

ENV JAVA_OPTS=""
ENV PARAMS=""

EXPOSE 8080

ENTRYPOINT [ "sh", "-c", "java -Djava.security.egd=file:/dev/./urandom $JAVA_OPTS -jar /app.jar $PARAMS" ]
Jenkins file and Dockerfile are located in the Java Devops jemo directory, and Jenkins pulls them from git warehouse.
4. Remote build trigger
Expected effect: the remote github code is submitted, and the jenkins pipeline automatically triggers the construction.
Realization conditions:
- Ensure that the host of jenkins can be accessed remotely.
- Remote triggering in jenkins requires permission. We should use the user for authorization.
- Configure gitee and trigger webhook.
Implementation process:
1) Enter the pipeline configuration page and fill in the authentication token
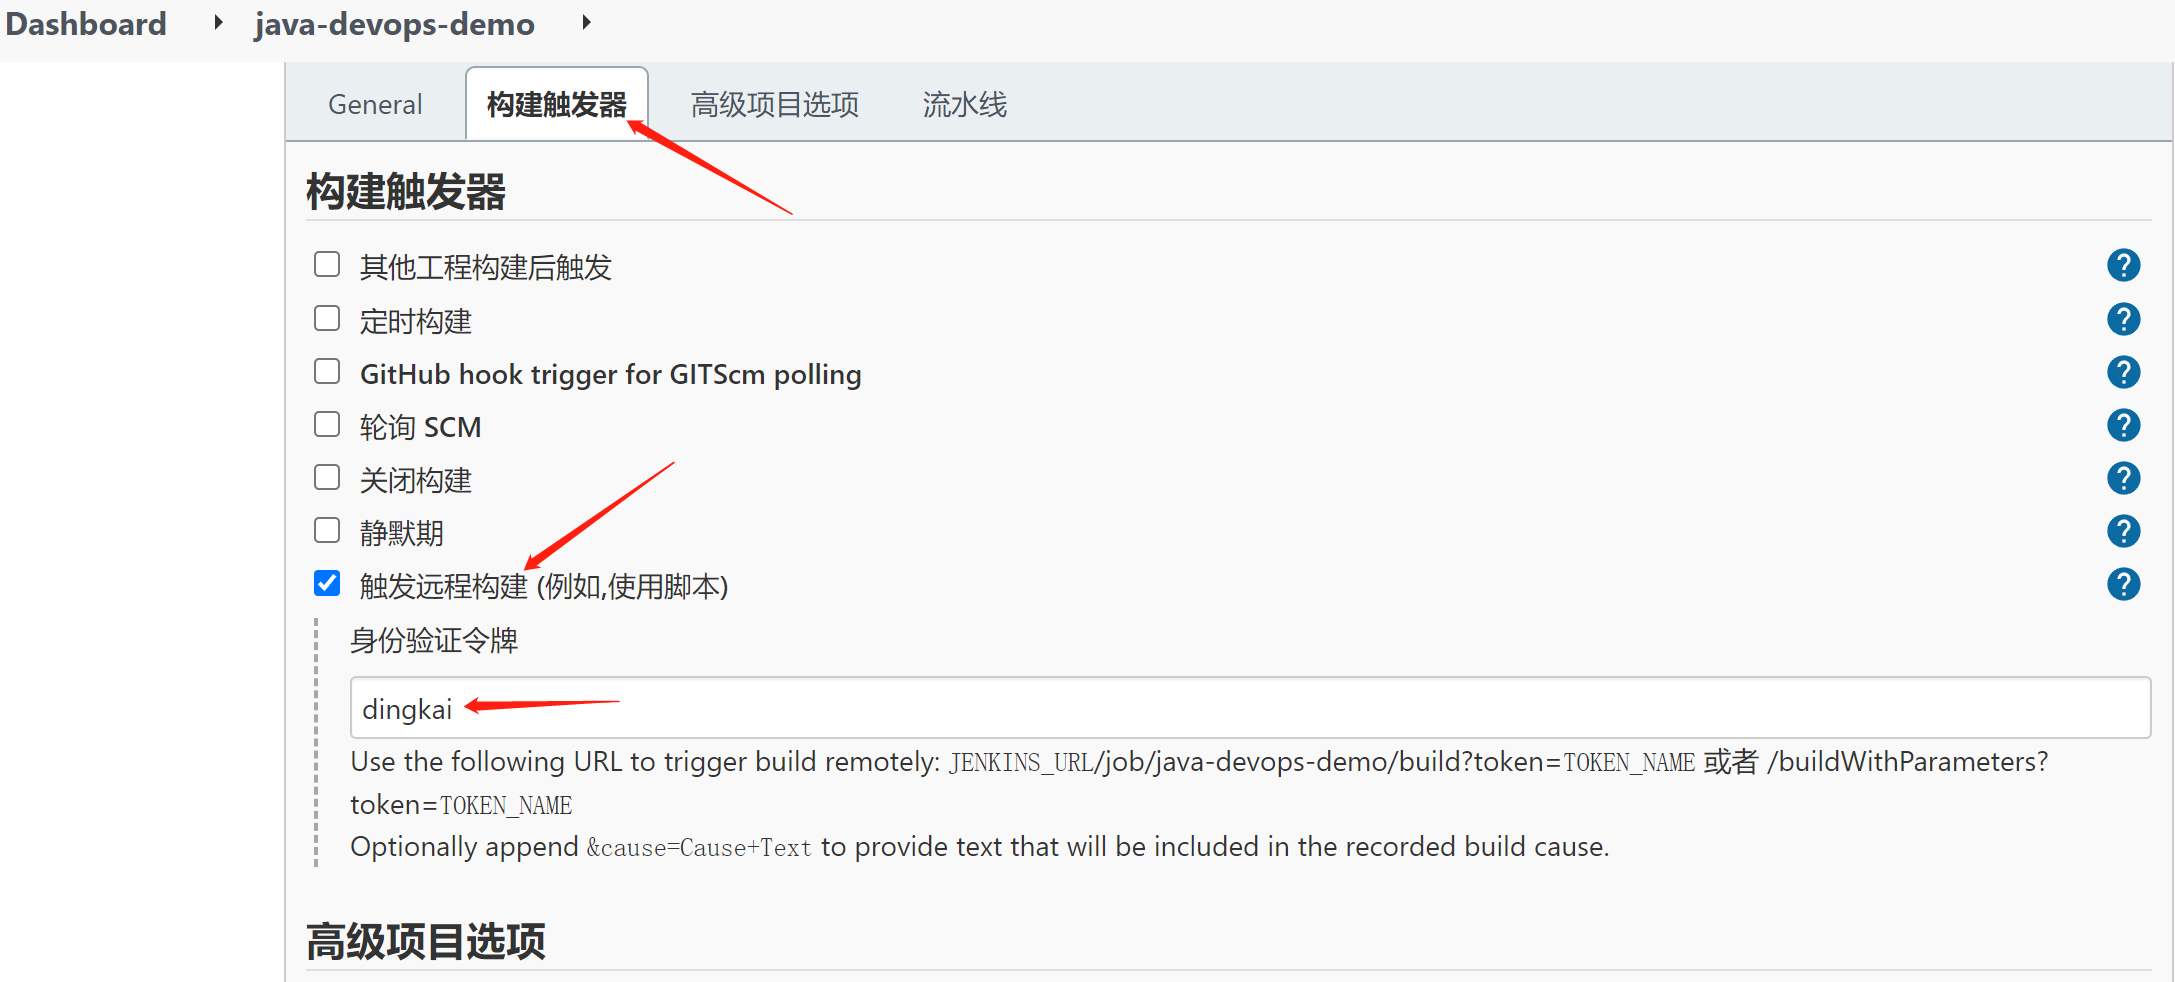
2) for remote construction, even if the webhook of gitee/github is configured, it will 403 by default. We should use users for authorization
A. create a user (main interface > Manage Jenkins > manage user > new user)

b. after creating a new user, you must log in again and activate it. Enter the user list > click the current user name > settings
c. generate an apitoken (copy immediately after generation, only once)
3) Configure WebHooks on the code cloud. Enter the code warehouse corresponding to the code cloud - configure - WebHooks - add WebHooks

URL configuration format: http://dk: Public IP address of apitoken @ host of user DK: 8080 / job / Java Devops demo / build? token= authentication token
After adding successfully, you can test the connectivity with the Jenkins host.
So far, when the code is modified locally and git push is submitted to gitee/github, Jenkins can build it automatically. After the construction is successful, you can view the changes of the front-end page.
5. Configure maven environment
(the maven environment is introduced in the way of user-defined agent, and the complex environment under different scenarios is constructed in multiple stages)
1) Install docker pipeline plug-in
2) Custom agent (inside stages)
3) Configure maven acceleration (configure domestic Alibaba cloud)
Put Maven's configuration file somewhere in Jenkins data. By default, all variable configuration items are recommended to be placed in Jenkins home to enhance portability.
4) Cache the necessary jar packages, and there is no need to download them for the next build
agent {
    docker {
        image 'maven:3-alpine' //You'll kill it if you use it
        args '-v /var/jenkins_home/appconfig/maven/.m2:/root/.m2'
        // take jar The package is mapped to the host/var/jenkins_home/appconfig/maven/.m2 In the directory
        // You can also jar The package is mounted to the host as a data volume
    }
}
- Problems caused by temporary containers (each stage will return to the default workspace, and the packaged data generated by temporary containers cannot be used)
- Check out the code for the first time. It is in / var / Jenkins by default_ home/workspace/[java-devops-demo]
- When docker temporary agent is used, each temporary container is allocated a temporary directory / var / Jenkins when running_ home/workspace/java-devops-demo@2 ; The default is the content of workspace / Java Devops demo
- The mvn package command running in the temporary container will be displayed in / var/jenkins_home/workspace/java-devops-demo@2 Carry out work
- package to / var/jenkins_home/workspace/java-devops-demo@2 Location
- Go to the next stage to package the image and return to / var/jenkins_home/workspace / [Java Devops demo] (the default workspace)
- There is no mvn clean package running in this location, so there is no target. The default working directory does not have a target
Solution: switch to the default working directory of Jenkins inside the temporary container, and then package maven.
6. Mail push
Use the mail extension: Email Extension Plugin-2.71 (the success of the task executed by each stage can be perceived through post execution)
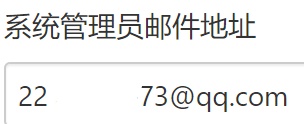
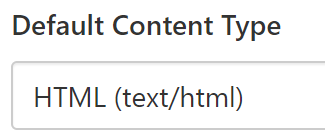
System Management > system configuration > configure administrator mailbox (administrator email address), SMTP service related and others
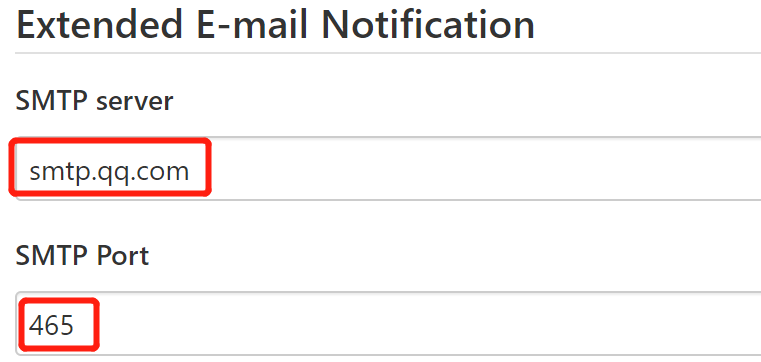
In the figure below, the Use SMTP Authentication part is no longer supported in the plug-in of higher version

After filling in, you can test by sending a test email.
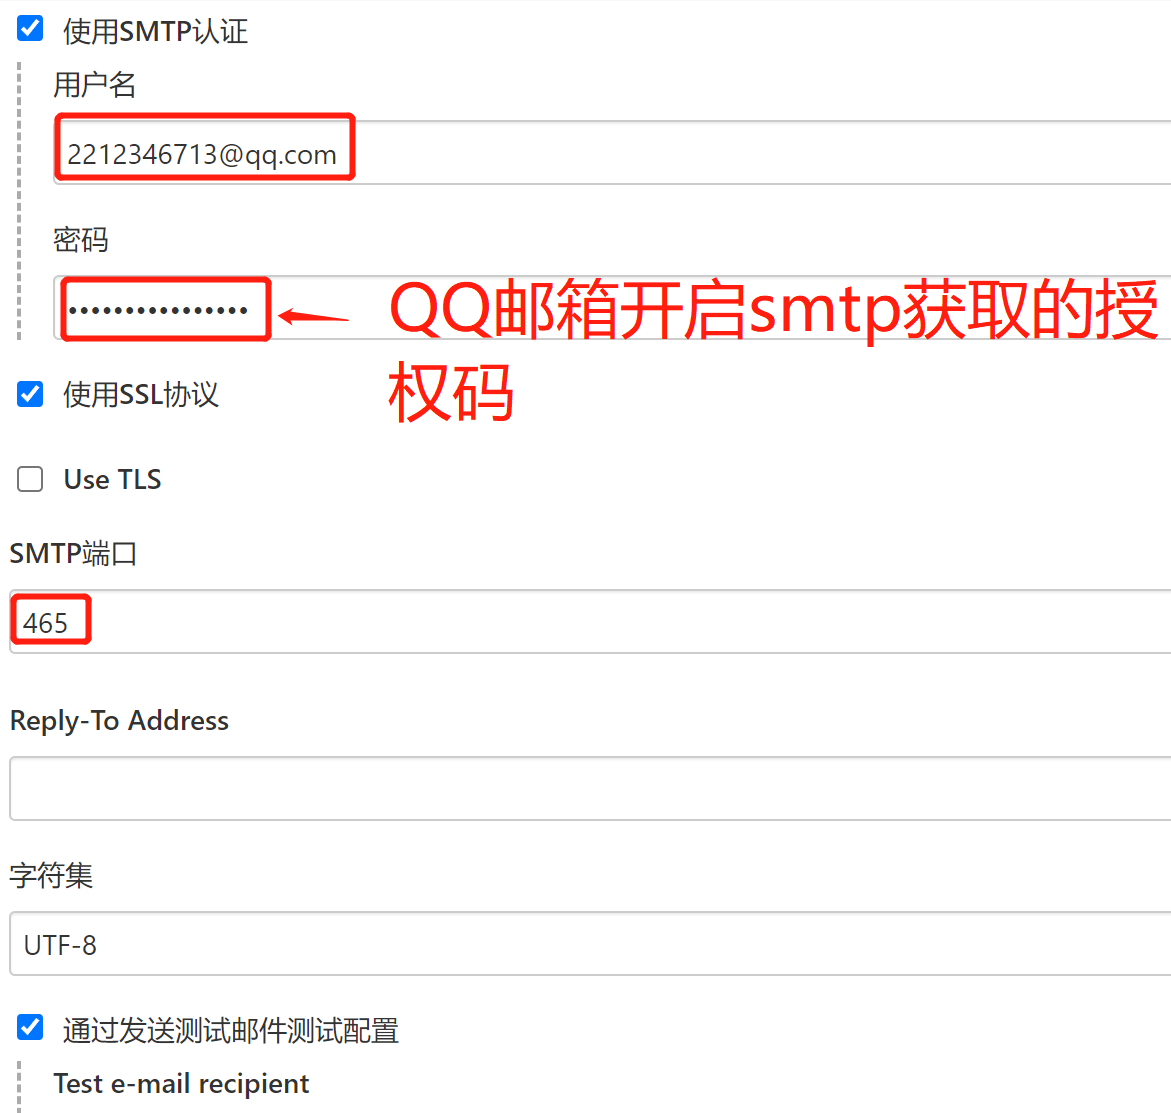
The authorization code of the mail user in the figure above needs to configure the authentication permission information for mail sending
- Log in to your mailbox and start POP3/SMTP mail service
- Get your own authorization code (tlqhksolsmeodjad)
- Configure and test mail sending
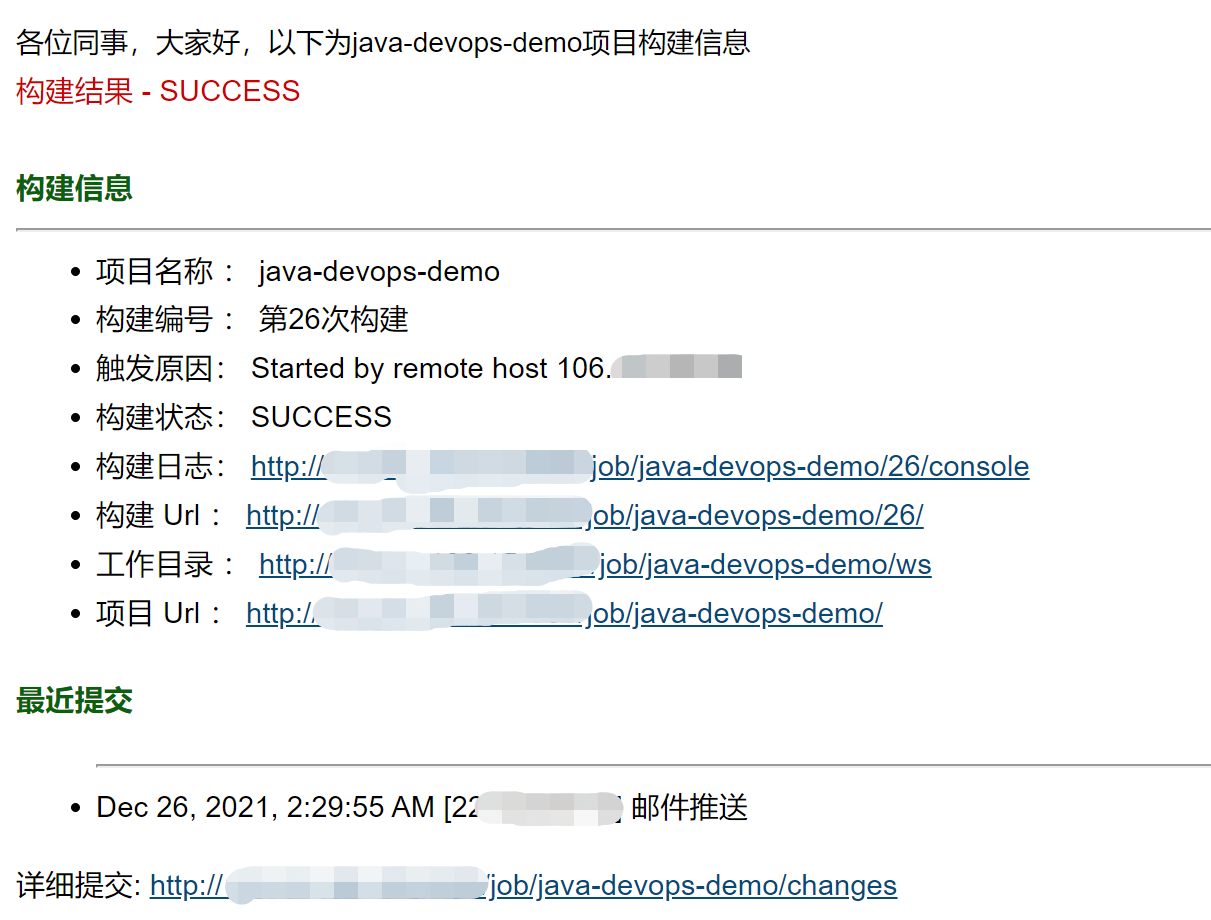
See the report push phase in Jenkinsfile for the contents of the email template.
So far, after the code is developed and submitted, the build process will be automatically triggered. After the build is completed, the build email report will be sent as follows: