Catalog
DHCP Service Deployment
I. Introduction
Dynamic Host Configuration Protocol (DHCP) is a network protocol for LAN, which is located in the application layer of OSI model and works with UDP protocol.
II. Usage and Function
Automatically assign IP addresses to users for intranet or network service providers
- Used by intranet administrators as a means of central management of all computers
Assignable IP address, subnet mask, network address, broadcast address, default gateway, DNS, boot file, TFTP (pxe kickstart unattended on time)
3. Principle + Topology
1. Principle
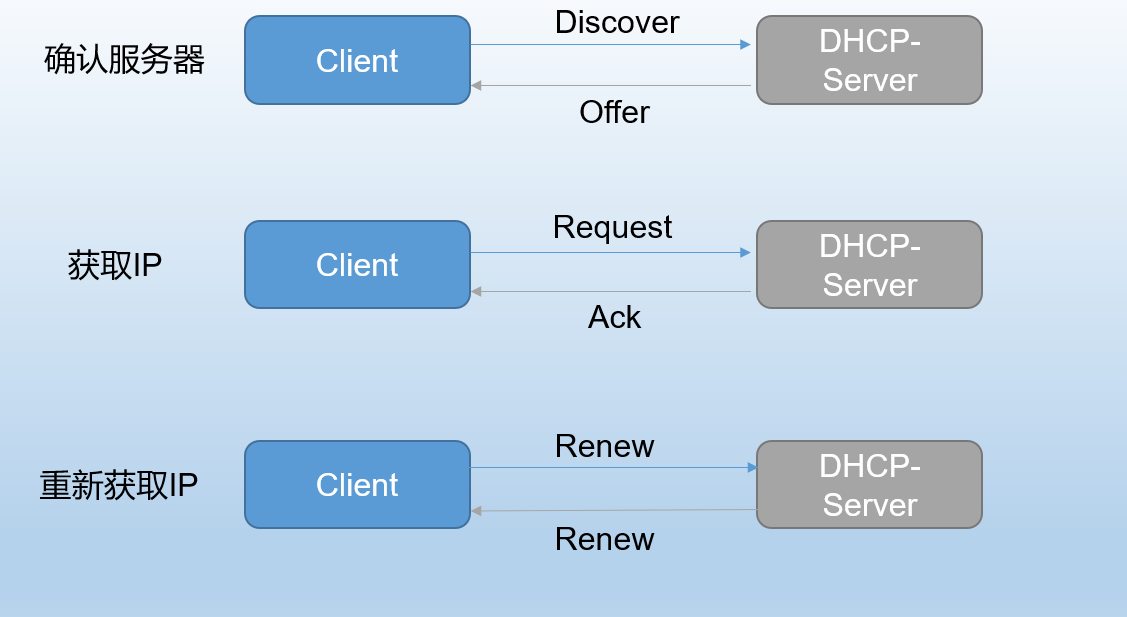
When a DHCP client first logs in, because there is no IP, it broadcasts Discover on port 67 of UDP (source 0.0.0.0 target 255.255.255). Within a second, no reply will be sent back Discovery Packet with a delay of 1,3,5,7,9+1-2000 Ms. After receiving the request, the DHCP server initiates offer Packet on port 68 of UDP (source). DHCP server IP target 0.0.0.0, including IP, subnet mask, lease and other information in the package Discover contains the MAC address of Client.
DHCP server tests whether the IP ready for distribution is occupied by ICMP protocol. Client sends Request package (source 0.0.0.0 target 255.255.255 package contains client's MAC address, accepts leased IP address, provides leased DHCP server address), DHCP initiates ACK backpack (original address DHCP server address target address 0.255.255 package). Packet 0.0.0 contains the legal lease of this IP address and other configuration information.
Rent Problem: When 50% is used, renewal requests will be made to the server. If the server does not respond, renewal requests will be made again when 75% is used. If not, the Discover package will be broadcast again after 100%.
After the Client gets the IP successfully, if the network card is broken and the IP is occupied again, the Discover package will be re-initiated, otherwise the original IP address will continue to be used.
2. Schema
IV. Practical Construction
Relevant documents
Service name: dhcpd dhcrelay
Main Profile/etc/dhcp/dhcpd.conf
Template file/usr/share/doc/dhcp-*/dhcpd.conf.simple
Relay Profile/etc/sysconfig/dhcrelay
Port udp 67 68
Configuring the underlying DHCP server
1. Experimental environment
| machine | master | slave1 | slave2 |
|---|---|---|---|
| Effect | DHCP Server | Client | Client |
| IP address | 192.168.32.80 | 192.168.32.81 | 192.168.32.82 |
2. Steps
(1) master machine configures yum source and installs dhcp package
[root@master ~]# yum install -y dhcp
(2) Copy the template file and overwrite the original configuration file
[root@master ~]# cp -a /usr/share/doc/dhcp-4.1.1/dhcpd.conf.sample /etc/dhcp/dhcpd.conf
(3) Modify the configuration file and restart the dhcp service
[root@master ~]# vim /etc/dhcp/dhcpd.conf
    subnet 192.168.32.0 netmask 255.255.255.0 {     # Subnet specifies a segment netmask specifies a subnet mask
    range 192.168.32.20 192.168.32.30;                      # range specifies 20-30 segments of the automatically allocated ip subnet
    option domain-name-servers 114.114.114.114,8.8.8.8;  # Specify dns server
    option routers 192.168.32.1;                                 # Gateway
    default-lease-time 600;                                         # default-lease-time
    max-lease-time 7200;                                            # Maximum lease time
}
[root@master ~]# service dhcpd restart
Close dhcpd:[OK]
Starting dhcpd: [OK]
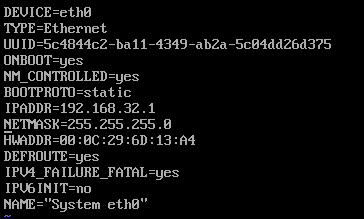
(4) Modify the configuration files of slave1 and slave2 network cards
[root@slave1 ~]# vim /etc/sysconfig/network-scripts/ifcfg-eth0
    DEVICE=eth0
    TYPE=Ethernet
    UUID=021f0b15-fc52-4e9f-912f-4bf79963fab5
    ONBOOT=yes
    NM_CONTROLLED=yes
    BOOTPROTO=dhcp
    HWADDR=00:0C:29:B1:18:8D
    DEFROUTE=yes
    IPV4_FAILURE_FATAL=yes
    IPV6INIT=no
    NAME="System eth0"
Similarly, slave 2 changed BOOTPROTO to dhcp
The results of slave1 are as follows: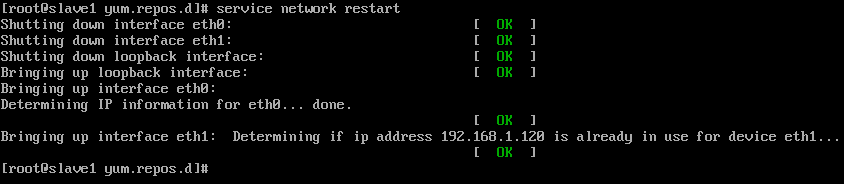
The results of slave2 are as follows: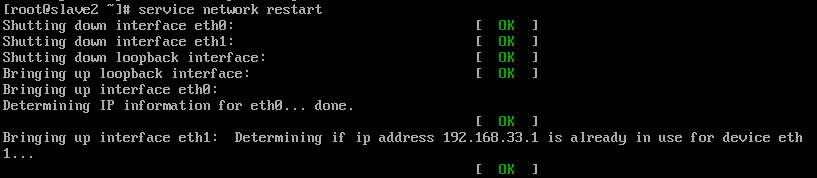
Configure DHCP Retention Address
(1). Modify master's dhcp configuration file
[root@master ~]# vim /etc/dhcp/dhcpd.conf
    host fantasia {
      hardware ethernet 00:0C:29:6D:13:A4;
      fixed-address 192.168.32.22;
    }
    host newhost {
      hardware ethernet 00:0C:29:B1:18:8D;
      fixed-address 192.168.32.23;
    }
(2) Client restart network to view mac and ip correspondence
slave1: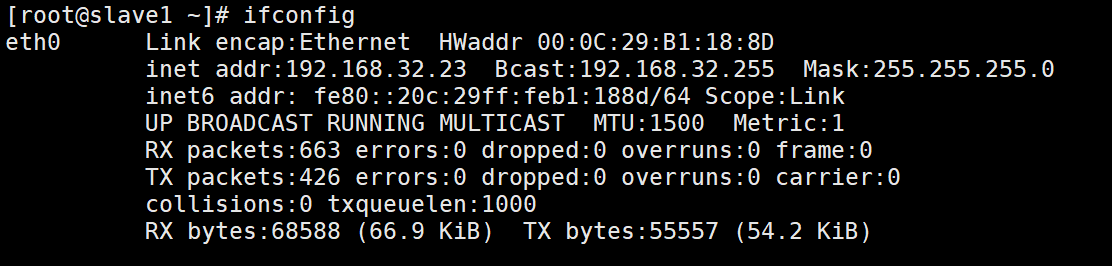
slave2: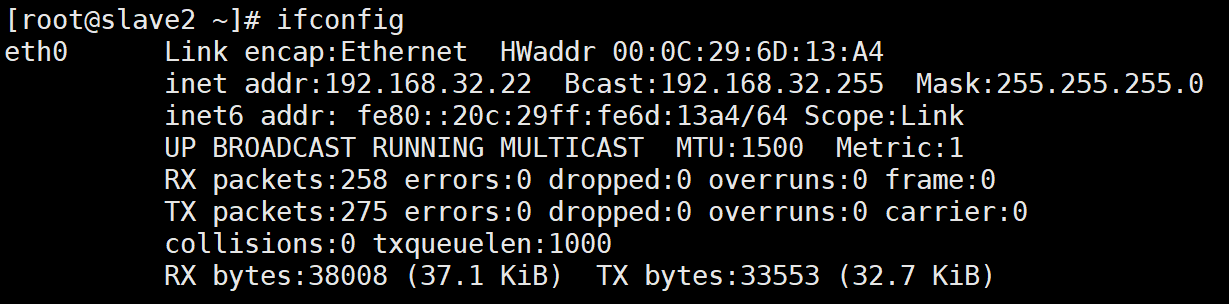
Configuring DHCP superscopes
1. Defining superscopes
To solve the problem of insufficient IP addresses in a single scope of DHCP, for example, 300 machines in a company need to configure DHCP to automatically acquire ip, while only 251 addresses are available for a class C IP (leaving out gateways, headers and tails, DHCP server IP). At this time, it is necessary to configure DHCP super scope to allocate insufficient IP.
2. Configuring Super Scope
[root@master ~]# vim /etc/dhcp/dhcpd.conf
    # dhcpd.conf
    #
    # Sample configuration file for ISC dhcpd
    #

    # option definitions common to all supported networks...
    option domain-name "example.org";
    option domain-name-servers ns1.example.org, ns2.example.org;

    default-lease-time 600;
    max-lease-time 7200;

    # Use this to enble / disable dynamic dns updates globally.
    #ddns-update-style none;

    # If this DHCP server is the official DHCP server for the local
    # network, the authoritative directive should be uncommented.
    #authoritative;

    # Use this to send dhcp log messages to a different log file (you also
    # have to hack syslog.conf to complete the redirection).
    log-facility local7;

    # No service will be given on this subnet, but declaring it helps the
    # DHCP server to understand the network topology.


    # Hosts which require special configuration options can be listed in
    # host statements.   If no address is specified, the address will be
    # allocated dynamically (if possible), but the host-specific information
    # will still come from the host declaration.

    host passacaglia {
      hardware ethernet 0:0:c0:5d:bd:95;
      filename "vmunix.passacaglia";
      server-name "toccata.fugue.com";
    }

    # Fixed IP addresses can also be specified for hosts.   These addresses
    # should not also be listed as being available for dynamic assignment.
    # Hosts for which fixed IP addresses have been specified can boot using
    # BOOTP or DHCP.   Hosts for which no fixed address is specified can only
    # be booted with DHCP, unless there is an address range on the subnet
    # to which a BOOTP client is connected which has the dynamic-bootp flag
    # set.

    # You can declare a class of clients and then do address allocation
    # based on that.   The example below shows a case where all clients
    # in a certain class get addresses on the 10.17.224/24 subnet, and all
    # other clients get addresses on the 10.0.29/24 subnet.

    class "foo" {
      match if substring (option vendor-class-identifier, 0, 4) = "SUNW";
    }
    --------------------------------------------------------------------------
    shared-network 224-29 {
    subnet 192.168.32.0 netmask 255.255.255.0 {
      range 192.168.32.20 192.168.32.20;
      option domain-name-servers 114.114.114.114,8.8.8.8;
      option routers 192.168.32.1;
      default-lease-time 600;
      max-lease-time 7200;
    }
    subnet 192.168.33.0 netmask 255.255.255.0 {
      range 192.168.33.20 192.168.33.20;
      option domain-name-servers 114.114.114.114,8.8.8.8;
      option routers 192.168.33.1;
      default-lease-time 600;
      max-lease-time 7200;
    }
    }
    ---------------------------------------------------------------------------
Slve1 echoes as follows: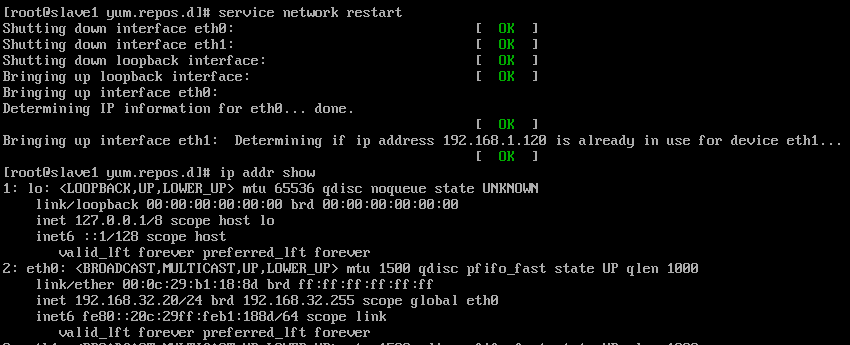
Slve2 echoes as follows:
Note!!! At this time, slave1 and slave2 machines are not ping, because the network segment is different, so it will use one-arm routing to make its communication - - - dhcp relay.
Configuring DHCP Relay
1. Experimental environment
Unfilled delegates in the form are automatically retrieved, and "-" delegates do not need to be configured.
| machine | master | slave1 | slave2 | slave3 |
|---|---|---|---|---|
| Network Card Configuration | vm1 | vm1 | vm1 vm2 | vm2 |
| Effect | DHCP Server | DHCP client | DHCP relay | DHCP Relay and Forwarding Client |
| IP address | 192.168.32.80 | vm1 192.168.32.1 vm2 192.168.33.1 | ||
| gateway | 192.168.32.1 | -- |
2. Experimental steps
(1). To configure master Machine Network Card
[root@master ~]# vim /etc/sysconfig/network-scripts/ifcfg-eth0
    DEVICE=eth0
    HWADDR=00:0C:29:63:EA:94
    TYPE=Ethernet
    UUID=70f2ac2f-2ed4-4f12-887c-f545bf45df8f
    ONBOOT=yes
    NM_CONTROLLED=yes
    BOOTPROTO=static
    IPADDR=192.168.32.80
    NETMASK=255.255.255.0
    GATEWAY=192.168.32.1
(2) Restart the network card
[root@master ~]# service network restart
Closing interface eth0: [OK]
Close the loopback interface: [OK]
Pop-up loop interface: [OK]
Pop-up interface eth0: Determining if ip address 192.168.32.80 is already in use for device eth0...
[Definition]
[root@master ~]# route -n
Kernel IP routing table
Destination Gateway Genmask Flags Metric Ref Use Iface
192.168.32.0 0.0.0.0 255.255.255.0 U 0 0 0 eth0
169.254.0.0 0.0.0.0 255.255.0.0 U 1002 0 0 eth0
0.0.0.0 192.168.32.1 0.0.0.0 UG 0 0 0 eth0
(3) Modifying configuration files
    # dhcpd.conf
    #
    # Sample configuration file for ISC dhcpd
    #

    # option definitions common to all supported networks...
    option domain-name "example.org";
    option domain-name-servers ns1.example.org, ns2.example.org;

    default-lease-time 600;
    max-lease-time 7200;


    # Use this to send dhcp log messages to a different log file (you also
    # have to hack syslog.conf to complete the redirection).
    log-facility local7;

      subnet 192.168.32.0 netmask 255.255.255.0 {
      range 192.168.32.20 192.168.32.200;
      option domain-name-servers 114.114.114.114,8.8.8.8;
      option routers 192.168.32.1;
      default-lease-time 600;
      max-lease-time 7200;
    }
    subnet 192.168.33.0 netmask 255.255.255.0 {
      range 192.168.33.30 192.168.33.200;
      option domain-name-servers 114.114.114.114,8.8.8.8;
      option routers 192.168.33.1;
      default-lease-time 600;
      max-lease-time 7200;
    }

    host passacaglia {
      hardware ethernet 0:0:c0:5d:bd:95;
      filename "vmunix.passacaglia";
      server-name "toccata.fugue.com";
    }
(4) Modify the configuration file eth0 of the relay network card in slave2:
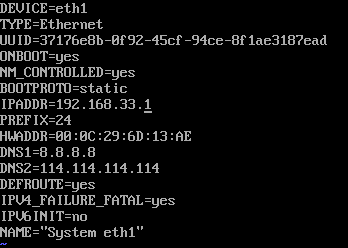
(5) Modify the eth1 network card configuration file of slave2
(6). Slve2 turns on routing forwarding
vim /etc/sysctl.conf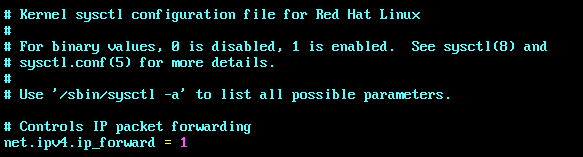
Sysctl-p takes effect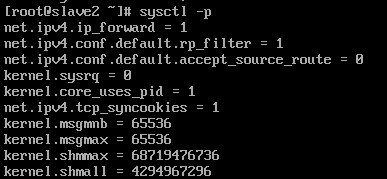
(7). Install dhcrelay
[root@slave2 ~]# yum install -y dhcp
(8). Modify the relay configuration file
[root@slave2 ~]# vim /etc/sysconfig/dhcrelay
    # Command line options here
    DHCRELAYARGS=""
    # DHCPv4 only
    INTERFACES="eth0 eth1"
    # DHCPv4 only
    DHCPSERVERS="192.168.32.80"
(9). Restart the relay service
[root@slave2 ~]# /etc/init.d/dhcrelay restart
Starting dhcrelay: [OK]
(10). Slve1 and Slve3 restart the network card (don't forget to change the network card configuration file to dhcp)
[root@slave1 ~]# service network restart
Closing interface eth0: [OK]
Closing interface eth1: [OK]
Close the loopback interface: [OK]
Pop-up loop interface: [OK]
Pop-up interface eth0:
IP information is being determined for eth0... Completed.
[root@slave1 ~]# ifconfig
eth0 Link encap:Ethernet HWaddr 00:0C:29:B1:18:8D
inet addr:192.168.32.20 Bcast:192.168.32.255 Mask:255.255.255.0
inet6 addr: fe80::20c:29ff:feb1:188d/64 Scope:Link
UP BROADCAST RUNNING MULTICAST MTU:1500 Metric:1
RX packets:1755 errors:0 dropped:0 overruns:0 frame:0
TX packets:818 errors:0 dropped:0 overruns:0 carrier:0
collisions:0 txqueuelen:1000
RX bytes:189969 (185.5 KiB) TX bytes:104084 (101.6 KiB)
[root@slave3 ~]# systemctl restart network
[root@slave3 ~]# ifconfig
ens33: flags=4163<UP,BROADCAST,RUNNING,MULTICAST> mtu 1500
inet 192.168.33.30 netmask 255.255.255.0 broadcast 192.168.33.255
inet6 fe80::8fd:c838:d2f4:15ce prefixlen 64 scopeid 0x20
ether 00:0c:29:82:a8:c9 txqueuelen 1000 (Ethernet)
RX packets 239 bytes 25362 (24.7 KiB)
RX errors 0 dropped 0 overruns 0 frame 0
TX packets 227 bytes 27096 (26.4 KiB)
TX errors 0 dropped 0 overruns 0 carrier 0 collisions 0
(11). ping to see if communication is possible
[root@slave1 ~]# ping 192.168.33.30 -c 1
PING 192.168.33.30 (192.168.33.30) 56(84) bytes of data.
64 bytes from 192.168.33.30: icmp_seq=1 ttl=128 time=0.645 ms
--- 192.168.33.30 ping statistics ---
1 packets transmitted, 1 received, 0% packet loss, time 0ms
rtt min/avg/max/mdev = 0.645/0.645/0.645/0.000 ms
[root@slave3 yum.repos.d]# ping 192.168.32.20 -c 1
PING 192.168.32.20 (192.168.32.20) 56(84) bytes of data.
64 bytes from 192.168.32.20: icmp_seq=1 ttl=63 time=0.645 ms
--- 192.168.32.20 ping statistics ---
1 packets transmitted, 1 received, 0% packet loss, time 0ms
rtt min/avg/max/mdev = 0.645/0.645/0.645/0.000 ms
V. Summary
Possible Problems in the Configuration of Relay dhcp
    Description:
        dhcp relay allocated host can only ping to one-way host
    Solution:
        Route-n looks at the routing table and finds that with dual network cards, the gateway of nat mode occupies the gateway allocated by dhcp, resulting in all data packets going out through the gateway of nat mode. Finally, the network card gateway in nat mode is deleted, and the network card can be restarted to normal.