LNMP architecture
LNMP platform is the combined architecture of Linux, Nginx, MySQL and PHP. It requires Linux server, MySQL server and PHP parsing environment
Component component
Linux is a kind of Unix computer operating system, which is the most popular free operating system.
Nginx is a high-performance HTTP and reverse proxy server.
Mysql is a small relational database management system.
PHP is a script language that embeds HTML documents on the server side.
LAMP advantage
Nginx has stable performance, rich functions, simple operation and maintenance, fast static file processing speed, little system resources consumption, small and efficient.
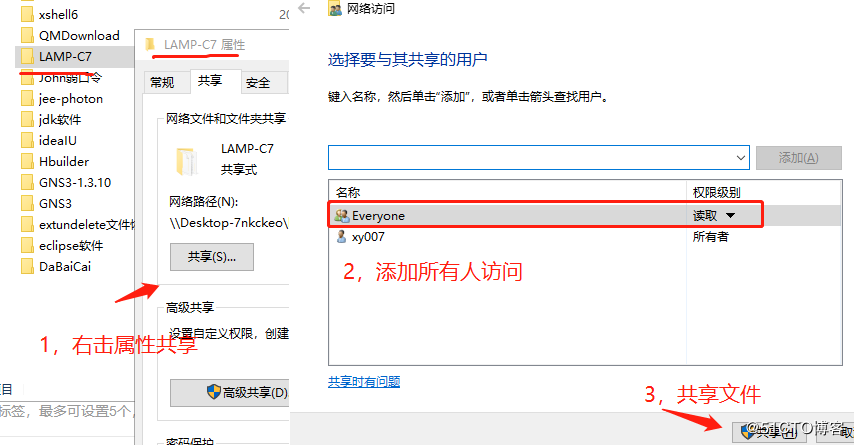
First, share the required compression package of LAMP on Windows (please refer to the previous blog articles for any questions here)

Second, use remote share to get files and mount them to mnt directory on Linux
[root@localhost ~]# smbclient -L //192.168.100.3 / ාාremote shared access
Enter SAMBA\root's password:
Sharename Type Comment
--------- ---- -------
LNMP-C7 Disk
[root@localhost ~]# mount.cifs //192.168.100.3/LNMP-C7 /mnt ××××××××× mount to / mnt directory
III. compile and install Nginx
1. Unzip the source package to / opt and check
[root@localhost ~]# cd /mnt    ##Switch to mount point directory
[root@localhost mnt]# ls
Discuz_X3.4_SC_UTF8.zip    nginx-1.12.2.tar.gz
mysql-boost-5.7.20.tar.gz  php-7.1.20.tar.gz
[root@localhost mnt]# tar zxvf nginx-1.12.2.tar.gz -C /opt   ##Extract the Nginx source package to / opt
[root@localhost mnt]# cd /opt/    ##Switch to the unzipped directory
[root@localhost opt]# ls
nginx-1.12.2  rh
2. Install the environment component package required for compilation
[root@localhost opt]# yum -y install \
gcc \                                       //c language
gcc-c++ \                        //c++ language
pcre-devel \                     //pcre language tools
zlib-devel                       //Function library for data compression
3. Create program user nginx and compile nginx
[root@localhost opt]# useradd -M -s /sbin/nologin nginx  ##Create program user, safe and non login status
[root@localhost opt]# id nginx
uid=1001(nginx) gid=1001(nginx) group=1001(nginx)
[root@localhost opt]# cd nginx-1.12.0/                 ##Switch to nginx directory
[root@localhost nginx-1.12.0]# ./configure \         ##Configure nginx
> --prefix=/usr/local/nginx \        ##Installation path
> --user=nginx \                         ##User name
> --group=nginx \                       ##User group
> --with-http_stub_status_module     ##Status statistics module
4. Compile and install
[root@localhost nginx-1.12.0]# make     ##Compile
...
[root@localhost nginx-1.12.0]# make install   ##install
...
5. Optimize nginx startup script for system identification
[root@localhost nginx]# ln -s /usr/local/nginx/sbin/nginx /usr/local/sbin/
##Create a soft connection for the system to recognize the nginx startup script
[root@localhost nginx]# nginx -t       ##Check configuration file for syntax problems
nginx: the configuration file /usr/local/nginx/conf/nginx.conf syntax is ok
nginx: configuration file /usr/local/nginx/conf/nginx.conf test is successful
[root@localhost nginx]# nginx      ##Open ngnix
[root@localhost nginx]# netstat -ntap | grep 80     ##Check the port. nginx is on
tcp   0   0 0.0.0.0:80      0.0.0.0:*   LISTEN   39620/nginx: master
[root@localhost nginx]# systemctl stop firewalld.service    ##Turn off firewall
[root@localhost nginx]# setenforce 0
[root@localhost nginx]# nginx                         ##open
6. Make management script for service management
[root@localhost nginx]# cd /etc/init.d/   ##Switch to startup profile directory
[root@localhost init.d]# ls
functions  netconsole  network  README
[root@localhost init.d]# vim nginx         ##Edit startup script file

#!/bin/bash
# chkconfig: - 99 20                                    ##Annotation information
# description: Nginx Service Control Script
PROG="/usr/local/nginx/sbin/nginx"           ##Set variable to nginx command file
PIDF="/usr/local/nginx/logs/nginx.pid"       ##Set the variable PID file process number to 5346
case "$1" in
    start)
        $PROG                                              ##Opening service
        ;;
    stop)
        kill -s QUIT $(cat $PIDF)                    ##Shut down service
        ;;
    restart)                                                  ##Restart service
        $0 stop
        $0 start
        ;;
    reload)                                                  ##Heavy load service
        kill -s HUP $(cat $PIDF)
        ;;
    *)                                                           ##Error input prompt
                echo "Usage: $0 {start|stop|restart|reload}"
                exit 1
esac
exit 0
[root@localhost init.d]# chmod +x /etc/init.d/nginx    ##Give startup script execution permission
[root@localhost init.d]# chkconfig --add nginx          ##Add to service manager
[root@localhost init.d]# service nginx stop                ##You can use service to control nginx
[root@localhost init.d]# service nginx start
7. It is also convenient for system CTL management and configuration file (just write one for convenience)
[root@localhost ~]# vim /lib/systemd/system/nginx.service      ##create profile

[Unit]
Description=nginx                                            ##describe
After=network.target                                        ##Describe service type
[Service]
Type=forking                                                    ##Background operation form
PIDFile=/usr/local/nginx/logs/nginx.pid            ##PID file location
ExecStart=/usr/local/nginx/sbin/nginx              ##Startup service
ExecReload=/usr/bin/kill -s HUP $MAINPID    ##Overload configuration according to PID
ExecStop=/usr/bin/kill -s QUIT $MAINPID       ##Terminate process according to PID
PrivateTmp=true
[Install]
WantedBy=multi-user.target

[root@localhost ~]# chmod 754 /lib/systemd/system/nginx.service     ##Set execution permission
[root@localhost ~]# systemctl stop nginx.service       ##Close
[root@localhost ~]# systemctl start nginx.service       ##open
IV. compile and install MySQL
1. Install environment components
[root@localhost ~]# yum install -y \     ##Install environment components
> ncurses \
> ncurese-devel \    ##Control terminal screen display library
> bison \                 ##Parsing tools
> cmake                 ##cmake tools
[root@localhost ~]# useradd -s /sbin/nologin mysql     ##Create program user
2. Decompress the source package to / opt
[root@localhost ~]# cd /mnt
[root@localhost mnt]# tar zxvf mysql-boost-5.7.20.tar.gz -C /opt   ##Extract the source package to / opt
[root@localhost mnt]# cd /opt
[root@localhost opt]# ls
mysql-5.7.20  nginx-1.12.2  rh
3. cmake configuration
[root@localhost opt]# cd mysql-5.7.20/       ##Switch to MySQL directory
[root@localhost mysql-5.7.20]# cmake \     ##cmake configuration
-DCMAKE_INSTALL_PREFIX=/usr/localmysql \            ##Installation path
-DMYSQL_UNIX_ADDR=/usr/local/mysql/mysql.sock \ ##Define a sock file to connect to a database file
-DSYSCONFDIR=/etc \                                                   ##Profile directory
-DSYSTEMD_PID_DIR=/usr/local/mysql \                      ##PID file directory
-DDEFAULT_CHARSET=utf8 \                                       ##Specify character set
-DDEFAULT_COLLATION=utf8_general_ci \                 ##Specify character set defaults
-DWITH_INNOBASE_STORAGE_ENGINE=1 \            ##Storage engine
-DWITH_ARCHIVE_STORAGE_ENGINE=1 \
-DWITH_BLACKHOLE_STORAGE_ENGINE=1 \
-DWITH_PERFSCHEMA_STORAGE_ENGINE=1 \
-DMYSQL_DATADIR=/usr/local/mysql/data \                 ##Database data file directory
-DWITH_BOOST=boost \                                               ##Underlying runtime
-DWITH_SYSTEMD=1                                                   ##Master slave parameter

>
4. Compilation and installation
[root@localhost mysql-5.7.20]# make          ##Compile
[root@localhost mysql-5.7.20]# make install    ##install
5. Configure mysql and adjust the configuration file
[root@localhost mysql-5.7.20]# chown -R mysql:mysql /usr/local/mysql/   ##Database directory for permission adjustment
[root@localhost mysql-5.7.20]# vim /etc/my.cnf     ##Adjust profile

[client]                            ##Client
port = 3306
default-character-set=utf8
socket = /usr/local/mysql/mysql.sock

[mysql]                           ##Client
port = 3306
default-character-set=utf8
socket = /usr/local/mysql/mysql.sock

[mysqld]                         ##The server
user = mysql                  ##user
basedir = /usr/local/mysql      ##Set the installation directory of mysql
datadir = /usr/local/mysql/data    ##Set the storage directory of mysql database data
port = 3306                    ##Set 3306 port
character_set_server=utf8            ##Chinese character set
pid-file = /usr/local/mysql/mysqld.pid     ##pid file path
socket = /usr/local/mysql/mysql.sock     ##sock file path
server-id = 1                                           ##Master slave parameter

sql_mode=NO_ENGINE_SUBSTITUTION,STRICT_TRANS_TABLES,NO_AUTO_CREATE_USER,NO_AUTO_VALUE_ON_ZERO,NO_ZERO_IN_DATE,NO_ZERO_DATE,ERROR_FOR_DIVISION_BY_ZERO,PIPES_AS_CONCAT,ANSI_QUOTES
##Support module
>

[root@localhost mysql-5.7.20]# echo 'PATH=/usr/local/mysql/bin:/usr/local/mysql/lib:$PATH' >> /etc/profile
##Write MySQL to the local environment configuration
[root@localhost mysql-5.7.20]# echo 'export PATH' >> /etc/profile    ##Set global environment configuration
[root@localhost mysql-5.7.20]# source /etc/profile    ##Restart profile
6. Initialize the database
[root@localhost mysql-5.7.20]# cd /usr/local/mysql/
[root@localhost mysql]# bin/mysqld \
> --initialize-insecure \        ##Initialization
> --user=mysql \                 ##user
> --basedir=/usr/local/mysql \      ##Installation directory
> --datadir=/usr/local/mysql/data   ##Database data file directory
7. Copy MySQL service configuration file to / usr/lib/systemd/system / for system CTL management
[root@localhost mysql]# cp usr/lib/systemd/system/mysqld.service /usr/lib/systemd/system/
##Convenient for system CTL management
[root@localhost mysql]# systemctl enable mysqld   ##Power on self start
[root@localhost mysql]# systemctl start mysqld.service     ##Open database
[root@localhost mysql]# netstat -ntap | grep 3306              ##View the opening status of MySQL port number
tcp6  0  0 :::3306    :::*       LISTEN   59464/mysqld
8. Set MySQL password
[root@localhost mysql]# mysqladmin -u root -p password
Enter password:               ##Blank space
New password:                ##New password
Confirm new password:   ##Confirm password
5. Compile and install PHP
1. Install environment dependency package
[root@localhost mysql]# yum install -y \
> libjpeg \                              ##jpeg image format and development package
> libjpeg-devel \
> libpng libpng-devel \           ##png picture and development package
> freetype freetype-devel \    ##Font library
> libxml2 \                              ##xml file library
> libxml2-devel \
> zlib zlib-devel \                    ##Compression library
> curl curl-devel \                   ##Support data file download tool
> openssl openssl-devel        ##Secure access connection
2. Decompress the source package to / opt
[root@localhost mysql]# cd /mnt     ##Switch to mount point
[root@localhost mnt]# tar jxvf php-7.1.10.tar.bz2 -C /opt     ##Extract the source package to / opt
[root@localhost mnt]# cd /opt
[root@localhost opt]# ls       ##See
mysql-5.7.20  nginx-1.12.2  php-7.1.10  rh
3. Configure PHP
[root@localhost opt]# cd php-7.1.10/
[root@localhost php-7.1.10]# ./configure
--prefix=/usr/local/php                        ##Installation path
--with-mysql-sock=/usr/local/mysql/mysql.sock   ##Connecting files to build communication bridge
--with-mysqli                                    ##Client support library
--with-zlib                                         ##compress
--with-curl                                        ##Support upload and download function
--with-gd                                          ##gd image support image processing library
--with-jpeg-dir                                  ##jpeg
--with-png-dir                                   ##png
--with-freetype-dir                            ##Typeface
--with-openssl                                  ##Secure access connection
--enable-fpm                                    ##fpm supports dynamic request module
--enable-mbstring                            ##Multi byte string support
--enable-xml                                    ##xml file
--enable-session                             ##Session support session
--enable-ftp                                     ##ftp services
--enable-pdo                                   ##Drive connection management
--enable-tokenizer                          ##PHP native functions
--enable-zip                                    ##zip compression package
4. Compilation and installation
[root@localhost php-7.1.10]# make ##Compile
[root@localhost php-7.1.10]# make install ##install
5. Configure the core configuration file (php.ini core configuration file, php-fpm.conf process service configuration file, www.conf extended configuration file)
[root@localhost php-7.1.10]# cp php.ini-development /usr/local/php/lib/php.ini   ##Copy to the installation directory lib Library
[root@localhost php-7.1.10]# vim /usr/local/php/lib/php.ini   ##Configure core profile

mysqli.default_socket = /usr/local/mysql/mysql.sock     ##Default connection file
date.timezone = Asia/Shanghai                                      ##time

[root@localhost php-7.1.10]# /usr/local/php/bin/php -m   ##Verify installed modules
6. Configure and optimize FPM module
[root@localhost php-7.1.10]# cd /usr/local/php/etc/
[root@localhost etc]# cp php-fpm.conf.default php-fpm.conf   ##Optimize replication of default process service profiles
[root@localhost etc]# cd /usr/local/php/etc/php-fpm.d/
[root@localhost php-fpm.d]# cp www.conf.default www.conf   ##Optimize replication extension profiles
[root@localhost php-fpm.d]# cd /usr/local/php/etc/
[root@localhost etc]# vim php-fpm.conf      ##Start fpm.pid process
pid = run/php-fpm.pid
[root@localhost etc]# /usr/local/php/sbin/php-fpm -c /usr/local/php/etc/php.ini
[root@localhost etc]# netstat -ntap | grep 9000     ##View port information
tcp   0 0 127.0.0.1:9000   0.0.0.0:*    LISTEN   69104/php-fpm: mast
[root@localhost etc]# ln -s /usr/local/php/bin/* /usr/local/bin/   ##Creating soft connections for system identification
[root@localhost etc]# ps aux | grep -c "php-fpm"
4
7. Make Nginx support PHP function
[root@localhost etc]# vim /usr/local/nginx/conf/nginx.conf    ##Configure nginx profile
    location ~ \.php$ {
        root           html;
        fastcgi_pass   127.0.0.1:9000;
        fastcgi_index  index.php;
        fastcgi_param  SCRIPT_FILENAME  /usr/local/nginx/html$fastcgi_script_name;   ##Site path
        include        fastcgi_params;
    }
[root@localhost etc]# vim /usr/local/nginx/html/index.php               ##Testing php web pages
<?php
phpinfo();
?>

8. Enter database to create bbs database and set administrator and password
[root@localhost etc]# mysql -u root -p
Enter password:      ##Enter the database with the password of abc23
mysql> CREATE DATABASE BBS;   ##Create bbs database
Query OK, 1 row affected (0.00 sec)

mysql> GRANT all ON bbs.* TO 'bbsusers'@'%' IDENTIFIED BY 'admin123';
##bbsuser is the administrator and sets the password
Query OK, 0 rows affected, 1 warning (0.00 sec)

mysql> GRANT all ON bbs.* TO 'bbsusers'@'localhost' IDENTIFIED BY 'admin123';
Query OK, 0 rows affected, 1 warning (0.00 sec)

mysql> flush privileges;         ##Refresh database
Query OK, 0 rows affected (0.00 sec)

mysql> quit       ##Sign out

[root@localhost etc]# vim /usr/local/nginx/html/index.php   ##Test database connection status
<?php
$link=mysqli_connect('192.168.13.130','bbsusers','admin123');
if($link) echo "<h1>Success!</h1>";
else echo "Fail!!";
?>
[root@localhost etc]# systemctl restart nginx.service     ##Restart service

Vi. install the Discuz forum package
1. Decompress the compressed package to / opt, and copy the contents of the directory to the bbs site
[root@localhost etc]# cd /mnt
[root@localhost mnt]# unzip  Discuz_X3.4_SC_UTF8.zip -d /opt    ##Unzip to / opt
[root@localhost mnt]# cd /opt
[root@localhost opt]# ls
dir_SC_UTF8  mysql-5.7.20  nginx-1.12.2  php-7.1.10  rh  Explain.htm
[root@localhost opt]# cd dir_SC_UTF8/          ##Enter the forum directory
[root@localhost dir_SC_UTF8]# cp -r upload/ /usr/local/nginx/html/bbs/
##Copy the contents of the / opt directory to the bbs directory of the html site
2. Access to the site and give rights to program users
[root@localhost dir_SC_UTF8]# cd /usr/local/nginx/html/bbs/    ##Enter bbs site directory
[root@localhost bbs]# chown -R root:nginx ./config/                   ##Rights for program users
[root@localhost bbs]# chown -R root:nginx ./data/                     ##Modify group
[root@localhost bbs]# chown -R root:nginx ./uc_client/
[root@localhost bbs]# chown -R root:nginx ./uc_server/
[root@localhost bbs]# chmod -R 777 ./config/                            ##Modify all permissions
[root@localhost bbs]# chmod -R 777 ./data/
[root@localhost bbs]# chmod -R 777 ./uc_client/
[root@localhost bbs]# chmod -R 777 ./uc_server/
3. Visit 192.168.235.137/bbs to install Discuz Forum

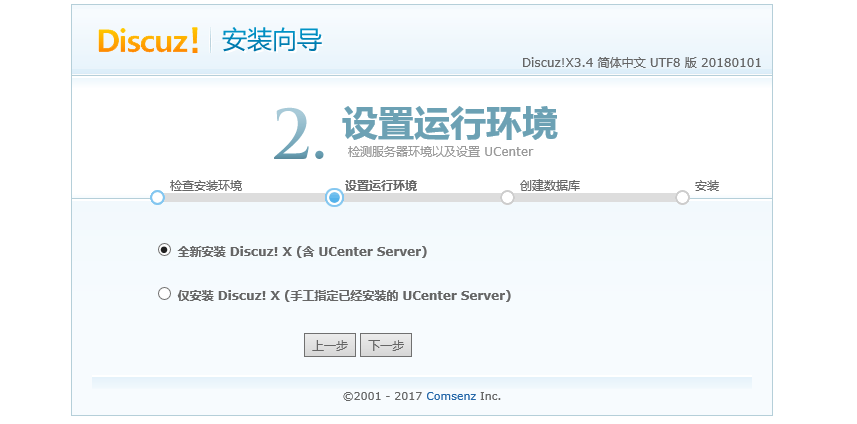
4. Set the operation environment to a new installation

5. Install database
Data server: 192.168.13.130 (enter IP address of creating database host here)
Database name: bbs
 Database user name: bbsusers (user name can be modified at the command line)
Database password: admin123 (password can be modified at the command line)
Administrator account: admin (default)
Password: 123123 (the password can be set directly on the web page)

VII. Successfully set up and visit the Forum

Thank you for reading!!!


