This article will take you hand in hand to build a distributed storage cluster (Rook/ceph) on K8s
1 Environmental preparation
1.1 basic environment
- 3 virtual machines with consistent configuration:
- Virtual machine configuration: 4c 8g
- Virtual machine operating system: cents7
- Hard disk: vda: 40G vdb: 20G
- Kubernete version: 1.20 0
- Docker version: 20.10 seven
By default, k8s installation is completed, and kubedm container installation is adopted
1.2 installed rook/ceph version:
ceph: v15.2.11
rook: 1.6.3
1.3 premise
- Multi node k8s cluster in normal operation, with two or more child nodes
- The version of rook is greater than 1.3 and cannot use directories to create clusters. A separate bare disk should be used to create clusters, that is, create a new disk, mount it to the host computer, and use it directly without formatting. Inspection steps:
lsblk -f
NAME   FSTYPE LABEL UUID                                 MOUNTPOINT
vda
└─vda1 xfs          6f15c206-f516-4ee8-a4b7-89ad880647db /
vdb
- The disk with empty FSTYPE is an available disk, which needs to clear data (cannot be formatted).
- This experiment requires high configuration. The configuration of each child node shall not be less than 2-core 4G, and the configuration of the master node shall not be less than 4-core 8G
2 construction process
2.1 what is rook?
- Rook itself is not a distributed storage system, but uses the powerful functions of Kubernetes platform to provide services for each storage provider through Kubernetes Operator. It is a storage "choreographer" that can use different back ends (such as Ceph, EdgeFS, etc.) to perform heavy storage management work, thus abstracting a lot of complexity.
- Rook transforms the distributed storage system into a self managing, self expanding and self repairing storage service. It automates the tasks of the storage administrator: deployment, boot, configuration, provisioning, expansion, upgrade, migration, disaster recovery, monitoring, and resource management
- Rook orchestrates multiple storage solutions, and each solution has a dedicated Kubernetes Operator to realize automatic management. Ceph, Cassandra and NFS are currently supported.
- At present, the mainstream backend is Ceph, which provides more than block storage; It also provides S3/Swift compatible object storage and distributed file system. Ceph can distribute the data of a volume on multiple disks, so it is convenient for a volume to actually use more disk space than a single disk. When more disks are added to the cluster, it automatically rebalances / redistributes data between disks.
2.2 CEPH look and k8s integration mode
- Rook is an open-source cloud native storage choreography that provides a platform and framework; Provide platforms, frameworks and support for various storage solutions for local integration with cloud native environments.
- Rook transforms storage software into a self managing, self expanding and self-healing storage service. It achieves this goal by automating deployment, boot, configuration, provisioning, expansion, upgrade, migration, disaster recovery, monitoring and resource management.
- Rook uses the tools provided by the underlying cloud native container management, scheduling and orchestration platform to realize its own functions.
- Rook currently supports Ceph, NFS, Minio Object Store and CockroachDB.
- Rook uses the Kubernetes primitive to enable the Ceph storage system to run on Kubernetes
3 installation and deployment
3.1 preparation before installation
#Confirm installation lvm2
yum install lvm2 -y
#Enable rbd module
modprobe rbd
cat > /etc/rc.sysinit << EOF
#!/bin/bash
for file in /etc/sysconfig/modules/*.modules
do
  [ -x \$file ] && \$file
done
EOF
cat > /etc/sysconfig/modules/rbd.modules << EOF
modprobe rbd
EOF
chmod 755 /etc/sysconfig/modules/rbd.modules
lsmod |grep rbd
3.2 download Rook installation file
git clone --single-branch --branch v1.6.3 https://github.com/rook/rook.git
Change configuration
cd rook/cluster/examples/kubernetes/ceph
Modify the Rook CSI image address. The original address may be the image of gcr, but the image of gcr cannot be accessed domestically. Therefore, it is necessary to synchronize the image of gcr to Alibaba cloud image warehouse. This document has been synchronized for you. You can directly modify it as follows:
vim operator.yaml
take

Replace with:
ROOK_CSI_REGISTRAR_IMAGE: "registry.cn-beijing.aliyuncs.com/dotbalo/csi-node-driver-registrar:v2.0.1"
 ROOK_CSI_RESIZER_IMAGE: "registry.cn-beijing.aliyuncs.com/dotbalo/csi-resizer:v1.0.1"
 ROOK_CSI_PROVISIONER_IMAGE: "registry.cn-beijing.aliyuncs.com/dotbalo/csi-provisioner:v2.0.4"
 ROOK_CSI_SNAPSHOTTER_IMAGE: "registry.cn-beijing.aliyuncs.com/dotbalo/csi-snapshotter:v4.0.0"
 ROOK_CSI_ATTACHER_IMAGE: "registry.cn-beijing.aliyuncs.com/dotbalo/csi-attacher:v3.0.2"
It is also the operator file. The new version of rook turns off the deployment of automatic discovery container by default. You can find rook_ ENABLE_ DISCOVERY_ Change daemon to true:

3.4 deploy ROOK
cd cluster/examples/kubernetes/ceph
kubectl create -f crds.yaml -f common.yaml -f operator.yaml
Wait for the container to start. Only running can proceed to the next step
[root@k8s-master01 ceph]# kubectl -n rook-ceph get pod
NAME                                                     READY   STATUS      RESTARTS   AGE
rook-ceph-operator-675f59664d-b9nch                      1/1     Running     0          32m
rook-discover-4m68r                                      1/1     Running     0          40m
rook-discover-chscc                                      1/1     Running     0          40m
rook-discover-mmk69                                      1/1     Running     0          40m
3.5 creating ceph clusters
kubectl create -f cluster.yaml
After creation, you can view the status of the pod:
[root@k8s-master01 ceph]# kubectl -n rook-ceph get pod
NAME                                                     READY   STATUS      RESTARTS   AGE
csi-cephfsplugin-8d6zn                                   3/3     Running     0          39m
csi-cephfsplugin-dr6wd                                   3/3     Running     0          39m
csi-cephfsplugin-gblpg                                   3/3     Running     0          39m
csi-cephfsplugin-provisioner-846ffc6cb4-qjv7s            6/6     Running     0          39m
csi-cephfsplugin-provisioner-846ffc6cb4-wbjzg            6/6     Running     0          39m
csi-rbdplugin-6bd9t                                      3/3     Running     0          39m
csi-rbdplugin-9b6gt                                      3/3     Running     0          39m
csi-rbdplugin-9vtpp                                      3/3     Running     0          39m
csi-rbdplugin-provisioner-75fd5c779f-9989z               6/6     Running     0          39m
csi-rbdplugin-provisioner-75fd5c779f-zx49t               6/6     Running     0          39m
rook-ceph-crashcollector-k8s-master01-75bb6c6dd9-lnncg   1/1     Running     0          38m
rook-ceph-crashcollector-k8s-node-90-84b555c8c8-5vt72    1/1     Running     0          38m
rook-ceph-crashcollector-k8s-node-94-798667dd4b-dzvbw    1/1     Running     0          31m
rook-ceph-mgr-a-86d4459f5b-8bk49                         1/1     Running     0          38m
rook-ceph-mon-a-847d986b98-tff45                         1/1     Running     0          39m
rook-ceph-mon-b-566894d545-nbw2t                         1/1     Running     0          39m
rook-ceph-mon-c-58c5789c6-xz5l7                          1/1     Running     0          38m
rook-ceph-operator-675f59664d-b9nch                      1/1     Running     0          32m
rook-ceph-osd-0-76db9d477d-dz9kf                         1/1     Running     0          38m
rook-ceph-osd-1-768487dbc8-g7zq9                         1/1     Running     0          31m
rook-ceph-osd-2-5d9f8d6fb-bfwtk                          1/1     Running     0          31m
rook-ceph-osd-prepare-k8s-master01-4b4mp                 0/1     Completed   0          31m
rook-ceph-osd-prepare-k8s-node-90-7jg4n                  0/1     Completed   0          31m
rook-ceph-osd-prepare-k8s-node-94-4mb7g                  0/1     Completed   0          31m
rook-discover-4m68r                                      1/1     Running     0          40m
rook-discover-chscc                                      1/1     Running     0          40m
rook-discover-mmk69                                      1/1     Running     0          40m
The osd-0, osd-1 and osd-2 containers must exist and work normally. If the above pod s run successfully, the cluster installation is considered successful.
3.6 installing ceph client tools
The path of this file is still in the ceph folder
kubectl create -f toolbox.yaml -n rook-ceph
After the container is Running, you can execute the relevant commands:
[root@k8s-master01 ~]# kubectl -n rook-ceph exec -it deploy/rook-ceph-tools -- bash
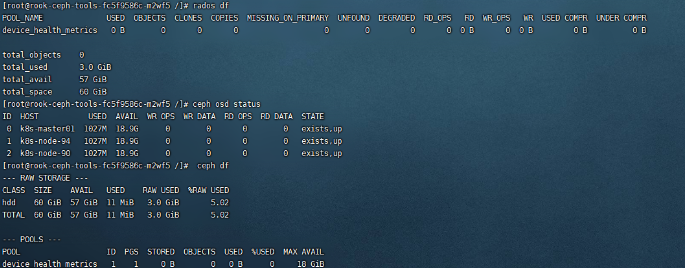
[root@rook-ceph-tools-fc5f9586c-m2wf5 /]# ceph status
cluster:
id: 9016340d-7f90-4634-9877-aadc927c4e81
health: HEALTH_WARN
mons are allowing insecure global_id reclaim
clock skew detected on mon.b
services:
mon: 3 daemons, quorum a,b,c (age 3m)
mgr: a(active, since 44m)
osd: 3 osds: 3 up (since 38m), 3 in (since 38m)
data:
pools: 1 pools, 1 pgs
objects: 0 objects, 0 B
usage: 3.0 GiB used, 57 GiB / 60 GiB avail
pgs: 1 active+clean
Common commands:
ceph status
ceph osd status
ceph df
rados df
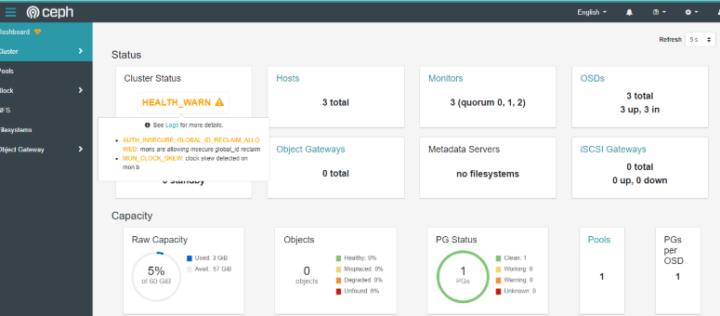
3.7 configuring ceph dashboard
The default ceph is the installed ceph dashboard, but its svc address is service clusterIP and cannot be accessed externally
kubectl apply -f dashboard-external-https.yaml
The NodePort type can be accessed externally
[root@k8s-master01 ~]# kubectl get svc -n rook-ceph|grep dashboard
rook-ceph-mgr-dashboard                  ClusterIP   192.168.204.219   <none>        8443/TCP            49m
rook-ceph-mgr-dashboard-external-https   NodePort    192.168.34.227    <none>        8443:32529/TCP      49m
Browser access (replace master01 IP with your own cluster ip):
https://master01-ip:32529/#/login?returnUrl=%2Fdashboard
The user name is admin by default, and the password can be obtained through the following code:
kubectl -n rook-ceph get secret rook-ceph-dashboard-password -o jsonpath="{['data']['password']}"|base64 --decode && echo

4 delete cluster and clear data
4.1 delete Cephcluster CRD
kubectl -n rook-ceph delete cephcluster rook-ceph
After confirming the deletion in the previous step, query
kubectl -n rook-ceph get cephcluster
4.2 delete Operator and related resources
kubectl delete -f operator.yaml
kubectl delete -f common.yaml
kubectl delete -f crds.yaml
4.3 deleting data on the host
When rook creates a cluster, some data will be unloaded into / var / lib / rook (the directory specified by datadirhostpath) of the local machine. If it is not deleted, it will affect the next cluster deployment. It is said that the next version of rook will add k8s local storage call function, so it will not be stored directly on the hard disk
rm -rf /var/lib/rook
4.4 erasing data on hard disk
When creating an osd, the data is written and needs to be erased. Otherwise, the ceph cluster cannot be created again. There are various hard disk erase commands in the script, which do not need to be executed successfully. It is determined according to the hard disk condition of the current machine.
vim clean-ceph.sh

#!/usr/bin/env bash
DISK="/dev/vdb"

sgdisk --zap-all $DISK

dd if=/dev/zero of="$DISK" bs=1M count=100 oflag=direct,dsync

blkdiscard $DISK

ls /dev/mapper/ceph-* | xargs -I% -- dmsetup remove %

rm -rf /dev/ceph-*
rm -rf /dev/mapper/ceph--*
5 FAQ
5.1 uninstall and delete CEPH rook, kubectl get ns, rook CEPH does not display Terminating and cannot be deleted
NAMESPACE=rook-ceph

kubectl proxy &

kubectl get namespace $NAMESPACE -o json |jq '.spec = {"finalizers":[]}' >temp.json

curl -k -H "Content-Type: application/json" -X PUT --data-binary @temp.json 127.0.0.1:8001/api/v1/namespaces/$NAMESPACE/finalize
5.2 another sequelae of uninstalling osd or cluster is that the rook CEPH namespace is deleted, but cephcluster cannot be deleted
#View namespace, deleted
[root@k8s-master01 ~]# kubectl get ns
NAME              STATUS   AGE
default           Active   22h
kube-node-lease   Active   22h
kube-public       Active   22h
kube-system       Active   22h
#See if the cluster still exists
[root@k8s-master01 ~]# kubectl -n rook-ceph get cephcluster
NAME        DATADIRHOSTPATH MONCOUNT AGE PHASE       MESSAGE                HEALTH
rook-ceph   /var/lib/rook   3        20h Progressing Configuring Ceph Mons
[root@k8s-master01 ~]# kubectl api-resources --namespaced=true -o name|xargs -n 1 kubectl get --show-kind --ignore-not-found -n rook-ceph
Error from server (MethodNotAllowed): the server does not allow this method on the requested resource
NAME                         TYPE                                  DATA   AGE
secret/default-token-lz6wh   kubernetes.io/service-account-token   3      8m34s
NAME                     SECRETS   AGE
serviceaccount/default   1         8m34s
Error from server (MethodNotAllowed): the server does not allow this method on the requested resource
NAME                                 DATADIRHOSTPATH   MONCOUNT   AGE   PHASE         MESSAGE                 HEALTH
cephcluster.ceph.rook.io/rook-ceph   /var/lib/rook     3          20h   Progressing   Configuring Ceph Mons

#terms of settlement:
kubectl edit  cephcluster.ceph.rook.io -n rook-ceph
 hold finalizers Delete the value of, cephcluster.ceph.rook.io It will be deleted by itself
5.3 open dashboard to display HEALTH_WARN warning
Enter CEPH tools and execute the following commands:
ceph config set mon auth_allow_insecure_global_id_reclaim false

Other common warning resolution links:
https://docs.ceph.com/en/octopus/rados/operations/health-checks/