preface
After finishing the intelligent watering machine, I always have a mysterious longing for this scene that can save time and energy (lazy people are like this). This time, I am going to make a device that can automatically open the window. Combined with the previous formaldehyde detection sensor, I can automatically open the window for ventilation when the formaldehyde content is too high, and then I can detect gas, smoke, carbon monoxide Various gas sensors for air quality detection are also connected in, and the coverage and practicability of this scene are also full. If a friend still has ideas about which parts can be connected in this scene, he can also leave a message to me, and then I connect in (leave a message for me quickly! Please, let my roommate kowtow to everyone!).

Hardware selection
The board is still super easy to use, invincible and cheap, complete information and perfect ecology ESP32S .
Electric window opener Because my home is a common sliding window, most of which are pushed and pulled on Taobao. After looking for the cheapest one for transformation for a long time, don't ask, asking is poor! (T▽T)
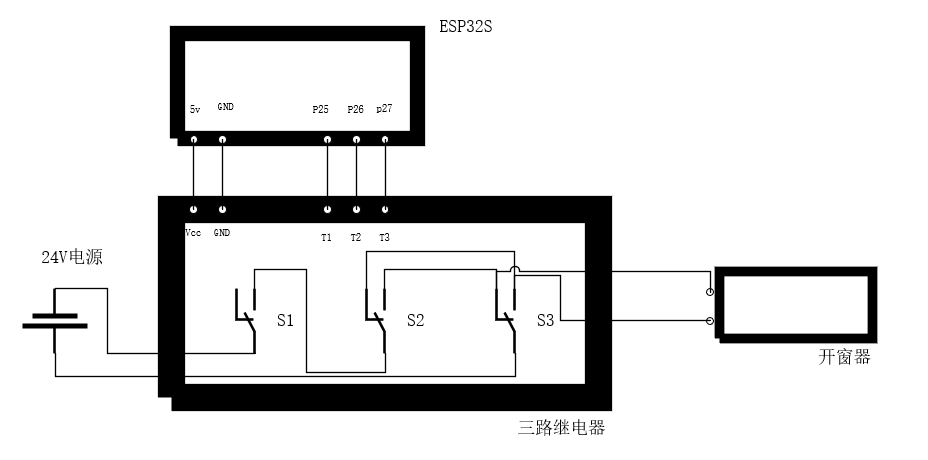
The wiring is somewhat complicated, because the direction of the window opener is controlled by the current direction, I used a three-way relay at hand to reverse the current. The wiring is as follows:
ESP32S-5V - relay Vcc
ESP32S-GND - relay GND
ESP32S-P25 - relay-1 control terminal
ESP32S-P26 - relay-2-way control terminal
ESP32S-P27 - relay - 3-way control terminal
+24V output relay 1-way intermediate node
-24V output relay 3-way intermediate node
Relay 1 normally open node - relay 2 intermediate nodes
Relay 2-way normally closed node - relay 3-way normally open node
Relay 2-way normally open node - relay 3-way normally closed node
Relay 3-way normally closed node - window opener + 24V input
Relay 3-way normally open node - 24V input of window opener

Code parsing
Get code
In order to facilitate the explanation of logic, I will disrupt the order of the code and may cut it. If you want to run directly with the code, you can go directly The secret treasure house of inspiration desktop Get the code, or directly clone:
https://gitee.com/inspiration-desktop/DEV-lib-arduino.git
After downloading or clone code, the three folders are used this time:
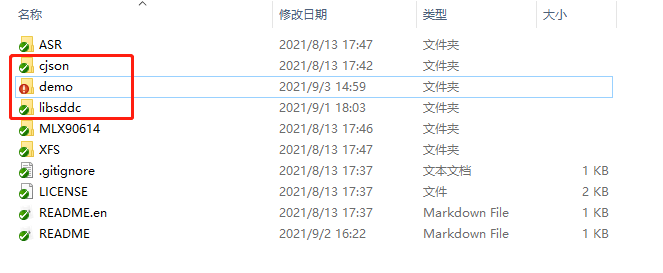
Cjson: the cjson library I transplanted is the standard cjson library. Put it in the libraries folder under the arduino installation directory and Baidu can use the cjson functions.
libsddc: I transplanted it from the official SDDC library and the SDK I wrote, and just put it in the libraries folder. Inside is the processing function of SDDC protocol. We don't care.
In the demo folder are the demo codes of our various sensors:
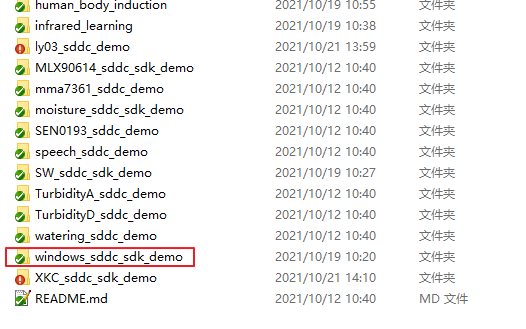
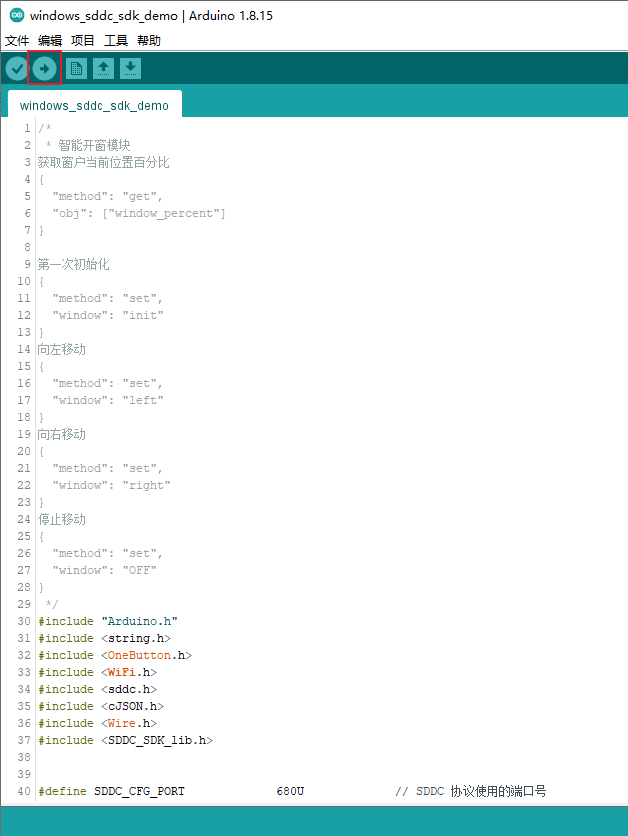
Red circle windows_ sddc_ sdk_ The demo folder contains our code. Click in to see windows_sddc_sdk_demo.ino file. Double clicking the file will automatically start Arduino ide to open the code. Select the corresponding COM port in tools - > port and click upload to burn the code into the board:
For the specific arduino tutorial, see my previous articles arduino Development Guide and arduino development: the first application based on ESP32S - infrared temperature measuring gun (with pin diagram)
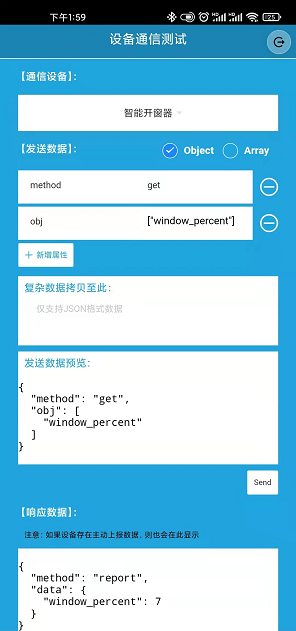
Equipment control command:
Via Spirit 1's application or Sniffer Commands sent to sensor devices:
Gets the percentage of the current position of the window
{
  "method": "get",
  "obj": ["window_percent"]
}
Move left
{
  "method": "set",
  "window": "left"
}
Move right
{
  "method": "set",
  "window": "right"
}
Stop moving
{
  "method": "set",
  "window": "OFF"
}
Configure device information
This part of the code can configure the WiFi name and WiFi password, the pin to be used, and configure the information displayed by the device on Spirit 1:
#define SDDC_ CFG_ Port 680u / / port number used by SDDC protocol
#define PIN_ Input 0 / / select IO0 to control
#define ESP_TASK_STACK_SIZE       4096
#define ESP_TASK_PRIO             25

#define WINDOW_STATE_RIGHT        1
#define WINDOW_STATE_LEFT         0
#define WINDOW_ON                 1
#define WINDOW_OFF                0
#define WINDOW_PERCENT            "window_percent"


static int window_state           = 0;
static int window_direction       = 0;
static double window_percent      = 0;
static sddc_t *g_sddc;
static const char* ssid           = "EOS-Tenda";         // WiFi name
static const char* password       = "1234567890";        // WiFi password

static const int window2_pin      = 25;                 // Control pin of motor direction
static const int window1_pin      = 26;                 // Control pin of motor direction
static const int off_pin          = 27;                 // Control pin of motor start and stop

/*
 *  Information definition of the current device
 */
DEV_INFO    dev_info = {
            .name     = "Intelligent window opener",
            .type     = "device.window",
            .excl     = SDDC_FALSE,
            .desc     = "ESP-32S",
            .model    = "IDWINDOW01B",
            .vendor   = "inspiration-desktop",
};

/*
 *   System registration object aggregation
 */
SDDC_CONFIG_INFO sys_cfg = {
        .token             = "1234567890",            // Device password
        .devinfo           = &dev_info,
        .io_dev_reg        = io_dev,
        .io_dev_reg_num    = ARRAY_SIZE(io_dev),
        .num_dev_reg       = num_dev,
        .num_dev_reg_num   = ARRAY_SIZE(num_dev),
        .state_get_reg     = dev_state_get_reg,
        .state_get_reg_num = ARRAY_SIZE(dev_state_get_reg),
        .dis_dev_reg       = dis_dev,
        .dis_dev_num       = ARRAY_SIZE(dis_dev),
};
Callback function registration
This is the location where the callback function is registered after receiving the command. Only the functions registered here can be called correctly by the SDK and perform correct actions.
For specific SDK analysis, please refer to The official series of coerced death! SDK framework based on sddc protocol_ sdk_ Lib parsing and The official series of coerced death! From DDC sniffer to SDDC_ sdk_ Data analysis of Lib
/*
 *  Registration of object function and processing method of digital quantity equipment
 */
NUM_DEV_REGINFO num_dev[] = {
        {"window_percent",window_percent_set},
};

/*
 *  Display device object function and processing method registration
 */
DIS_DEV_REGINFO dis_dev[] = {
};

/*
 * IO Device object setting function and processing method registration
 */
IO_DEV_REGINFO io_dev[] = {
        {"window",window_set},
};

/*
 *  System object status get registration
 */
DEV_STATE_GET  dev_state_get_reg[] = {
        {"window",   DEV_IO_TYPE,  window_get},
        {"window_percent", DEV_NUM_TYPE, window_percent_get},
};
Data acquisition and sending process
Here is the processing flow written by ourselves, which can be changed according to your needs. After receiving set or get, enter the corresponding processing function according to the previously registered function.
static void dev_report_state()
{
    cJSON * root = cJSON_CreateObject();
    cJSON * array = cJSON_CreateArray();
    cJSON_AddItemToArray(array, cJSON_CreateString(WINDOW_PERCENT));
    cJSON_AddItemToObject(root, "obj", array);
    object_report(root);
}

static void window_percent_task(void *arg) {
    while(1) {
        if (window_state) {
            if (window_direction == 1 && window_percent < 100) {
                window_percent++;
            } else if (window_direction == 0 && window_percent > 0) {
                window_percent--;
            }
            if (window_percent == 0 || window_percent == 100) {
                printf("Stop moving!\n");
                digitalWrite(off_pin, LOW);
                window_state = WINDOW_OFF;
            }
            dev_report_state();
        }
        delay(250);
    }
}

sddc_bool_t window_percent_set(const uint64_t value)
{
    window_percent = value;
    return SDDC_TRUE;
}

/*
 * Windowing control function
 */
sddc_bool_t window_set(const char* value)
{
    if (!strcmp(value,"left") && window_percent > 0) {
        digitalWrite(off_pin, LOW);
        digitalWrite(window1_pin, HIGH);
        digitalWrite(window2_pin, HIGH);
        window_direction = WINDOW_STATE_LEFT;
        window_state = WINDOW_ON;
        if (digitalRead(window1_pin) == 1 && digitalRead(window2_pin) == 1) {
            digitalWrite(off_pin, HIGH);
            printf("Move left!\n");
        } else {
            printf("Short circuit Warning!!!\n");
            digitalWrite(off_pin, LOW);
        }
    } else if (!strcmp(value,"right") && window_percent < 100) {
        digitalWrite(off_pin, LOW);
        digitalWrite(window1_pin, LOW);
        digitalWrite(window2_pin, LOW);
        window_direction = WINDOW_STATE_RIGHT;
        window_state = WINDOW_ON;
        if (digitalRead(window1_pin) == 0 && digitalRead(window2_pin) == 0) {
            digitalWrite(off_pin, HIGH);
            printf("Move right!\n");
        } else {
            printf("Short circuit Warning!!!\n");
            digitalWrite(off_pin, LOW);
        }
    } else if (!strcmp(value,"OFF")) {
        printf("Stop moving!\n");
        digitalWrite(off_pin, LOW);
        window_state = WINDOW_OFF;
    } else if (!strcmp(value,"init")) {
        printf("init!\n");
    }
    return SDDC_TRUE;
}
After the code is written, it will be finished by burning it. It is exactly the same as before. Click Save, and then upload OK. You can see the details Previous documents , I'm too lazy to write it again (/ ω\)
verification
Write before opening DDC protocol sniffer Carry out the next test, no problem, and then write an application, perfect!
summary
After the intelligent window opener has been modified, I still feel a sense of achievement (mainly because the wiring is too cracked "▽"). After that, I will write an application to improve the performance of this scene. Please look forward to it. If you have any good ideas and suggestions, you can also comment on it!
This article is only for personal learning and use. If there are errors, please correct them ˙ ᗜ ˙ ) Thank you, boss!