1, Database configuration
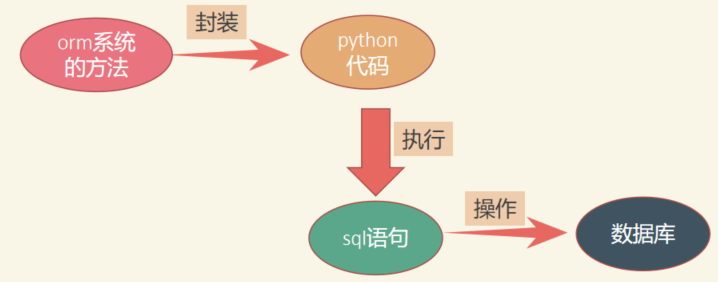
1.ORM concept
Definition: Object Relational Mapping (ORM)
Advantages: you don't need to write SQL code directly, just operate data from the database like an operation object.

2. Model mapping relationship

- All model classes must be written in models under app Py file
- If the model needs to be mapped to the database, the app must be installed
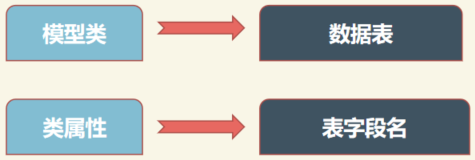
- A data table corresponds to a model class. The fields in the table correspond to the class attributes in the model
3. Database configuration
- 1. In settings Configuring DATABASES in PY
DATABASES = {
    'default': {
        'ENGINE': 'django.db.backends.mysql',  # database engine
        'NAME': 'mydb',                        #Database name
        'USER': 'admin',                       # User name of the linked database
        'PASSWORD':'qwe123',                   # Password for linked database
        'HOST': '127.0.0.1',                   # Domain name and ip address of mysql server
        'PORT': '3306',                        # A port number of mysql. The default is 3306
    }
}

- 2._init_.py
Set connector to pymysql:
In the home directory__init__.py Add the following two sentences to the file
import pymysql
pymysql.install_as_MySQLdb()
Two. Modeling and mapping of models.
1. Use the model in Django
Under app, click models Py to create django's model class
The code is as follows:
from django.db import models

class User(models.Model):  #Table name corresponding to model class name
    id = models.AutoField(primary_key=True) #id can be omitted and will be created automatically
    name = models.CharField(max_length=30)  #Character type
    age = models.IntegerField()  #Integer type

    def __str__(self):  #How to display data when using query method
        return "User<id={0}>,name={1},age={2}".format(self.id, self.name, self.age)
2. Map the model class to the database
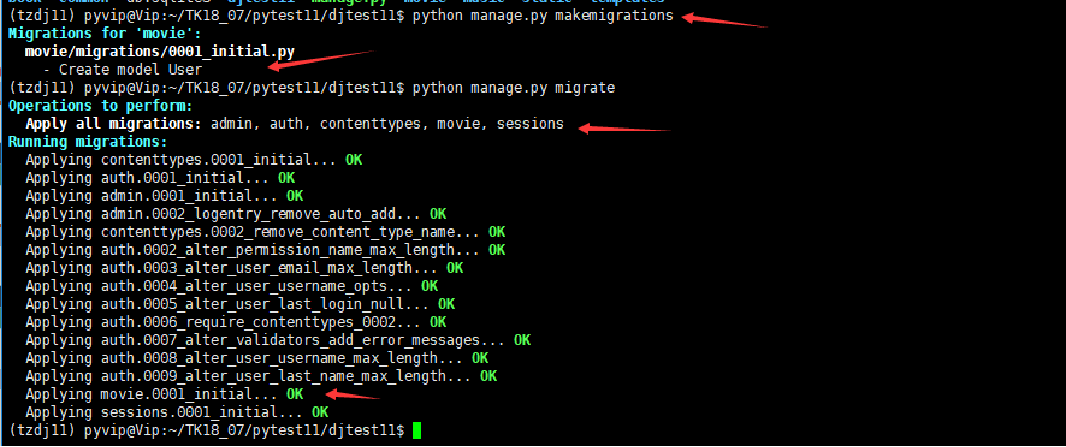
- First execute the following command to create a mapping file
- python manage.py makemigrations app_name
-The command can be followed by the app name, indicating that it specifies to map the model of an app. All apps are executed without writing - Execute the following command to submit the mapping data in the mapping file to the database
- python manage.py migrate
-Before implementation, ensure that the APP we create the model is a registered APP
	(django_moran) [lemon@iZbp159egvvktszc82dr5xZ testPro]$ python manage.py makemigrations model_test

Migrations for 'model_test':
  model_test/migrations/0001_initial.py
    - Create model User


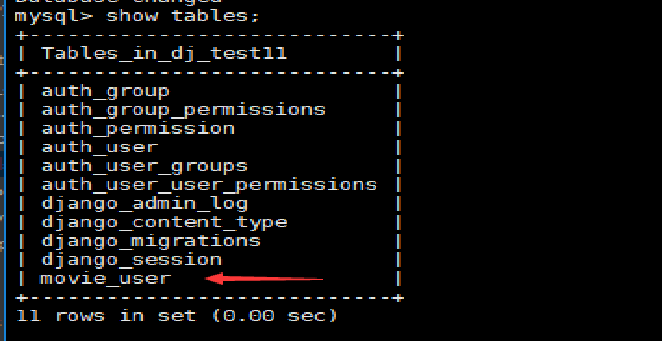
Open the data and we can see that the created app is named_ The data table of model name, while some other tables are automatically generated by django
Note: if you want to delete a table, you can annotate the model class in the django model, and then execute the mapping command. Do not delete it manually on the command line
3. Addition, deletion, modification and query of data
3.1 data addition, deletion, modification and query ---------- add data
Import the User model class in the view function, and then use the following method to add data
def add_user(request):
    #Method 1
    moran = User(name='wuyifan', age=43)
    moran.save()#Save upload
    return HttpResponse('Data added successfully')

    #Method 2
    wufeng = User()
    wufeng.name = 'Tom'
    wufeng.age = 19
    wufeng.city = 'Shanghai'
    wufeng.save()
    return HttpResponse(f'data{wufeng.name}Successfully added!')

    #Method 3
    User.objects.create(name='Siri', age=17, city='Shijiazhuang')
    return HttpResponse('Data added successfully!')


    #Method 4
    User.objects.get_or_create(name='Jerry', age=20)
    return HttpResponse('Data added successfully!')
3.2 addition, deletion, modification and query of data ----------- find data
Import the User model class in the view function to realize simple search
< queryset [< user: user < id = 5 >, name = ctmd, age = 50 >] > supports indexing
def select_user(request):
    #Query all data
    rs = User.objects.all()
    for i in rs:
        print(rs)
    #Query a record object by criteria
    rs = User.objects.get(id=1)  #get general query primary key field
    print(rs)

    #Get the objects that meet the conditions (the result is a QuerySet, which supports indexing)
    rs2 = User.objects.filter(age=50)
    print(rs2[0])


	#Query the first data
    rs3 = User.objects.first()
    print(rs3)

    #Exclusion criteria query
    rs4 = User.objects.exclude(age=43)
    print(rs4)

    #Sort query
    rs5 = User.objects.order_by('age')  #positive sequence
    rs5 = User.objects.order_by('-age')  #flashback

    #Range query
    rs6 = User.objects.filter(age__gt=18)  #gt: greater than
    rs6 = User.objects.filter(age__lt=18)  #lt: less than
    rs6 = User.objects.filter(age__in=[18,40])  #Closed interval range
    rs6 = User.objects.filter(age__range=(18,40))  #Open interval range

    #Turn to dictionary query
    rs7 = User.objects.all().values()
    rs7 = User.objects.filter(age=18).values()

	return HttpResponse('Data query completed')
3.3 data addition, deletion, modification and query ----------- modify data
Import the User model class in the view function, and then update the data using the following method
def update_user(request):
    #Method 1: query the data first, and then modify the attribute
    # res = User.objects.get(id=5)
    # res.name = 'WCTMD'
    # res.age = 29
    # res.city = 'TianChang'
    # res.save()
    # return HttpResponse('data modified ')

    #Method 2: query and modify directly
    User.objects.filter(id=5).update(city='DaTianChang')
    return HttpResponse('Data modification completed')
3.4 data addition, deletion, modification and query ---------- delete data
Import the User model class in the view function, and then update the data using the following method
def delete_user(request):
    User.objects.get(id=8).delete()
    User.objects.filter(name='Siri').delete()

    return HttpResponse("Data deletion completed")
Data addition, deletion, modification and query - database related interfaces (QuerySet API)
1. The query results from the database are generally a set, which is called QuerySet
2.QuerySet is an iteratable object
3.QuerySet supports slicing and negative index
4. You can use list to forcibly turn QuerySet into a list