Dry goods content
1. Introduction to Django MTV mode
2. File upload function under Django
3. Implement VirusTotal API call under Django
0x0 introduction to Django framework
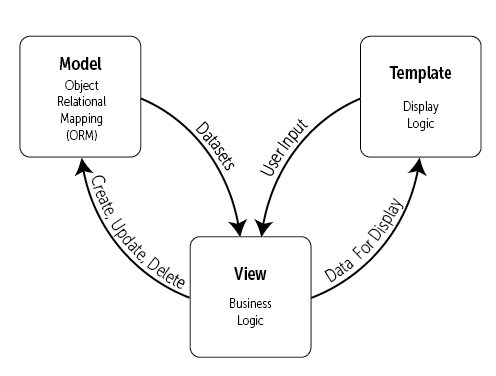
At present, many Web frameworks are developed based on MVC development mode. Django is also very similar, but it is based on MTV development mode.
Here is a brief introduction to MTV:
- M represents the Model: the function of writing the program, which is responsible for the mapping (ORM) between business objects and databases.
- T stands for template: it is responsible for how to display the page (html) to users.
- V represents View: responsible for business logic and calling Model and Template when appropriate.
- In addition to the above three layers, a URL distributor is also needed. Its function is to distribute the page requests of URLs to different views for processing, and then the View calls the corresponding Model and Template. The response mode of MTV is as follows:

1x0 Django project creation
Here, the file is uploaded in the Form of Form. The logic is to open the home page, click the upload button to trigger action, and jump to fileManagerUpload. The implementation process of each module is described in detail below.
1x1 create initial Django project
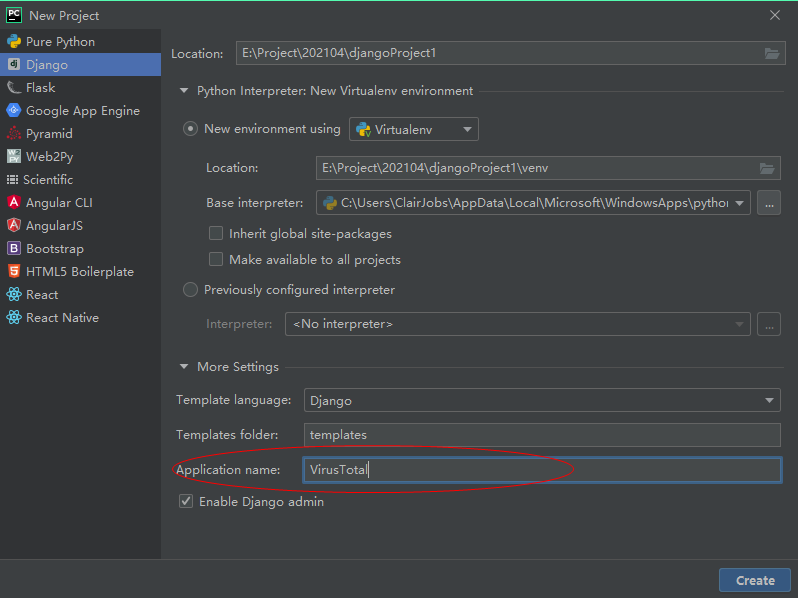
The IDE of the development environment is pychart. When creating a new project, you must check the Application name, which will facilitate the addition of multiple webapps in the future:

1x2 create view file: views py
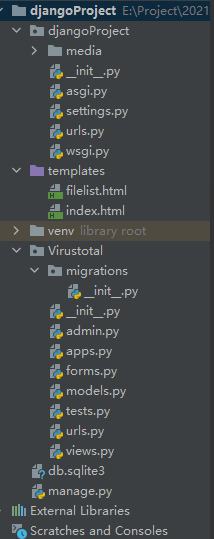
The following is a complete directory structure for creating projects:

2x0 file upload and API call code implementation
2x1 engineering settings Py settings
Because the function we want to achieve is file upload, we must confirm the absolute path after file upload. At this time, we should set it in settings Set the path under py.
Be careful!: When developing windows, the path should be equipped with double slash \
- settings.py
BASE_DIR = Path(__file__).resolve().parent.parent
MEDIA_URL="media/"
MEDIA_ROOT = os.path.join('E:\\Project\\202104\\djangoProject\\djangoProject', 'media')
2x2 global routing and WebApp routing configuration
urls.py is used to configure the calling logic of web pages. Generally speaking, a WebApp initially has an 'index' of the home page HTML ', but in case of multiple WebApp colleagues, it should be configured uniformly:
- Global routing URLs Py configuration
from django.contrib import admin
from django.urls import include,path

urlpatterns = [
    path('admin/', admin.site.urls),	# Django management interface
    path('', include('Virustotal.urls')), # The homepage is directed to urls configuration under WebApp
]
- WebApp routing URLs Py configuration
urlpatterns = [
    path('',views.index),
    path('fileManagerUpload/',views.fileManagerUpload),
] + static(settings.MEDIA_URL,document_root=settings.MEDIA_ROOT)
2x3 Index.html settings
Here I commented out the Ajax code of asynchronous display. If you need to do asynchronous web page display, you can refer to the annotated code. It is very simple without asynchronous display code:
- index.html
<!DOCTYPE html>
<html lang="en">
<head>
    <meta charset="UTF-8">
    <title>ClairJobs</title>
</head>
<body>

<form enctype="multipart/form-data" action="fileManagerUpload/" method="post">
    {% csrf_token %}
    <input type="file" name="myfile" id="avatar_file"/>
    <br/>
    <input type="submit" value="upload">
</form>

{#<script src="https://code.jquery.com/jquery-3.1.1.min.js"></script>#}
{#<script>#}
{#    $(function () {#}
        {#Always use Ajax upload#}
{#        console.log('Ajax upload');#}
{#        $("#upload").click(function () {#}
{#            var formdata = new FormData();#}
{#            formdata.append("fname", $("#fname").val());#}
{#            formdata.append("lname", $("#lname").val());#}
{#            formdata.append("csrfmiddlewaretoken", $("[name='csrfmiddlewaretoken']").val());#}
{#            $.ajax({#}
{#                url: "/process",#}
{#                type: "post",#}
{#                data: formdata,#}
{#                contentType: false,#}
{#                processData: false,#}
{#                success: function (data) {#}
{#                    alert("Upload succeeded!")#}
{#                    console.log(data)#}
{#                    document.getElementById("p1").innerHTML=data.status;#}
{#                    document.getElementById("fname").value=data.data.name;#}
{#                    document.getElementById("lname").value=data.data.age;#}
{#                    alert(data.list)#}
{#                },#}
{#                error: function (data) {#}
{#                    alert("Upload failed!")#}
{#                    console.log(data)#}
{#                }#}
{#            })#}
{#        })#}
{#    });#}
{#</script>#}
</body>
</html>
2x4 view layer views Py configuration
This is the classic view. Here we can write methods according to our own needs, and then use urls routing to finally realize the method under views to display the effect of web pages.
Here are the three most important things we need to do:
- Display web pages according to Get and Post requests
- Upload file
- Call VirusTotal API
- views.py
from django.shortcuts import render, redirect
from django.http import HttpResponse, JsonResponse
from django.conf import settings
import os
import requests
import json

def index(request):
    return render(request,'index.html')

def fileManagerUpload(request):
    # File upload
    print(request.POST)
    print(request.FILES)
    if request.method=='GET':
        return render(request, 'index.html')

    if request.method == 'POST':
        myFile = request.FILES.get("myfile", None)
        print(myFile)
        if not myFile:
            return HttpResponse('There are no files to upload')

        destination = open(os.path.join(settings.MEDIA_ROOT, myFile.name), 'wb+')
        for chunk in myFile.chunks():
            destination.write(chunk)

        # After uploading, call VirusTotal API through requests
        url = 'Yours API Call URL'
        params = {'apikey': 'Yours APIKEY'}
        files = {'file': (myFile.name, open(os.path.join(settings.MEDIA_ROOT, myFile.name), 'rb'))}
        responseup = requests.post(url, files=files, params=params)
        print(responseup.json())

        # Download Report
        url = 'Yours API Call URL'
        params = {'apikey': 'Yours APIKEY',
                  'resource': 'Your file Hash value'}
        responsedown = requests.get(url, params=params)
        destination.close()
        print(responsedown.json)
		return JsonResponse(responsedown.json(),safe=False) #CSRF Token error

    return HttpResponse('fail')
Summarize the comparison between Go and Python
At first, it was considered to use Beego to realize the API call of VirusTotal. However, the 'net/http' of go language is a little useless. The compromise method is to add CURL Library under Beego and then realize the call of the interface. It is a little troublesome. After checking the data and various trials and errors, it is concluded that go is born concurrent, and go is more similar to the collaborative process in Python, which is suitable for creating an API for others to call, Go itself is not as convenient as Python to call other people's APIs. Although performance does not need to be considered in the current scenario, we need to learn more about the high concurrency of go in case of urgent need.
~Go after reading some likes~
If there are errors and omissions in the article, please contact me in time, thank you!