Django interface application
- Written in front
- 1. Try to write an interface
- 1.1 new django project
- 1.1.1. First, create a new django project in pycharm
- 1.1.2 write driver (used to connect mysql)
- 1.1.3 new database
- 1.1.4 migration
- 1.1.5 login database
- 1.2 first test whether django can start normally
- 1.3 create interface application
- 1.4 operation and access
- 2. Use interface
- 2.1. Use the postman tool to send a POST request
- 2.1.1 download postman (interface test tool)
- 2.1.2 write an interface that can receive post requests
- 2.1.3 open postman and send a POST request
- 2.1.4. There are also interface testing tools under the linux command window
- 2.2 GET request
- 2.3 GET request with parameters
- 2.4 DELETE request with parameters
- 3. Interface and web page docking
Written in front
- RESTFul is a unified interface principle. For specific explanation, please refer to the following connection
https://www.runoob.com/w3cnote/restful-architecture.html - The interface view function only returns the JSON type to the front-end, and then gives the JSON data to js, so that the front-end js can handle the html page changes
1. Try to write an interface
1.1 new django project
If you have created a new project (including mysql database) and it can run successfully
You can skip 1.1 and go to 1.2
1.1.1. First, create a new django project in pycharm
(here I use Python 3, django2)
django 0 foundation can read this article first, and then read the following: https://www.cnblogs.com/liqu/p/9308966.html
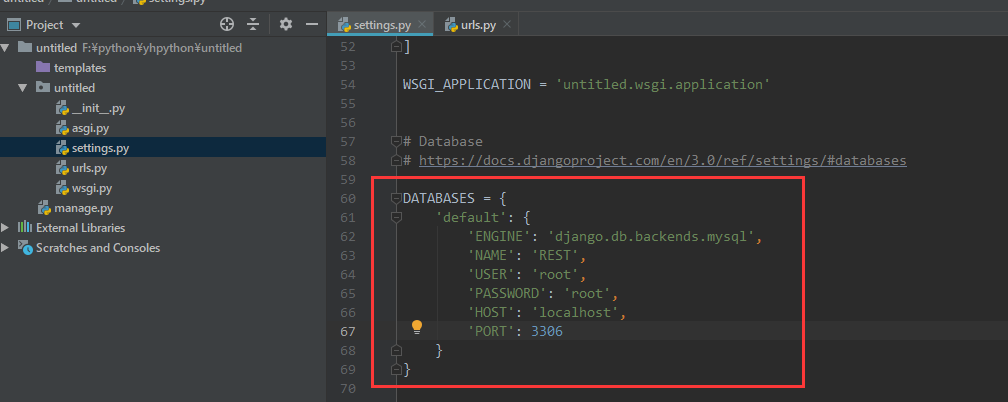
Remember to modify the setting configuration file after creation (DEBUG = True, allowed ENU hosts = ["*"], change the database to mysql, and comment out the csrf)
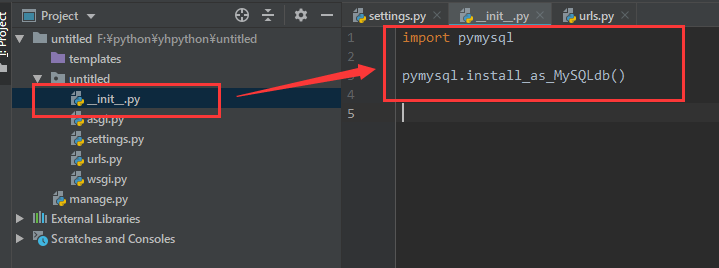
1.1.2 write driver (used to connect mysql)
1.1.3 new database
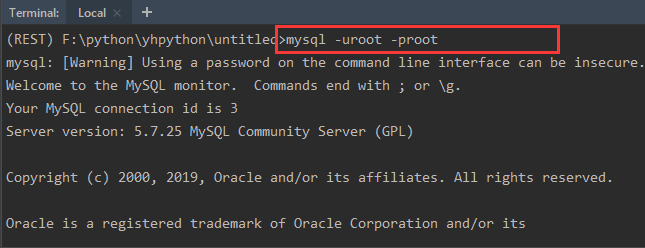
Input instruction, log in database
Login database instruction: mysql -u user name - p password
Building database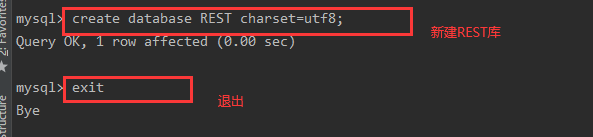
create database Library name charset=utf8;
1.1.4 migration
Execute migration command
python manage.py migrate
I used django2 here, so I reported an error. This problem is only caused by django2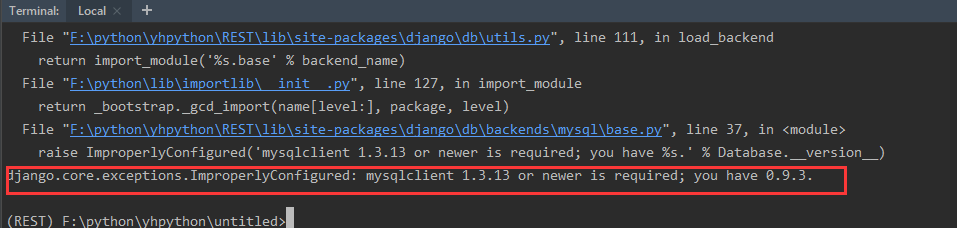
Specific solution: find the line below if version corresponding to the base file below, comment it out and write a pass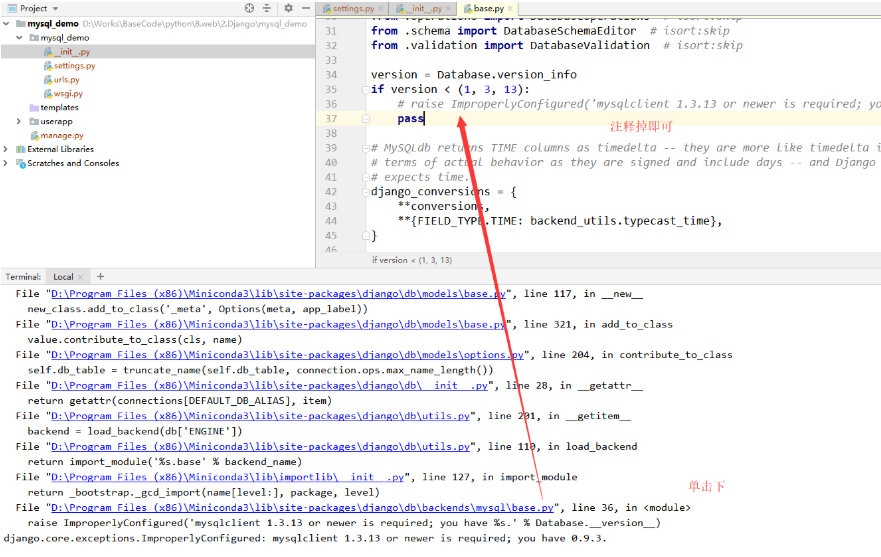
Execute migration command again, successful
1.1.5 login database
Here we log in pycharm (you can also log in navicat and other database software)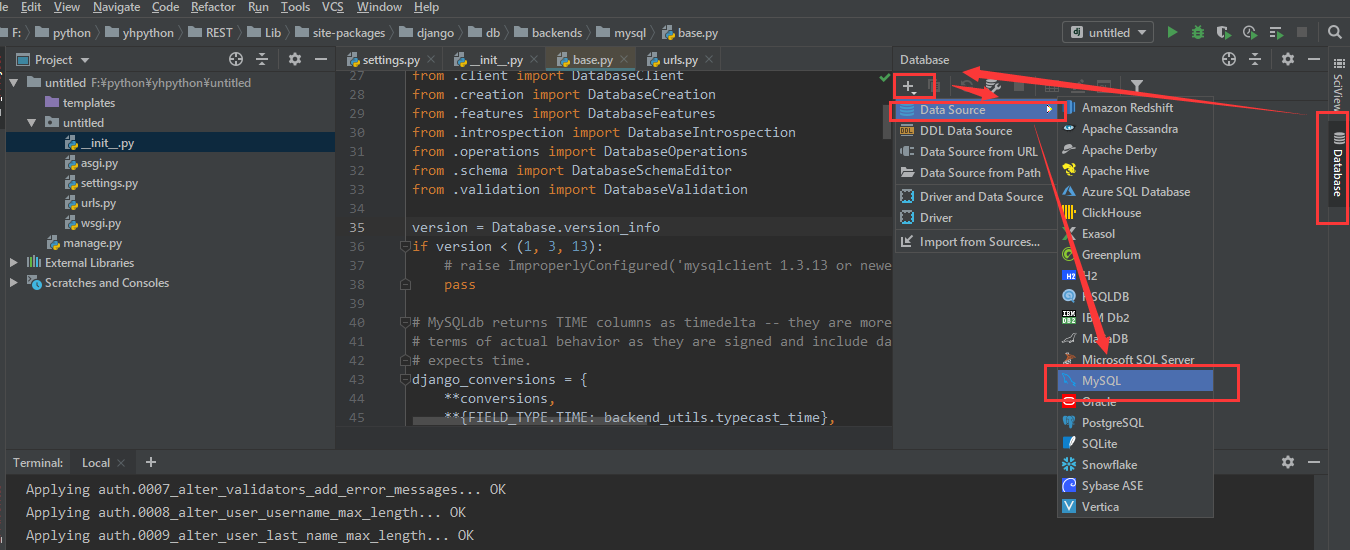
Note that the name of the database should be consistent with the name of the database created in 1.1.3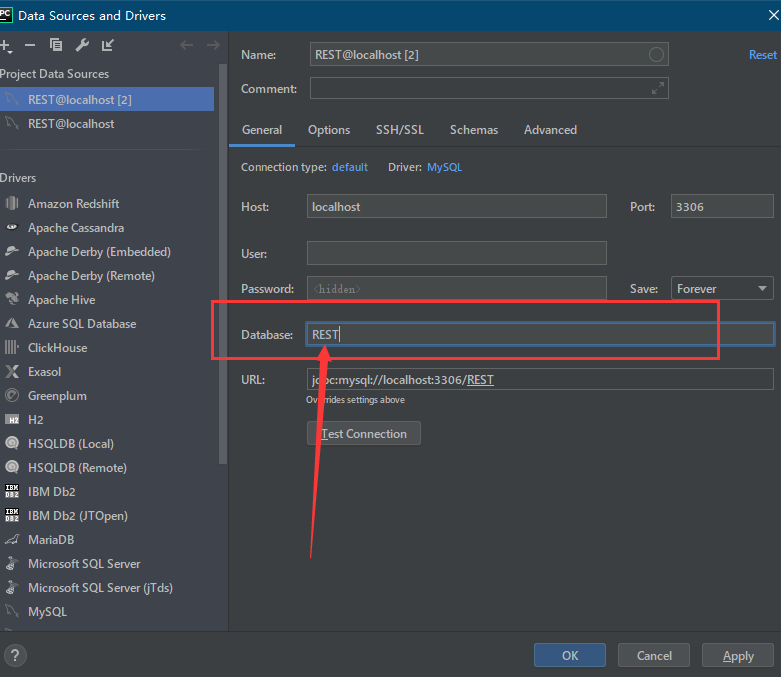
Then fill in the user name and password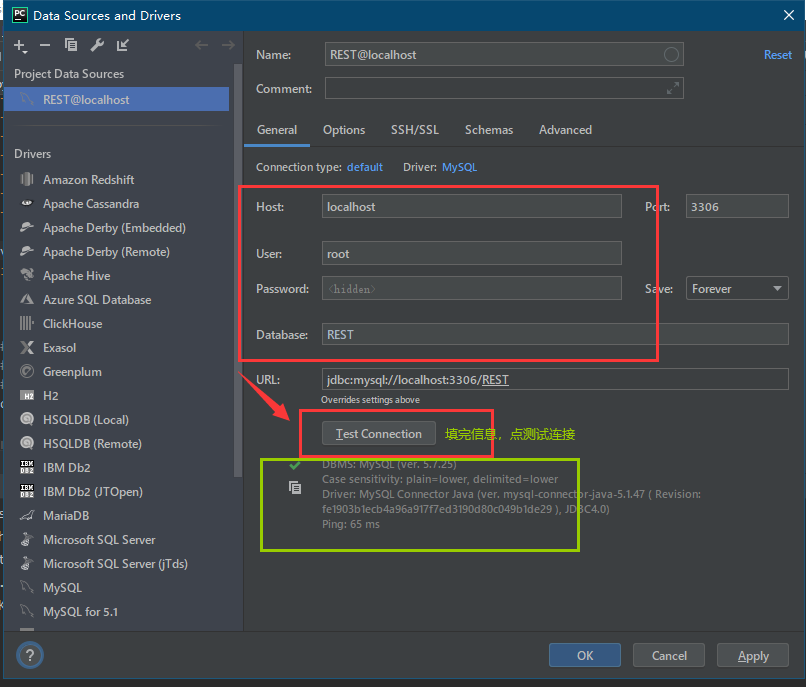
Fill in the information point test connection, as shown in the figure above. If the green part is checked, you can click "ok",
If the test fails
For database version, please refer to https://www.cnblogs.com/wt7018/p/11209854.html
Refer to the database time zone: https://www.cnblogs.com/wt7018/p/11209854.html
Create success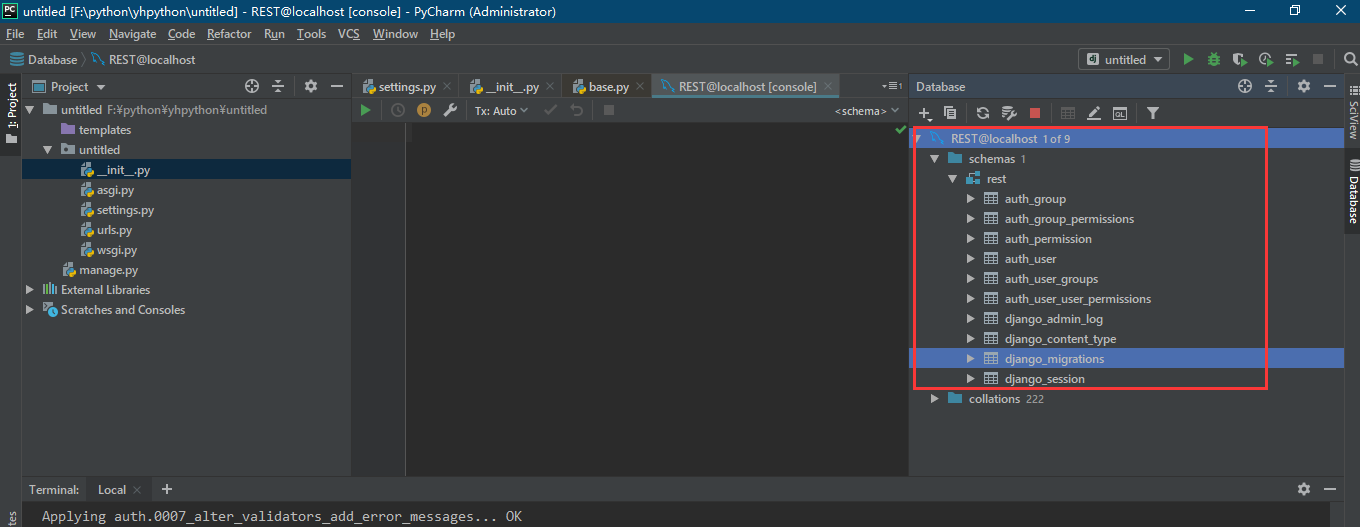
1.2 first test whether django can start normally
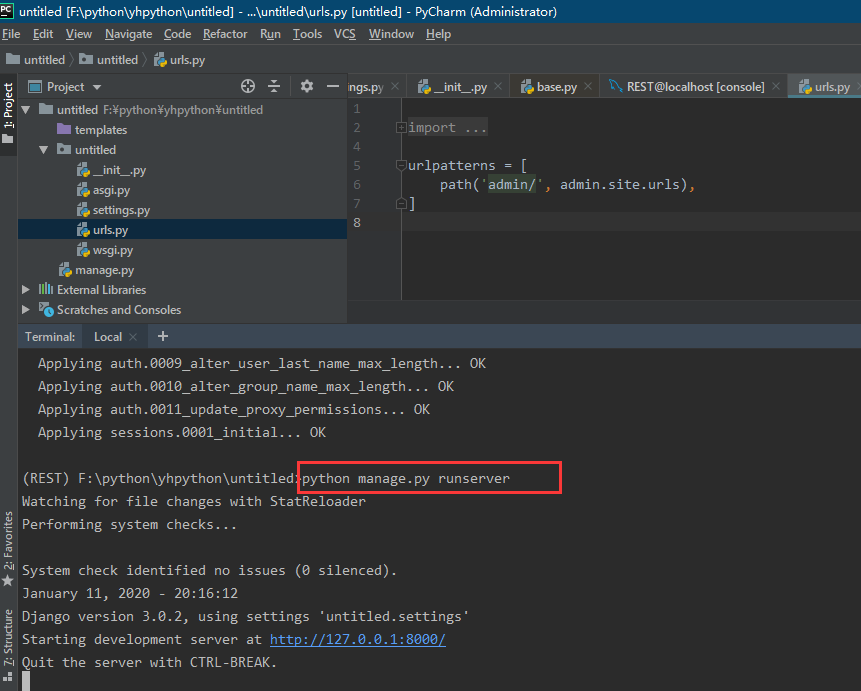
python manage.py runserver
Enter http://127.0.0.1:8000/ in the browser, and the following page will run successfully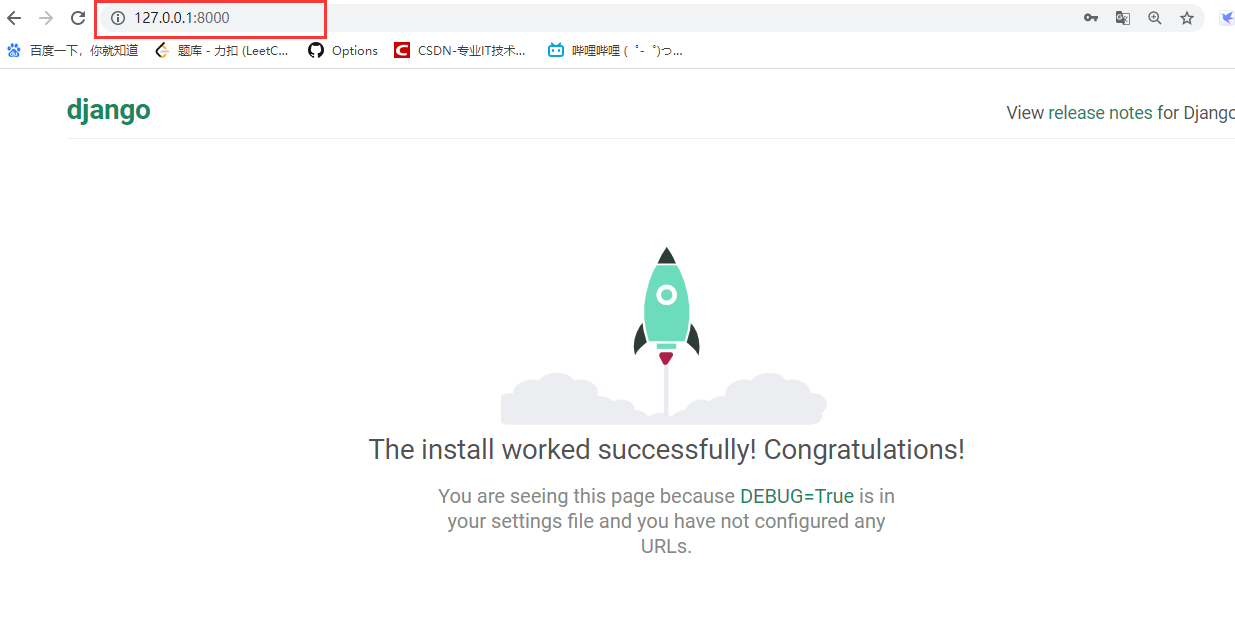
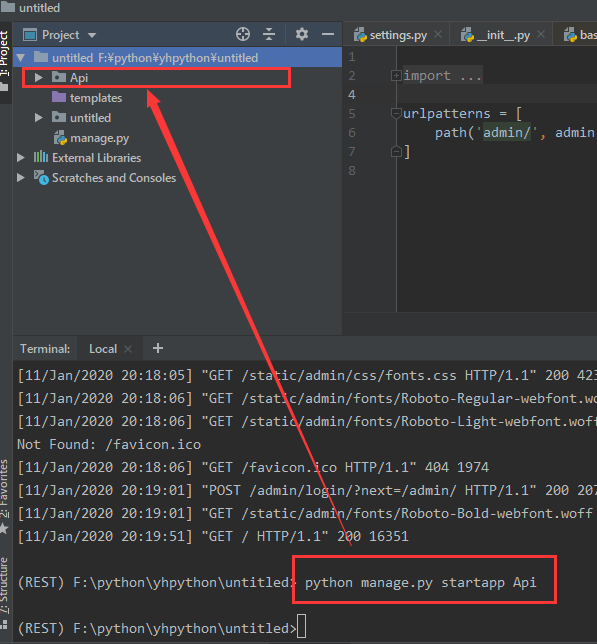
1.3 create interface application
1.3.1 create application Api
According to RESTFul principle, we should call the interface application "Api"“
python manage.py startapp Api
Remember to register Api in setting after creation (error may be reported when using models.py without registration)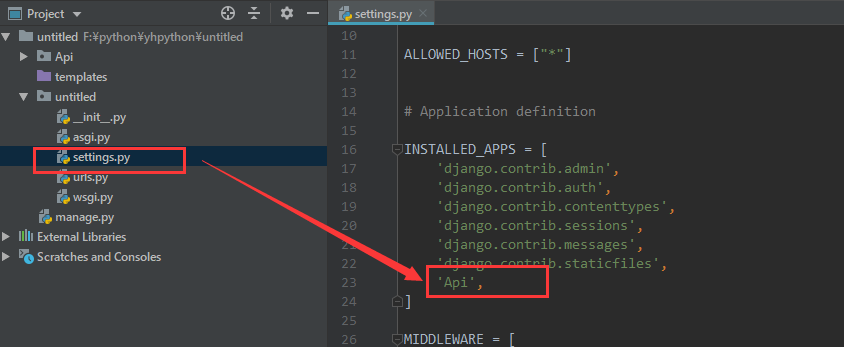
Create a new urls.py in Api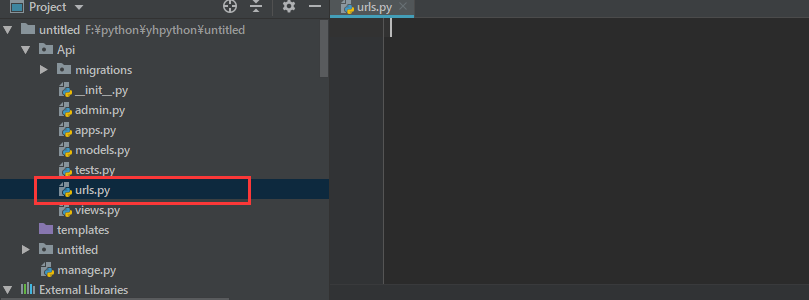
Add the new urls.py on the root route untitled/urls.py
Note: This is the way django2 is written. django1 is slightly different
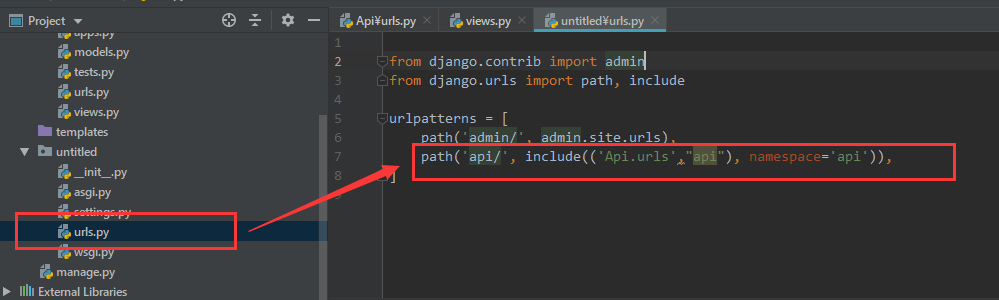
Add a route in Api/urls.py
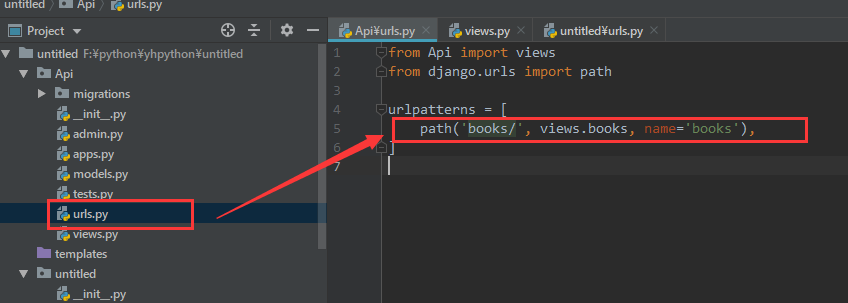
Create corresponding view function in view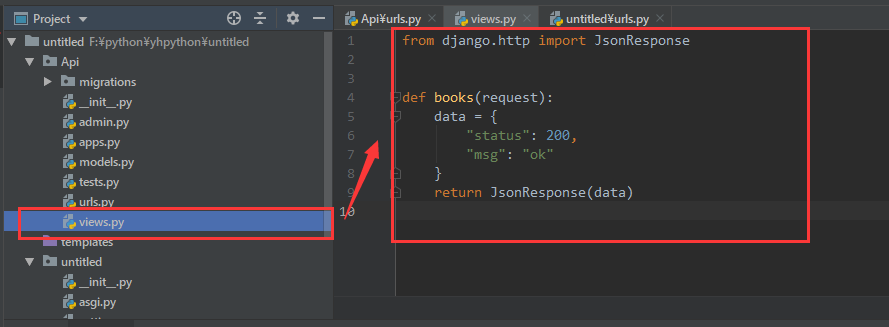
1.4 operation and access
Function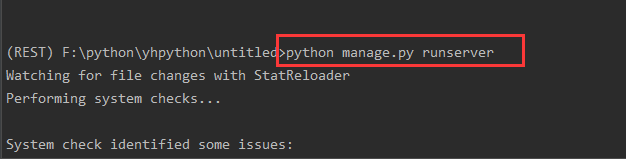
Then try to access the interface in the browser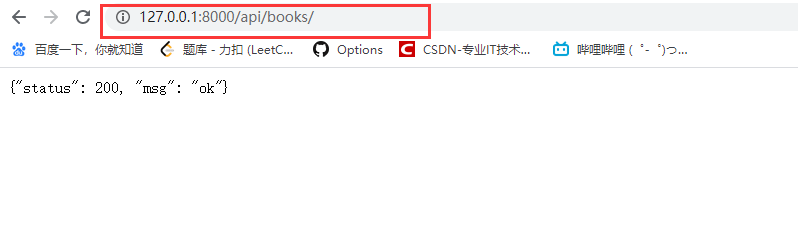
Here a simple django interface is created successfully
2. Use interface
2.1. Use the postman tool to send a POST request
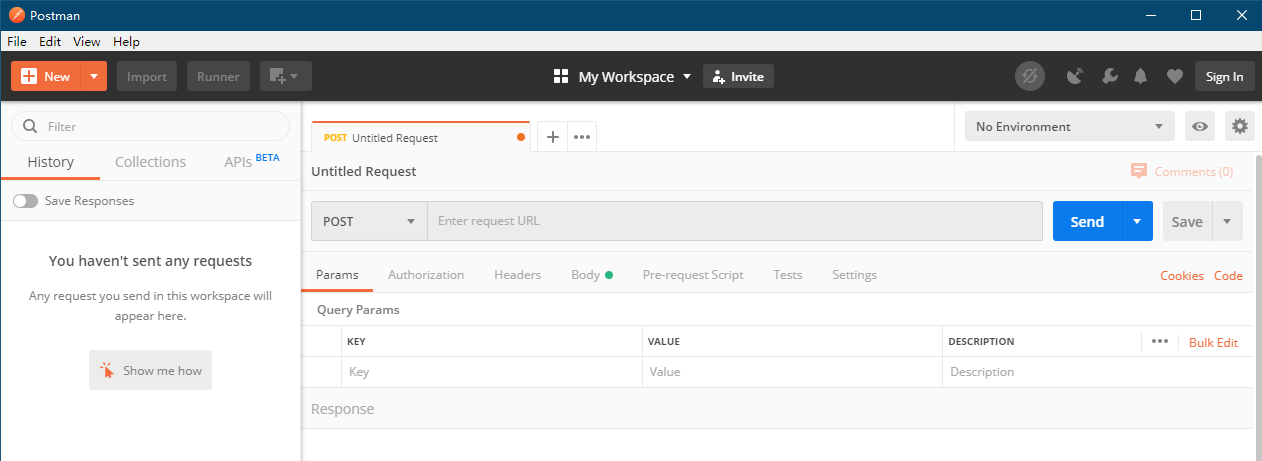
2.1.1 download postman (interface test tool)
https://dl.pstmn.io/download/latest/win32
Open postman and it will pop up a login page, which can be skipped directly
You can refer to this article for the post man tutorial (I don't think it's necessary, it's easy to operate)
https://www.jianshu.com/p/97ba64888894
2.1.2 write an interface that can receive post requests
Api routing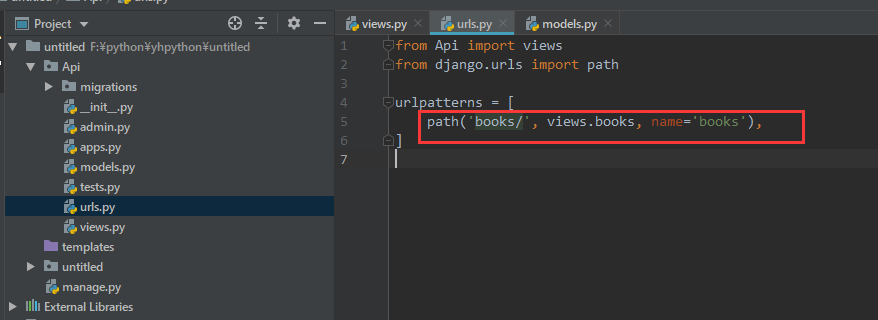
Model (models.py)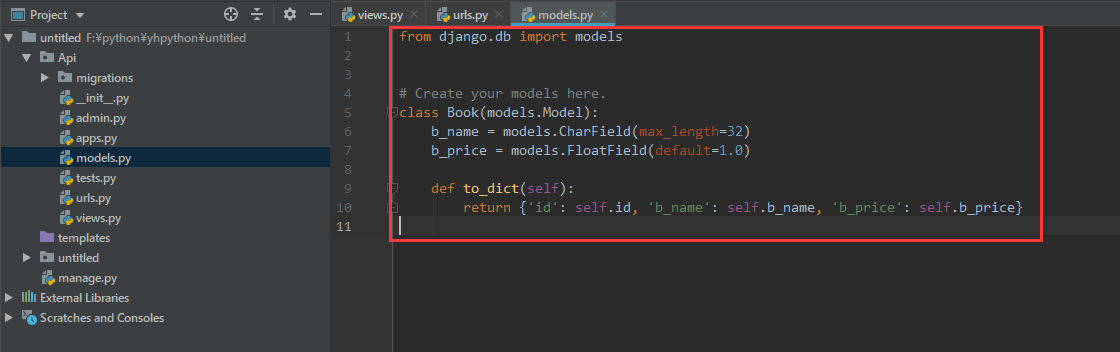
from django.db import models


# Create your models here.
class Book(models.Model):
    b_name = models.CharField(max_length=32)
    b_price = models.FloatField(default=1.0)

    def to_dict(self):
        return {'id': self.id, 'b_name': self.b_name, 'b_price': self.b_price}
transfer
python manage.py makemigrations
python manage.py migrate
view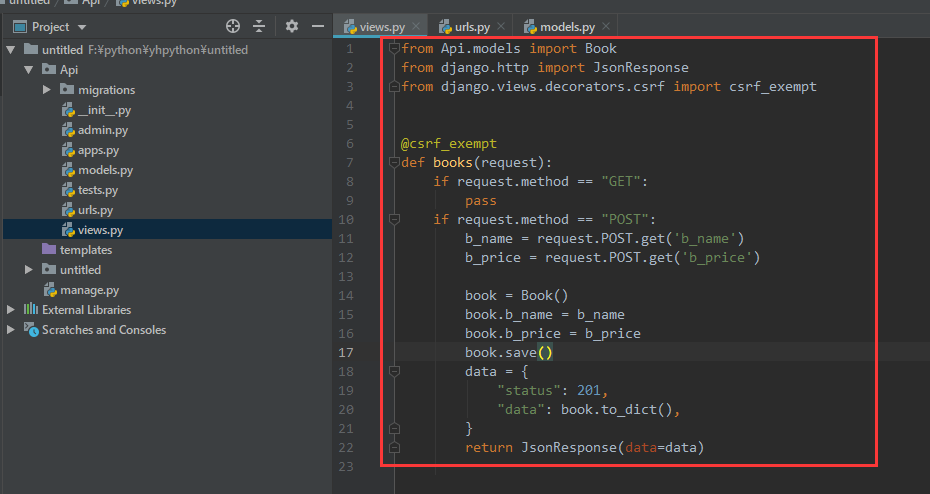
from Api.models import Book
from django.http import JsonResponse
from django.views.decorators.csrf import csrf_exempt


@csrf_exempt
def books(request):
    if request.method == "GET":
        pass
    if request.method == "POST":
        b_name = request.POST.get('b_name')
        b_price = request.POST.get('b_price')

        book = Book()
        book.b_name = b_name
        book.b_price = b_price
        book.save()
        data = {
            "status": 201,
            "data": book.to_dict(),
        }
        return JsonResponse(data=data)
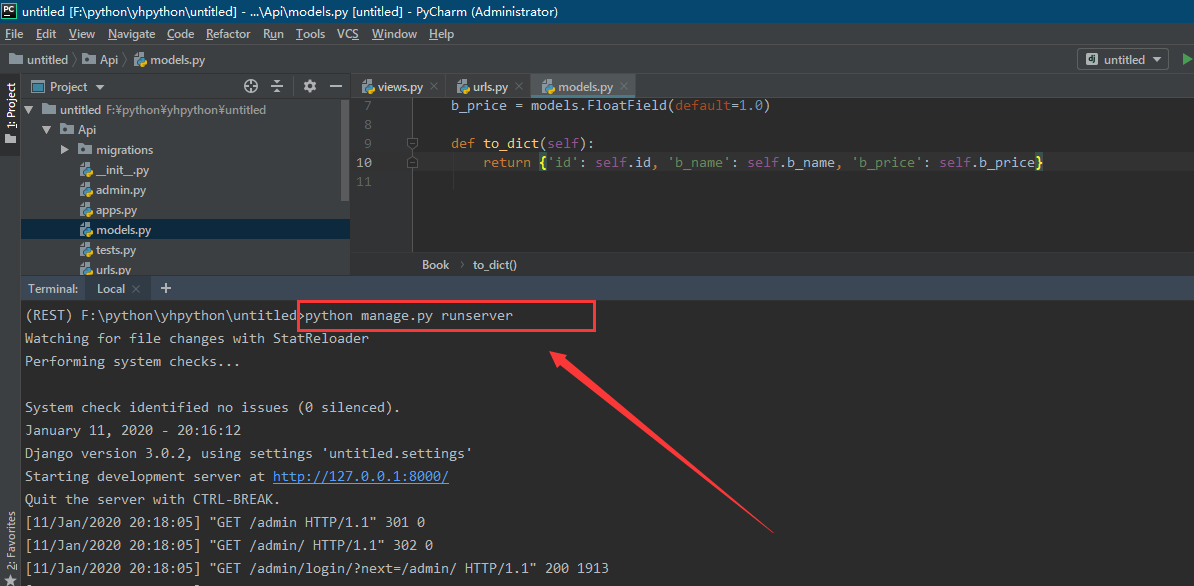
2.1.3 open postman and send a POST request
Start django first
python manage.py runserver
Open postman and input the corresponding content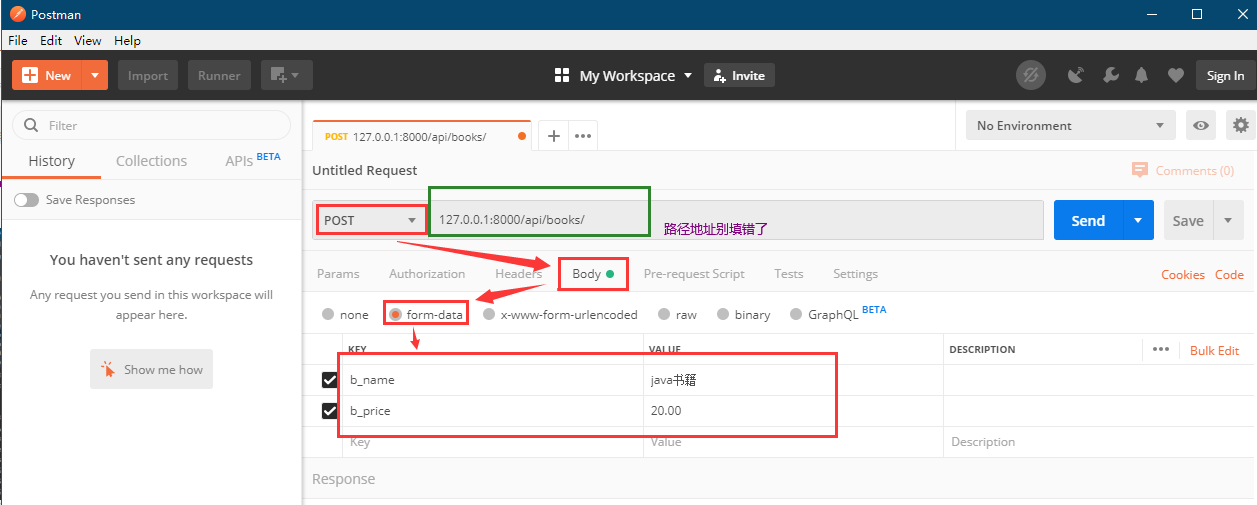
Click send to send and the following screenshot will show success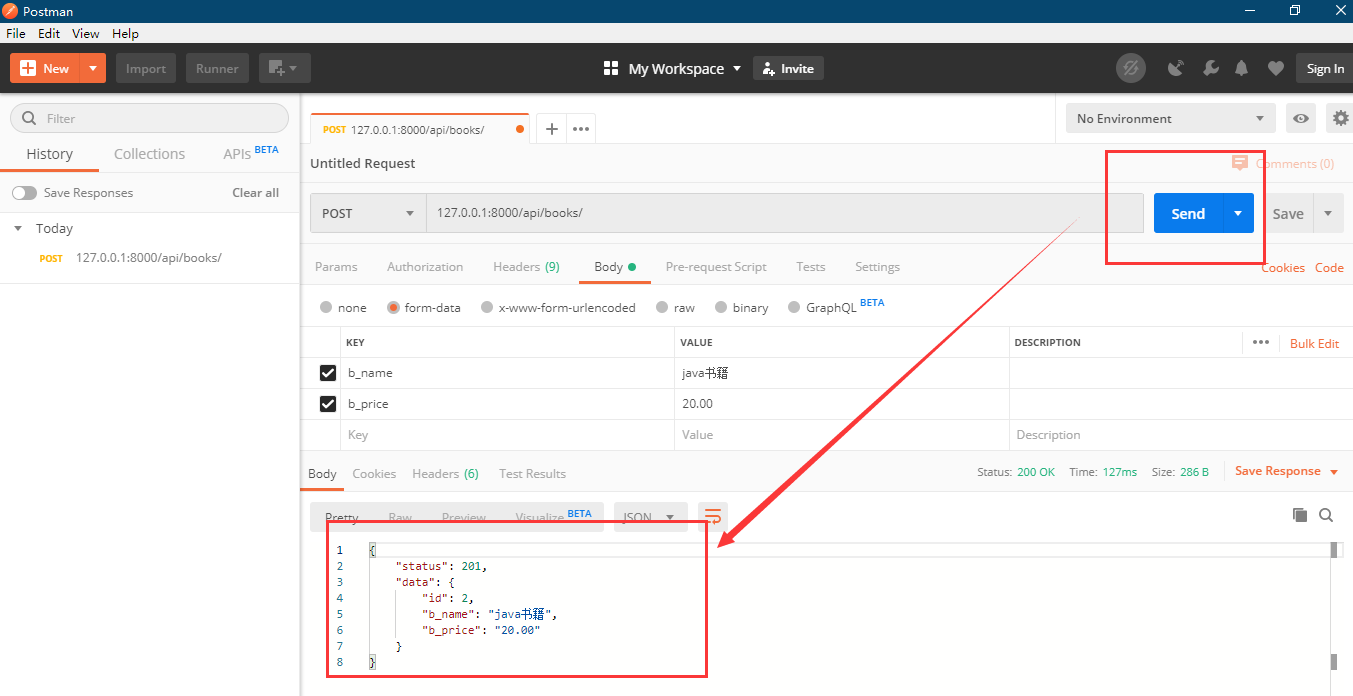
You can also check whether the data is inserted in the database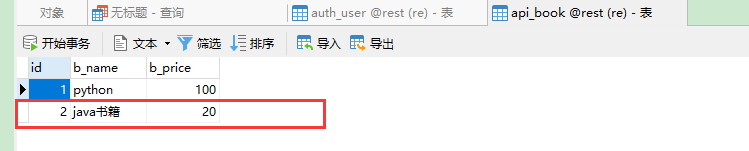
2.1.4. There are also interface testing tools under the linux command window
Students using the linux command window can view this article
HTTPie installation and use: https://blog.csdn.net/bobey/article/details/84863380
POST request simulating form
http -f POST www.baidu.com b_name='java book' b_price=20
Common operation instructions:
http -f POST www.baidu.com name=name  #Simulation form submission

http -v www.baidu.com     #Show detailed request information
http -h www.baidu,com     #Show headers only
http -b www.baidu.com     #Show Body only
http -d www.baidu.com     #Download File

http PUT www.baidu.com name=name password=pwd  #Pass json type parameter (string)
http PUT www.baidu.com age:=28 #Non string type use:=Division

http --form POST www.baidu.com name='name'    #Simulated formPOSTrequest
http -f POST www.baidu.com/files  name='name' file@~/test.txt  #Upload simulation form file

http www.baidu.com User-Agent:Txl/1.0 'Cookie:a=b;b=c' Referer:http://www.baidu.com/
# Modify request header using: split

http -a username:password www.baidu.com   #Authentication
http --auth--type=digest -a user:pwd www.baidu.com  #Authentication

http --proxy=http:http://192.168.1.1:8080 www.baidu.com
# UseHTTPagent
2.2 GET request
view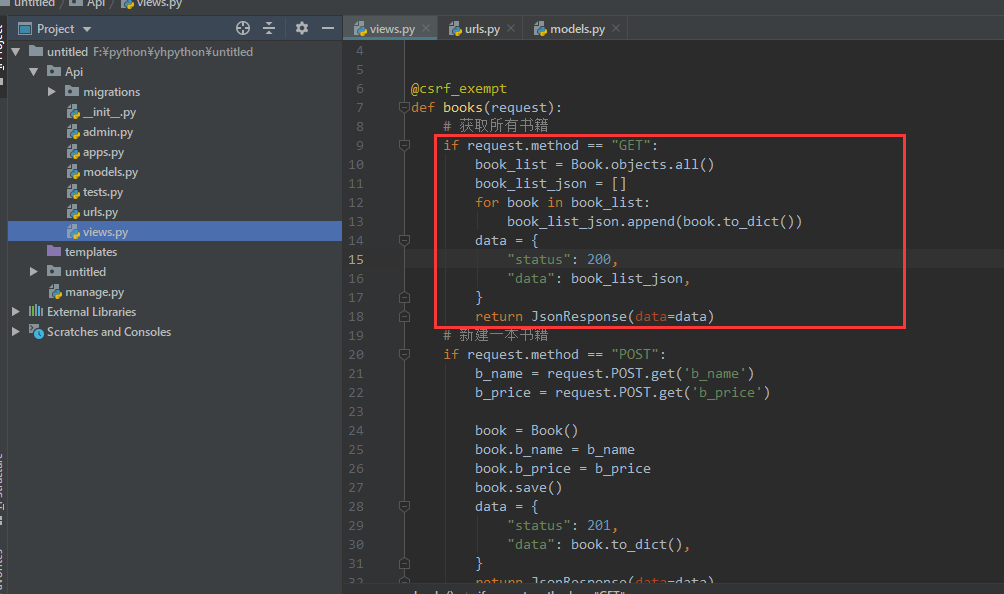
    if request.method == "GET":
        book_list = Book.objects.all()
        book_list_json = []
        for book in book_list:
            book_list_json.append(book.to_dict())
        data = {
            "status": 200,
            "data": book_list_json,
        }
        return JsonResponse(data=data)
Start django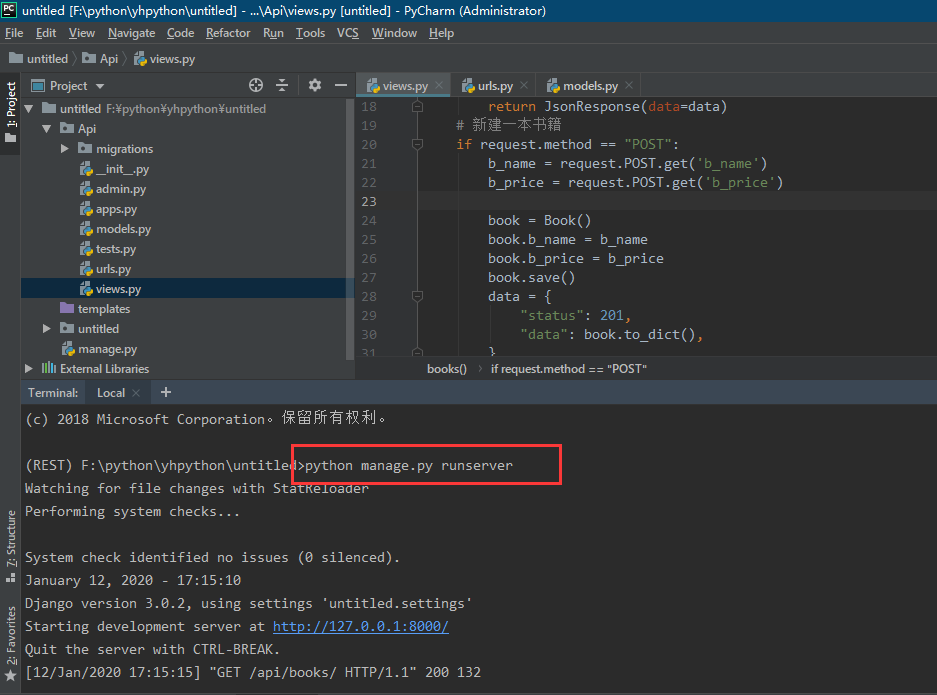
Request in postman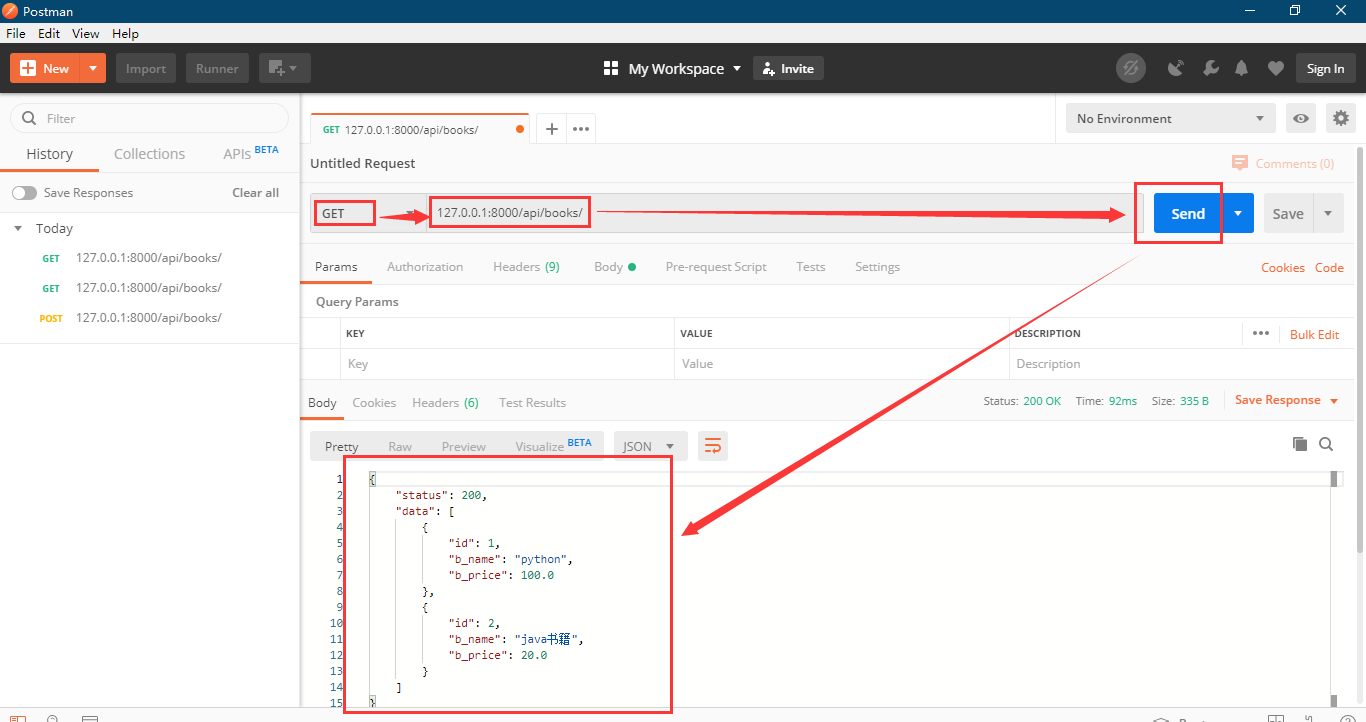
2.3 GET request with parameters
Get a Book
Route: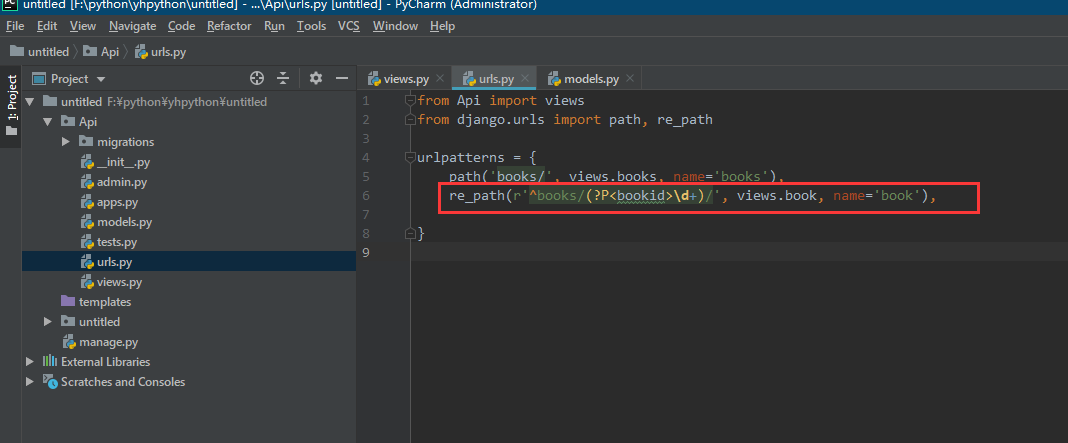
View: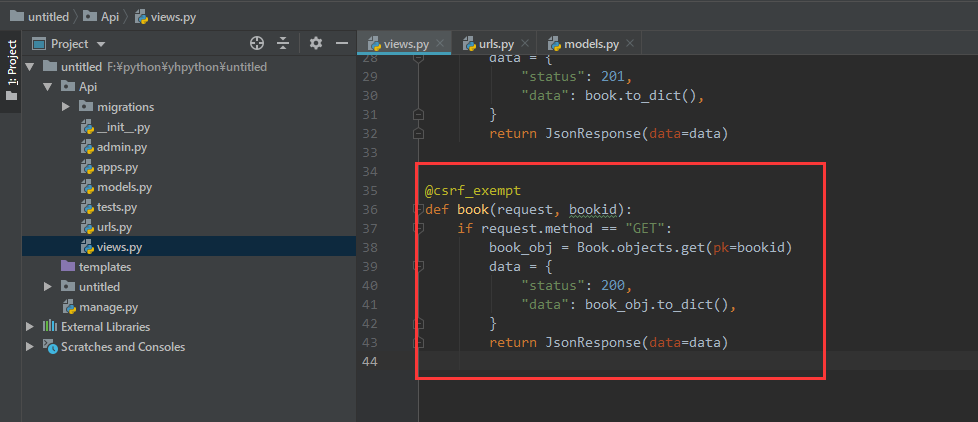
@csrf_exempt
def book(request, bookid):
    if request.method == "GET":
        book_obj = Book.objects.get(pk=bookid)
        data = {
            "status": 200,
            "data": book_obj.to_dict(),
        }
        return JsonResponse(data=data)
Visit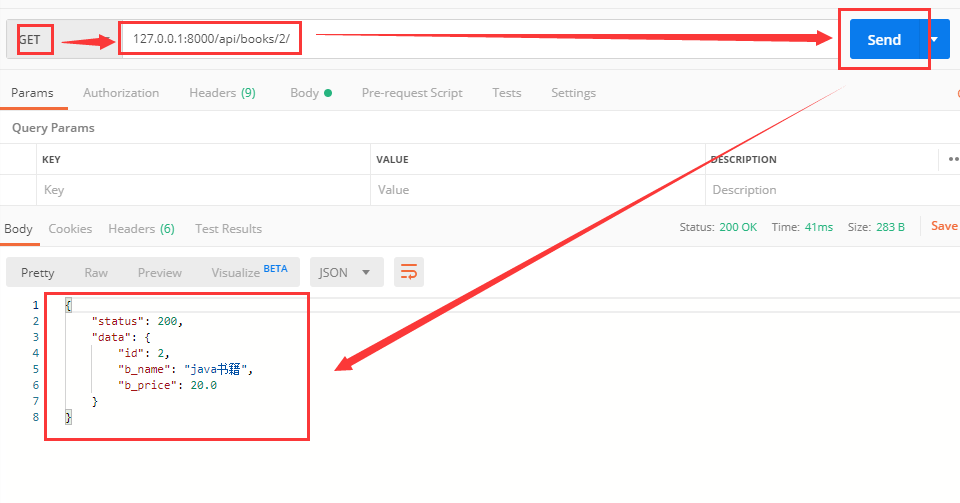
2.4 DELETE request with parameters
view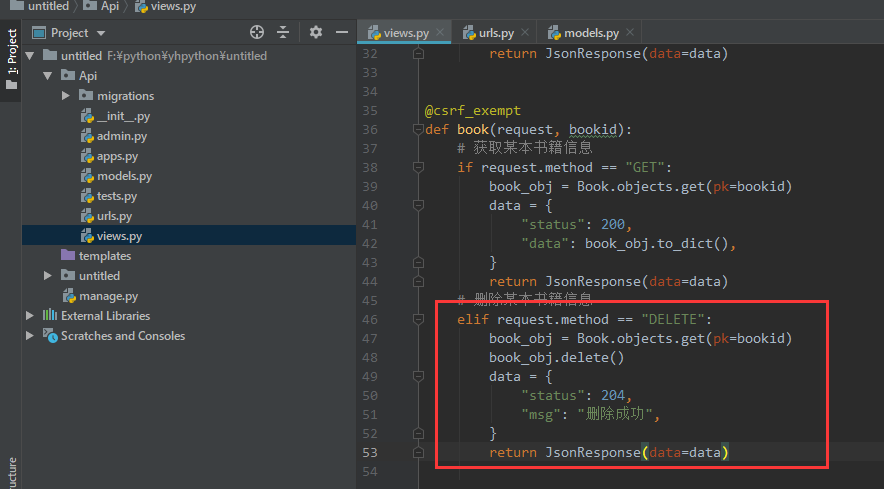
Visit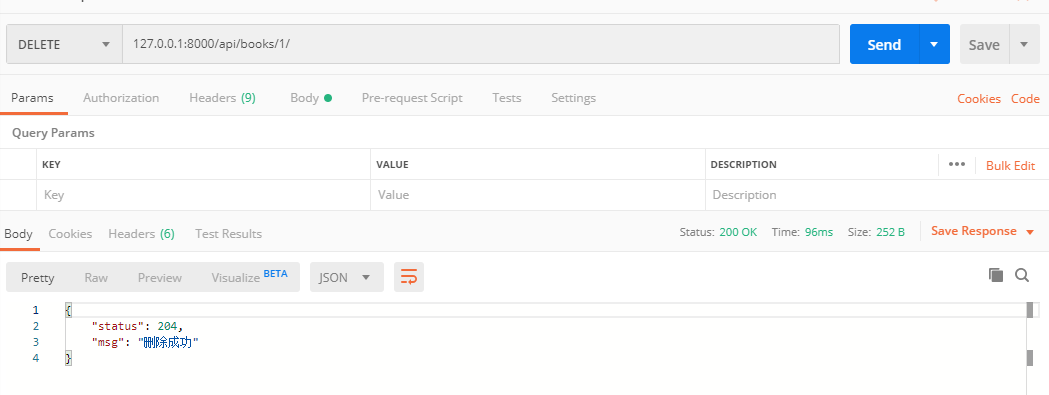
3. Interface and web page docking
Create static folder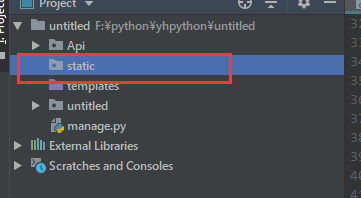
Registered static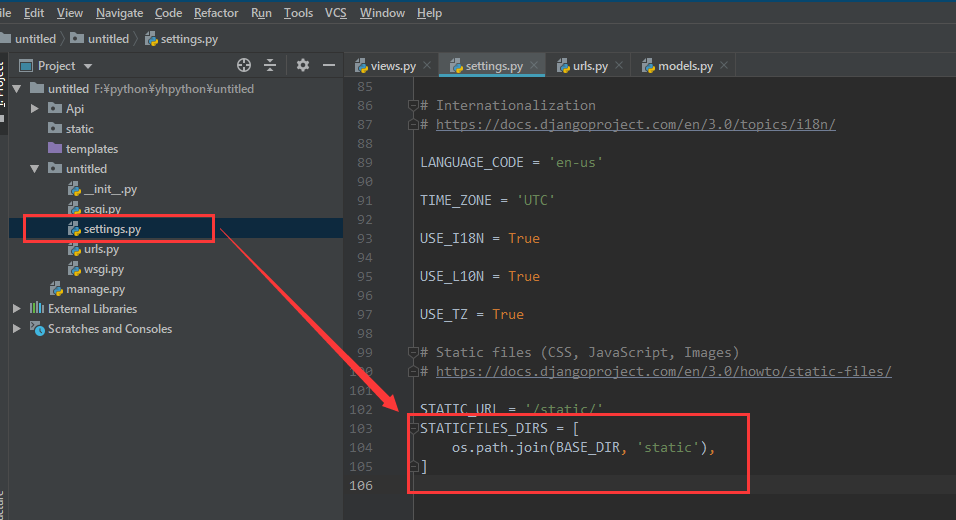
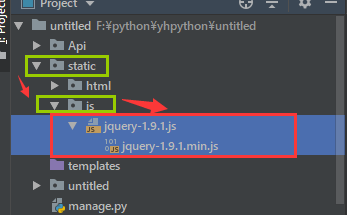
3.1. Create a new BookList.html
First import jQuery (. JS and. min.js are copied in)
jq Download address: http://www.jq22.com/jquery/jquery-1.11.3.zip
New BookList.html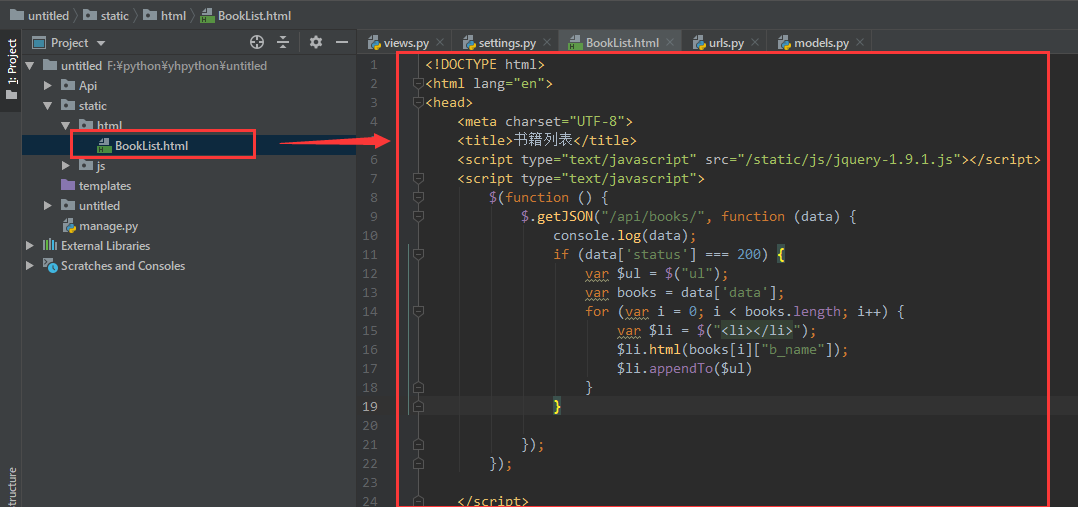
<!DOCTYPE html>
<html lang="en">
<head>
    <meta charset="UTF-8">
    <title>List of books</title>

    // If you copy directly, pay attention to your jquery location and name, which may be inconsistent with mine

    <script type="text/javascript" src="/static/js/jquery-1.9.1.js"></script>
    <script type="text/javascript">
        $(function () {
            $.getJSON("/api/books/", function (data) {
                console.log(data);
                if (data['status'] === 200) {
                    var $ul = $("ul");
                    var books = data['data'];
                    for (var i = 0; i < books.length; i++) {
                        var $li = $("<li></li>");
                        $li.html(books[i]["b_name"]);
                        $li.appendTo($ul)
                    }
                }

            });
        });

    </script>

</head>
<body>
<div id="container">
    <ul>

    </ul>
</div>
</body>
</html>
Here $. getJSON("/api/books /" Get the json data directly from the view books
3.2 browser access
Post run access: note that this is a direct access html file without routing allocation (html obtains json data through jq asynchronous submission)

