DMDSC setup (VMware virtual machine + Centos7 operating system + DM8x86 version)
1, Construction premise:
This setup is applicable to (VMware virtual machine + Centos7 operating system + DM8x86 version):
1. Create shared disk for virtual machine: (steps are as follows)
DSC01 node:
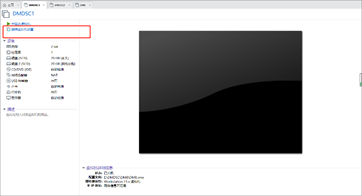
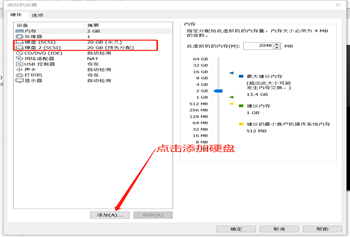
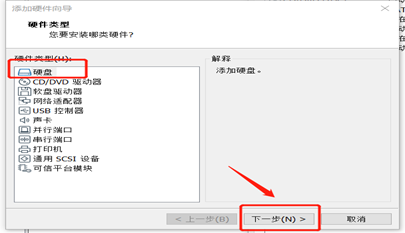
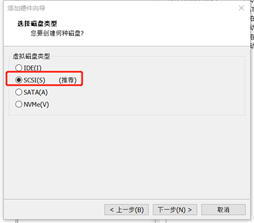
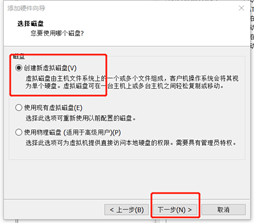
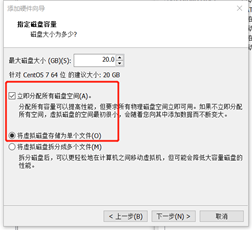

Create a new virtual disk and remember the name and path of the disk:
DSC02 node:
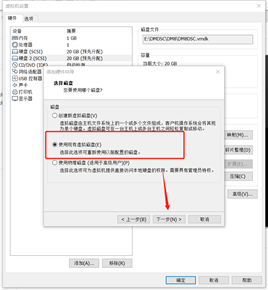
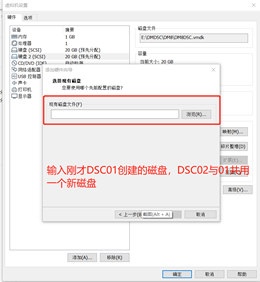
Like the first four steps when DSC01 creates a disk, step 5 selects to use an existing disk, and step 6 enters the path and name of the disk created by DSC01.
After creating the disk:
Add the following restrictions to the configuration files of the two virtual disks (. vmx is the suffix) and modify the use restrictions of the virtual disks:
disk.locking="FALSE"
scsi0:1.SharedBus="Virtual"
scsi1:1.SharedBus="Virtual"
#(both stations have to be modified)
2, Division of bare equipment:
2.1 raw device division on shared disk:
(perform the following operations on any node):
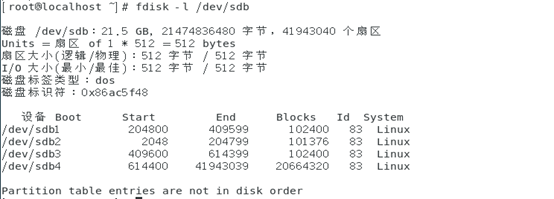
fdisk /dev/sdb
Enter in sequence:
n → p → 1 → enter → + 100M → enter to complete the division of the first disk
n → p → 2 → enter → + 100M → enter to complete the division of the second disk
n → p → 3 → enter → + 2048M → enter to complete the division of the third disk
n → p → 4 → enter → enter → enter, complete the partition of the fourth disk
Press w to save and exit
The size of the first two partitions is 100M, and the third partition is no less than 2G (if the partition is too small, there may be errors such as starting dmserver flash back, connection failure when creating ASM disk group, etc.)
View disk partition: fdisk -l /dev/sdb
2.2 binding bare devices in udev mode:
Edit in each node:
vim /etc/udev/rules.d/90-raw.rules
Add the following command
ACTION=="add",KERNEL=="sdc",RUN+="/bin/raw /dev/raw/raw1 %N"
ACTION=="add",KERNEL=="sdd",RUN+="/bin/raw /dev/raw/raw2 %N"
ACTION=="add",KERNEL=="sde",RUN+="/bin/raw /dev/raw/raw3 %N"
ACTION=="add",KERNEL=="sdf",RUN+="/bin/raw /dev/raw/raw4 %N"
KERNEL=="raw[1-4]", OWNER="dmdba", GROUP="dinstall", MODE="660"
Then save and exit: the following command takes effect:
udevadm trigger --type=devices --action=change
: then restart all virtual machines.
View results:

2.3 creating asm disk
Using the dmdba user, go to the bin directory of the DM database software installation directory and execute the following command (only on one node).
Execute in bin directory:/ dmasmcmd
DMASMCMD V8
ASM>create dcrdisk '/dev/raw/raw1' 'dcr';
syntax error
asmcmd parse failed!
ASM>create dcrdisk '/dev/raw/raw1' 'dcr'
[Trace]The ASM initialize dcrdisk /dev/raw/raw1 to name DMASMdcr
Used time: 7.334(ms).
ASM>create votedisk '/dev/raw/raw2' 'vote'
 [Trace]The ASM initialize votedisk /dev/raw/raw2 to name DMASMvote
Used time: 3.766(ms).
ASM>create asmdisk '/dev/raw/raw3' 'LOG0'
[Trace]The ASM initialize asmdisk /dev/raw/raw3 to name DMASMLOG0
Used time: 7.499(ms).
ASM>create asmdisk '/dev/raw/raw4' 'DATA0'
[Trace]The ASM initialize asmdisk /dev/raw/raw4 to name DMASMDATA0
Used time: 7.210(ms).
Note: no semicolon is added after each statement under dmamcmd, otherwise an error will be reported.
Configure DCR initialization profile
Create a directory for storing configuration files. Execute both nodes. Use the dmdba user to execute the following command: mkdir -p /home/dmdba/config
New edit dmdcr_cfg.ini file. Node 1 uses the dmdba user and executes the following command:
DCR_N_GRP             = 3
DCR_VTD_PATH          = /dev/raw/raw2
DCR_OGUID         = 63635
[GRP]
 DCR_GRP_TYPE         = CSS
 DCR_GRP_NAME         = CSS
 DCR_GRP_N_EP         = 2
 DCR_GRP_DSKCHK_CNT   = 60
[CSS]
 DCR_EP_NAME          = CSS1
 DCR_EP_HOST          = 10.12.11.102(IP)
 DCR_EP_PORT          = 9341
[CSS]
 DCR_EP_NAME          = CSS2
 DCR_EP_HOST          = 10.12.11.103
 DCR_EP_PORT          = 9341
[GRP]
 DCR_GRP_TYPE         = ASM
 DCR_GRP_NAME         = ASM
 DCR_GRP_N_EP         = 2
 DCR_GRP_DSKCHK_CNT   = 60
[ASM]
 DCR_EP_NAME          = ASM1
 DCR_EP_SHM_KEY       = 93360
 DCR_EP_SHM_SIZE      = 10
 DCR_EP_HOST          = 10.12.11.102(IP)
 DCR_EP_PORT          = 9351
 DCR_EP_ASM_LOAD_PATH  = /dev/raw
[ASM]
 DCR_EP_NAME          = ASM2
 DCR_EP_SHM_KEY       = 93361
 DCR_EP_SHM_SIZE      = 10
 DCR_EP_HOST          = 10.12.11.103
 DCR_EP_PORT          = 9351
 DCR_EP_ASM_LOAD_PATH  = /dev/raw
[GRP]
 DCR_GRP_TYPE         = DB
 DCR_GRP_NAME         = DSC
 DCR_GRP_N_EP         = 2
 DCR_GRP_DSKCHK_CNT   = 60
[DSC]
 DCR_EP_NAME         = DSC1
 DCR_EP_SEQNO                 = 0
 DCR_EP_PORT         = 5232
 DCR_CHECK_PORT            = 9741
[DSC]
 DCR_EP_NAME         = DSC2
 DCR_EP_SEQNO                 = 1
 DCR_EP_PORT         = 5232
 DCR_CHECK_PORT            = 9741
Initialization using the DMASMCMD tool
init dcrdisk '/dev/raw/raw1' from '/home/dmdba/config/dmdcr_cfg.ini'
init dcrdisk '/dev/raw/raw1' from '/home/dmdba/config/dmdcr_cfg.ini' identified by '123456'
init votedisk '/dev/raw/raw2' from '/home/dmdba/config/dmdcr_cfg.ini'
Prepare the MAL configuration file of DMASM (named dmasvrmal.ini). All nodes using DMASM should be configured with exactly the same content. Save it to the directory / home/dmdba/cofig:
[MAL_INST1]
    MAL_INST_NAME              = ASM0
    MAL_HOST                    = 10.0.2.101 (Own node IP)
    MAL_PORT                    = 7236

[MAL_INST2]
    MAL_INST_NAME              = ASM1
    MAL_HOST                    = 10.0.2.102
    MAL_PORT                    = 7237
Prepare dmdcr Ini configuration file and save it to / home/dmdba/cofig directory
The two nodes of DMASM are configured with dmdcr ini,dmdcr_ Same path, dmasvrmal The contents of the INI file are the same, dmdcr_seqo is 0 and 1 respectively.
Node 1:
DMDCR_PATH     = /dev/raw/raw1
DMDCR_MAL_PATH =/home/dmdba/cofig /dmasvrmal.ini  #MAL profile path used by dmasmsvr
DMDCR_SEQNO   = 0

#ASM restart parameter, start in command line mode
DMDCR_ASM_RESTART_INTERVAL = 0
DMDCR_ASM_STARTUP_CMD	=	/home/dmdba/dmdbms/bin/dmasmsvr   dcr_ini=/home/dmdba/cofig /dmdcr.ini

#DB restart parameter, start in command line mode
DMDCR_DB_RESTART_INTERVAL = 0
DMDCR_DB_STARTUP_CMD	=	/home/dmdba/dmdbms/bin/dmserver   path=/home/dmdba/cofig /config/dm.ini dcr_ini=/home/dmdba/cofig /dmdcr.ini
Node 2:
DMDCR_PATH     = /dev/raw/raw1
DMDCR_MAL_PATH =/home/dmdba/cofig /dmasvrmal.ini  #MAL profile path used by dmasmsvr
DMDCR_SEQNO   = 1

#ASM restart parameter, start in command line mode
DMDCR_ASM_RESTART_INTERVAL = 0
DMDCR_ASM_STARTUP_CMD	=	/home/dmdba/dmdbms/bin/dmasmsvr dcr_ini=/home/dmdba/cofig /dmdcr.ini
#DB restart parameter, start in command line mode
DMDCR_DB_RESTART_INTERVAL = 0
DMDCR_DB_STARTUP_CMD	=	/home/dmdba/dmdbms/bin/dmserver path=/home/dmdba/cofig /dm.ini dcr_ini =/home/dmdba/cofig /dmdcr.ini
2.4 the front desk starts the DMDSC cluster service
Manually start the dmcss command:
Two nodes start DMCSS, and the dmdba user goes to the database bin to execute:
./dmcss dcr_ini=/home/dmdba/config/dmdcr.ini
Manually start the dmasmsvr command:
./dmasmsvr DCR_INI=/home/dmdba/dmdcr.ini
After startup, open a new window and execute the following command in the bin directory of dmdbms:
./dmasmtool dcr_ini=/home/dmdba/config/dmdcr.ini
Enter the following command:
create diskgroup 'DMLOG' asmdisk '/dev/raw/raw3'
create diskgroup 'DMDATA' asmdisk '/dev/raw/raw4'
2.5 prepare dminit Ini configuration file, save to / home/dmdba/config directory
vim /home/dmdba/config/dminit.ini
db_name        = DSC
system_path       = +DMDATA/data

system        = +DMDATA/data/dsc/system.dbf
system_size       = 128
roll     = +DMDATA/data/dsc/roll.dbf
roll_size     = 128
main     = +DMDATA/data/dsc/main.dbf
main_size     = 128
ctl_path     = +DMDATA/data/dsc/dm.ctl
ctl_size     = 8
log_size     = 100
dcr_path     = /dev/raw/raw1
dcr_seqno     = 0
auto_overwrite   = 1
[DSC1]
config_path    = /home/dmdba/config/dsc1
port_num     = 5232
mal_host     = 10.12.11.102
mal_port     = 9236
log_path     = +DMLOG/log/DSC1_log01.log
log_path     = +DMLOG/log/DSC1_log02.log
[DSC2]
config_path    = /home/dmdba/config/dsc2
port_num     = 5232
mal_host     = 10.12.11.103
mal_port     = 9236
log_path     = +DMLOG/log/DSC2_log01.log
log_path     = +DMLOG/log/DSC2_log02.log
The two node configuration files are the same. Just scp:
Initialize the instance. On node 1, the dmdba user executes the following commands:
./dminit control=/home/dmdba/config/dminit.ini
After initialization, two instance configuration folders will be generated in the directory of init control file configuration:
dsc1
dsc2
Copy the dsc2 directory to the directory corresponding to node 2
scp -r /home/dmdba/config/dsc2
The foreground starts the database service
10.0.2.101 machine:
./dmserver /home/dmdba/config/dsc1/dm.ini dcr_ini=/home/dmdba/config/dmdcr.ini
10.0.2.102 machine:
./dmserver /home/dmdba/config/dsc2/dm.ini dcr_ini=/home/dmdba/config/dmdcr.ini
configure monitor
To create a new monitor configuration file for any node, execute the following command:
vim /home/dmdba/config/dmcssm.ini
CSSM_OGUID = 63635			#Dmdcr_ cfg. DCR in ini_ Oguid is consistent
#Configure the connection information of all CSS,
#Dmdcr_ cfg. DCR of CSS configuration item in ini_ EP_ Host and DCR_ EP_ Consistent with port
CSSM_CSS_IP = 10.12.11.102:9341(node IP)
CSSM_CSS_IP = 10.12.11.103:9341
CSSM_LOG_PATH =/home/dmdba/dmdbms/log		#Storage path of monitor log file
CSSM_LOG_FILE_SIZE = 32 			#Maximum 32 MB per log file
CSSM_LOG_SPACE_LIMIT = 0 			#Unlimited total log file space
Start monitor: (under bin directory)
./dmcssm ini_path=/home/dmdba/config/dmcssm.ini
Register cluster service
Register the cluster service and change the foreground startup mode to system service to facilitate the startup and shutdown of the cluster and realize self startup.
Both nodes need to be registered. Use the root user to register the service under the script/root directory
#Register css1 cluster service
./dm_service_installer.sh -t dmcss -p dsc1 -dcr_ini
/home/dmdba/config/dmdcr.ini
Register asm1 shared storage service
./dm_service_installer.sh -t dmasmsvr -p dsc1 -dcr_ini
/home/dmdba/config/dmdcr.ini -y DmCSSServicedsc1.service
#Register database service
./dm_service_installer.sh -t dmserver -p dsc1 -dm_ini
/home/dmdba/config/dsc1/dm.ini -dcr_ini /home/dmdba/config/dmdcr.ini
-y DmCSSServicedsc1.service
#Register css2 cluster service
./dm_service_installer.sh -t dmcss -p dsc2 -dcr_ini
/home/dmdba/config/dmdcr.ini
Register asm2 shared storage service
./dm_service_installer.sh -t dmasmsvr -p dsc2 -dcr_ini
/home/dmdba/config/dmdcr.ini -y DmCSSServicedsc2.service
#Register database service
./dm_service_installer.sh -t dmserver -p dsc2 -dm_ini
/home/dmdba/config/dsc1/dm.ini -dcr_ini /home/dmdba/config/dmdcr.ini
-y DmCSSServicedsc2.service
Last step:
1. After the service registration is completed, exit the window started at the front desk and use the service view command to view each node to ensure that all services have been stopped.
2. Start CSS, ASM and service with the commands just registered:
To the bin directory of dmdbms: (1 node)
./DmCSSServicedsc1
./DmASMSvrServicedsc1
./DmServicedsc1
(2) node to the bin directory of dmdbms:
./DmCSSServicedsc2
./DmASMSvrServicedsc2
./DmServicedsc2
It is recommended to start all services in this order
After all commands display OK, use:
ps -ef|grep dmcss
ps -ef|grep dmasm
ps -ef|grep dmserver
Check whether all services are started, and check the cluster status through the monitor.