Super long warning!!! It is recommended to look at the catalogue first
Introduction to docker and related cases
It's not easy to summarize. If you agree, please like it~
If there is any mistake, please correct it!
Docker directory
- Document introduction
- Docker overview
- Docker installation
- Basic components of Docker
- Docker installation steps
- Configure alicloud image acceleration
- HelloWorld start process analysis
- Underlying principle
- Docker common commands
- Help command
- Mirror command
- docker images view images on all local hosts
- docker search search image
- docker pull Download Image
- docker rmi delete image
- Container command
- docker run start container
- docker ps viewing running containers
- Exit container
- docker rm delete container
- Start and stop container
- Common other commands
- docker run -d background start container
- docker logs viewing logs
- docker top view process information in container
- docker inspect view the metadata of the image (important)
- docker exec/attach enters the currently running container
- docker cp copies files from the container to the host
- Summary of orders
- Practice
- Docker visualization
- Docker image explanation
- Container data volume
- What is a container data volume?
- Using data volumes
- MySQL synchronization data
- Named and anonymous mount
- Getting to know DockerFile
- Data volume container
- Summary
- Docker File
- About DockerFile
- DockerFile build process
- DockerFile instruction
- Real battle: build a CentOS of your own
- Difference between CMD and ENTRYPOINT
- Practice: making a Tomcat image
- Publish your own image to DockerHub
- Summary
- Docker network
Document introduction
This document is based on the teaching video of station B. It is highly recommended to watch this UP main teaching video, Video address
According to the relevant teaching videos, we have gained a lot. Thank you very much, Lord up
If you can, please click the video link and click like coin sharing and forwarding at the bottom of the video. Your support is very important
Docker overview
Why does Docker appear?
- In the development process of a product / project, there will be two sets of environment (dev prod), such as application environment and application configuration, if you want to go through the process of [development = = > go online]
- Generally, there are two departments (development, operation and maintenance) in the company. Environmental problems will cause problems in the project. There is a saying: "I can run my computer, why not yours". It can also be seen that the operation of the project has requirements for the environment, which may be due to different versions, resulting in service unavailability, or other reasons.
- The solution is either to manage the development and unify the environment through operation and maintenance, or the development also includes the operation and maintenance work, or the salary will not be so high.
- So the most fundamental problem is the environment. The environment configuration is troublesome, especially when building a cluster environment, it takes time and effort to configure the environment one machine at a time.
- In the past, when we released projects, there were jar / war packages. If we could bring the environment to the project, it would be more convenient.
- Especially when it is developed on Windows and distributed on Linux, such cross platform environment configuration is very troublesome
- So compared with the traditional "developers bring jar package operation and maintenance online", now it is more inclined to "develop package deployment online a set of processes" to solve.
- This gives birth to Docker, which provides a set of solutions for the above problems
- [java develops jar package] - > [package project (image) with environment] - > [publish to Docker warehouse] - > [download image, run directly]
Docker introduction
Homepage: https://www.docker.com/
Official documents: https://docs.docker.com/
Docker image warehouse address: https://hub.docker.com/
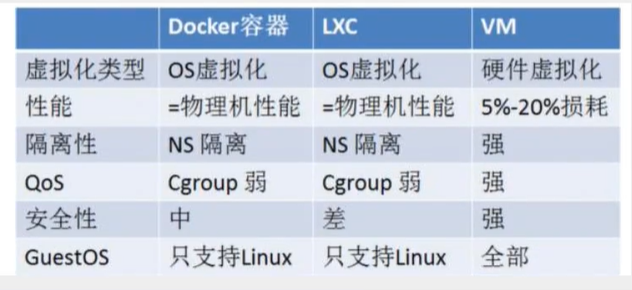
- Docker is an advanced container engine based on LXC, which is open-source for the PaaS provider [dotCloud]. The source code is hosted on Github, based on the go language and in compliance with the Apache 2.0 protocol.
- Docker's idea comes from "container". It can be seen from the logo that the container will open the cargo on the wharf, which is similar to running many applications on the computer. In the past, there may be conflicts between applications. For example, there will be many Java applications running on the JRE, and there may be port conflicts. In the past, they are all crossed. Now we need to isolate them
- Isolation is also the core idea of Docker! Pack the application into boxes, and separate each box from each other! In addition, Docker can also maximize the performance of the server through the isolation mechanism. Just like in a cluster environment, in the past, you need to open multiple virtual machines, now you only need one virtual machine, and then use the Docker isolation mechanism to run multiple applications to simulate the cluster environment.
Docker's history
[only by understanding the history of technology can we learn technology better]
- In 2010, several young people engaged in IT established a company in the United States: dotCloud, to do some PaaS cloud computing services! To put IT bluntly, IT is the container technology related to LXC.
- They named their container technology as Docker
- When Docker was just born, it did not attract the attention of the industry and was difficult to maintain
- So I plan to open the technology and open the source code
- [2013] the founder of the company, Solomon Hykes, made docker open-source, which became popular. Docker will update one version every month
- [April 9, 2014], Docker 1.0 released
- Advantages of Docker:
- Very light! Before container technology came out, virtual machine technology was used (one or more computers were simulated by software), but virtual machine occupied memory and wasted performance
- Virtual machine is also a virtualization technology. Docker's container technology is also a virtualization technology! The essence is similar.
-
Difference between the two:
- When the virtual machine is installed, download the native image and then install it. To achieve isolation, only multiple virtual machines can be opened
- docker is isolated through image mechanism. It is not a complete computer, but the core environment. It is very light. In addition to the required environment, it is packaged into an image. When it is running, the image is very small
- The virtual machine needs a few gigabytes to run, while the Docker image only needs a few megabytes or a few hundred megabytes, and it starts almost in seconds
- So far, it has developed into a technology that all developers must know
What can Docker do?
[the external link image transfer failed, and the source station may have anti-theft chain mechanism. It is recommended to save the image and upload it directly (img-IbbXr6dv-1593050117053)(D:/typora/Typora/img/Docker 2020 latest super detailed / 1592643101078.png))
A computer needs to have a kernel and a dependency library on which to run the application
Virtual machine technology is to simulate another computer on a computer
Disadvantages of virtual machine technology
- A lot of resources
- Redundant steps
- Slow startup
Containerization Technology
[the external link image transfer failed. The source station may have anti-theft chain mechanism. It is recommended to save the image and upload it directly (img-ExX8ZAx6-1593050117056)(D:/typora/Typora/img/Docker 2020 latest super detailed / 1592643153551.png))
- Containerization technology is not to simulate a complete operating system
- Each container contains the environment and application of dependency library, and each container is isolated from each other. Different from the traditional virtual machine technology, each application cross shares the dependency library, which is prone to conflict
Different from Docker and virtual machine technology
- Traditional virtual machine: virtualize a set of hardware, run a complete operating system, and then install and run the environment on this system
- The application in the container runs directly in the host's kernel. There is no kernel and virtual hardware in the container, so it is light
- Each container is isolated from each other. Each container has its own file system, which does not affect each other
After using Docker, we deploy the application just like building blocks
-
Faster delivery and deployment of applications
Legacy: a bunch of help documents, setup
Docker: packaging image publishing test, one click operation -
More convenient upgrade and expansion
The project is packaged as an image. If there is A performance bottleneck in the operation of server A and horizontal expansion is needed, you can directly run the image on server B with one click -
Simpler system operation and maintenance
After containerization, the development and test environments are highly consistent -
More efficient use of computing resources
Docker is a kernel level virtualization, which can run many container instances on a physical machine to maximize the performance of the server
Docker installation
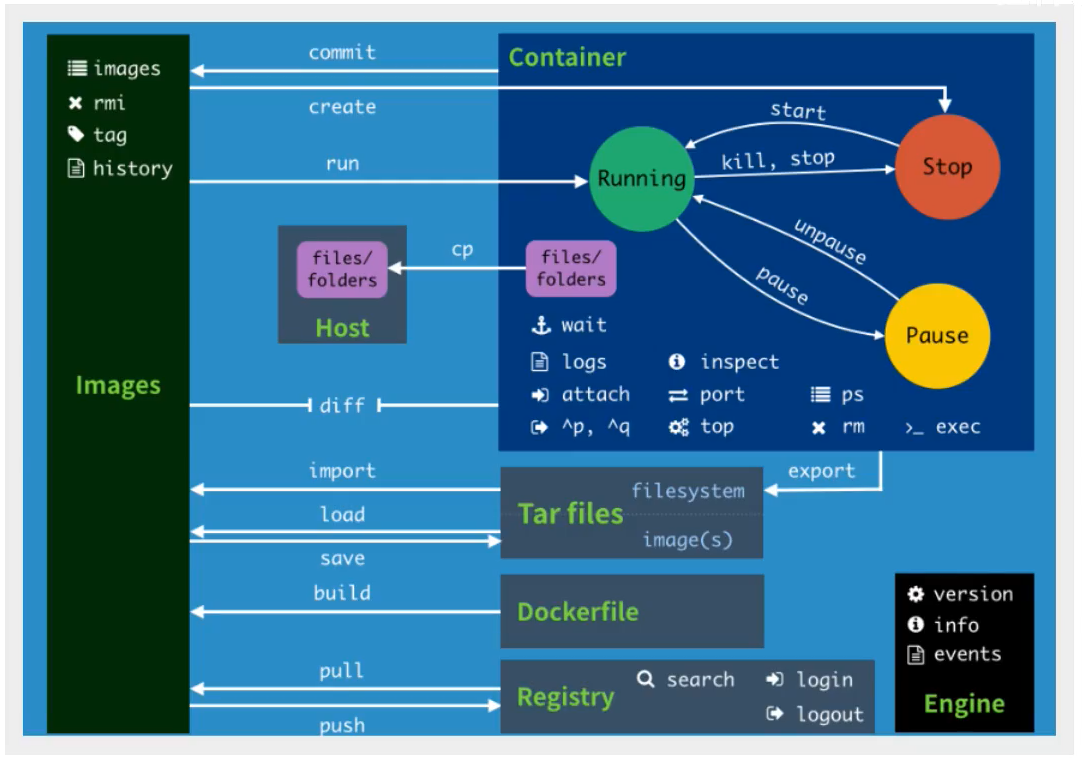
Basic components of Docker
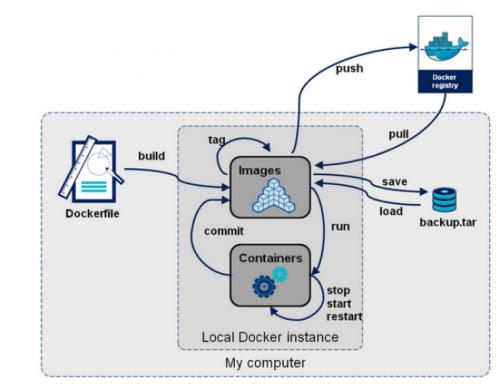
image
It's like a template, through which you can create multiple containers. For example, tomcat image = = > Run = > tomcat container (providing server), through which multiple containers can be created. [the final service operation or project operation is in the container]
container
Docker uses container technology to independently run one or a group of applications and create them through images
There are start, stop, delete and other basic commands
Now we can understand this container as a simple Linux system
Warehouse
The warehouse is where the image is stored!
The warehouse is divided into public warehouse and private warehouse
Docker installation steps
- Environment preparation: CentOS7 virtual machine (can be on virtual machine or remote terminal, such as XShell / FinalShell)
- Environment view
uname -r // View system kernel
cat /etc/os-release  // View basic system information
docker -v  //View docker version
docker stats //View the cpu status of docker
docker top container id //View the process information of docker
[failed to transfer the pictures in the external link. The source station may have anti-theft chain mechanism. It is recommended to save the pictures and upload them directly (img-pyy5OmB8-1593050117100)(D:/typora/Typora/img/Docker 2020 latest super detailed / 1592643179017.png))
[the external link image transfer failed. The source station may have anti-theft chain mechanism. It is recommended to save the image and upload it directly (img-lvt2osvl-1593050111704) (D: / typora / typora / img / docker 2020 latest version of super detailed / 1592643192083.png))
To install docker, follow these steps
# 1. Uninstall the old version
	yum remove docker \
        docker-client \
        docker-client-latest \
        docker-common \
        docker-latest \
        docker-latest-logrotate \
        docker-logrotate \
        docker-engine

# 2. Installation package required
yum install -y yum-utils

# 3. Setting up the image warehouse is foreign by default. We'd better use Alibaba cloud, which is recommended in China
    yum-config-manager \
    --add-repo \
    http://mirrors.aliyun.com/docker-ce/linux/centos/docker-ce.repo
    # https://download.docker.com/linux/centos/docker-ce.repo


# 4. The next configuration in the document is Optional: Enable the nightly or test repositories
#    It's useless. It's not configured here for the time being

# 5. Installation of docker related content: docker ce is community version ee, and ce is recommended for enterprise version
# --Before installation, it is better to update the yum package index, command - > Yum makecache fast
yum install docker-ce docker-ce-cli containerd.io
# You can also specify the version installation here. The second point of the help document is the installation method. First check the version list, and then use the command to specify the version installation

# 6. Start Docker
service docker start
#systemctl start docker

# 7. Check whether the startup is successful
docker version    # View docker version

# 8. Start Hello World
docker run hello-world

# 9. To uninstall docker, there are two steps [uninstall dependency delete directory]
yum remove docker-ce docker-ce-cli containerd.io
rm -rf /var/lib/docker

# 10. To upgrade the docker engine, you can download the updated package file and repeat the installation steps again
# Then use yum -y upgrade instead of yum -y install and point to the new file

# docker setting power on self start
systemctl enable docker
Configure alicloud image acceleration
Link address: https://cr.console.aliyun.com/cn-shanghai/instances/repositories
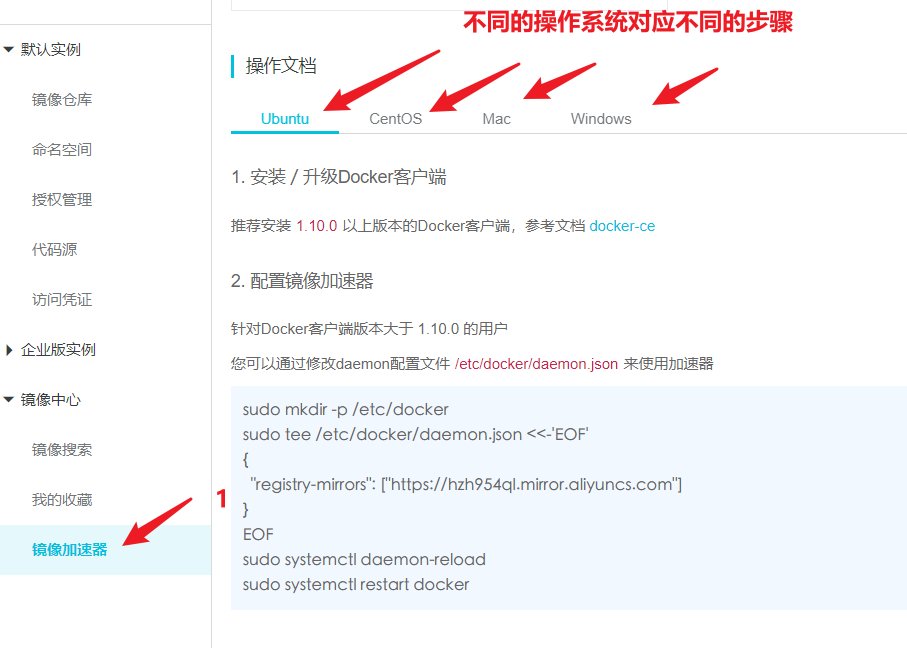
sudo mkdir -p /etc/docker

sudo tee /etc/docker/daemon.json <<-'EOF'
{
  "registry-mirrors": ["https://sxsbhw9e.mirror.aliyuncs.com"]
}
EOF

sudo systemctl daemon-reload

sudo systemctl restart docker
According to the four commands in the image accelerator
HelloWorld start process analysis
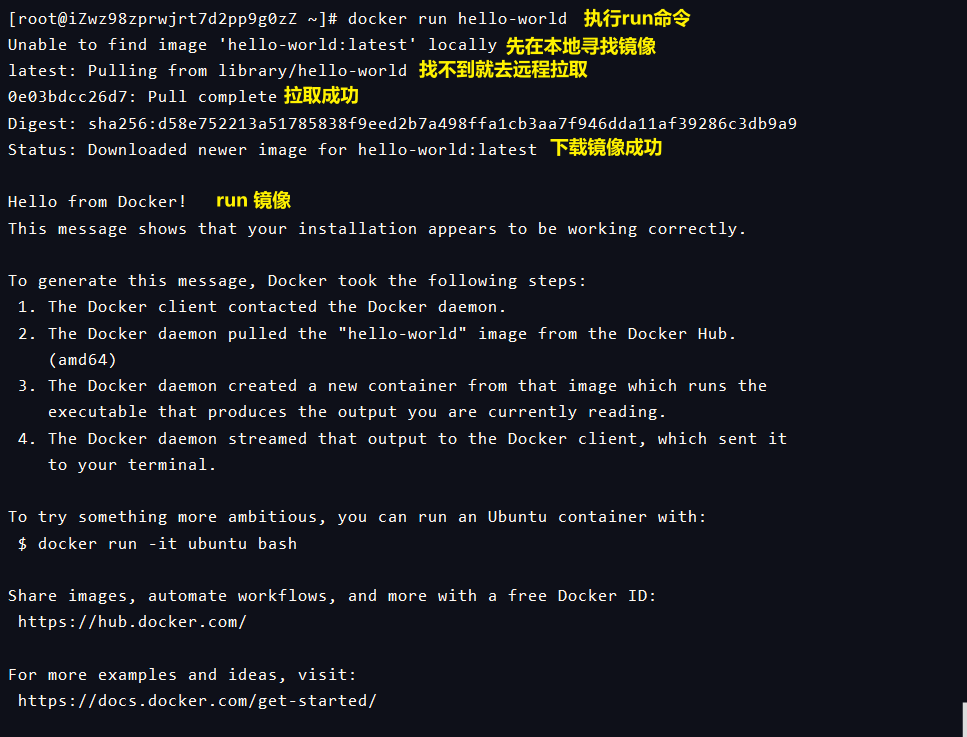
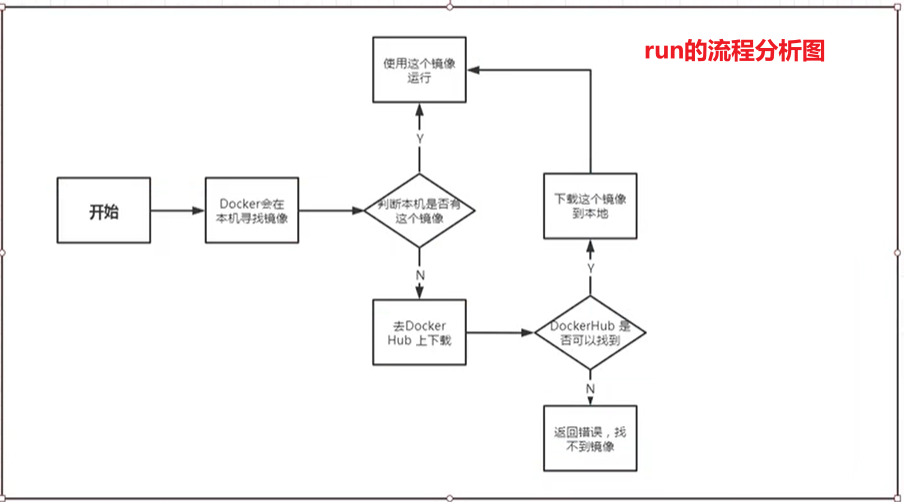
Underlying principle
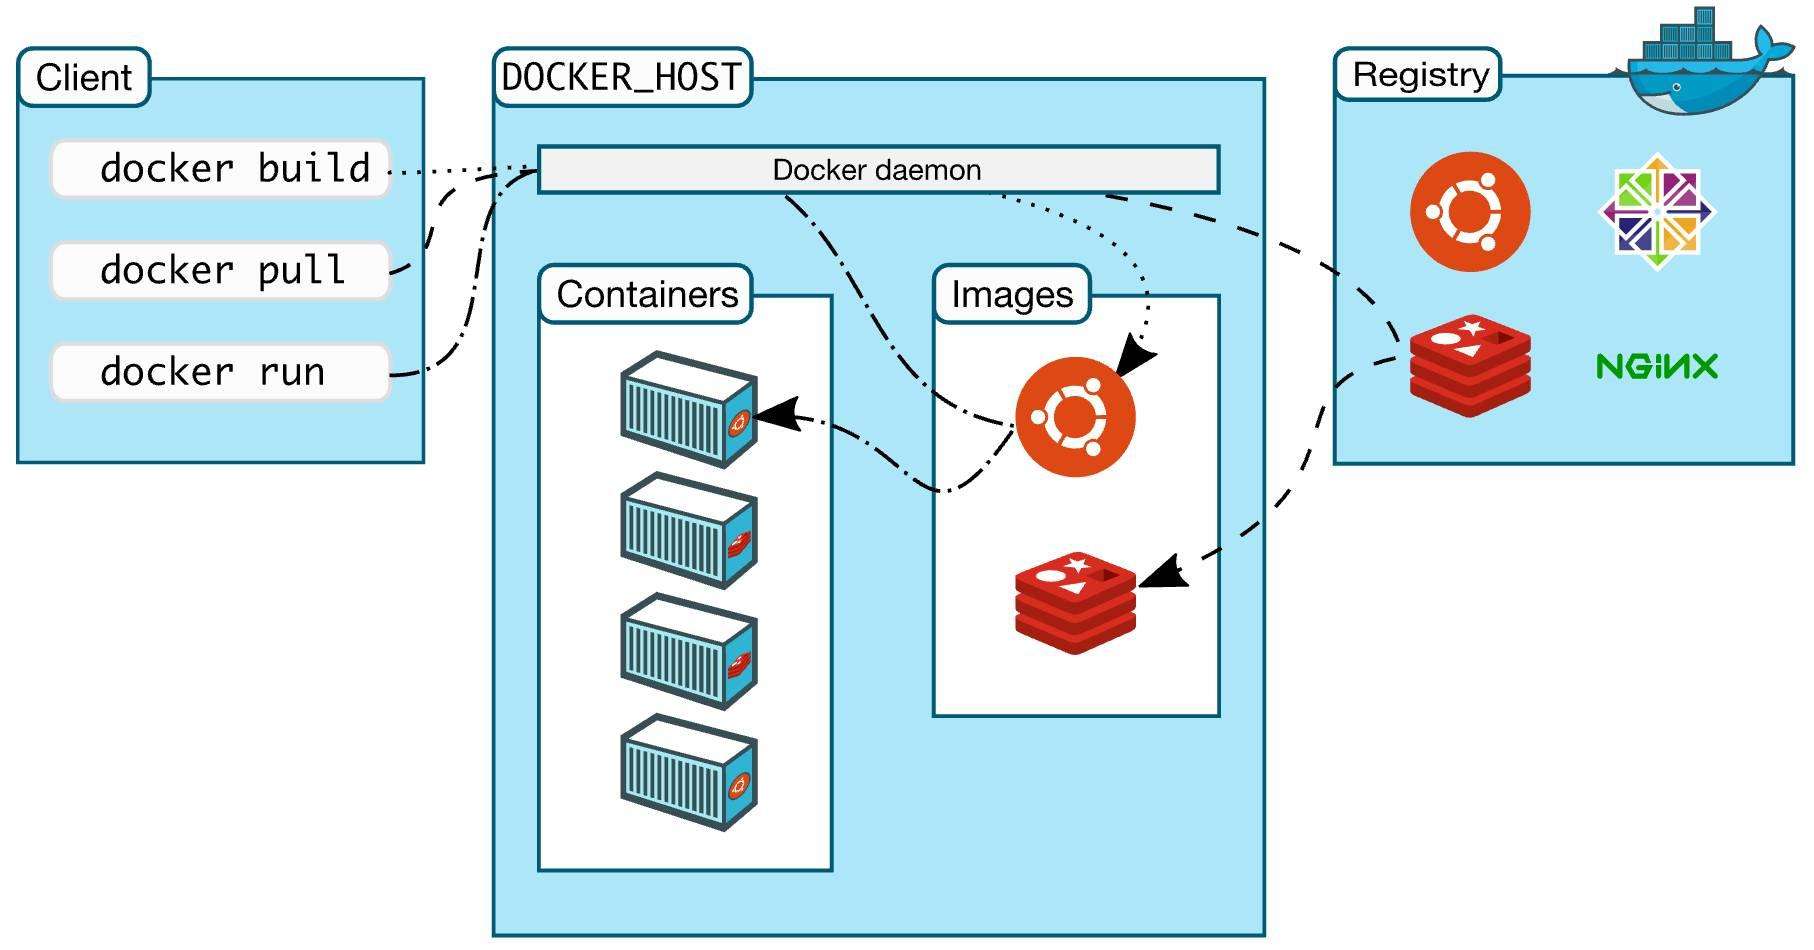
How does Docker work?
Docker is a Client Server system. The Docker daemon runs on the host and is accessed from the Client through Socket!
When the Docker Server receives the Docker Client instruction, it will execute the command
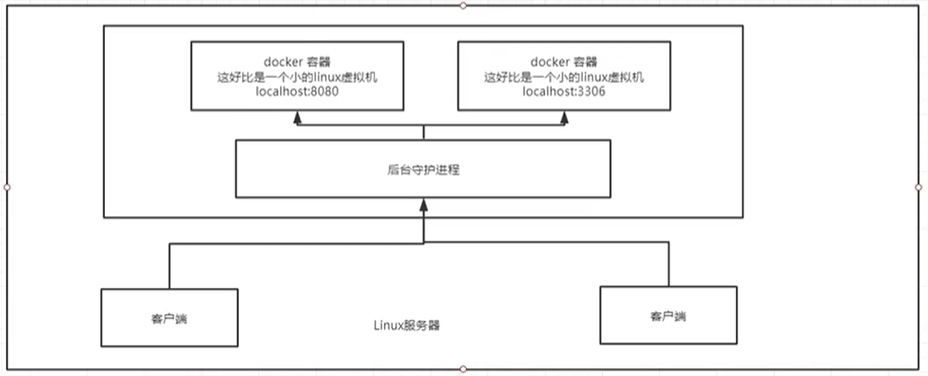
Why is Docker faster than virtual machine?
1. Docker has less abstraction layer than virtual machine
2. Docker uses the host's kernel, and VM needs GuestOS [to build another system environment]
So when you create a new container, Docker doesn't need to reload the kernel of an operating system like a virtual machine to avoid some guiding operations; the virtual machine loads Guest OS at the minute level, and Docker uses the operating system of the host computer to omit this complex process, so it is a second level startup
If you don't understand it very well, it doesn't matter. Go on and look down. When you come back to this theory after you have learned all the commands, it will be much clearer.
Docker common commands
Help command
docker version       # Show docker version information
docker info          # System information of docker, including the number of images and containers
docker command --help   # Help command
If you encounter an unknown help document to view:[ https://docs.docker.com/engine/reference/commandline/build/]
Mirror command
docker images view images on all local hosts
# View help other commands are used similarly
[root@iZwz98zprwjrt7d2pp9g0zZ ~]# docker images --help

Usage:  docker images [OPTIONS] [REPOSITORY[:TAG]]

List images

Options:
  -a, --all             List all mirrors
      --digests         display summary
  -f, --filter filter   Filter the output according to the conditions provided
      --format string   Specify the template file for the return value
      --no-trunc        Do not truncate the output, that is, display the complete image information
  -q, --quiet           Show only mirrors ID
# A-Q is more commonly used


# View mirrors on the local host
[root@admin ~]# docker images
REPOSITORY          TAG                 IMAGE ID            CREATED             SIZE
hello-world         latest              bf756fb1ae65        5 months ago        13.3kB
# explain
REPOSITORY   Mirrored warehouse source
TAG          Label of the mirror
IMAGE ID     mirrored  id
CREATED      Creation time of image
SIZE         Size of the image
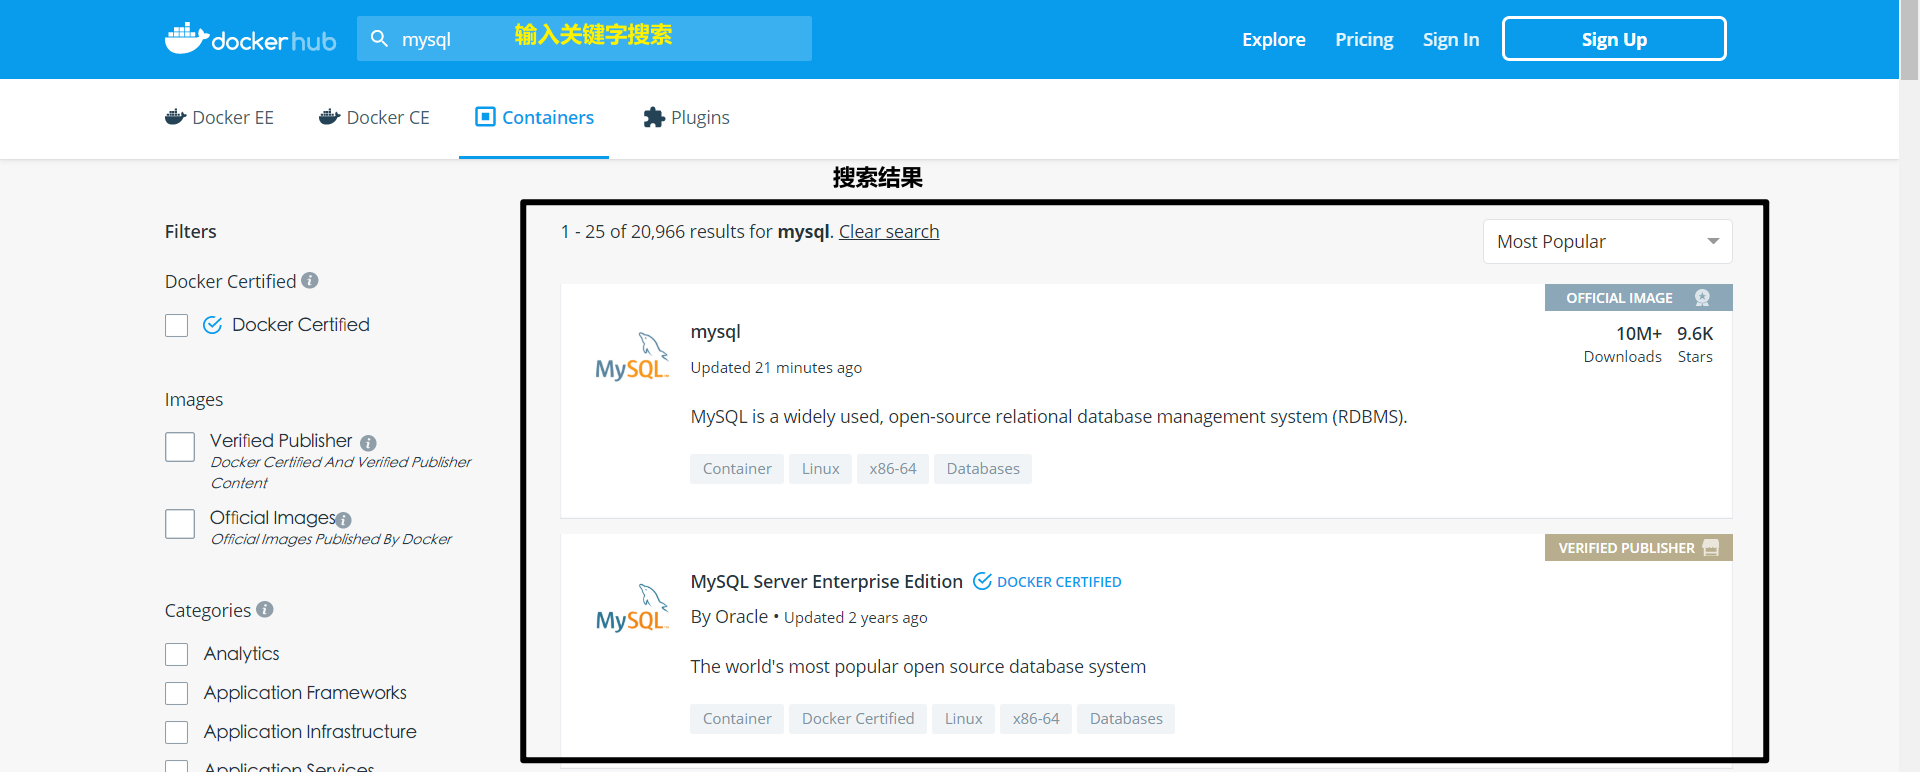
docker search search image
The web version can search the image through Docker Hub, and use docker search in the Linux command line
[root@admin~]# docker search mysql
NAME                              DESCRIPTION                                     STARS               OFFICIAL            AUTOMA
TED
mysql                             MySQL is a widely used, open-source relation...   9621                [OK]
mariadb                           MariaDB is a community-developed fork of MyS...   3495                [OK]
# Optional, filter search results by collection or other
--filter=stars=3000  # The image found is the one with STARS greater than 5000
[root@admin~]# docker search mysql --filter=stars=5000
NAME                DESCRIPTION                                     STARS               OFFICIAL            AUTOMATED
mysql               MySQL is a widely used, open-source relation...   9621                [OK]
docker pull Download Image
# Download Image docker pull image name [: tag] tag you can specify the version. If not, the latest version will be used by default
[root@admin ~]# docker pull mysql
Using default tag: latest   # If you don't write tag, it will be the latest version by default
latest: Pulling from library/mysql
8559a31e96f4: Pull complete    # Layered download, core of docker image, joint file system
d51ce1c2e575: Pull complete
c2344adc4858: Pull complete
fcf3ceff18fc: Pull complete
16da0c38dc5b: Pull complete
b905d1797e97: Pull complete
4b50d1c6b05c: Pull complete
c75914a65ca2: Pull complete
1ae8042bdd09: Pull complete
453ac13c00a3: Pull complete
9e680cd72f08: Pull complete
a6b5dc864b6c: Pull complete
Digest: sha256:8b7b328a7ff6de46ef96bcf83af048cb00a1c86282bfca0cb119c84568b4caf6  # Signature information
Status: Downloaded newer image for mysql:latest
docker.io/library/mysql:latest  # Real address
# Namely: docker pull mysql and docker pull docker.io/library/mysql:latest is equivalent

# The download version of the specified version cannot be scribbled. You can view it on the docker hub
[root@admin ~]# docker pull mysql:5.7  # Add the tag to download the specified version
5.7: Pulling from library/mysql
8559a31e96f4: Already exists   # You can see that some files already exist
d51ce1c2e575: Already exists   # This is the advantage of layered download. You can share some files
c2344adc4858: Already exists
fcf3ceff18fc: Already exists
16da0c38dc5b: Already exists
b905d1797e97: Already exists
4b50d1c6b05c: Already exists
d85174a87144: Pull complete
a4ad33703fa8: Pull complete
f7a5433ce20d: Pull complete
3dcd2a278b4a: Pull complete
Digest: sha256:32f9d9a069f7a735e28fd44ea944d53c61f990ba71460c5c183e610854ca4854
Status: Downloaded newer image for mysql:5.7
docker.io/library/mysql:5.7

# View image after download
[root@admin ~]# docker images
REPOSITORY          TAG                 IMAGE ID            CREATED             SIZE
mysql               5.7                 9cfcce23593a        4 days ago          448MB
mysql               latest              be0dbf01a0f3        4 days ago          541MB
hello-world         latest              bf756fb1ae65        5 months ago        13.3kB
docker rmi delete image
It can be deleted by IMAGE ID or by image name
# Delete the image with the specified id
docker rmi -f container id
# Delete multiple mirrors
docker rmi -f container id container id container id
# Delete all mirrors
docker rmi -f $(docker images -aq)
Container command
[note] containers can only be created with images. Download a centos image to test and learn
docker pull centos
docker run start container
docker run [Optional parameters] image

# Description of common parameters
--name="NAME"  Container name is used to distinguish containers
-d             Running in background mode
-it            Run interactively, for example, to enter a container to view content
-p             Specify container port -p 8080
	-p ip:Host port:Container port
	-p Host port:Container port (Common)
	-p Container port
	//Container port    (It's OK to write the container port directly)
-P             Capitalized P Randomly assigned port

# Test starts and enters new container
# Start centos in interactive mode, enter the container, and specify bash in centos as the console for interaction
[root@admin ~]# docker run -it centos /bin/bash
# Here you can see that the prefix of the command line has changed, indicating that it has entered the container
[root@67d60e7e973b /]# ls
bin  dev  etc  home  lib  lib64  lost+found  media  mnt  opt  proc  root  run  sbin  srv  sys  tmp  usr  var

# Exit container to host
[root@67d60e7e973b /]# exit
exit
[root@admin ~]# ls
mysql80-community-release-el7-3.noarch.rpm  shell
docker ps viewing running containers
-a    # List currently running containers + historical running containers are all containers
-n=?  # Show recently created containers? Number of
-q    # Display only the number of the container

[root@admin ~]# docker ps
CONTAINER ID        IMAGE               COMMAND             CREATED             STATUS              PORTS               NAMES

[root@admin ~]# docker ps -a
CONTAINER ID        IMAGE               COMMAND             CREATED              STATUS                          PORTS               NAMES
67d60e7e973b        centos              "/bin/bash"         15 minutes ago       Exited (0) 15 minutes ago                           keen_yalow
95b5db0ebd50        hello-world         "/hello"            4 hours ago          Exited (0) 4 hours ago                              wizardly_leavitt

[root@admin ~]# docker ps -aq
Exit container
exit    # Stop the container directly and exit

ctrl + p + q  # Press the shortcut key container directly and exit without stopping

#Two ways of starting again without stopping exit
docker exec -it container id /bin/bash
docker attach container id
docker rm delete container
docker rm container id                 # Delete the container with the specified id, cannot delete the running container rm -f to force deletion
docker rm -f $(docker ps -aq)    # Delete all containers
docker ps -a -q|xargs docker rm  # Delete all containers through pipes
Start and stop container
docker start container id ා start container
 docker restart container id ා restart container
 docker stop container id ා stop container
 docker kill container id
Common other commands
docker run -d background start container
# docker run id image name background start
docker run -d  centos   # Background start

# When docker is started, ps will find that centos is stopped
# Common pit: when docker container runs in the background, there must be a foreground process (that is, interaction)
# If docker finds that there is no application and does not provide service, it will stop immediately
docker logs viewing logs
docker logs -f -t --tail container id   # View container run log

# For example, run the script while in the container to output the string
# Script
[root@admin ~]# docker run -d centos /bin/sh -c "while true;do echo hello;sleep 1;done"
c482e0df32230d949c36dd9047f93257c23702960298317830f1b8b2ad42e28c

# View container
[root@admin ~]# docker ps -a
CONTAINER ID        IMAGE               COMMAND                  CREATED             STATUS              PORTS               NAMES
c482e0df3223        centos              "/bin/sh -c 'while t..."   11 seconds ago      Up 10 seconds                           ecstatic_dhawan

# Show logs show 10 ways
[root@admin ~]# Docker logs - t f -- tail 10 container ID | docker logs - F -- tail 10 - t 014E 2020-06-13t08:04:41.312351474z hello
2020-06-13T08:04:42.314853838Z hello
2020-06-13T08:04:43.317313743Z hello
2020-06-13T08:04:44.319772893Z hello
2020-06-13T08:04:45.322357813Z hello
2020-06-13T08:04:46.324866999Z hello
2020-06-13T08:04:47.327293107Z hello
2020-06-13T08:04:47.327293107Z hello
2020-06-13T08:04:47.327293107Z hello
2020-06-13T08:04:47.327293107Z hello
...(After directly outputting 10 logs, it will continue to increase because while Loop is output all the time)
# Without -- tail 10, all logs will be displayed
docker top view process information in container
#View process information in the container
 docker top container id
docker inspect view the metadata of the image (important)
# View all information in the container
docker inspect container id
# test
[root@admin ~]# docker inspect 09b2534befb1
[
    {
        # The container id can find that the id in the command is just a small part of it
        "Id": "09b2534befb12a8c5297bbc4cbe26ae3b528478d713efbb23e7c5cdaf8400b26",,
        # Creation time
        "Created": "2020-06-13T08:12:31.964868162Z",
        # Interactive foreground path
        "Path": "/bin/bash",
        # Carry parameters
        "Args": [],
        # Container status
        "State": {
            "Status": "running",
            "Running": true,
            "Paused": false,
            "Restarting": false,
            "OOMKilled": false,
            "Dead": false,
            "Pid": 2076,
            "ExitCode": 0,
            "Error": "",
            "StartedAt": "2020-06-13T08:12:32.29364097Z",
            "FinishedAt": "0001-01-01T00:00:00Z"
        },
        # Image source
        "Image": "sha256:470671670cac686c7cf0081e0b37da2e9f4f768ddc5f6a26102ccd1c6954c1ee",
        "ResolvConfPath": "/var/lib/docker/containers/09b2534befb12a8c5297bbc4cbe26ae3b528478d713efbb23e7c5cdaf8400b26/resolv.conf",
        "HostnamePath": "/var/lib/docker/containers/09b2534befb12a8c5297bbc4cbe26ae3b528478d713efbb23e7c5cdaf8400b26/hostname",
        "HostsPath": "/var/lib/docker/containers/09b2534befb12a8c5297bbc4cbe26ae3b528478d713efbb23e7c5cdaf8400b26/hosts",
        "LogPath": "/var/lib/docker/containers/09b2534befb12a8c5297bbc4cbe26ae3b528478d713efbb23e7c5cdaf8400b26/09b2534befb12a8c5297bbc4cbe26ae3b528478d713efbb23e7c5cdaf8400b26-json.log",
        "Name": "/compassionate_kepler",
        "RestartCount": 0,
        "Driver": "overlay2",
        "Platform": "linux",
        "MountLabel": "",
        "ProcessLabel": "",
        "AppArmorProfile": "",
        "ExecIDs": null,
        # Host configuration
        "HostConfig": {
            "Binds": null,
            "ContainerIDFile": "",
            "LogConfig": {
                "Type": "json-file",
                "Config": {}
            },
            "NetworkMode": "default",
            "PortBindings": {},
            "RestartPolicy": {
                "Name": "no",
                "MaximumRetryCount": 0
            },
            "AutoRemove": false,
            "VolumeDriver": "",
            "VolumesFrom": null,
            "CapAdd": null,
            "CapDrop": null,
            "Capabilities": null,
            "Dns": [],
            "DnsOptions": [],
            "DnsSearch": [],
            "ExtraHosts": null,
            "GroupAdd": null,
            "IpcMode": "private",
            "Cgroup": "",
            "Links": null,
            "OomScoreAdj": 0,
            "PidMode": "",
            "Privileged": false,
            "PublishAllPorts": false,
            "ReadonlyRootfs": false,
            "SecurityOpt": null,
            "UTSMode": "",
            "UsernsMode": "",
            "ShmSize": 67108864,
            "Runtime": "runc",
            "ConsoleSize": [
                0,
                0
            ],
            "Isolation": "",
            "CpuShares": 0,
            "Memory": 0,
            "NanoCpus": 0,
            "CgroupParent": "",
            "BlkioWeight": 0,
            "BlkioWeightDevice": [],
            "BlkioDeviceReadBps": null,
            "BlkioDeviceWriteBps": null,
            "BlkioDeviceReadIOps": null,
            "BlkioDeviceWriteIOps": null,
            "CpuPeriod": 0,
            "CpuQuota": 0,
            "CpuRealtimePeriod": 0,
            "CpuRealtimeRuntime": 0,
            "CpusetCpus": "",
            "CpusetMems": "",
            "Devices": [],
            "DeviceCgroupRules": null,
            "DeviceRequests": null,
            "KernelMemory": 0,
            "KernelMemoryTCP": 0,
            "MemoryReservation": 0,
            "MemorySwap": 0,
            "MemorySwappiness": null,
            "OomKillDisable": false,
            "PidsLimit": null,
            "Ulimits": null,
            "CpuCount": 0,
            "CpuPercent": 0,
            "IOMaximumIOps": 0,
            "IOMaximumBandwidth": 0,
            "MaskedPaths": [
                "/proc/asound",
                "/proc/acpi",
                "/proc/kcore",
                "/proc/keys",
                "/proc/latency_stats",
                "/proc/timer_list",
                "/proc/timer_stats",
                "/proc/sched_debug",
                "/proc/scsi",
                "/sys/firmware"
            ],
            "ReadonlyPaths": [
                "/proc/bus",
                "/proc/fs",
                "/proc/irq",
                "/proc/sys",
                "/proc/sysrq-trigger"
            ]
        },
        "GraphDriver": {
            "Data": {
                "LowerDir": "/var/lib/docker/overlay2/9d1b03a32ce30afcaf3da85e14de8412cad304c4e4815a6ff045883017a2e4ae-init/diff:/var/lib/docker/overlay2/5108dfc3feeecdef61ca695a9c4b8c459eb743214117505341369d6c7f62fe53/diff",
                "MergedDir": "/var/lib/docker/overlay2/9d1b03a32ce30afcaf3da85e14de8412cad304c4e4815a6ff045883017a2e4ae/merged",
                "UpperDir": "/var/lib/docker/overlay2/9d1b03a32ce30afcaf3da85e14de8412cad304c4e4815a6ff045883017a2e4ae/diff",
                "WorkDir": "/var/lib/docker/overlay2/9d1b03a32ce30afcaf3da85e14de8412cad304c4e4815a6ff045883017a2e4ae/work"
            },
            "Name": "overlay2"
        },
        # Mount information
        "Mounts": [],
        # Basic configuration
        "Config": {
            "Hostname": "09b2534befb1",
            "Domainname": "",
            "User": "",
            "AttachStdin": true,
            "AttachStdout": true,
            "AttachStderr": true,
            "Tty": true,
            "OpenStdin": true,
            "StdinOnce": true,
            # Environment variables don't have java, so they can't use java
            "Env": [
                "PATH=/usr/local/sbin:/usr/local/bin:/usr/sbin:/usr/bin:/sbin:/bin"
            ],
            # command line
            "Cmd": [
                "/bin/bash"
            ],
            "Image": "centos",
            "Volumes": null,
            "WorkingDir": "",
            "Entrypoint": null,
            "OnBuild": null,
            "Labels": {
                "org.label-schema.build-date": "20200114",
                "org.label-schema.license": "GPLv2",
                "org.label-schema.name": "CentOS Base Image",
                "org.label-schema.schema-version": "1.0",
                "org.label-schema.vendor": "CentOS",
                "org.opencontainers.image.created": "2020-01-14 00:00:00-08:00",
                "org.opencontainers.image.licenses": "GPL-2.0-only",
                "org.opencontainers.image.title": "CentOS Base Image",
                "org.opencontainers.image.vendor": "CentOS"
            }
        },
        # Network settings
        "NetworkSettings": {
            "Bridge": "",
            "SandboxID": "26ea3297b66bbae1ac7798d19783e51fcc1f88037409888db0137bf3549b18d3",
            "HairpinMode": false,
            "LinkLocalIPv6Address": "",
            "LinkLocalIPv6PrefixLen": 0,
            "Ports": {},
            "SandboxKey": "/var/run/docker/netns/26ea3297b66b",
            "SecondaryIPAddresses": null,
            "SecondaryIPv6Addresses": null,
            "EndpointID": "25b52bae99d2c591b03ba97e644dc3b3a26917209523d76bb78f3190b364a3a3",
            "Gateway": "172.17.0.1",
            "GlobalIPv6Address": "",
            "GlobalIPv6PrefixLen": 0,
            "IPAddress": "172.17.0.2",
            "IPPrefixLen": 16,
            "IPv6Gateway": "",
            "MacAddress": "02:42:ac:11:00:02",
            "Networks": {
            	# The current network working mode bridging mode
                "bridge": {
                    "IPAMConfig": null,
                    "Links": null,
                    "Aliases": null,
                    "NetworkID": "695424c9542cb18c12700a9df49559009382acf4ace4668dafc94367620a0522",
                    "EndpointID": "25b52bae99d2c591b03ba97e644dc3b3a26917209523d76bb78f3190b364a3a3",
                    "Gateway": "172.17.0.1",
                    "IPAddress": "172.17.0.2",
                    "IPPrefixLen": 16,
                    "IPv6Gateway": "",
                    "GlobalIPv6Address": "",
                    "GlobalIPv6PrefixLen": 0,
                    "MacAddress": "02:42:ac:11:00:02",
                    "DriverOpts": null
                }
            }
        }
    }
]
docker exec/attach enters the currently running container
# We usually run the container in the background. Sometimes we need to enter the container and modify some configurations

# Mode 1
docker exec -it container id bashShell Form of
# test
[root@admin ~]# docker ps -a
CONTAINER ID        IMAGE               COMMAND             CREATED             STATUS              PORTS               NAMES
09b2534befb1        centos              "/bin/bash"         11 minutes ago      Up 11 minutes                           compassionate_kepler
[root@admin ~]# docker exec -it 09b2534befb1 /bin/bash
[root@09b2534befb1 /]# ps -ef
UID        PID  PPID  C STIME TTY          TIME CMD
root         1     0  0 08:12 pts/0    00:00:00 /bin/bash
root        15     0  0 08:24 pts/1    00:00:00 /bin/bash
root        28    15  0 08:24 pts/1    00:00:00 ps -ef

# Mode 2
docker attach container id
# test
[root@admin ~]# docker ps -a
CONTAINER ID        IMAGE               COMMAND             CREATED             STATUS              PORTS               NAMES
09b2534befb1        centos              "/bin/bash"         13 minutes ago      Up 13 minutes                           compassionate_kepler
[root@admin ~]# docker attach 09b2534befb1
[root@09b2534befb1 /]#

//The difference between the two commands:
1,docker exec   After entering the container [a new terminal is opened], you can operate in it
2,docker attach Enter the container [executing terminal] and no new process will be started
docker cp copies files from the container to the host
# command
docker cp container id:Path in container destination host path
# test
# Create a new file in the container
[root@09b2534befb1 /]# cd /home
[root@09b2534befb1 home]# ls
[root@09b2534befb1 home]# touch hello.txt
# Copy files can exit the container copy, even if the data is stopped
[root@09b2534befb1 home]# exit
exit
[root@admin ~]# docker ps
CONTAINER ID        IMAGE               COMMAND             CREATED             STATUS              PORTS               NAMES
# Copy the data to the home directory of the host
[root@admin ~]# docker cp 09b2534befb1:/home/hello.txt /home
[root@admin ~]# cd /home
# see file
[root@admin home]# ls
hello.txt  study

# Copy is a manual process, and then we can use the technology of - v volume to automatically synchronize
You need to type all the orders once to make a deep impression
docker common commands
#View image
docker images

docker rmi -f container id  		      # Delete the image with the specified id
docker rmi -f container id container id    	    # Delete multiple mirrors
docker rmi -f $(docker images -aq) # Delete all mirrors

docker ps     #View running containers
docker ps-a   #View all containers
docker ps-aq  #View all container numbers

docker run -it centos /bin/bash   #Open the container of centos image
ctrl + p + q  # Press the shortcut key container directly and exit without stopping
docker exec -it container id /bin/bash    #Enter the currently running container 1
docker attach container id				  #Enter the currently running container 2

exit / ctrl+c  	#Exit the current container

docker start container id      # Start container
docker stop container id      #Stop the current container
docker kill container id        #Kill container

docker rm container id                  # Delete the container with the specified id, rm -f forces deletion
docker rm -f $(docker ps -aq)    # Delete all containers

docker logs container id               #view log

docker cp container id:/home/xx file linux Contents of  #Copy files
Summary of orders
There are many commands for Docker. The above commands we have learned are the most commonly used container and image commands
  attach      Attach local standard input, output, and error streams to a running container    # The attach connection under the current shell specifies the running image
  build       Build an image from a Dockerfile                                                 # Customizing image through Dokcerfile
  commit      Create a new image from a container's changes                                    # Commit the current container as a new mirror
  cp          Copy files/folders between a container and the local filesystem                  # Copy the specified file or directory from the container to the host
  create      Create a new container                                                           # Create a new container, the same as run but do not start the container
  diff        Inspect changes to files or directories on a container's filesystem              # View Docker container changes
  events      Get real time events from the server                                             # Get container real-time time time from Docker service
  exec        Run a command in a running container                                             # Run command on an existing container
  export      Export a container's filesystem as a tar archive                                 # The content stream of the everywhere container serves as a tar Archive (corresponding to import)
  history     Show the history of an image                                                     # Display the history of image formation
  images      List images                                                                      # List the current image of the system
  import      Import the contents from a tarball to create a filesystem image                  # Create a new file system image from the contents of the tar package (corresponding to export)
  info        Display system-wide information                                                  # Display system related information
  inspect     Return low-level information on Docker objects                                   # View container details
  kill        Kill one or more running containers                                              # kill specifies the docker container
  load        Load an image from a tar archive or STDIN                                        # Load the image from a tar package (corresponding to save)
  login       Log in to a Docker registry                                                      # Register or log in to a docker source server
  logout      Log out from a Docker registry                                                   # Exit from the current Docker registry
  logs        Fetch the logs of a container                                                    # Output current container log information
  pause       Pause all processes within one or more containers                                # Pause container
  port        List port mappings or a specific mapping for the container                       # View the container internal source port corresponding to the mapped port
  ps          List containers                                                                  # List containers
  pull        Pull an image or a repository from a registry                                    # Pull the specified image or library image from the docker image source server
  push        Push an image or a repository to a registry                                      # Push the specified image or library image to the docker source server
  rename      Rename a container                                                               # Rename a container
  restart     Restart one or more containers                                                   # Restart one or more containers
  rm          Remove one or more containers                                                    # Remove one or more containers
  rmi         Remove one or more images                                                        # Remove one or more mirrors (use the mirror without a container to remove it, otherwise delete the related container to continue or force - f)
  run         Run a command in a new container                                                 # Create a new container and run a command
  save        Save one or more images to a tar archive (streamed to STDOUT by default)         # Save an image as a tar package (corresponding to load)
  search      Search the Docker Hub for images                                                 # Searching for images in docker hub
  start       Start one or more stopped containers                                             # Start container
  stats       Display a live stream of container(s) resource usage statistics                  # Display real-time container resource usage statistics flow
  stop        Stop one or more running containers                                              # Stop container
  tag         Create a tag TARGET_IMAGE that refers to SOURCE_IMAGE                            # Label the image in the source
  top         Display the running processes of a container                                     # View process information running in the container
  unpause     Unpause all processes within one or more containers                              # Unsuspend container
  update      Update configuration of one or more containers                                   # Update configuration for container
  version     Show the Docker version information                                              # View docker version number
  wait        Block until one or more containers stop, then print their exit codes             # Block until one or more containers stop, and then print its exit code, that is, intercept the exit status value when the container stops
Practice
Job 1. Use Docker to install Nginx (learning exposure port)
1, Search image search
[root@admin ~]# docker search --filter=stars=8000 nginx
NAME                DESCRIPTION                STARS               OFFICIAL            AUTOMATED
nginx               Official build of Nginx.   13326               [OK]
2, Download Image pull
[root@admin ~]# docker pull nginx
Using default tag: latest
latest: Pulling from library/nginx
8559a31e96f4: Pull complete
8d69e59170f7: Pull complete
3f9f1ec1d262: Pull complete
d1f5ff4f210d: Pull complete
1e22bfa8652e: Pull complete
Digest: sha256:21f32f6c08406306d822a0e6e8b7dc81f53f336570e852e25fbe1e3e3d0d0133
Status: Downloaded newer image for nginx:latest
docker.io/library/nginx:latest

3, View image images
[root@admin ~]# docker images
REPOSITORY          TAG                 IMAGE ID            CREATED             SIZE
nginx               latest              2622e6cca7eb        3 days ago          132MB
centos              latest              470671670cac        4 months ago        237MB
hello-world         latest              bf756fb1ae65        5 months ago        13.3kB

4, start-up run  -d Background operation  -p Specify port -name Map the 3344 of the custom named host to port 80 of the container
[root@admin ~]# docker run -d --name nginx01 -p 3344:80 nginx
129642f969d4cff63d173ba822c096192a435830f64a6ffe77e8d6743f342767

5, View startup ps
[root@admin ~]# docker ps
CONTAINER ID        IMAGE               COMMAND                  CREATED             STATUS              PORTS                  NAMES
129642f969d4        nginx               "/docker-entrypoint...."   4 seconds ago       Up 4 seconds        0.0.0.0:3344->80/tcp   nginx01

6, Run tests nginx
[root@admin ~]# curl localhost:3344
<!DOCTYPE html>
<html>
<head>
<title>Welcome to nginx!</title>
<style>
    body {
        width: 35em;
        margin: 0 auto;
        font-family: Tahoma, Verdana, Arial, sans-serif;
    }
</style>
</head>
<body>
<h1>Welcome to nginx!</h1>
<p>If you see this page, the nginx web server is successfully installed and
working. Further configuration is required.</p>

<p>For online documentation and support please refer to
<a href="http://nginx.org/">nginx.org</a>.<br/>
Commercial support is available at
<a href="http://nginx.com/">nginx.com</a>.</p>

<p><em>Thank you for using nginx.</em></p>
</body>
</html>

//At this point, the nginx installation is complete. If alicloud server is used and port 3344 is configured in the security group configuration, you can directly open the nginx page
//If you visit: 39.106.230.179:3344, you can see Welcome to nginx! page
#Enter the related nginx container by name
docker exec -it nginx01 /bin/bash

#View files included in nginx
whereis nginx

#View the configuration of nginx
cd /etc/nginx
ls
- Port exposure concept
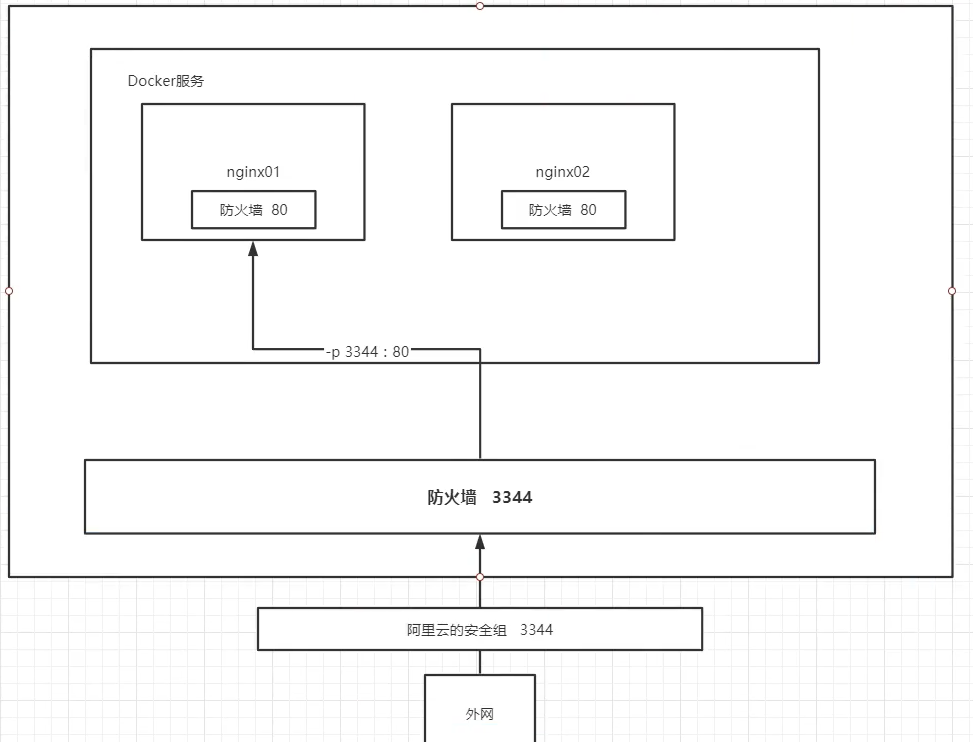
Question to consider: if you change nginx configuration file every time, do you need to enter the container for internal changes? It's very troublesome. If I can provide a mapping path outside the container, I can modify the file outside the container, and then the file inside the container can be modified automatically, which is very convenient. This is the - v data volume technology to learn later.
Assignment 2. Use docker to install tomcat (learn official test and enter container to view content)


# Official use
# Our previous startup was in the background. After the container is stopped, the container can still be found
#  --rm means to delete the container after the deletion stops. It is usually used for testing
docker run -it --rm tomcat:9.0


# Do we use it according to the normal process
# 1. Pull to download tomcat9. If no version is specified, the new version will be installed by default
docker pull tomcat:9.0
# 2. View image
docker images
# 3. Create container running image - d background running - p specify port host's 3355 map to container's 8080 port - name is a custom name
docker run -d -p 3355:8080 --name tomcat01 tomcat:9.0
docker run -it -p 8080:8080 tomcat   #Simplify commands for creating tomcat containers
# 4. View
docker ps
# 5. Test access http://39.106.230.179:3355 / but page 404 Not Found
# 6. Enter the relevant tomcat container according to the name
docker exec -it tomcat01 /bin/bash
ls -al
# 7. View webapps folder
cd webapps
ls   /   ls -al
# 8. Discovery directory is empty
# 9. It turns out that the official image is castrated, and many files are not configured
#    The reason for Alibaba cloud's image is that it is the smallest image by default. All unnecessary images are eliminated to ensure a small and operational environment
#      a. Less Linux commands, such as the ll command
#      b. webapps directory is empty
#    Solution: there is a root directory in the container webapps.dist  Folder, which contains the default example
#              In this way, you can copy the contents in the folder to cp-r under webapps webapps.dist/ * webapps
Thinking again: if every deployment project has to enter the container, it will be very troublesome. The answer is obvious. We can use volume technology to automatically synchronize with the external, so we don't have to enter every time.
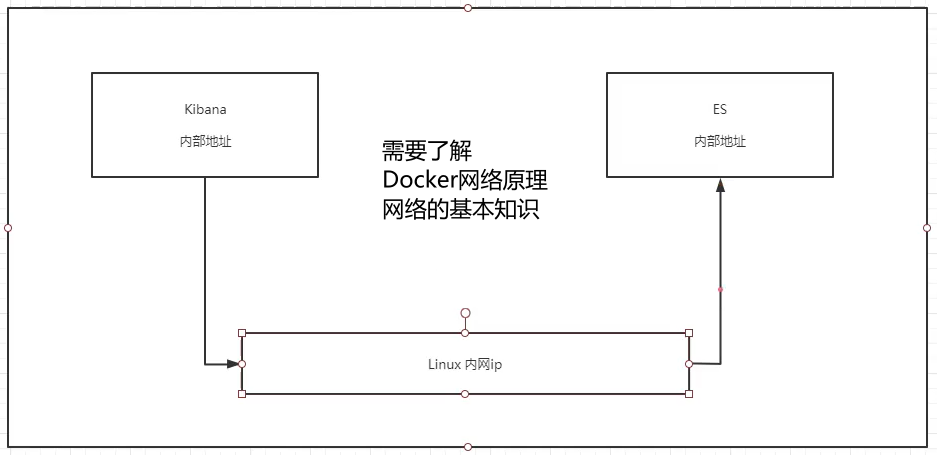
Assignment 3. Deploy ES + kibana (learn to view the container status and modify)
Note: installation of ES takes up memory, 1.2G, and shuts down unused services in advance
Difficulties:
 1. es needs to expose a lot of ports
 2. es consumes a lot of memory
 3. Generally, the data of es needs to be placed in the safe directory = = > it can be hung to solve the problem
# 1. Old rules search installation start
#    --net somenetwork ?  Remove the network configuration first
docker run -d --name elasticsearch -p 9200:9200 -p 9300:9300 -e "discovery.type=single-node" elasticsearch:7.7.1

# After startup, linux will be very busy. You can use docker stats to check the cpu status
CONTAINER ID        NAME                CPU %               MEM USAGE / LIMIT   MEM %               NET I/O             BLOCK I/O           PIDS
7d399bee6df4        elasticsearch       0.45%               1.229GiB / 3.7GiB   33.20%              0B / 0B             0B / 0B             50
c92ee0f0ac1c        tomcat01            0.15%               76.88MiB / 3.7GiB   2.03%               0B / 0B             0B / 0B             36
# You can see that it takes up a lot of memory
# 2. Test whether the startup is successful
[root@admin ~]# curl localhost:9200
{
  "name" : "7d399bee6df4",
  "cluster_name" : "docker-cluster",
  "cluster_uuid" : "BRfKhOPTS52FScc55t3vew",
  "version" : {
    "number" : "7.7.1",
    "build_flavor" : "default",
    "build_type" : "docker",
    "build_hash" : "ad56dce891c901a492bb1ee393f12dfff473a423",
    "build_date" : "2020-05-28T16:30:01.040088Z",
    "build_snapshot" : false,
    "lucene_version" : "8.5.1",
    "minimum_wire_compatibility_version" : "6.8.0",
    "minimum_index_compatibility_version" : "6.0.0-beta1"
  },
  "tagline" : "You Know, for Search"
}

# 3. Close it quickly, increase the limit of memory usage modify the configuration file - e environment configuration modify
#    It is to add parameters to the restart command to limit the use of memory
#    -e ES_JAVA_OPTS="-Xms64m Xmx512m"
docker run -d --name elasticsearch02 -p 9200:9200 -p 9300:9300 -e "discovery.type=single-node" -e ES_JAVA_OPTS="-Xms64m -Xmx512m" elasticsearch:7.7.1
- So the question comes as scheduled. How to use kibana to connect es? How can the network connect to the past? First, we need to understand a basic model, and then we need to learn some knowledge of the network. First, lay the foreshadowing for the following content. [you can find the answer in the chapter of Docker network]
Docker visualization
There are two tools:
- Porter (used first, not the best choice)
- Rancher (reuse of CI/CD)
What is a porter?
- Docker graphical interface management tool provides a background panel for us to operate
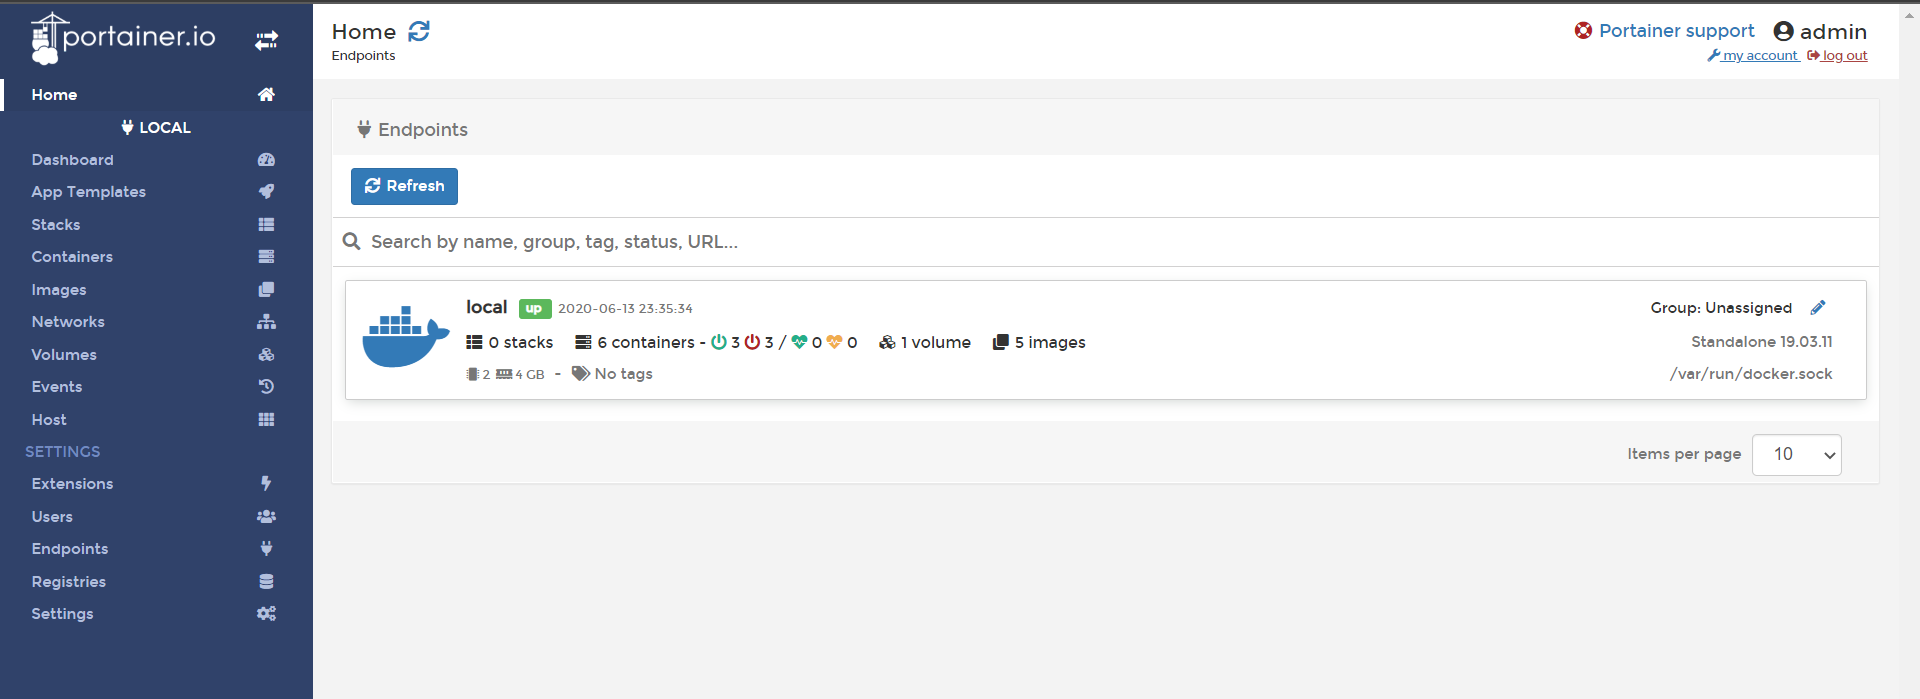
- Installation:
#Simplified commands are not used here
docker run -d -p 8088:9000

# --restart=always start mode
# -v /var/run/docker.sock:/var/run/docker.sock  mount
# --privileged=true permission
docker run -d -p 8088:9000 --restart=always -v /var/run/docker.sock:/var/run/docker.sock --privileged=true portainer/portainer
- Access test: public ip address: 8088 or local test curl localhost:8088
After entering, set the user name and password for access. Create user
[the external link image transfer failed. The source station may have anti-theft chain mechanism. It is recommended to save the image and upload it directly (img-1RcASqvP-1593050117113)(D:/typora/Typora/img/Docker 2020 latest version super detailed / 1592730037318.png))
After entering, you will be asked to create a user first, and then select Local to enter a control panel
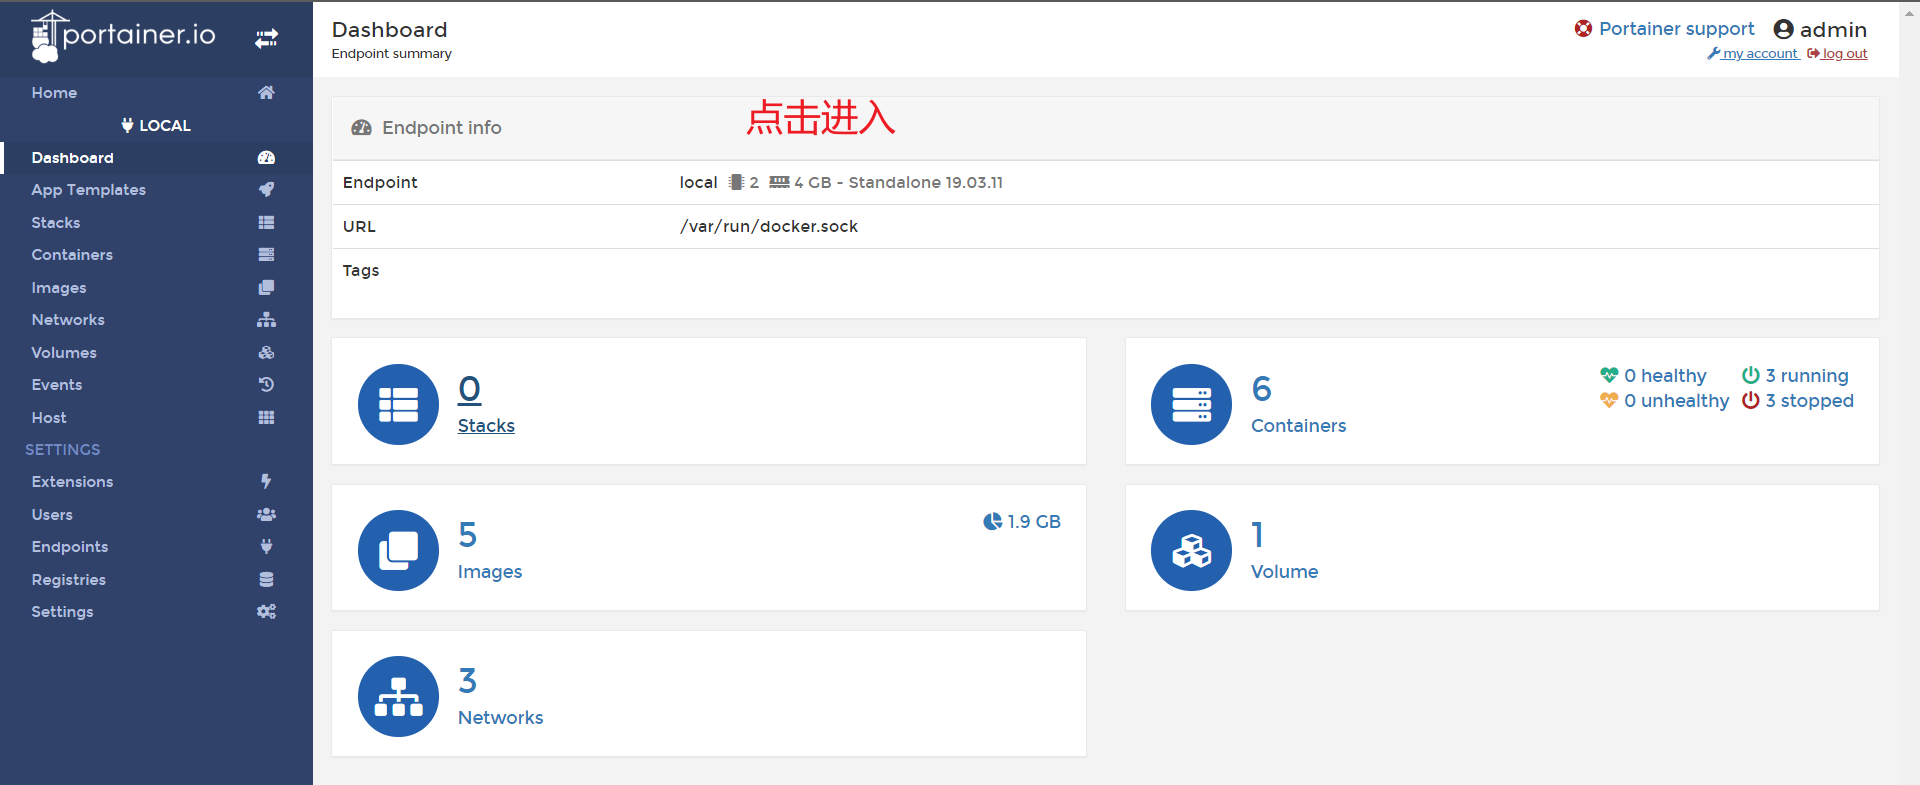
Visualization panel complete
Docker image explanation
What is mirror image?
Image is a kind of [lightweight and executable independent software package], which is used to package the software running environment and the software developed based on the running environment. It contains [all contents] required to run a software, including [code, runtime, library, environment variables and configuration files]
All applications, directly package docker image, you can run directly!
So how to get the image?
- Download from remote warehouse
- Friend copy
- Create an image Dockerfile by yourself
Docker image loading principle
UnionFS (Federated file system)
This is what we saw when downloading!
Union fs (joint file system): it is a kind of [layered, lightweight and high-performance] file system. It supports the modification of the file system. As a single submission, it can stack layers. At the same time, it can mount different directories to the same virtual file system (unit directories into a single virtual file system). UnionFS is the foundation of Docker image, which can be inherited through layering. Based on the basic image (the image without the parent image), you can make various specific application images
[features] multiple file systems are loaded at the same time, but only one file system can be seen from the outside. Joint loading will stack the file systems of each layer, so that the final file system will contain all the underlying files and directories
[example]: for example, both mysql and tomcat need centos environment. If I install mysql first, then I have centos environment. If I want to install tomcat again, then I can share this layer of centos without downloading centos.
Docker image loading principle
Docker's image is actually composed of one layer of file system, UnionFS.
BootFS (Boot file system) mainly includes bootloader and kernel. Bootloader mainly loads kernel. When Linux is just started, it will load BootFS file system. The bottom layer of Docker image is BootFS. This layer is the same as our typical Linux/Unix system, including boot loader and kernel. When the boot load is completed, the whole kernel is in memory. At this time, the use right of memory has been transferred from BootFS to the kernel. At this time, the system will also unload BootFS.
RootFS (Root File System), on top of BootFS, contains / dev, / proc, / bin, / etc and other standard directories and files in a typical Linux system. RootFS is a variety of different operating system distributions, such as Ubuntu CentOS and so on.
The problem is that we usually install several G's of CentOS into the virtual machine. Why is Docker only 200M here?
[the external link image transfer failed. The source station may have anti-theft chain mechanism. It is recommended to save the image and upload it directly (img-9ZdYQ3r7-1593050117116)(D:/typora/Typora/img/Docker 2020 latest super detailed / 1592730984652.png))
That's because for a thin OS, RootFS can be very small, just including the most basic commands, tools and libraries. Because the underlying layer directly uses the Host's kernel, it only needs to provide RootFS. It can be seen that for different Linux distributions, bootfs is basically the same, and RootFS will be different, so different distributions can be public BootFS.
Virtual machine is minute level, container is second level
Layered understanding
Layered mirror
You can observe the log output when downloading an image, and you will find that it is downloaded layer by layer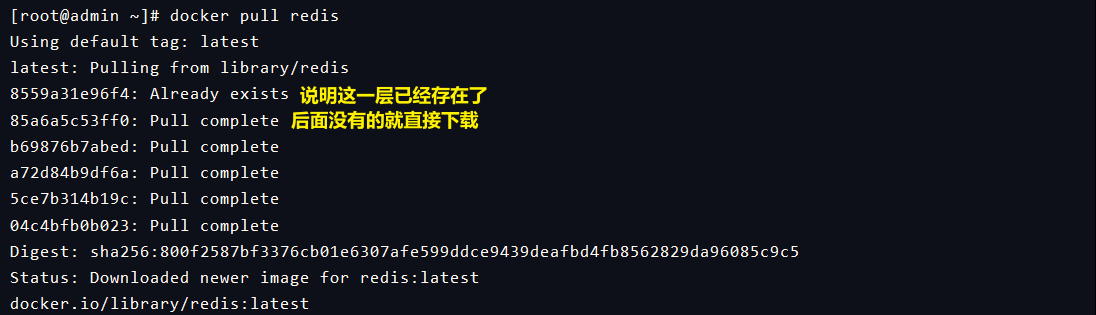
[q] Why does Docker image adopt this hierarchical structure?
[answer] the biggest benefit is resource sharing. For example, if multiple images are built from the same base image, the host only needs to keep one base image on the disk, and only one base image needs to be loaded in the memory, so that it can serve all containers, and each layer of the image can be shared.
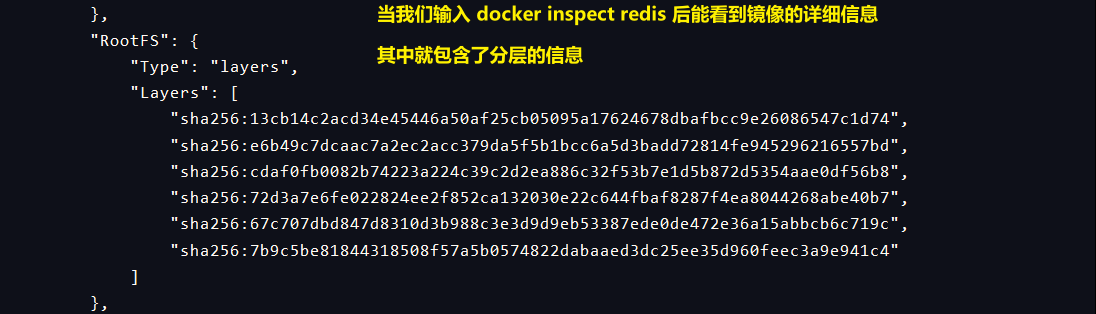
We can view the image hierarchy through the docker inspect command
[deepen understanding]
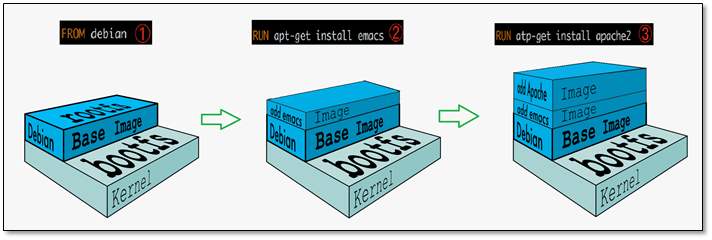
All Docker images start from a basic image layer. When you modify or add new content, a new image layer will be created above the current image layer.
[example] image of the first layer: create a new image based on Ubuntu Linux 16.04; if you add Python package to this image, you will create a second image layer on the basic image layer; if you continue to add a security patch, you will create a third image layer, as shown below.
[the external link image transfer failed. The source station may have anti-theft chain mechanism. It is recommended to save the image and upload it directly (img-gnW6Hpad-1593050117118)(D:/typora/Typora/img/Docker 2020 latest super detailed / 1592731965448.png))
While adding additional image layers, it is very important to understand the current combination of all images when the image is always maintained. In the following figure, a simple example is given. Each image layer contains three files, while the image contains six files from two image layers
[failed to transfer and store the pictures in the external link. The source station may have anti-theft chain mechanism. It is recommended to save the pictures and upload them directly (img-rNsbblUG-1593050117120)(D:/typora/Typora/img/Docker 2020 latest super detailed / 1592731986539.png))
The image layer in the above figure is slightly different from that in the previous figure. The main purpose is to facilitate the presentation of files.
The figure below shows a slightly complex three-tier image. In the external view, there are only six files in the whole image, because file 7 in the top layer is an updated version of file 5
[the external link image transfer failed, and the source station may have anti-theft chain mechanism. It is recommended to save the image and upload it directly (img-p4gcwxrp-1593050117122)(D:/typora/Typora/img/Docker 2020 latest super detailed / 1592732038506.png))
In this case, the files in the upper image layer cover the files in the lower image layer. In this way, the updated version of the file is added to the image as a new image layer.
Docker implements the image layer stack through the storage engine (snapshot mechanism is adopted in the new version), and ensures that multiple image layers are displayed as a unified file system.
The storage engines available on Linux are AUFS, OverLay2, Device Mapper, Btrfs, and ZFS. As the name implies, each storage engine is based on the corresponding file system or block device technology in Linux, and each storage engine has its unique performance characteristics.
Docker only supports windows filter as a storage engine on Windows, which implements layering and CoW based on NTFS file system
The following figure shows the same three-tier image as the system display. All image layers are stacked and merged to provide a unified view.
characteristic
Docker images are all read-only. When the container is started, a new writable layer is loaded on the top of the image!
This layer is what we usually call the "container layer". The layer under the container is called the "image layer"
[the external link image transfer failed. The source station may have anti-theft chain mechanism. It is recommended to save the image and upload it directly (img-DReKxq75-1593050117124)(D:/typora/Typora/img/Docker 2020 latest super detailed / 1592732066425.png))
commit image
docker commit commit container becomes a new copy

docker commit -a = "author" - m = "description information submitted" container id target image name [tag]

Test:
docker run -it -p 8080:8080 tomcat start tomcat container
 docker exec -it container id /bin/bash to enter tomcat's console

As mentioned earlier, there is no file under webapps of tomcat container
 Every time you start webapps.dist  Copy the contents under the directory to the webapps directory
 Now I've copied some basic applications myself = > CP - R webapps.dist/ * webapps/

#Pack a mirror image for future use
docker commit -a="tizi" -m="add webs app" bc7 tomcat_new:diy
 #View image
docker images
REPOSITORY          TAG                 IMAGE ID            CREATED             SIZE
tomcat_new          diy                 9d7965108263        3 seconds ago       652MB
centos             latest              831691599b88         4 days ago          215MB
tomcat              9.0                 2eb5a120304e        11 days ago         647MB
tomcat             latest              2eb5a120304e        11 days ago          647MB
nginx              latest              2622e6cca7eb        11 days ago          132MB
portainer/portainer   latest           cd645f5a4769        2 weeks ago         79.1MB
elasticsearch       7.7.1              830a894845e3        3 weeks ago          804MB

We can see that the storage generated by ourselves is larger
We should first understand the concept, even if it is ambiguous, and then we must practice it. Finally, we should combine practice with theory to summarize and solve this knowledge point
- If you want to save the state of the current container, you can submit it through commit to obtain an image. The next time you start the container, you can use the image directly, just like the snapshot when you use a virtual machine
Container data volume
What is a container data volume?
[demand]
- Many times, our application will have a lot of data. If the data is placed in the container, as long as the container is deleted, the data will be lost, which makes it easy for people to delete the database and run away. Therefore, we hope that [data can be persistent], that is, data is stored locally rather than in the container]
- In this way, the technology of data sharing between containers is born. The data generated in the Docker container can be synchronized to the local!
- This is volume technology, that is, data mount. Mount the directory in the container to the host
Volume technology is used for container persistence and synchronization! Data between containers can also be shared!
Using data volumes
Mode 1: directly use the command to mount the data (mode 2 is in the initial DockerFile)
docker run -it -v Host Directory: in container directory

Test: mount the home directory of the container to the ceshi directory under the home directory of the host
docker run -it -v /home/ceshi:/home centos /bin/bash

After entering the container, enter the home directory and create a new file
touch hello.txt
 ls view the contents of the directory, and you can see the file
 At this time, switch to the host or open another terminal to check the ceshi directory under the home directory of the host
cd /home/ceshi
 ls view the contents of the directory, and find hello.txt  The files have been synced

Let's test again. Can the data be synchronized when we turn off the container?
docker exec -it container id /bin/bash
 1. exit container first
 2. docker ps to see if the container really stops
 3. VIM / home / ceshi on the host/ hello.txt  Modify file
 4. docker start container
 5. Cat / home in container/ hello.txt  view file contents
 It can be found that the content of the file is the same as the previously modified one, which means that the file has been synchronized. When the file is deleted or created, the file will be synchronized

docker inspect container id to view mount information
- The advantage of this is that you only need to modify it locally in the future, and the container will automatically synchronize
MySQL synchronization data
1,Get it first mysql Image here use 5.7 edition
docker pull mysql:5.7
2,Run the container to mount data and configuration files at the same time [note] mysql Configuration password required for startup
docker run -d -p 3306:3306 -v /home/mysql/conf:/etc/mysql/conf.d -v /home/mysql/data:/var/lib/mysql -e MYSQL_ROOT_PASSWORD=123456 --name mysql mysql:5.7
3,After the startup is successful, you can use the navicat Let's connect mysql perhaps docker exec -it Enter container mysql -p get into mysql Console
4,Create a database, and then view the mapped path on the host, you can view the newly created database file
5,It's exciting. Delete the container docker rm -f mysql01
6,Check the path just now cd /home/mysql/data then ls see file
7,It can be found that the file still exists without loss, which realizes the function of container data persistence
You can connect to mysql database through the port set above
[the external link image transfer failed. The source station may have anti-theft chain mechanism. It is recommended to save the image and upload it directly (img-oTmHUJOp-1593050117129)(D:/typora/Typora/img/Docker 2020 latest super detailed / 1592807178917.png))
Create a database in the database. In the data directory of Linux home, you can see that there will be more new databases.
After deleting mysql container, run the same command to create mysql container again, and the data is still
Named and anonymous mount
- Anonymous mount
-v path in the container [a path will be created automatically without writing the path on the host]
-P [upper case P, random designated port]
docker run -d -P --name nginx01 -v /etc/nginx nginx
 After installation, you can view the volume through docker volume
 Options can be viewed through docker volume --help
 docker volume ls displays a list of volumes
 It can be found that the name of a volume is a string of characters, which is an anonymous mount
 When we write - v, we only write the path inside the container, not outside the container
- Mount by name
If there is / in front of the path, it means absolute path; if not, it means just a name, not a directory
docker run -d -P --name nginx02 -v juming-nginx:/etc/nginx nginx

Then look at the volume list docker volume ls
 You can see the volume we named just nginx

Name the volume by - v volume name: path inside the container

Then we can also view the path through the volume name
docker volume inspect juming-nginx
- All the volumes in the docker container, without a specified directory, are in [/ var/lib/docker/volumes/xxxx/_data]
- We can easily find one of our volumes through a named mount. In most cases, we are also using [named mount]
So the question is, how can we determine whether to mount it anonymously or by designated path?
-v path in container = > anonymous mount
 -v volume name: path in container = > named mount
 -v / host path: path in container = > there will be an absolute path for the specified path mount
[expansion]:
- Sometimes we have commands like this, followed by a ro or rw
docker run -d -P --name nginx02 -v juming-nginx:/etc/nginx:ro nginx
docker run -d -P --name nginx02 -v juming-nginx:/etc/nginx:rw nginx - This can be used to change the read-only and read-write permissions. Once the permissions of the container are set, the container will limit the content we mount
- ro as long as you see ro, it means that this path can only be operated by the host, and it cannot be operated inside the container. The default value is rw
Getting to know DockerFile
Docker File is the construction file used to [build docker image]. This is a command script. You can use this script to generate an image.
The image is layer by layer, so the corresponding script is the commands one by one, and each command is a layer of the image.
Mode 2: set the startup image in the self built image and mount it automatically
Let's do a little test first: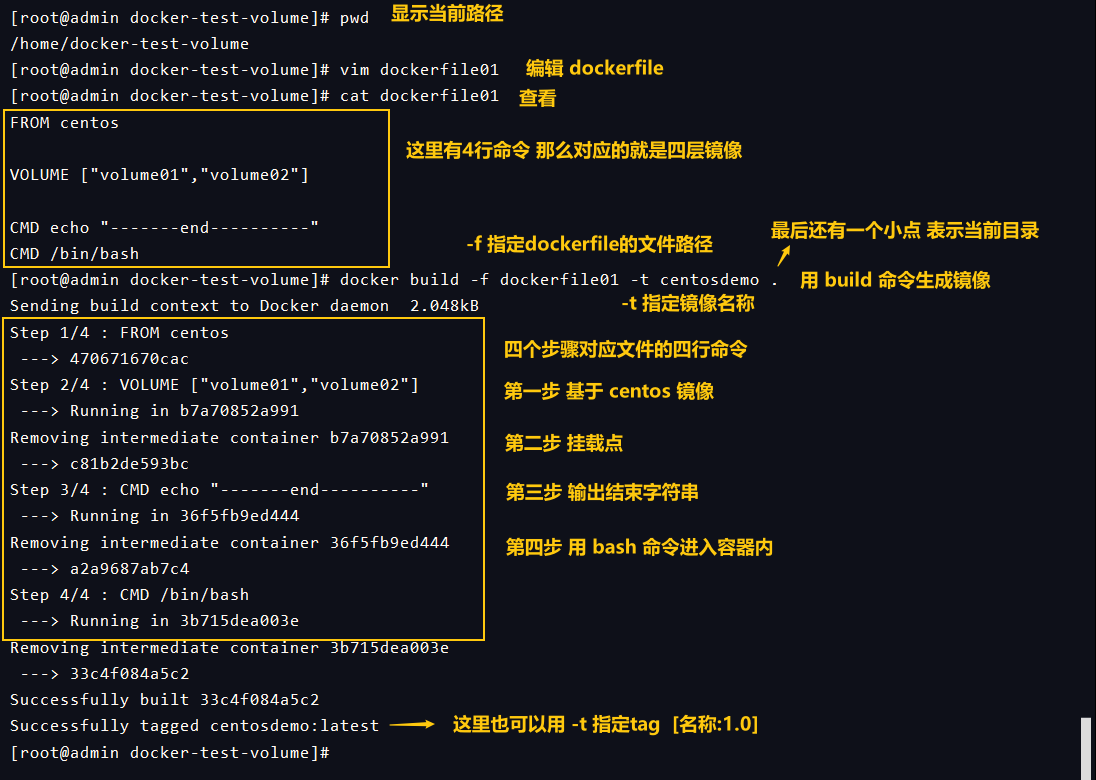

- Let's start the image and check the content
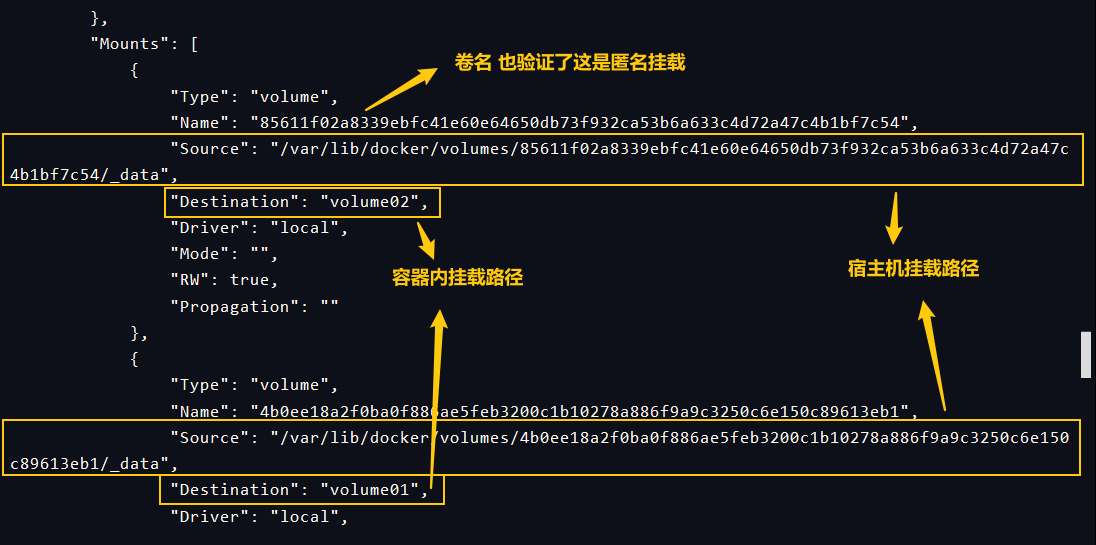
- Since it is a data volume, there must be a synchronous directory outside. In addition, because we [only write the directory in the container, so this is an anonymous mount], if we look for it, the volume name should be an irregular string.
- Remember the inspection command in front of us, which can view the detailed information of the image. There is a mount node that stores the information of the mount point. We can view the information of the mount point here [first docker ps to view the image ID, then docker inspect ion image ID]
- Let's create another file
- This method will be used a lot in the future, because we usually build our own image. When adding the image, we do not hang it on the volume. We need to mount it manually [- v volume name: path inside the container]
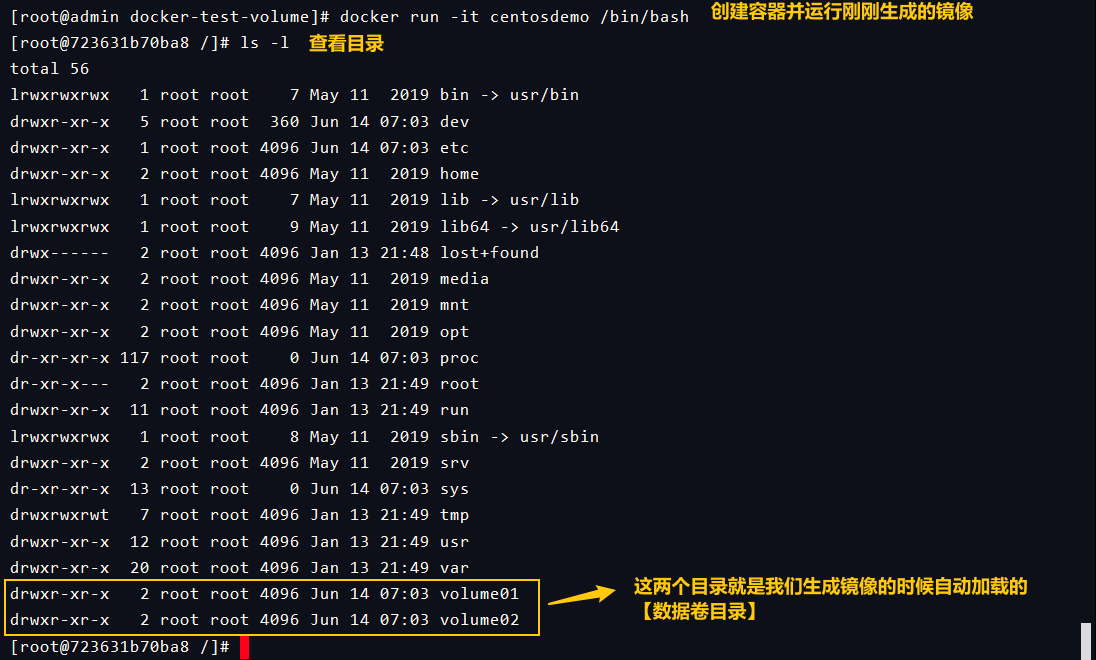
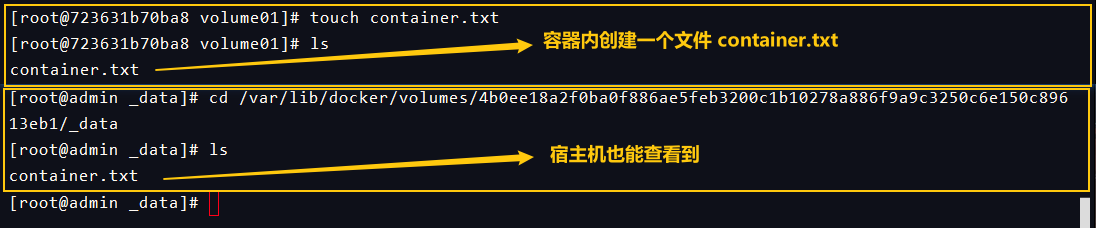
# 1. Create script file
/home/ mkdir docker-test-volume

cd mkdir docker-test-volume/vim dockerfile1

# Enter the following
FORM centos

VOLUME ["volume01","volume02"]

CMD echo "---end---"
CMD /bin/bash
# 2. Start custom script note
docker build -f /home/docker-test-volume/dockerfile1 -t tizi/centos:1.0 .

#After success, you can view the image generated according to the script in docker images

#Start the self written image container
docker run -it container id /bin/bash

#Enter into container
docker exec -it container id /bin/bash
docker attach container id
#Write a file
cd volume01
touch a.java

#View mount information
docker inspect container id
Data volume container
- [usage scenario]: multiple mysql synchronization data
[the external link image transfer failed. The source station may have anti-theft chain mechanism. It is recommended to save the image and upload it directly (img-9JtJzvDD-1593050117132)(D:/typora/Typora/img/Docker 2020 latest version super detailed / 1592815072922.png))
[hands on operation]
#Start the two containers docker01 and docker02 through the image we just generated
 #Create container 1 through the specified version of centos defined by yourself
docker run -it --name docker01 tizi/centos:1.0
 #Create container 2 through the specified version of centos defined by yourself -- volumes from docker01 is similar to 02 inheriting 01, synchronizing data
docker run -it --name docker02 --volumes-from docker01 tizi/centos:1.0
 Then enter docker01, enter volume01 directory, and create a new docker01 file
 Then enter docker02, enter volume01 directory, and view the contents of the directory
 It can be found that the data between two containers has been synchronized

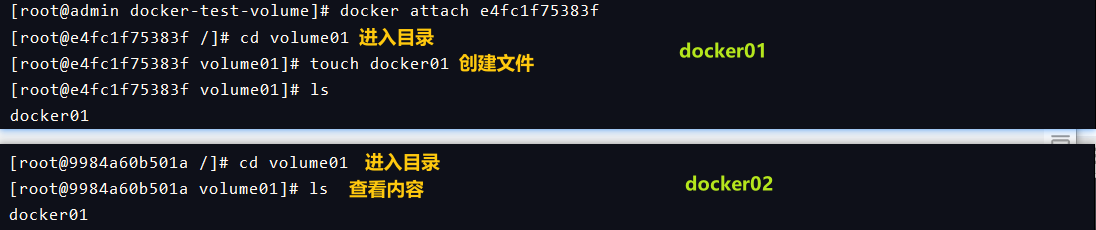
Maybe someone wants to ask: can I have another docker03 to mount docker01? Then try it!
docker run -it --name docker03 --volumes-from docker02 tizi/centos:1.0

When creating files in volume01, you can find that both the 1 and 2 containers will be obtained and the data is shared.
When you delete 3, the other container data is still there, containing the contents of 3.
Same principle as copy backup

- So as long as we create containers through -- volumes from, we can realize data sharing between containers. [note] this data sharing means that even if the container for creating this file is deleted, the file still exists.
- It is more like a reference. When the data volume container is mounted to the directory of the host, and then other containers are mounted to the data volume container, the reference to the file (copy of the data address) is used. If the file is copied, it is not only inefficient, but also wasteful of space. :
Example: multiple MySQL data sharing
docker run -d -p 3310:3306 -v /home/mysql/conf:/etc/mysql/conf.d -v /home/mysql/data:/var/lib/mysql -e MYSQL_ROOT_PASSWORD=123456 --name mysql01 mysql:5.7

docker run -d -p 3310:3306 -e MYSQL_ROOT_PASSWORD=123456 --name mysql02 --volumes-from mysql01 mysql:5.7
Summary
- The transfer of configuration information between containers can be managed centrally through data volumes or reused
- The life cycle of the data volume container will last until there is no container location, but once you persist to the local, the local data will not be deleted
- This chapter focuses on two mounting methods: one is to mount through the - v command, and the other is to write the mount directory to the image when we build the DockerFile again.
- There are two ways to mount: named mount and anonymous mount
- Then, it introduces the way of data sharing between containers [-- volume from mount to data volume container]
Docker File
About DockerFile
The core of DockerFile is the file used to build docker image, which is a command parameter script
Construction steps:
1. Write a dockerfile file
2. docker build as an image
3. docker run image
4. docker push publishing image (DockerHub, Alibaba cloud image warehouse)
-
We can see how officials do it:
[the external link image transfer failed. The source station may have anti-theft chain mechanism. It is recommended to save the image and upload it directly (img-zVFYWUQt-1593050117134)(D:/typora/Typora/img/Docker 2020 latest super detailed / 15928432954. PNG))[the external link image transfer failed. The source station may have anti-theft chain mechanism. It is recommended to save the image and upload it directly (img-TAbe7ERD-1593050117136)(D:/typora/Typora/img/Docker 2020 latest super detailed / 1592827933309.png))
-
Many official images are basic packages, many functions are not available, usually we will build an image ourselves!
DockerFile build process
Basic knowledge
-
Each reserved key (instruction) must be a capital letter
-
The instructions are executed from top to bottom
-
#Sign for comment
-
Each instruction creates and commits a new image layer
[the external link image transfer failed. The source station may have anti-theft chain mechanism. It is recommended to save the image and upload it directly (img-cU9DZa41-1593050117139)(D:/typora/Typora/img/Docker 2020 latest super detailed / 1592828042311.png)) -
Dockerfile is development oriented. We will release the project later, make the image and submit the file. You need to write a dockerfile, which is very simple
Explanation of related terms
Dockerfile: build file, which defines all steps, equivalent to source code
DockerImages: a product that builds the generated image through Dockerfile and finally publishes and runs, which is equivalent to the original war package and jar package
Docker container: the container is used to provide services when the image is running
DockerFile instruction
FROM          #The basic image, such as centos/ubuntu, is built from here
MAINTAINER    #Who wrote the image, usually name + email
RUN           #Commands to run during image construction
ADD           #For example, to add tomcat, you need a Tomcat compression package, which is the content to be added
WORKDIR       #Working directory of the image
VOLUME        #Mounted directory
EXPOSE        #Specify exposed port configuration
CMD           #Specify the command to run when the container starts. Only the last one will take effect and will be replaced
ENTRYPOINT    #Specify the command to run when the container starts. You can append the command
ONBUILD       #When an inherited DockerFile is built, the ONBUILD instruction will be run
COPY          #Similar to the ADD command, copy the file to the image
ENV           #Setting environment variables during construction

- Next we can write a mirror image of ourselves!
Real battle: build a CentOS of your own
-
Let's take a look at the official DockerFile of CentOS
[external link image transfer failed. The source station may have anti-theft chain mechanism. It is recommended to save the image and upload it directly (img-7xINykCb-1593050117141)(D:/typora/Typora/img/Docker 2020 latest version super detailed / 1592830502955.png)) -
Most of the images in the DockerHub are FROM scratch from this basic image, and then configure the required software and configuration to build it
-
Then we will base on the official image and add some environment we need
Start the official centos,You'll find less functionality
docker run -it centos
pwd    #Will be in the root directory
vim	   #No content
ifconfig
//According to the above situation, we build an upgraded version of centos

1,Enter a directory first and create a dockerfile Directory welcome to store some files
   cd /home
   mkdir dockerfile
2,Create a dockerfile File. Name it as you like. Here it is mydockerfile
   vim mydockerfile
3,Start writing instructions (remove the marked instructions when copying)
   FROM centos      # base image
   MAINTAINER tizi<  <xxxxxxx@qq.com>    # Author information

   ENV MYPATH /usr/local    # Create a variable to hold a value
   WORKDIR $MYPATH    # The working directory after startup is the default directory after entering the container

   RUN yum -y install vim    # Execution instruction installation vim
   RUN yum -y install net-tools    # Execute the instruction to install net tools

   EXPOSE 80    # Exposed port

   CMD echo $MYPATH    # Output MYPATH variable
   CMD echo "------end---------"    # Output information
   CMD /bin/bash    # Use bash command line after startup
4,Build a mirror
   docker build -f mydockerfile -t mycentos:0.1 .
5,Build the output at the end of success
   Successfully built fa1d3cda51dc
   Successfully tagged mycentos:0.1
6,test run
   docker images #View your own centos
   docker run -it mycentos:0.1 #Run your own centos
7,We can go through history Command check the running instructions
   docker history image ID
Difference between CMD and ENTRYPOINT
- [CMD] specifies the command to run when the container is started. Only the last one will take effect and will be replaced
- [ENTRYPOINT] specifies the command to be run when the container is started. You can append the command
The following steps are recommended
1. Create a dockerfile and write
   FROM centos
   CMD ["ls","-a"]
2. Build a mirror
   docker build -f dockercmd -t cmdtest .
3. Running the image directly
   docker run image id
 4. You can see that the ls-a command is in effect
 5. Now we want to append a - l command, which is to execute the ls -al command
   According to the previous content, we can add the - l command as the parameter after the docker run command
   That is, docker run a9d76c1b34d2 -l
   But when we confirmed the implementation, we found that the error was reported
   docker: Error response from daemon: OCI runtime create failed: container_linux.go:349:
   starting container process caused "exec: \"-l\": executable file not found in $PATH": unknown.
   ERRO[0000] error waiting for container: context canceled
   Why? In the case of CMD, - l replaces the CMD ["ls","-a"] command, but - l is not a command, so an error is reported.
   Then we can directly add the complete command to add [docker run a9d76c1b34d2 ls -al] so that the execution is successful, but it is very troublesome
 6. Import ENTRYPOINT for operation and re create a dockerfile
   FROM centos
   ENTRYPOINT ["ls","-a"]
7. Rebuild run
   docker build -f dockerentrypoint -t entrypointtest .
   docker run 7855e875f6e1
   Up to this point, the result is no different from that of using CMD
 8. Append - l after docker run command
   docker run 7855e875f6e1 -l
   You will find that the result is not only error free, but also the same as executing LS Al, so you can see the gap between the two commands
   Indicates that the - l command is directly spliced after the ENTRYPOINT command
Many commands in Dockerfile are very similar. We need to understand their differences. The best way to learn is to compare the learning and then test the effect.
Practice: making a Tomcat image
There is a problem with the image generated in this way. There is no file in the webapp directory of tomcat, curl localhost:9090 Or the browser will report an error
Please refer to other specific methods for completion https://blog.csdn.net/weixin_43397326/article/details/83306562
Or search for other content references
- Prepare image files: tomcat installation package, jdk installation package (tar package)
- Create resource in Linux root directory and docker under resource_ tomcat_ JDK file, created in this directory readme.txt (not to be built). vim dockerfile. Create by yourself
- Write a Dockerfile, which is officially named Dockerfile. build will find this file automatically, so you don't need to specify - f
Note to remove comments when copying. When you're done, you need to docker_tomcat_jdk File. Otherwise, you need to specify the file plus -f
//Run command: docker build -t custom name .
//Such as running reference command under other files(It's easy to report mistakes, not recommended):
docker build -f resource/docker_tomcat_jdk/dockerfile -t diytomcat .

FROM centos	# The mirror image of the basic system, on which to build
MAINTAINER xiangt>iti@66666@qq.com	# Author information

COPY readme.txt /resource/dockerfile/readme.txt	 # Copy the path from readme to the inside of the container

ADD jdk-8u161.tar.gz /usr/local/	 # The ADD command will automatically unzip the tar package to the specified path, and the installation through linux will also automatically put it into usr/local
ADD apache-tomcat-9.0.36.tar.gz /usr/local

RUN yum -y install vim	# Install some basic commands

ENV MYPATH /usr/local	# Set default working directory
WORKDIR $MYPATH

ENV JAVA_HOME /usr/local/jdk1.8.0_161	# Configuration of java environment variables
ENV CLASSPATH $JAVA_HOME/lib/dt.jar:$JAVA_HOME/lib/tools.jar
ENV CATALINA-HOME /usr/local/apache-tomcat-9.0.36	# tomcat environment variable
ENV CATALINA-BASH /usr/local/apache-tomcat-9.0.36
ENV PATH $PATH:$JAVA_HOME/bin:$CATALINA_HOME/lib:$CATALINA_HOME/bin

EXPOSE 8080  # Exposed tomcat port is 8080
# Start tomcat to display the newly added content of the file by & & splicing some parameters, tail-f
CMD /usr/local/apache-tomcat-9.0.36/bin/startup.sh && tail -F /usr/local/apache-tomcat-9.0.36/bin/catalina.out
- After the construction image [docker build -t diytomcat.] file is named Dockerfile, it can be matched automatically without specifying the file - f
- After the construction, it will run and mount the data with the directory specified by - v [docker run - D - P 9090:8080 -- name zdytomcat - V / resource / tomcatdy_ juan:/usr/local/apache-tomcat-9.0.36/webapps diytomcat]
- Access test: enter the container to view the directory [docker exec -it container id /bin/bash] [ls -l]
- Publish the project, because we mount the webapps directory in a directory of the host, so we can write the project directly locally
- Visit the application in tomcat server to test whether it is successful
Publish your own image to DockerHub
Address: https://hub.docker.com/
- You need to register an account first
- Make sure this account can be logged in
- Submit your own image on our server
1. First log in to the command line and enter the command, then you will be asked to enter the password. The Login Succeeded message appears, indicating that the login is successful
   Docker login - U user name of dockerhub
 2. Submit image docker push without version number is to submit latest version
   We are required to bring the account name when building the image to prevent confusion
   docker push user name / mycentos
   If you don't take the tag with you, just add the wrong tag. The default is latest, and tag is recommended
   Retype the tag command: docker tag user name / mycentos user name/ mycentos:1.0
Publish to Alibaba cloud image warehouse
-
Log in to alicloud
-
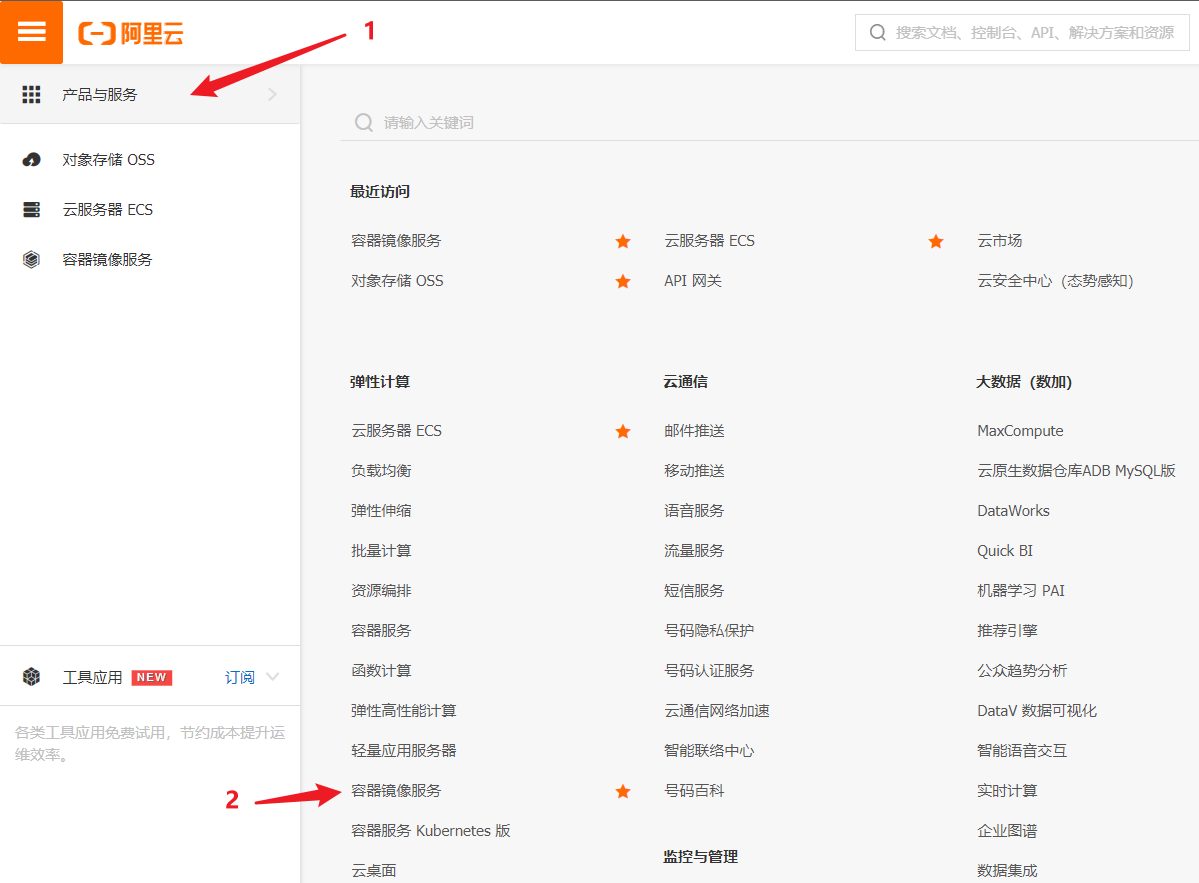
Search for container image service
[the external link image transfer failed. The source station may have anti-theft chain mechanism. It is recommended to save the image and upload it directly (img-Nv3sMuLV-1593050117144)(D:/typora/Typora/img/Docker 2020 latest super detailed / 1592891116456.png)) -
Create a namespace to isolate and prevent image conflicts
[the external link image transfer failed. The source station may have anti-theft chain mechanism. It is recommended to save the image and upload it directly (img-AobyqvxG-1593050117147)(D:/typora/Typora/img/Docker 2020 latest super detailed / 1592891249791.png)) -
Create image warehouse: fill in the information and select local warehouse
[the external link image transfer failed. The source station may have anti-theft chain mechanism. It is recommended to save the image and upload it directly (img-Eec4D9EC-1593050117149)(D:/typora/Typora/img/Docker 2020 latest version super detailed / 1592891310123.png)) -
Browse the warehouse information [click the blue warehouse name]
[the external link image transfer failed. The source station may have anti-theft chain mechanism. It is recommended to save the image and upload it directly (img-gPecsRYf-1593050117151)(D:/typora/Typora/img/Docker 2020 latest super detailed / 1592891393576.png)) -
Follow the operation guide, submit the image, [refer to official documents]
-
sudo docker login --username=ti66666@vip.qq.com registry.cn - beijing.aliyuncs.com . Log on to Alibaba cloud warehouse
-
docker push mysql:5.7
Summary
- A flow chart can sort out the knowledge points of this chapter
Docker network
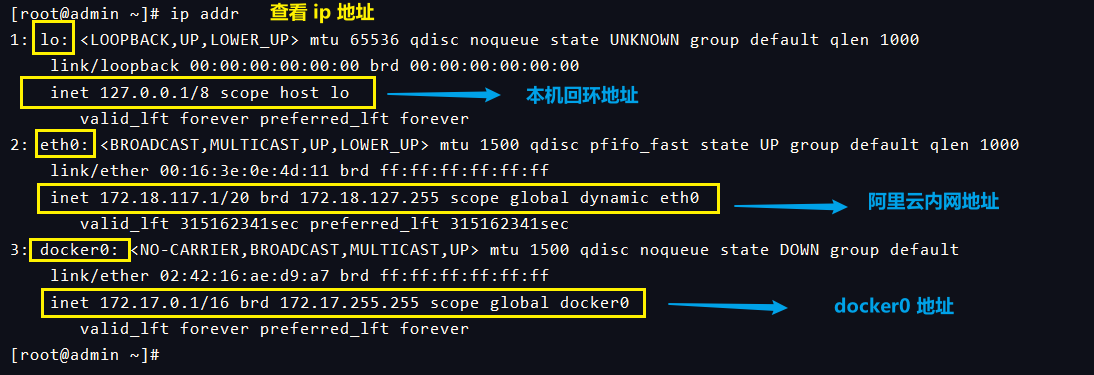
Understand [Docker0]
-
The core of Docker network is Docker0
-
We can use ip addr to check the ip information of the host
-
[question] how does docker handle container network access?
-
For example, there are two containers (A container and B container). Now the application in Tomcat of A container needs to access MySql of B container. How do I connect here? Which of the above three addresses is used for access?
-
We also asked this question when configuring ES. How can kibana connect to ES?
1,Let's run one first tomcat Image, check the network card again
   docker run -d -P --name tomcat01 tomcat
   docker exec -it tomcat01 ip addr
   //We can see that when the container starts, we get a eth0@if81  This is the identifier assigned by docker
   ----- Operation results -----
   1: lo: <LOOPBACK,UP,LOWER_UP> mtu 65536 qdisc noqueue state UNKNOWN group default qlen 1000
       link/loopback 00:00:00:00:00:00 brd 00:00:00:00:00:00
       inet 127.0.0.1/8 scope host lo
          valid_lft forever preferred_lft forever
   80: eth0@if81: <BROADCAST,MULTICAST,UP,LOWER_UP> mtu 1500 qdisc noqueue state UP group default
       link/ether 02:42:ac:11:00:02 brd ff:ff:ff:ff:ff:ff link-netnsid 0
       inet 172.17.0.2/16 brd 172.17.255.255 scope global eth0
          valid_lft forever preferred_lft forever
   -------------------
2,Let's try to see if we can ping Inside of container
   ping 172.17.0.2
  //Discover the ability to ping through
-
[analysis]
- Looking back at the address of docker0, we find that it is 172.17.0.1, which is very similar to our router address 192.168.0.1
- When we connect the wifi of this router with our mobile phone, the assigned ip address is 192.168.0.3 and so on. These two IPS can ping each other in one network segment
- In the same way, the ip address of the container we tested is 172.17.0.2, which is the same network segment as 172.17.0.1, so it can be ping ed
- Every time we start a docker container, docker will assign an ip to the container. As long as we install docker, we will have a network card docker0
- This network card uses the bridging mode, and the technology used is the Veth pair technology
-
After we create the container, we can use ip addr to view the network card
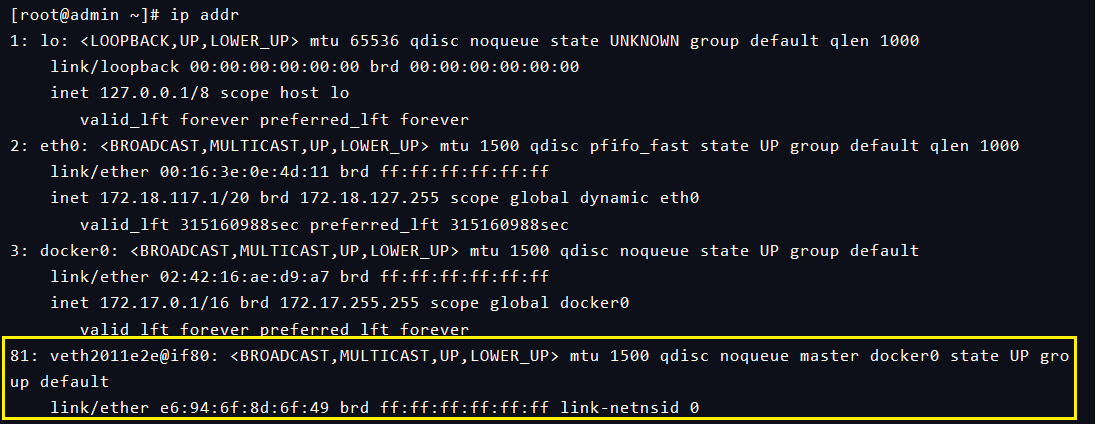
-
Have you found anything!!??
-
One of the network cards we view after creating the container is [80: eth0@if81 ], just opposite to the network card in the figure above
-
What about starting another tomcat container?
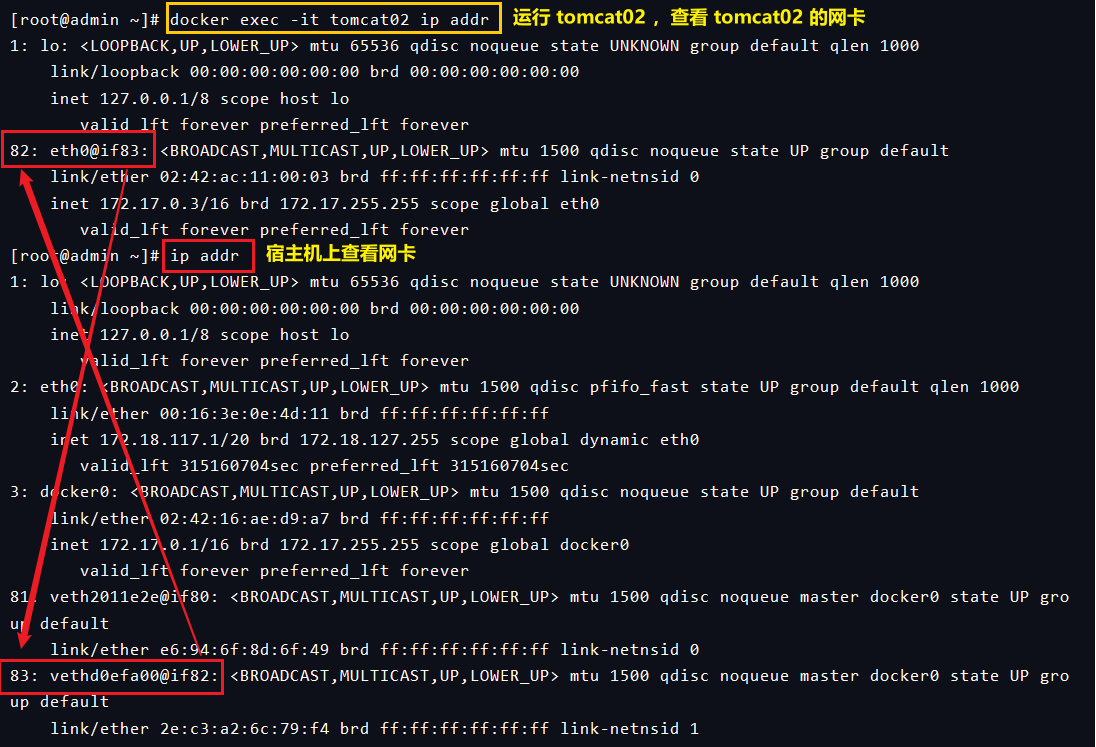
-
Another pair of network cards was found. Note that it's a pair! This one-to-one pair of network cards is due to the use of the Veth pair technology
-
Veth pair is a pair of virtual device interfaces. They are all in pairs, one end is connected to the protocol, the other end is connected to each other
-
Because of this feature, this technology is usually used as a bridge to connect various virtual network devices
-
For example, the connection between OpenStack Docker containers, ovs, uses the Veth pair technology
-
Let's try to Ping tomcat02 at tomcat01

-
So you can ping between containers!
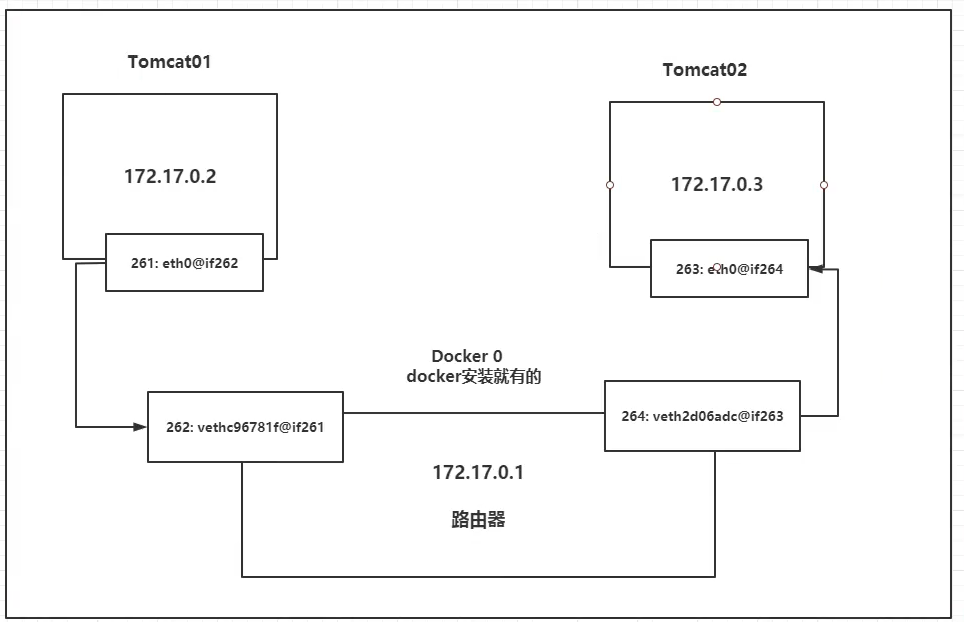
-
When we go to ping 3 in 2, or we first forward it from 261 to 262 through the Veth pair technology, 1 then register the information through the saved port, and then send it from 264 to 263, thus completing a data communication, rather than directly sending it from 2 to 3, which is the concept of bridging.
-
There are two mechanisms here, one is similar to routing and forwarding, which is directly forwarded to a specific port; the other is broadcasting, sending out, and checking the receiving and processing of that port.
-
If you have learned computer network, you will understand it better. If you don't understand it, you are advised to find some information.
-
All containers are routed by docker0 without specifying the network. Docker will assign a default available ip to our container. You can see that tomcat is started without specifying the ip. docker ps is a randomly generated port of docker0
-
You can use - net to specify the network
Summary
- Docker uses the bridge of Linux, and the host is a docker container bridge [docker0]
- All the network interfaces in Docker are virtual, and the virtual forwarding efficiency is high!
- As long as the container is deleted, the corresponding pair of bridges will be lost
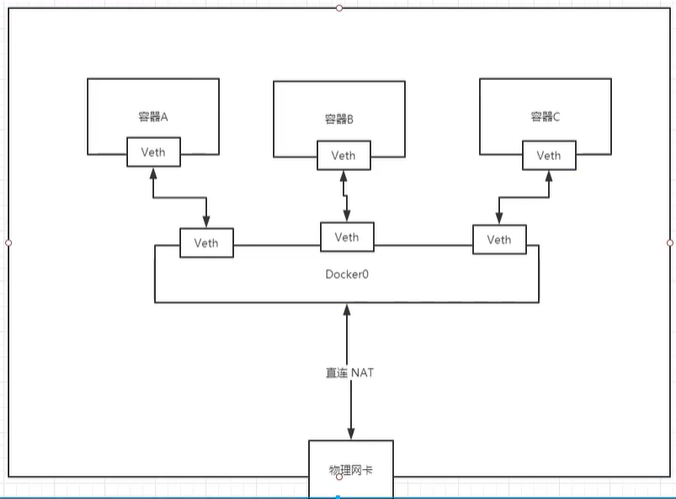
Container interconnection -- link command
Thinking about a scenario, we wrote a microservice that needs to connect to the database through a URL. Every time we start the container, we will reallocate the IP address, the IP address will change, and the URL address will fail.
- When learning spring cloud, I learned feign. Feign is called by the service name. That is, no matter how the IP changes, I can call it by the fixed service name
- Similarly, if we can ping through [container name], we can still connect even if the IP address changes
- So we can also achieve high availability
1,Let's try to pass the container name first ping through
[root@admin ~]# docker exec -it tomcat02 ping tomcat01
ping: tomcat01: Name or service not known
//Find out can't ping through

2,Create a new tomcat03 Container use --link
[root@admin ~]# docker run -d -P --name tomcat03 --link tomcat02 tomcat
d6f626ab5aa0f56f48e56ae2c2603444d19c2c96e7e56a5fa15bcbbf692d0869

3,stay tomcat03 Use container name ping tomcat02
[root@admin ~]# docker exec -it tomcat03 ping tomcat02
PING tomcat02 (172.17.0.3) 56(84) bytes of data.
64 bytes from tomcat02 (172.17.0.3): icmp_seq=1 ttl=64 time=0.121 ms
64 bytes from tomcat02 (172.17.0.3): icmp_seq=2 ttl=64 time=0.078 ms
//find ping All right!!!

4,But when we were tomcat02 Use container name ping tomcat03 When, the result is not as we wish
[root@admin ~]# docker exec -it tomcat02 ping tomcat03
ping: tomcat03: Name or service not known
//As a result ping No way
- This is because there is no configuration in tomcat02. We configured -- link in tomcat03, but there is no configuration in 02
[exploration]
- Let's check the metadata information of docker's network
1,see docker Network list
   docker network ls
NETWORK ID          NAME                DRIVER              SCOPE
7bc4edf2a0e8        bridge              bridge              local
de44533d6de3        host                host                local
32983fccf962        none                null                local

2,Let's take a look at the first one
   docker network inspect 7bc4edf2a0e8
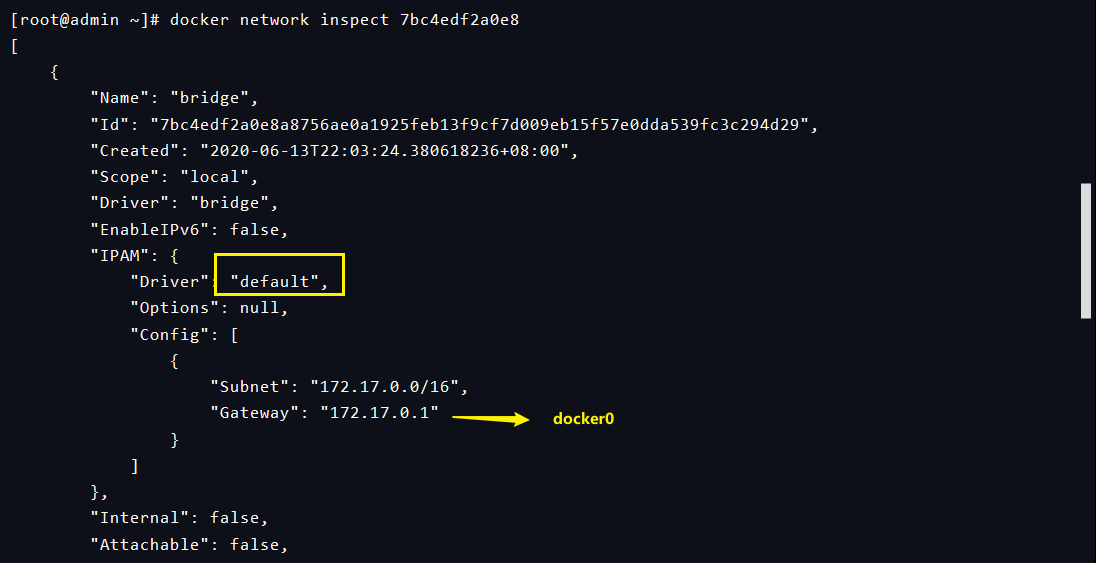
- Keep turning down and see what's left behind
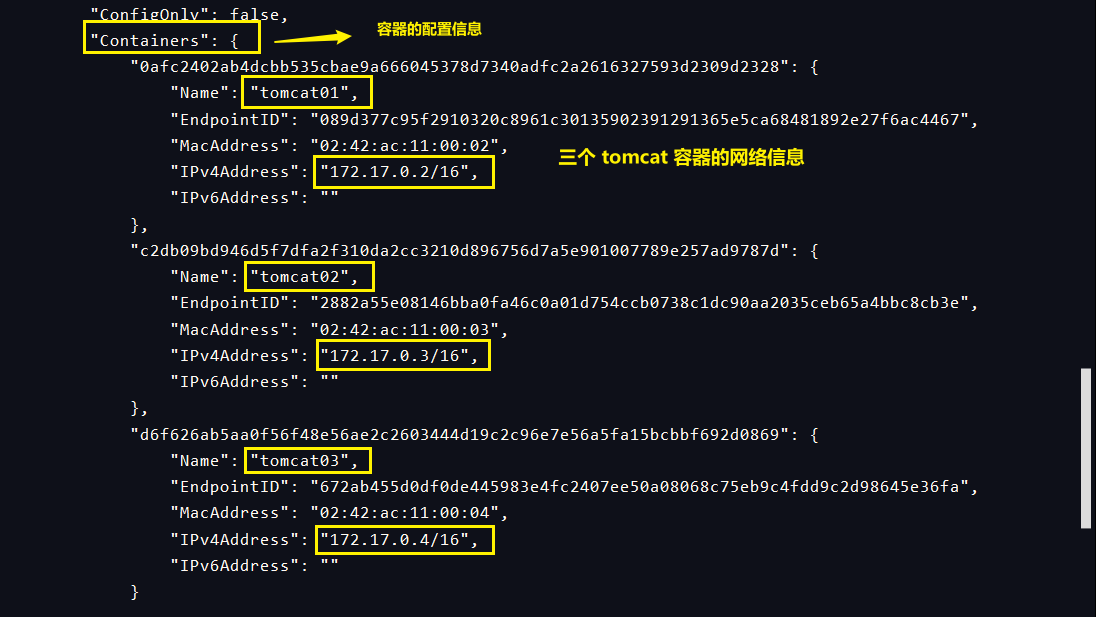
-
Here we can see the network information of three containers
-
Next, let's look at the configuration information of the tomcat03 container we just created. There is a Links in HostConfig

-
According to the DNS resolution process, when we visit a domain name / address, we will first check the host file. Then we can also check the host file of tomcat03
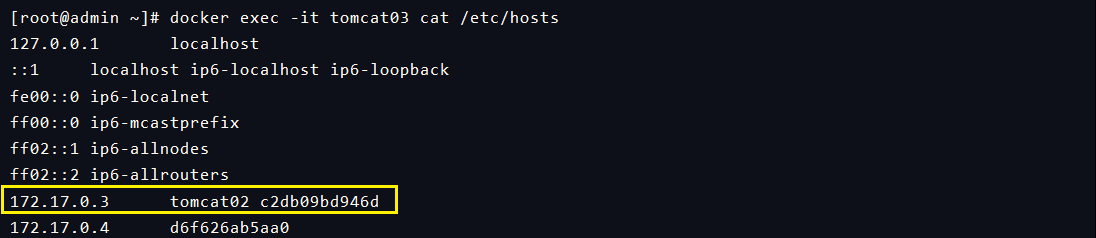
-
This means that as long as we request tomcat02, we will directly forward it to 172.17.0.3, so we can ping Tong
-
And -- link is that we added tomcat02 mapping in the host configuration
-
When the IP is changed, it means that the container is restarted. Then -- link is re linked and the configuration file is automatically changed
-
Let's take a look at the connection configuration information in the host file and the image metadata of the container that tomcat02 has not configured
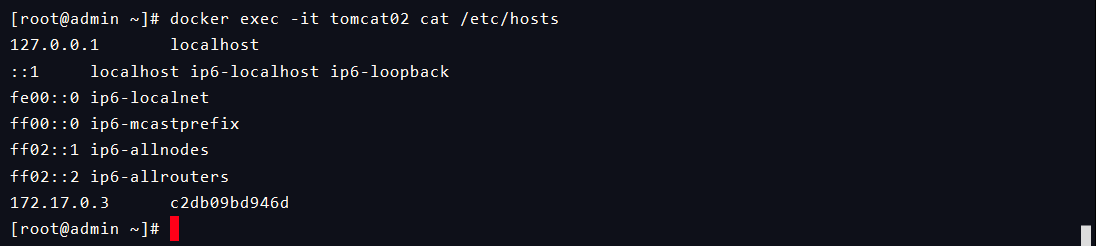

-
It can be found that there are no such configurations in tomcat02
-
In fact, the essence of this is host mapping, which is too stupid. We need more advanced
-
What we need is [user defined network], not applicable to [docker0]. Docker0 is the official bridge, which is limited
-
For example, docker0 [does not support container name connection access]
-
So the advanced operation is to use user defined network
Custom network
View all docker networks

-
Network mode
- Bridge: bridge mode [docker bridging (default))
- Host: host mode [share network with host]
- none: do not configure network
- Container: network connection in the container [large limitation, less use, not recommended]
-
test
Before we started the command directly, the default is to add -- net bridge, which is our docker0
docker run -d -P --name tomcat01 --net bridge tomcat

docker0 is the default. We can use -- link to get through the connection

We can customize a network
 --driver bridge indicates using bridge mode
 --subnet 192.168.0.0/16 indicates that subnet ip can be allocated from 192.168.0.2 to 192.168.255.255
 --gateway 192.168.0.1 means gateway
 mynet stands for network name
docker network create --driver bridge --subnet 192.168.0.0/16 --gateway 192.168.0.1 mynet

After creation, we can check it
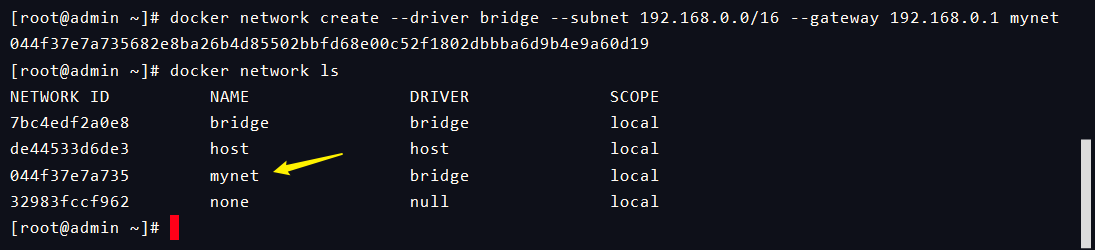
We can use the custom network we created to start a container
docker run -d -P --name tomcat-mynet-01 --net mynet tomcat
docker run -d -P --name tomcat-mynet-02 --net mynet tomcat

If you look at the metadata of mynet, you can see two containers
docker network inspect mynet
- So why do we use custom networks?
- Let's test the Ping container again. At this time, we can ping the container directly

- We can ping through the container name without using -- link
- Our customized network and docker have helped us maintain the corresponding relationship. It is recommended that we use the network in the future
- The advantage is that when we build clusters in the future, different clusters like mysql and redis can use different networks to ensure that the clusters are safe and healthy
Network connectivity
-
As mentioned above, suppose a Redis in my Redis cluster wants to access Tomcat, what should I do?
-
It is impossible to ping directly between two different network segments
-
Then we can check the commands in the docker network
-
Let's use the command to test and get through Tomcat mynet. First, we need to create two containers tomcat01 and tomcat02 in the normal way
docker run -d -P --name tomcat01 tomcat
docker run -d -P --name tomcat02 tomcat
-
After connecting, put tomcat01 under the mynet network
-
It's just like our Alibaba cloud server, a public ip and a private ip
-
Let's ping again
-
To enable tomcat02 to ping through Tomcat mynet, just connect tomcat02 to mynet
Actual combat: deploying Redis cluster
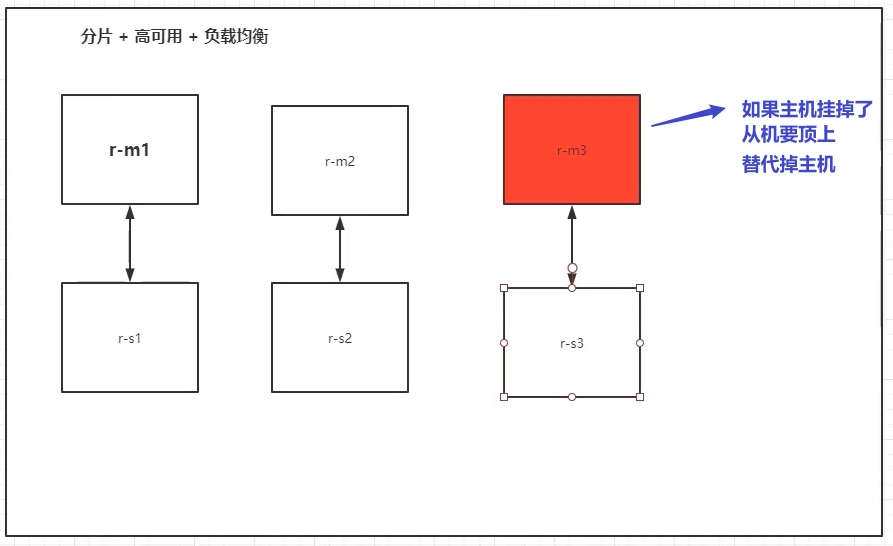
#1. Create a redis network
docker network create redis --subnet 172.38.0.0/16
#View the metadata of the image
docker network inspect redis

#2. Create 6 redis containers with shell script and configure
for port in $(seq 1 6); \
do \
mkdir -p /mydata/redis/node-${port}/conf
touch /mydata/redis/node-${port}/conf/redis.conf
cat << EOF >/mydata/redis/node-${port}/conf/redis.conf
port 6379
bind 0.0.0.0
cluster-enabled yes
cluster-config-file nodes.conf
cluster-node-timeout 5000
cluster-announce-ip 172.38.0.1${port}
cluster-announce-port 6379
cluster-announce-bus-port 16379
appendonly yes
EOF
done
#cd to view / mydata/redis

#3. Create 6 redis containers with configuration files
docker run -p 6371:6379 -p 16371:16379 --name redis-1 \
-v /mydata/redis/node-1/data:/data \
-v /mydata/redis/node-1/conf/redis.conf:/etc/redis/redis.conf \
-d --net redis --ip 172.38.0.11 redis:5.0.9-alpine3.11 redis-server /etc/redis/redis.conf

docker run -p 6372:6379 -p 16372:16379 --name redis-2 \
-v /mydata/redis/node-2/data:/data \
-v /mydata/redis/node-2/conf/redis.conf:/etc/redis/redis.conf \
-d --net redis --ip 172.38.0.12 redis:5.0.9-alpine3.11 redis-server /etc/redis/redis.conf

docker run -p 6373:6379 -p 16373:16379 --name redis-3 \
-v /mydata/redis/node-3/data:/data \
-v /mydata/redis/node-3/conf/redis.conf:/etc/redis/redis.conf \
-d --net redis --ip 172.38.0.13 redis:5.0.9-alpine3.11 redis-server /etc/redis/redis.conf

docker run -p 6374:6379 -p 16374:16379 --name redis-4 \
-v /mydata/redis/node-4/data:/data \
-v /mydata/redis/node-4/conf/redis.conf:/etc/redis/redis.conf \
-d --net redis --ip 172.38.0.14 redis:5.0.9-alpine3.11 redis-server /etc/redis/redis.conf

docker run -p 6375:6379 -p 16375:16379 --name redis-5 \
-v /mydata/redis/node-5/data:/data \
-v /mydata/redis/node-5/conf/redis.conf:/etc/redis/redis.conf \
-d --net redis --ip 172.38.0.15 redis:5.0.9-alpine3.11 redis-server /etc/redis/redis.conf

docker run -p 6376:6379 -p 16376:16379 --name redis-6 \
-v /mydata/redis/node-6/data:/data \
-v /mydata/redis/node-6/conf/redis.conf:/etc/redis/redis.conf \
-d --net redis --ip 172.38.0.16 redis:5.0.9-alpine3.11 redis-server /etc/redis/redis.conf

#4. Create cluster
//Enter redis-01 first. There is no official image of redis bash ,To use sh
docker exec -it redis-1 /bin/sh
//Enter command to configure cluster
redis-cli --cluster create 172.38.0.11:6379 172.38.0.12:6379 172.38.0.13:6379 172.38.0.14:6379 172.38.0.15:6379 172.38.0.16:6379 --cluster-replicas 1
//Display OK
//Enter the cluster
redis-cli -c
//View node
cluster nodes
//You can see three master hosts; three slave slaves
#5. Test that we set a value, and then the host that stores the value stops, and see if we can get that value
//interpolation
127.0.0.1:6379> set a b
-> Redirected to slot [15495] located at 172.38.0.13:6379
OK
//Stop the corresponding redis-3 of 172.38.0.13 on the host computer
[root@admin ~]# docker stop redis-3
redis-3
//Get the value again
127.0.0.1:6379> get a
-> Redirected to slot [15495] located at 172.38.0.14:6379
"b"
//Got it! It can be seen that the value obtained is 172.38.0.14, which is the slave of redis-3. He replaced redis-3

#6. Let's use cluster nodes to view node information
//You can see that 172.38.0.13 shows master and fail
//See that before 172.38.0.14, slave was displayed, but now master is displayed, which means that redis-4 replaced redis-3 as the host
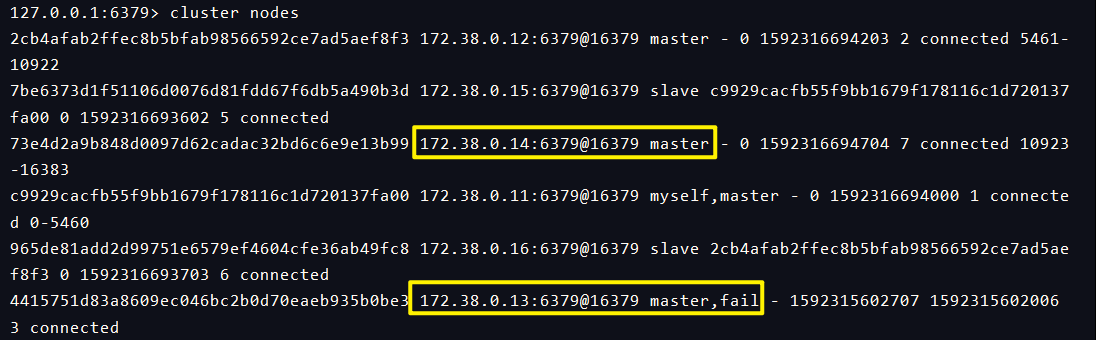
SpringBoot microservice packaging Docker image
In total, there are five steps:
-
Build spring boot project, write a controller, write a hello world
-
Package application (jar package / war package here)
-
Create a dockerfile under the project (it can be written directly on the idea. You need to install a plug-in Docker integration, which is generally available by default)
FROM java:8

COPY *.jar /app.jar

CMD ["--server.port=8080"]

EXPOSE 8080

ENTRYPOINT ["java","-jar","/app.jar"]
-
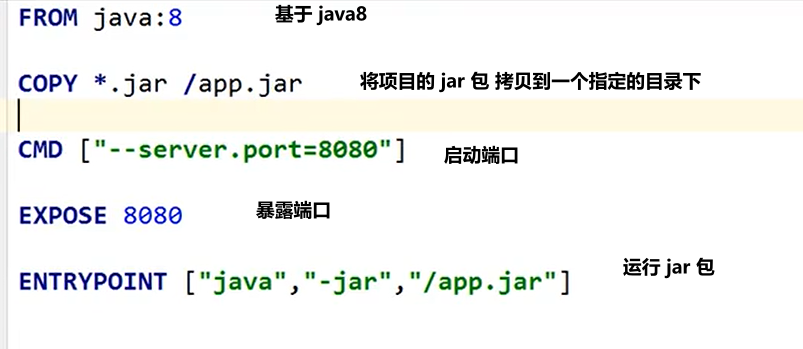
-
Build a mirror
Upload the project jar package and the dockerfile just written to the server
docker build -t tizi6666 .
Wait for build to succeed
Successfully built bcb2b2418d6f
Successfully tagged tizi6666:latest
- Start container publishing run
docker images view the image
docker run -d -P --name tzDemo image id / name
-
Test container
docker ps viewing started containers
curl localhost: the port number can be seen and an error will be reported
curl localhost: port number / hello successfully output content
After using docker, you can deliver an image to others
For a simple project, what if there are many images in the notice?
Enterprise level needs further study
Docker Compose container orchestration
docker Swarm (similar to k8s, simpler than k8s) cluster deployment
Jenkins of CI/CD
ok, I've learned that the work here is enough. If you have any questions, please comment. Thank you for watching and reference
Copyright notice: This is the original article of CSDN blogger "shallow on paper". Please attach the original source link and this notice for reprint according to CC 4.0 BY-SA copyright agreement.
Original link: https://blog.csdn.net/Kobe_k/article/details/106724971
First of all, thanks for the docker summary shared by the original author, and the personal learning gains are also great.
I refer to the above original articles in the learning process, and change some contents according to my own learning.