Docker container (configuration + image creation and Optimization)
I brief introduction
What is Docker
Docker is developed and implemented in Go language introduced by Google. Based on cgroup and namespace of Linux kernel and UnionFS of AUFS class, docker encapsulates and isolates processes, which belongs to virtualization technology at the operating system level. Because the isolated process is independent of the host and other isolated processes, it is also called a container. The initial implementation of Docke was based on LXC
docker is a platform for developers and system administrators to use containers to build, run and share applications. Deploying applications using containers is called containerization
Features of Docker container
Lightweight: faster start-up time
Multiple Docker containers running on a machine can share the operating system kernel of the machine; They can start up quickly and take up very little computing and memory resources.
Standard: consistent operating environment
Docker container is based on open standards and can run on all mainstream Linux versions, Microsoft Windows and any infrastructure including VM, bare metal server and cloud. Docker image provides a complete runtime environment except the kernel to ensure the consistency of application running environment. At the same time, docker ensures the consistency of the execution environment, making it easier to migrate applications; There is no need to worry about the situation that the application cannot run normally due to the change of the operating environment.
Safety: isolation
Docker gives applications isolation not only from each other, but also independent of the underlying infrastructure. Docker provides the strongest isolation by default, so the application problem is only a single container problem, and will not affect the whole machine.
Coherence: continuous delivery and deployment
Docker enables continuous integration, continuous delivery and deployment by customizing application images. Developers can build the image through Dockerfile and conduct integration test in combination with continuous integration system, while operation and maintenance personnel can quickly deploy the image in the production environment directly, or even automatically deploy it in combination with continuous delivery / deployment system.
2, Container configuration
1. Build docker warehouse
Build docker warehouse to facilitate subsequent component installation
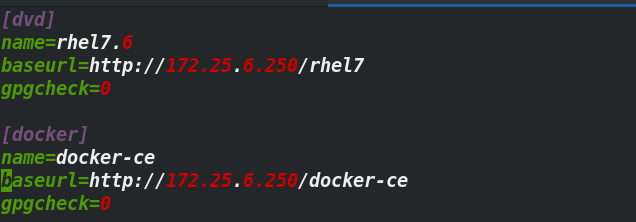
[root@server1 ~]# cd /etc/yum.repos.d/
[root@server1 yum.repos.d]# vim westos.repo
[root@server1 yum.repos.d]#
[docker]
name=docker-ce
baseurl=http://172.25.6.250/docker-ce
gpgcheck=0
[root@server1 ~]# yum repolist
Loaded plugins: product-id, search-disabled-repos, subscription-manager
This system is not registered with an entitlement server. You can use subscription-manager to register.
docker                                                     | 3.0 kB  00:00:00  dvd                                                        | 4.3 kB  00:00:00  docker/primary_db                                          |  14 kB  00:00:00  repo id              repo name                                         status
docker               docker-ce                                         20
dvd                  rhel7.6                                           5,152
repolist: 5,172
2. Download docker CE, start the service, and start it automatically
[root@server1 ~]# yum install -y docker-ce
[root@server1 ~]# systemctl start docker
[root@server1 ~]# systemctl enable --now  docker
Created symlink from /etc/systemd/system/multi-user.target.wants/docker.service to /usr/lib/systemd/system/docker.service.

3. View docker information
[root@server1 ~]# docker info  ##An error is reported

WARNING: bridge-nf-call-iptables is disabled
WARNING: bridge-nf-call-ip6tables is disabled

[root@server1 ~]# cd /etc/sysctl.d
[root@server1 sysctl.d]# ls
99-sysctl.conf
[root@server1 sysctl.d]# vim docker.conf   ##Edit this file to resolve the error

net.bridge.bridge-nf-call-iptables = 1
net.bridge.bridge-nf-call-ip6tables = 1

[root@server1 sysctl.d]# sysctl  --system  ##take effect
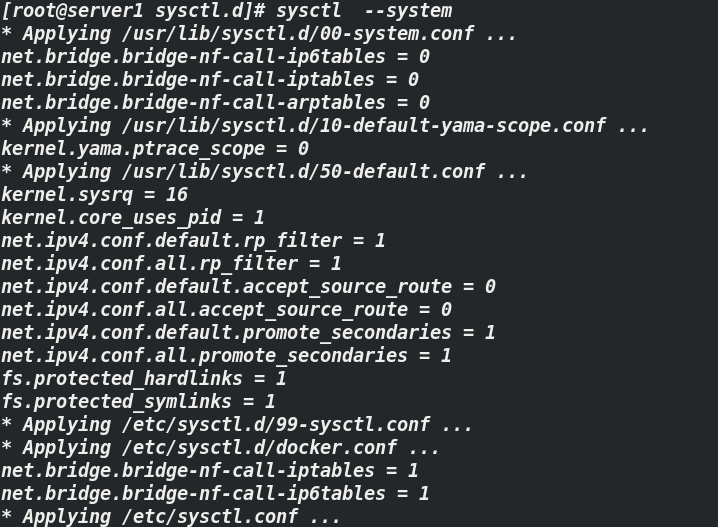 After the dcoker CE service is started, docker0, ip address appears
[root@server1 sysctl.d]# ip a ##docker0, ip appears
 Use test of container
[root@server1 ~]# docker load -i mario.tar   ##Load mario application image locally
,This mirror can use: dcoker pull Command direct download
[root@server1 ~]# docker run -d --name demo -p 80:8080 mario  ##Open the demo container and use mario to apply the image
f03d4ece9ed2e8deee25cd434d190b908adb625e90667cb189a6405d6a751905
 notes:Enter: 172 in the web page.25.6.1,Can enter the game mario

[root@server1 ~]# ls
mario.tar
[root@server1 ~]# docker rm -f demo ##Delete container
demo
[root@server1 ~]# docker ps ##Container process view
CONTAINER ID        IMAGE               COMMAND             CREATED             STATUS              PORTS               NAMES
[root@server1 ~]# docker ps -a ##Container all processes view
CONTAINER ID        IMAGE               COMMAND             CREATED             STATUS              PORTS               NAMES
3, docker image
Image -- a special file system
Image is the cornerstone of Docker. Users run their own containers based on images. Mirroring is also a "build" part of the Docker lifecycle. Image is a hierarchical structure based on Federated file system, which is built step by step by a series of instructions
Copy on write can write to the container layer. All mirror layers below the container layer are read-only. docker searches for files from top to bottom. The container layer saves the changed part of the image and does not make any modification to the image itself. A mirror can have up to 127 layers
Image is a read-only container template, which contains the file system structure and content required to start the docker container. Docker encapsulates all components and environments related to the application based on the image and the container built on the image and the unit of container development, testing and publishing, so as to avoid the dependency problems caused by the migration of applications between different platforms, It ensures that the application achieves a highly consistent practical effect in all stages of the production environment
Characteristics of mirror image
Layering mechanism:
Images are built in layers. Each image consists of a series of image layers. When a file in the container needs to be modified, only the top read-write layer is changed, and the contents of the existing file system below are not overwritten. When the modified container file system is submitted as a new image, the saved content is only the updated file in the top-level read-write file system.
Copy on write:
-
Images can be shared among multiple containers, and there is no need to copy a separate image file when each container starts
-
Mount all mirror layers to a mount point in a read-only manner, covering a read-write container layer.
-
Replication on write, combined with the layered mechanism, reduces the disk space occupied by the image and the container startup time
Note: copy on write can write to the container layer. All image layers below the container layer are read-only. docker searches for files from top to bottom. The container layer saves the changed part of the image and does not make any modification to the image itself. There are 127 layers at most for one image

1. Hierarchical structure of image
Load busybox as experimental environment
[root@server1 ~]# docker load -i busybox.tar
[root@server1 ~]# docker history busybox:latest  ## busybox.tar image history view

Execute the shell, provide an interactive environment, enter the interactive environment, and run the container named demo
[root@server1 ~]# docker run -it  --name demo busybox
/ # ls
bin   dev   etc   home  proc  root  sys   tmp   usr   var
/ # touch file1
/ # touch file2     ## CLRT+d launches that interactive environment

[root@server1 ~]# docker ps -a
 Open the demo container and create the material
[root@server1 ~]# docker start 6eced95916b6  ##Open demo container
6eced95916b6
[root@server1 ~]# docker container attach 6eced95916b6  ##Direct access to container
/ # ls
bin    dev    etc    file1  file2  home   proc   root   sys    tmp    usr    var
/ # touch file3
## CTRL+p+q is to enter the background. You can exit the interactive environment or keep the process
[root@server1 ~]# docker ps -a

[root@server1 ~]# docker rm 6eced95916b6 #
6eced95916b6
[root@server1 ~]# docker run -it --rm busybox
2. Image construction
docker commit creation
- docker commit build a new image Trilogy
- Run container
- Modify container
- Save the container as a new mirror
- Disadvantages:
- Low efficiency, weak repeatability and error prone
- The user cannot audit the image, which is a potential security hazard
[root@server1 ~]# docker run -it  --name demo busybox  ##Run the container named demo, - i for interactive, - t for open pseudo terminal
/ # touch file1   ##Edit data
/ # touch file2
/ # touch file3
[root@server1 ~]# docker ps
CONTAINER ID        IMAGE               COMMAND             CREATED             STATUS              PORTS               NAMES
863eb28b2878        busybox             "sh"                52 seconds ago      Up 51 seconds                           demo
[root@server1 ~]# docker commit -m "add files" demo demo:v1  ##Save container as a new image
sha256:4856694c05822d33a952518067b3fcc374442e6882d890763414346625ac2cbe
[root@server1 ~]# docker images  ##View mirror
[root@server1 ~]# docker history demo:v1 ##View v mirror history
[root@server1 ~]# docker history busybox:latest       ##View busybox: image history,
The above experiments show that v1 image is based on busybox: image

[root@server1 ~]# docker rm demo -f ## -f force deletion of containers
[root@server1 ~]# docker rmi demo:v1 ##Mirror deletion
 Through the above experiments and comparing the hierarchical structure, we will find that the manually added container does not explain the role of each layer, so it is built with Dockerfile file
Dockerfile file build
[root@server1 ~]# mkdir docker ##Create dcoker directory
[root@server1 ~]# cd docker
[root@server1 docker]# vim Dockerfile  ##Import, run and modify images by file
```
FROM busybox
RUN touch file1
RUN mkdir westos
```
[root@server1 ~]# docker build -t demo:v1 .
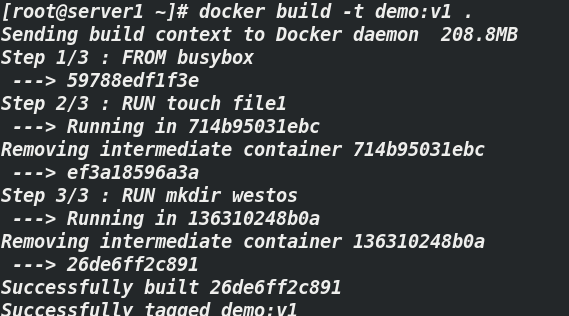 root@server1 ~]# docker history demo:v1

[root@server1 docker]# vim Dockerfile
```bash
FROM demo:v1
RUN touch file2
RUN mkdir redhat
```
[root@server1 ~]# docker build -t demo:v2 .

[root@server1 ~]# docker history demo:v2

4, Detailed explanation of Dockerfile (construction and optimization of nginx image)
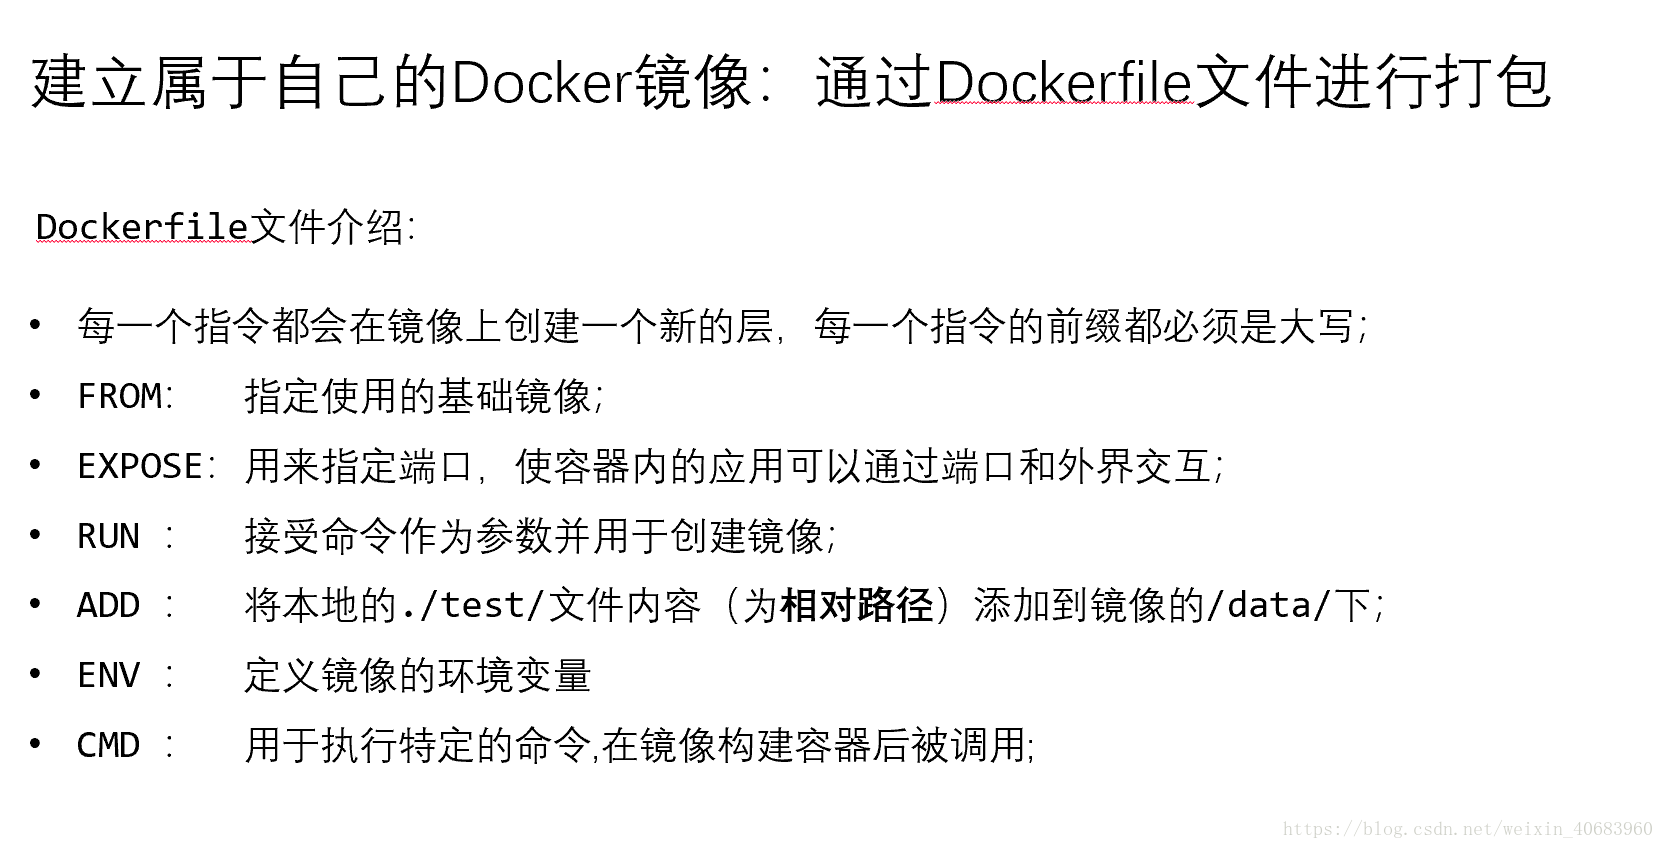
4.1 nginx image construction
Here, nginx 'is used as the experimental material to illustrate the situation
[root@server1 docker]# ls   ##First, store the corresponding basic images and files in the docker directory
Dockerfile  nginx-1.20.1.tar.gz  rhel7.tar  westos.repo
[root@server1 docker]# vim Dockerfile
  1 FROM rhel7  ##rhel7 warehouse image
  2 EXPOSE 80  ##Port 80
  3 VOLUME ["/usr/local/nginx/html"]  ##Declare the data volume, specify the application data hanging point,
  4 COPY westos.repo /etc/yum.repos.d/  ##Copy file from build context to image
 Two forms are supported: COPY src dest and COPY ["src", "dest"],src Must specify build context Files or directories in
  5 ADD nginx-1.20.1.tar.gz /mnt
  6 RUN rpmdb --rebuilddb
  7 RUN yum install -y gcc pcre-devel zlib-devel make  ##Operation module - software installation
  8 WORKDIR /mnt/nginx-1.20.1   ##Sets the current working directory in the image for the RUN, CMD, ENTRYPOINT, ADD, and COPY directives
  9 RUN ./configure &> /dev/null
 10 RUN make &>/dev/null
 11 RUN make install &> /dev/null
 12 CMD ["/usr/local/nginx/sbin/nginx","-g","daemon off;"]  ##After nginx is built, close the container
 [root@server1 docker]# docker build -t rhel7:v1 .


 [root@server1 docker]# docker images rhel7   ##View v1 image size
REPOSITORY          TAG                 IMAGE ID            CREATED             SIZE
rhel7               v1                  400e89940f1a        23 minutes ago      303MB
rhel7               latest              0a3eb3fde7fd        7 years ago         140MB
Run rhel7:v1 image and perform nginx access test
 [root@server1 docker]# docker run -d --name demo3 rhel7:v1
0084a24786e8d05263aec049c1beef00abea42f0bfb44fa28d612a8f94faf0ba

[root@server1 _data]# docker inspect demo3
"Source": "/var/lib/docker/volumes    /ac0e30f4d25df13bcd9e6250160159f6ccfb080754cecdfae1608f77d6ff4686/_data",  ##nginx
 Data volume path
"Gateway": "172.17.0.1",  ##Deploy nginx container gateway
"IPAddress": "172.17.0.3",##ip address for deploying nginx container

 In order to make nginx access clearer, add the access page
[root@server1 docker]# cd /var/lib/docker/volumes/ac0e30f4d25df13bcd9e6250160159f6ccfb080754cecdfae1608f77d6ff4686/_data
[root@server1 _data]# ls
[root@server1 _data]# echo nginx-06 > index.html
[root@server1 _data]# curl 172.17.0.3
nginx-06
4.2 nginx image optimization
The v1 image deployed by nginx above reaches 330mb, which is much larger than the 140mb meta image, so the image is optimized
Mirror optimization direction:
Select the most compact basic image, reduce the number of image layers, clean up the intermediate products of image construction, pay attention to optimizing network requests, try to use the construction cache, and use multi-stage image construction
4.2.1 optimized basic version of nginx image
Reduce the number of image layers, merge all RUN instructions, and clean up the intermediate products of image construction, including the compiled installation package and cache / mnt/nginx-1.20.1 /var/cache/*
[root@server1 docker]# vim Dockerfile
FROM rhel7
EXPOSE 80
COPY dvd.repo /etc/yum.repos.d/
ADD nginx-1.20.1.tar.gz /mnt
WORKDIR /mnt/nginx-1.20.1
RUN rpmdb --rebuilddb &&  yum install -y gcc pcre-devel zlib-devel make && sed -i 's/CFLAGS="$CFLAGS -g"/#CFLAGS="$CFLAGS -g"/g' auto/cc/gcc  && ./configure &> /dev/null && make &> /dev/null &&  make install &> /dev/null && rm -fr /mnt/nginx-1.20.1 /var/cache/*
CMD ["/usr/local/nginx/sbin/nginx", "-g", "daemon off;"]
[root@server1 docker]# docker build -t rhel7:v2 . ##Create v2 image
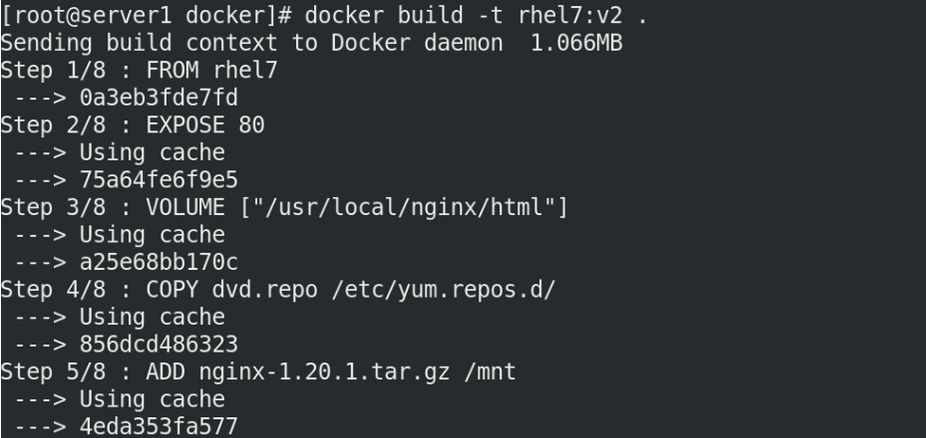
[root@server1 docker]# docker images

4.2.2 optimized advanced version of nginx image
The v2 image deployed by nginx above is 255mb, which is still much larger than the 140mb meta image, so continue to optimize the image
The best optimization of single-phase image has reached its limit, so try to use build cache and use multi-phase build image
[root@server1 docker]# vim Dockerfile
FROM rhel7
EXPOSE 80
COPY dvd.repo /etc/yum.repos.d/
ADD nginx-1.20.1.tar.gz /mnt
WORKDIR /mnt/nginx-1.20.1
RUN rpmdb --rebuilddb &&  yum install -y gcc pcre-devel zlib-devel make && sed -i 's/CFLAGS="$CFLAGS -g"/#CFLAGS="$CFLAGS -g"/g' auto/cc/gcc  && ./configure &> /dev/null && make &> /dev/null &&  make install &> /dev/null && rm -fr /mnt/nginx-1.20.1 /var/cache/*
FROM rhel7
COPY --from=build /usr/local/nginx /usr/local/nginx
CMD ["/usr/local/nginx/sbin/nginx", "-g", "daemon off;"]
[root@server1 docker]# docker build -t rhel7:v3 . ##Create v3 image
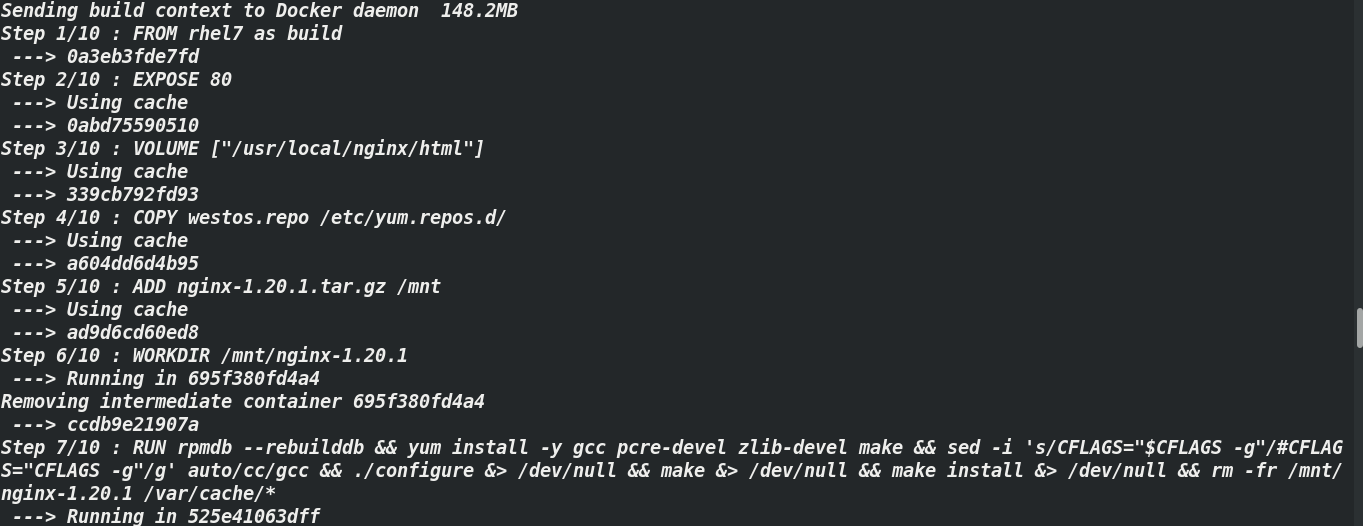

[root@server1 docker]# docker images
REPOSITORY          TAG                 IMAGE ID            CREATED             SIZE

<none>              <none>              66a3cc6f8627        26 seconds ago      255MB
rhel7               v3                  a7c6b4e995d5        26 seconds ago      141MB
rhel7               v1                  400e89940f1a        About an hour ago   303MB
rhel7               latest              0a3eb3fde7fd        7 years ago         140MB
4.2.3 optimized sublimation version of nginx image
The v3 image deployed by nginx above is 141mb, but the image optimization can still be continued
Starting from the source, select a simplified basic image to replace the original rhel7
Load base image locally
[root@server1 docker]# docker load -i base-debian10.tar  ##Thin base image -- base debian10
de1602ca36c9: Loading layer  3.041MB/3.041MB
1d3b68b6972f: Loading layer  17.77MB/17.77MB
Loaded image: gcr.io/distroless/base-debian10:latest
[root@server1 docker]# vim Dockerfile
vim /Dockerfile

FROM nginx:latest as base

# https://en.wikipedia.org/wiki/List_of_tz_database_time_zones
ARG TIME_ZONE

RUN mkdir -p /opt/var/cache/nginx && \
    cp -a --parents /usr/lib/nginx /opt && \
    cp -a --parents /usr/share/nginx /opt && \
    cp -a --parents /var/log/nginx /opt && \
    cp -aL --parents /var/run /opt && \
    cp -a --parents /etc/nginx /opt && \
    cp -a --parents /etc/passwd /opt && \
    cp -a --parents /etc/group /opt && \
    cp -a --parents /usr/sbin/nginx /opt && \
    cp -a --parents /usr/sbin/nginx-debug /opt && \
    cp -a --parents /lib/x86_64-linux-gnu/ld-* /opt && \
    cp -a --parents /lib/x86_64-linux-gnu/libpcre.so.* /opt && \
    cp -a --parents /lib/x86_64-linux-gnu/libz.so.* /opt && \
    cp -a --parents /lib/x86_64-linux-gnu/libc* /opt && \
    cp -a --parents /lib/x86_64-linux-gnu/libdl* /opt && \
    cp -a --parents /lib/x86_64-linux-gnu/libpthread* /opt && \
    cp -a --parents /lib/x86_64-linux-gnu/libcrypt* /opt && \
    cp -a --parents /usr/lib/x86_64-linux-gnu/libssl.so.* /opt && \
    cp -a --parents /usr/lib/x86_64-linux-gnu/libcrypto.so.* /opt && \
    cp /usr/share/zoneinfo/${TIME_ZONE:-ROC} /opt/etc/localtime

FROM gcr.io/distroless/base-debian10

COPY --from=base /opt /

EXPOSE 80 443

ENTRYPOINT ["nginx", "-g", "daemon off;"]
[root@server1 docker]# docker build -t rhel7:v4 .
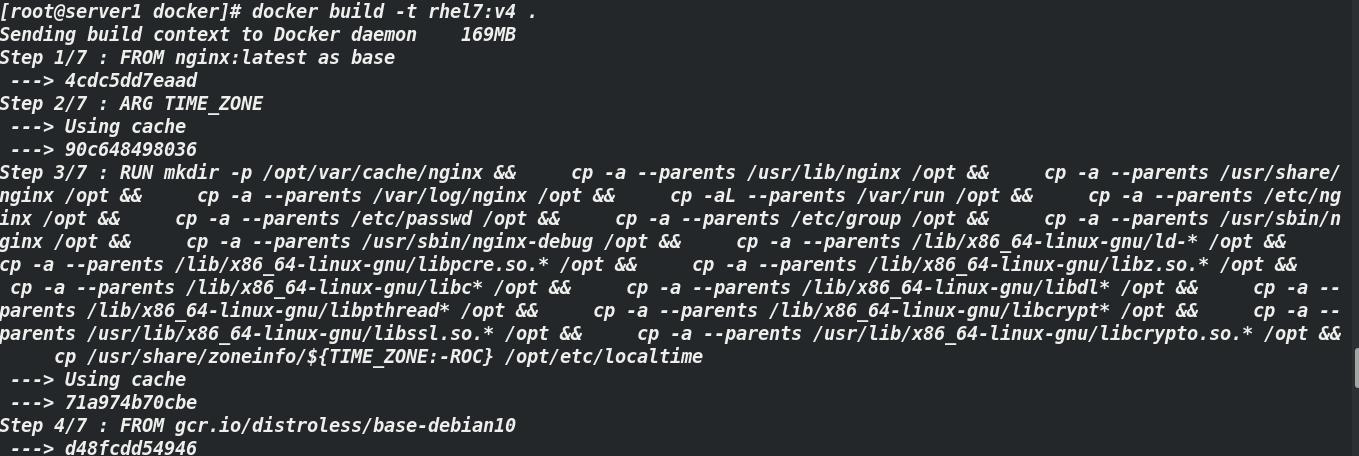

[root@server1 docker]# docker images rhel7 ##View rhel7 mirror

[root@server1 docker]#  docker run -d --name demo4 rhel7:v4  ##Run the v4 image to deploy and open nginx inside the container
1f881774fce4890c42472aec424dad4f425eefb277691fe2fb9e369e7b898408
[root@server1 docker]# docker inspect demo4  ##View container information

"IPAddress": "172.17.0.4",
[root@server1 docker]# curl 172.17.0.4 ##Access nginx
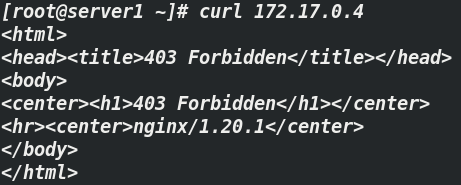
[root@server1 ~]# docker exec -it demo4 bash  ##Enter the demo4 container and write the access page of nginx
bash-4.2# cd /usr/local/nginx/html/  ##Access directory of nginx
bash-4.2# echo westos > index.html  ##index.html: default access file
bash-4.2# curl  localhost
westos
bash-4.2# exit
[root@server1 ~]# curl 172.17.0.4
westos