1.Data Volume Introduction
Docker packages and runs environments to form container runs. Data generated by Docker containers will naturally be lost when the containers are deleted unless a new image is generated through docker commit. In order to save data in Docker we use volumes. |
Volumes are directories or files that exist in one or more containers and are mounted by Docker s to containers, but are not part of the Union FileSystem, so they bypass the federated file system to provide some features for persistent storage or sharing of data:
Volumes are designed for data persistence and are completely independent of the lifetime of containers, so Docker does not delete their mounted volumes when containers are deleted.
Features of a data volume:
- Data volumes can share or reuse data between containers
- Changes in volumes can take effect directly
- Changes in the data volume will not be included in mirrored updates
- The life cycle of a data volume continues until no containers use it
2.Simple use
Run the container, specifying the mount data volume command:
docker run -it -v Host Directory:Container directory
Create a data volume from the host directory/home/test and container/home. First create a test.java file in the container directory, then go to the host directory to see if there is one.
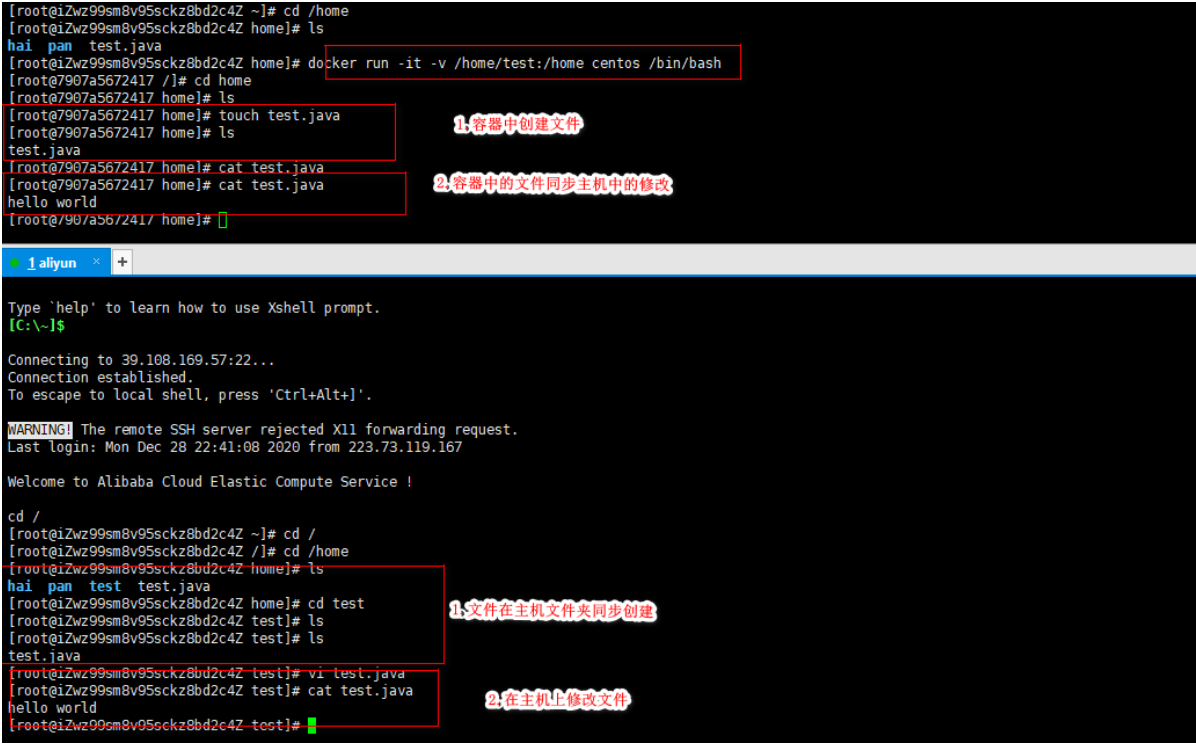
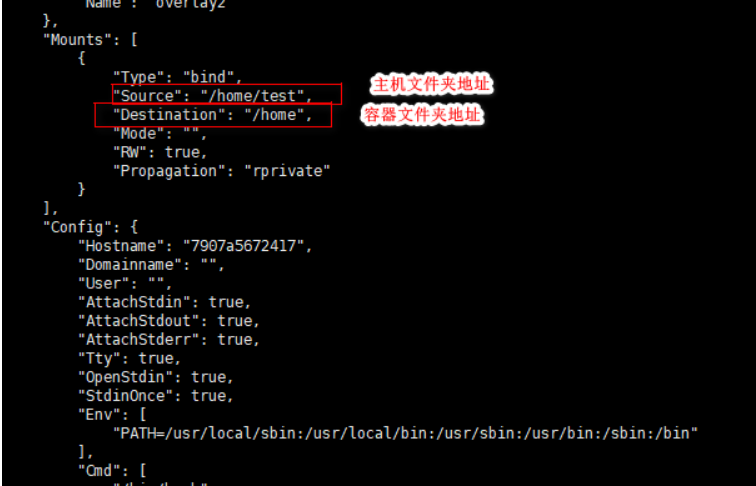
View the container's corresponding metadata docker inspect container id to see the established data volume information in the Mounts node.
Even if the container stops running or is deleted, data synchronization can still be achieved and local data volumes will not be lost.
3.MySQL Container Establishes Data Volume Synchronization Data
The default data document storage directory for MySQL on Linux is/var/lib/mysql, and the default configuration file location/etc/mysql/conf.d. To ensure data loss after MySQL mirroring or container deletion, a data volume is created below to store MySQL data and files.
[root@iZwz99sm8v95sckz8bd2c4Z home]# docker images;
REPOSITORY            TAG       IMAGE ID       CREATED             SIZE
mytomcat              1.0       f189aac861de   About an hour ago   653MB
mysql                 5.7       f07dfa83b528   6 days ago          448MB
tomcat                latest    feba8d001e3f   10 days ago         649MB
nginx                 latest    ae2feff98a0c   12 days ago         133MB
centos                latest    300e315adb2f   2 weeks ago         209MB
portainer/portainer   latest    62771b0b9b09   5 months ago        79.1MB
elasticsearch         7.6.2     f29a1ee41030   9 months ago        791MB
[root@iZwz99sm8v95sckz8bd2c4Z home]# docker run -d -p 6603:3306 -v /home/mysql/conf:/etc/mysql/conf.d -v /home/mysql/data:/var/lib/mysql -e MYSQL_ROOT_PASSWORD=123456 --name mysql01 mysql:5.7
72efdb845471b6bd19077b596af51122baa982c01211c39f989afaca556b149f
[root@iZwz99sm8v95sckz8bd2c4Z home]# cd /home
[root@iZwz99sm8v95sckz8bd2c4Z home]# ls
hai  mysql  pan  test  test.java
[root@iZwz99sm8v95sckz8bd2c4Z home]# cd mysql/conf
[root@iZwz99sm8v95sckz8bd2c4Z conf]# ls
[root@iZwz99sm8v95sckz8bd2c4Z conf]# cd /home/mysql/data
[root@iZwz99sm8v95sckz8bd2c4Z data]# ls
auto.cnf    client-cert.pem  ibdata1      ibtmp1              private_key.pem  server-key.pem
ca-key.pem  client-key.pem   ib_logfile0  mysql               public_key.pem   sys
ca.pem      ib_buffer_pool   ib_logfile1  performance_schema  server-cert.pem
[root@iZwz99sm8v95sckz8bd2c4Z data]# ls
auto.cnf    client-cert.pem  ibdata1      ibtmp1              private_key.pem  server-key.pem
ca-key.pem  client-key.pem   ib_logfile0  mysql               public_key.pem   sys
ca.pem      ib_buffer_pool   ib_logfile1  performance_schema  server-cert.pem  test
Common Commands
(1) Create a data volume
docker volume create my-vol
(2) View all data volumes
$ docker volume ls
local my-vol
(3) View the information for the specified data volume
$ docker volume inspect my-vol
[
{
"Driver": "local",
"Labels": {},
"Mountpoint": "/var/lib/docker/volumes/my-vol/_data",
"Name": "my-vol",
"Options": {},
"Scope": "local"
}
]
(4) Delete the data volume docker volume rm...
$ docker volume rm my-vol
(5) Delete related volumes when deleting containers
$ docker rm -v ...
Data volumes are designed to persist data, and their lifecycle is container independent. Docker does not automatically delete data volumes after they are deleted, and there is no mechanism such as garbage collection to handle data volumes without any container references. If you need to remove data volumes while deleting containers, you can use docker rm-v when deleting containers.This command.
A data volume without a master may take up a lot of space. To clean it up, use the following commands
$ docker volume prune
(5) Create data volumes using--mount
Mount a host directory as a data volume. Use the --mount flag to specify the directory to mount a local host into the container.
$ docker run -d -P \
--name web \
# -v /src/webapp:/opt/webapp \
--mount type=bind,source=/src/webapp,target=/opt/webapp \
training/webapp
python app.py
The above command mounts the host's/src/webapp directory to the container's/opt/webapp directory. Users can place programs in their local directory to see if the container is working properly. The path to the local directory must be an absolute path, and Docker will automatically create it for you if the directory does not exist.
The default permission for Docker to mount the host directory is read-write, or users can specify read-only by adding the readonly parameter.
$ docker run -d -P \
--name web \
# -v /src/webapp:/opt/webapp:ro \
--mount type=bind,source=/src/webapp,target=/opt/webapp,readonly \
training/webapp \
python app.py
 Added readonly After that, mount it as read-only. If you are in a container/src/webapp Directory creates a new file with the following error
/src/webapp # touch new.txt
touch: new.txt: Read-only file system
5.Named and anonymous mounts
5.1 Anonymous mount
Anonymous mounting means that when you specify a data volume, you do not specify the host path for the container path, so the corresponding mapped host path is the default path/var/lib/docker/volumes/where a randomly named folder is automatically generated.
Run as follows and mount the Nginx container anonymously:
[root@iZwz99sm8v95sckz8bd2c4Z ~]# docker run -d -P --name nginx01 -v /etc/nginx nginx
d3a27b969d122d5516cac75e99b17dff7aaaf1e0c042385c6b05990053f1259
Looking at all volume volumes, VOLUME NAME has a real directory value here.
[root@iZwz99sm8v95sckz8bd2c4Z ~]# docker volume ls
DRIVER    VOLUME NAME
local     0cd45ab893fc13971219ac5127f9c0b02491635d76d94183b0261953bdb52d26
local     668a94251e562612880a2fdb03944d67d1acdbbdae6ef7c94bee8685644f2956
local     e605f3dc4bf11ab693972592b55fb6911e5bf2083425fd58869c5f574998a09a
5.2 Named Mount
Named mount means specifying the folder name, which is different from the specified path mount, where the specified folder name is under the default data volume path specified by Docker. You can view the directory status of the current data volume through the docker volume ls command.
[root@iZwz99sm8v95sckz8bd2c4Z ~]# docker run -d -P --name nginx02 -v juming-nginx:/etc/nginx nginx
4ceaff19e5275dcd3014a8e7a8af618f7f7ce0da18d605c7c41a8653e78bf912
[root@iZwz99sm8v95sckz8bd2c4Z ~]# docker volume ls
DRIVER    VOLUME NAME
local     0cd45ab893fc13971219ac5127f9c0b02491635d76d94183b0261953bdb52d26
local     668a94251e562612880a2fdb03944d67d1acdbbdae6ef7c94bee8685644f2956
local     e605f3dc4bf11ab693972592b55fb6911e5bf2083425fd58869c5f574998a09a
local     juming-nginx
Command to view specified data volume information: docker volume inspect data volume name
[root@iZwz99sm8v95sckz8bd2c4Z ~]# docker volume inspect juming-nginx
[
    {
        "CreatedAt": "2020-12-29T22:40:25+08:00",
        "Driver": "local",
        "Labels": null,
        "Mountpoint": "/var/lib/docker/volumes/juming-nginx/_data",
        "Name": "juming-nginx",
        "Options": null,
        "Scope": "local"
    }
]
You can see that the host data volume is mounted on / var/lib/docker/volumes/juming-nginx/_data
Docker all data volumes default to / var/lib/docker/volumes/directory
[root@iZwz99sm8v95sckz8bd2c4Z volumes]# ls
0cd45ab893fc13971219ac5127f9c0b02491635d76d94183b0261953bdb52d26  backingFsBlockDev                                                 juming-nginx
668a94251e562612880a2fdb03944d67d1acdbbdae6ef7c94bee8685644f2956  e605f3dc4bf11ab693972592b55fb6911e5bf2083425fd58869c5f574998a09a  metadata.db
Anonymous mount, named mount, command differences for specified path mount are as follows:
-v Path inside container#Anonymous mount
-v Volume Name: Path in Container#Named Mount
-v/Host Path: Path in Container#Specify Path Mount
Specify parameters related to data volume mapping:
ro - readonly Read-only. If read-only is set, only the host's path can be manipulated, not the corresponding path in the container.
rw ----- readwrite Readable and Writable
[root@iZwz99sm8v95sckz8bd2c4Z ~]# docker run -d -P --name nginx02 -v juming-nginx:/etc/nginx:ro nginx
[root@iZwz99sm8v95sckz8bd2c4Z ~]# docker run -d -P --name nginx02 -v juming-nginx:/etc/nginx:rw nginx
6.Add Data Volume to Dockerfile
We can use the VOLUME directive in the Dockerfile to add one or more data volumes to the mirror.
The following uses Dockerfile to build a new image, the contents of the dockerfile01 file, and anonymously mounts the volume01 and volume02 directories:
FROM centos

VOLUME ["volume01","volume02"]

CMD echo "----end----"
CMD /bin/bash
Perform build mirroring
[root@iZwz99sm8v95sckz8bd2c4Z docker-test-volume]# docker build -f /home/docker-test-volume/dockerfile01 -t ethan/centos:1.0 .
Sending build context to Docker daemon  2.048kB
Step 1/4 : FROM centos
 ---> 300e315adb2f
Step 2/4 : VOLUME ["volume01","volume02"]
 ---> Running in 215ef28fd5a6
Removing intermediate container 215ef28fd5a6
 ---> f506ddf133d2
Step 3/4 : CMD echo "----end----"
 ---> Running in 62a1c4b9dc7b
Removing intermediate container 62a1c4b9dc7b
 ---> bbea81a6e94e
Step 4/4 : CMD /bin/bash
 ---> Running in 245d239f3776
Removing intermediate container 245d239f3776
 ---> 1df90e6fd790
Successfully built 1df90e6fd790
Successfully tagged ethan/centos:1.0
[root@iZwz99sm8v95sckz8bd2c4Z docker-test-volume]# docker images
REPOSITORY            TAG       IMAGE ID       CREATED          SIZE
ethan/centos          1.0       1df90e6fd790   13 minutes ago   209MB
mytomcat              1.0       f189aac861de   25 hours ago     653MB
mysql                 5.7       f07dfa83b528   7 days ago       448MB
tomcat                latest    feba8d001e3f   11 days ago      649MB
nginx                 latest    ae2feff98a0c   13 days ago      133MB
centos                latest    300e315adb2f   3 weeks ago      209MB
portainer/portainer   latest    62771b0b9b09   5 months ago     79.1MB
elasticsearch         7.6.2     f29a1ee41030   9 months ago     791MB
Start the container you generated after you finished generating the mirror
[root@iZwz99sm8v95sckz8bd2c4Z docker-test-volume]# docker run -it 1df90e6fd790 /bin/bash
[root@828d43dba78e /]# ls -l
total 56
lrwxrwxrwx   1 root root    7 Nov  3 15:22 bin -> usr/bin
drwxr-xr-x   5 root root  360 Dec 29 15:41 dev
drwxr-xr-x   1 root root 4096 Dec 29 15:41 etc
drwxr-xr-x   2 root root 4096 Nov  3 15:22 home
lrwxrwxrwx   1 root root    7 Nov  3 15:22 lib -> usr/lib
lrwxrwxrwx   1 root root    9 Nov  3 15:22 lib64 -> usr/lib64
drwx------   2 root root 4096 Dec  4 17:37 lost+found
drwxr-xr-x   2 root root 4096 Nov  3 15:22 media
drwxr-xr-x   2 root root 4096 Nov  3 15:22 mnt
drwxr-xr-x   2 root root 4096 Nov  3 15:22 opt
dr-xr-xr-x 111 root root    0 Dec 29 15:41 proc
dr-xr-x---   2 root root 4096 Dec  4 17:37 root
drwxr-xr-x  11 root root 4096 Dec  4 17:37 run
lrwxrwxrwx   1 root root    8 Nov  3 15:22 sbin -> usr/sbin
drwxr-xr-x   2 root root 4096 Nov  3 15:22 srv
dr-xr-xr-x  13 root root    0 Dec 29 15:41 sys
drwxrwxrwt   7 root root 4096 Dec  4 17:37 tmp
drwxr-xr-x  12 root root 4096 Dec  4 17:37 usr
drwxr-xr-x  20 root root 4096 Dec  4 17:37 var
drwxr-xr-x   2 root root 4096 Dec 29 15:41 volume01
drwxr-xr-x   2 root root 4096 Dec 29 15:41 volume02
You can see the automounted data volume directory. Here's a look at the corresponding host's data volume directory
[root@iZwz99sm8v95sckz8bd2c4Z docker-test-volume]# docker inspect 828d43dba78e
[
    {
        "Id": "828d43dba78ecaa10e7e57c1091ee8cf3581dae88187aa04163946dfc86bfd76",
        "Created": "2020-12-29T15:41:29.297091075Z",
        "Path": "/bin/bash",
        "Args": [],
        "State": {
            "Status": "running",
            "Running": true,
            "Paused": false,
            "Restarting": false,
            "OOMKilled": false,
            "Dead": false,
            "Pid": 1719,
            "ExitCode": 0,
            "Error": "",
            "StartedAt": "2020-12-29T15:41:34.107755138Z",
            "FinishedAt": "0001-01-01T00:00:00Z"
        },
...
#A key:
        "Mounts": [
            {
                "Type": "volume",
                "Name": "c51c75b11a69c526a97a07b03ce2ec74d8e77aa150b736291777c1c204a8aecc",
                "Source": "/var/lib/docker/volumes/c51c75b11a69c526a97a07b03ce2ec74d8e77aa150b736291777c1c204a8aecc/_data",
                "Destination": "volume01",
                "Driver": "local",
                "Mode": "",
                "RW": true,
                "Propagation": ""
            },
            {
                "Type": "volume",
                "Name": "1ae2d34c56c4352ba906b5bc261706b235a07ca2b3c9df6c612bb4380db8983f",
                "Source": "/var/lib/docker/volumes/1ae2d34c56c4352ba906b5bc261706b235a07ca2b3c9df6c612bb4380db8983f/_data",
                "Destination": "volume02",
                "Driver": "local",
                "Mode": "",
                "RW": true,
                "Propagation": ""
            }
        ],
You can see that there is a host mount directory under Mounts. Since there is no host directory specified in the dockerfile, it is an anonymous mount and a randomly named path is generated under the / var/lib/docker/volumes/directory.
7.Container data volume
Container data volumes refer to the establishment of data volumes to synchronize data between multiple containers and achieve data synchronization between containers.
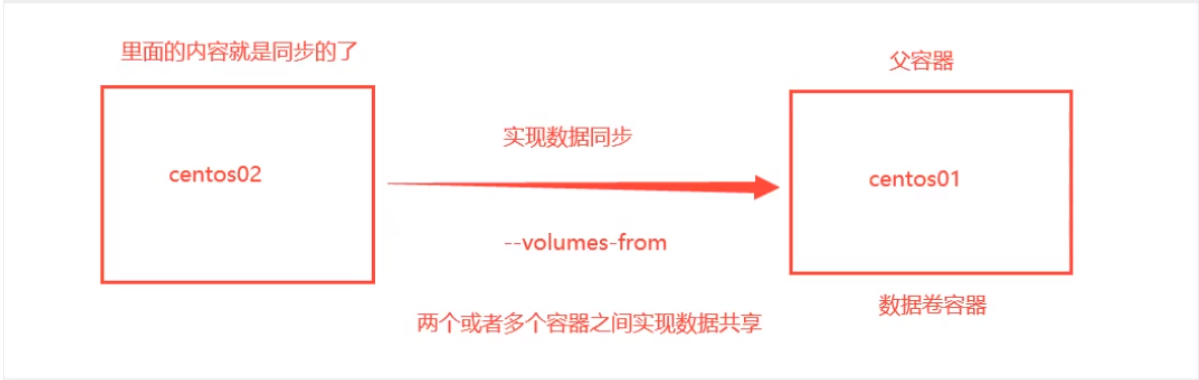
Start container 1 first, volume 01, volume 02 as Mount directory.
[root@iZwz99sm8v95sckz8bd2c4Z ~]# docker run -it --name cnetos01 ethan/centos:1.0
[root@731d53b8c3d5 /]# ls
bin  dev  etc  home  lib  lib64  lost+found  media  mnt  opt  proc  root  run  sbin  srv  sys  tmp  usr  var  volume01	volume02
Then start Container 2 and set Container 2 and Container 1 to establish a data volume mount relationship with the parameter--volumes-from.
[root@iZwz99sm8v95sckz8bd2c4Z /]# docker run -it --name centos02 --volumes-from cnetos01 ethan/centos:1.0
[root@7f90d4147511 /]# ls -l
total 56
lrwxrwxrwx   1 root root    7 Nov  3 15:22 bin -> usr/bin
drwxr-xr-x   5 root root  360 Dec 30 14:58 dev
drwxr-xr-x   1 root root 4096 Dec 30 14:58 etc
drwxr-xr-x   2 root root 4096 Nov  3 15:22 home
lrwxrwxrwx   1 root root    7 Nov  3 15:22 lib -> usr/lib
lrwxrwxrwx   1 root root    9 Nov  3 15:22 lib64 -> usr/lib64
drwx------   2 root root 4096 Dec  4 17:37 lost+found
drwxr-xr-x   2 root root 4096 Nov  3 15:22 media
drwxr-xr-x   2 root root 4096 Nov  3 15:22 mnt
drwxr-xr-x   2 root root 4096 Nov  3 15:22 opt
dr-xr-xr-x 108 root root    0 Dec 30 14:58 proc
dr-xr-x---   2 root root 4096 Dec  4 17:37 root
drwxr-xr-x  11 root root 4096 Dec  4 17:37 run
lrwxrwxrwx   1 root root    8 Nov  3 15:22 sbin -> usr/sbin
drwxr-xr-x   2 root root 4096 Nov  3 15:22 srv
dr-xr-xr-x  13 root root    0 Dec 29 15:41 sys
drwxrwxrwt   7 root root 4096 Dec  4 17:37 tmp
drwxr-xr-x  12 root root 4096 Dec  4 17:37 usr
drwxr-xr-x  20 root root 4096 Dec  4 17:37 var
drwxr-xr-x   2 root root 4096 Dec 30 14:54 volume01
drwxr-xr-x   2 root root 4096 Dec 30 14:54 volume02
First add files to volume 01 in container 2
[root@7f90d4147511 /]# cd volume01
[root@7f90d4147511 volume01]# touch test.java
[root@7f90d4147511 volume01]# ls
test.java
Then you can see that the file for container 1 is also added
The following synchronizes the two MySQL databases and configuration files, the same as above. First, create a data volume, then set up a container data volume mount for another MySQL container. Example:
[root@iZwz99sm8v95sckz8bd2c4Z home]# docker run -d -p 6603:3306 -v /home/mysql/conf:/etc/mysql/conf.d -v /home/mysql/data:/var/lib/mysql -e MYSQL_ROOT_PASSWORD=123456 --name mysql01 mysql:5.7
[root@iZwz99sm8v95sckz8bd2c4Z home]# docker run -d -p 6604:3306 -e MYSQL_ROOT_PASSWORD=123456 --name mysql02 --volumes-from mysql01 mysql:5.7