Deploy centos7 container applications
Mirror download:
[root@yixuan ~]# docker pull daocloud.io/library/centos:7
systemd Integration:
Because SYSTEMd requires CAPSYSADMIN permission, which gives it the ability to read to the host cgroup, SYSTEMd has been replaced with fakesystemd in CentOS7.However, if we use systemd, we can refer to the following Dockerfile:
[root@yixuan ~]# mkdir test
[root@yixuan ~]# cd test/
[root@yixuan test]# vim Dockerfile
FROM daocloud.io/library/centos:7
MAINTAINER "soso"  soso@qq.com
ENV container docker

RUN yum -y swap -- remove fakesystemd -- install systemd systemd-libs
RUN yum -y update; yum clean all; \
(cd /lib/systemd/system/sysinit.target.wants/; for i in *; do [ $i == systemd-tmpfiles-setup.service ] || rm -f $i; done); \
rm -f /lib/systemd/system/multi-user.target.wants/*;\
rm -f /etc/systemd/system/*.wants/*;\
rm -f /lib/systemd/system/local-fs.target.wants/*; \
rm -f /lib/systemd/system/sockets.target.wants/*udev*; \
rm -f /lib/systemd/system/sockets.target.wants/*initctl*; \
rm -f /lib/systemd/system/basic.target.wants/*;\
rm -f /lib/systemd/system/anaconda.target.wants/*;

VOLUME [ "/sys/fs/cgroup" ]

CMD ["/usr/sbin/init"]
This Dockerfile deletes fakesystemd and installs systemd.Then build the base image:
[root@yixuan test]# docker build -t local/c7-systemd .
Execution OK This generates an example application container containing systemd
[root@yixuan test]# docker images
REPOSITORY         TAG                 IMAGE ID            CREATED             SIZE
local/c7-systemd   latest              a153dcaa642e        6 minutes ago       391MB
In order to use a container that contains systemd like the one above, you need to create a Dockerfile similar to the following:
[root@yixuan test]# mkdir http
[root@yixuan test]# cd http/
[root@yixuan http]# vim Dockerfile
FROM local/c7-systemd
RUN yum -y install httpd; yum clean all; systemctl enable httpd.service
EXPOSE 80
CMD ["/usr/sbin/init"]
Build a mirror:
[root@yixuan http]# docker build -t local/c7-systemd-httpd .
Run the application container containing systemd:
In order to run a container containing systemd, you need to use the - privileged option and mount the host's cgroups folder.Here is an example command to run an httpd container containing systemd:
[root@yixuan http]# docker run --privileged -tid -v /sys/fs/cgroup:/sys/fs/cgroup:ro -p 80:80 local/c7-systemd-httpd

--privileged:Authorization.Let the inside of the container root Users have authenticity root Jurisdiction(Some privileges are not available)
Note: If not running in the foreground (useless-d), you can use ctrl+p+q to put in the background
Testing is available:
[root@yixuan http]# yum install -y elinks
[root@yixuan http]# elinks --dump http://192.168.246.141 #apache default page
                                 Testing 123..

   This page is used to test the proper operation of the [1]Apache HTTP
   server after it has been installed. If you can read this page it means
   that this site is working properly. This server is powered by [2]CentOS.
Another example of installing openssh-server is:
[root@yixuan http]# cd ..
[root@yixuan test]# mkdir ssh
[root@yixuan test]# cd ssh/
[root@yixuan ssh]# vim Dockerfile
FROM local/c7-systemd
RUN yum -y install openssh-server; yum clean all; systemctl enable sshd.service
RUN echo 1 | passwd --stdin root
EXPOSE 22
CMD ["/usr/sbin/init"]
[root@yixuan ssh]# docker build --rm -t local/c7-systemd-sshd .
[root@yixuan ssh]# docker run --privileged -tid -v /sys/fs/cgroup:/sys/fs/cgroup:ro -p 2222:22 local/c7-systemd-sshd
[root@yixuan ssh]# ssh 192.168.246.141 -p 2222
[root@ce1af52a6f6c ~]#
docker data storage location
View Storage Path
[root@yixuan ~]# docker info | grep Root
 Docker Root Dir: /var/lib/docker

//Modify the default storage location:
//Append--data-root parameter to dockerd startup command to specify new location
[root@yixuan ~]# vim  /usr/lib/systemd/system/docker.service
ExecStart=/usr/bin/dockerd -H fd:// --containerd=/run/containerd/containerd.sock --data-root=/data

[root@yixuan ~]# systemctl daemon-reload
[root@yixuan ~]# systemctl restart docker

//To see if it works:
[root@yixuan ~]# docker info | grep Root
 Docker Root Dir: /data

 [root@yixuan ~]# cd /data/
[root@yixuan data]# ls
builder  buildkit  containers  image  network  overlay2  plugins  runtimes  swarm  tmp  trust  volumes
docker network
Container Network Classification
Note:
Interview use, no use after use of the organization
View the current network:
[root@yixuan ~]# docker network list
NETWORK ID          NAME                DRIVER              SCOPE
9b902ee3eafb        bridge              bridge              local
140a9ff4bb94        host                host                local
d1210426b3b0        none                null                local
When docker is installed, three network types are created by default, bridge, host, and none
1. bridge: Network Bridging
By default, this mode is used to start and create containers, so each time a docker container restarts, the corresponding ip addresses are obtained in sequence.
2, none: No specified network
When starting a container, the docker container will not allocate LAN ip through --network=none
3. host: host network
 The docker container shares an ip address with the host.
 Use the host network to create containers:
[root@yixuan ~]# docker run -it --name testnginx2 --net host 98ebf73ab
[root@yixuan ~]# netstat -lntp | grep 80
tcp6       0      0 :::80                   :::*                    LISTEN      3237/docker-proxy

Browser Access Host ip Address
4. Fixed ip:
Create a container with fixed Ip:
4.1,Create a custom network type and specify a segment
[root@yixuan ~]# docker network create --subnet=192.168.0.0/16 staticnet
4efd309244c6ad70eda2d047a818a3aec5b162f5ca29fb6024c09a5efbf15854
//You can see that there is one more staticnet in the network type through docker network ls:
[root@yixuan ~]# docker network ls
NETWORK ID          NAME                DRIVER              SCOPE
9b902ee3eafb        bridge              bridge              local
140a9ff4bb94        host                host                local
d1210426b3b0        none                null                local
4efd309244c6        staticnet           bridge              local
 4.2. Create and start containers with new network types
 [root@yixuan ~]# docker run -itd --name userserver --net staticnet --ip 192.168.0.2 daocloud.io/library/centos:7
 Container ip 192.168.0.2 can be viewed through docker inspect:
 [root@yixuan ~]# docker inspect userserver | grep -i ipaddress
            "SecondaryIPAddresses": null,
            "IPAddress": "",
                    "IPAddress": "192.168.0.2",

Close the container and restart, found that the container ip has not changed
Heterogeneous main containers interconnected
Mode 1. Routing
Small-scale docker environments mostly run on a single host, and how dockers on multiple hosts are interconnected if the company uses dockers on a large scale
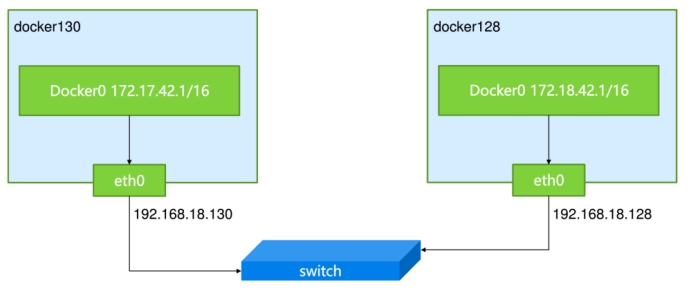
Docker's default internal ip is 172.17.42.0 segments, so you must modify one of the default segments to avoid ip conflicts.
notes:docker Version 1.13
1.stay docker-server1 Operation above----192.168.246.141
[root@docker-server1 ~]# docker pull daocloud.io/library/centos
[root@docker-server1 ~]# vim /etc/sysconfig/docker-network
DOCKER_NETWORK_OPTIONS=--bip=172.17.0.1/16
[root@docker-server1 ~]# vim /etc/sysctl.conf
net.ipv4.ip_forward=1
[root@docker-server1 ~]# sysctl -p
[root@docker-server1 ~]# reboot
[root@docker-server1 ~]# docker images
REPOSITORY                   TAG                 IMAGE ID            CREATED             SIZE
daocloud.io/library/centos   latest              0f3e07c0138f        3 weeks ago         220MB
[root@docker-server1 ~]# docker run -it --name centos 0f3e07c0138f /bin/bash
[root@ef1a4d6be97f /]#
[root@docker-server1 ~]# docker inspect centos | grep IPAddress
            "SecondaryIPAddresses": null,
            "IPAddress": "172.17.0.2",
                    "IPAddress": "172.17.0.2",
===============================================
2.docker-server2(192.168.246.143)Top:
[root@docker-server2 ~]# vim /etc/sysconfig/docker-network
DOCKER_NETWORK_OPTIONS=--bip=172.18.0.1/16
[root@docker-server2 ~]# vim /etc/sysctl.conf
net.ipv4.ip_forward = 1
[root@docker-server2 ~]# sysctl -p
[root@docker-server2 ~]# reboot
[root@docker-server2 ~]# systemctl daemon-reload
[root@docker-server2 ~]# systemctl restart docker
[root@docker-server2 ~]# docker images
REPOSITORY                   TAG                 IMAGE ID            CREATED             SIZE
daocloud.io/library/centos   latest              0f3e07c0138f        3 weeks ago         220MB
[root@docker-server2 ~]# docker run -it --name centos 0f3e07c0138f /bin/bash
[root@c84a8c704d03 /]#
[root@docker-server2 ~]# docker inspect c | grep IPAddress
            "SecondaryIPAddresses": null,
            "IPAddress": "172.18.0.2",
                    "IPAddress": "172.18.0.2",
Add Route:
[root@docker-server1 ~]# route add -net 172.18.0.0/16 gw 192.168.246.143
[root@docker-server2 ~]# route add -net 172.17.0.0/16 gw 192.168.246.141
Verification:
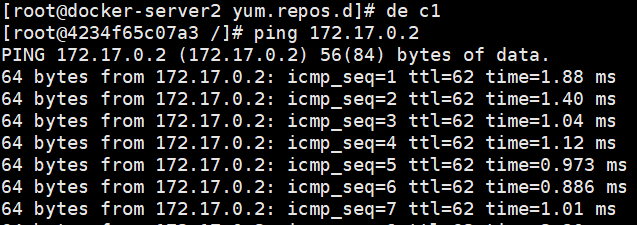

Containers in both hosts are now ready to communicate.
Mode 2, open vswitch
If docker technology is to be used on a large scale in production and testing environments, the first step is to solve the interconnection of docker containers built by different physical machines.
Openvswitch can be used to interconnect docker containers on different physical servers in centos7 environment

