In the previous essay, we learned about docker's network related instructions. Please refer to https://www.cnblogs.com/qiuhom-1874/p/12952616.html Today, let's talk about docker's data management instructions;
In the previous blog, we emphasized that the image of docker is built hierarchically. After the image is started as a container, docker will load the read-only layer image and add a read-write layer at the top of the image. We also said that the read-write layer does not belong to the container of the image. If the container is down, then the read-write layer at the top of the image will disappear. So the problem comes, How can I save the data generated in the writable layer before the container is down? To solve this problem, let's first look at the COW mechanism of docker;
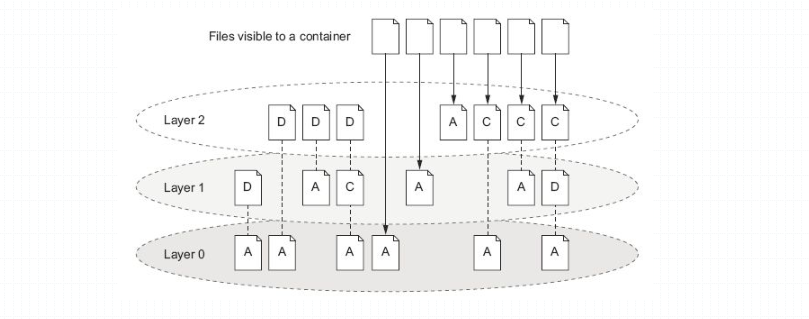
As shown in the figure above, the docker image is built in layers. When the data in the lowest layer has the same data in the second or higher layer, the data in the upper layer will cover the same data in the lower layer. As a result, only one copy of the same data in the upper layer and the lower layer will exist, and different data will exist. In the same way, the docker image will exist through layers For image construction, the data seen at the top level of the docker image should be the overlapping of the following layers. The same data can only be seen at the top level, while other data is composed of the superposition of different layers of data below. When running the layer container, the data seen inside the container is the result of the collection of different layers of image data and the same data. If When the container modifies an existing file during operation, the file will be copied from the bottom of the read-write layer to the read-write layer. The original file in the read-only layer still exists, but the copy of the file has been hidden by the read-write layer. This is called the docker's write time replication (cow) mechanism;
From the above information, we know that the data generated by the docker container is in the writable layer. When modifying the data, the original data will be copied from the original read-only layer to the writable layer to hide the original read-only layer, but the data in the read-only layer is still there. So after the container is deleted, the modified data will not be saved to the image, but will be deleted with the deletion of the container. Close and Restart the container will not affect the data. Is there a way to save the data in the read-write layer, even if the container is deleted, the data still exists?
First, let's talk about nfs data sharing. nfs sharing is to mount a directory to another directory through the network. When writing data to a directory, it is equivalent to writing data to a file in a remote directory. In the docker container, we call this kind of way volume. The so-called volume is one or more directories on the container. Such directories can Bypass the federated file system, and generate an association relationship with a directory on the host (binding, similar to the mount in nfs); volume will be created when the container is initialized by base The data in the volume provided by image will be copied during this period. The original intention of volume is to realize data persistence independent of the life cycle of the container, so when deleting the container, neither the volume will be deleted, nor the unreferenced volumes will be garbage collected;
Volume provides a container independent data management mechanism for docker; we can think of the image as a static file, such as a program, and compare the volume to a dynamic content, such as data, so that the image can be reused, and the volume can be shared; volume realizes the separation of program (image) and data (volume); realizes the data sharing and reuse between containers, and enables the transmission between containers Data becomes efficient and convenient; the modification of data in the data volume will take effect immediately, whether in the container or in the local operation; docker has two types of volumes, each of which has a mount point in the container, but its location on the host is different; bind mount volume is a volume that the user specifies to mount a directory on the storage to a directory inside the container. Dockekr managed volume is a volume managed by docker itself, which usually displays the ID of / var/lib/docker/vfs/dir / a volume on the host to a directory inside the container;
Example: using volume of type docker managed in the docker container of
[root@node1 ~]# docker run --name m2 -it --rm  -v /mydata linux1874/myimg:v0.1 /bin/sh
/ # ls /
bin     dev     etc     home    mydata  proc    root    sys     tmp     usr     var
/ # cd /mydata/
/mydata # ls
/mydata # [root@node1 ~]# docker container inspect m2 -f {{.Mounts}}
[{volume 65db95bc3010530381e2bcc20fdd216329a502527e17a1e70c1cb7f6e2d2a422 /var/lib/docker/volumes/65db95bc3010530381e2bcc20fdd216329a502527e17a1e70c1cb7f6e2d2a422/_data /mydata local  true }]
[root@node1 ~]# ll /var/lib/docker/volumes/65db95bc3010530381e2bcc20fdd216329a502527e17a1e70c1cb7f6e2d2a422/_data
total 0
[root@node1 ~]# echo "hello world" > /var/lib/docker/volumes/65db95bc3010530381e2bcc20fdd216329a502527e17a1e70c1cb7f6e2d2a422/_data/aa.txt
[root@node1 ~]# cat /var/lib/docker/volumes/65db95bc3010530381e2bcc20fdd216329a502527e17a1e70c1cb7f6e2d2a422/_data/aa.txt
hello world
[root@node1 ~]# docker attach m2
/mydata # ls
aa.txt
/mydata # cat aa.txt
hello world
/mydata #
Tip: - v only specifies a directory to indicate the directory inside the specified container. It will automatically generate the mount directory on the host through docker daemon. Such a mount is called a docker managed data volume. From the above information, we can see that we can use docker container inspection - F {. Mounts}}} Container name to view the volume, identifier and mount point host directory information of the container; we create a aa.txt And then you can see the file and its contents in the container / mydata;
Test: let's stop the container to see if the data volume will be deleted?
[root@node1 ~]# cat /var/lib/docker/volumes/65db95bc3010530381e2bcc20fdd216329a502527e17a1e70c1cb7f6e2d2a422/_data/aa.txt
hello world
[root@node1 ~]# docker attach m2
/mydata # ls
aa.txt
/mydata # cat aa.txt
hello world
/mydata # exit
[root@node1 ~]#
[root@node1 ~]# docker ps
CONTAINER ID        IMAGE                  COMMAND                  CREATED             STATUS              PORTS               NAMES
33c6f135eb86        linux1874/myimg:v0.1   "/bin/sh -c '/bin/ht..."   20 minutes ago      Up 20 minutes                           m1
[root@node1 ~]# cat /var/lib/docker/volumes/65db95bc3010530381e2bcc20fdd216329a502527e17a1e70c1cb7f6e2d2a422/_data/aa.txt
cat: /var/lib/docker/volumes/65db95bc3010530381e2bcc20fdd216329a502527e17a1e70c1cb7f6e2d2a422/_data/aa.txt: No such file or directory
[root@node1 ~]#
Tip: if the -- rm option is used when running the container, but the corresponding mount point data volume will be deleted after the container is stopped;
Test: run the container without the -- rm option to see if the data volume will be deleted after the container is stopped?
[root@node1 ~]# docker run --name m2 -v /mydata -it linux1874/myimg:v0.1 /bin/sh
/ # ls /
bin     dev     etc     home    mydata  proc    root    sys     tmp     usr     var
/ # cd mydata/
/mydata # ls
/mydata # [root@node1 ~]# docker container inspect -f {{.Mounts}} m2
[{volume 28c477840d926c2fc33ebfacd607b84cfd5a272d279e1f966a65b7cb2f1d9a2e /var/lib/docker/volumes/28c477840d926c2fc33ebfacd607b84cfd5a272d279e1f966a65b7cb2f1d9a2e/_data /mydata local  true }]
[root@node1 ~]# cd /var/lib/docker/volumes/28c477840d926c2fc33ebfacd607b84cfd5a272d279e1f966a65b7cb2f1d9a2e/_data
[root@node1 _data]# ls
[root@node1 _data]# echo "hello tom" > aa.txt
[root@node1 _data]# cat aa.txt
hello tom
[root@node1 _data]# docker attach m2
/mydata # ls
aa.txt
/mydata # cat aa.txt
hello tom
/mydata # exit
[root@node1 _data]#docker ps -a
CONTAINER ID        IMAGE                  COMMAND                  CREATED              STATUS                     PORTS               NAMES
e6560584d41e        linux1874/myimg:v0.1   "/bin/sh"                About a minute ago   Exited (0) 9 seconds ago                       m2
33c6f135eb86        linux1874/myimg:v0.1   "/bin/sh -c '/bin/ht..."   32 minutes ago       Up 32 minutes                                  m1
[root@node1 _data]# docker container rm m2
m2
[root@node1 _data]# docker ps -a
CONTAINER ID        IMAGE                  COMMAND                  CREATED             STATUS              PORTS               NAMES
33c6f135eb86        linux1874/myimg:v0.1   "/bin/sh -c '/bin/ht..."   35 minutes ago      Up 35 minutes                           m1
[root@node1 _data]# cd
[root@node1 ~]# cd -
/var/lib/docker/volumes/28c477840d926c2fc33ebfacd607b84cfd5a272d279e1f966a65b7cb2f1d9a2e/_data
[root@node1 _data]# ls
aa.txt
[root@node1 _data]# cat aa.txt
hello tom
[root@node1 _data]#
Tip: run the container without the -- rm option. Delete the container after the container stops. The data volume will not be deleted;
Example: using bind mount type volume in the docker container
[root@node1 ~]# mkdir /hostdir/v1 -p
[root@node1 ~]# docker run --name m3 -it -v /hostdir/v1/:/mydata linux1874/myimg:v0.1 /bin/sh
/ # ls /
bin     dev     etc     home    mydata  proc    root    sys     tmp     usr     var
/ # cd /mydata/
/mydata # ls
/mydata # [root@node1 ~]# docker container inspect -f {{.Mounts}} m3
[{bind  /hostdir/v1 /mydata   true rprivate}]
[root@node1 ~]# cd /hostdir/v1/
[root@node1 v1]# ls
[root@node1 v1]# echo "hello jerry" > aa.sh
[root@node1 v1]# cat aa.sh
hello jerry
[root@node1 v1]# docker attach m3
/mydata # ls
aa.sh
/mydata # cat aa.sh
hello jerry
/mydata # exit
[root@node1 v1]# docker ps -a
CONTAINER ID        IMAGE                  COMMAND                  CREATED              STATUS                     PORTS               NAMES
62ddbdc11a62        linux1874/myimg:v0.1   "/bin/sh"                About a minute ago   Exited (0) 4 seconds ago                       m3
33c6f135eb86        linux1874/myimg:v0.1   "/bin/sh -c '/bin/ht..."   41 minutes ago       Up 41 minutes                                  m1
[root@node1 v1]# docker container rm m3
m3
[root@node1 v1]# cd
[root@node1 ~]# cd -
/hostdir/v1
[root@node1 v1]# ls
aa.sh
[root@node1 v1]# cat aa.sh
hello jerry
[root@node1 v1]#
Prompt: - v specifies the host Directory: the container directory means to mount the host directory to a directory of the container; the directory in the container can be a nonexistent directory, which will be created automatically; this kind of data volume is called a bind mount type data volume; usually, the user defines the host directory as a data volume to mount to a certain directory of the container Directory; as above, we create files in the corresponding directory of the host, which can be accessed normally in the corresponding directory of the container; - v can use multiple times to specify different data volume mount relationships; usually, bind mount type volumes are used more frequently;
Example: volumes of multiple containers use the same host directory
[root@node1 ~]# ll /hostdir/v1/aa.sh
-rw-r--r-- 1 root root 12 May 24 13:59 /hostdir/v1/aa.sh
[root@node1 ~]# cat /hostdir/v1/aa.sh
hello jerry
[root@node1 ~]#  docker ps -a
CONTAINER ID        IMAGE               COMMAND             CREATED             STATUS              PORTS               NAMES
[root@node1 ~]# docker run --name m1 -d -v /hostdir/v1/:/var/www/web/html linux1874/myimg:v0.1
9eb3287e4007f0656b1f099aac9504724307679ac41689774059388a96d75cf0
[root@node1 ~]# docker container inspect -f {{.Mounts}} m1
[{bind  /hostdir/v1 /var/www/web/html   true rprivate}]
[root@node1 ~]# docker container inspect -f {{.NetworkSettings.IPAddress}} m1
172.17.0.2
[root@node1 ~]# curl http://172.17.0.2
<HTML><HEAD><TITLE>404 Not Found</TITLE></HEAD>
<BODY><H1>404 Not Found</H1>
The requested URL was not found
</BODY></HTML>
[root@node1 ~]# curl http://172.17.0.2/aa.sh
hello jerry
[root@node1 ~]# docker run --name m2 -d -v /hostdir/v1/:/var/www/web/html linux1874/myimg:v0.1
ff877e29d10c55b355b5270218d486894958880058e2eb7bef9bdd1c7c531f0f
[root@node1 ~]# docker container inspect -f {{.Mounts}} m2
[{bind  /hostdir/v1 /var/www/web/html   true rprivate}]
[root@node1 ~]# docker container inspect -f {{.NetworkSettings.IPAddress}} m2
172.17.0.3
[root@node1 ~]# curl http://172.17.0.3
<HTML><HEAD><TITLE>404 Not Found</TITLE></HEAD>
<BODY><H1>404 Not Found</H1>
The requested URL was not found
</BODY></HTML>
[root@node1 ~]# curl http://172.17.0.3/aa.sh
hello jerry
[root@node1 ~]#
Tip: attaching a data volume to a container will overwrite the original file of the container. This is not fundamentally different from mounting a mount. You can see from the above information aa.sh Put the original index.html In addition to the above methods, we can also use the -- volumes from option to specify the container from which to copy data and mount it to this container; as follows
[root@node1 ~]# docker run --name m3 -d --volumes-from m1 linux1874/myimg:v0.1
61a1fbdc9c559a594870dc1e2bbf505a4eb588fc03e5ab50233b55b907beb9b0
[root@node1 ~]# docker container inspect -f {{.Mounts}} m3
[{bind  /hostdir/v1 /var/www/web/html   true rprivate}]
[root@node1 ~]# docker container inspect -f {{.NetworkSettings.IPAddress}} m3
172.17.0.4
[root@node1 ~]# curl http://172.17.0.4/aa.sh
hello jerry
[root@node1 ~]# docker images
REPOSITORY          TAG                 IMAGE ID            CREATED             SIZE
linux1874/myimg     v0.1                e408b1c6e04f        38 hours ago        1.22MB
busybox             latest              78096d0a5478        10 days ago         1.22MB
centos              7                   b5b4d78bc90c        2 weeks ago         203MB
nginx               stable-alpine       ab94f84cc474        4 weeks ago         21.3MB
[root@node1 ~]# docker run --name c1 -it --volumes-from m1 centos:7 /bin/sh
sh-4.2# ls /
anaconda-post.log  dev  home  lib64  mnt  proc  run   srv  tmp  var
bin                etc  lib   media  opt  root  sbin  sys  usr
sh-4.2# cat /var/www/web/html/aa.sh
hello jerry
sh-4.2#
Example: mount a data volume read-only
[root@node1 ~]# docker ps -a
CONTAINER ID        IMAGE               COMMAND             CREATED             STATUS              PORTS               NAMES
[root@node1 ~]# docker images
REPOSITORY          TAG                 IMAGE ID            CREATED             SIZE
linux1874/myimg     v0.1                e408b1c6e04f        38 hours ago        1.22MB
busybox             latest              78096d0a5478        10 days ago         1.22MB
centos              7                   b5b4d78bc90c        2 weeks ago         203MB
nginx               stable-alpine       ab94f84cc474        4 weeks ago         21.3MB
[root@node1 ~]# docker run --name c1 -it -v /hostdir/v1/:/mydata:ro centos:7 /bin/sh
sh-4.2# ls /
anaconda-post.log  dev  home  lib64  mnt     opt   root  sbin  sys  usr
bin                etc  lib   media  mydata  proc  run   srv   tmp  var
sh-4.2# cd mydata/
sh-4.2# ls
aa.sh
sh-4.2# echo "hello tom" > aa.sh
sh: aa.sh: Read-only file system
sh-4.2# exit
exit
[root@node1 ~]# docker run --name c2 -it -v /hostdir/v1/:/mydata centos:7 /bin/sh
sh-4.2# cd /mydata/
sh-4.2# ls
aa.sh
sh-4.2# echo "hello tom" > aa.sh
sh-4.2# cat aa.sh
hello tom
sh-4.2# exit
exit
[root@node1 ~]#
Tip: if you do not specify the permission to mount the data volume, rw will be used by default. If you specify ro (read-only) as the permission to mount the data volume, you cannot modify the file content in the data volume inside the container;
Example: backing up data from another container with a container
[root@node1 ~]# ll /hostdir/v1/
total 4
-rw-r--r-- 1 root root 10 May 24 14:42 aa.sh
[root@node1 ~]# echo "hello world" > /hostdir/v1/bb.sh
[root@node1 ~]# echo "hello world,hello tom" > /hostdir/v1/cc.sh
[root@node1 ~]# ls /hostdir/v1/
aa.sh  bb.sh  cc.sh
[root@node1 ~]# docker run --name m1 -d -v /hostdir/v1/:/var/www/web/html linux1874/myimg:v0.1
5959e832c01f68c24e2542138a95eb7bfeabcb7608b070ef1b536c625ddfd612
[root@node1 ~]# docker run --name c1 --volumes-from m1 -v $(pwd):/backup centos:7 tar cvf /backup/backup.tar.gz /var/www/web/html
tar: Removing leading `/' from member names
/var/www/web/html/
/var/www/web/html/aa.sh
/var/www/web/html/bb.sh
/var/www/web/html/cc.sh
[root@node1 ~]# ls
backup.tar.gz
[root@node1 ~]# tar xf backup.tar.gz
[root@node1 ~]# ls
backup.tar.gz  var
[root@node1 ~]# cd var/www/web/html/
[root@node1 html]# ls
aa.sh  bb.sh  cc.sh
[root@node1 html]# cat aa.sh bb.sh cc.sh
hello tom
hello world
hello world,hello tom
[root@node1 html]#
Tip: explain that the container is used to back up the data in another container. First, clone the data volume of m1 through -- volumes from, then mount the current path to the / backup directory inside the container through - v, and then execute tar CVF / backup by starting the container/ backup.tar.gz /var/www/web/html to package / var/www/web/html files in the container into / backup/backup.tar.gz The reason why we can see the packed files in the current directory is because we mount the current path to the / backup directory in the container, so we can see the packed files in the current host directory;
Example: using a container to recover the data file just packaged
Run a container first
[root@node1 ~]# docker ps -a
CONTAINER ID        IMAGE                  COMMAND                  CREATED             STATUS              PORTS               NAMES
5959e832c01f        linux1874/myimg:v0.1   "/bin/sh -c '/bin/ht..."   15 minutes ago      Up 15 minutes                           m1
[root@node1 ~]# docker run --name m2 -it -v /var/www/web/html linux1874/myimg:v0.1 /bin/sh
/ # ls /var/www/web/html/
index.html
/ # [root@node1 ~]#
Then, the data volume of the container before the container cloning is performed. The current directory is mounted as the data volume, and the tar xf command is executed to unpack
[root@node1 ~]# docker ps -a
CONTAINER ID        IMAGE                  COMMAND                  CREATED             STATUS              PORTS               NAMES
6462f22e0d7f        linux1874/myimg:v0.1   "/bin/sh"                2 minutes ago       Up 2 minutes                            m2
5959e832c01f        linux1874/myimg:v0.1   "/bin/sh -c '/bin/ht..."   22 minutes ago      Up 21 minutes                           m1
[root@node1 ~]# docker run --name c2 --volumes-from m2 -v $(pwd):/backup centos:7 tar xf /backup/backup.tar.gz
[root@node1 ~]# docker attach m2
/ # ls
bin   dev   etc   home  proc  root  sys   tmp   usr   var
/ # ls /var/www/web/html/
aa.sh       bb.sh       cc.sh       index.html
/ # cd /var/www/web/html/
/var/www/web/html # cat aa.sh bb.sh cc.sh
hello tom
hello world
hello world,hello tom
/var/www/web/html #
Tip: the idea of the above command is to run container c2 Clone the m2 data volume to c2 first, then mount the current host directory to the container's / backup, and then perform the unpacking operation; note also that if the container's working directory is not the root directory or other special directory, the unpacking command can specify the directory to which to unpack through - C;