1. Install the yum utils package.
yum install -y yum-utils device-mapper-persistent-data lvm2
2. Before installing Docker engine community on the new host for the first time, you need to set up the Docker warehouse. After that, you can install and update Docker from the warehouse.
yum-config-manager --add-repo http://mirrors.aliyun.com/docker-ce/linux/centos/docker-ce.repo
3. Install the latest version of Docker Engine and containerd, or go to the next step to install a specific version.
yum install docker-ce docker-ce-cli containerd.io
4. Start Docker.
sudo systemctl start docker
5. View Docker version.
docker -v
6. Verify that the Docker engine is installed correctly by running the hello world image.
docker run hello-world
Note: this command downloads the test image and runs it in the container. When the container is running, it prints a message and exits.
7. Upgrade Docker engine
yum -y upgrade
8. Uninstall Docker engine, CLI, and container packages:
yum remove docker-ce docker-ce-cli containerd.io
The above command does not automatically delete images, containers, volumes, or custom profiles on the host. To delete all images, containers, and volumes.
rm -rf /var/lib/docker
rm -rf /var/lib/containerd
Note: you must manually delete any edited profiles.
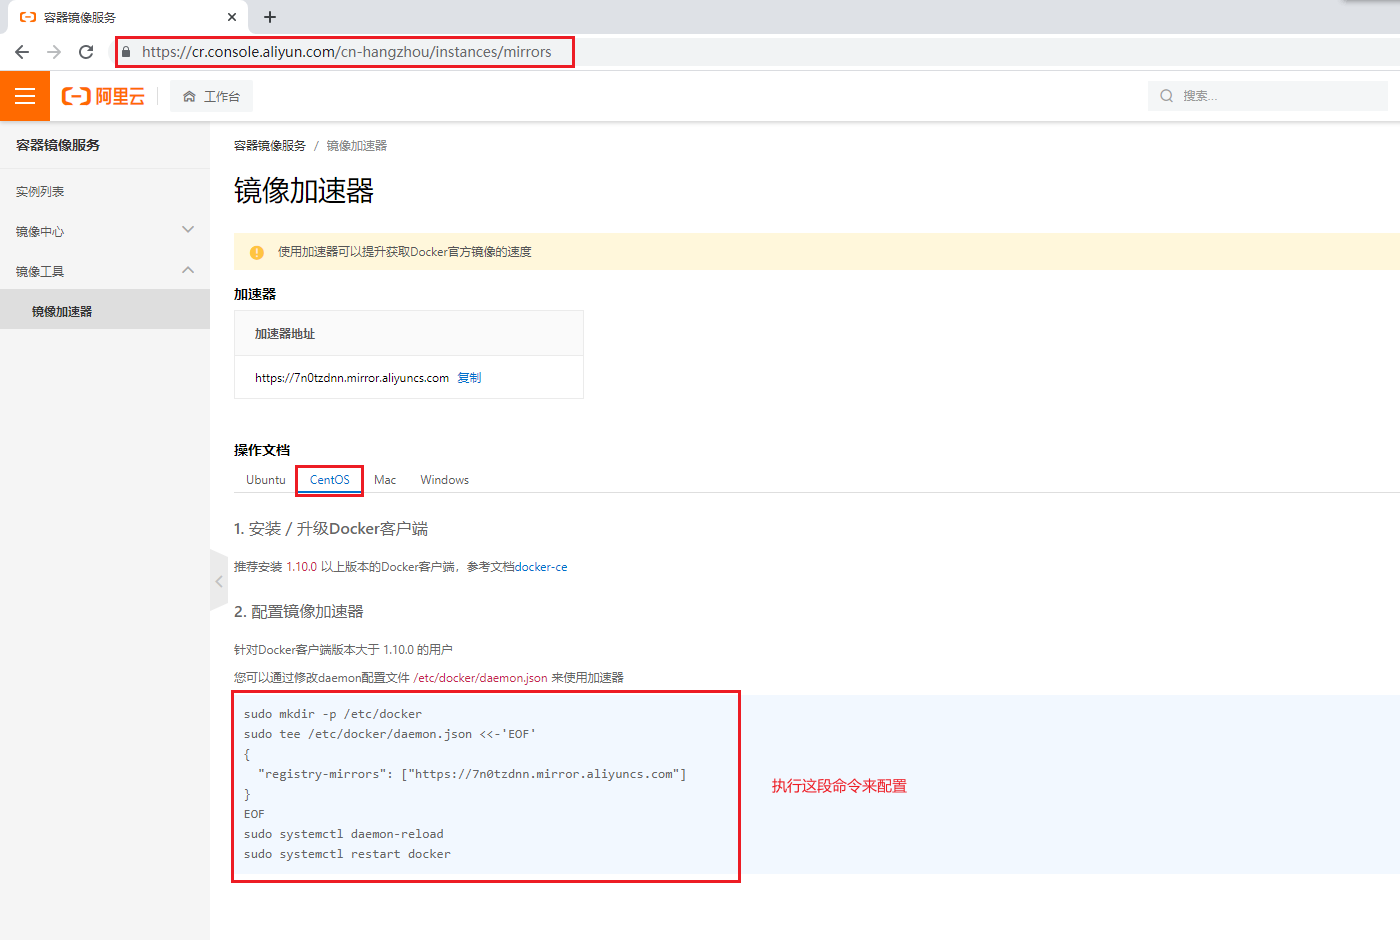
10. To configure the image accelerator:
sudo mkdir -p /etc/docker
sudo tee /etc/docker/daemon.json <<-'EOF'
{
  "registry-mirrors": ["https://wpe5731n.mirror.aliyuncs.com"]
}
EOF
sudo systemctl daemon-reload
sudo systemctl restart docker
Open the Alibaba cloud image Accelerator Web page: https://cr.console.aliyun.com/cn-hangzhou/instances/mirrors
Chapter IV Docker process related commands
- Start docker service: systemctl start docker
- Stop docker service: systemctl stop docker
- Restart docker service: systemctl restart docker
- View docker service status: systemctl status docker
- Set docker startup: systemctl enable docker
- Cancel docker startup: systemctl disable docker
Chapter V Docker image related commands
View image: view all local images
docker images
docker images –q # View the id of the image used
Search image: find the image from the Internet
docker search Image name
Pull image: by default, the image is downloaded from the Docker warehouse to the local. The image name format is name: version number. If the version number is not specified, it is the latest version.
docker pull Image name
docker pull Image name:Mirror version
Note: if you don't know the image version, you can go to the docker hub to search for the corresponding image.
Delete mirror: deletes the local mirror
docker rmi image id # Delete the specified local image (add - f to force deletion)
docker rmi `docker images -q`  # Delete all local mirrors
View image storage information:
docker info # After downloading, the image is stored in / var/lib/docker
Get image details:
docker inspect image id
Export image:
docker save -o /catalogue/File name image name:Mirror version
Import image:
docker load -i /catalogue/file name
Chapter VI Docker container related commands
Container list:
docker ps # View running containers
docker ps –a # View all local containers
Create container:
docker create --name="Container name" Image name:Mirror version initialization statement
 For example:
docker create --name="centos7" centos:7 /bin/bash
Start container:
docker start Container name/container ID
Stop container:
docker stop Container name/container ID
Restart container:
docker restart Container name/container ID
Delete container:
docker rm Container name/container ID
To view container information:
docker inspect Container name/container ID
To view the container log:
docker logs Container name/container ID
Set startup and self startup:
docker update --restart=always Container name/container ID
Start container:
docker run parameter --name="Container name" Image name:Mirror version initialization statement

Parameter Description:
-i: Keep the container running. Usually with -t Use at the same time. join it After these two parameters, the container will automatically enter the container after creation, and close automatically after exiting the container.
-t: Reassign a pseudo input terminal to the container, usually with -i Use at the same time.
-d: Run the container in daemon (background) mode. To create a container to run in the background, you need to use docker exec Enter the container. After exiting, the container will not close.
-it: The containers created are generally called interactive containers,-id Containers created are generally referred to as guarded containers.

-P(Upper case): expose random ports
-p((lowercase): expose the specified port. There are four types:
docker run -p container_port                    #Map a port of the container to a random port of all interfaces of the host.
docker run -p host_port:container_port          #Map a port of the container to a specific port of all interfaces of the host.
docker run -p host_ip:host_port:container_port  #Map a port of the container to a specific port of a specific IP address of the host.
docker run -p host_ip::container_port           #Map a port of the container to a random port of a specific IP address of the host.

Use command docker port Container name/container ID View port mapping information.
Enter container:
docker exec Parameter image name:Mirror version initialization statement

Parameter Description:
-i: Keep the container running. Usually with -t Use at the same time. join it After these two parameters, the container will automatically enter the container after creation, and close automatically after exiting the container.
-t: Reassign a pseudo input terminal to the container, usually with -i Use at the same time.
-d: Run the container in daemon (background) mode. To create a container to run in the background, you need to use docker exec Enter the container. After exiting, the container will not close.
-it: The containers created are generally called interactive containers,-id Containers created are generally referred to as guarded containers.
Exit container:
exit
Export container:
docker export -o /catalogue/File name container name/container ID
 For example: save container as by date tar Documents.
docker export -o centos-`date +%Y%m%d`.tar c1
Import container:
docker import /catalogue/File name image name:Mirror version
 For example: put the above tar Archive file import.
docker import centos-20210805.tar centos-ccl:7
Export a new image from the container:
docker commit container ID Image name:Mirror version
Copy files from container to host:
For example: docker cp 2592d3fad0fb:/opt/test.txt ~/abc123.txt
Copy files from host to container:
For example: docker cp ~/test.txt 2592d3fad0fb:/opt/
Chapter 7 data volume of Docker container
Configure data volume: a data volume is a share between the host and the container.
docker run parameter -v Host Directory(file):In container directory(file) --name="Container name" Image name:Mirror version initialization statement
 For example: docker run -it -v /root/aaa:/root/bbb --name=c0 centos:7 /bin/bash
Configure data volume containers: data volume containers are shared between containers.
1. Create the boot c3 data volume container and set the data volume using the – v parameter
docker run –it –v /volume --name=c3 centos:7 /bin/bash
2. Create the boot c1 c2 container and set the data volume with the – - volumes from parameter
docker run –it --volumes-from c3 --name=c1 centos:7 /bin/bash
docker run –it --volumes-from c3 --name=c2 centos:7 /bin/bash
Chapter VIII common application deployment of Docker
8.1. Deploy MySQL
1. Search mysql image
docker search mysql
2. Pull mysql image
docker pull mysql:5.7
3. Create container and set port mapping and directory mapping
mkdir ~/mysql
cd ~/mysql
docker run -id \
-p 3306:3306 \
--name=c_mysql \
-v $PWD/conf:/etc/mysql/conf.d \
-v $PWD/logs:/logs \
-v $PWD/data:/var/lib/mysql \
-e MYSQL_ROOT_PASSWORD=123456 \
mysql:5.7
- Parameter Description:
- -p 3306:3306: map the 3306 port of the container to the 3306 port of the host.
- -v $PWD/conf:/etc/mysql/conf.d: set conf / my CNF is mounted to / etc / MySQL / my cnf. configure directory
- -v $PWD/logs:/logs: mount the logs directory under the current directory of the host to / logs of the container. Log directory
- -v $PWD/data:/var/lib/mysql: mount the data directory under the current directory of the host to / var/lib/mysql of the container. Data directory
- -e MYSQL_ROOT_PASSWORD=123456: initialize the password of the root user.
4. Enter the container and operate mysql
docker exec -it c_mysql /bin/bash
mysql -uroot -p123456
5. Open the host port to the firewall
firewall-cmd --zone=public --add-port=3306/tcp --permanent
firewall-cmd --reload
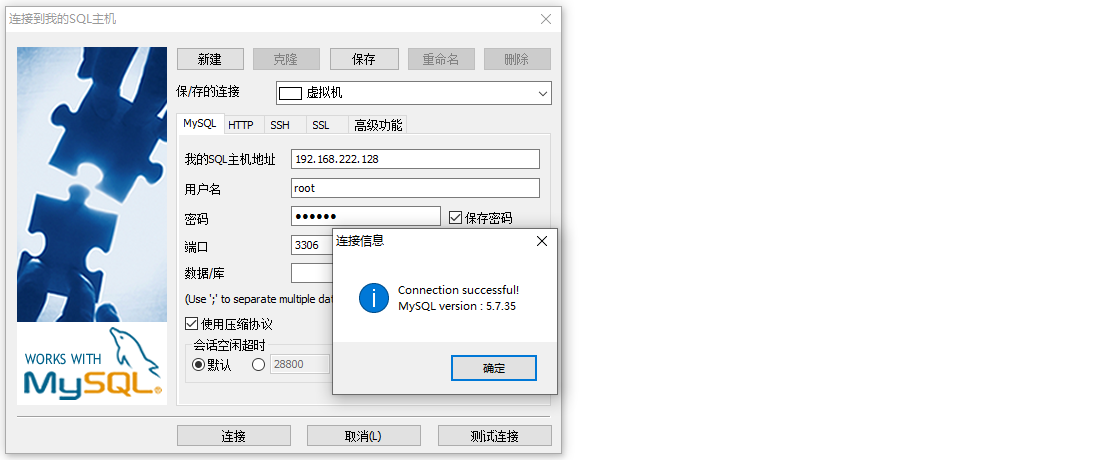
6. Use SQLyog to connect mysql outside the virtual machine
7. Set container self start
docker update --restart=always c_mysql
8.2. Redis deployment
1. Search redis image
docker search redis
2. Pull redis image
docker pull redis:6.0
3. Create container and set port mapping
docker run -id -p 6379:6379 --name=c_redis redis:6.0
4. Open the host port to the firewall
firewall-cmd --zone=public --add-port=6379/tcp --permanent
firewall-cmd --reload
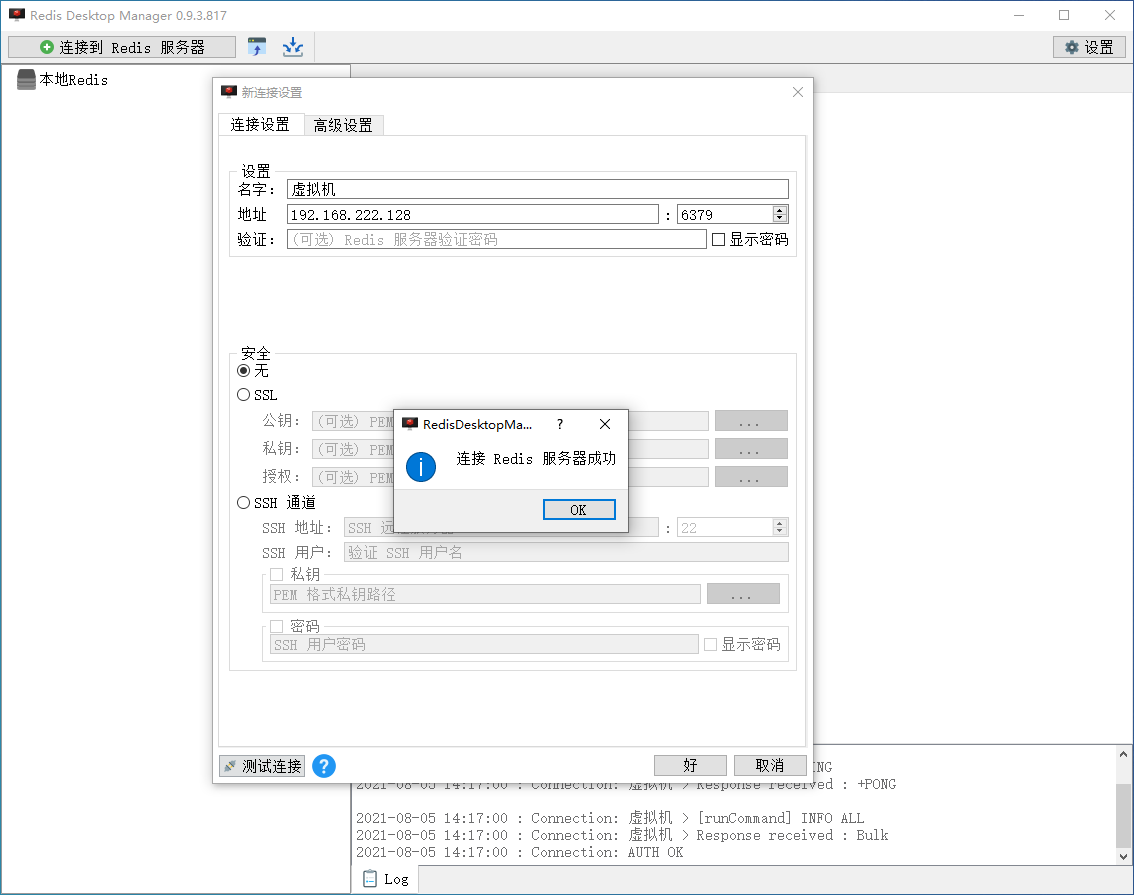
5. Use RedisDesktopManager to connect redis outside the virtual machine
6. Set container self start
docker update --restart=always c_redis
8.3. Deploy Tomcat
1. Search tomcat image
docker search tomcat
2. Pull tomcat image
docker pull tomcat
3. Create container and set port mapping and directory mapping
# Create a tomcat directory under the / root directory to store tomcat data information
mkdir ~/tomcat
cd ~/tomcat
docker run -id --name=c_tomcat \
-p 8080:8080 \
-v $PWD:/usr/local/tomcat/webapps \
tomcat
-
Parameter Description:
-
-p 8080:8080: map the 8080 port of the container to the 8080 port of the host
-v $PWD:/usr/local/tomcat/webapps: mount the current directory in the host to the webapps of the container
-
4. Open the host port to the firewall
firewall-cmd --zone=public --add-port=8080/tcp --permanent
firewall-cmd --reload
5. Write a web page
mkdir -p ~/tomcat/app/
echo "<h1> hello tomcat docker </h1>" > ~/tomcat/app/index.html
6. Use Google browser to access the page outside the virtual machine

7. Set container self start
docker update --restart=always c_tomcat
8.4 deployment Nginx
1. Search nginx image
docker search nginx
2. Pull nginx image
docker pull nginx
3. Create container and set port mapping and directory mapping
# Create nginx directory under / root directory to store nginx data information
mkdir ~/nginx
cd ~/nginx
mkdir conf
cd conf
# Create nginx under ~ / nginx/conf / Conf file, paste the following
vi nginx.conf
user  nginx;
worker_processes  1;

error_log  /var/log/nginx/error.log warn;
pid        /var/run/nginx.pid;

events {
    worker_connections  1024;
}

http {
    include       /etc/nginx/mime.types;
    default_type  application/octet-stream;

    log_format  main  '$remote_addr - $remote_user [$time_local] "$request" '
                      '$status $body_bytes_sent "$http_referer" '
                      '"$http_user_agent" "$http_x_forwarded_for"';

    access_log  /var/log/nginx/access.log  main;

    sendfile        on;
    #tcp_nopush     on;

    keepalive_timeout  65;

    #gzip  on;

    include /etc/nginx/conf.d/*.conf;
}
cd ~/nginx

docker run -id --name=c_nginx \
-p 80:80 \
-v $PWD/conf/nginx.conf:/etc/nginx/nginx.conf \
-v $PWD/logs:/var/log/nginx \
-v $PWD/html:/usr/share/nginx/html \
nginx
- Parameter Description:
- -p 80:80: Map port 80 of the container to port 80 of the host.
- -v $PWD/conf/nginx.conf:/etc/nginx/nginx.conf: set / conf / nginx.exe in the current directory of the host Conf: / etc / nginx / nginx. Mounted to the container conf. configure directory
- -v $PWD/logs:/var/log/nginx: mount the logs directory under the current directory of the host to / var/log/nginx of the container. Log directory
4. Open the host port to the firewall
firewall-cmd --zone=public --add-port=80/tcp --permanent
firewall-cmd --reload
5. Write a web page
echo "<h1> hello nginx docker </h1>" > ~/nginx/html/index.html
6. Use Google browser to access the page outside the virtual machine

7. Set container self start
docker update --restart=always c_nginx
8.5 deployment RabbitMQ
1. Search rabbitmq image
docker search rabbitmq
2. Pull rabbitmq image
docker pull rabbitmq
3. Create container and set port mapping
docker run -id --name c_rabbitmq \
-p 15672:15672 \
rabbitmq:management
4. Open the host port to the firewall
firewall-cmd --zone=public --add-port=5672/tcp --permanent
firewall-cmd --zone=public --add-port=15672/tcp --permanent
firewall-cmd --reload
5. Use Google browser to access the page outside the virtual machine

6. Set container self start
docker update --restart=always c_rabbitmq
8.6 deployment FastDFS
First:
1. Search fastdfs image
docker search fastdfs
2. Pull fastdfs image
docker pull season/fastdfs
3. Create directory
mkdir ~/fastdfs
cd ~/fastdfs
4. Open firewall
firewall-cmd --zone=public --add-port=8888/tcp --permanent
firewall-cmd --zone=public --add-port=22122/tcp --permanent
firewall-cmd --zone=public --add-port=23000/tcp --permanent
firewall-cmd --reload
5. Use the docker image to build the tracker container (tracking server, which plays the role of scheduling)
docker run -id --name c_fastdfs_tracker \
-v $PWD/tracker/data:/fastdfs/tracker/data \
--net=host \
season/fastdfs tracker
6. Use the docker image to build the storage container (storage server, providing capacity and backup services, and the following IP address is the virtual machine address)
docker run -id --name c_fastdfs_storage \
-v $PWD/storage/data:/fastdfs/storage/data \
-v $PWD/store_path:/fastdfs/store_path \
--net=host \
-e TRACKER_SERVER:192.168.222.128:22122 \
-e GROUP_NAME=group1 \
season/fastdfs storage
7. Copy profile
docker cp c_fastdfs_storage:/fdfs_conf/. ~/fastdfs/conf/
cd conf
8. Modify corresponding configuration
vi tracker.conf
bind_addr=192.168.222.128

vi storage.conf
tracker_server=192.168.222.128:22122

vi client.conf
tracker_server=192.168.222.128:22122
9. Restore profile
docker cp ~/fastdfs/conf/. c_fastdfs_storage:/fdfs_conf/
cd ..
10. Restart the storage service
docker restart c_fastdfs_storage
11. Upload files to the storage container in the docker simulation client
docker run -tid --name c_fastdfs_sh \
--net=host \
season/fastdfs sh


docker cp ~/fastdfs/conf/storage.conf c_fastdfs_sh:/fdfs_conf/


docker exec -it c_fastdfs_sh /bin/bash


root@localhost:/# ls
FastDFS_v4.08  bin   dev            etc      fdfs_conf  lib    lib64            media  opt   root  sbin     srv  tmp  var
a.txt          boot  entrypoint.sh  fastdfs  home       lib32  libevent-2.0.14  mnt    proc  run   selinux  sys  usr
root@localhost:/# cd fdfs_conf/
root@localhost:/fdfs_conf# echo "hello,world" > a.txt
root@localhost:/fdfs_conf# fdfs_upload_file storage.conf a.txt
group1/M00/00/00/wKjegGELqT-AX5oxAAAADLMSuiI089.txt
12. Stop and uninstall
docker stop c_fastdfs_sh c_fastdfs_storage c_fastdfs_tracker
docker rm c_fastdfs_sh c_fastdfs_storage c_fastdfs_tracker
docker rmi season/fastdfs
rm -rf ~/fastdfs
Second:
1. Search fastdfs image
docker search fastdfs
2. Pull fastdfs image
docker pull delron/fastdfs
3. Create directory
mkdir ~/fastdfs
cd ~/fastdfs
4. Open firewall
firewall-cmd --zone=public --add-port=8888/tcp --permanent
firewall-cmd --zone=public --add-port=22122/tcp --permanent
firewall-cmd --zone=public --add-port=23000/tcp --permanent
firewall-cmd --reload
5. Use the docker image to build the tracker container (tracking server, which plays the role of scheduling)
docker run -id --name c_fastdfs_tracker \
-v $PWD/tracker:/var/fdfs \
--network=host \
delron/fastdfs tracker
6. Use the docker image to build the storage container (storage server, providing capacity and backup services, and the following IP address is the virtual machine address)
docker run -id --name c_fastdfs_storage \
-v $PWD/storage:/var/fdfs \
-e TRACKER_SERVER=192.168.222.128:22122 \
--network=host \
delron/fastdfs storage
7. Install upload tool
cd storage/
yum install lrzsz


[root@localhost storage]# rz
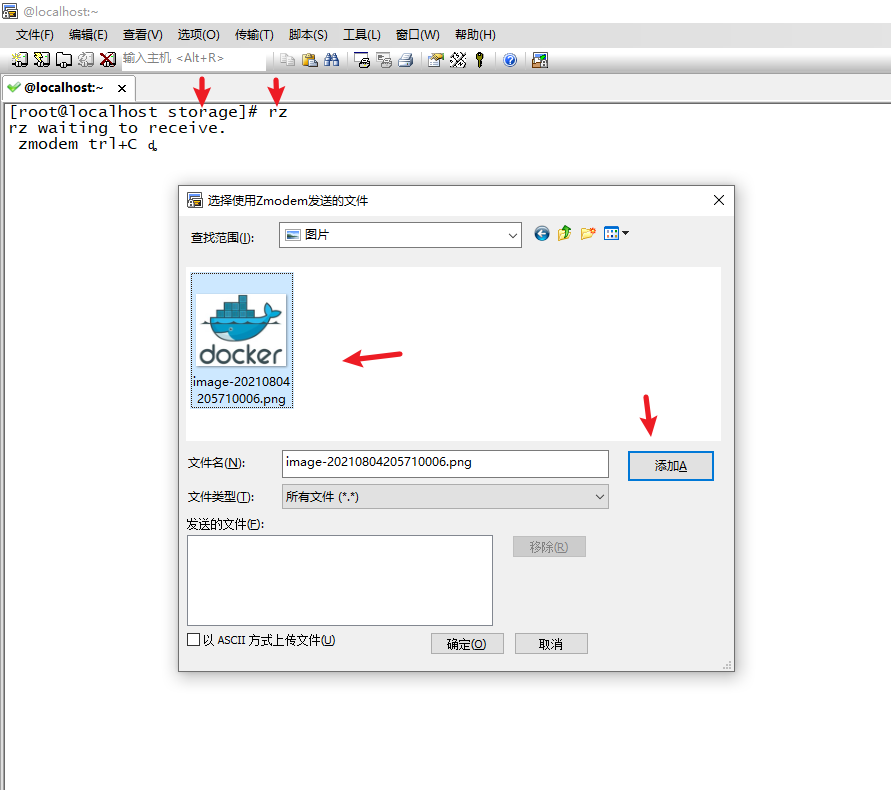
8. Enter storage and upload pictures
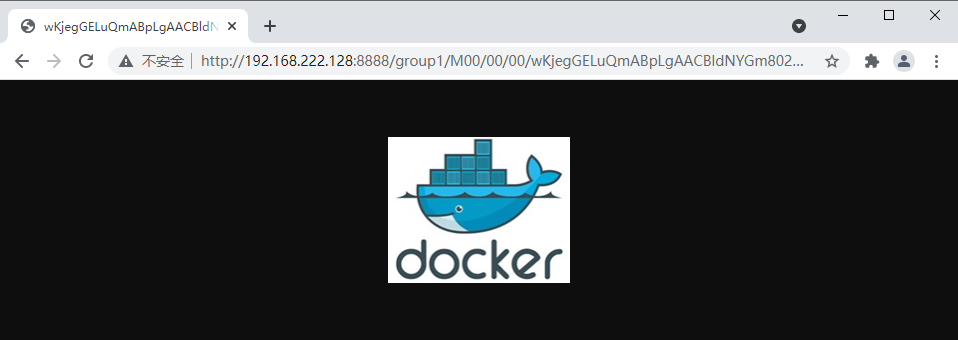
docker exec -it c_fastdfs_storage /bin/bash
[root@localhost nginx-1.12.2]# /usr/bin/fdfs_upload_file /etc/fdfs/client.conf /var/fdfs/image-20210804205710006.png
group1/M00/00/00/wKjegGELuQmABpLgAACBldNYGm8026.png
9. Use Google browser to access pictures outside the virtual machine
10. Set container self start
docker update --restart=always c_fastdfs_tracker c_fastdfs_storage
8.7. Deploy GitLab
1. Search gitlab image
docker search gitlab
2. Pull gitlab image
docker pull gitlab/gitlab-ce
3. Create container and set port mapping and directory mapping
mkdir ~/gitlab
cd ~/gitlab


docker run -id \
-p 9443:443 \
-p 9080:80 \
-p 9022:22 \
--name c_gitlab \
-v $PWD/config:/etc/gitlab \
-v $PWD/logs:/var/log/gitlab \
-v $PWD/data:/var/opt/gitlab \
gitlab/gitlab-ce
4. Configure ip and port
vi ./config/gitlab.rb


gitlab_rails['gitlab_ssh_host'] = '192.168.222.128'
gitlab_rails['gitlab_shell_ssh_port'] = 9022
gitlab_rails['gitlab_shell_git_timeout'] = 800
external_url 'http://192.168.222.128:9080'
5. Open firewall
firewall-cmd --zone=public --add-port=9443/tcp --permanent
firewall-cmd --zone=public --add-port=9080/tcp --permanent
firewall-cmd --zone=public --add-port=9022/tcp --permanent
firewall-cmd --reload
6. Restart gitlab configuration
docker exec -it c_gitlab /bin/bash
gitlab-ctl reconfigure
7. Access outside the virtual machine using Google browser
http://192.168.222.128:9080/ , default account: root, default password: cat ~/gitlab/config/initial_root_password
8. Set container startup and self startup
docker update --restart=always c_gitlab
8.8. Deploy MongoDB
1. Search MongoDB image
docker search mongo
2. Pull MongoDB image
docker pull mongo
3. Create container and set port mapping and directory mapping
docker run -id -p 27017:27017 --name c_mongo mongo --auth
4. Set password
docker exec -it c_mongo mongo admin
> db.createUser({ user:'admin',pwd:'123456',roles:[ { role:'userAdminAnyDatabase', db: 'admin'},"readWriteAnyDatabase"]});
> db.auth('admin', '123456');
> exit
5. Open firewall
firewall-cmd --zone=public --add-port=27017/tcp --permanent
firewall-cmd --reload
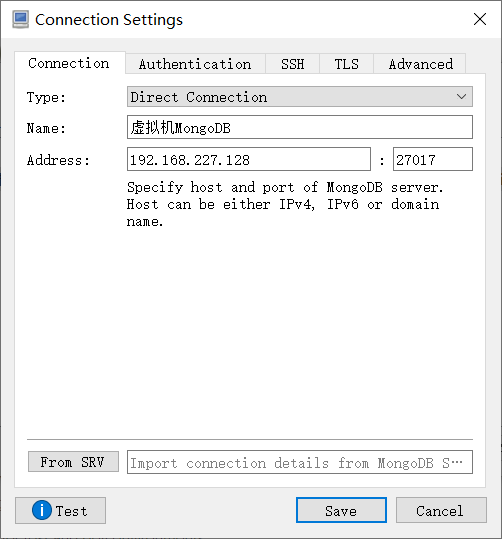
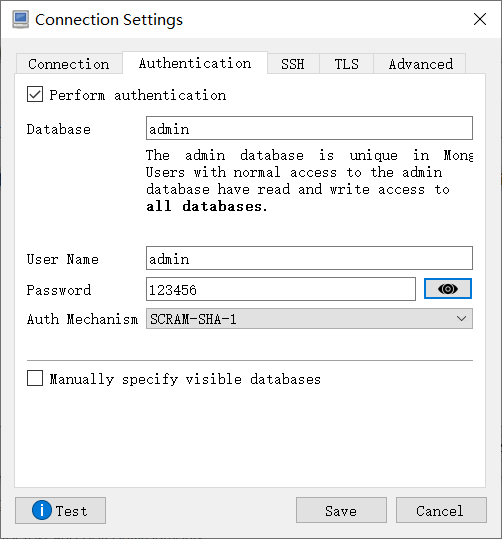
6. Graphical connection
7. Set container startup and self startup
docker update --restart=always c_mongo
Chapter 9 Dockerfile quick start
Case:
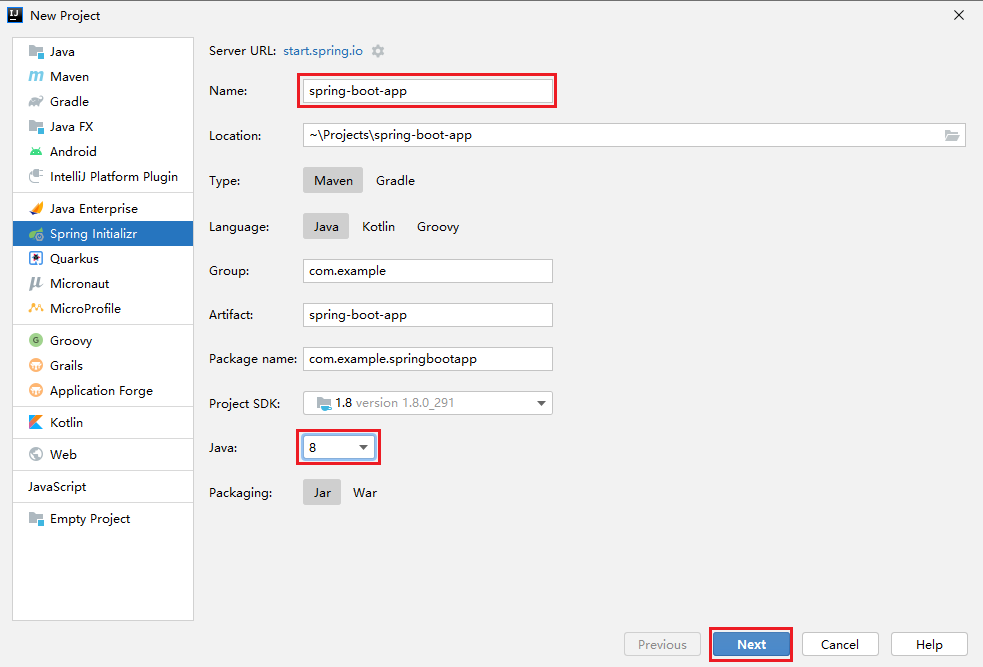
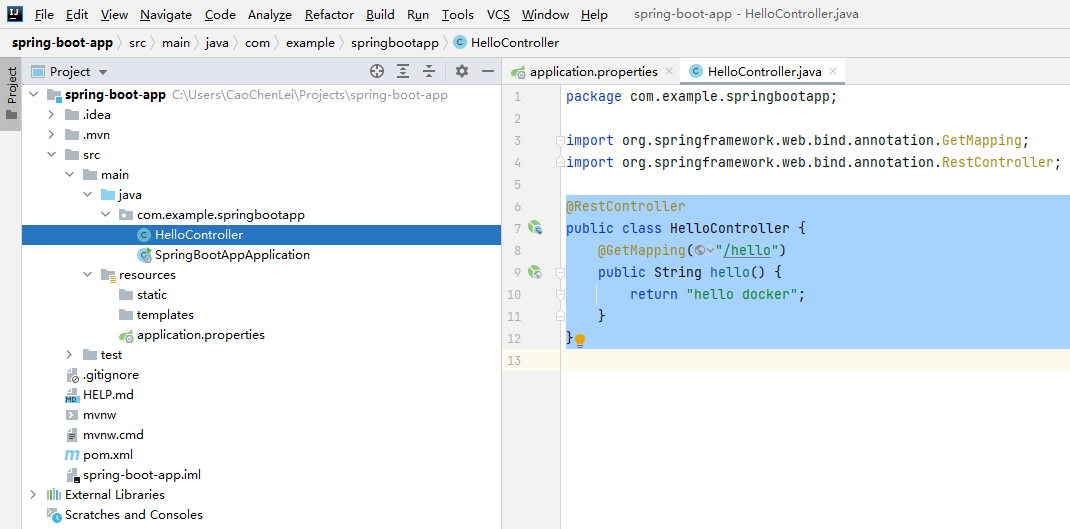
1. Create a Spring Boot application
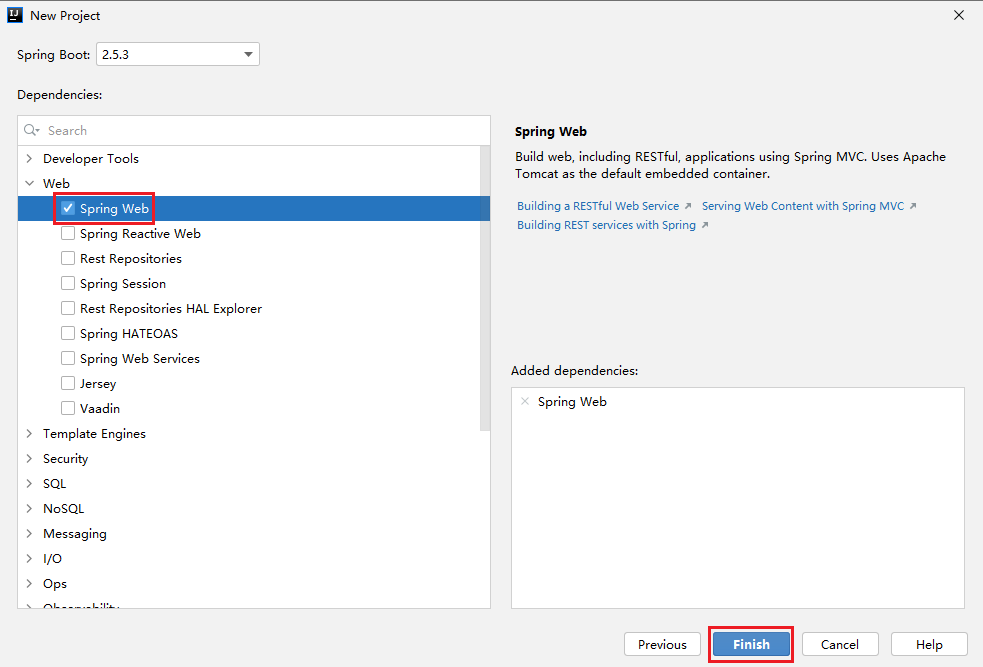
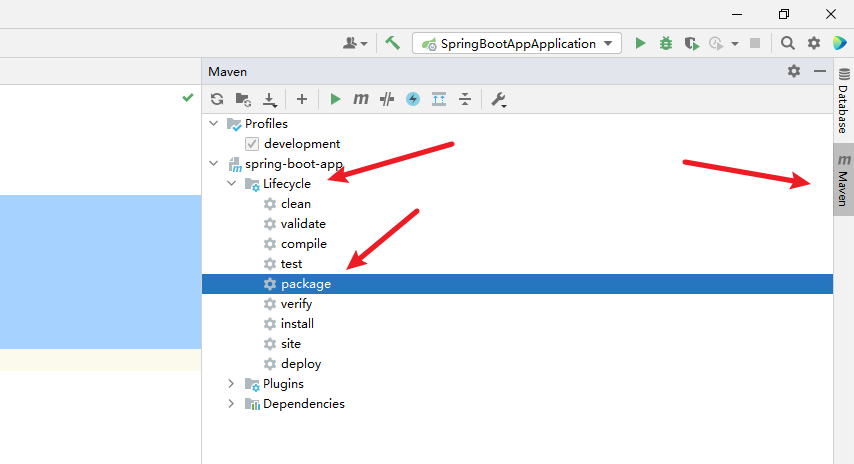
2. Packaging Spring Boot applications
3. Upload Spring Boot application

4. Write dockerfile configuration
vi spring-boot-app-0.0.1-dockerfile


FROM java:8
MAINTAINER caochenlei <774908833@qq.com>
ADD spring-boot-app-0.0.1-SNAPSHOT.jar app.jar
CMD java -jar app.jar

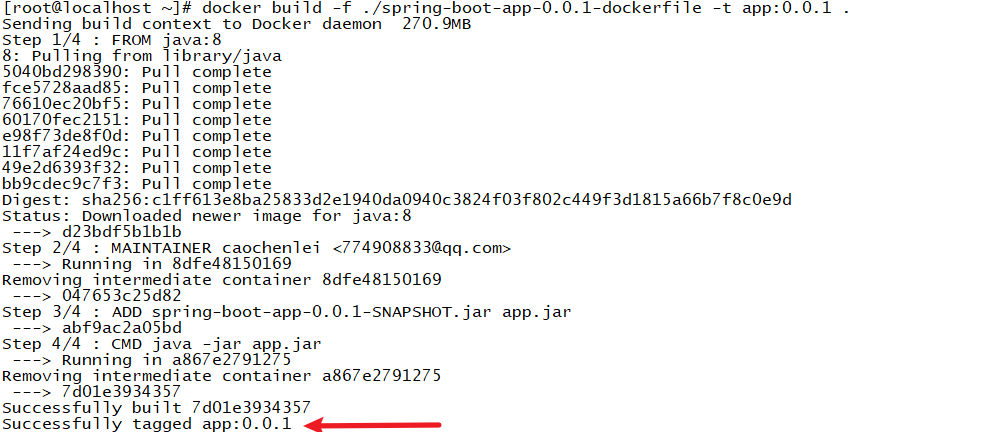
5. Build image through dockerfile
docker build -f ./spring-boot-app-0.0.1-dockerfile -t app:0.0.1 .
6. Create a container using the newly created image

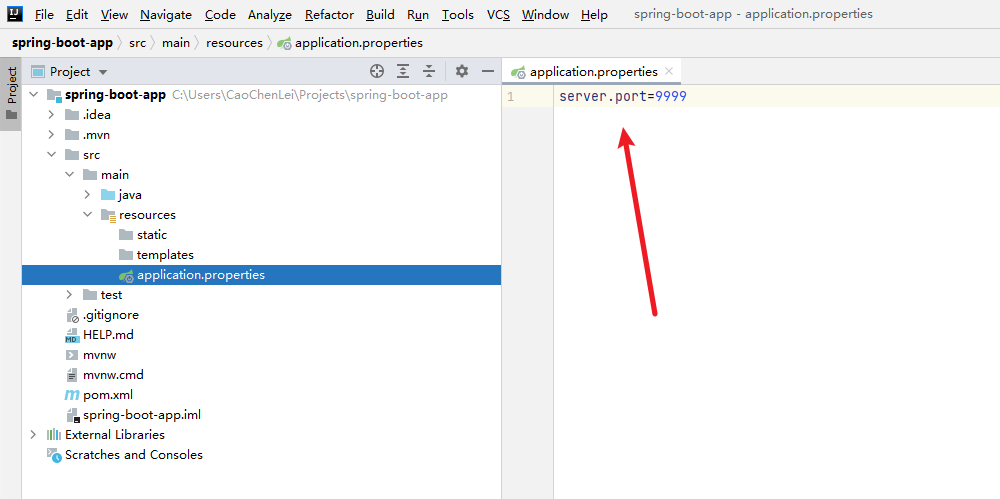
docker run -id -p 9999:9999 app:0.0.1
7. Add port to firewall
firewall-cmd --zone=public --add-port=9999/tcp --permanent
firewall-cmd --reload
8. Access with Google browser outside the virtual machine

9. Set container self start
docker update --restart=always f1ee93f709ba
Chapter 10 Docker builds its own private server
Docker official Docker hub( https://hub.docker.com )It is a warehouse for managing public images. We can pull images from it to the local or push our own images. However, sometimes our servers cannot access the Internet, or you don't want to put your images on the public network, so we need to build our own private warehouse to store and manage our images.
1. Construction of private warehouse
# 1. Pull private warehouse image
docker pull registry
# 2. Start private warehouse container
docker run -id --name=registry -p 5000:5000 registry
# 3. After opening the port, open the browser and enter the address http: / / private warehouse server ip:5000/v2/_catalog, see {"repositories": []} indicates that the private warehouse has been built successfully
firewall-cmd --zone=public --add-port=5000/tcp --permanent
firewall-cmd --reload
# 4. Modify daemon json
vim /etc/docker/daemon.json
# Add a key to the above file, save and exit. This step is used to make docker trust the private warehouse address; Note: change the ip address of the private warehouse server to the real ip address of your own private warehouse server
{"insecure-registries":["Private warehouse server ip:5000"]}
# 5. Restart docker service
systemctl restart docker
docker start registry
2. Upload the image to the private warehouse
# 1. Mark image as private warehouse image
docker tag centos:7 Private warehouse server IP:5000/centos:7

# 2. Upload the image of the tag
docker push Private warehouse server IP:5000/centos:7
3. Pull image from private warehouse
#Pull image
docker pull Private warehouse server ip:5000/centos:7