Article catalog
docker distributed warehouse harbor
Harbor is an enterprise level Registry server for storing and distributing Docker images, which is open-source by VMware. It extends the open-source Docker Distribution by adding some necessary enterprise features, such as security, identification and management. As an enterprise private Registry server, harbor provides better performance and security. Improve the efficiency of using Registry to build and run environment transfer image. Harbor supports the copying of image resources installed in multiple Registry nodes. All images are stored in private Registry to ensure the control of data and intellectual property rights in the company's internal network. In addition, harbor also provides advanced security features, such as user management, access control and activity audit. The official website address is: https://vmware.github.io/harbor/cn/ , official GitHub address: https://github.com/vmware/harbor
1. Official introduction to harbor function
- Role based access control: users and Docker image warehouses are organized and managed through "project". A user can have different permissions for multiple image warehouses in the same namespace (project).
- Mirror replication: mirrors can be replicated (synchronized) in multiple Registry instances. Especially suitable for load balancing, high availability, mixed cloud and multi cloud scenarios.
- Graphical user interface: users can browse through the browser, retrieve the current Docker image warehouse, manage projects and namespaces.
- AD/LDAP branch: Harbor can integrate the existing AD/LDAP in the enterprise for authentication management. Audit management: all operations against the image warehouse can be traced for audit management.
- Internationalization: we have localized versions in English, Chinese, German, Japanese and Russian. More languages will be added.
- RESTful API - RESTful API: provides administrators with more control over Harbor, making it easier to integrate with other management software.
- Simple deployment: two installation tools, online and offline, can also be installed to vSphere platform (OVA mode) virtual devices.
2. Install Harbor
The current stable version of harbor is harbor-offline-installer-v1.7.6.tgz
Download address: https://github.com/vmware/harbor/releases
Installation documentation: https://github.com/goharbor/harbor/blob/master/docs/install-config/_index.md
2.1 solving dependent environment
Docker and docker compose need to be installed
1. Install docker
# step 1: install some necessary system tools
sudo apt-get update
sudo apt-get -y install apt-transport-https ca-certificates curl software-properties-common
# step 2: install GPG certificate
curl -fsSL https://mirrors.aliyun.com/docker-ce/linux/ubuntu/gpg | sudo apt-key add -
# Step 3: write software source information
sudo add-apt-repository "deb [arch=amd64] https://mirrors.aliyun.com/docker-ce/linux/ubuntu $(lsb_release -cs) stable"
# Step 4: update and install docker CE
sudo apt-get -y update


apt install docker-ce=5:18.09.9~3-0~ubuntu-bionic  docker-ce-cli=5:18.09.9~3-0~ubuntu-bionic -y
2. Install docker compose
You can use apt to install
root@Z4:~# apt-cache madison  docker-compose
docker-compose |   1.17.1-2 | http://mirrors.aliyun.com/ubuntu bionic/universe amd64 Packages
docker-compose |   1.17.1-2 | http://mirrors.aliyun.com/ubuntu bionic/universe i386 Packages
docker-compose |   1.17.1-2 | http://mirrors.aliyun.com/ubuntu bionic/universe Sources
root@Z4:~#
root@Z4:~# apt install docker-compose
pip installation
root@z3:~# apt  install python-pip
root@z3:~# pip install --upgrade pip
root@z3:~# pip  install docker-compose
2.2 and configure harbor startup
Download the installation package
root@z3:/usr/local/src# wget https://storage.googleapis.com/harbor-releases/release-1.7.0/harbor-offline-installer-v1.7.6.tgz

root@z3:/usr/local/src# tar xvf harbor-offline-installer-v1.7.6.tgz


root@z3:/usr/local/src# ln -sv /usr/local/src/harbor  /usr/local/harbor
'/usr/local/harbor' -> '/usr/local/src/harbor'
Modify profile key
root@z3:/usr/local/harbor# vim harbor.cfg

#Write ip address or domain name
hostname =192.168.1.103

harbor_admin_password =12345
install
root@z3:/usr/local/harbor# ./prepare
root@z3:/usr/local/harbor# ./install.sh

✔ ----Harbor has been installed and started successfully.----

Now you should be able to visit the admin portal at http://192.168.1.103.
For more details, please visit https://github.com/goharbor/harbor .
Authentication: access http://192.168.1.103 Enter the password to log in (the default account is admin, and the password is the one customized by the configuration file)
2.3. Harbor later modification configuration
Modify the configuration later. If you need to change the configuration after harbor runs for a period of time, the steps are as follows:
- Go to the harbor installation directory
root@z3:/usr/local/harbor# pwd
/usr/local/harbor
- Stop docker compose to start harbor related containers
root@z3:/usr/local/harbor# docker-compose stop
- Edit harbor.cfg Make relevant configuration
root@z3:/usr/local/harbor# vim harbor.cfg
- Updating the configuration will automatically clean up the previous build configuration files (such as key certificates)
root@z3:/usr/local/harbor# ./prepare
- Start harbor service
root@z3:/usr/local/harbor# docker-compose start
3. Use harbor and upload image
3.1 build harbor project
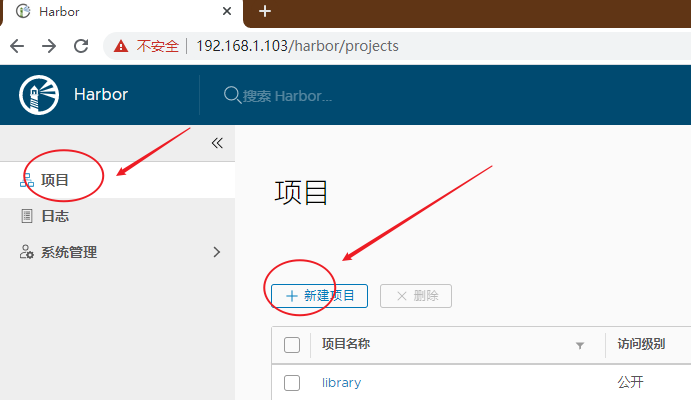
Click new project in the project
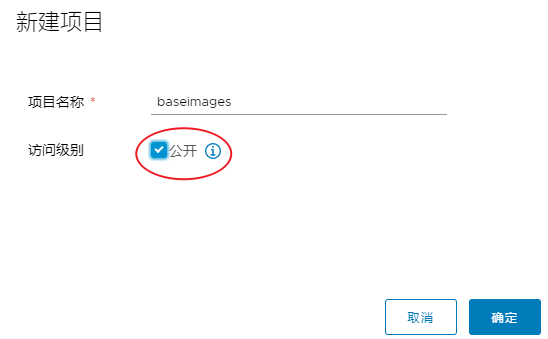
After the project name is filled in, the project must be selected to be open, otherwise even pulling the image must be logged into the warehouse, which is not convenient
3.2 label the old image
root@z2:~# docker images
REPOSITORY                       TAG                 IMAGE ID            CREATED             SIZE
ubuntu                           18.04               c3c304cb4f22        5 weeks ago         64.2MB
root@z2:~# docker tag ubuntu:18.04 192.168.1.103/baseimages/ubuntu:1804
Format: warehouse domain name or address / project name / image name: image version
3.3 upload image
root@z2:~# docker push 192.168.1.103/baseimages/ubuntu:1804
The push refers to repository [192.168.1.103/baseimages/ubuntu]
Get https://192.168.1.103/v2/: dial tcp 192.168.1.103:443: connect: connection refused
Direct upload will be rejected because upload requires permission and adding non secure warehouse
Set up non secure warehouse and restart
root@z2:~# vim /etc/docker/daemon.json
{
  "registry-mirrors": ["https://n0kig9se.mirror.aliyuncs.com"],
  "insecure-registries":["192.168.1.103"]
}
root@z2:~# systemctl restart docker
Try again. I can't find it
root@z2:~# docker push 192.168.1.103/baseimages/ubuntu:1804
The push refers to repository [192.168.1.103/baseimages/ubuntu]
28ba7458d04b: Preparing
838a37a24627: Preparing
a6ebef4a95c3: Preparing
b7f7d2967507: Preparing
denied: requested access to the resource is denied
Login warehouse validation
root@z2:~# docker login 192.168.1.103
Just try it
3.4 downloading images
Just add an insecure warehouse and restart docker
root@z1:~# vim  /etc/docker/daemon.json
{
  "registry-mirrors": ["https://n0kig8se.mirror.aliyuncs.com"],
  "insecure-registries":["192.168.1.103"]
}
root@z1:~# docker pull 192.168.1.103/baseimages/ubuntu:1804
1804: Pulling from baseimages/ubuntu
23884877105a: Pull complete
bc38caa0f5b9: Pull complete
2910811b6c42: Pull complete
36505266dcc6: Pull complete
Digest: sha256:b58746c8a89938b8c9f5b77de3b8cf1fe78210c696ab03a1442e235eea65d84f
4. Replication management of harbor
harbor can realize master-slave synchronization and improve service availability.
Prepare 2 servers first. 192.168.1.103,192.168.1.104.
The following implements one-way replication. 192.168.1.104 is the slave, copy the project content under 192.168.1.103/baseimages
4.1 create a new replication target
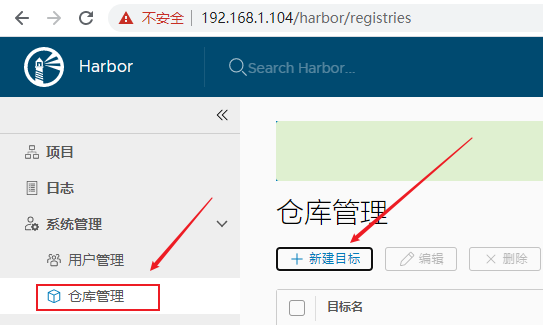
Click warehouse management new target under system management / warehouse management page
Be careful not to check verify remote certificates.
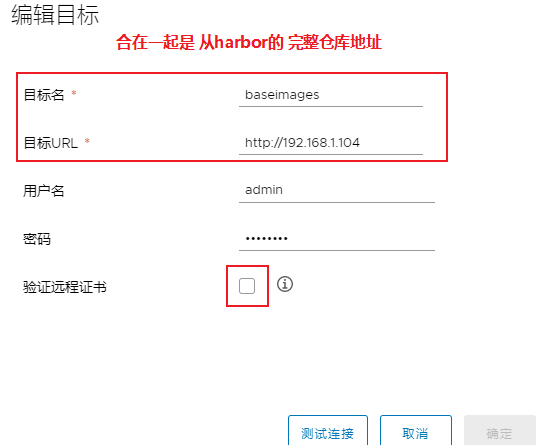
After filling in the information, you can click the method of testing the connection book to test whether the information filled in is correct
4.2 create a new rule in replication management
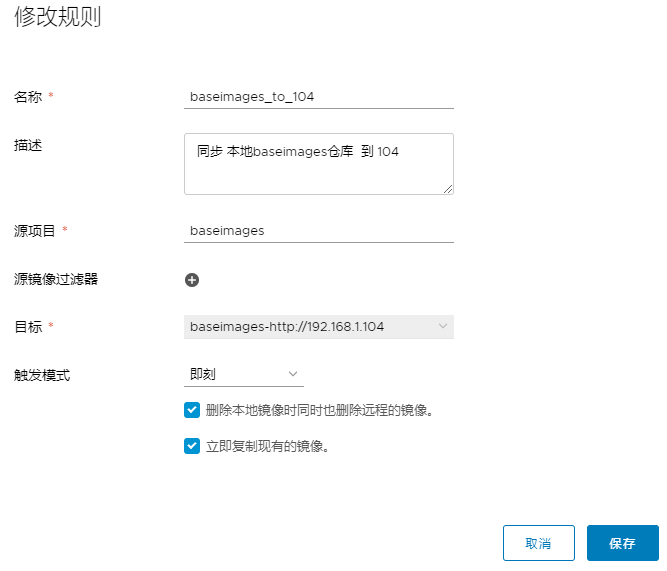
4.3 verify replication results
push any image on other machines, and there will be the same image on 104 machines
be careful:
-
When the master and slave are synchronized, the slave will automatically modify the warehouse address. For example, 192.168.1.103/baseimages/alpine:v1 Change to 192.168.1.104/baseimages/alpine:v1 .
-
If synchronization fails, you can check the log to find out the reason
