Install MySql database
Installation steps
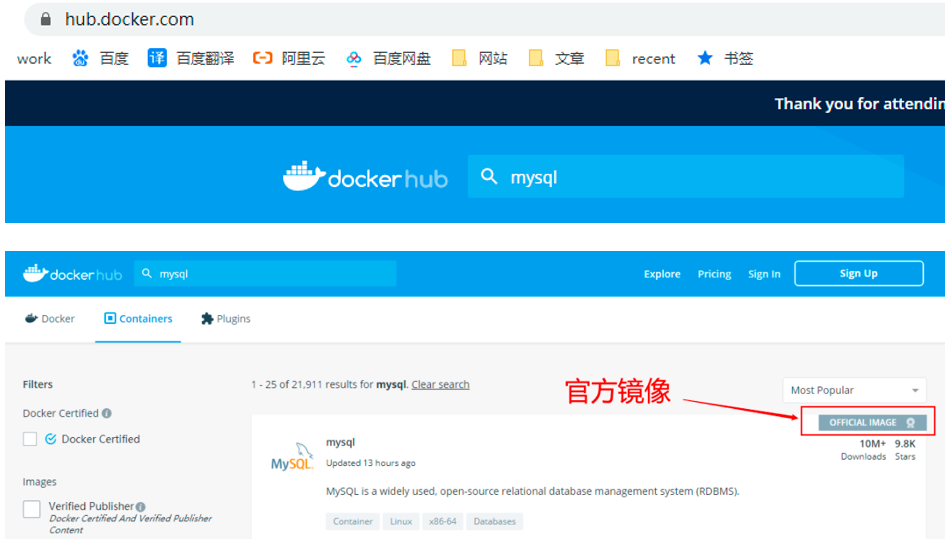
Step 1: in hub docker. Search mysql image on. Com
Step 2: pull the specified version of mysql. You can also specify the pull version, for example:
docker pull mysql:8.0.23
- 1
Step 3: check the mysql image
docker images
- 1
Step 4: start and run mysql image (docker run is used to start a container)
sudo docker run -p 3306:3306 --name mysql \
-v /usr/local/docker/mysql/mysql-files:/var/lib/mysql-files \
-v /usr/local/docker/mysql/conf:/etc/mysql \
-v /usr/local/docker/mysql/logs:/var/log/mysql \
-v /usr/local/docker/mysql/data:/var/lib/mysql \
-e MYSQL_ROOT_PASSWORD=root \
-d mysql:8.0.23
- 1
- 2
- 3
- 4
- 5
- 6
- 7
If the installation fails, you can view the previous container through docker ps -a. if it already exists, you can delete it through docker rm image id and reinstall it.
Log in to mysql service
Step 1: enter the container (exit for exiting the container)
sudo docker exec -it mysql bash
- 1
Step 2: log in (the default password is root), and be sure to enter the mysql container first.
mysql -uroot -proot
- 1
Stop and start mysql service
Stop mysql service (optional)
docker stop mysql
- 1
service mysql start
docker start mysql
- 1
If you want to view the log when MySQL is started, you can execute the command docker container logs mysql.
Set mysql startup self startup (optional)
docker update mysql --restart=always
- 1
Install Redis database
Installation steps
Step 1: download the image file
docker pull redis
- 1
Step 2: create a redis instance and start it
Create redis profile directory
mkdir -p /usr/local/docker/redis01/conf
- 1
Create redis. In the configuration file record Conf configuration file (because redis.conf in the redis image is a directory, you need to create this configuration file first, or it will become a directory in our local mount point)
touch /usr/local/docker/redis01/conf/redis.conf
- 1
sudo docker run -p 6379:6379 --name redis01 \
-v /usr/local/docker/redis01/data:/data \
-v /usr/local/docker/redis01/conf/redis.conf:/etc/redis/redis.conf \
-d redis redis-server /etc/redis/redis.conf
- 1
- 2
- 3
- 4
Step 3: view the running process
docker ps
- 1
Access redis server
Step 1: connect the console directly to redis test
docker exec -it redis01 bash
- 1
Step 2: check the redis version
redis-server -v
- 1
perhaps
redis-cli -v
- 1
Step 3: log in to redis (no password is required by default)
redis-cli
- 1
Or you can directly combine the above two steps into one step. The instructions are as follows:
docker exec -it redis01 redis-cli
- 1
Stop and start redis service
Stop redis service?
docker stop redis01
- 1
Start redis service?
docker start redis01
- 1
Restart redis service?
docker restart redis01
- 1
Install Ngnix agent
Installation steps
Step 1: pull the ngnix image (find it here at hub.docker.com)
docker pull nginx
- 1
Step 2: view the images Image
docker images
- 1
Step 3: create a data volume (this object will directly create a directory on the host)
docker volume create nginx-vol
- 1
Note: to view the host directory corresponding to the data volume, you can use the following instructions:
docker inspect container-vol
- 1
Step 4: start nginx service
docker run --name nginx -p 80:80 -v nginx-vol:/etc/nginx -d nginx
- 1
Where: / etc/nginx is the default decompression directory of nginx image files when the nginx container is started
Note: if you want to modify the nginx configuration in the future, you can modify it directly in the directory corresponding to the nginx Vol data volume
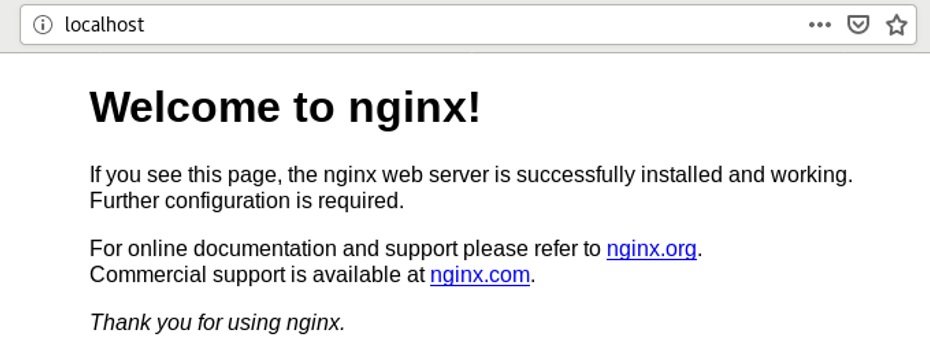
Accessing nginx services
Perform access detection, as shown in the figure:
Stop and nginx service
Stop nginx service
docker stop nginx
- 1
Start nginx service
docker start nginx
- 1
Restart nginx service
docker restart nginx
- 1
Installing Nacos components
Installation steps
Step 1: pull nacos (hub.docker.com)
docker pull nacos/nacos-server:1.4.1
- 1
Step 2: execute the sql script file of nacos in mysql
1) The file Nacos mysql Copy the SQL to the mount directory corresponding to the host of the MySQL container
2) Start and log in to mysql in linux environment
3) Run the sql file under the mount directory in the host machine through the source command
source /Container directory/nacos-mysql.sql
- 1
Step 3: create and start the nacos container
docker run  \
-e TZ="Asia/Shanghai" \
-e MODE=standalone \
-e SPRING_DATASOURCE_PLATFORM=mysql \
-e MYSQL_DATABASE_NUM=1 \
-e MYSQL_SERVICE_HOST=192.168.227.131 \
-e MYSQL_SERVICE_PORT=3306 \
-e MYSQL_SERVICE_USER=jason \
-e MYSQL_SERVICE_PASSWORD=jason \
-e MYSQL_SERVICE_DB_NAME=nacos_config \
-p 8848:8848 \
--name nacos \
--restart=always \
-d nacos/nacos-server:1.4.1
- 1
- 2
- 3
- 4
- 5
- 6
- 7
- 8
- 9
- 10
- 11
- 12
- 13
- 14
Parameter description
- Single node mode
MODE=standalone - Database address
MYSQL_SERVICE_HOST - Database user name
MYSQL_SERVICE_USER - Database password
MYSQL_SERVICE_PASSWORD - Name of database to be connected
MYSQL_SERVICE_DB_NAME - Port mapping
-p 8848:8848 - Restart the container at any time, and the container can be started automatically (docker needs to be set to start automatically)
--restart=always
- 1
Step 4: check the nacos service
docker ps
- 1
If the startup fails, check the startup log, for example:
docker container logs nacos
- 1
The startup log of nacos is in / home / nacos / logs / start Out file.
Accessing nacos services
Start Nacos, and then enter http://ip:port/nacos Access test
Stop and start the nacos service
Stop the nacos service
docker stop nacos
- 1
Start the nacos service
docker start nacos
- 1
Restart the nacos service
docker restart nacos
- 1
Summary
This chapter focuses on the installation and basic configuration of common image services. You need to master the basic process of image operation and solutions to problems.