1.1 Docker0 initial experience
1. Empty all containers of the server and all running images
docker rm -f $(docker ps -a -q)       # Delete all containers
docker rmi -f $(docker images -qa)      # Delete all mirrors
2. View the local ip and execute the command: ip addr
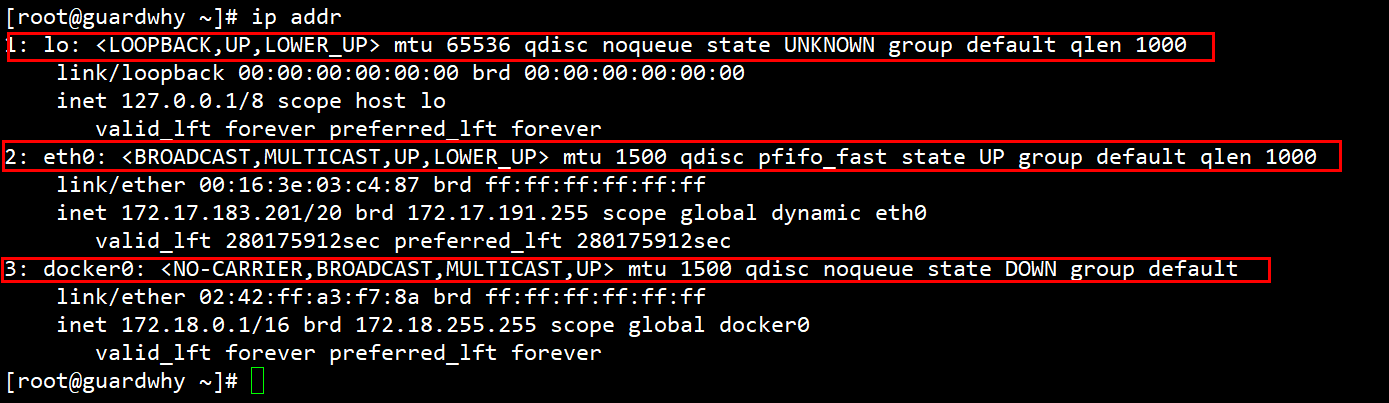
Network port analysis
1: lo: 127.0.0.1/8  #Local loopback address
2: eth0: 172.17.183.201 #Alibaba cloud intranet address
3: docker0: 172.18.0.1 # docker0 address
3. How does docker handle network access between containers?
# Start mytomcat01
[root@guardwhy ~]# docker run -d -P --name mytomcat01 tomcat
latest: Pulling from library/tomcat
42d8171e56e6: Pull complete
774078a3f8bb: Pull complete
Digest: sha256:71703331e3e7f8581f2a8206a612dbeedfbc7bb8caeee972eadca1cc4a72e6b1
Status: Downloaded newer image for tomcat:latest
eb4d1a5d5884ab76d06aaa6b1209d96905f0f822b78ca0ce82bea6a1532c9566

# View the internal network address of the container: ip addr
# When the container starts, you will get a eth0@if33 This is the IP address assigned by docker!!!
[root@guardwhy ~]# docker exec -it mytomcat01 ip addr
1: lo: <LOOPBACK,UP,LOWER_UP> mtu 65536 qdisc noqueue state UNKNOWN group default qlen 1000
    link/loopback 00:00:00:00:00:00 brd 00:00:00:00:00:00
    inet 127.0.0.1/8 scope host lo
       valid_lft forever preferred_lft forever
32: eth0@if33: <BROADCAST,MULTICAST,UP,LOWER_UP> mtu 1500 qdisc noqueue state UP group default
    link/ether 02:42:ac:12:00:02 brd ff:ff:ff:ff:ff:ff link-netnsid 0
    inet 172.18.0.2/16 brd 172.18.255.255 scope global eth0
       valid_lft forever preferred_lft forever


## The host can ping through the container!!
[root@guardwhy ~]# ping 172.18.0.2
PING 172.18.0.2 (172.18.0.2) 56(84) bytes of data.
64 bytes from 172.18.0.2: icmp_seq=1 ttl=64 time=0.088 ms
64 bytes from 172.18.0.2: icmp_seq=2 ttl=64 time=0.070 ms
64 bytes from 172.18.0.2: icmp_seq=3 ttl=64 time=0.050 ms
64 bytes from 172.18.0.2: icmp_seq=4 ttl=64 time=0.070 ms
[root@guardwhy ~]#
Summary: docker will assign an ip to each container, and containers and containers can access each other.
Principle analysis
1. Whenever a docker container is started, docker will assign an ip to the docker container. As long as docker is installed, there will be a network card docker0.
2. Note: This is a bridging mode, using evth pair technology.
## Check the ip addr of the host again
[root@guardwhy ~]# ip addr
1: lo: <LOOPBACK,UP,LOWER_UP> mtu 65536 qdisc noqueue state UNKNOWN group default qlen 1000
    link/loopback 00:00:00:00:00:00 brd 00:00:00:00:00:00
    inet 127.0.0.1/8 scope host lo
       valid_lft forever preferred_lft forever
2: eth0: <BROADCAST,MULTICAST,UP,LOWER_UP> mtu 1500 qdisc pfifo_fast state UP group default qlen 1000
    link/ether 00:16:3e:03:c4:87 brd ff:ff:ff:ff:ff:ff
    inet 172.17.183.201/20 brd 172.17.191.255 scope global dynamic eth0
       valid_lft 280172255sec preferred_lft 280172255sec
3: docker0: <BROADCAST,MULTICAST,UP,LOWER_UP> mtu 1500 qdisc noqueue state UP group default
    link/ether 02:42:ff:a3:f7:8a brd ff:ff:ff:ff:ff:ff
    inet 172.18.0.1/16 brd 172.18.255.255 scope global docker0
       valid_lft forever preferred_lft forever
## Originally, there were three networks. After starting a tomcat container, there was an if33 network!!!
33: vethdeea84c@if32: <BROADCAST,MULTICAST,UP,LOWER_UP> mtu 1500 qdisc noqueue master docker0 state UP group default
    link/ether fe:d3:88:7b:b5:85 brd ff:ff:ff:ff:ff:ff link-netnsid 0
[root@guardwhy ~]#
3. Every time a container is started, a virtual network card will be added to the linux host.
[root@guardwhy ~]# docker run -d -P --name mytomcat02 tomcat
1f2a56ea7754f4c31a7713c840baa5af163a78332bb3a1edcc9e670d3718af3a
[root@guardwhy ~]# docker exec -it mytomcat02 ip addr
1: lo: <LOOPBACK,UP,LOWER_UP> mtu 65536 qdisc noqueue state UNKNOWN group default qlen 1000
    link/loopback 00:00:00:00:00:00 brd 00:00:00:00:00:00
    inet 127.0.0.1/8 scope host lo
       valid_lft forever preferred_lft forever
34: eth0@if35: <BROADCAST,MULTICAST,UP,LOWER_UP> mtu 1500 qdisc noqueue state UP group default
    link/ether 02:42:ac:12:00:03 brd ff:ff:ff:ff:ff:ff link-netnsid 0
    inet 172.18.0.3/16 brd 172.18.255.255 scope global eth0
       valid_lft forever preferred_lft forever
## Check the ip addr of the host again
[root@guardwhy ~]# ip addr
1: lo: <LOOPBACK,UP,LOWER_UP> mtu 65536 qdisc noqueue state UNKNOWN group default qlen 1000
    link/loopback 00:00:00:00:00:00 brd 00:00:00:00:00:00
    inet 127.0.0.1/8 scope host lo
       valid_lft forever preferred_lft forever
2: eth0: <BROADCAST,MULTICAST,UP,LOWER_UP> mtu 1500 qdisc pfifo_fast state UP group default qlen 1000
    link/ether 00:16:3e:03:c4:87 brd ff:ff:ff:ff:ff:ff
    inet 172.17.183.201/20 brd 172.17.191.255 scope global dynamic eth0
       valid_lft 280169868sec preferred_lft 280169868sec
3: docker0: <BROADCAST,MULTICAST,UP,LOWER_UP> mtu 1500 qdisc noqueue state UP group default
    link/ether 02:42:ff:a3:f7:8a brd ff:ff:ff:ff:ff:ff
    inet 172.18.0.1/16 brd 172.18.255.255 scope global docker0
       valid_lft forever preferred_lft forever
## Originally, there were three networks. After starting two tomcat containers, there was an if33 and if35 network!!!
33: vethdeea84c@if32: <BROADCAST,MULTICAST,UP,LOWER_UP> mtu 1500 qdisc noqueue master docker0 state UP group default
    link/ether fe:d3:88:7b:b5:85 brd ff:ff:ff:ff:ff:ff link-netnsid 0
35: veth62d856a@if34: <BROADCAST,MULTICAST,UP,LOWER_UP> mtu 1500 qdisc noqueue master docker0 state UP group default
    link/ether 1e:fa:6d:dd:06:12 brd ff:ff:ff:ff:ff:ff link-netnsid 1
[root@guardwhy ~]#
4. Summary:
This container brings network cards, which are one-to-one.
Veth pair is a pair of virtual device interfaces, which appear in pairs. One end is connected to the protocol stack and the other end is connected to each other.
Because of this feature, evth pair acts as a bridge to connect various virtual network devices.
The connection between OpenStack, Docker containers and OVS all use evth pair technology.
5. Test whether mytomcat01 and mytomcat02 containers can ping each other?
docker exec -it mytomcat02 ping 172.18.0.2
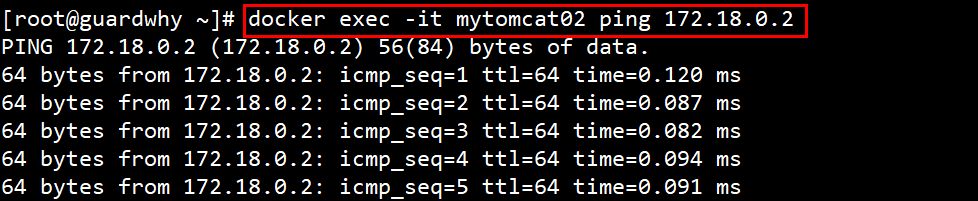
Conclusion: containers and containers can access each other.
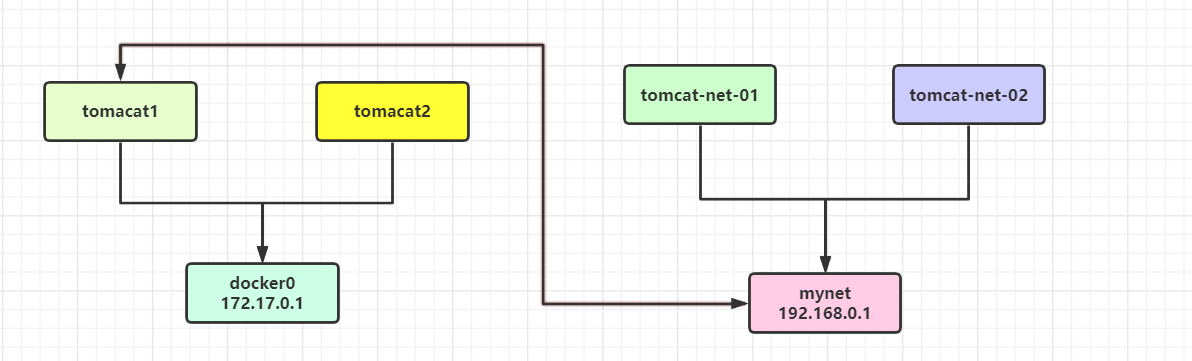
6. Draw a network model diagram
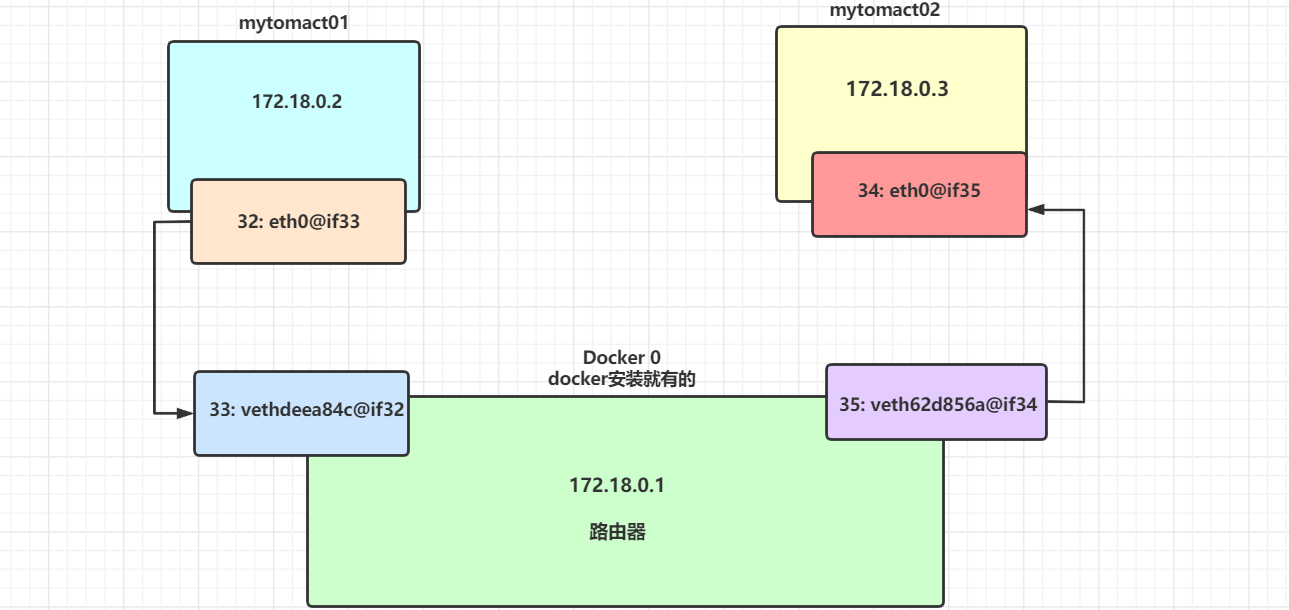
Conclusion: mytomcat01 and tomcat02 share the same router (docker0). By default, the docker0 network is used when any container is started, and docker will assign an available ip to the container by default.
7. Docker0 summary
Docker uses Linux bridging. A docker container bridge (docker0) is virtualized in the host. When docker starts a container, it will assign an IP address to the container according to the network segment of docker bridge, which is called container IP. At the same time, docker bridge is the default gateway of each container. Because the containers in the same host are connected to the same bridge, the containers can be directly connected through the container IP of the container
signal communication.
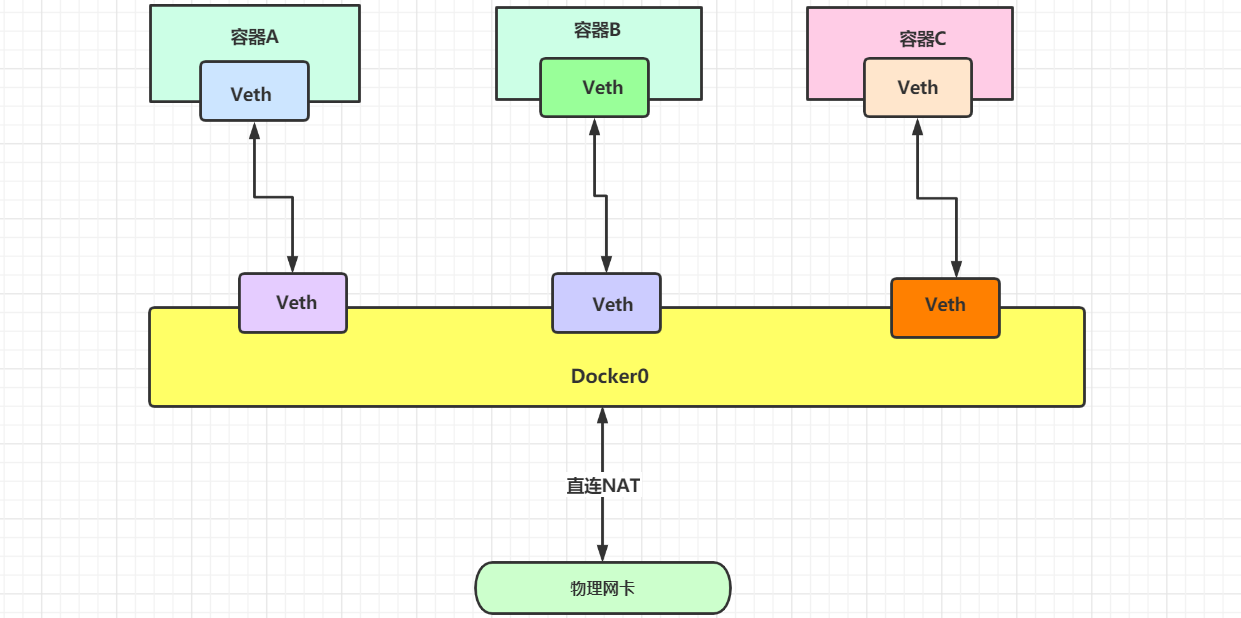
All network interfaces in Docker are virtual, and virtual forwarding efficiency is high!! (transfer files through intranet). As long as the container is deleted, the corresponding bridge pair will disappear..
1.2 custom network
1. Basic command view
docker network --help

2. View all networks
[root@guardwhy ~]# docker network ls
NETWORK ID          NAME                DRIVER              SCOPE
835529da25a3        bridge              bridge              local
12b6d842b3ab        host                host                local
6b4770ba279b        none                null                local
[root@guardwhy ~]#
| Network mode | to configure | Specify |
|---|---|---|
| bridge mode | –net=bridge | By default, a new network stack is created for the container on Docker bridge docker0. |
| none mode | –net=none | Do not configure the network. |
| container mode | – net=container:name/id | Container network connection!! (use less!! very limited) |
| host mode | –net=host | Container and host share Network namespace |
| User defined | – net = custom network | Users define the network and create the container by using network related commands When you can specify your own defined network |
3. Delete all original containers
[root@guardwhy ~]# docker rm -f $(docker ps -aq)
Remove one or more containers

# Back to the beginning
[root@guardwhy ~]# ip addr
1: lo: <LOOPBACK,UP,LOWER_UP> mtu 65536 qdisc noqueue state UNKNOWN group default qlen 1000
    link/loopback 00:00:00:00:00:00 brd 00:00:00:00:00:00
    inet 127.0.0.1/8 scope host lo
       valid_lft forever preferred_lft forever
2: eth0: <BROADCAST,MULTICAST,UP,LOWER_UP> mtu 1500 qdisc pfifo_fast state UP group default qlen 1000
    link/ether 00:16:3e:03:c4:87 brd ff:ff:ff:ff:ff:ff
    inet 172.17.183.201/20 brd 172.17.191.255 scope global dynamic eth0
       valid_lft 280125789sec preferred_lft 280125789sec
3: docker0: <NO-CARRIER,BROADCAST,MULTICAST,UP> mtu 1500 qdisc noqueue state DOWN group default
    link/ether 02:42:ff:a3:f7:8a brd ff:ff:ff:ff:ff:ff
    inet 172.18.0.1/16 brd 172.18.255.255 scope global docker0
       valid_lft forever preferred_lft forever
[root@guardwhy ~]#
Note: all containers created by default are docker0 network cards
# Characteristics of docker0 network
1.It is the default
2.Domain name access is blocked
3.--link The domain name passes, but it can't be deleted
4. Create a container using a custom network
View command: docker network create --help
[root@guardwhy ~]# docker network create --help

Usage:	docker network create [OPTIONS] NETWORK

Create a network

Options:
      --attachable           Enable manual container attachment
      --aux-address map      Auxiliary IPv4 or IPv6 addresses used by Network driver (default map[])
      --config-from string   The network from which copying the configuration
      --config-only          Create a configuration only network
  -d, --driver string        Driver to manage the Network (default "bridge")
      --gateway strings      IPv4 or IPv6 Gateway for the master subnet
      --ingress              Create swarm routing-mesh network
      --internal             Restrict external access to the network
      --ip-range strings     Allocate container ip from a sub-range
      --ipam-driver string   IP Address Management Driver (default "default")
      --ipam-opt map         Set IPAM driver specific options (default map[])
      --ipv6                 Enable IPv6 networking
      --label list           Set metadata on a network
  -o, --opt map              Set driver specific options (default map[])
      --scope string         Control the network's scope
      --subnet strings       Subnet in CIDR format that represents a network segment
[root@guardwhy ~]#
Custom create a network
## --driver bridge bridge
## --subnet 192.168.0.0/16 subnet
## --gateway 192.168.0.1 gateway
[root@guardwhy ~]# docker network create --driver bridge --subnet 192.168.0.0/16 --gateway 192.168.0.1 mynet
9f140b28095cf395ead5572e3dd5189519380ba3ea8fcd7cdf98e65f25d534f4
[root@guardwhy ~]# docker network ls
NETWORK ID          NAME                DRIVER              SCOPE
835529da25a3        bridge              bridge              local
12b6d842b3ab        host                host                local
9f140b28095c        mynet               bridge              local
6b4770ba279b        none                null                local

# View the network and execute the command ` docker network inspect mynet`
[root@guardwhy ~]# docker network inspect mynet
[
    {
        "Name": "mynet",
        "Id": "9f140b28095cf395ead5572e3dd5189519380ba3ea8fcd7cdf98e65f25d534f4",
        "Created": "2021-06-12T16:22:33.929558248+08:00",
        "Scope": "local",
        "Driver": "bridge",
        "EnableIPv6": false,
        "IPAM": {
            "Driver": "default",
            "Options": {},
            "Config": [
                {	# network
                    "Subnet": "192.168.0.0/16",
                    "Gateway": "192.168.0.1"
                }
            ]
        },
        "Internal": false,
        "Attachable": false,
        "Ingress": false,
        "ConfigFrom": {
            "Network": ""
        },
        "ConfigOnly": false,
        "Containers": {},
        "Options": {},
        "Labels": {}
    }
]
[root@guardwhy ~]#
5. Customize two containers and use your own mynet.
[root@guardwhy ~]# docker run -d -P --name tomcat-net-01 --net mynet tomcat
Digest: sha256:71703331e3e7f8581f2a8206a612dbeedfbc7bb8caeee972eadca1cc4a72e6b1
afa85e96d4f5ded21769674438d3f70b8eda2c1ea229a87e055d23ac49b1a024
[root@guardwhy ~]# docker run -d -P --name tomcat-net-02 --net mynet tomcat
68dabac6d09369bd3f39191bc08b954123cfc177af06aba5263a2e4fd5b6bdaf

## View mirror
[root@guardwhy ~]# docker ps
CONTAINER ID        IMAGE               COMMAND             CREATED              STATUS              PORTS                     NAMES
68dabac6d093        tomcat              "catalina.sh run"   About a minute ago   Up About a minute   0.0.0.0:32777->8080/tcp   tomcat-net-02
afa85e96d4f5        tomcat              "catalina.sh run"   About a minute ago   Up About a minute   0.0.0.0:32776->8080/tcp   tomcat-net-01

# View the network and execute the command ` docker network inspect mynet`
[root@guardwhy ~]# docker network inspect mynet
[
    {
        "Name": "mynet",
        "Id": "9f140b28095cf395ead5572e3dd5189519380ba3ea8fcd7cdf98e65f25d534f4",
        "Created": "2021-06-12T16:22:33.929558248+08:00",
        "Scope": "local",
        "Driver": "bridge",
        "EnableIPv6": false,
        "IPAM": {
            "Driver": "default",
            "Options": {},
            "Config": [
                {
                    "Subnet": "192.168.0.0/16",
                    "Gateway": "192.168.0.1"
                }
            ]
        },
        "Internal": false,
        "Attachable": false,
        "Ingress": false,
        "ConfigFrom": {
            "Network": ""
        },
        "ConfigOnly": false,
        "Containers": {
            "68dabac6d09369bd3f39191bc08b954123cfc177af06aba5263a2e4fd5b6bdaf": {
                "Name": "tomcat-net-02",
                "EndpointID": "a153fdec599850124a3610716e7e174eb1992079a353cb3903fc00c85465ec20",
                "MacAddress": "02:42:c0:a8:00:03",
                "IPv4Address": "192.168.0.3/16",
                "IPv6Address": ""
            },
            "afa85e96d4f5ded21769674438d3f70b8eda2c1ea229a87e055d23ac49b1a024": {
                "Name": "tomcat-net-01",
                "EndpointID": "0a41c7b5ebf089e9114268891f67df4595e856185543b69c06c3dc39edcbe357",
                "MacAddress": "02:42:c0:a8:00:02",
                "IPv4Address": "192.168.0.2/16",
                "IPv6Address": ""
            }
        },
        "Options": {},
        "Labels": {}
    }
]
[root@guardwhy ~]#
6. Test whether containers can ping each other
# 1. Test ping connection (ip address)
[root@guardwhy ~]# docker exec -it tomcat-net-01 ping 192.168.0.3
PING 192.168.0.3 (192.168.0.3) 56(84) bytes of data.
64 bytes from 192.168.0.3: icmp_seq=1 ttl=64 time=0.120 ms
64 bytes from 192.168.0.3: icmp_seq=2 ttl=64 time=0.087 ms
64 bytes from 192.168.0.3: icmp_seq=3 ttl=64 time=0.095 ms
64 bytes from 192.168.0.3: icmp_seq=4 ttl=64 time=0.085 ms

# 2. Test the ping connection (container name). Now you don't need to use -- link to ping
[root@guardwhy ~]# docker exec -it tomcat-net-01 ping tomcat-net-02
PING tomcat-net-02 (192.168.0.3) 56(84) bytes of data.
64 bytes from tomcat-net-02.mynet (192.168.0.3): icmp_seq=1 ttl=64 time=0.073 ms
64 bytes from tomcat-net-02.mynet (192.168.0.3): icmp_seq=2 ttl=64 time=0.085 ms
[root@guardwhy ~]#
Summary:
The customized network docker has helped us maintain the corresponding relationship. It is recommended to use the network in this way!!!
Benefits:
Redis and Mysql - different clusters use different networks to ensure that the cluster is safe and healthy.
1.3 network connectivity
1. docker0 and the user-defined network certainly do not work. The advantage of using the user-defined network is network isolation. How can tomcat-net-01 access tomcat1?
2. Case description
# 0. View existing running containers
[root@guardwhy ~]# docker ps -a
CONTAINER ID        IMAGE               COMMAND             CREATED             STATUS              PORTS                     NAMES
68dabac6d093        tomcat              "catalina.sh run"   4 hours ago         Up 4 hours          0.0.0.0:32777->8080/tcp   tomcat-net-02
afa85e96d4f5        tomcat              "catalina.sh run"   4 hours ago         Up 4 hours          0.0.0.0:32776->8080/tcp   tomcat-net-01

# 1. Start the default container under docker0 network
[root@guardwhy ~]# docker run -d -P --name tomcat01 tomcat
39506e89093fa3923bfd840d3f9c0223ba09c3a01fce5d000464149b87509563
[root@guardwhy ~]# docker run -d -P --name tomcat02 tomcat
f0a1b251d28519f6360b7340befbd57acb2c974b7cae678b4c0eea6194e7971e

# 2. View current container
[root@guardwhy ~]# docker ps
CONTAINER ID        IMAGE               COMMAND             CREATED             STATUS              PORTS                     NAMES
f0a1b251d285        tomcat              "catalina.sh run"   8 seconds ago       Up 8 seconds        0.0.0.0:32779->8080/tcp   tomcat02
39506e89093f        tomcat              "catalina.sh run"   18 seconds ago      Up 18 seconds       0.0.0.0:32778->8080/tcp   tomcat01
68dabac6d093        tomcat              "catalina.sh run"   4 hours ago         Up 4 hours          0.0.0.0:32777->8080/tcp   tomcat-net-02
afa85e96d4f5        tomcat              "catalina.sh run"   4 hours ago         Up 4 hours          0.0.0.0:32776->8080/tcp   tomcat-net-01

# 3. Check the network help and find a command connect
[root@guardwhy ~]# docker network --help
Commands:
	# Connect a container to a network
  connect     Connect a container to a network
  create      Create a network
  disconnect  Disconnect a container from a network
  inspect     Display detailed information on one or more networks
  ls          List networks
  prune       Remove all unused networks
  rm          Remove one or more networks

 # 4. Test to get through mynet-docker0. Basic syntax: ` docker network connect [OPTIONS] NETWORK CONTAINER`
[root@guardwhy ~]# docker network connect mynet tomcat01
[root@guardwhy ~]# docker network inspect mynet
[
    {
        "Name": "mynet",
        "Id": "9f140b28095cf395ead5572e3dd5189519380ba3ea8fcd7cdf98e65f25d534f4",
        "Created": "2021-06-12T16:22:33.929558248+08:00",
        "Scope": "local",
        "Driver": "bridge",
        "EnableIPv6": false,
        "IPAM": {
            "Driver": "default",
            "Options": {},
            "Config": [
                {
                    "Subnet": "192.168.0.0/16",
                    "Gateway": "192.168.0.1"
                }
            ]
        },
        "Internal": false,
        "Attachable": false,
        "Ingress": false,
        "ConfigFrom": {
            "Network": ""
        },
        "ConfigOnly": false,
        "Containers": {
            "39506e89093fa3923bfd840d3f9c0223ba09c3a01fce5d000464149b87509563": {
            	# After connecting, tomcat01 is placed under the mynet network. A container has two IP addresses, similar to the public IP and private IP of Alibaba cloud services.
                "Name": "tomcat01",
                "EndpointID": "6608306aa8fd6144bf8f74451cca8cb5a1dac6ffa314a8cd604253eaeaf84608",
                "MacAddress": "02:42:c0:a8:00:04",
                "IPv4Address": "192.168.0.4/16",
                "IPv6Address": ""
            },
            "68dabac6d09369bd3f39191bc08b954123cfc177af06aba5263a2e4fd5b6bdaf": {
                "Name": "tomcat-net-02",
                "EndpointID": "a153fdec599850124a3610716e7e174eb1992079a353cb3903fc00c85465ec20",
                "MacAddress": "02:42:c0:a8:00:03",
                "IPv4Address": "192.168.0.3/16",
                "IPv6Address": ""
            },
            "afa85e96d4f5ded21769674438d3f70b8eda2c1ea229a87e055d23ac49b1a024": {
                "Name": "tomcat-net-01",
                "EndpointID": "0a41c7b5ebf089e9114268891f67df4595e856185543b69c06c3dc39edcbe357",
                "MacAddress": "02:42:c0:a8:00:02",
                "IPv4Address": "192.168.0.2/16",
                "IPv6Address": ""
            }
        },
        "Options": {},
        "Labels": {}
    }
]
# 5. OK, tomcat01 can ping
[root@guardwhy ~]# docker exec -it tomcat01 ping tomcat-net-01
PING tomcat-net-01 (192.168.0.2) 56(84) bytes of data.
64 bytes from tomcat-net-01.mynet (192.168.0.2): icmp_seq=1 ttl=64 time=0.114 ms
64 bytes from tomcat-net-01.mynet (192.168.0.2): icmp_seq=2 ttl=64 time=0.103 ms
64 bytes from tomcat-net-01.mynet (192.168.0.2): icmp_seq=3 ttl=64 time=0.106 ms

# tomcat02 is still unable to ping
[root@guardwhy ~]# docker exec -it tomcat02 ping tomcat-net-01
ping: tomcat-net-01: Name or service not known
[root@guardwhy ~]#
3. Summary
If you want to operate others across the network, you need to use docker network connect [OPTIONS] NETWORKCONTAINER to connect.