Docker installation
1, Install Docker
1. Uninstall old version
yum remove docker \
           docker-client \
           docker-client-latest \
           docker-common \
           docker-latest \
           docker-latest-logrotate \
           docker-logrotate \
           docker-engine
2. Required installation package
yum install -y yum-utils
3. Set up a mirrored warehouse
yum-config-manager \
    --add-repo \
    https://download.docker.com/linux/centos/docker-ce.repo
#Alibaba cloud
yum-config-manager \
   --add-repo \
   http://mirrors.aliyun.com/docker-ce/linux/centos/docker-ce.repo
Update yum package index
yum makecache fast
4. Install docker
yum install docker-ce docker-ce-cli containerd.io
5. Start docker
systemctl start docker
6. Uninstall docker
#1. Unload dependency
yum remove docker-ce docker-ce-cli containerd.io

#2. Delete resource
rm -rf /var/lib/docker
rm -rf /var/lib/containerd
2, Configure Docker image acceleration
mkdir -p /etc/docker

vim /etc/docker/daemon.json

#Edit content
{
  "registry-mirrors" : [
    "https://registry.docker-cn.com",
    "https://docker.mirrors.ustc.edu.cn",
    "http://hub-mirror.c.163.com",
    "https://cr.console.aliyun.com/"
  ]
}

systemctl daemon-reload

systemctl restart docker
Docker common commands
1, Help command
docker version  # Displays the version information of docker
docker info     # Displays the system information of docker, including the number of images and containers
docker --help   # Help command
2, Mirror common commands
docker images  # List all local mirrors

docker search Image name  #Search image

docker pull Image name[:tag]    #Download image tag version

docker rmi -f Image name, image id    #delete mirror
docker rmi -f image id image id image id   #Delete multiple mirrors
docker rmi -f $(docker images -aq) #Delete all mirrors
3, Container common commands
Note: a container can only be created with a mirror
1. Create a new container and start
docker run [Optional parameters]  image

#Parameter description
--name="Name"   # Container name, used to distinguish containers
-d              # Run in background mode
-it             # Run in interactive mode and enter the container to view the content
-p              # Specify the port of the container -p 8080:8080
		-p ip:Host port: container port
		-p Host port: container port
		-p Container port
-P              # Randomly assigned port

#Test, start and enter the container
docker run -it centos /bin/bash

#Exit container
exit
2. List all running containers
docker ps
			# Lists currently running containers
-a          # List all containers
-n=?        # Lists recently created containers
-q          # Displays only the number of the container
3. Exit container
exit           # Direct container exit and stop operation

ctrl + p + q   # The container does not stop exiting
4. Delete container
docker rm container id [Container name]       # Delete the specified container. You cannot delete a running container
docker rm -f $(docker ps -aq) # Delete all
5. Start and stop container operation
docker start   container id    # Start container
docker restart container id    # Restart container
docker stop    container id    # Stop the currently running container
docker kill    container id    # Force stop of current container
4, Common other commands
Background startup container
docker run -d Image name

# Common pitfalls: when the docker container runs in the background, there must be a foreground process. Docker will stop if it finds no application
view log
docker logs -f -t --tail Number of containers

-tf            # Show log
--tail number  # Number of logs to display
View process information in container
docker top container id
View metadata for container
docker inspect container id
Enter the currently running container
# The container usually runs in the background mode. You need to enter the container and modify some configurations

docker exec -it container id /bin/bash  # After entering the container, open a new terminal (common)

docker attach container id         # Entering the terminal where the container is executing will not start a new terminal
Copy files from container to host
docker cp container id: Host path for in container destination

docker cp f2503442275e:/home/test.txt /home
commit image
docker commit Submit the container as a new copy

docker commit -m="Description information submitted" -a="author" container id Target image name:[TAG]
Container data volume
1, What is a container data volume
data If the data is in the image, delete the container and the data will be lost! Requirements: Data Persistence
Mysql, delete the container, delete the library and run! Requirement: MySQL data can be stored locally!
There can be a data sharing technology between containers! Synchronize the data generated in Docker container to the local!
This is volume technology! Directory mount, let's talk about the directory in our container and mount it to linux!
2, Using data volumes
Method 1: directly use the command to mount - v
docker run -it -v Native Directory: container directory   # Mount the container directory to the host directory

#test
docker run -it -v /home/test:/home centos /bin/bash

If the data in the container cannot be modified locally, the modified local data will be synchronized to the container
3, Actual combat: install mysql
Thinking: data persistence of Mysql!
# Get container
docker pull mysql:5.6

# To run the container, you need to mount the data
docker run -d -p 3310:3306 -v /home/mysql/conf:/etc/mysql/conf.d -v /home/mysql/data:/var/lib/mysql -e MYSQL_ROOT_PASSWORD=123456  --name mysql01 mysql:5.6
4, Named and anonymous mount
# Anonymous mount
-v Path in container!
docker run -d -P --name nginx01 -v /etc/nginx nginx

# View all volume s
docker volume ls

[root@whisper data]# docker volume ls
DRIVER    VOLUME NAME
local     e195fbdecf684e410ea7334de6cb21ac226789e78c53661b9b0c349f2ef91f8c

# This is anonymous mount. We only write the path inside the container in -v, not the path outside the container!

# Named mount
docker run -d -P --name nginx02 -v juming-nginx:/etc/nginx nginx

[root@whisper data]# docker volume ls
DRIVER    VOLUME NAME
local     juming-nginx

# Via -v volume name: path within container
#Take a look at this volume
docker volume inspect juming-nginx

[root@whisper data]# docker volume inspect juming-nginx
[
    {
        "CreatedAt": "2021-07-02T17:11:32+08:00",
        "Driver": "local",
        "Labels": null,
        "Mountpoint": "/var/lib/docker/volumes/juming-nginx/_data",
        "Name": "juming-nginx",
        "Options": null,
        "Scope": "local"
    }
]
be-all docker The volumes in the container are stored in the container without a specified directory /var/lib/docker/volumes/xxxx/_data Directory
 We can easily find one of our volumes through named mount. In most cases, named mount is used
# How to determine whether a named mount or an anonymous mount or a specified path mount

-v In container path             # Anonymous mount
-v Volume name:In container path         # Named mount
-v /Host path: path within container   # Specified path mount
expand:
# Change read and write permissions through - v path in container: ro rw
ro  readonly  # read-only
rw  readwrite # Readable and writable

#When the container permission is set, the container limits the content we mount
docker run -d -P --name nginx02 -v juming-nginx:/etc/nginx:ro nginx
docker run -d -P --name nginx02 -v juming-nginx:/etc/nginx:rw nginx

# When ro sees RO, it means that this path can only be operated by the host, and cannot be modified inside the container
Dockerfile
1, Dockerfile introduction
dockerfile is the file used to build the docker image! Command parameter script!
Construction steps:
1. Write a dockerfile file;
2. docker build builds an image;
3. docker run runs the image;
4. docker push releases images (DockerHub, Alibaba cloud image warehouse);
2, DockerFile construction process
Basics:
1. Each reserved keyword (instruction) must be an uppercase letter;
2. Execution sequence from top to bottom;
3. # indicates a comment;
4. Each instruction will create and submit a new image layer;
DockerFile is development oriented;
DockerFile: build file, which defines all steps and source code;
DockerImages: images generated through DockerFile construction, and products finally released and run;
Docker container: a container is an image running to provide a server;
3, DockerFile instruction
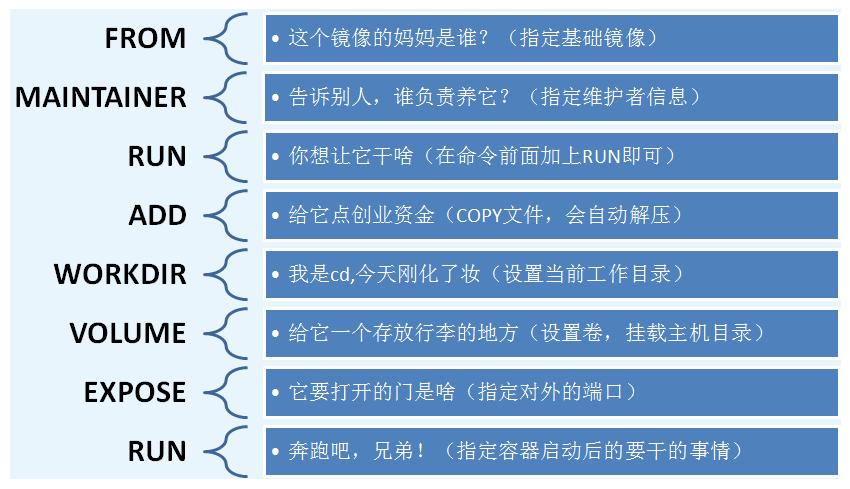
FROM       # Basic image, everything starts from here
MAINTAINER # Who wrote the image, name + email
RUN        # Commands to run during image construction
ADD        # Step, adding content
WORKDIR    # Mirrored working directory
VOLUME     # Mounted directory
EXPOSE     # Exposed port configuration
CMD        # Specify the command to run when the container starts. Only the last one will take effect and can be replaced
ENTRYPOINT # Specify the command to run when the container starts, and you can append the command
ONBUILD    # When an inherited DockFile is built, the ONBUILD instruction will be run to trigger the instruction
COPY       # Similar to ADD, copy our files to the image
ENV        # Set environment variables during construction!
4, Actual test
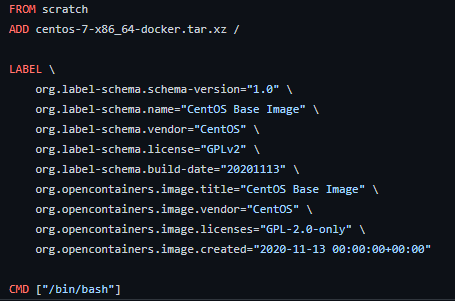
99% of the images in DockerHub are FROM scratch, and then the required software and configuration are configured for construction;
Create your own centos
# 1. Writing DockerFile files
[root@whisper local]# cat DockerFile
FROM centos

MAINTAINER whisper<whisper57124@gmail.com>

ENV MYPATH /usr/local

WORKDIR $MYPATH

run yum -y install vim
run yum -y install net-tools

EXPOSE 80

CMD echo $MYPATH
CMD echo "----end----"
CMD /bin/bash

# 2. Building images from files
# Command docker build -f dockerfile file path - t image name: [tag]
docker build -f DockerFile -t mycentos:1.0 .

# 3. Test run
docker run -it --name mycentos mycentos:1.0
We can list the change history of the image
docker history image id

[root@whisper dockerfile]# docker history 8bf89c6c80c7
IMAGE          CREATED          CREATED BY                                      SIZE      COMMENT
8bf89c6c80c7   2 minutes ago    /bin/sh -c #(nop)  CMD ["/bin/sh" "-c" "/bin...   0B
4b2fb9a476e0   2 minutes ago    /bin/sh -c #(nop)  CMD ["/bin/sh" "-c" "echo...   0B
be2af22b75af   2 minutes ago    /bin/sh -c #(nop)  CMD ["/bin/sh" "-c" "echo...   0B
1b14b6727c99   2 minutes ago    /bin/sh -c #(nop)  EXPOSE 80                    0B
6497b2e5b8df   2 minutes ago    /bin/sh -c yum -y install net-tools             37.8MB
b42d22c8740a   27 minutes ago   /bin/sh -c #(nop) WORKDIR /usr/local            0B
7fc1cce57a21   27 minutes ago   /bin/sh -c #(nop)  ENV MYPATH=/usr/local        0B
ff7f4f437dba   27 minutes ago   /bin/sh -c #(nop)  MAINTAINER whisper<whispe...   0B
300e315adb2f   7 months ago     /bin/sh -c #(nop)  CMD ["/bin/bash"]            0B
<missing>      7 months ago     /bin/sh -c #(nop)  LABEL org.label-schema.sc...   0B
<missing>      7 months ago     /bin/sh -c #(nop) ADD file:bd7a2aed6ede423b7...   209MB
5, Publish your own image
DockerHub
1. Address https://hub.docker.com/ Register your account
2. Make sure this account can log in
3. Submit your own image on our server
root@VM-0-4-debian:~# docker login --help

Usage:  docker login [OPTIONS] [SERVER]

Log in to a Docker registry.
If no server is specified, the default is defined by the daemon.

Options:
  -p, --password string   Password
      --password-stdin    Take the password from stdin
  -u, --username string   Username
4. After successful login, you can submit the image
docker tag 257d3068b6ee yoonaisu/mynginx:1.0

docker push yoonaisu/mynginx:1.0
Summary
Docker network
Custom network
View all docker networks
docker network ls

NETWORK ID     NAME      DRIVER    SCOPE
76a76b2678cf   bridge    bridge    local
0034c11d4f3e   host      host      local
508c5a48cb6d   none      null      local
Network mode
bridge: bridge docker (default)
none: do not configure the network
Host: share network with host
Container: container network connectivity (less used)
test
# The command we started directly -- net bridge, and this is docker0
docker run -d -P --name nginx01 nginx
docker run -d -P --name nginx01 --net bridge nginx

#docker0 features: by default, the domain name cannot be accessed, - link can get through

# We can customize the network
# --driver bridge
# --subnet 192.168.0.0/16
# --gateway 192.168.0.1

root@VM-0-4-debian:~# docker network create --driver bridge --subnet 192.168.0.0/16 --gateway 192.168.0.1 mynet

root@VM-0-4-debian:~# docker network ls
NETWORK ID     NAME      DRIVER    SCOPE
76a76b2678cf   bridge    bridge    local
0034c11d4f3e   host      host      local
5cdad218f4c1   mynet     bridge    local
508c5a48cb6d   none      null      local

# View network
root@VM-0-4-debian:~# docker network inspect mynet
[
    {
        "Name": "mynet",
        "Id": "5cdad218f4c1e0f2815bdf9a68ff41539e4f73d7ff149af27cd64927fc5b2c3e",
        "Created": "2021-07-19T17:32:20.465073697+08:00",
        "Scope": "local",
        "Driver": "bridge",
        "EnableIPv6": false,
        "IPAM": {
            "Driver": "default",
            "Options": {},
            "Config": [
                {
                    "Subnet": "192.168.0.0/16",
                    "Gateway": "192.168.0.1"
                }
            ]
        },
        "Internal": false,
        "Attachable": false,
        "Ingress": false,
        "ConfigFrom": {
            "Network": ""
        },
        "ConfigOnly": false,
        "Containers": {},
        "Options": {},
        "Labels": {}
    }
]
Benefits:
redis - different clusters use different networks to ensure that the cluster is safe and healthy
mysql - different clusters use different networks to ensure that the cluster is safe and healthy
Network connectivity
docker network connect
root@VM-0-4-debian:~# docker network connect -h
Flag shorthand -h has been deprecated, please use --help

Usage:  docker network connect [OPTIONS] NETWORK CONTAINER

Connect a container to a network

Options:
      --alias strings           Add network-scoped alias for the container
      --driver-opt strings      driver options for the network
      --ip string               IPv4 address (e.g., 172.30.100.104)
      --ip6 string              IPv6 address (e.g., 2001:db8::33)
      --link list               Add link to another container
      --link-local-ip strings   Add a link-local address for the container
# Run an nginx under the docker0 network
root@VM-0-4-debian:~# docker run -d -P --name nginx03 nginx
root@VM-0-4-debian:~# docker network inspect mynet
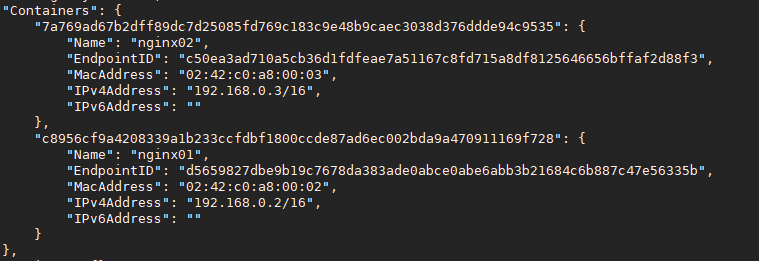
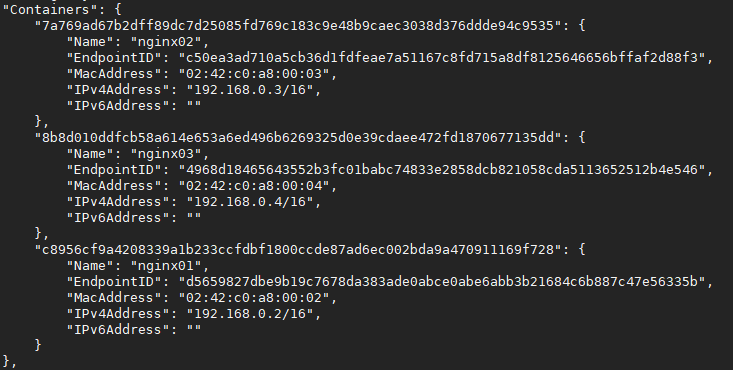
# Network connectivity
root@VM-0-4-debian:~# docker network connect mynet nginx03

# After connecting, nginx03 is put under the mynet network
# One container two ip addresses

root@VM-0-4-debian:~# docker network inspect mynet
Conclusion: if you need to connect containers across the network, you need to use docker network connect to connect!
Actual combat: Redis cluster
# Create network card
docker network create --subnet 172.38.0.0/16 --gateway 172.38.0.1 redis

# Create 6 redis configurations through scripts and run them
for port in $(seq 1 6); \
do \
mkdir -p /mydata/redis/node-${port}/conf
touch /mydata/redis/node-${port}/conf/redis.conf
cat << EOF >/mydata/redis/node-${port}/conf/redis.conf
port 6379
bind 0.0.0.0
cluster-enabled yes
cluster-config-file nodes.conf
cluster-node-timeout 5000
cluster-announce-ip 172.38.0.1${port}
cluster-announce-port 6379
cluster-announce-bus-port 16379
appendonly yes
EOF
docker run -p 637${port}:6379 -p 1637${port}:16379 --name redis-${port} \
-v /mydata/redis/node-${port}/data:/data \
-v /mydata/redis/node-${port}/conf/redis.conf:/etc/redis/redis.conf \
-d --net redis --ip 172.38.0.1${port} redis redis-server /etc/redis/redis.conf
done

#Create cluster
#Enter any redis
docker exec -it redis-1 /bin/sh

# Run command
redis-cli --cluster create 172.38.0.11:6379 172.38.0.12:6379 172.38.0.13:6379 172.38.0.14:6379 172.38.0.15:6379 172.38.0.16:6379 --cluster-replicas 1

# redis-cli --cluster create 172.38.0.11:6379 172.38.0.12:6379 172.38.0.13:6379 172.38.0.14:6379 172.38.0.15:6379 172.38.0.16:6379 --cluster-replicas 1
>>> Performing hash slots allocation on 6 nodes...
Master[0] -> Slots 0 - 5460
Master[1] -> Slots 5461 - 10922
Master[2] -> Slots 10923 - 16383
Adding replica 172.38.0.15:6379 to 172.38.0.11:6379
Adding replica 172.38.0.16:6379 to 172.38.0.12:6379
Adding replica 172.38.0.14:6379 to 172.38.0.13:6379
M: 2c0462c9d29f92763cd0412c1371538bef7c7df1 172.38.0.11:6379
   slots:[0-5460] (5461 slots) master
M: 4e1d2ecd59207f46f5efc3e4f367ce2317663f57 172.38.0.12:6379
   slots:[5461-10922] (5462 slots) master
M: bc654a09f9ee1d9e5883521cdd4aa158b7019412 172.38.0.13:6379
   slots:[10923-16383] (5461 slots) master
S: 4398e7f2384f0f8b694f1a6f54772145c4b1662d 172.38.0.14:6379
   replicates bc654a09f9ee1d9e5883521cdd4aa158b7019412
S: ebde76c72b642b74cea8060b3f91f2d8ef81d82c 172.38.0.15:6379
   replicates 2c0462c9d29f92763cd0412c1371538bef7c7df1
S: 319aaf1fe0f3b07f23c882b3282844a5e4b27abc 172.38.0.16:6379
   replicates 4e1d2ecd59207f46f5efc3e4f367ce2317663f57
Can I set the above configuration? (type 'yes' to accept): yes
>>> Nodes configuration updated
>>> Assign a different config epoch to each node
>>> Sending CLUSTER MEET messages to join the cluster
Waiting for the cluster to join
.
>>> Performing Cluster Check (using node 172.38.0.11:6379)
M: 2c0462c9d29f92763cd0412c1371538bef7c7df1 172.38.0.11:6379
   slots:[0-5460] (5461 slots) master
   1 additional replica(s)
M: 4e1d2ecd59207f46f5efc3e4f367ce2317663f57 172.38.0.12:6379
   slots:[5461-10922] (5462 slots) master
   1 additional replica(s)
M: bc654a09f9ee1d9e5883521cdd4aa158b7019412 172.38.0.13:6379
   slots:[10923-16383] (5461 slots) master
   1 additional replica(s)
S: ebde76c72b642b74cea8060b3f91f2d8ef81d82c 172.38.0.15:6379
   slots: (0 slots) slave
   replicates 2c0462c9d29f92763cd0412c1371538bef7c7df1
S: 4398e7f2384f0f8b694f1a6f54772145c4b1662d 172.38.0.14:6379
   slots: (0 slots) slave
   replicates bc654a09f9ee1d9e5883521cdd4aa158b7019412
S: 319aaf1fe0f3b07f23c882b3282844a5e4b27abc 172.38.0.16:6379
   slots: (0 slots) slave
   replicates 4e1d2ecd59207f46f5efc3e4f367ce2317663f57
[OK] All nodes agree about slots configuration.
>>> Check for open slots...
>>> Check slots coverage...
[OK] All 16384 slots covered.

# View cluster information
# Enter cluster command
redis-cli -c

127.0.0.1:6379> cluster info
cluster_state:ok
cluster_slots_assigned:16384
cluster_slots_ok:16384
cluster_slots_pfail:0
cluster_slots_fail:0
cluster_known_nodes:6
cluster_size:3
cluster_current_epoch:6
cluster_my_epoch:1
cluster_stats_messages_ping_sent:228
cluster_stats_messages_pong_sent:220
cluster_stats_messages_sent:448
cluster_stats_messages_ping_received:215
cluster_stats_messages_pong_received:228
cluster_stats_messages_meet_received:5
cluster_stats_messages_received:448

127.0.0.1:6379> cluster nodes
4e1d2ecd59207f46f5efc3e4f367ce2317663f57 172.38.0.12:6379@16379 master - 0 1626690968538 2 connected 5461-10922
bc654a09f9ee1d9e5883521cdd4aa158b7019412 172.38.0.13:6379@16379 master - 0 1626690970546 3 connected 10923-16383
ebde76c72b642b74cea8060b3f91f2d8ef81d82c 172.38.0.15:6379@16379 slave 2c0462c9d29f92763cd0412c1371538bef7c7df1 0 1626690969000 1 connected
4398e7f2384f0f8b694f1a6f54772145c4b1662d 172.38.0.14:6379@16379 slave bc654a09f9ee1d9e5883521cdd4aa158b7019412 0 1626690969342 3 connected
2c0462c9d29f92763cd0412c1371538bef7c7df1 172.38.0.11:6379@16379 myself,master - 0 1626690968000 1 connected 0-5460
319aaf1fe0f3b07f23c882b3282844a5e4b27abc 172.38.0.16:6379@16379 slave 4e1d2ecd59207f46f5efc3e4f367ce2317663f57 0 1626690970345 2 connected