1, docker installation (Linux)
1. docker official website
Note: during the installation process, you need to log in root on linux, otherwise some commands will be blocked
2. Find the documentation for installing docker in CentOS
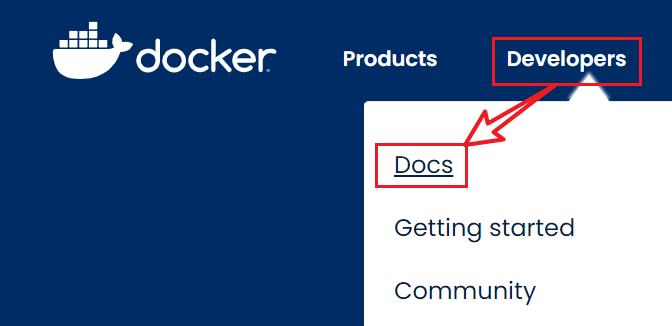
Click Developers Docs, as follows:
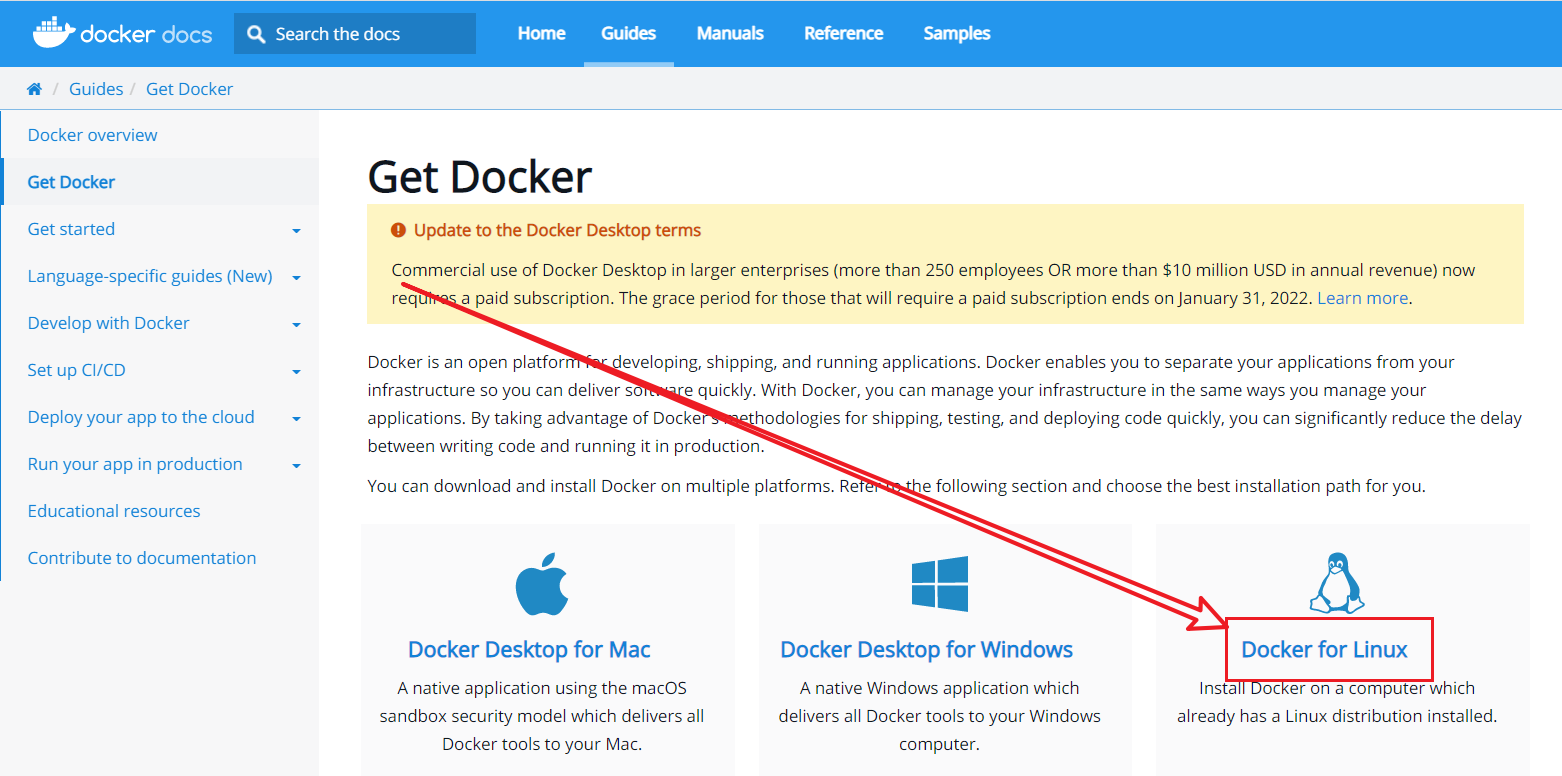
Click Download And Install as follows:

Click docker from Linux, as follows:
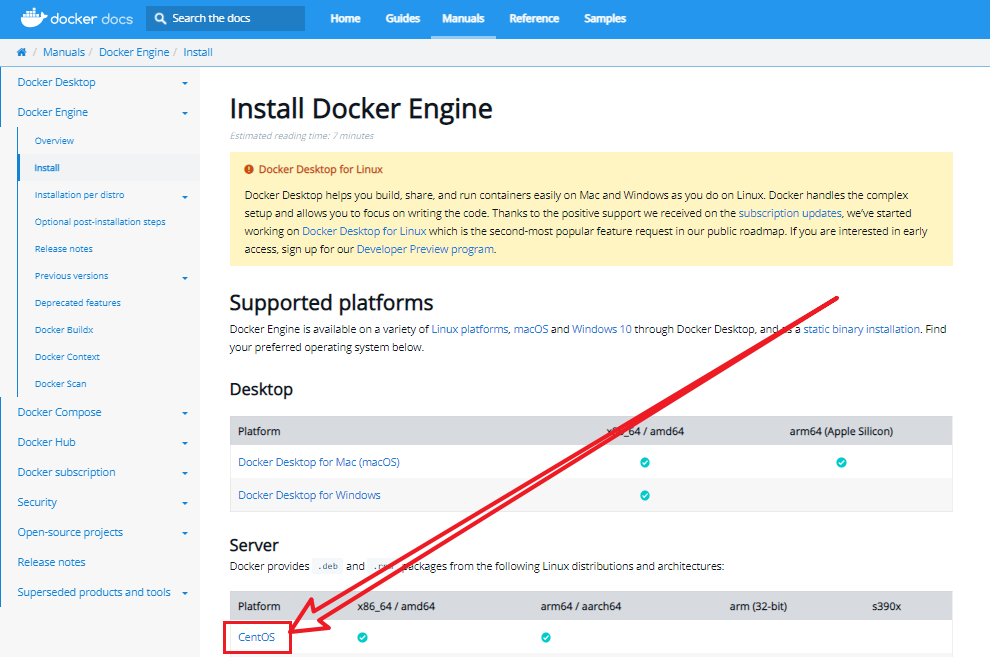
Click CentOS, as follows:
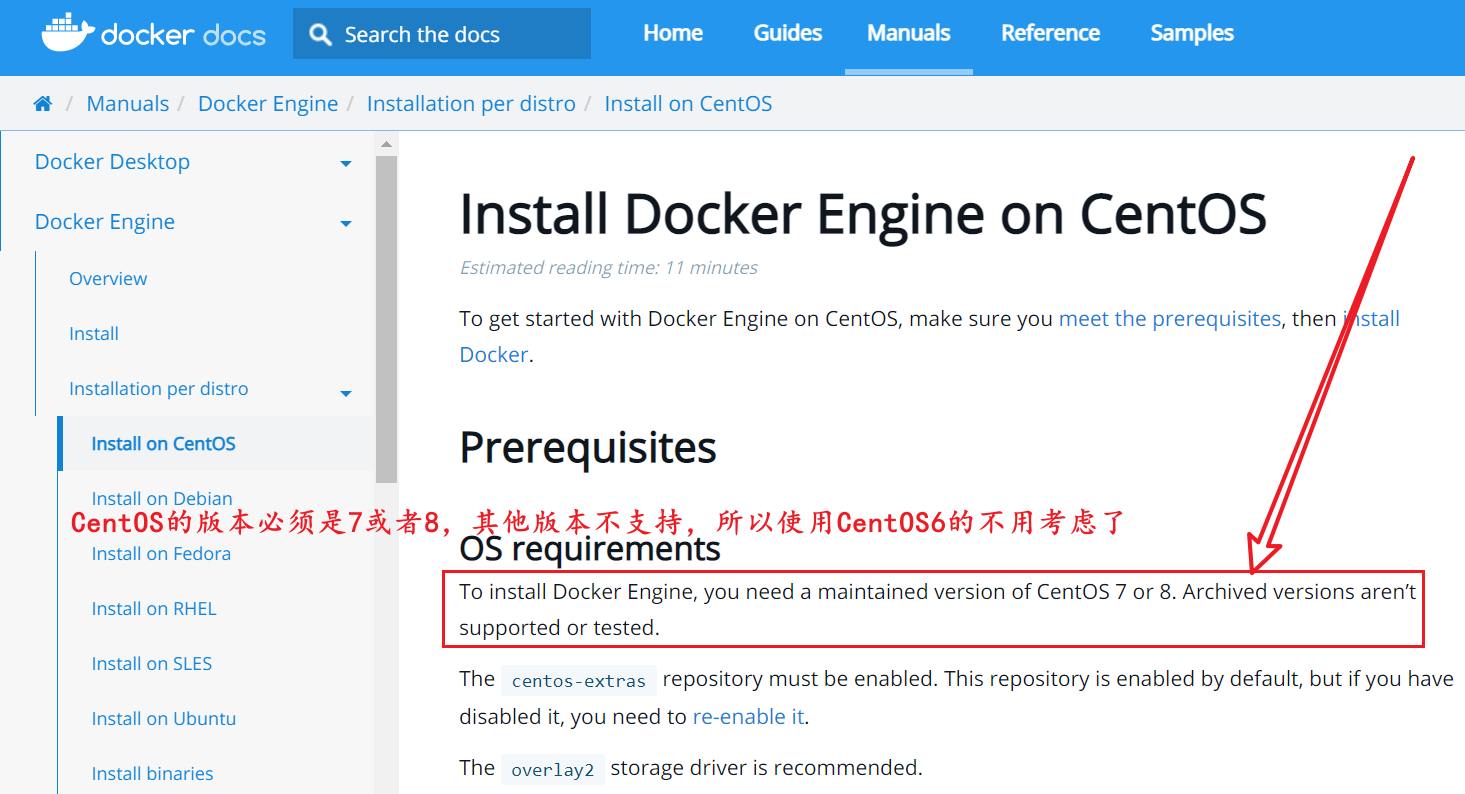
3. Judge whether the CentOS environment where docker is installed meets the requirements
The judgment source is still the official website. The screenshot is as follows. If you don't know your CentOS version, you can use cat / etc / RedHat release command in the terminal to view the current CentOS version
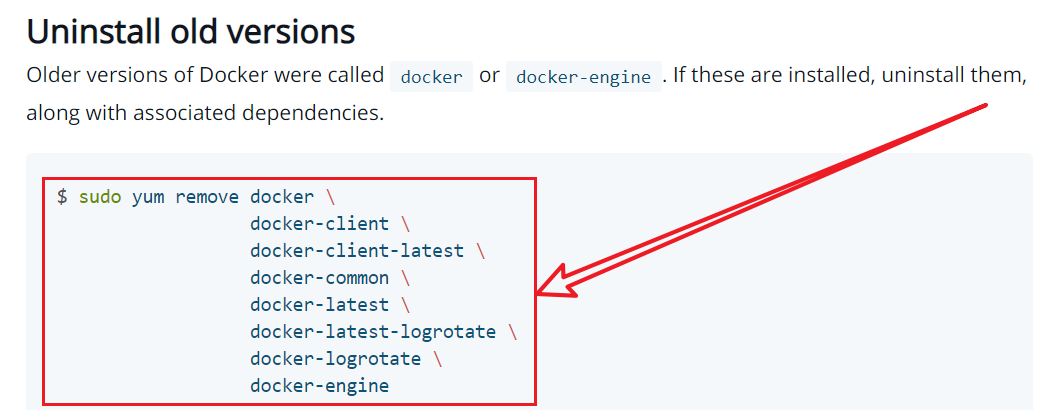
4. Uninstall old version
If you have installed docker before and the new version of docker is installed this time, you need to uninstall the old version first, and then install the new version. The uninstall command is as follows. If you haven't installed docker at all, please ignore this step.
sudo yum remove docker \
                  docker-client \
                  docker-client-latest \
                  docker-common \
                  docker-latest \
                  docker-latest-logrotate \
                  docker-logrotate \
                  docker-engine
The above order comes from the official website, and the screenshot is as follows:
5. Install gcc related tools
5.1. Judge whether CentOS can access the Internet
Use the following command to judge, as follows:
ping www.baidu.com
If you cannot connect to the Internet, you need to configure the blog as follows: CentOS configuring static IP
5.2. Install gcc compiler
Execute the following command to install the gcc compiler:
yum -y install gcc
Note: if you are not sure whether it has been installed, you can also execute this command. Executing this command multiple times will not download multiple times
5.3. Install gcc-c + + compiler
The c-gcc compiler executes the following commands:
yum -y install gcc-c++
Note: if you are not sure whether it has been installed, you can also execute this command. Executing this command multiple times will not download multiple times
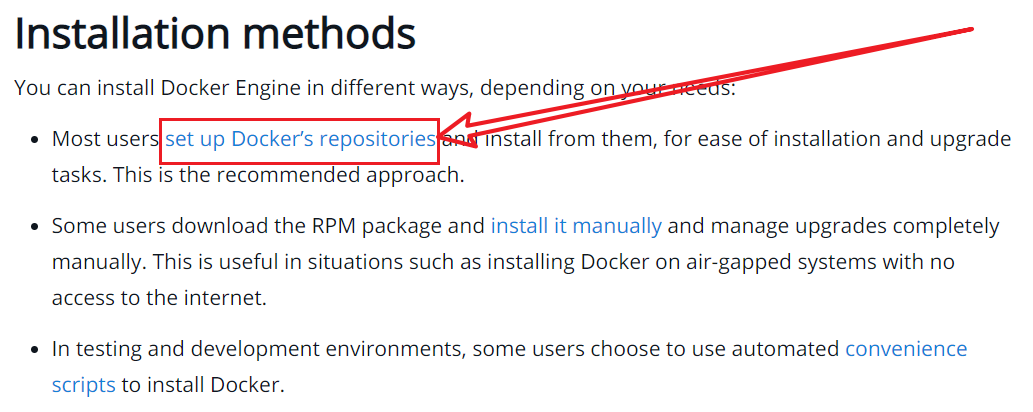
6. Select the appropriate installation method
Just choose the installation method most people use, and click the blue link in the figure below:
7. Install the yum utils package
Install the yum utils installation package with the following command:
yum install -y yum-utils
8. Install alicloud image warehouse
Do not use official recommended https://download.docker.com/linux/centos/docker-ce.repo , because this is a foreign image warehouse, it is easy to cause TCP connection problems and timeout problems when used in China
It is recommended to use Alibaba cloud or Netease cloud's docker image warehouse. Let's take Alibaba cloud's docker image warehouse as an example to install and configure. The following configuration script comes from the article on Alibaba cloud's official website Docker CE image In, as follows:
sudo yum-config-manager --add-repo https://mirrors.aliyun.com/docker-ce/linux/centos/docker-ce.repo
9. Install docker engine
Execute the following command:
sudo yum -y install docker-ce docker-ce-cli containerd.io
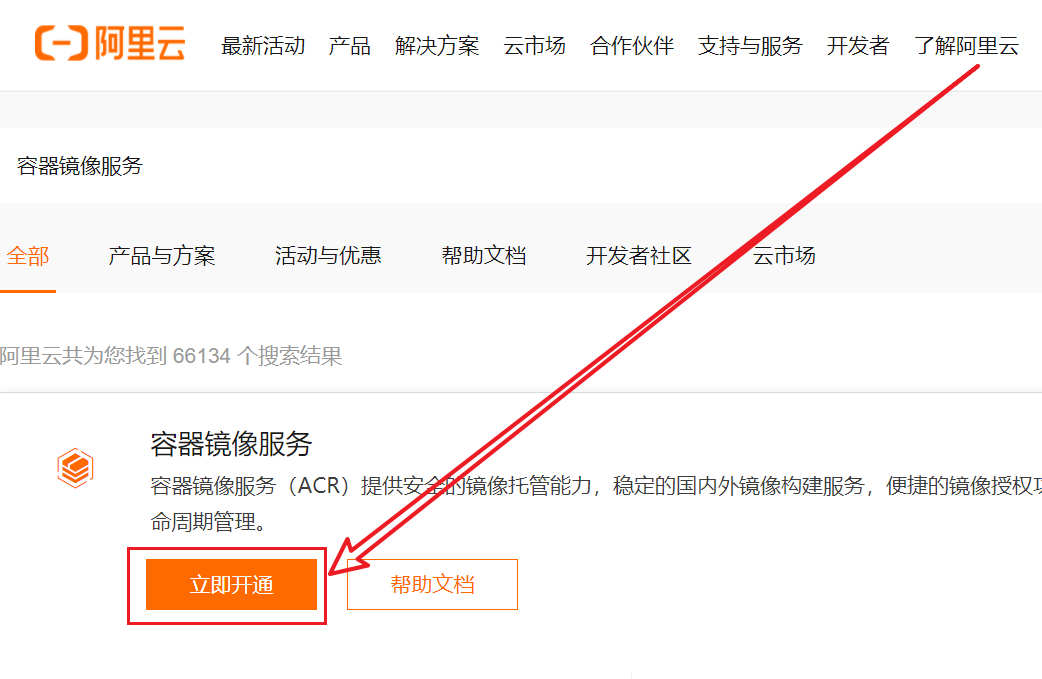
10. Configure alicloud image accelerator
First search Alibaba cloud's official website on Baidu, then enter the official website, log in to the account, search the container image service, and choose to open it immediately, as follows:
Find the script command to execute, as follows:
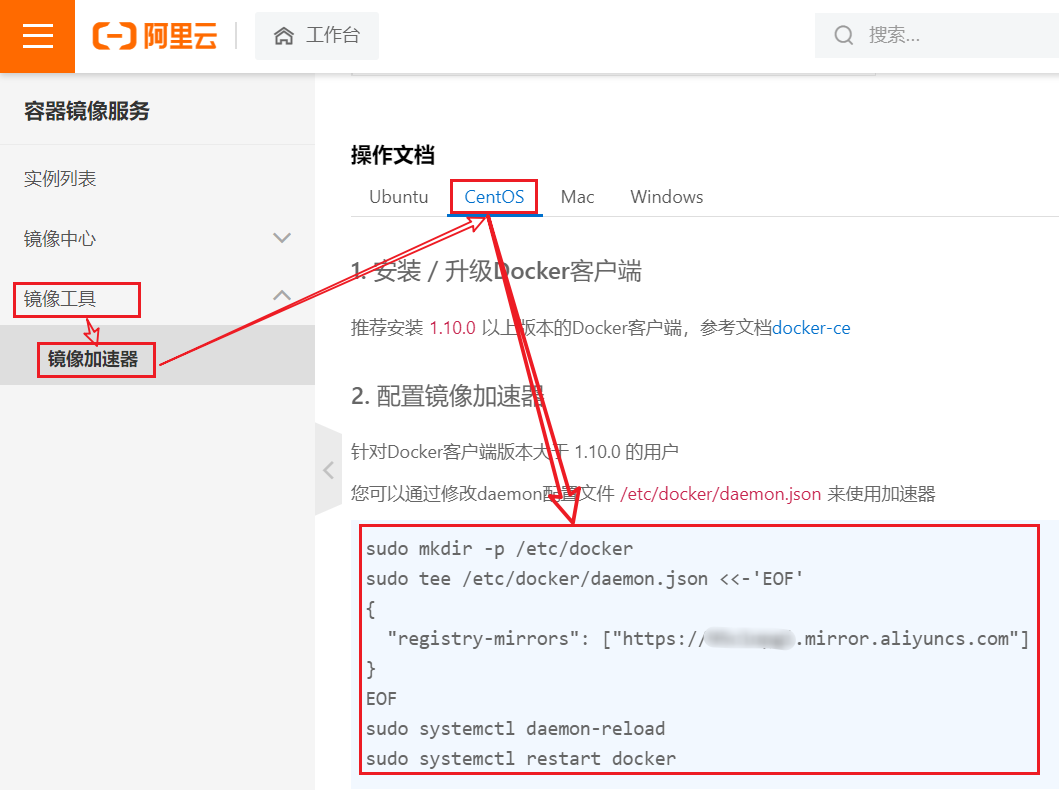
The script commands framed in the above screenshot must be executed in linux to complete the acceleration function
11. Start docker
Execute the following command to start docker:
systemctl start docker
Note: there will be no message prompt after startup, but you can verify whether the docker is started successfully through ps -ef | grep docker
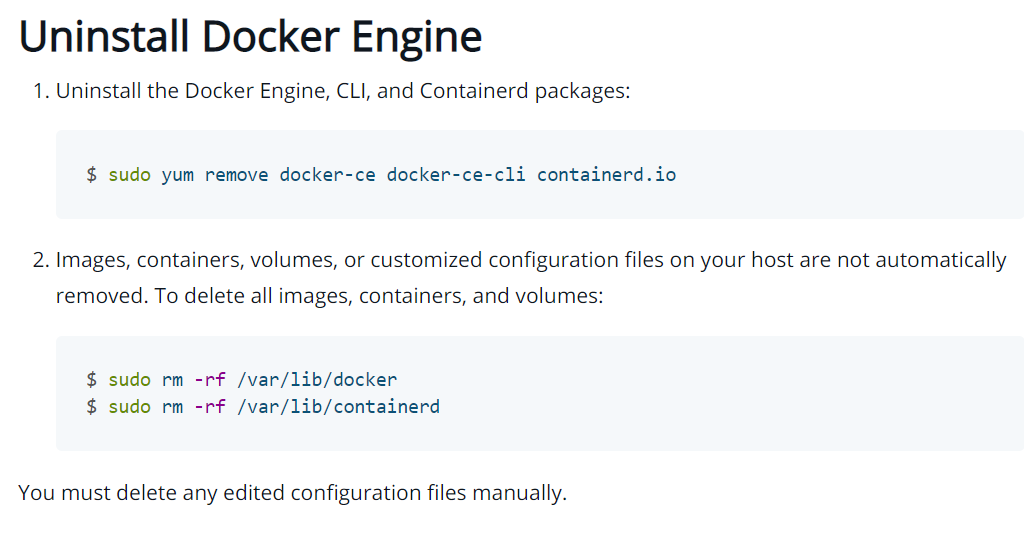
2, docker uninstall (Linux)
Execute the following command:
systemctl stop docker
sudo yum remove docker-ce docker-ce-cli containerd.io
sudo rm -rf /var/lib/docker
sudo rm -rf /var/lib/containerd
The above command is from the official website. The screenshot is as follows:
3, docker command
3.1. Version view command
// View docker Version (details)
docker version

// View docker Version (brief information)
docker --version
3.2 help command
// Query docker profile
docker info

// Help documentation
docker help

// Single command help documentation
docker Command name help
3.3. Start / stop / restart / view status command
// Start docker
systemctl start docker

// Stop docker
systemctl stop docker

// Restart docker
systemctl restart docker

// View docker status
systemctl status docker

// Start docker
systemctl enable docker
3.4. Image command
docker images [optional] [image name]
1,effect
 List all local mirrors

2,Parameter description
REPOSITORY: Name of the image in the warehouse
TAG: Image label version number (used to identify different versions of the current image)
IMAGE ID: image id Top few
CREATED: Image creation time
SIZE: Mirror size)

3,Optional
-a: Lists all local mirrors, including the historical image layer
-q: Show only mirrors id
 Note: optional-a and-q Can be used together, for example docker images -aq

4,Image name
 Only query all different label images under the current image name, for example: docker images tomcat
docker search [optional] image name
1,effect
 Find images in the warehouse

2,Parameter description
NAME: Image name
DESCRIPTION: Image description information
STARS: Number of likes
OFFICIAL: Whether it is official;[OK]: Official, no content: unofficial
AUTOMATED: Whether to build automatically;[OK]: Auto build, no content: no auto build

3,Optional
--limit Number: if not used limit,By default, 25 images with the same name are listed, but we can use limit Limit the number of likes by default STARS Sort, for example: docker search --limit 5 redis
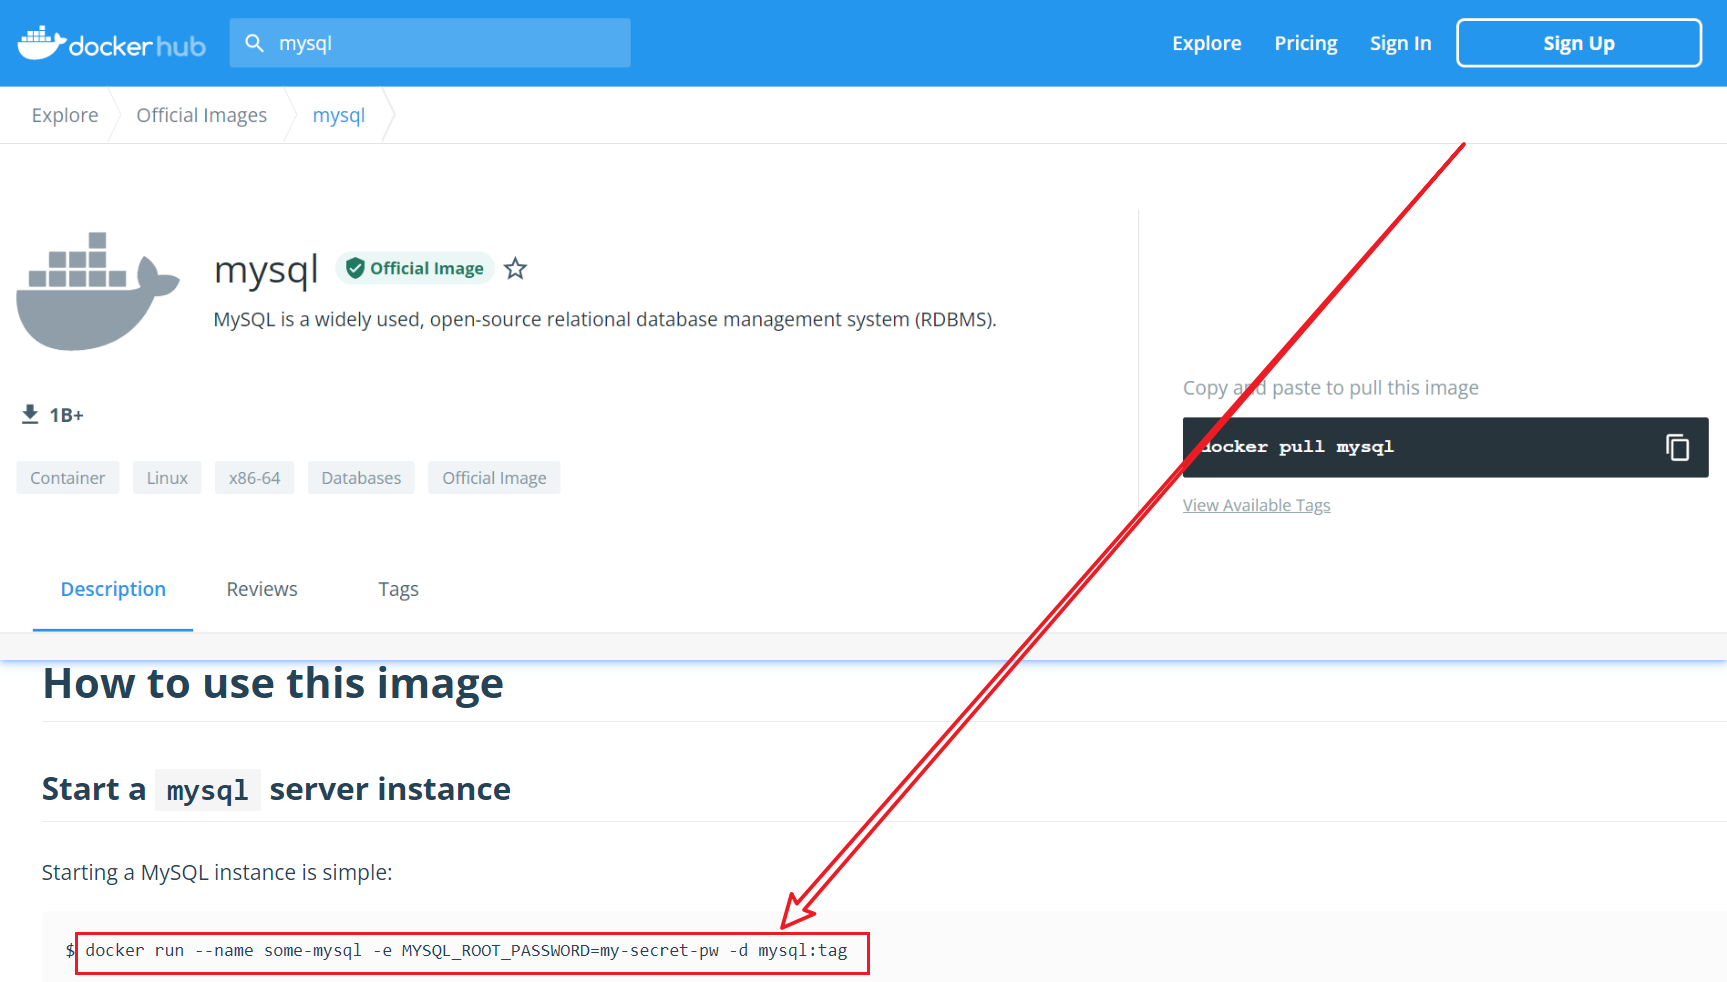
docker pull image name [: image label]
1,effect
 Pull the image from the remote warehouse to the local

2,Mirror label
 The image label is not used. The default image label is latest,such as docker pull redis amount to docker pull redis:latest
 Use image tag: if you know the image tag, you can add it directly. If you are not sure, you can log in first dockerhub Official website,
the address is https://hub.docker.com, then search the image name in the search box in the upper left corner, select the image name with Official Image logo, and click,
choice Tags,Select the appropriate image version, click the copy button on the right, and click linux You can pull the image of this version by executing in, for example docker pull redis:6.0.8
docker system df
1,effect
 View the space occupied by mirrors, containers and data volumes

2,Parameter description
TYPE: Images(Mirror image) Containers(Container) Local Volumes(Local volume) Build Cache(Build cache)
TOTAL: total
ACTIVE: Quantity in activity
SIZE: size
RECLAIMABLE: Scalability
docker rmi [-f] image name: label / id
1,effect
 delete mirror

2,-f
 Do not add-f: If there is an active mirror container, executing this command will cause a conflict, so that the mirror cannot be deleted
 add to-f: f The corresponding word is force,It means mandatory, so the image will be deleted even if the above conflict occurs

3,Delete a single mirror
docker rmi -f Image name:label/id

4,Delete multiple mirrors (multiple mirror names):label/id (separated by spaces)
docker rmi -f Image 1 name/id Mirror 2 name/id Mirror 3 name/id ......

5,Delete all mirrors
docker rmi -f $(docker images -aq)
3.5 container command
docker run [optional] image name: label [command] [other parameters...]
1,effect
 Create container

2,Optional
--name="Container name": Specify the container name, which is classified by the system by default, or can be written as:--name Container name
-d: Start the container in the background and return to the container after running id,Start the daemon container (running in the background)

-i: Start the container in interactive mode, often with -t Combined use
-t: Reassign a pseudo input terminal to the container

-P: Random port mapping, i.e docker Port correspondence in linux The ports in are random, for example-P
-p: Specifies the port mapping, i.e docker Port correspondence in linux The port in is set, for example-p 3306:3306

3,Start interactive container (foreground command line)
-i and-t You can start an interactive container by using it together, for example: docker run -it ubuntu /bin/bash

4,Exit interactive container
 Stop container after exit: enter in the interactive container console exit Then click enter
 Exit without stopping the container: Click Ctrl+p+q,The operation is to press and hold Ctrl,Click in turn p and q

5,Re enter the interactive container
 Method 1 (recommended): use the command: docker exec -it container id/Container name /bin/bash,You can re-enter the interactive container and test ubuntu
 Method 2: use the command: docker attach container id/Container name, you can re-enter the interactive container and test ubuntu
 The difference between the two methods: Method 1 will open a new terminal in the container, start a new process, and enter exit Exit the container without causing the container to stop; Method 2 conversely, enter exit Exiting the container will cause the container to stop

6,Start daemon container
 Use parameters-d You can start a guard container, such as docker run -d redis:6.0.8
 Generally used first docker run -d image id/Image name:tags Start the daemon container and use docker exec -it container id/Container name /bin/bash Go inside the container and do something
docker ps [optional]
1,effect
 List all running containers

2,Parameter description
CONTAINER ID: container id
IMAGE: Image name
COMMAND: command
CREATED: Creation time
STATUS: Start state
PORTS: port
NAMES: Container name

3,Optional
-a: Lists all containers, including those that are running and those that have run in history
-q: Only the container number is displayed in the return value
-l: Display 1 container recently created
-n XXX: Show recently created XXX Containers, where XXX Is the number of containers displayed, for example: docker ps -n 3
docker stats
1,effect
 dynamic viewing docker Container status
docker start container id / container name
1,effect
 Start the container that has been stopped (we can docker ps -n 5 See the list of recent containers, STATUS Status of Exited The beginning is the container that has been stopped)
docker restart container id / container name
1,effect
 Restart container
docker stop container id / container name
1,effect
 Stop container
docker kill container id / container name
1,effect
 Force restart container
docker rm [-f] container id / container name
1,effect
 Delete the stopped container. After the container is deleted, the docker ps -a The command cannot be queried, so there is no way to restore it

2,-f
 If the container is running, you can add-f Parameter to delete a running container

3,Delete all container instances at once
 Method 1: docker rm -f $(docker ps -aq)
Method 2: docker ps -aq | xargs docker rm -f
docker logs container id / container name
1,effect
 View container log
docker top container id / container name
1,effect
 View the process running in the container
docker inspect container id
1,effect
 View container interior details
docker cp container id / container name: path in container destination host path
1,effect
 Back up the data in the container to the host to avoid that the data cannot be recovered after deleting the container
docker export container id / container name > XXX tar
1,effect
 Backup container; That is, all contents in the export container are one tar Package archive file for subsequent recovery of the container

2,example
docker export distracted_stonebraker>/home/xm/testexport.tar
cat XXX.tar | docker import - image user / image user [: image version number]
1,effect
 Restore container exported tar The package is a mirror image; Where "mirror user" in the command/"Mirror user" is execution docker images Command see Images Image name under

2,be careful
 In command/No or, it's just a symbol

3,command
cat testexport.tar | docker import - xm/ubuntu:latest
 Explanation: will tar After the package archive file is exported as an image, you can use the docker images See the specific image. For example, after the above command is executed, we use docker images The results are as follows:
REPOSITORY    TAG       IMAGE ID       CREATED         SIZE
xm/ubuntu     latest    af0e6355799d   5 seconds ago   72.8MB
docker commit -m = "description" - a = "author name" container id / name target image name to be created [: tag name]
1,effect
 Commit the current container as a local image

2,example
docker commit -m="add to vim tool" -a="Bright de Xuanmi 61" 132f48fd425a xm/ubuntu:1.0.0
 result:
REPOSITORY   TAG       IMAGE ID       CREATED         SIZE
xm/ubuntu    1.0.0     6cf11614c3a9   3 seconds ago   72.8MB
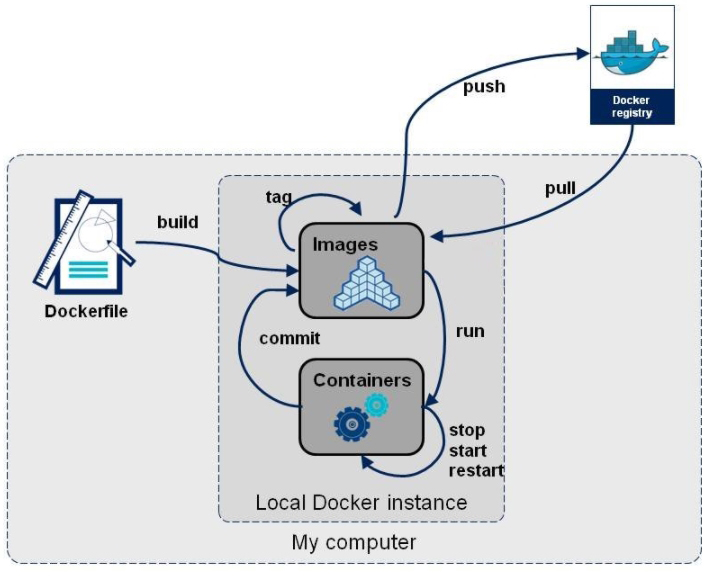
4, docker image
Image concept
Image is a lightweight and executable independent software package, which contains all the contents required by a software. We package the application and configuration dependencies to form a deliverable running environment (including code, libraries required for runtime, environment variables and configuration files). This packaged running environment is the image file. Container instances can only be generated by mirroring files
Mirror layering
Through docker pull image name: tags, we can see that a lot of image IDs are generated during the process of pulling the remote warehouse image to the local. This shows that the image is superimposed layer by layer. We can see that an image, such as ubuntu, is formed by many images
UnionFS (Federated file system)
Federated file system is a layered, lightweight and high-performance file system. It supports the superposition of file system modifications as one submission. At the same time, different directories can be mounted under the same virtual file system. Federated file system is the foundation of docker image. Images can be integrated through layering. Based on the basic image (without parent image), various specific application images can be made
Features: multiple file systems can be loaded at the same time, but from the outside, only one file system can be seen. Federated loading will overlay all layers of file systems, and finally the federated file system will contain all underlying files and directories
docker image loading principle
The docker image is actually composed of a layer by layer file system, which is called UnionFS (Federated file system).
Bootfs (boot file system) mainly includes BootLoader and kernel. BootLoader is mainly used to boot and load the kernel. When Linux starts, it will load the bootfs file system, which is the lowest boot file system of docker image. This layer is the same as our typical linux/unix system, including boot loader and kernel, so we say that the container is a simple version of Linux environment. When bootfs is loaded, the whole kernel is in memory. At this time, the right to use the memory has been transferred from bootfs to the kernel. At this time, the system will also unload bootfs.
rootfs (root file system) is above bootfs and contains standard directories and files such as / dev, / bin, / etc in typical Linux systems. rootfs is a variety of operating system distributions, such as ubuntu, centos, etc
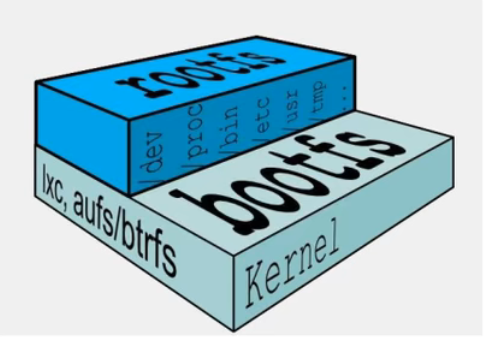
For a streamlined OS, rootfs can be very small. It only needs to contain the most appropriate commands, tools and program libraries. Because the kernel of the Host is directly used at the bottom, you only need to provide rootfs. Therefore, for different linux distributions, bootfs is basically always, and rootfs will be different, so different hairstyles can share bootfs
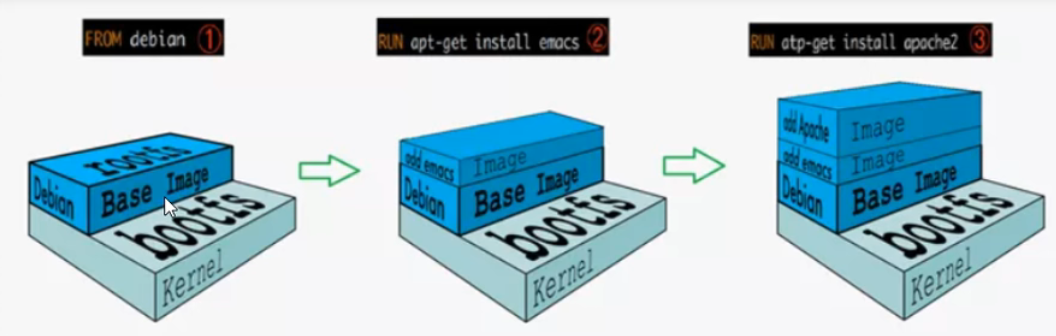
Why does docker adopt this hierarchical structure?
One of the biggest benefits of image layering is to share resources. In fact, it is to reuse resources. For example, if multiple images are built from the same base image, the Docker Host only needs to save a base image on the disk, and only needs to load a base image in the memory to serve all images, and each layer of the image can be shared
Relationship between mirror layer and container layer
The docker image layer is read-only, and the container layer is writable. When the container starts, a new writable layer is loaded onto the top of the image. This layer is usually called the container layer, and those below the container layer are called the image layer
Mirror layering summary
Image layering in docker supports extending existing images. Similar to Java, which inherits from a base basic class, it is expanding on demand. The new image is generated by superimposing the base image layer by layer. Each time a software is installed, one layer is added to the existing image
5, Publish local images to alicloud
Circulation process
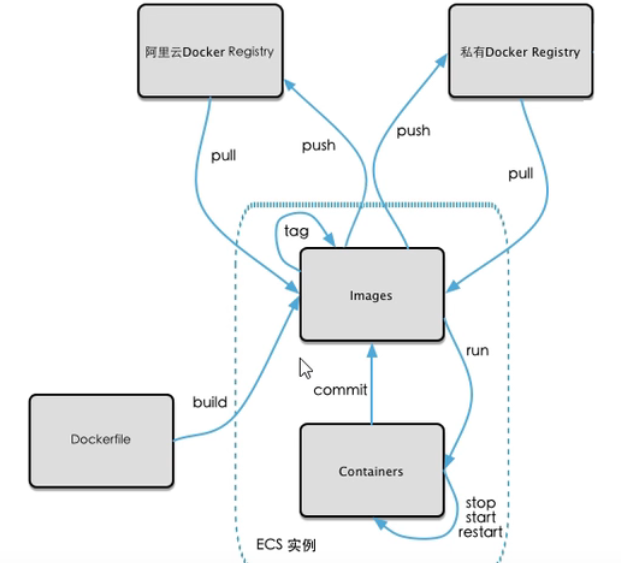
Push local image to alicloud
1. Create local mirror
Create a local image through docker commit -m = "description" - a = "author name" container id / name the target image name to be created [: tag name] command
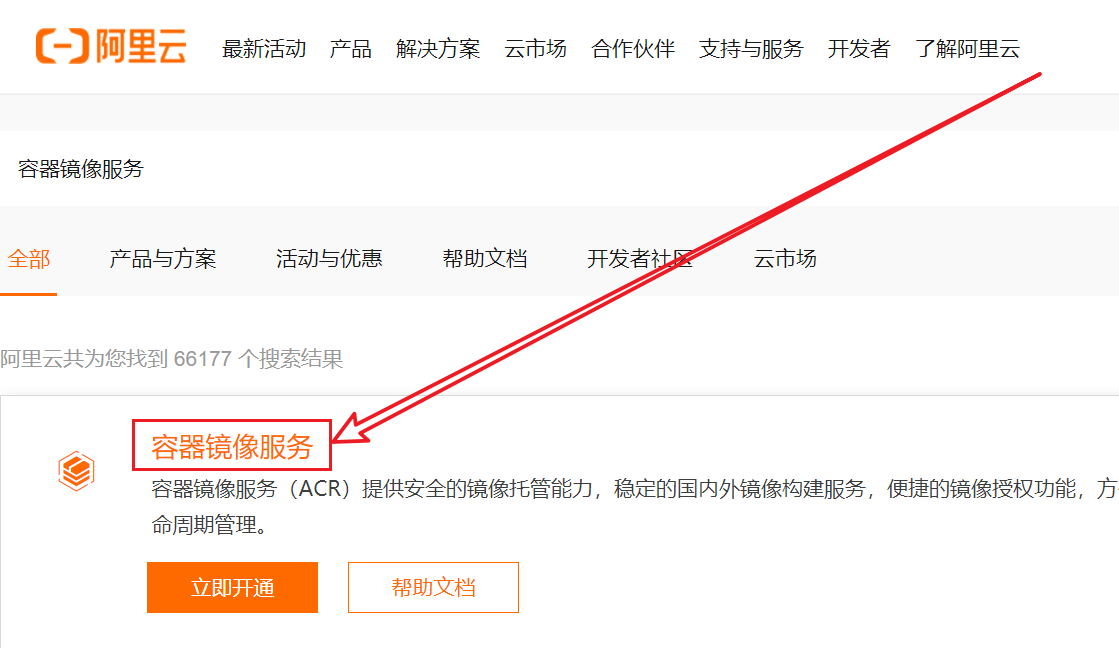
2. Configure the namespace and image warehouse on the Alibaba cloud official website, and push the local image to the Alibaba cloud image warehouse
Sign in Alibaba cloud official website , search the container image service as follows:
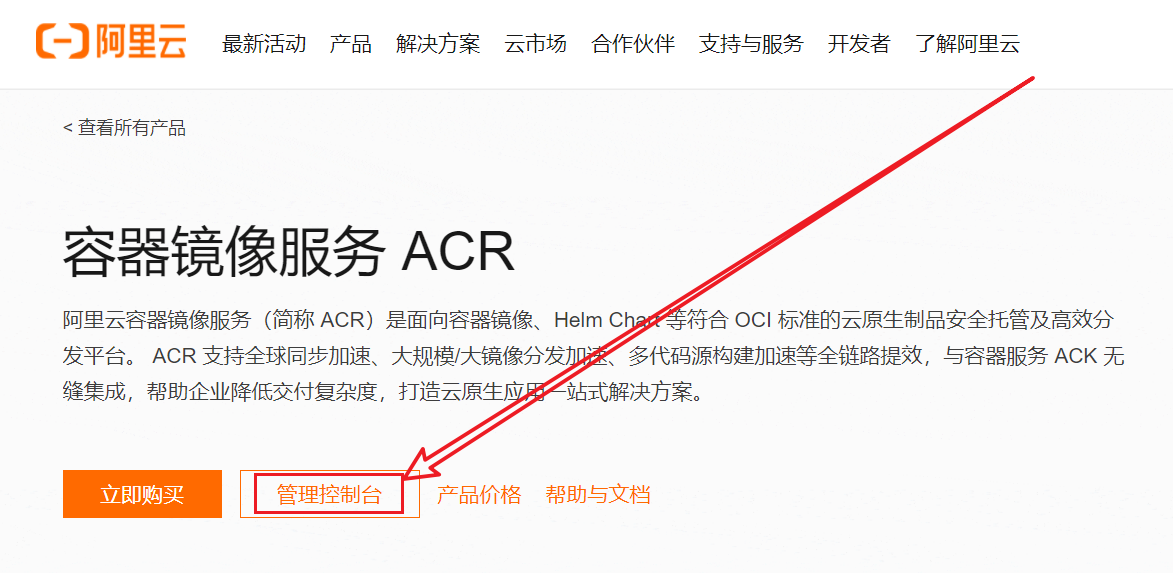
Click the management console as follows:
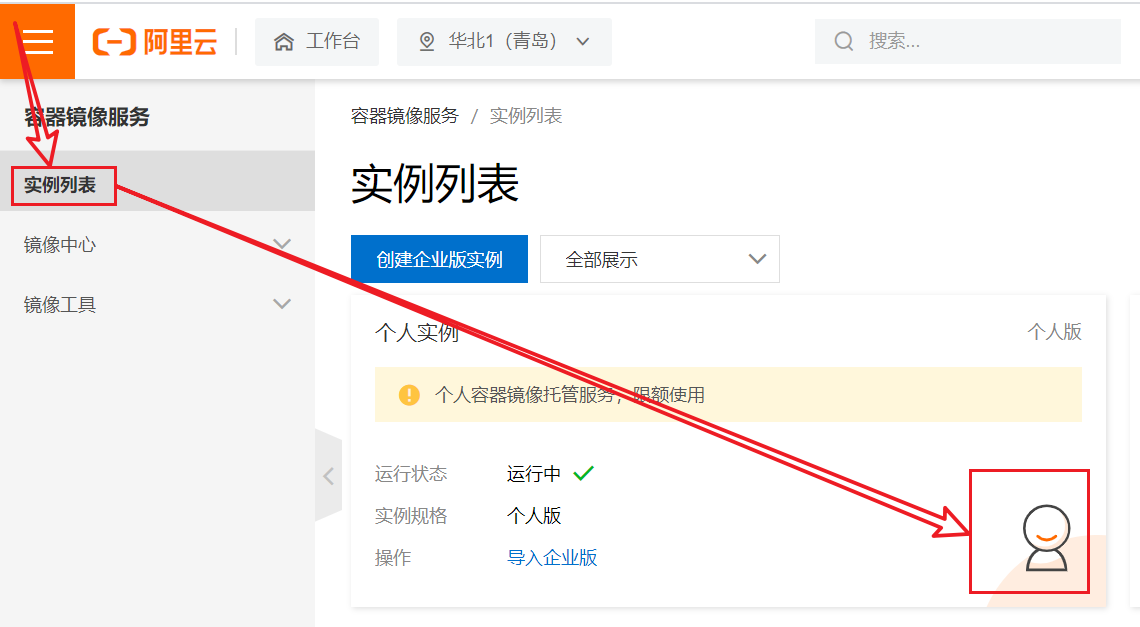
Click the strength list and select a personal instance as follows:
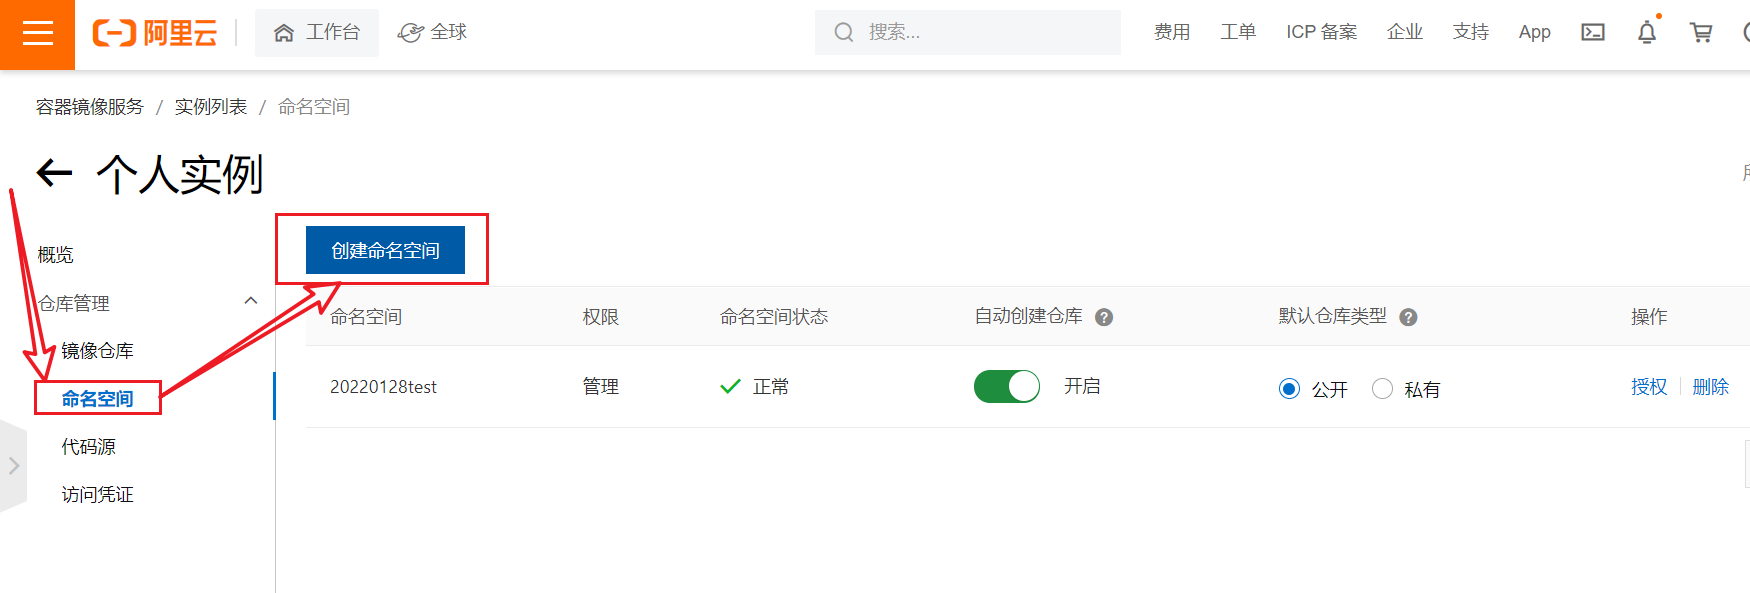
Create a command space as follows:
Create a mirror warehouse as follows:
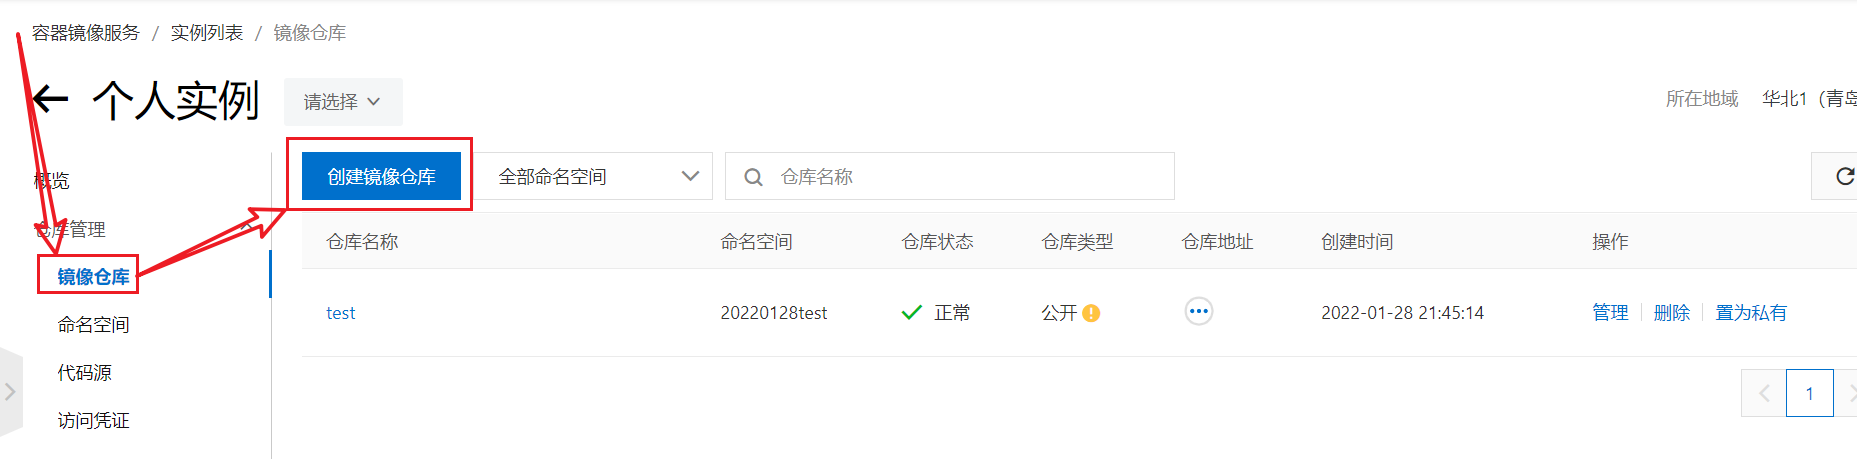
Click manage to find the upload command as follows:
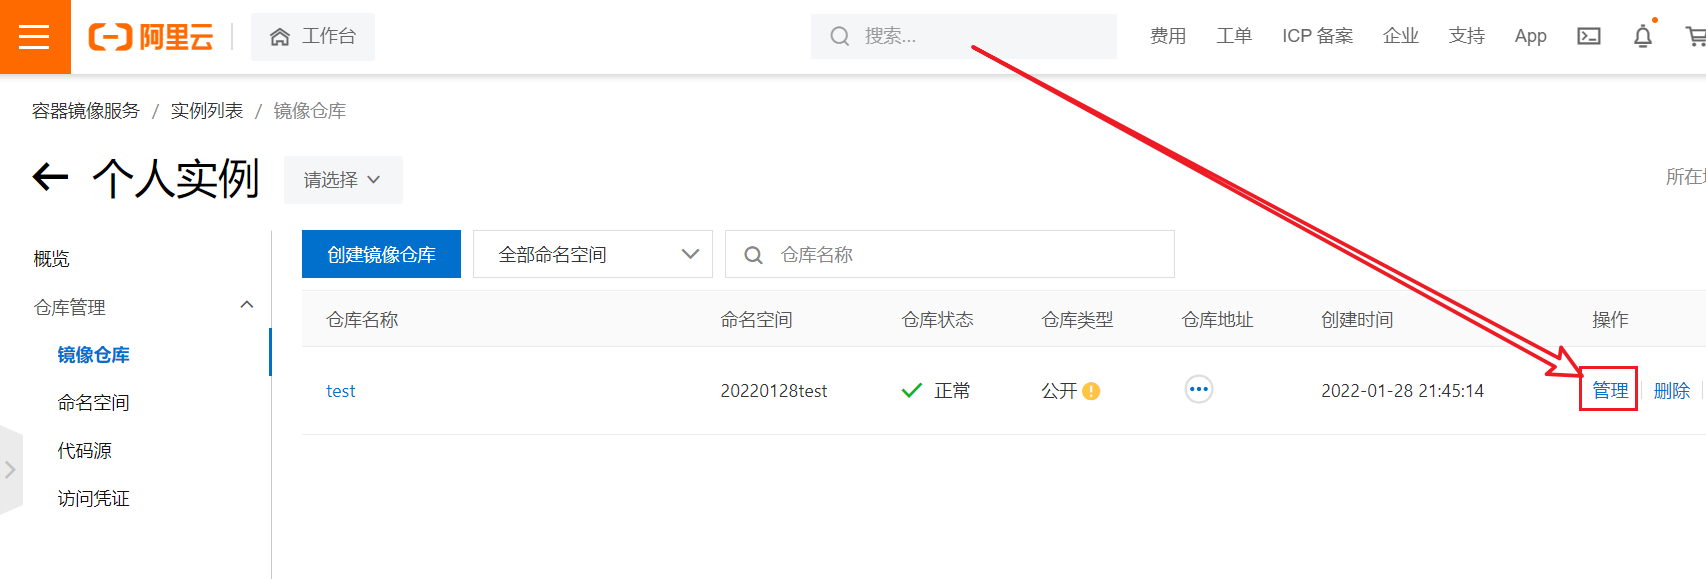
Execute the following commands in sequence to push the image to the remote warehouse, as follows:

be careful:
1. After entering command 1, you need to enter the alicloud password
2. The [ImageId] in Command 2 is the local image id generated by our docker commit... And then the [image version number] is the image version number displayed in the Alibaba cloud warehouse
3. The [mirror version number] in command 3 is the mirror version number in Command 2
4. After the image is successfully pushed to Alibaba cloud, you can see the image we pushed to Alibaba cloud through docker images
For example:
docker login --username=Alicloud user name registry.cn-qingdao.aliyuncs.com
docker tag 6cf11614c3a9 registry.cn-qingdao.aliyuncs.com/20220128test/test:1.0.0
docker push registry.cn-qingdao.aliyuncs.com/20220128test/test:1.0.0
Download images from alicloud to local
According to the screenshot of pushing local images to Alibaba cloud, we can find the following interface:
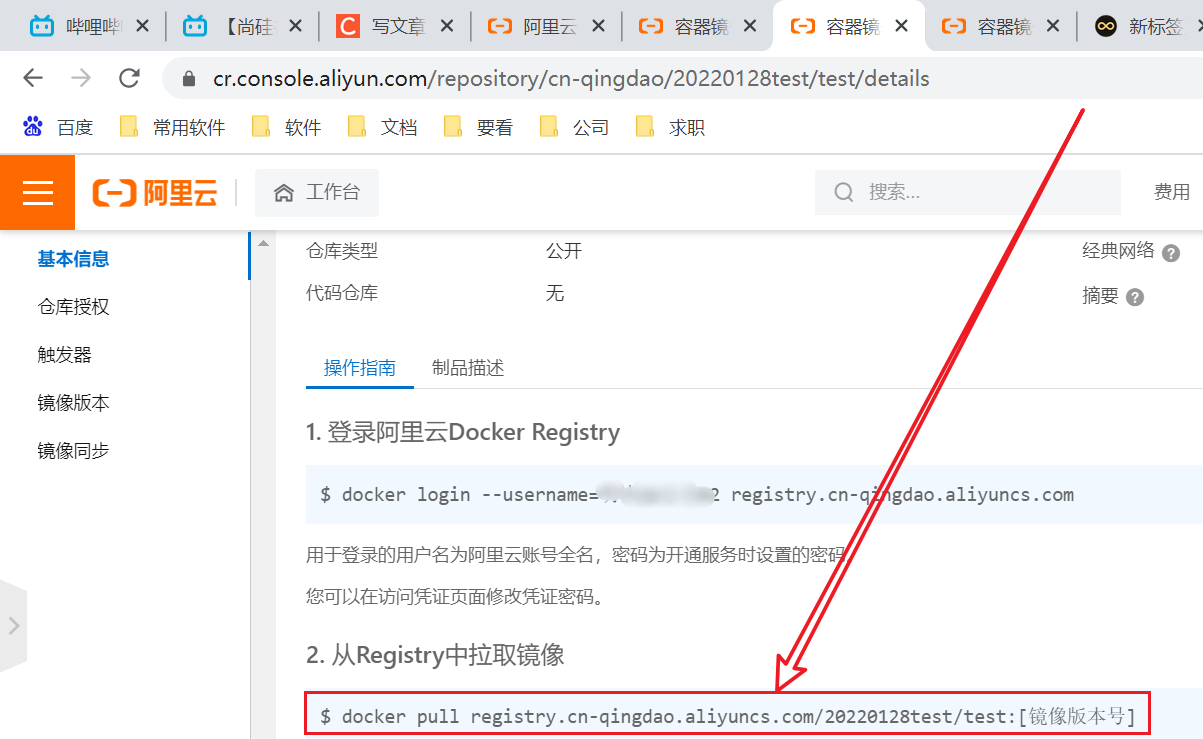
Example commands are as follows:
docker pull registry.cn-qingdao.aliyuncs.com/20220128test/test:1.0.0
6, Push local image to private image library
Build private image library
Download Docker Registry image:
docker pull registry
Run the registry image to generate the container:
docker run -d -p 5000:5000 -v /xm/myregistry/:/tmp/registry --privileged=true registry
Generate a new image through docker commit -m = "description" - a = "author name" container id / name the target image name to be created [: tag name] command, for example:
docker commit -m="add to vim tool" -a="Bright de Xuanmi 61" 132f48fd425a xm/ubuntu:1.0.0
For example, you can copy a copy of the image through the ip address tag: Doc of the local server. For example, you can copy a copy of the image through the ip address tag: Doc of the local server:
docker tag xm/ubuntu:1.0.0 192.168.139.129:5000/xm/ubuntu:1.0.0
Modify the configuration file to support http, as follows:
First use VIM / etc / docker / daemon JSON open the configuration file, and then add the secure registers ": [" ip: 5000 "]. Note that the ip uses your local ip, for example:
{
  "registry-mirrors": ["Alibaba cloud image acceleration website"],
  "insecure-registries": ["192.168.139.129:5000"]
}
Restart the docker and registry containers as follows:
// Restart docker container
systemctl restart docker
// Locate the registry container for the stop
docker ps -a
// Start registry container
docker start container id
Push image to local image warehouse
Push the image name through docker: the image label pushes the image to the local image warehouse, where the image name and image label are the image information generated above that meets the private server specifications, for example:
docker push 192.168.139.129:5000/xm/ubuntu:1.0.0
Through curl -XGET http://ip/v2/_catalog Command to verify the image existing on the private server library, where IP is your local IP, for example:
curl -XGET http://192.168.139.129:5000/v2/_catalog
The verification results are as follows:

Pull the image from the local image warehouse
Pull the image from the local image warehouse through docker pull ip:5000 / image name: label name (I still don't know how to see the label name from the local image warehouse), for example:
docker pull 192.168.139.129:5000/xm/ubuntu:1.0.0
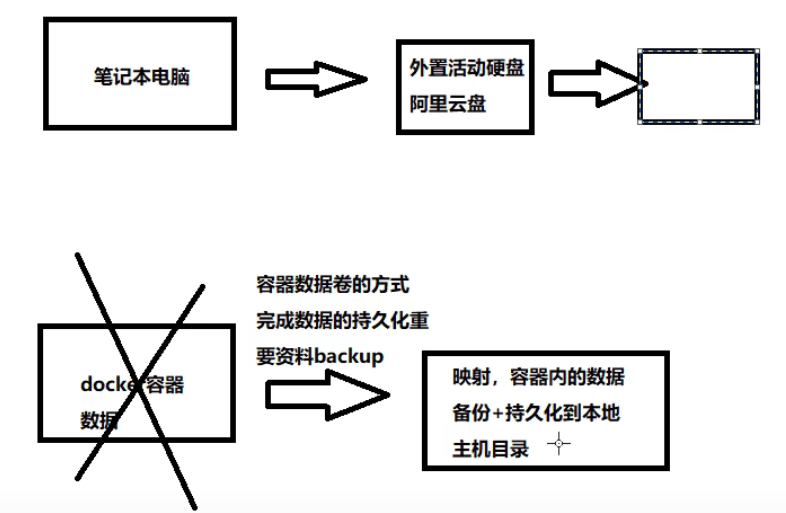
7, Container data volume (in Linux system, equivalent to U SB flash disk)
1. Concept
To put it simply: the container data volume is equivalent to a USB flash disk. We operate the files in the USB flash disk through the computer. These files are always in the USB flash disk, not in the computer. The container data volume exists in the linux system. The purpose is to put the important data in the docker container into the linux system
Detailed explanation: a volume is a directory or file that can be used in one or more containers. It exists in the linux operating system. It is mounted in the container by docker and provided to the container for use, but it does not belong to the federated file system. Therefore, it can bypass the federated file system and provide some features for continuous storage or sharing of data. The volume is designed for data persistence, which is completely independent of the life cycle of the container. Therefore, the data volume will not be deleted when the docker container is deleted
If it's not very clear, take a look at this: Docker container data Volume volume summary
The following screenshot also clearly shows that the container data volume is equivalent to a U SB flash disk on a computer, as follows:
2,–privileged=true
Simply put: let the container have absolutely sufficient permissions on the container data volume in the operating linux system
Detailed explanation: we will put some important contents in the docker container into the Linux system, but in CentOS 7, the security module will be stronger than before. This kind of directory mounting is considered unsafe. If no operation is carried out, the root user in the container is only equivalent to an ordinary user in the Linux system. Of course, the permission is also limited, Therefore, we need to ensure that the root permission in the container is equal to that in the Linux system through the -- privileged=true parameter, so that there will be no insufficient permission when writing data from the container to the Linux system
3. Function
(1) Data volumes can share or reuse data between containers
Detailed explanation: if the container data volume is located in the linux operating system, it can be used by multiple containers. We synchronize the important contents in the docker container to the container data volume in the linux system in real time, so that the docker container can be recovered in case of accidental deletion. When the docker container is deleted, the backup contents in the linux system will not be deleted. This function is equivalent to the aof and rdb files in redis
(2) Changes to data volumes can take effect in real time in the docker container
(3) Changes in the data volume are not included in the update of the mirror
(4) The life cycle of a data volume is consistent until no container uses it
4. Command
Add container data volume:
docker run -it --privileged=true -v linux Host absolute path:Container absolute path mirror name
For example:
docker run -it -v /tmp/testdocker/:/tmp/testdocker/ ubuntu /bin/bash
Note: if the above two directories do not exist, they will be created automatically when the command is executed. Remember to add them after the directory name/
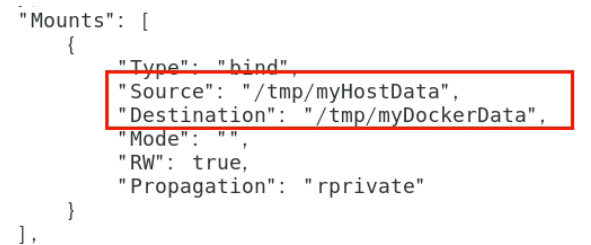
Verify that the container data volume is mounted successfully:
docker inspect container id/name
The verification results are as follows:
Prohibit writing files to containers:
For the above command of adding container data volume, you can also read and write files in the container after execution. In fact, it is equivalent to docker run -it --privileged=true -v linux host absolute path: container absolute path: rw image name, where rw is equivalent to reading and writing
If you need to prohibit file writing in the container, you only need to add a read-only permission to the container data volume, so we can only perform writing in the linux system, and then the command needs to be changed into docker run -it --privileged=true -v linux host absolute path: container absolute path: ro image name, where ro stands for read only, If we want to add files in the container, the following prompt will appear:

5. Inheritance and sharing of container data volumes
// First create the container u1
docker run -it -v /tmp/testdocker/:/tmp/testdocker/ --name="u1" ubuntu /bin/bash
// Then exit container u1, create container u2, and let the container data volume of u2 inherit u1, which is equivalent to executing: docker run - it - V / TMP / testlocker /: / TMP / testlocker / -- name = "u2" Ubuntu / bin / bash
docker run -it --volumes-from u1 --name="u2" ubuntu /bin/bash
Note: the file operations we perform in the / TMP / testlocker / directory of containers u1 and u2 and the / TMP / testlocker / directory of linux operating system can be interconnected, which completes the inheritance and sharing of container data volumes
8, Regular software installation in docker
1. Overall steps
- Search image
- Pull image
- View mirror
- Start mirroring
- Stop mirroring
- Remove mirror
2. Install tomcat
Pull tomcat8 image and run it (with jdk)
// Pull image
docker pull billygoo/tomcat8-jdk8

// Find the image id of tomcat8
docker images

// Start tomcat8 image
docker run -d -p 8080:8080 --name="tomcat8-jdk8" tomcat8 image id

// Access on Browser http://ip:port/8080/ You can view the effect of tomcat home page
Expand: pull the latest tomcat image and run it
Pull the image and start the container:
// Pull tomcat image to local
docker pull tomcat

// Create a local tomcat container
docker run -d -p 8080:8080 tomcat
Change the webapps directory in the container and access tomcat on the browser:
tomcat 10:
  First pass docker ps notice tomcat Container, passing through docker exec -it container id /bin/bash get into tomcat After the container, we can ls -l Can see tomcat Under the root directory of webapp,webapps.dist Directory, where webapp Is an empty directory, then we use http://IP: port / 8080 / only shows 404 in the browser, so we need to use rm -rf webapp command to delete webapp directory, and webapp The dist directory contains the previous contents, so we need to use MV webapp List webapp to change the name, and then we http://ip:port/8080/ You can see the specific page

Low version tomcat:
  start-up tomcat Later pass http://ip:port/8080 /, you can see the specific page
3. Install mysql
Pull the image and start the container:
// Pull image
docker pull mysql:5.7

// Start container
docker run -d --name mysql5.7 -p 3306:3306 --privileged=true -v /docker/mysql/log:/var/log/mysql -v /docker/mysql/data:/var/lib/mysql -v /docker/mysql/conf:/etc/mysql/conf.d -e MYSQL_ROOT_PASSWORD=123456 mysql:5.7

// Set the coding method to avoid Chinese random code
 stay/docker/mysql/conf Create in my.cnf File, then insert the following contents into it and save;
[client]
default-character-set=utf8

[mysql]
default-character-set=utf8

[mysqld]
init_connect='SET collation_connection = utf8_unicode_ci'
init_connect='SET NAMES utf8'
character-set-server=utf8
collation-server=utf8_unicode_ci
skip-character-set-client-handshake
skip-name-resolve

// Restart mysql5 7 container
docker retstart mysql:5.7

// Enter container
docker exec -it mysql5.7 /bin/bash
be careful:
1. The command to start the container and set the password for the root user comes from the official website of dockerhub, as follows:
2. The command to start the container interrupts the container. The data volume represents logs, data and configuration files
4. redis installation
// Pull image
docker pull redis:6.0.8

// Create redis Directory to which conf belongs
mkdir /docker/reids/conf

// Redis.com in the following link Copy the conf file to the conf directory
 Link: https://pan.baidu.com/s/1OLPyYh0NcwmXlHIKhFr3dQ?pwd=oq8y
 Description of changing parameters: 1. Enable password verification and search“ requirepass"so 2. Notes“ bind 127.0.0.1",Allow external connections; 3. Set“ daemonize no",Avoid and docker run in-d Parameter conflict, resulting in container startup failure; 4. Set“ appendonly yes ",Turn on container persistence

// Create container
docker run -d -p 6379:6379 --privileged=true --name="redis6.0.8" -v /docker/redis/conf/redis.conf:/etc/redis/redis.conf -v /docker/redis/data:/data redis:6.0.8 redis-server /etc/redis/redis.conf
 explain: redis-server /etc/redis/redis.conf Representative in redis-server Use at startup/etc/redis/redis.conf

// Enter container
docker exec -it redis6.0.8 /bin/bash
9, Installation of complex software in docker (owed first)
1. mysql master-slave replication setup (owed first)
2. redis cluster setup (owed first)
10, Dockerfile
1. Concept
Dockerfile is a text file used to build Docker images. It is a script composed of instructions and parameters required to build images one by one
2. Official documents
https://docs.docker.com/engine/reference/builder/
3. Basic knowledge
- Each reserved word instruction must be a thank-you letter, and the instruction must be followed by at least one parameter
- The instructions are executed from top to bottom
- #: indicates a comment
- Each instruction creates a new mirror layer and commits the mirror
4. Execution process
- docker runs a container from the underlying image
- Execute an instruction and make changes to the container
- Perform an operation similar to docker commit and submit a new image layer
- docker runs a new container based on the image just submitted
- Execute the next instruction in the dockerfile until all instructions are executed
5. Three steps of construction
- Write Dockfile file
- Use the docker build command to build the image
- Use docker run XXX to run the container instance for the image

6. Common reserved word instruction
Note: the address of the Dockfile reference configuration file that describes the reserved word instruction: https://github.com/docker-library/tomcat/blob/master/10.0/jdk8/corretto/Dockerfile
FROM
Which image is the current new image based on? Instruct an existing image, for example: from Amazon corretto: 8
MAINTAINER
Name and email address of the image maintainer
RUN
1,effect
 Commands to run when building containers

2,format
(1)shell Format (common): the method of use is RUN <Command line command>,among<Command line command>Equivalent to operating at the terminal shell command
(2)exec Format: the method of use is RUN ["Executable file", "Parameter 1", "Parameter 2"],for example RUN ["./test.php", "dev", "offline"]Equivalent to RUN ./test.php dev offline
EXPOST
The exposed port of the current container, for example: export 8080
WROKDIR
Specify the working directory that the terminal will log in by default after creating the container. For example, the dockerfile of redis says WORKDIR /data, and then we use the docker exec... Command to log in. The directory we see is / data
USER
Specify the user after logging in to the image. If not specified, it means root
ENV
It is used to set and store the environment variable value in the process of building the image. The use method is: ENV variable name variable value, and then the variable value can be used elsewhere through the $variable name, for example:
ENV CATALINA_HOME /usr/local/tomcat
ENV PATH $CATALINA_HOME/bin:$PATH
RUN mkdir -p "$CATALINA_HOME"
WORKDIR $CATALINA_HOME
VALUME
Container data volume is used for data saving and persistence, such as VOLUME /data
ADD
1,effect
 Copy the files in the host directory to the image and process them automatically URL And decompress the compressed package; amount to COPY And decompression operation;

2,The compressed package is renamed and decompressed first
 If you need to rename the compressed package and decompress it, you can do this: ADD The name of the changed package
COPY
Similar to ADD, copy files or directories to the image. Copy the file / directory from the < source path > in the build context directory to the < target path > location in the new layer of image, as explained below:

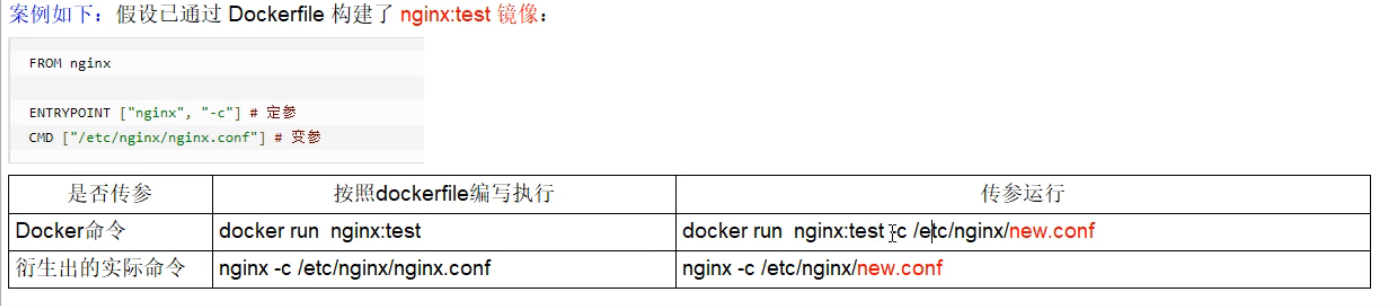
CMD
1,effect
 Specify what needs to be done after the container starts

2,Start command
(1)shell Format: CMD <command>
(2)exec Format: CMD ["Executable file", "Parameter 1", "Parameter 2"......]
(3)Parameter list format: CMD ["Parameter 1", "Parameter 2"......],Specified in ENTRYPOINT After the command, use CMD Specify specific parameters

3,matters needing attention
(1)Dockerfile There can be more than one CMD Directive, but only the last one takes effect, that is, the following CMD The instruction will overwrite all previous CMD instructions
(2)CMD The executable file in the instruction will be deleted docker run Subsequent executable replacement
 Explanation: start before tomcat8 When I was, the command I used was docker run -it 8080:8080 tomcat /bin/bash,adopt docker ps You can also see tomcat Container started successfully,
But visit localhost:8080 But there are no pages, which means tomcat It didn't start successfully. We can have a look tomcat8 of Dockfile Documents, as follows:
CMD ["catalina.sh", run]
It is equivalent to starting after the container starts tomcat,However, after executing the above command to create a container, this line of command changes as follows:
CMD ["/bin/bash", run]
therefore tomcat In fact, it didn't really start, which is the crux of the problem

4,CMD and RUN Differences between
 The running time is different: RUN Yes docker build When running, and CMD Yes docker run Run when
ENTRYPOINT
1,effect
 Specify what needs to be done after the container starts

2,Command format
ENTERYPOINT ["instructions", "Parameter 1", "Parameter 2"......]

3,be careful
(1),Can put CMD write to ENTERYPOINT Back, here CMD The role of becomes ENTERYPOINT Pass parameters, such as:
ENTERYPOINT ["instructions", "Parameter 1", "Parameter 2"]
CMD["Parameter 3"]
Equivalent to:
ENTERYPOINT ["instructions", "Parameter 1", "Parameter 2", "Parameter 3"]
(2),If we follow the above example, we use it at this time docker run Start the container and then in the back docker run Parameter 4 is added later,
So according to CMD Parameter 3 will be docker run Replace the following parameter 4. The case is as follows:
Dockerfile The content in the is still:
ENTERYPOINT ["instructions", "Parameter 1", "Parameter 2"]
CMD["Parameter 3"]
The command to create a container is as follows:
docker run -it XXX Parameter 4,
So what's up there Dockerfile The content of the becomes as follows:
ENTERYPOINT ["instructions", "Parameter 1", "Parameter 2"]
CMD["Parameter 4"]
Equivalent to:
ENTERYPOINT ["instructions", "Parameter 1", "Parameter 2", "Parameter 4"]
Examples are as follows:
Summary

Dockerfile write and build image case demonstration (install and configure jdk on centos)
source material:
jdk-8u121-linux-x64.tar.gz: https://pan.baidu.com/s/1FQu5gB6nUiLU7U5mttNvhQ , password: cm55
Write Dockerfile (file name: Dockerfile):
# Basic image: centos
FROM centos
# Name and email address of the image maintainer
MAINTAINER Bright de Xuanmi 61<helloworld@qq.com>

# Define environment variables
ENV MYPATH /usr/local
# Location of the first entry into the container
WORKDIR $MYPATH

# Install vim editor
RUN yum -y install vim
#Install ifconfig command to view network IP
RUN yum -y install net-tools
#Install java8 and lib Libraries
RUN yum -y install glibc.i686
# Install the jdk under the / usr/local/java directory
RUN mkdir /usr/local/java
#ADD is the relative path jar, jdk-8u121-linux-x64 tar. GZ is added to the container, and the installation package must be in the same directory as the Dockerfile file
ADD jdk-8u121-linux-x64.tar.gz /usr/local/java/
#Configuring java environment variables
ENV JAVA_HOME /usr/local/java/jdk1.8.0_121
ENV JRE_HOME $JAVA_HOME/jre
ENV CLASSPATH $JAVA_HOME/lib/dt.jar:$JAVA_HOME/lib/tools.jar:$JRE_HOME/lib:$CLASSPATH
ENV PATH $JAVA_HOME/bin:$PATH

# Expose 80 ports
EXPOSE 80

# Output the first entry directory
CMD echo $MYPATH
CMD echo "success--------------ok"

# The commands to be executed after the container is started, so we don't need to add / bin/bash after docker run
CMD /bin/bash
Build image:
The command is as follows:
docker build -t centos-java8:1.0 .
Corresponding to - t, the explanation of docker build --help is as follows:
  -t, --tag list                Name and optionally a tag in the 'name:tag' format
      --target string           Set the target build stage to build.
      --ulimit ulimit           Ulimit options (default [])
Using the first explanation this time, we can see that the name of the image is centos-java8, while the tag is 1.0, and then Represents the current directory and the location of the Dockerfile file
Virtual image creation, query and deletion
Create a virtual mirror:
Write a Dockerfile file (the name is Dockerfile), as follows:
FROM centos
CMD echo "successful!"
Run the command to build the image as follows:
docker bulid .
This time, - t is not used to set the image name and image label, so you can see the following through docker images:
REPOSITORY              TAG       IMAGE ID       CREATED          SIZE
<none>                  <none>    328182347781   7 seconds ago    231MB
View all suspended mirrors:
docker image ls -f dangling=true
Delete all suspended mirrors:
// Execute the following command, and then the selection item appears. You need to enter y and enter
docker image prune
Write Dockerfile to publish microservices
Create and run microservices to ensure that they can be accessed by the browser after being started in the IDEA, and then type the jar package. This can be operated by the teacher. Here is the jar package
https://pan.baidu.com/s/1TPOLIhKN_9jQCkSlAf53Pg?pwd=900t
Upload the jar package to linux, and then write Dockerfile under the same level directory, as follows:
# The basic image uses java
FROM java:8
# author
MAINTAINER Bright de Xuanmi 61
# VOLUME specifies the temporary file directory as / tmp. A temporary file is created in the host / var/lib/docker directory and linked to / tmp of the container
VOLUME /tmp
# Add the jar package to the container and rename springbootdockertest jar
ADD docker-demo-0.0.1-SNAPSHOT.jar springBootDockerTest.jar
# Run the jar package
RUN bash -c 'touch /springBootDockerTest.jar'
ENTRYPOINT ["java", "-jar", "/springBootDockerTest.jar"]
# Expose 6001 port. After all, the port exposed by the program is 6001
EXPOSE 6001
The placement path is as follows:

Build Dockerfile and generate image
docker build -t springbootdockertest:1.0 .
Start the springBootDockerTest image
docker run -d -p 6001:6001 springbootdockertest
Since the port used in the micro service is 6001, we also need to expose 6001 and access ip:6001 / port on the browser
11, docker network
1. Common commands of docker network
// View all docker networks
docker network ls
 Explanation:
NETWORK ID     NAME      DRIVER    SCOPE
 network id         Network name     drive       Range

// View details of docker network / image / container
docker inspect id/name

// Create docker network
docker network create Network name

// Delete docker network
docker network rm network id/name
2. Explanation of executing ifconfig command on linux host
Case 1: docker is not started
ens33: flags=4163<UP,BROADCAST,RUNNING,MULTICAST>  mtu 1500
        inet 192.168.139.129  netmask 255.255.255.0  broadcast 192.168.139.255
        inet6 fe80::1797:c3de:f94c:2a7  prefixlen 64  scopeid 0x20<link>
        ether 00:0c:29:64:09:f9  txqueuelen 1000  (Ethernet)
        RX packets 1437  bytes 112583 (109.9 KiB)
        RX errors 0  dropped 0  overruns 0  frame 0
        TX packets 1069  bytes 103821 (101.3 KiB)
        TX errors 0  dropped 0 overruns 0  carrier 0  collisions 0

lo: flags=73<UP,LOOPBACK,RUNNING>  mtu 65536
        inet 127.0.0.1  netmask 255.0.0.0
        inet6 ::1  prefixlen 128  scopeid 0x10<host>
        loop  txqueuelen 1  (Local Loopback)
        RX packets 72  bytes 6260 (6.1 KiB)
        RX errors 0  dropped 0  overruns 0  frame 0
        TX packets 72  bytes 6260 (6.1 KiB)
        TX errors 0  dropped 0 overruns 0  carrier 0  collisions 0

virbr0: flags=4099<UP,BROADCAST,MULTICAST>  mtu 1500
        inet 192.168.122.1  netmask 255.255.255.0  broadcast 192.168.122.255
        ether 52:54:00:c2:8d:e4  txqueuelen 1000  (Ethernet)
        RX packets 0  bytes 0 (0.0 B)
        RX errors 0  dropped 0  overruns 0  frame 0
        TX packets 0  bytes 0 (0.0 B)
        TX errors 0  dropped 0 overruns 0  carrier 0  collisions 0
Explanation:
ens33 is our commonly used network. If you execute ipcofnig on windows machine, you can see the following:
ethernet adapter  VMware Network Adapter VMnet8:
   Connect specific DNS suffix . . . . . . . :
   Local link IPv6 address. . . . . . . . : fe80::b994:d4d7:5e45:28fd%9
   IPv4 address . . . . . . . . . . . . : 192.168.139.1
   Subnet mask  . . . . . . . . . . . . : 255.255.255.0
   Default gateway. . . . . . . . . . . . . :
So we can see that they are consistent with the top three ip addresses of ens33
lo is the local network of the virtual machine, representing localhost
Then, the explanation of virbr0 is as follows: during the installation of CentOS7, if relevant virtualization services are selected to install the system, when starting the network card, you will find a virbr0 network card with a private network address connected by the network bridge (virbr0 network card: it also has a fixed default IP address 192.168.122.1), which is used as a virtual machine network bridge, Its function is to provide NAT access to the external network for the virtual machine network card connected to it.
Case 2: start docker
docker0: flags=4099<UP,BROADCAST,MULTICAST>  mtu 1500
        inet 172.17.0.1  netmask 255.255.0.0  broadcast 172.17.255.255
        ether 02:42:20:82:b2:a9  txqueuelen 0  (Ethernet)
        RX packets 0  bytes 0 (0.0 B)
        RX errors 0  dropped 0  overruns 0  frame 0
        TX packets 0  bytes 0 (0.0 B)
        TX errors 0  dropped 0 overruns 0  carrier 0  collisions 0

ens33: flags=4163<UP,BROADCAST,RUNNING,MULTICAST>  mtu 1500
        inet 192.168.139.129  netmask 255.255.255.0  broadcast 192.168.139.255
        inet6 fe80::1797:c3de:f94c:2a7  prefixlen 64  scopeid 0x20<link>
        ether 00:0c:29:64:09:f9  txqueuelen 1000  (Ethernet)
        RX packets 1437  bytes 112583 (109.9 KiB)
        RX errors 0  dropped 0  overruns 0  frame 0
        TX packets 1069  bytes 103821 (101.3 KiB)
        TX errors 0  dropped 0 overruns 0  carrier 0  collisions 0

lo: flags=73<UP,LOOPBACK,RUNNING>  mtu 65536
        inet 127.0.0.1  netmask 255.0.0.0
        inet6 ::1  prefixlen 128  scopeid 0x10<host>
        loop  txqueuelen 1  (Local Loopback)
        RX packets 72  bytes 6260 (6.1 KiB)
        RX errors 0  dropped 0  overruns 0  frame 0
        TX packets 72  bytes 6260 (6.1 KiB)
        TX errors 0  dropped 0 overruns 0  carrier 0  collisions 0

virbr0: flags=4099<UP,BROADCAST,MULTICAST>  mtu 1500
        inet 192.168.122.1  netmask 255.255.255.0  broadcast 192.168.122.255
        ether 52:54:00:c2:8d:e4  txqueuelen 1000  (Ethernet)
        RX packets 0  bytes 0 (0.0 B)
        RX errors 0  dropped 0  overruns 0  frame 0
        TX packets 0  bytes 0 (0.0 B)
        TX errors 0  dropped 0 overruns 0  carrier 0  collisions 0
Explanation:
It can be seen that there is an additional docker0 compared with the previous one. If we use docker inspect bridge, we can see the following:
[
    {
        "Name": "bridge",
        "Id": "9f79433911aaa5bb259b389bbbfd7a15a52b866089769a148297ebe0f5d5189c",
        "Created": "2022-02-02T18:39:32.703246041+08:00",
        "Scope": "local",
        "Driver": "bridge",
        "EnableIPv6": false,
        "IPAM": {
            "Driver": "default",
            "Options": null,
            "Config": [
                {
                    "Subnet": "172.17.0.0/16",
                    "Gateway": "172.17.0.1"
                }
            ]
        },
        "Internal": false,
        "Attachable": false,
        "Ingress": false,
        "ConfigFrom": {
            "Network": ""
        },
        "ConfigOnly": false,
        "Containers": {},
        "Options": {
            "com.docker.network.bridge.default_bridge": "true",
            "com.docker.network.bridge.enable_icc": "true",
            "com.docker.network.bridge.enable_ip_masquerade": "true",
            "com.docker.network.bridge.host_binding_ipv4": "0.0.0.0",
            "com.docker.network.bridge.name": "docker0",
            "com.docker.network.driver.mtu": "1500"
        },
        "Labels": {}
    }
]
The penultimate line is the source of docker0 after we execute ifconfig command on the linux host
3. Four docker network models
3.1 overview
3.2. The ip address of docker container will change
// Pull ubuntu image
docker pull ubuntu

// Create a ubuntu container called u1
docker run -it --name u1 ubuntu // Remember to use Ctrl+p+q to exit

// Create a ubuntu container called u2
docker run -it --name u2 ubuntu // Remember to use Ctrl+p+q to exit

// View container details with container name u1
docker inspect u1 | tail -n 20
 Explanation: the information is as follows:
            "Networks": {
                "bridge": {
                    "IPAMConfig": null,
                    "Links": null,
                    "Aliases": null,
                    "NetworkID": "9f79433911aaa5bb259b389bbbfd7a15a52b866089769a148297ebe0f5d5189c",
                    "EndpointID": "f30f0369ef17ce53019a36ce1fb4b0bed8db7e8c53b2f3a81e7b1bab18d2bb3f",
                    "Gateway": "172.17.0.1",
                    "IPAddress": "172.17.0.2",
                    "IPPrefixLen": 16,
                    "IPv6Gateway": "",
                    "GlobalIPv6Address": "",
                    "GlobalIPv6PrefixLen": 0,
                    "MacAddress": "02:42:ac:11:00:02",
                    "DriverOpts": null
                }
            }
        }
    }
]
It can be seen that the network mode is bridge Mode, and IPAddress It's 172.17.0.2


// View container details with container name u2
docker inspect u2 | tail -n 20
 Explanation: the information is as follows:
            "Networks": {
                "bridge": {
                    "IPAMConfig": null,
                    "Links": null,
                    "Aliases": null,
                    "NetworkID": "9f79433911aaa5bb259b389bbbfd7a15a52b866089769a148297ebe0f5d5189c",
                    "EndpointID": "4627925092ee5bc045a3ea77c2051790418be30f8e60cdda4a233240d6080dcd",
                    "Gateway": "172.17.0.1",
                    "IPAddress": "172.17.0.3",
                    "IPPrefixLen": 16,
                    "IPv6Gateway": "",
                    "GlobalIPv6Address": "",
                    "GlobalIPv6PrefixLen": 0,
                    "MacAddress": "02:42:ac:11:00:03",
                    "DriverOpts": null
                }
            }
        }
    }
]
It can be seen that the network mode is bridge Mode, and IPAddress It's 172.17.0.3

// Delete the container named u2, create the ubuntu container named u2, and view the details of the container named u3
docker rm -f u2
docker run -it --name u3 ubuntu // Remember to use Ctrl+p+q to exit
docker inspect u3 | tail -n 20
 Explanation: the information is as follows:
            "Networks": {
                "bridge": {
                    "IPAMConfig": null,
                    "Links": null,
                    "Aliases": null,
                    "NetworkID": "9f79433911aaa5bb259b389bbbfd7a15a52b866089769a148297ebe0f5d5189c",
                    "EndpointID": "0446438ebdaed3a9a112e66beda7ccc5e4b95c643d2cd6c770cfb8e0cc59ba05",
                    "Gateway": "172.17.0.1",
                    "IPAddress": "172.17.0.3",
                    "IPPrefixLen": 16,
                    "IPv6Gateway": "",
                    "GlobalIPv6Address": "",
                    "GlobalIPv6PrefixLen": 0,
                    "MacAddress": "02:42:ac:11:00:03",
                    "DriverOpts": null
                }
            }
        }
    }
]
It can be seen that the network mode is bridge Mode, and IPAddress It's 172.17.0.3,Therefore, it can be explained that after the container is deleted, its original ip It will become another container ip address
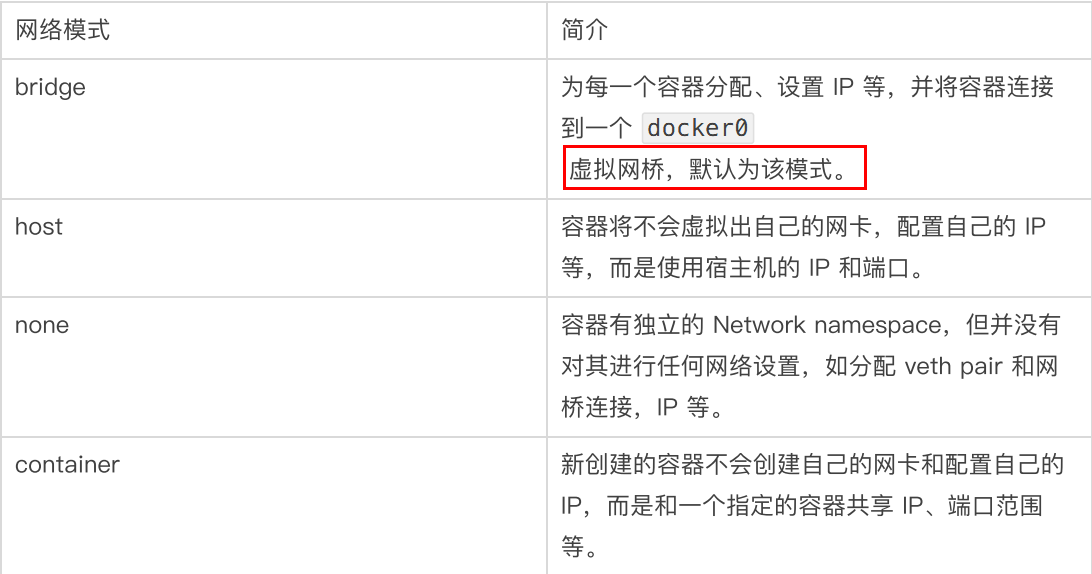
3.3,bridge
3.3.1 concept
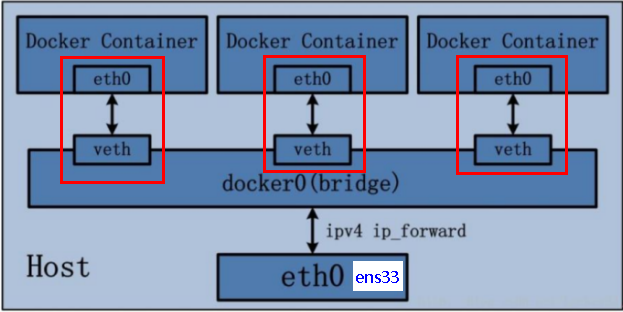
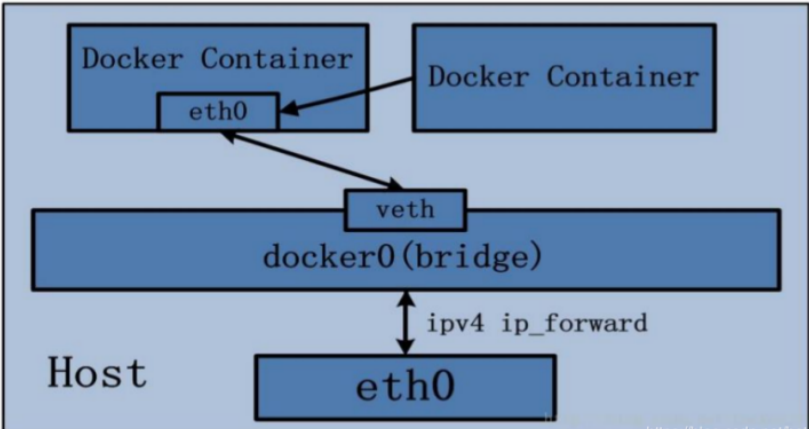
Docker service will create a docker0 bridge (with an internal interface of docker0) by default. The name of the bridge network is docker0, which connects other physical network cards or virtual network cards in the kernel layer. Docker specifies the IP address and subnet mask of the docker0 interface by default. The docker0 bridge is used to bridge the communication between hosts and containers, which puts all containers and local hosts on the same physical network.
3.3.2 description
- When the docker run command is executed, if the bridge mode is not specified, the bridge mode is used. After the docker container is started, a docker container bridge (docker0) will be virtualized in the linux virtual machine. The container started through the bridge mode will take the ip address of docker0 as the gateway and allocate the corresponding ip address according to the invariance principle of the first three segments of the gateway, In the above command, you can view the bridge mode and ip address used by the container through docker inspect container id / name | tail -n 20
- Bridge docker0 will create peer-to-peer virtual device interfaces, one of which is veth and the other is eth0. Because all docker containers are connected with bridge docker0, and bridge docker0 is connected with linux host, containers, containers and host can communicate with each other.
3.3.3 verification
Execute the following command:
// Create tomcat8081 container
docker run -d -p 8081:8080 --name tomcat8081 billygoo/tomcat8-jdk8

// Create tomcat8082 container
docker run -d -p 8082:8080 --name tomcat8082 billygoo/tomcat8-jdk8

// Log in to the tomcat8081 container in a new window
docker exec -it tomcat8081 /bin/bash

// Log in to the tomcat8082 container in a new window
docker exec -it tomcat8082 /bin/bash
Execute the ip addr command on the Linux host, and the results are as follows:

Execute the ip addr command inside the tomcat8081 container, as follows:

Execute the ip addr command inside the tomcat8082 container, as follows:
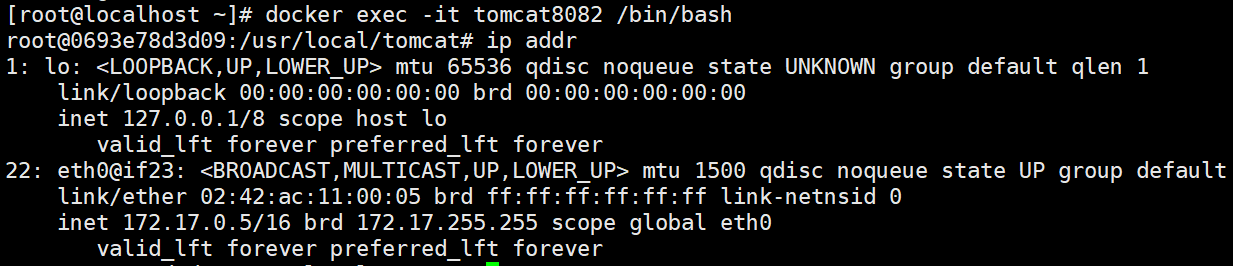
The comparison shows that the linux host is 19: veth67b4e46@if18 And 23: veth76b3f9f@if22 , then the tomcat8081 container is 18: eth0@if19 , but in the tomcat8082 container is 22: eth0@if23 , which also confirms the one-to-one correspondence between docker0 gateway Veth and container eth0 in the above picture
3.4,host
3.4.1 concept
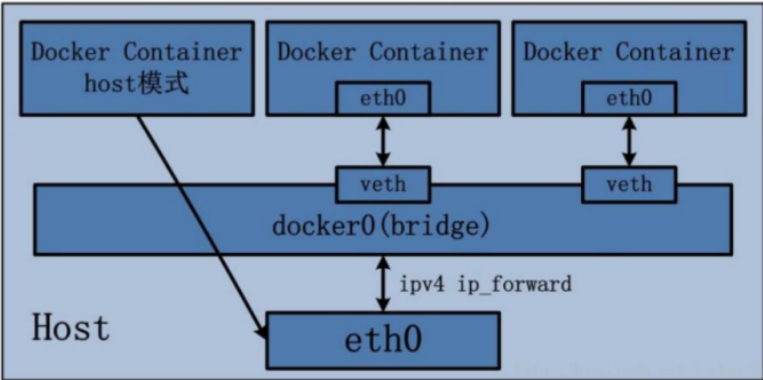
The ip address of the host is directly multiplexed to communicate with the outside world, instead of being converted through the docker0 gateway
3.4.2 description
The container will not get a separate Network Namespace, but will share a Network Namespace with the host. The container will not virtualize its own network card, but use the IP and port of the host. If the port that the container wants to use has been occupied, the port used by the container will increase on the original basis until a suitable port is found. Assuming that port 8080 has been occupied by other containers, and then the tomcat container starts in host mode, the tomcat container will use port 8081
3.4.3 verification
Execute the following command:
docker run -d --network host --name tomcat8083 billygoo/tomcat8-jdk8
Since the network mode is the host mode, the tomcat container and the linux host share ip and port. Therefore, the default port of the container is the port used. If the port is occupied, the end port will increase. Therefore, you do not need to use the - p command to set the port. Of course, if - p is used to set the port, it will not play any role. It is the same as not using - p, and a warning will appear: Published ports are discarded when using host network mode
If the addr command is executed in the linux host, we can see the same effect as the addr command in the host
Then we can visit http://ip:8080 To verify, of course, it is best to verify in the linux browser to avoid incorrect results
3.5,none
3.5.1 concept
In the none mode, no network configuration is performed for the Docker container. In other words, the Docker container has no network card, IP, routing and other information, but only one lo. We need to add network card and configure IP for Docker container. In other words, the network function is disabled, and only lo identification is available (127.0.0.1 indicates local loopback)
3.5.2 verification
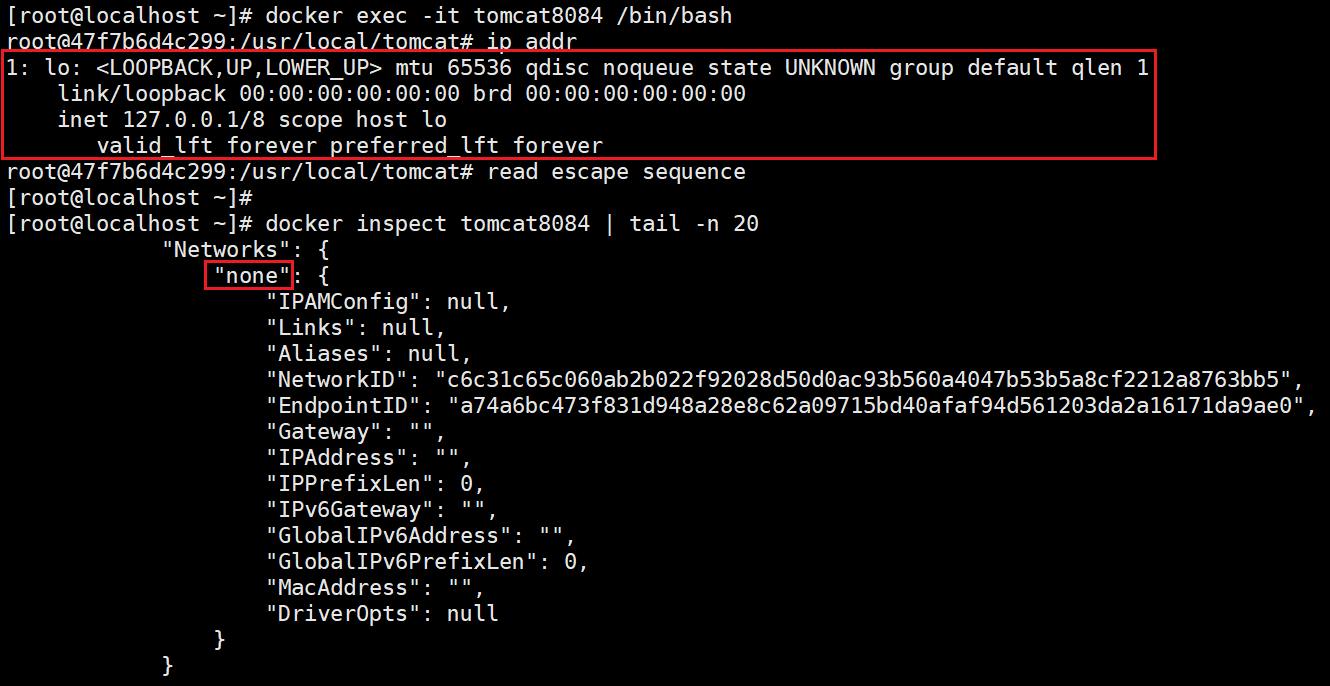
Execute the following command:
docker run -d --network none --name tomcat8084 billygoo/tomcat8-jdk8
After entering the container, use the result of ip addr to view the container details in the linux host as follows:
3.6,container
3.6.1 concept
The newly created container depends on the created container and shares the same set of ip and port with the created container. We can see the same results in the above two containers through the ip addr command. In addition to the network, other aspects such as file system and process list are isolated
3.6.2 verification
Since the newly created container and the original container share the same set of ip and port, tomcat cannot be used for testing. After all, the ports of tomcat will conflict, so we use alpine (small tomcat) to demonstrate. The execution commands are as follows:
// Pull alpine
docker pull alpine

// Create container alpine1
docker run -it --name alpine1 alpine:latest

// Execute the ip addr command. After execution, use Ctrl+p+q to exit
ip addr

// Create container alpine2
docker run -it --name alpine1 alpine:latest

// Execute the ip addr command. Don't quit, or you won't be able to log in. After all, you have to execute ip addr later
ip addr
The implementation effect is as follows:
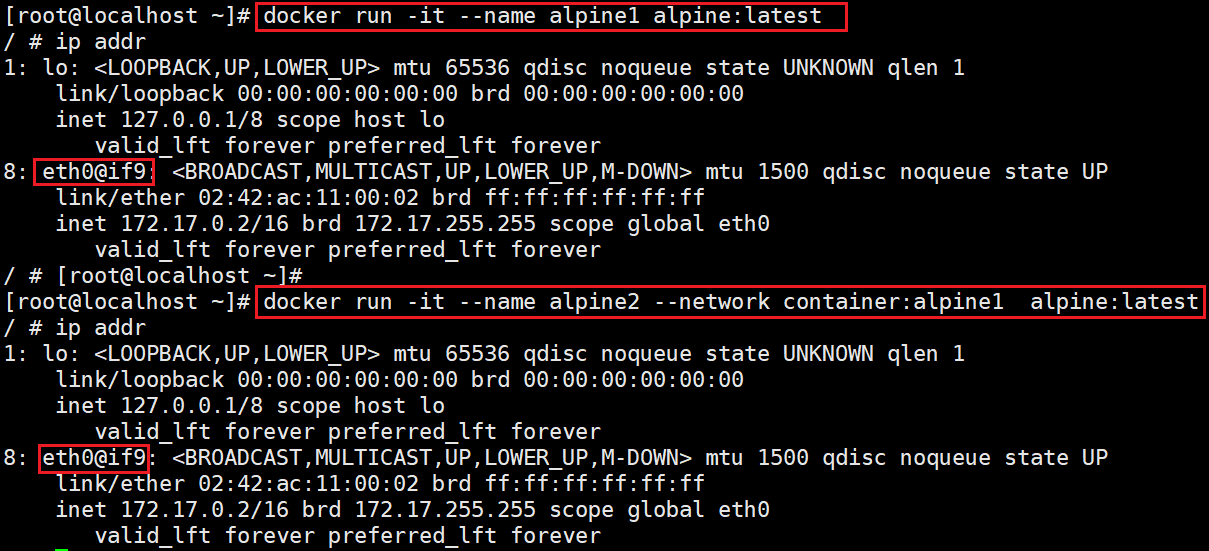
Since container alpine2 is attached to container alpine1, we can open a new window to execute docker stop alpine1. Then we stop container alpine1 at this time and look at the network status of container alpine2 as follows:

You can only have one lo left
3.7. User defined network
3.7.1 concept
The custom network itself maintains the corresponding relationship between the container name and ip. We can ping the corresponding container by using ip or container name
3.7.2. Solve pain points
If the two containers need to communicate, we can't write the ip. After all, the ip may change after the container is restarted, so what we need to write is the container name. Then we need to enable the communication between the two containers through the container name, which requires the user-defined network
This situation is often used when building clusters. For example, the communication between redis clusters should use the container name instead of ip
3.7.3 verification
Execute the following command:
// Create a custom network where custom_nework is a custom network name
docker network create custom_network

// Create container tomat81 and use custom network
docker run -it -p 8081:8080 --network custom_network --name tomcat81 billygoo/tomcat8-jdk8

// Create the container tomat82 and use the custom network. Remember to open a new window when executing the following command
docker run -it -p 8082:8080 --network custom_network --name tomcat82 billygoo/tomcat8-jdk8

// Execute the ping command in the container tomcat81 and find that you can ping the connection
ping tomcat82

// Execute the ping command in the container tomcat82 and find that you can ping the connection
ping tomcat81
When building the cluster, we no longer need to write the ip address, but only the container name. We don't have to worry about the change of the ip address after the container restarts, which also makes the docker container network well planned
12, compose
1. Install compose
(1) Locate the installation document location
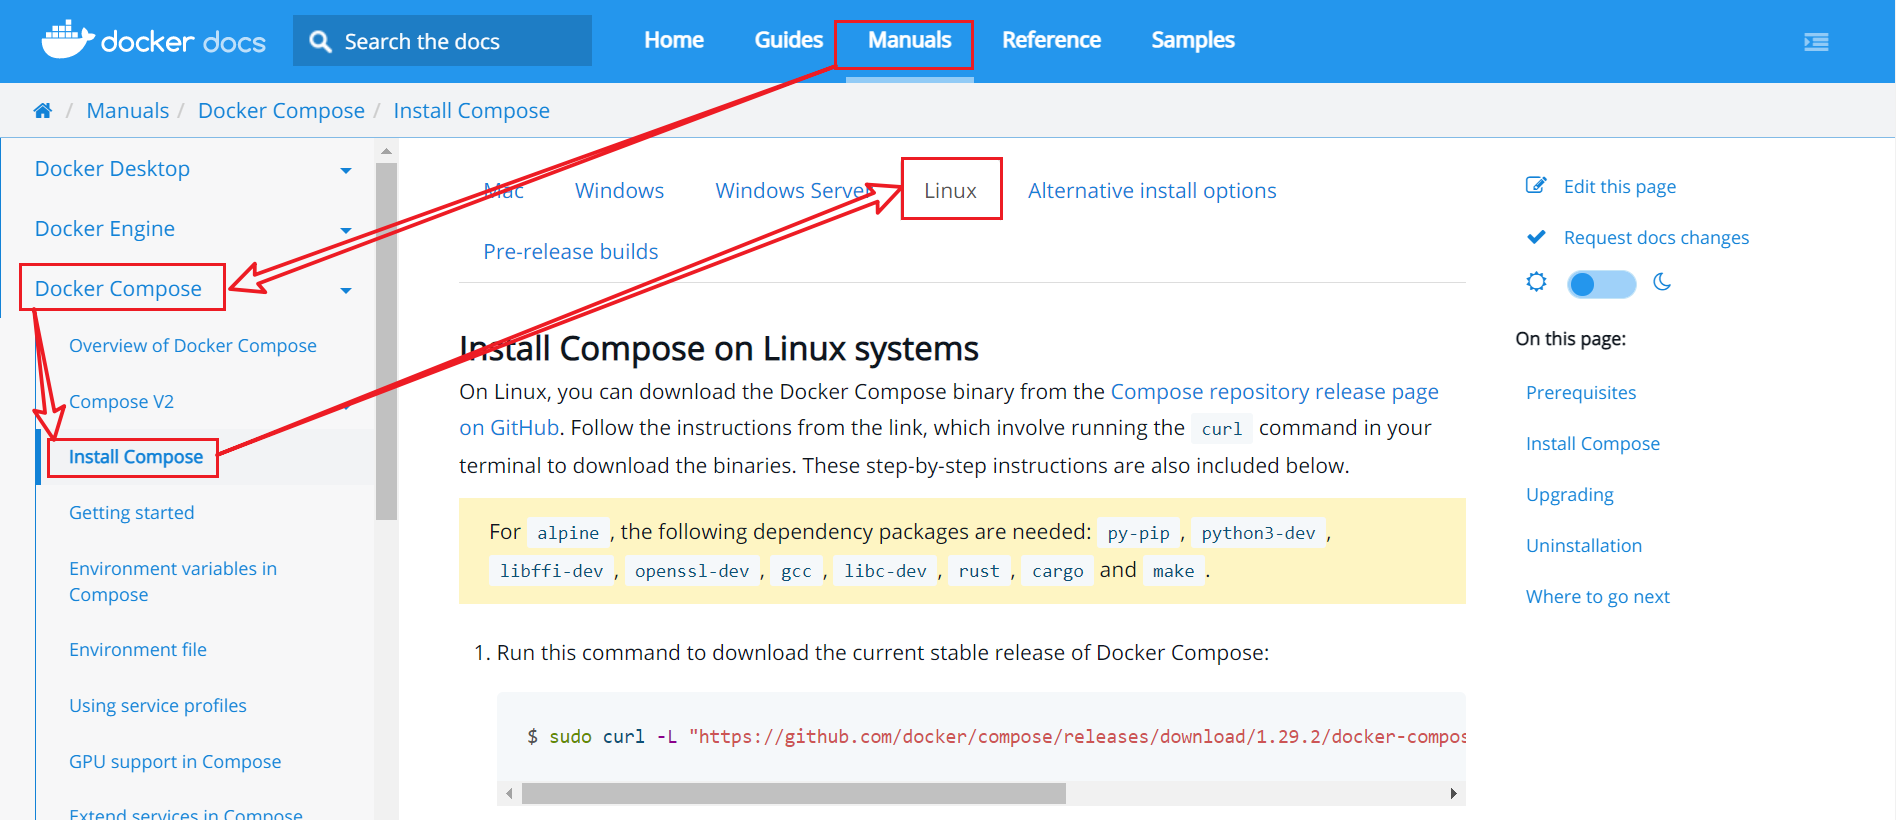
Log in first Official website , and then find the installation document location as follows:
(2) Install compose
Remember to log in as root and execute the following command:
curl -L "https://github.com/docker/compose/releases/download/1.29.2/docker-compose-$(uname -s)-$(uname -m)" -o /usr/local/bin/docker-compose
(3) Give docker compose executable permission
chmod +x /usr/local/bin/docker-compose
(4) Verify the compose version
docker-compose --version
If docker compose version 1.29.2 appears, build 5becea4c indicates that compose installation is successful
2. Uninstall compose
Log in first Official website , and then find the location of the uninstalled document as follows:
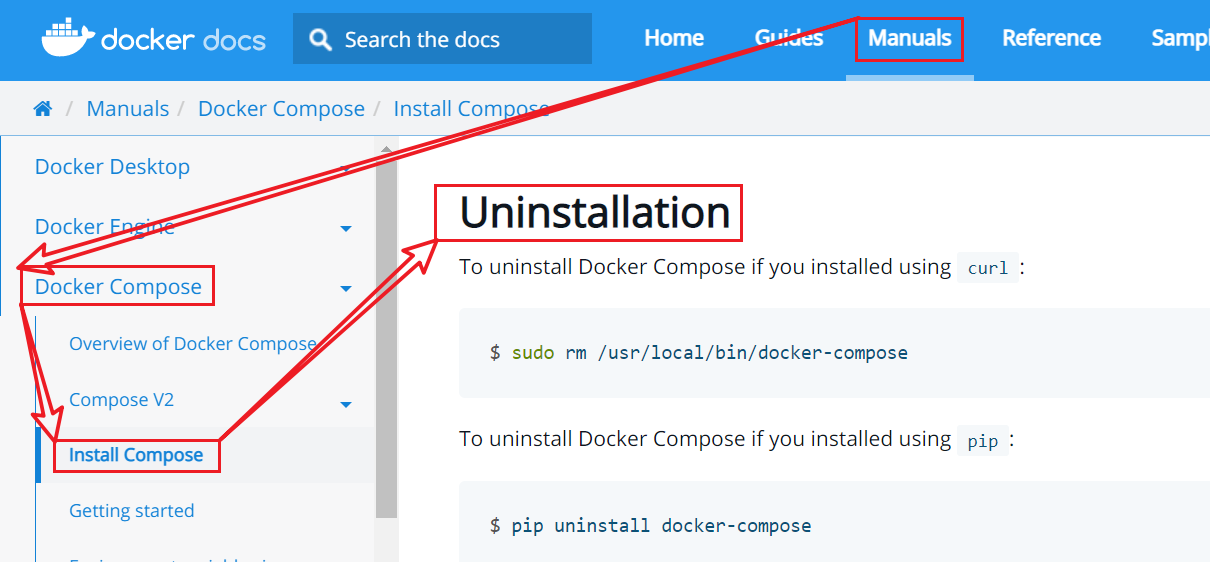
Since we use the curl command to install, execute the following command:
rm /usr/local/bin/docker-compose
3. Knowledge points related to compose
3.1 concept
Compose is a tool software launched by Docker company, which can manage multiple Docker containers to form an application. You need to define a YAML configuration file Docker compose YML, write the calling relationship between multiple containers. Then, with one command, these containers can be started / closed at the same time
3.2. Solve pain points
Deploying a web microservice project includes not only the microservice container itself, but also redis, mysql and other containers. If you use the docker run command, it will be too tired to start and close all these containers. Therefore, docker officials provide us with a docker compose multi service deployment tool. Compose allows users to use a separate docker-compose YML template file (YAML format) to define a set of associated application containers, which is also called a project.
3.3. Name of compose file
docker-compose.yml
3.4 compose services and Engineering
Services:
Application container instances, such as order micro service, inventory micro service, mysql container, nginx container or redis container
Project:
A complete business unit composed of a group of associated application containers needs to be in docker-compose.com Defined in YML file
3.5. Use steps of compose
Step 1:
Write the Dockerfile file corresponding to each micro service application, and build the corresponding image (excluding the image formed by redis, mysql, etc.)
Step 2:
Write docker compose YML is used to define a complete business unit and arrange various container services in the overall application.
Step 3:
Execute the docker compose up command to start and run the entire application, and complete the one click deployment online
4. compose common commands
docker-compose -h   # view help
docker-compose up   # Start all docker compose services (a log will appear on the console), that is, start docker compose xml
docker-compose up -d   # Start all docker compose services and run in the background
docker-compose down   # Stop and delete containers, networks, volumes, mirrors.
docker-compose exec yml Service inside id   # Enter docker compose exec docker compose.exe in the container instance The service ID written in the YML file is / bin / bash
docker-compose ps   # Display all the containers that have been choreographed and run by the current docker compose
docker-compose top   # Show the container processes currently choreographed by docker compose
docker-compose logs  yml Service inside id   # View container output log
docker-compose config   # Check configuration
docker-compose config -q   # Check the configuration and output only if there is a problem
docker-compose restart   # Restart service
docker-compose start   # Start service
docker-compose stop   # Out of Service
5. Write docker compose XML publishing microservice
5.1. Create micro service image
Create and run microservices to ensure that they can be accessed by the browser after being started in the IDEA, and then type the jar package. This can be operated by the teacher. Here is the jar package
https://pan.baidu.com/s/1TPOLIhKN_9jQCkSlAf53Pg?pwd=900t
Upload the jar package to linux, and then write Dockerfile under the same level directory, as follows:
# The basic image uses java
FROM java:8
# author
MAINTAINER Bright de Xuanmi 61
# VOLUME specifies the temporary file directory as / tmp. A temporary file is created in the host / var/lib/docker directory and linked to / tmp of the container
VOLUME /tmp
# Add the jar package to the container and rename springbootdockertest jar
ADD docker-demo-0.0.1-SNAPSHOT.jar springBootDockerTest.jar
# Run the jar package
RUN bash -c 'touch /springBootDockerTest.jar'
ENTRYPOINT ["java", "-jar", "/springBootDockerTest.jar"]
# Expose 6001 port. After all, the port exposed by the program is 6001
EXPOSE 6001
The placement path is as follows:

Build Dockerfile and generate image
docker build -t springbootdockertest:1.0 .
5.2. Prepare docker compose yml
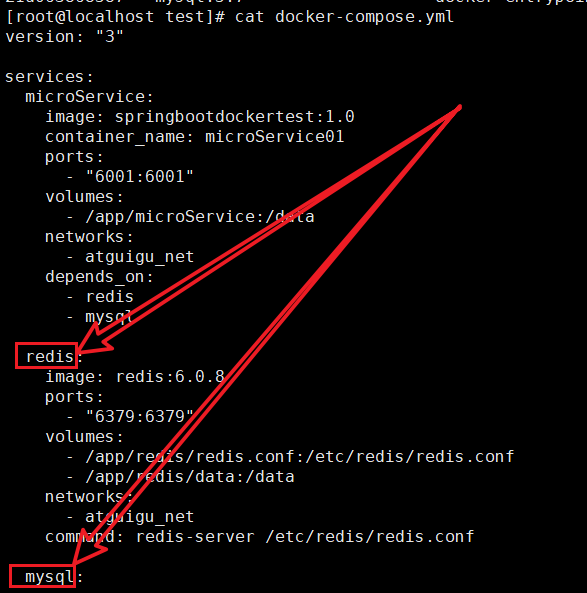
# The compose version needs to be 3, which corresponds to the docker version. Document address: https://docs.docker.com/compose/compose-file/compose-file-v3
version: "3"

# All services are placed under services
services:
  # The microService name is microService
  microService:
    # Spring bootlocker test: 1.0 is the image name and label
    image: springbootdockertest:1.0
    # Specify container name
    container_name: microService01
    # Specify container port mapping
    ports:
      - "6001:6001"
    # Specify container plug-in address
    volumes:
      - /app/microService:/data
    # Specifies the network used by the container
    networks:
      - atguigu_net
    # The dependent services, that is, the following two services, can be started before starting the microservice container
    depends_on:
      - redis
      - mysql

  redis:
    image: redis:6.0.8
    ports:
      - "6379:6379"
    volumes:
      - /app/redis/redis.conf:/etc/redis/redis.conf
      - /app/redis/data:/data
    networks:
      - atguigu_net
    # Commands to be executed after container startup
    command: redis-server /etc/redis/redis.conf

  mysql:
    image: mysql:5.7
    environment:
      MYSQL_ROOT_PASSWORD: '123456'
      MYSQL_ALLOW_EMPTY_PASSWORD: 'no'
      MYSQL_DATABASE: 'db2021'
      MYSQL_USER: 'zzyy'
      MYSQL_PASSWORD: 'zzyy123'
    ports:
       - "3306:3306"
    volumes:
       - /app/mysql/db:/var/lib/mysql
       - /app/mysql/conf/my.cnf:/etc/my.cnf
       - /app/mysql/init:/docker-entrypoint-initdb.d
    networks:
      - atguigu_net
     #Solve the problem of external inaccessibility
    command: --default-authentication-plugin=mysql_native_password

# Create a network where atguigu_net is the network name. After the network name: it cannot be missing
networks:
   atguigu_net:
The placement path is as follows:
5.3. Start compose
docker-compose up -d
5.4. Create test environment
After startup, use docker ps to find the container id of the mysql container, use docker exec -it mysql container id /bin/bash to enter the container, use mysql -uroot -p123456 to log in to the root user, and execute create database db2021 on the command line; Create the database, and then use use db2021; Switch the database, and then execute the following table creation statement:
CREATE TABLE `t_user` (
  `id` int(10) unsigned NOT NULL AUTO_INCREMENT,
  `username` varchar(50) NOT NULL DEFAULT '' COMMENT 'user name',
  `password` varchar(50) NOT NULL DEFAULT '' COMMENT 'password',
  `sex` tinyint(4) NOT NULL DEFAULT '0' COMMENT 'Gender 0=Female 1=male ',
  `deleted` tinyint(4) unsigned NOT NULL DEFAULT '0' COMMENT 'Delete flag: 0 is not deleted by default, and 1 is deleted',
  `update_time` timestamp NOT NULL DEFAULT CURRENT_TIMESTAMP ON UPDATE CURRENT_TIMESTAMP COMMENT 'Update time',
  `create_time` datetime NOT NULL COMMENT 'Creation time',
  PRIMARY KEY (`id`)
) ENGINE=InnoDB AUTO_INCREMENT=1 DEFAULT CHARSET=utf8 COMMENT='User table'
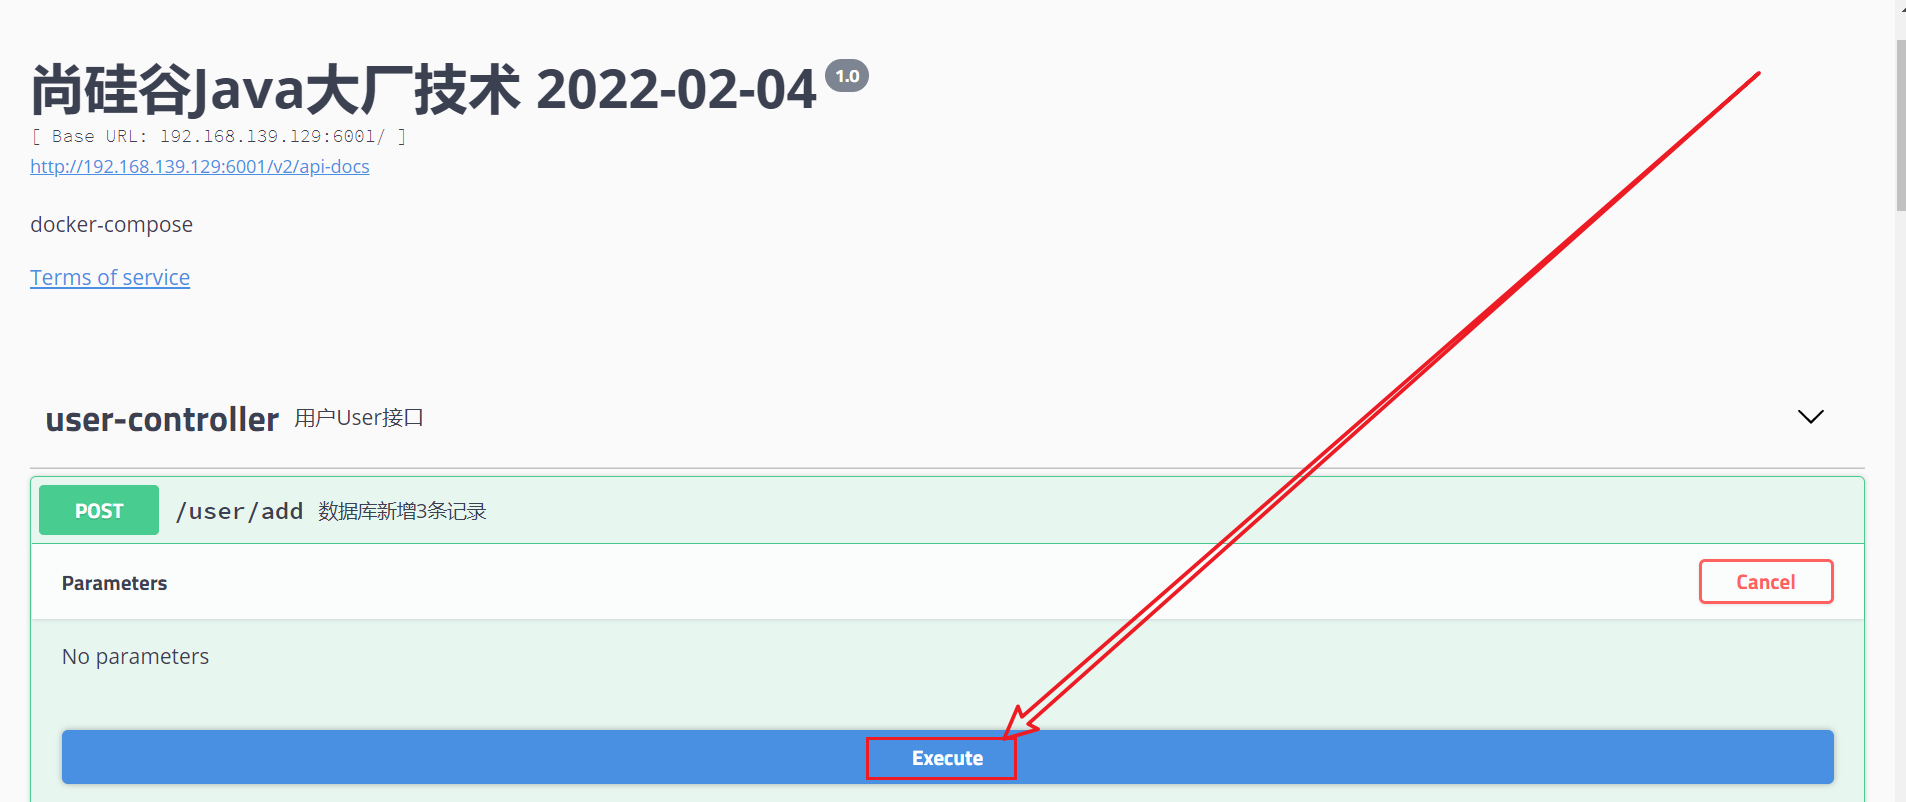
5.5. Visit swagger for microservice testing
First, access on the windows browser http://ip:6001/swagger-ui.html, then access the database and add three record interfaces, as follows:
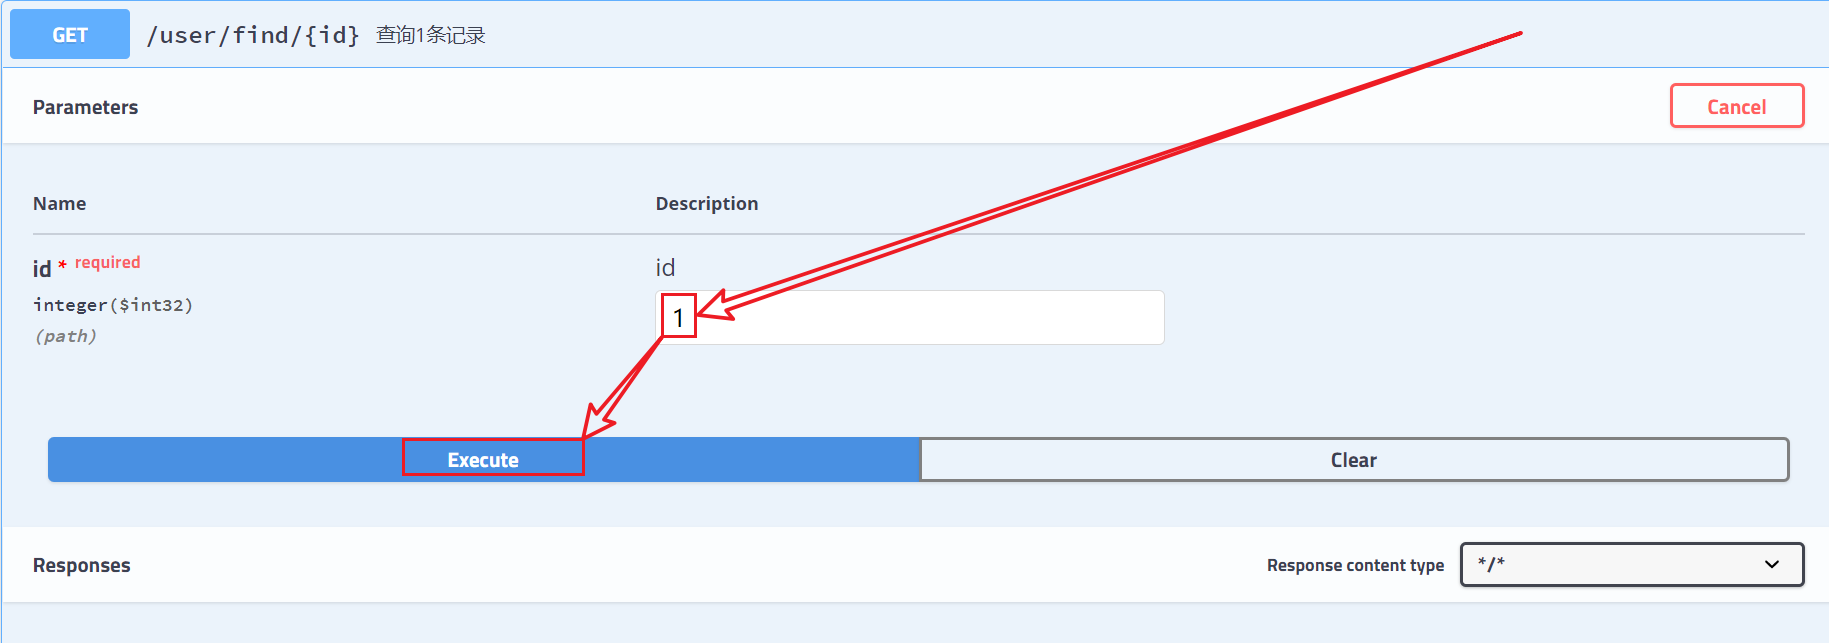
Then access the query interface for one record, fill in the id equal to 1, and click the Execute button to query the user information, as follows:
5.6. Stop and delete containers
docker-compose down
5.7 interpretation of difficulties
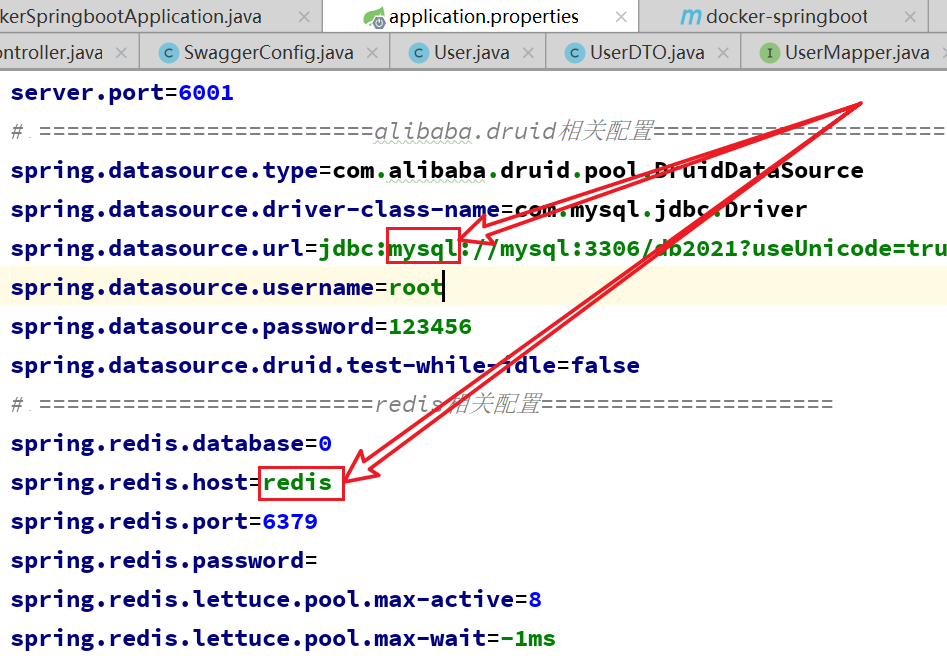
1. Application. In microservice project The ip is not used in the properties file, but the service name. This is the knowledge in the docker network. Although we use the container name in the docker network, this time we use the service name, which may be used in compose
application. The service name used in properties is docker compose The service name under services in the YML file, docker compose YML as follows:
Let's take a look at the application The configuration information in properties is as follows:
13, Portal
1. Installing the portal
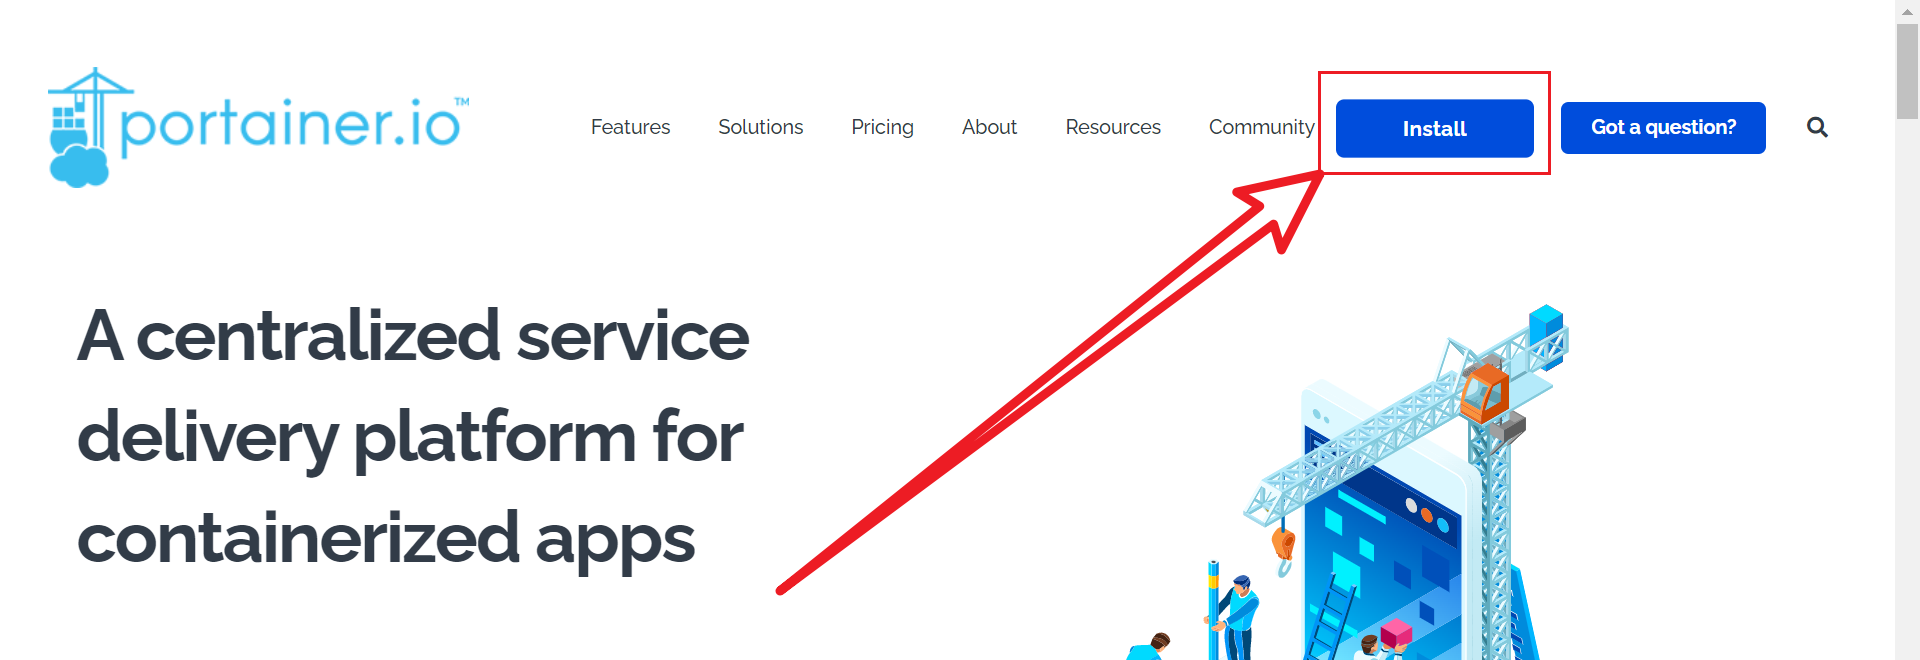
1.1 official website of Protainer
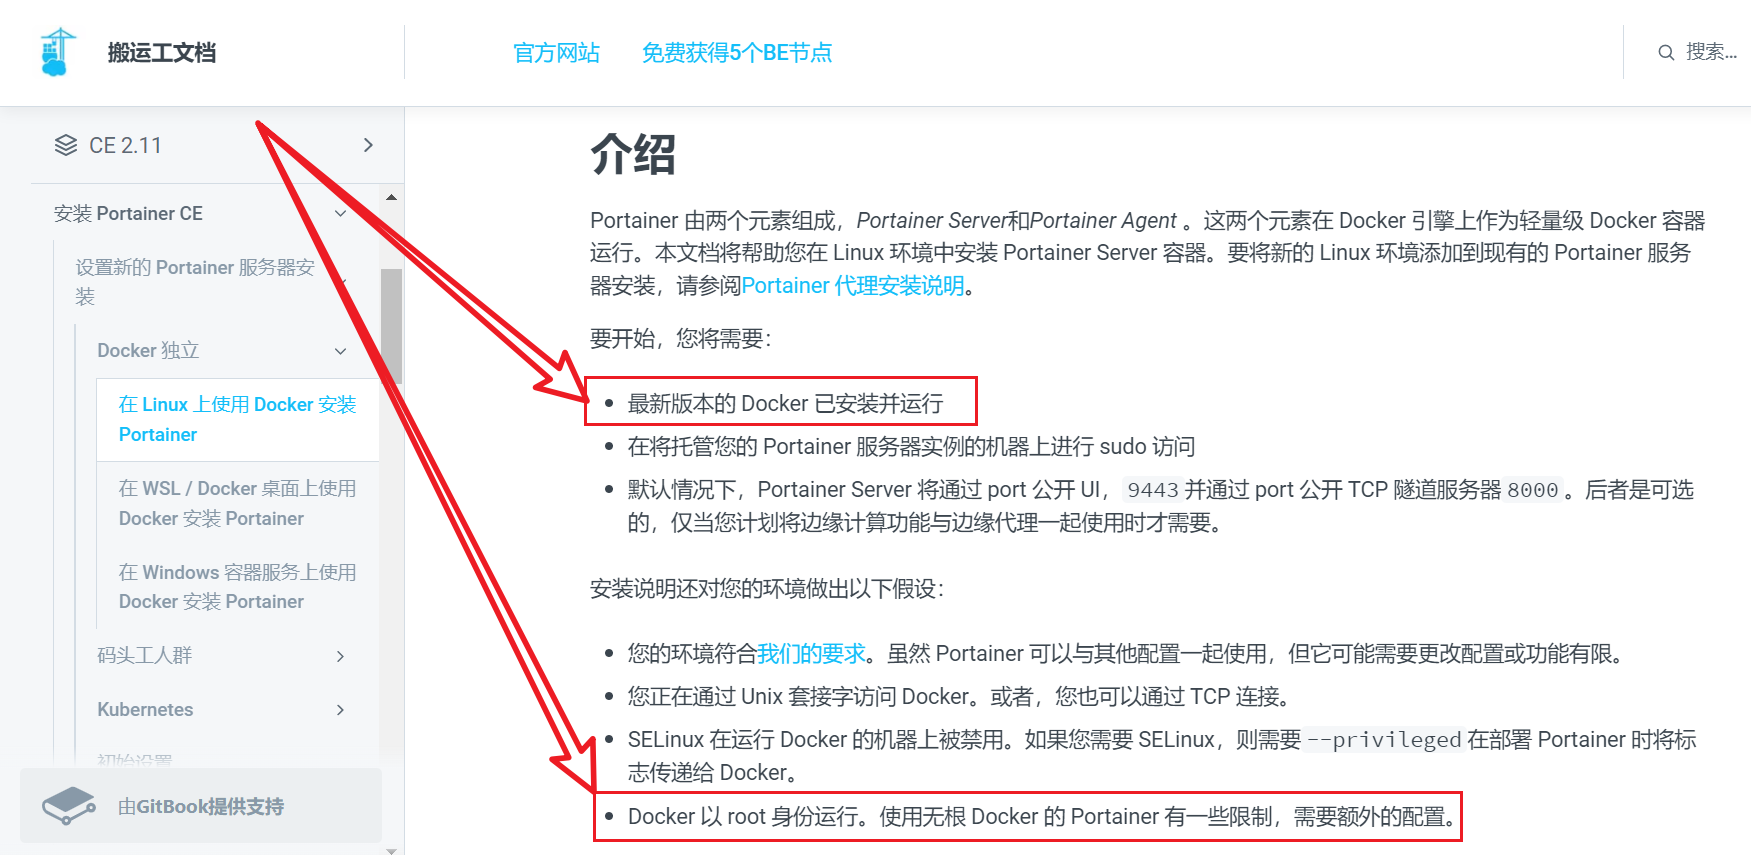
1.2. Find the documentation for installing portal in Linux
Click Install, as follows:
Locate the installation documentation as follows:

1.3 installation prerequisites
(1) Install and run docker (2) the user who starts docker is root
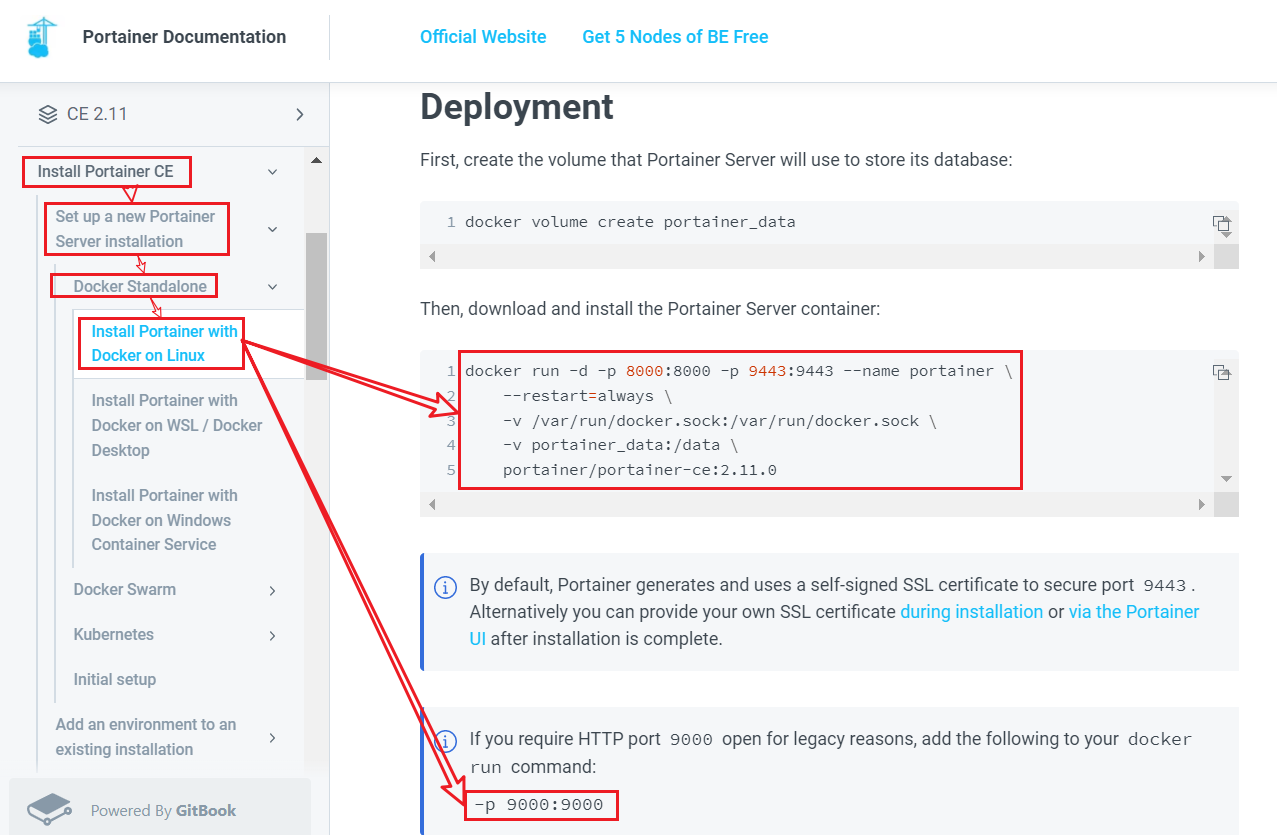
1.4 installation order
Execute the following commands on linux:
docker run -d -p 8000:8000 -p 9000:9000 -p 9443:9443 --name portainer \
    --restart=always \
    -v /var/run/docker.sock:/var/run/docker.sock \
    -v portainer_data:/data \
    portainer/portainer-ce:2.11.0
These commands are from the official website, as follows:
Use https 949000 to access
-- restart=always in the command means that the container will restart after the docker is restarted. After we start the docker and the container, we can use systemctl restart docker to restart the docker, and then use docker ps to see whether the restart of the container is successful
1.5. Log in to the console
// Method 1:
https://ip:9443

// Method 2:
http://ip:9000
After logging in for the first time, you need to set the user name and password. The password can be set to 12345678 and the user name is admin. After entering the console home page, click localhost to start the local console, as follows:

1.6. Routine operation
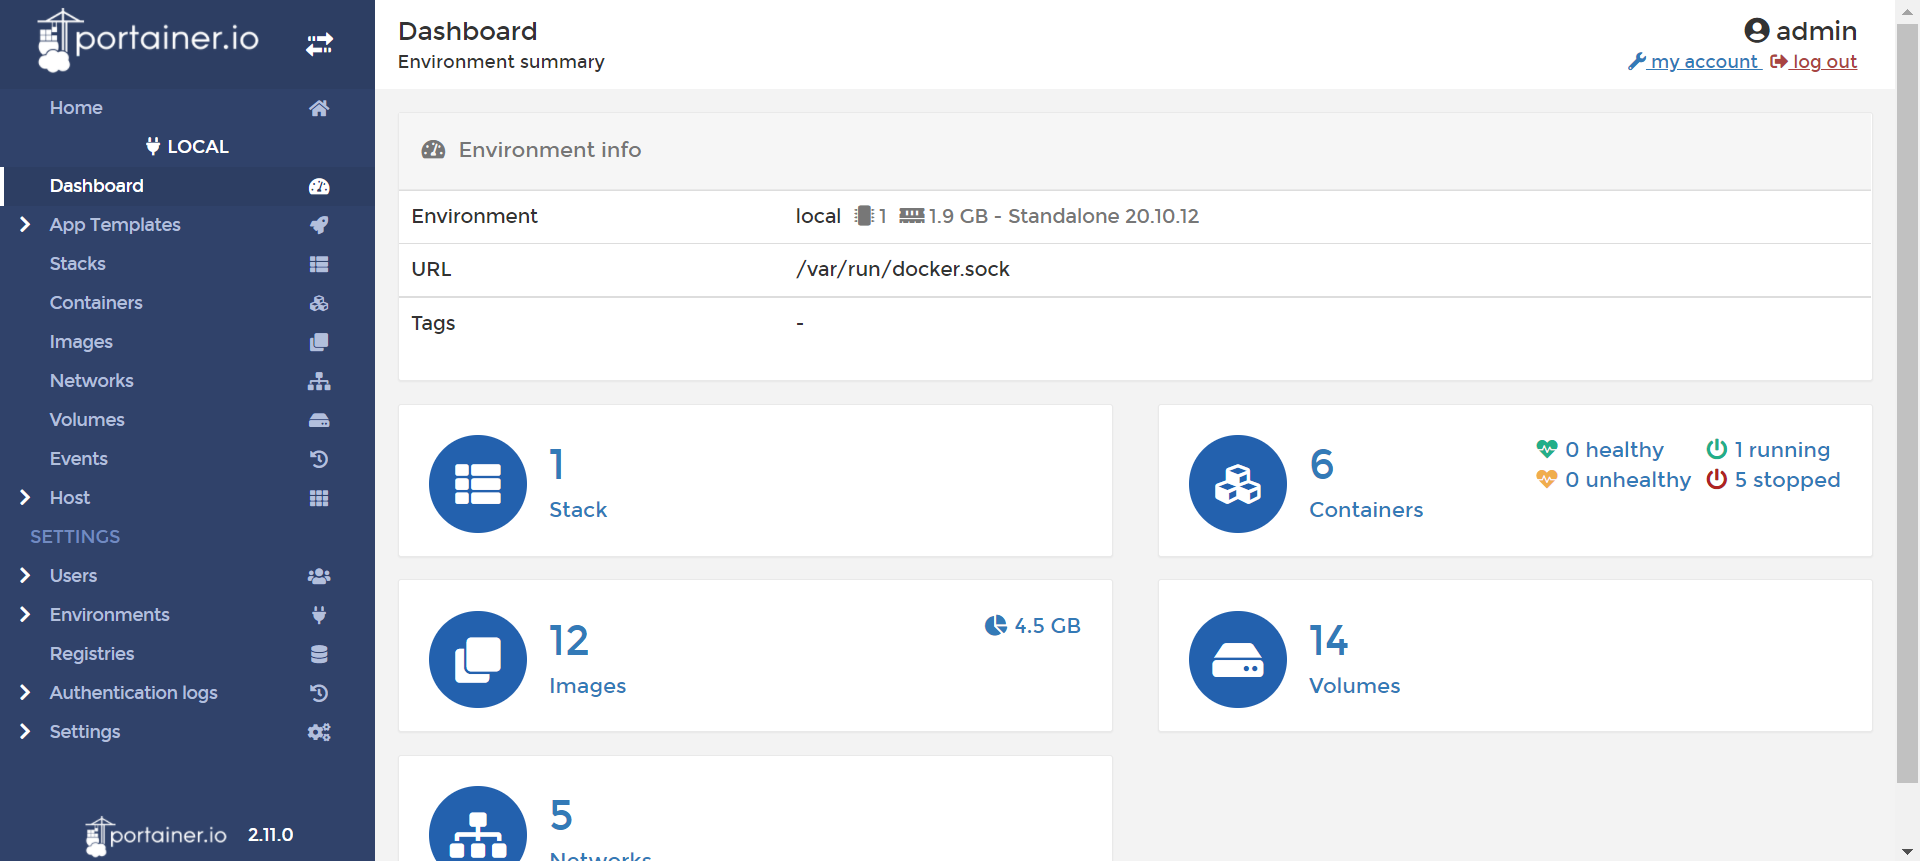
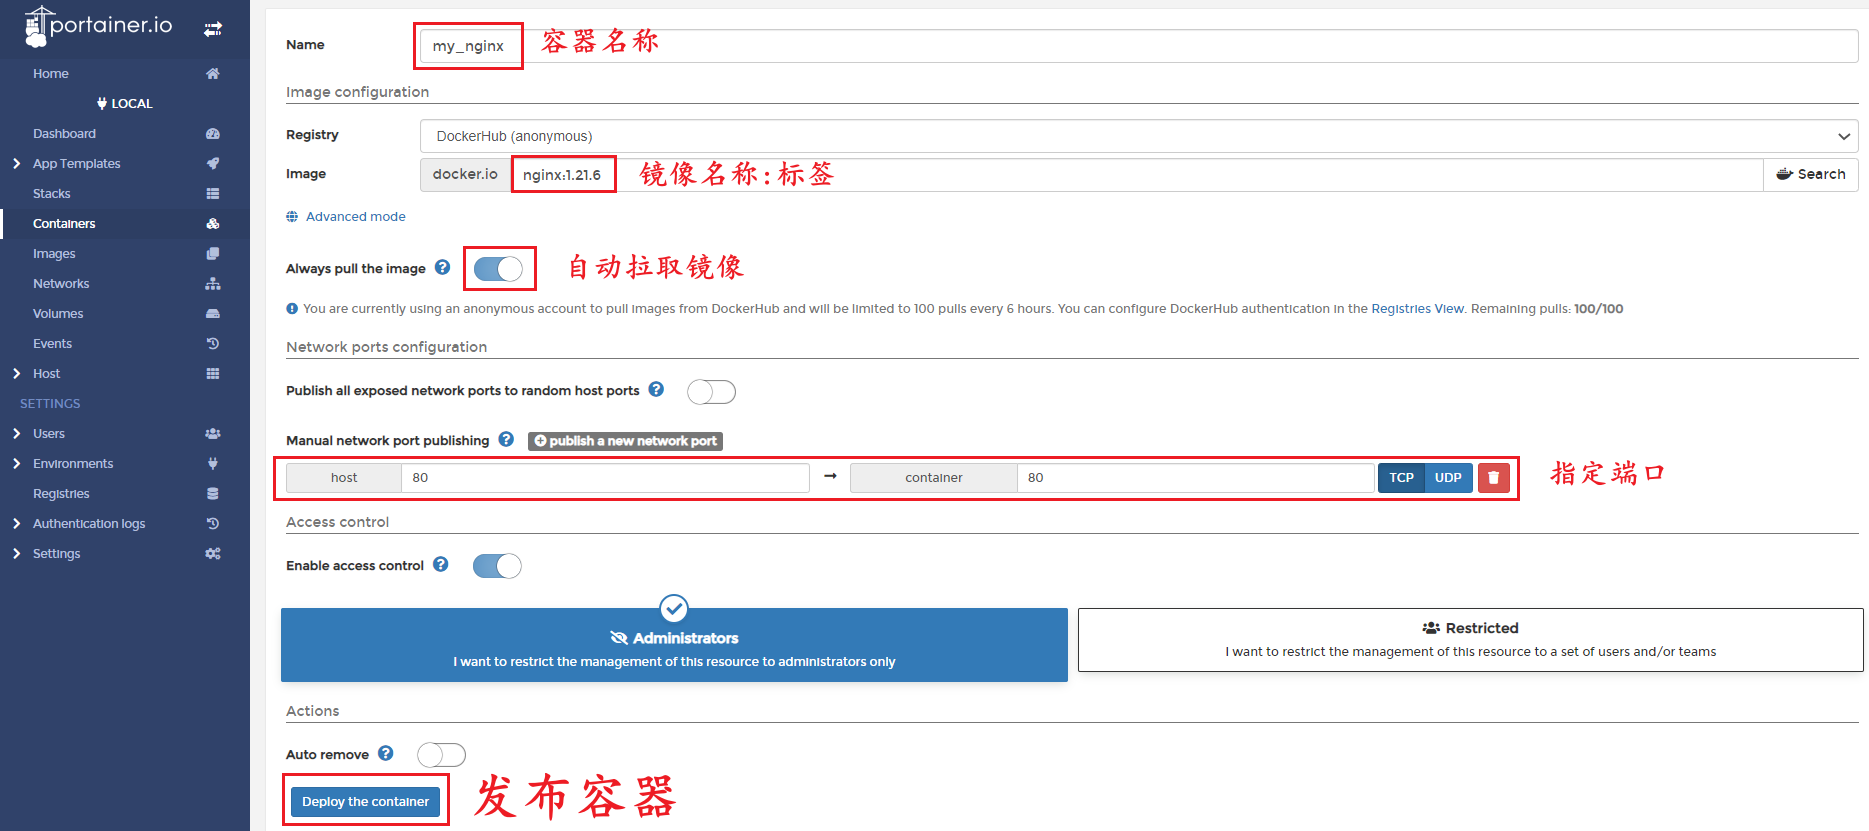
To view container information:

Publish container:
14, CIG (CAdvisor Collection + InfluxDB storage + Granfana display)
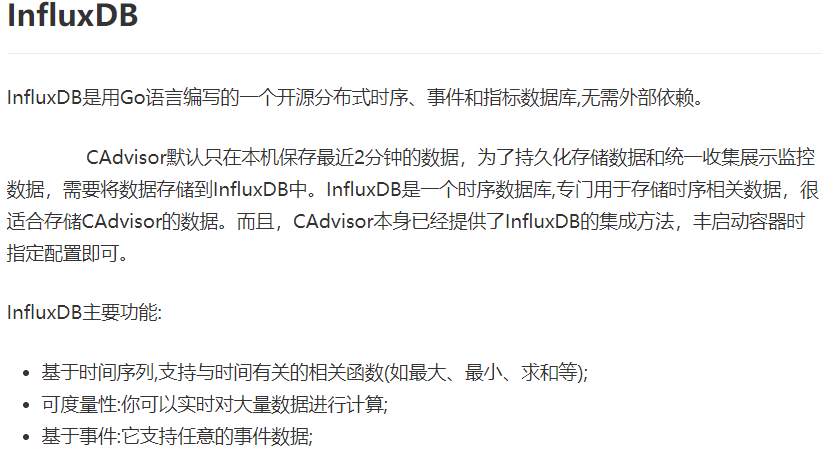
1. Concept
CAdvisor monitoring collection + InfluxDB storage data + Granfana display chart, as shown in the following figure:
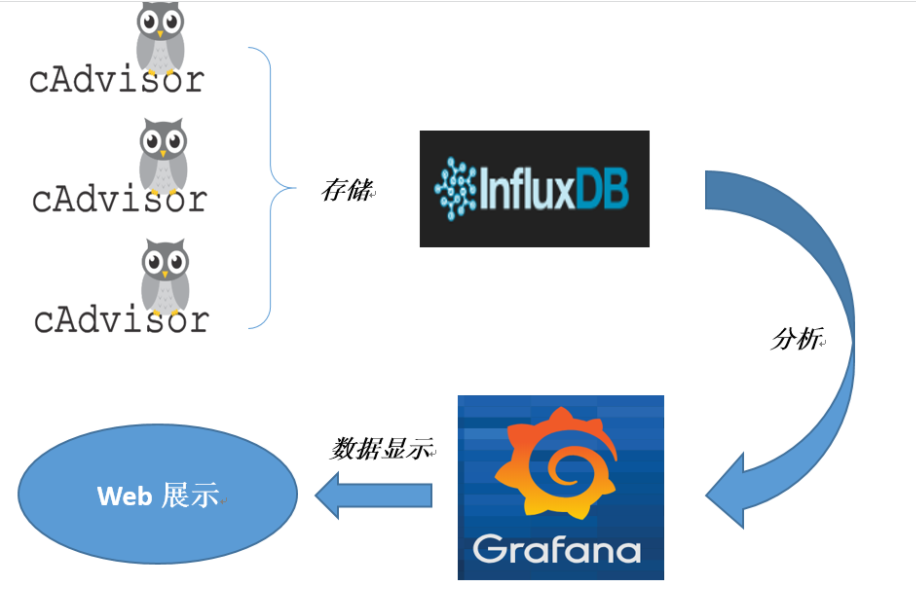
The functions of the three containers are as follows:


2. Create and start cig three containers
2.1. Create cig folder under / usr/local
2.2. Create docker compose in the cig folder created in the previous step YML, as follows
version: '3.1'

volumes:
  grafana_data: {}

services:
 influxdb:
  image: tutum/influxdb:0.9
  restart: always
  environment:
    - PRE_CREATE_DB=cadvisor
  ports:
    - "8083:8083"
    - "8086:8086"
  volumes:
    - ./data/influxdb:/data

 cadvisor:
  image: google/cadvisor
  links:
    - influxdb:influxsrv
  command: -storage_driver=influxdb -storage_driver_db=cadvisor -storage_driver_host=influxsrv:8086
  restart: always
  ports:
    - "8080:8080"
  volumes:
    - /:/rootfs:ro
    - /var/run:/var/run:rw
    - /sys:/sys:ro
    - /var/lib/docker/:/var/lib/docker:ro

 grafana:
  user: "104"
  image: grafana/grafana
  user: "104"
  restart: always
  links:
    - influxdb:influxsrv
  ports:
    - "3000:3000"
  volumes:
    - grafana_data:/var/lib/grafana
  environment:
    - HTTP_USER=admin
    - HTTP_PASS=admin
    - INFLUXDB_HOST=influxsrv
    - INFLUXDB_PORT=8086
    - INFLUXDB_NAME=cadvisor
    - INFLUXDB_USER=root
    - INFLUXDB_PASS=root
2.3. Start docker compose file
docker-compose up -d
2.4. Check whether the three containers are started
docker ps
The results are as follows:

3. Using cig
3.1. Access the console of three containers
// Browse ccadvisor collection service
http://ip:8080

// Browse for incluxdb storage services
http://ip:8083

// Browse grafana presentation services
http://ip:3000
3.2 instructions for the use of incluxdb
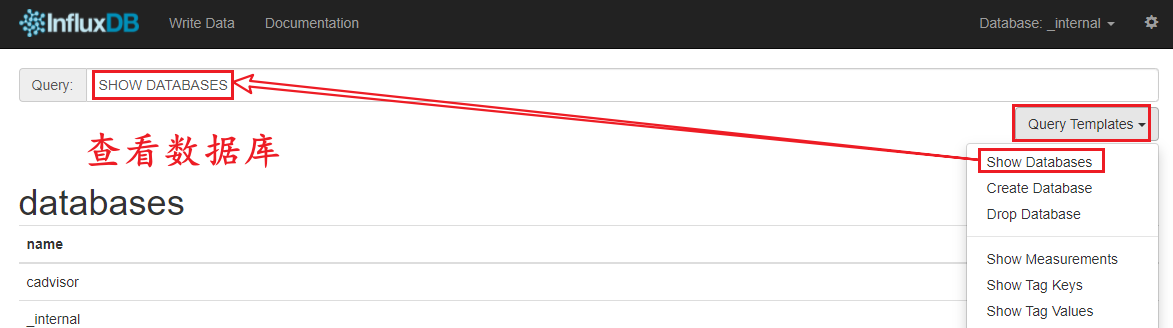
3.3 instructions for grafana
3.3.1 login information
user name: admin
 password: admin
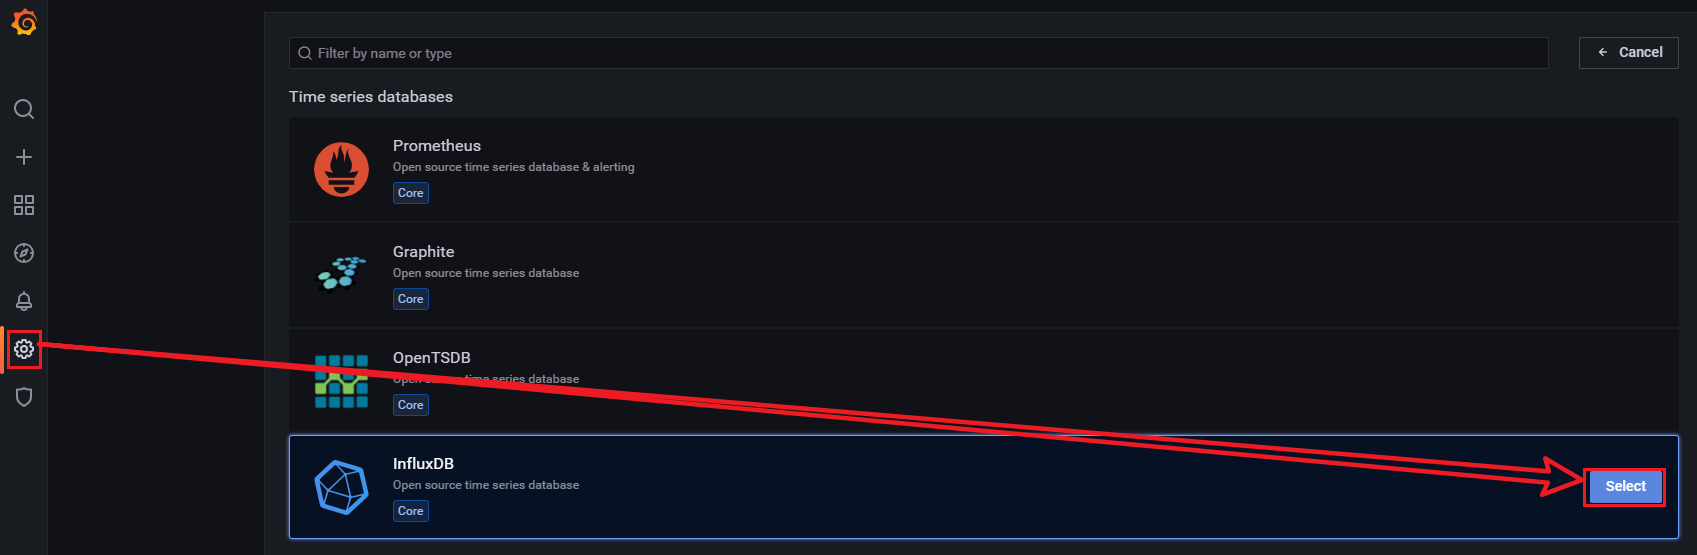
3.3.2. Configure data source
The data source used this time is influxdb. First select the data source as follows:
Set the service name in docker compose to database ip, as follows:

Configure the database, user name and password as follows:
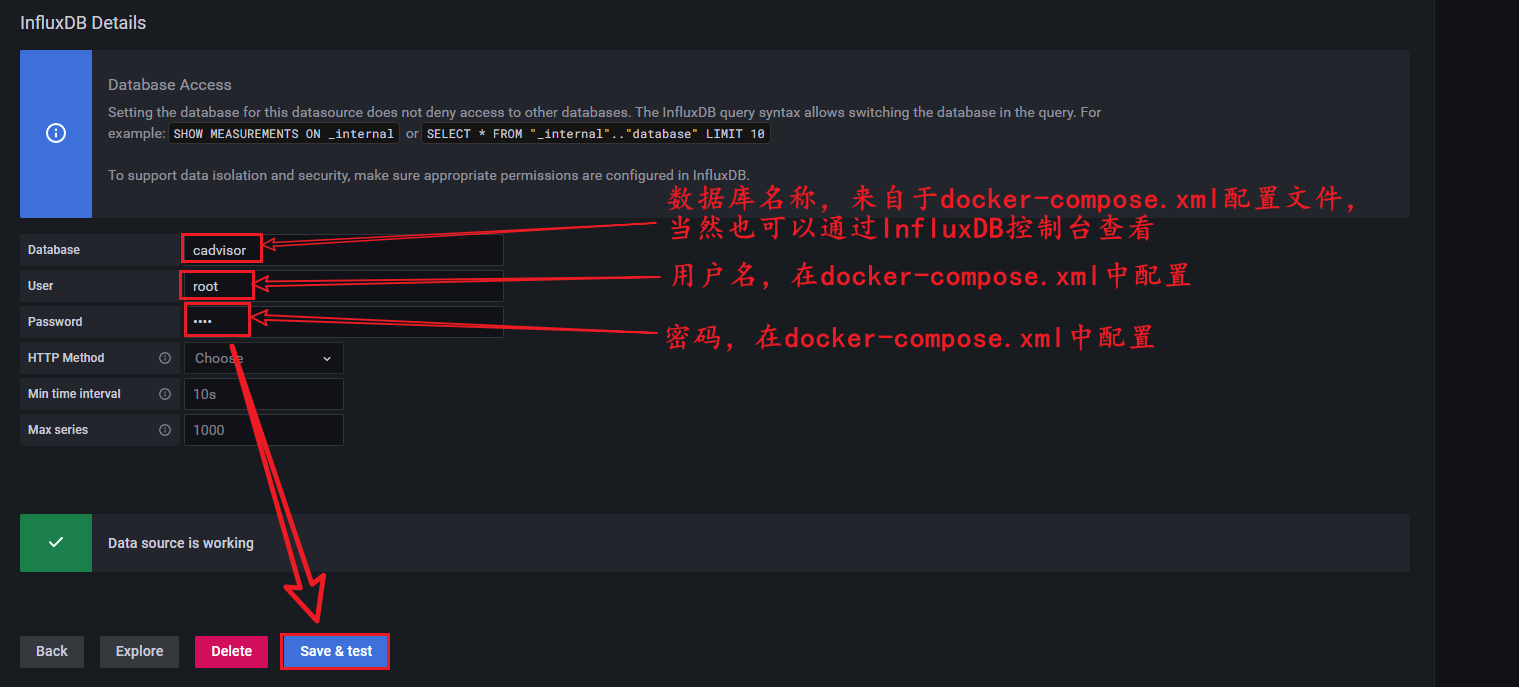
As long as you see the Data source is working, it means that the database connection is successful
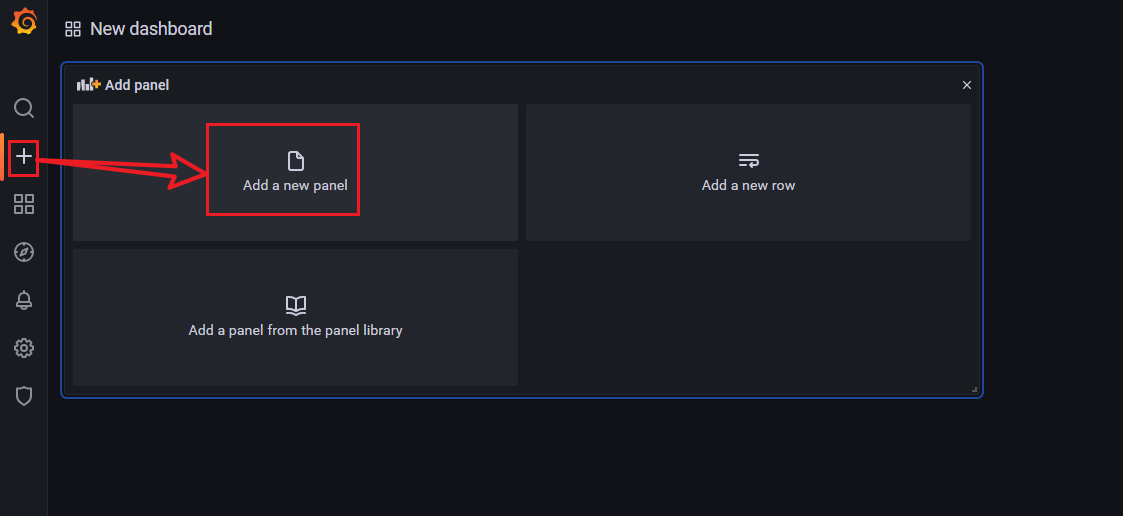
3.3.3. Add dashboard to view data
Click the add dashboard button as follows:
Select the data display method as follows:

Select the chart display method as follows:

Set the dashboard parameters and click save in the upper right corner, as follows:
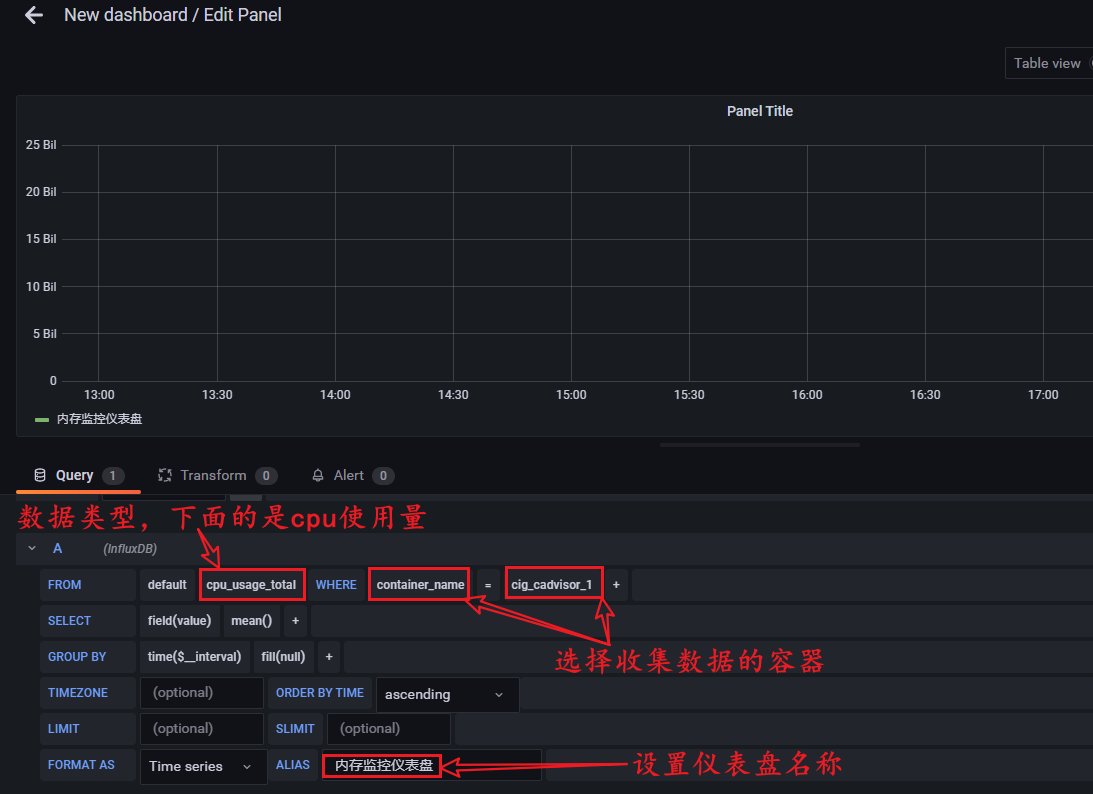
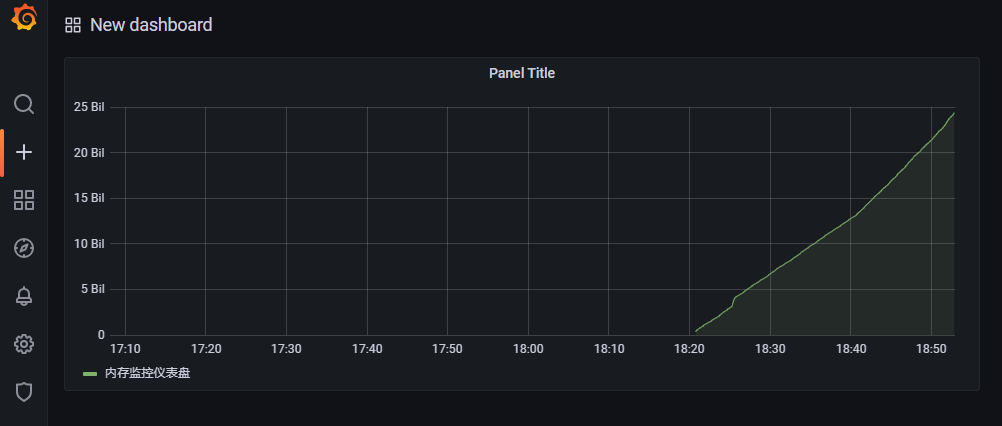
The generated dashboard results are as follows:
15, docker tips
docker run XXX execution process: local search (1. Existence: create container; 2. Nonexistence: go to remote warehouse to find); remote warehouse search (1. Existence: create container after pulling image; 2. Nonexistence: report error)
Suspended image: if you use docker images to find that the image name and label name of an image are < none >, it is a suspended image (Note: this kind of image has no effect, and it is recommended to delete the suspended image)
