This note refers to the series of tutorials of crazy God Theory in station B
What is docker?
Development based on GO language, open source project, container technology
The difference between docker and virtual machine technology
- The traditional virtual machine can create a set of hardware and run a complete operating system. For example, we can install centOS on the virtual machine, which is a complete system, and then install and run software on the system.
- The application in docker container runs directly on the host. The container does not have its own kernel or virtual hardware, so it is easy to use.
- Containers are isolated. Containers have their own independent file systems and do not affect each other.
Application and advantages
- Rapid delivery and deployment:
- Traditional: install a bunch of environments and programs
- docker: package image - > publish test - > Run container directly
- Upgrade and expand: deploying applications is like building blocks
- Simple system operation and maintenance: the development and testing environment are highly consistent
- Make full use of computer resources: docker is kernel level virtualization. A physical machine can run multiple container instances
Mirror (image)
- An image is like a template. Creating a container service through an image is like creating an instance from a template
- One image can create multiple container services
Container
- Containers are created by mirroring
- A container is an application or a group of applications that run independently (for example, one of my containers can contain services such as Tomcat or MySQL)
- The container is like a simple version of the system
Repository
- The warehouse is where the images are stored
- It is divided into shared warehouse and private warehouse
- Docker hub (default foreign)
- Alicloud has container services and configures image acceleration
docker preparation
- View system kernel
[root@VM-16-12-centos ~]# uname -r
4.18.0-305.3.1.el8.x86_64
- View the kernel version of linux system
cat /etc/os-release
//result
NAME="CentOS Linux"
VERSION="8 (Core)"
ID="centos"
ID_LIKE="rhel fedora"
VERSION_ID="8"
PLATFORM_ID="platform:el8"
PRETTY_NAME="CentOS Linux 8 (Core)"
ANSI_COLOR="0;31"
CPE_NAME="cpe:/o:centos:centos:8"
HOME_URL="https://www.centos.org/"
BUG_REPORT_URL="https://bugs.centos.org/"

CENTOS_MANTISBT_PROJECT="CentOS-8"
CENTOS_MANTISBT_PROJECT_VERSION="8"
REDHAT_SUPPORT_PRODUCT="centos"
REDHAT_SUPPORT_PRODUCT_VERSION="8"
-
docker installation and uninstallation, refer to
-
To configure Alibaba cloud image acceleration, refer to
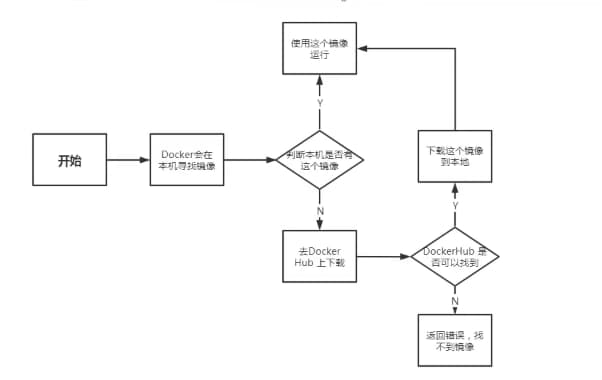
docker running process
Mirror command
docker images: view images on all local hosts
docker search image name: search for images
docker pull image name [: tag]: the default is latest. You can specify the download version number in the tag
docker rmi delete image
- docker rmi -f container id deletes the specified container
- docker rmi -f container id container id... Delete multiple containers
- docker rmi -f $(docker images -aq) delete all images
- docker rm $(docker ps -a -q) delete all containers (- q)
docker commit -m = "submit description" - a = "author" container id target image name: [tag] submit container to become a new copy
docker inspect image name view the meta information of the image
Container command
docker run [optional parameter] image: create a new container and start it
- Optional parameters:
- – name = "" specifies the name of the container to distinguish it
- -d background operation
- -it runs interactively and enters the container to view the content
- -p specifies the port of the container, such as - p 8080:8080
docker ps [optional parameter]<
- Optional parameters:
- -a list the currently running containers + historically running containers
- -n=? Displays recently created containers
- -q displays only the number of the container
exit directly stops the container and exits
ctrl+P+Q container does not stop exiting
docker start container id start container
docker restart container id restart container
docker stop container id stops the currently running container
docker kill container id forcibly stops the current container
docker inspect container id to view the metadata of the image
docker exec -it container id bashShell enters the container
docker attach container id bashShell enter container
- Note: docker exec is to open a new terminal after entering the container and can operate in it. docker attach is to enter the executing terminal and will not start a new process
docker inspect container id view the source data of the container
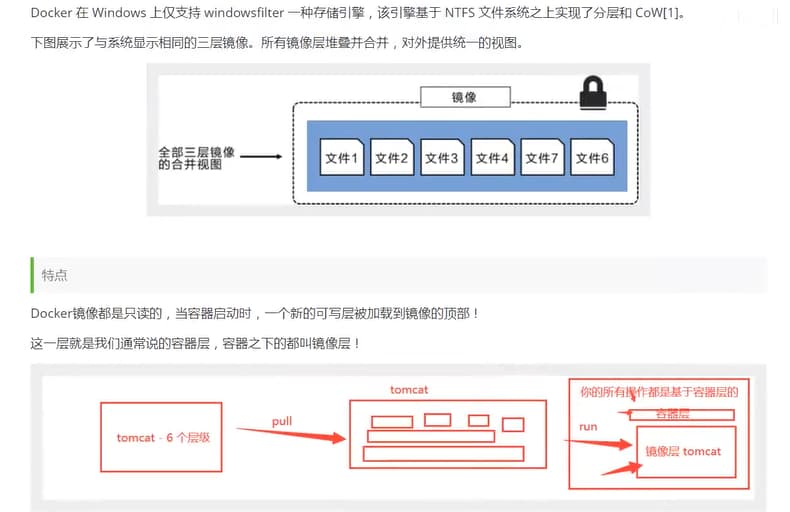
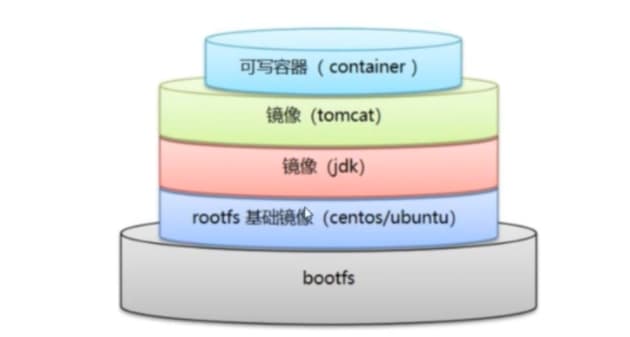
docker image loading principle
The image of docker is actually composed of a layer by layer file system, which is called UnionFS
boots(boot file system) mainly includes bootloader and kernel. Bootloader is mainly used to boot and load kernel. Bootfs file system will be loaded when Linux starts. Bootfs is the lowest layer of docker image. This layer is the same as that of typical Linux/Unix system, including boot loader and kernel. After the boot is loaded, the whole kernel is in memory. At this time, the right to use the memory is transferred from bootfs to the kernel, and the system will also unload bootfs
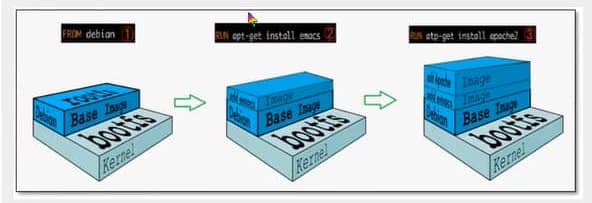
bootfs includes typical Linux, including standard directories and files such as / dev,/proc,/bin,/etc in typical Linux systems. rootfs is the distribution of various operating systems.
understand:
All docker images start from a basic image layer. When modifying or adding new content, a new image layer will be created on top of the current image layer
Data volume
The contents of the directory in the container can be synchronized with the contents of the host directory, which can realize persistence. When the container is deleted, the data of the host synchronization directory still exists, and the host directory can also be attached to the directory in the container
-
Method 1: docker run -it -v Host Directory: the directory in the container, such as

Named mount
-v volume name: path in container
[root@localhost /]# docker run -d -it --name mc1 -v mc1:/home/demo centos
89c00e60a0fd53dc7a0b6fcd5925b8bb162be2021c812608977393443f058b03
View data volumes
[root@localhost /]# docker volume ls
DRIVER              VOLUME NAME
local               dfcab5d41dba19a3139e25eae0dd96d622d316c702349ce9d40ca32e64bb51a0
local               f07bdd68d76d684e3260a47d6b413c52bd134ee68bd6c8a61b814673045df118
local               mc1
View the contents of a data volume
[root@localhost /]# docker volume inspect mc1
[
    {
        "CreatedAt": "2022-01-23T12:02:38+08:00",
        "Driver": "local",
        "Labels": null,
        "Mountpoint": "/var/lib/docker/volumes/mc1/_data",
        "Name": "mc1",
        "Options": null,
        "Scope": "local"
    }
]
Anonymous mount
[root@localhost /]# docker run -it -d --name mc2 -v /home/demo centos
f4bef19013393e759ece2cbe0faf7094f2d298f067bebf5dd89613b1bfb7aa2e
Data volume container data synchronization
[root@localhost home]# docker run -d -it --name c1 -v vc1:/home/test centos
3df9d890f0e510f8a3a22f60dfcc95214622c09291c9b4639f4d329d7b612f73
[root@localhost home]# docker run -it -d --name c2 --volumes-from c1 centos
5d1b47e5ac48416dc05041ca66e91fb85084148663a52a3911e6f4f4f20e954c
[root@localhost home]# docker exec -it c2 /bin/bash / / enter container c2
[root@5d1b47e5ac48 /]# cd /home/test / / create a file demo in the data volume directory of container c2 txt
[root@5d1b47e5ac48 test]# ls
[root@5d1b47e5ac48 test]# touch demo.txt
[root@5d1b47e5ac48 test]# ls
demo.txt
[root@localhost home]# docker exec -it c1 /bin/bash / / switch to container c1
[root@3df9d890f0e5 /]# cd /home/test / / enter the synchronization data volume directory, where you can see a demo txt
[root@3df9d890f0e5 test]# ls
demo.txt
After the above test, we can realize the data synchronization between containers
dockerfile
Purpose: dockerfile is used to build the image file of docker. It is a command parameter script.
Construction steps:
- Write dockerfile file
- docker build builds into an image
- docker run run image
- docker push publish image
About the build process:
- Each keyword (instruction) must be capitalized
- Execute from top to bottom
- #Indicates a comment
- Each instruction recreates and commits a new mirror layer
Instruction of dockerfile file:
| instructions | effect |
|---|---|
| FROM | Basic image layer, everything starts from here |
| MAINTAINER | Who wrote the image, name + email |
| RUN | Commands to run during image construction |
| ADD | Add content |
| WORKDIR | Mirrored working directory |
| VOLUME | Mounted directory |
| EXPOSE | Reserved port configuration |
| CMD | Specify the command to run when the container starts. Only the last one will take effect and can be replaced |
| ENTRYPOINT | Specify the command to be run when the container is started. You can append the command |
| ONBUILD | When constructing an inherited dockerfile, the ONBUILD instruction will be executed to trigger the instruction |
| COPY | Copy files to image |
| ENV | Setting environment variables at build time |
Practice: build your own mirror image
-
Write dockerfile
[root@localhost dockerfile]# cat dockerfile
FROM centos
MAINTAINER liyansheng<liyansheng0214@163.com>

ENV MYPATH /usr/local
WORKDIR $MYPATH

RUN yum -y install vim
RUN yum -y install net-tools

EXPOSE 80

CMD echo $MYPATH
CMD echo "---end---"
CMD /bin/bash
-
structure
[root@localhost dockerfile]# docker build -f ./dockerfile -t mycentos:1.0 .
Sending build context to Docker daemon  2.048kB
Step 1/10 : FROM centos
 ---> 5d0da3dc9764
Step 2/10 : MAINTAINER liyansheng<liyansheng0214@163.com>
 ---> Running in 5285905d9434
Removing intermediate container 5285905d9434
 ---> e79f5dd495c4
Step 3/10 : ENV MYPATH /usr/local
 ---> Running in 45b14e234021
Removing intermediate container 45b14e234021
 ---> a2148877572e
Step 4/10 : WORKDIR $MYPATH
Removing intermediate container 9e48c5851ec4
 ---> 05835920b703
Step 5/10 : RUN yum -y install vim
(Omit the part, the space is limited, and the whole is not shown here)
-
View the generated image
[root@localhost dockerfile]# docker images
REPOSITORY          TAG                 IMAGE ID            CREATED              SIZE
mycentos            1.0                 00ea04d73f90        About a minute ago   326MB
tomcat              9                   b8e65a4d736d        4 weeks ago          680MB
centos              latest              5d0da3dc9764        4 months ago         231MB
docker network
ip addr
[root@localhost /]# docker run -it -d --name m1 centos / / start a container
292fcdb76bb6ae98da7212eb24842c515ef58e642b750ac58b3c241b076d1346
[root@localhost /]# docker exec -it m1 ip addr / / view the internal address of the container
1: lo: <LOOPBACK,UP,LOWER_UP> mtu 65536 qdisc noqueue state UNKNOWN group default qlen 1000
    link/loopback 00:00:00:00:00:00 brd 00:00:00:00:00:00
    inet 127.0.0.1/8 scope host lo
       valid_lft forever preferred_lft forever
32: eth0@if33: <BROADCAST,MULTICAST,UP,LOWER_UP> mtu 1500 qdisc noqueue state UP group default
    link/ether 02:42:ac:11:00:02 brd ff:ff:ff:ff:ff:ff link-netnsid 0
    inet 172.17.0.2/16 brd 172.17.255.255 scope global eth0
       valid_lft forever preferred_lft forever
[root@localhost /]# ping 172.17.0.2 / / an external attempt is made to ping the address inside the container. After testing, it is found that it can be pinged
PING 172.17.0.2 (172.17.0.2) 56(84) bytes of data.
64 bytes from 172.17.0.2: icmp_seq=1 ttl=64 time=0.095 ms
64 bytes from 172.17.0.2: icmp_seq=2 ttl=64 time=0.045 ms
64 bytes from 172.17.0.2: icmp_seq=3 ttl=64 time=0.076 ms
64 bytes from 172.17.0.2: icmp_seq=4 ttl=64 time=0.049 ms
64 bytes from 172.17.0.2: icmp_seq=5 ttl=64 time=0.072 ms
64 bytes from 172.17.0.2: icmp_seq=6 ttl=64 time=0.141 ms
^C
--- 172.17.0.2 ping statistics ---
6 packets transmitted, 6 received, 0% packet loss, time 4999ms
rtt min/avg/max/mdev = 0.045/0.079/0.141/0.033 ms

[root@localhost /]# docker run -it -d --name m2 centos / / start another container
5df421def89457d85e462b08c65a0a10528cfa432ee8f014b9ca2aabff901e55
[root@localhost /]# docker exec -it m2 ip addr / / from below, we can know that the intranet connection IP of this container is 172.17.0.3
1: lo: <LOOPBACK,UP,LOWER_UP> mtu 65536 qdisc noqueue state UNKNOWN group default qlen 1000
    link/loopback 00:00:00:00:00:00 brd 00:00:00:00:00:00
    inet 127.0.0.1/8 scope host lo
       valid_lft forever preferred_lft forever
34: eth0@if35: <BROADCAST,MULTICAST,UP,LOWER_UP> mtu 1500 qdisc noqueue state UP group default
    link/ether 02:42:ac:11:00:03 brd ff:ff:ff:ff:ff:ff link-netnsid 0
    inet 172.17.0.3/16 brd 172.17.255.255 scope global eth0
       valid_lft forever preferred_lft forever


[root@localhost /]# docker exec -it m1 /bin/bash / / enter one of the containers

[root@292fcdb76bb6 /]# ping 172.17.0.3 / / try to ping this container to another container and find that it can be pinged
PING 172.17.0.3 (172.17.0.3) 56(84) bytes of data.
64 bytes from 172.17.0.3: icmp_seq=1 ttl=64 time=0.151 ms
64 bytes from 172.17.0.3: icmp_seq=2 ttl=64 time=0.062 ms
64 bytes from 172.17.0.3: icmp_seq=3 ttl=64 time=0.057 ms
64 bytes from 172.17.0.3: icmp_seq=4 ttl=64 time=0.059 ms
64 bytes from 172.17.0.3: icmp_seq=5 ttl=64 time=0.058 ms
^C
--- 172.17.0.3 ping statistics ---
5 packets transmitted, 5 received, 0% packet loss, time 4000ms
rtt min/avg/max/mdev = 0.057/0.077/0.151/0.037 ms
View all docker networks'
[root@VM-16-12-centos /]# docker network ls
NETWORK ID     NAME      DRIVER    SCOPE
393114baf26d   bridge    bridge    local
76f1077c6692   host      host      local
abf97d86b1e6   none      null      local
Network mode
- bridge: bridge docker (default)
- none: no network configuration
- Host: share network with host
- Container: container network connection
Custom network
[root@VM-16-12-centos /]# docker network create --driver bridge --subnet 192.168.0.0/16 --gateway 192.168.0.1 mynet
098a8191cb975114dc5abe7a242ba2b8782d29c94a954cb88b3fc201a558e4d6
[root@VM-16-12-centos /]# docker network ls
NETWORK ID     NAME      DRIVER    SCOPE
393114baf26d   bridge    bridge    local
76f1077c6692   host      host      local
098a8191cb97   mynet     bridge    local
abf97d86b1e6   none      null      local
View meta information of network
[root@VM-16-12-centos /]# docker network inspect mynet
[
    {
        "Name": "mynet",
        "Id": "098a8191cb975114dc5abe7a242ba2b8782d29c94a954cb88b3fc201a558e4d6",
        "Created": "2022-01-25T20:38:00.036863726+08:00",
        "Scope": "local",
        "Driver": "bridge",
        "EnableIPv6": false,
        "IPAM": {
            "Driver": "default",
            "Options": {},
            "Config": [
                {
                    "Subnet": "192.168.0.0/16",
                    "Gateway": "192.168.0.1"
                }
            ]
        },
        "Internal": false,
        "Attachable": false,
        "Ingress": false,
        "ConfigFrom": {
            "Network": ""
        },
        "ConfigOnly": false,
        "Containers": {},
        "Options": {},
        "Labels": {}
    }
]
Start the container and specify the network
[root@VM-16-12-centos /]# docker run -it -d --name t1 --net mynet tomcat
c8bd94a5c9ba03f9f3e6877544d60c6290fafdd3dc941647a1cd488501c452e9
[root@VM-16-12-centos /]# docker run -it -d --name t2 --net mynet tomcat
fdd7f1005e76db5fc74c8ab2dc0e8416d8f71e27d331b931fddb5c3c53e84f6a
Check the meta information of the custom network again. Pay attention to the contents in "Containers", where you can see the network information assigned to the container
[root@VM-16-12-centos /]# docker network inspect mynet
[
    {
        "Name": "mynet",
        "Id": "098a8191cb975114dc5abe7a242ba2b8782d29c94a954cb88b3fc201a558e4d6",
        "Created": "2022-01-25T20:38:00.036863726+08:00",
        "Scope": "local",
        "Driver": "bridge",
        "EnableIPv6": false,
        "IPAM": {
            "Driver": "default",
            "Options": {},
            "Config": [
                {
                    "Subnet": "192.168.0.0/16",
                    "Gateway": "192.168.0.1"
                }
            ]
        },
        "Internal": false,
        "Attachable": false,
        "Ingress": false,
        "ConfigFrom": {
            "Network": ""
        },
        "ConfigOnly": false,
        "Containers": {
            "c8bd94a5c9ba03f9f3e6877544d60c6290fafdd3dc941647a1cd488501c452e9": {
                "Name": "t1",
                "EndpointID": "473830f0a14201c212f383c1a0dea9a63f67d3c97e06af451d328949e7e31d2b",
                "MacAddress": "02:42:c0:a8:00:02",
                "IPv4Address": "192.168.0.2/16",
                "IPv6Address": ""
            },
            "fdd7f1005e76db5fc74c8ab2dc0e8416d8f71e27d331b931fddb5c3c53e84f6a": {
                "Name": "t2",
                "EndpointID": "265a9e72973a7632aea69421e8ee65d4f959a69135ad16d62ed55dbce4b22968",
                "MacAddress": "02:42:c0:a8:00:03",
                "IPv4Address": "192.168.0.3/16",
                "IPv6Address": ""
            }
        },
        "Options": {},
        "Labels": {}
    }
]
Package the springboot project as an image
demonstration:
-
Create a springboot project
-
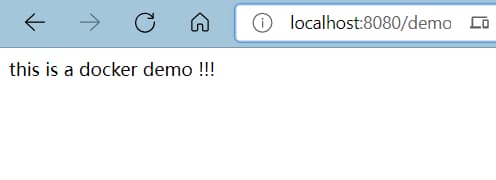
Create a new controller
package com.example.dockertest.controller; import org.springframework.web.bind.annotation.RequestMapping; import org.springframework.web.bind.annotation.RestController; @RestController public class DemoController { //Returns a string @RequestMapping("demo") public String demo() { return "this is a docker demo !!!"; } } -
Start the test, no problem
-
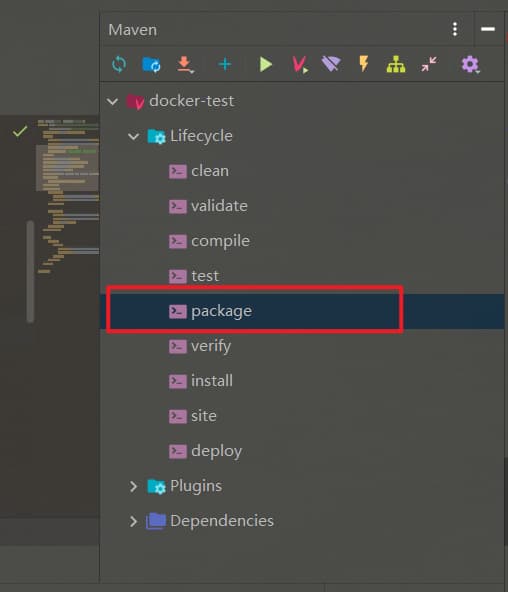
Package project
-
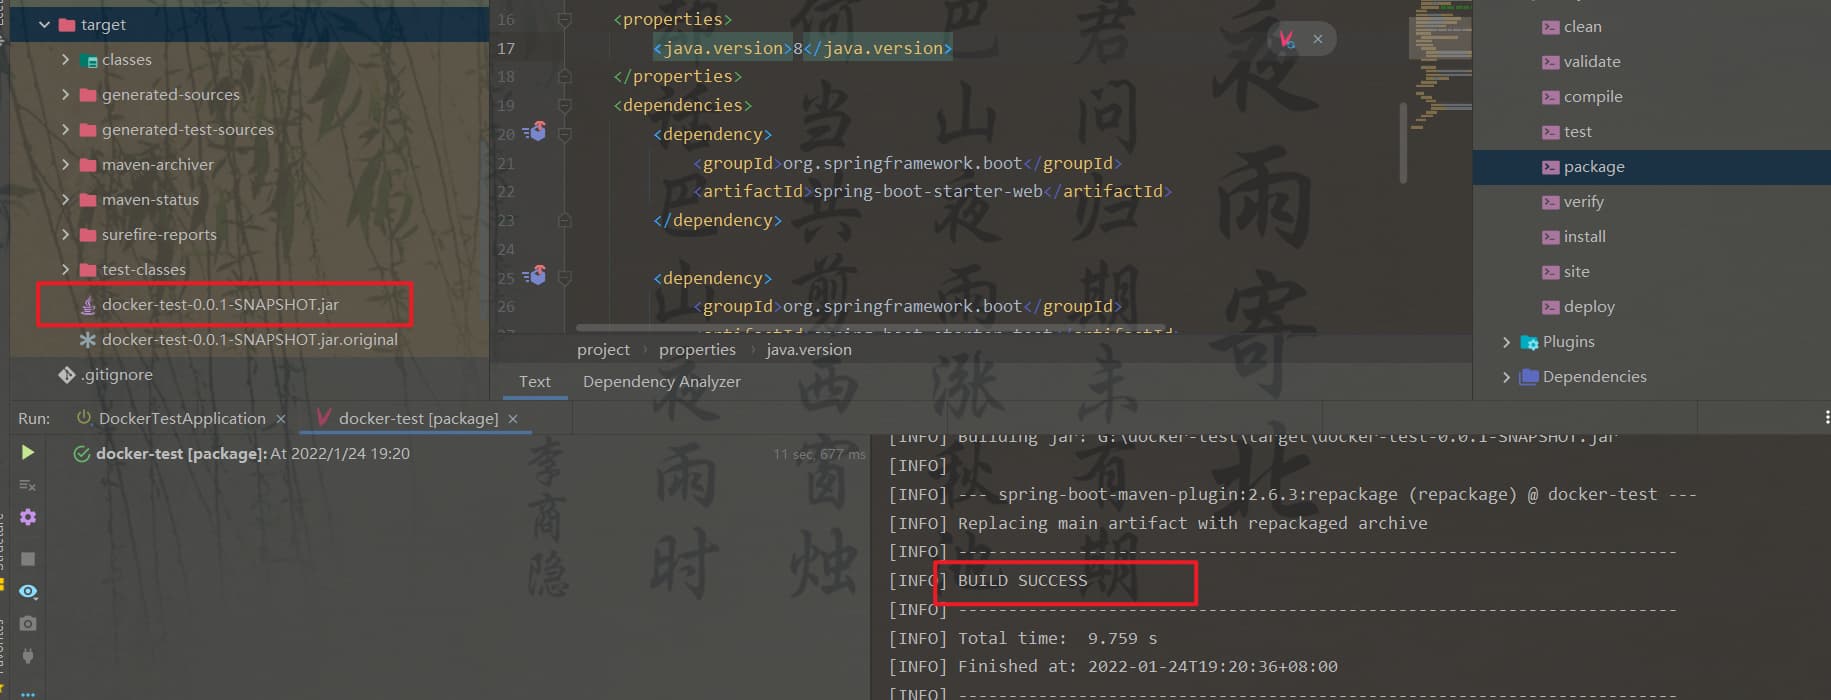
Note: you can start with POM Specify the Java version used in the XML file
<properties> <java.version>8</java.version> </properties> -
Click the button to pack
-
After successful packaging, you can see the jar package
-
-
Write Dockerfile file
FROM java:8

COPY *.jar /app.jar

CMD ["--server.port=8080"]

EXPOSE 8080

ENTRYPOINT ["java","-jar","/app.jar"]
-
Upload Dockerfile and jar package to Linux (both in the same directory)
-
Build image
[root@VM-16-12-centos idea]# ll
 Total consumption 17152
-rw-r--r-- 1 root root      115 1 June 24-14:46 Dockerfile
-rw-r--r-- 1 root root 17557203 1 June 24-14:44 docker-test-0.0.1-SNAPSHOT.jar

[root@VM-16-12-centos idea]# docker build -t demo1 .
Sending build context to Docker daemon  17.56MB
Step 1/5 : FROM java:8
8: Pulling from library/java
5040bd298390: Pull complete
fce5728aad85: Pull complete
76610ec20bf5: Pull complete
60170fec2151: Pull complete
e98f73de8f0d: Pull complete
11f7af24ed9c: Pull complete
49e2d6393f32: Pull complete
bb9cdec9c7f3: Pull complete
Digest: sha256:c1ff613e8ba25833d2e1940da0940c3824f03f802c449f3d1815a66b7f8c0e9d
Status: Downloaded newer image for java:8
 ---> d23bdf5b1b1b
Step 2/5 : COPY *.jar /app.jar
 ---> ab158f3d0550
Step 3/5 : CMD ["--server.port=8080"]
 ---> Running in d22cd8b7b8d0
Removing intermediate container d22cd8b7b8d0
 ---> bbea2dd3501b
Step 4/5 : EXPOSE 8080
 ---> Running in 4944ff94de47
Removing intermediate container 4944ff94de47
 ---> 3efe87e95bfd
Step 5/5 : ENTRYPOINT ["java","-jar","/app.jar"]
 ---> Running in 23292c3f2bf1
Removing intermediate container 23292c3f2bf1
 ---> ccbf52061d78
Successfully built ccbf52061d78
Successfully tagged demo1:latest
[root@VM-16-12-centos idea]# docker images
REPOSITORY    TAG       IMAGE ID       CREATED          SIZE
demo1         latest    ccbf52061d78   10 seconds ago   661MB        //This is the image we built
tomcat        latest    9f35737a8466   3 days ago       680MB
hello-world   latest    feb5d9fea6a5   4 months ago     13.3kB
centos        latest    5d0da3dc9764   4 months ago     231MB
java          8         d23bdf5b1b1b   5 years ago      643MB
-
Create the container through the image and run it to test the access address
[root@VM-16-12-centos ~]# docker run -it -d --name d1  -p 8081:8080 demo1
c22f3f6211e910994781b67c90adc37355af6fd1c1a6be8871d19e080895cb51
[root@VM-16-12-centos ~]# docker ps
CONTAINER ID   IMAGE     COMMAND                  CREATED         STATUS         PORTS                                       NAMES
c22f3f6211e9   demo1     "java -jar /app.jar ..."   7 seconds ago   Up 6 seconds   0.0.0.0:8081->8080/tcp, :::8081->8080/tcp   d1
ad6480377dd6   tomcat    "catalina.sh run"        5 hours ago     Up 5 hours     0.0.0.0:8080->8080/tcp, :::8080->8080/tcp   t1
5715275c3542   centos    "/bin/bash"              5 hours ago     Up 5 hours

[root@VM-16-12-centos ~]# curl localhost:8081
{"timestamp":"2022-01-24T11:03:08.269+00:00","status":404,"error":"Not Found","path":"/"}[root@VM-16-12-centos ~]# curl localhost:8081/demo
this is a docker demo !!!
It can be seen from the above that our own container can run and be accessed by the outside world