Weakness and material are not obstacles to production, arrogance is—— Three body
1, Overview
1.1 causes
common problem:
- When your computer runs, others can't run, which brings a great test to the operation and maintenance.
- Environment configuration is cumbersome, time-consuming and laborious, and can not cross platform.
When publishing a project, you don't just generate a jar or war, but you want the project to be packaged with the environment. When developers want to run a project, download it and run it directly. For example, java publishes an Android program: java - apk - publish (app store) - Zhang San uses apk - install.
After using Docker, java publishes a project: java - jar (environment) - package the project with environment (image) - (Docker warehouse: store) - download the published image - run it directly
Docker puts forward solutions to the above problems.
The core idea of Docker is packing and packing. Each box is isolated from each other. Through mechanisms at all levels, the server can be used to the extreme.
1.2 virtual machine and Docker
Virtual machine: it belongs to virtualization technology.
Docker: container technology is also a virtualization technology.
Vmware: using linux native image is equivalent to a computer. Multiple virtual machines are independent of each other. The volume of virtual machines is very large and requires several G of disk space; The opening speed is slow and takes a few minutes.
docker: it does not need linux image, but directly runs the core image environment (such as jdk, mysql, etc.), with small volume and fast startup.
1.3 official website
Official website: https://www.docker.com/

file: https://docs.docker.com/get-started/
Warehouse: https://hub.docker.com/
1.4 application
Virtual machine technology
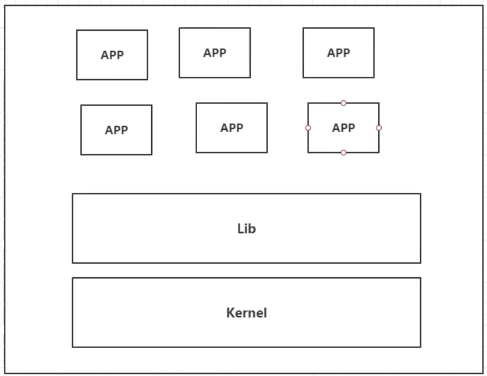
Disadvantages: many resources, redundant steps and slow startup
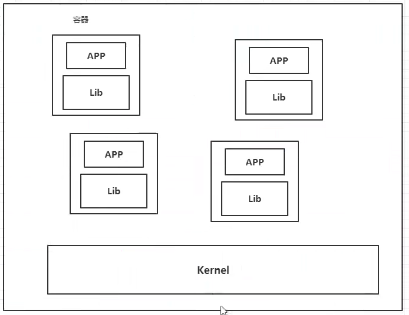
Containerization Technology
Containerization technology does not simulate a complete operating system.
Docker and virtual machine:
- The traditional virtual machine virtualizes a piece of hardware, runs a complete operating system, and then installs and runs software on this system
- The applications in the container run directly on the content of the host. The container does not have its own kernel or virtual hardware, so it is lightweight.
- Each container is isolated from each other, and each container has its own file system, which does not affect.
DevOps (development, operation and maintenance)
Faster delivery and deployment of applications
Traditional: a pile of help documents, installer
Docker: package image, release test, one click operation
More convenient upgrade and capacity expansion
After using Docker, we deploy applications like building blocks!
The project is packaged as an image to expand server A and server B.
Simpler system operation and maintenance
After containerization, our development and test environments are highly consistent.
More efficient utilization of computing resources
Docker is kernel level virtualization, which can run many container instances on a physical machine. Server performance can be squeezed to the extreme.
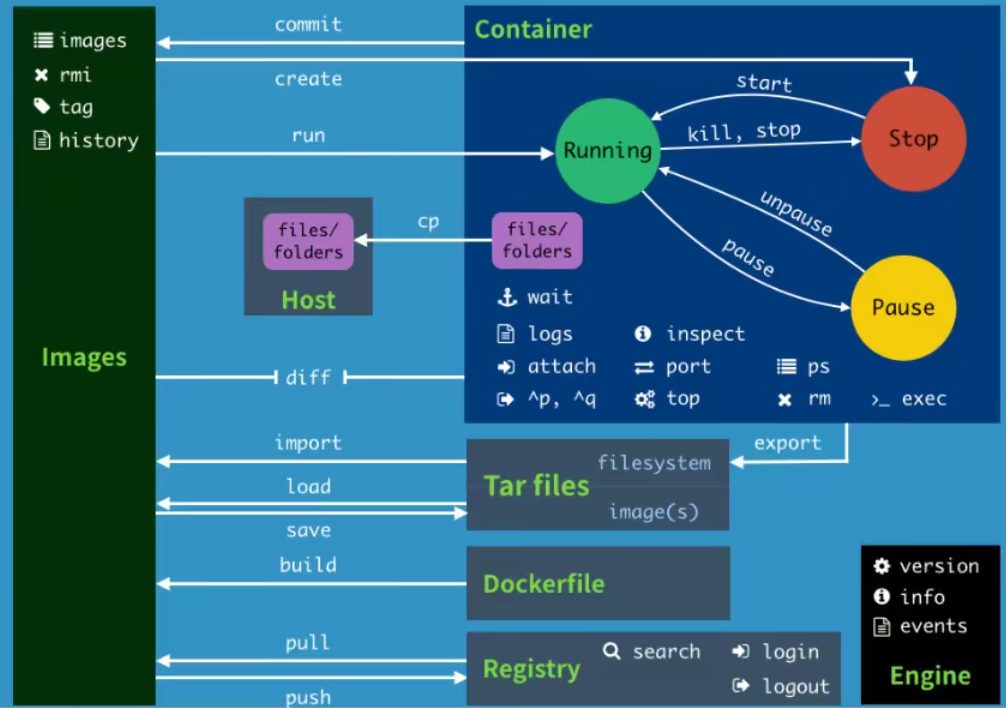
2, Basic composition
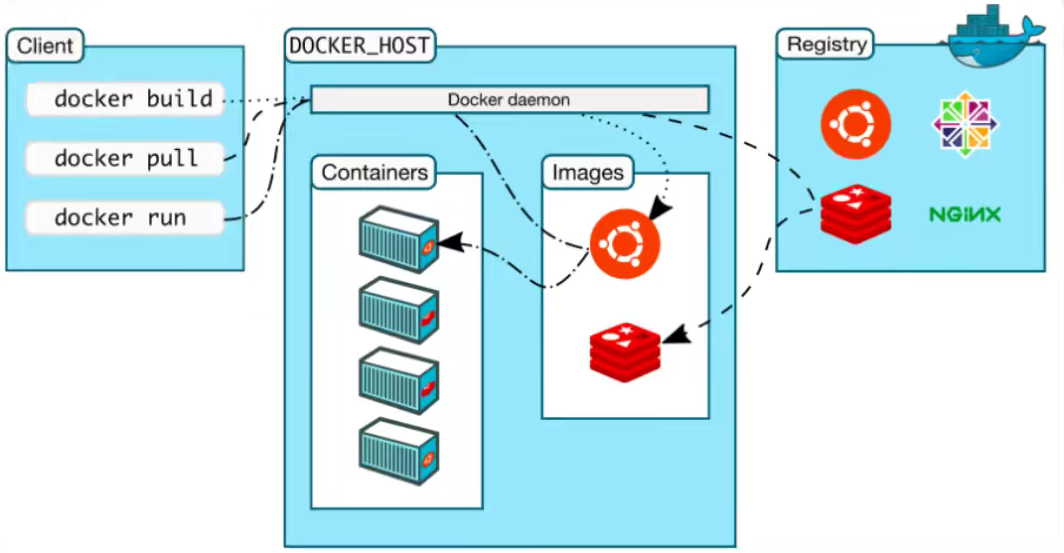
image:
The docker image is like a template. You can use this template to create container services. The Tomcat image -- > run -- > tomcat01 container (provides the server). Through this image, you can create multiple containers (the final service or project runs in the container).
container:
Docker uses container technology to run one or a group of applications independently and create them through image.
Start, stop, delete, basic command!
At present, this container can be understood as a simple linux system.
repository:
The warehouse is where the image is stored!
The warehouse is divided into public warehouse and private warehouse!
Docker Hub (foreign by default). Image acceleration needs to be configured.
There are Ali and others in China.
3, Installation
Install on CentOS to ensure that the CentOS version is 7 or above.
Official website installation tutorial: https://docs.docker.com/engine/install/centos/
Refer to the official documentation for a simplified installation process:
Step 1: uninstall (ensure that docker is not included in the system)
 sudo yum remove docker \
                  docker-client \
                  docker-client-latest \
                  docker-common \
                  docker-latest \
                  docker-latest-logrotate \
                  docker-logrotate \
                  docker-engine
Step 2: create warehouse and set warehouse address
sudo yum install -y yum-utils

sudo yum-config-manager \
   --add-repo \
   https://download.docker.com/linux/centos/docker-ce.repo
Step 3: install Docker engine
sudo yum install docker-ce docker-ce-cli containerd.io
Step 4: start Docker
sudo systemctl start docker
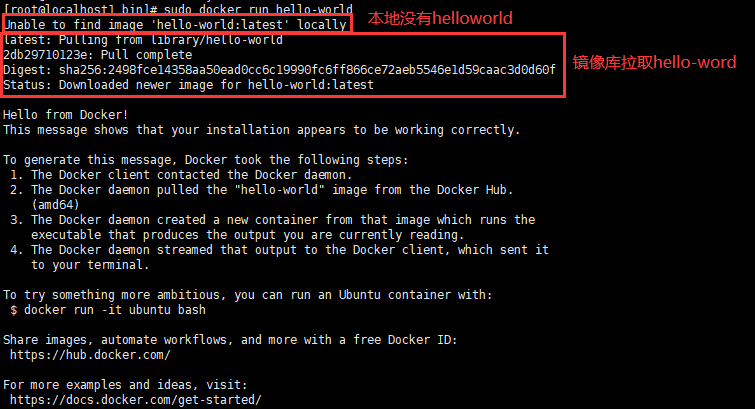
Step 5: run the helloword image test
sudo docker run hello-world
Step 6: set auto start
sudo systemctl enable docker
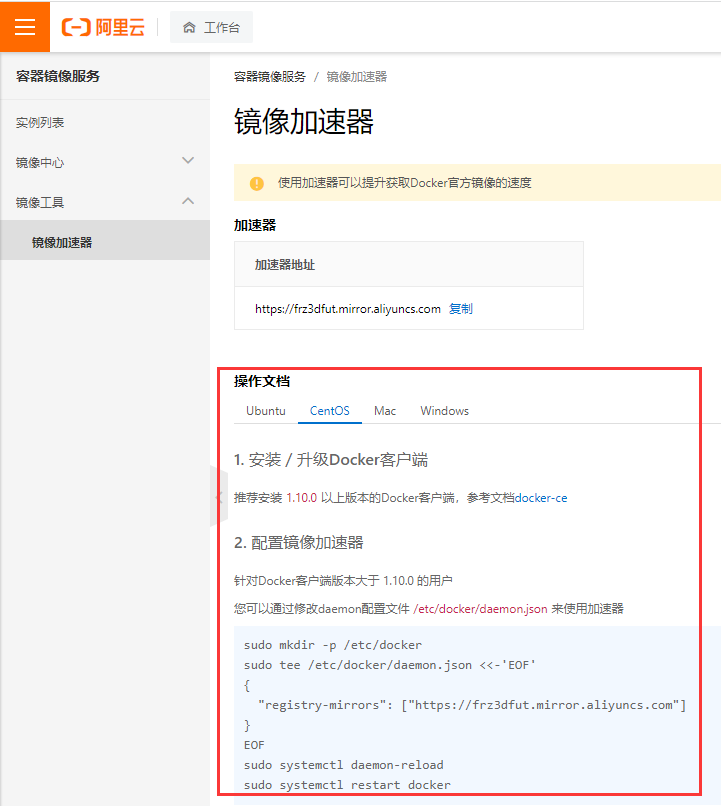
Step 7: configure image acceleration, Alibaba cloud
sudo mkdir -p /etc/docker
sudo tee /etc/docker/daemon.json <<-'EOF'
{
  "registry-mirrors": ["https://frz3dfut.mirror.aliyuncs.com"]
}
EOF
sudo systemctl daemon-reload
sudo systemctl restart docker
Alibaba cloud image accelerator: https://cr.console.aliyun.com/cn-hangzhou/instances/mirrors
Uninstall dokcer
Step 1: uninstall the docker engine
sudo yum remove docker-ce docker-ce-cli containerd.io
Step 2: unmount the image and container
sudo rm -rf /var/lib/docker
sudo rm -rf /var/lib/containerd
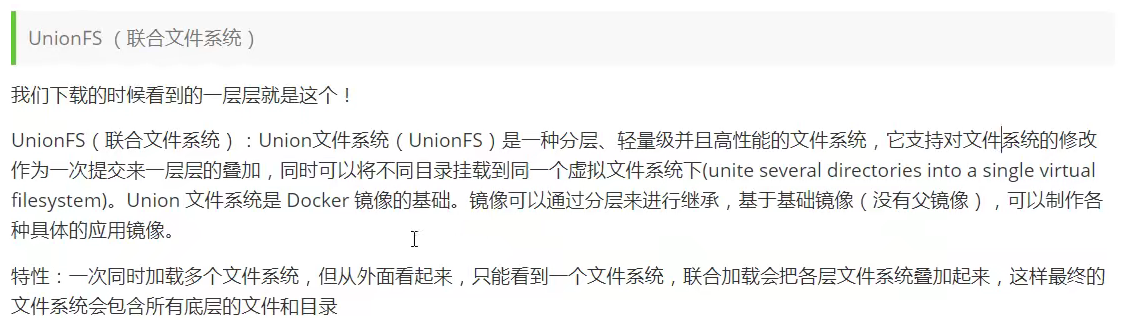
4, Operating principle
During the installation just now, the principle of running Hello world is shown in the figure below.
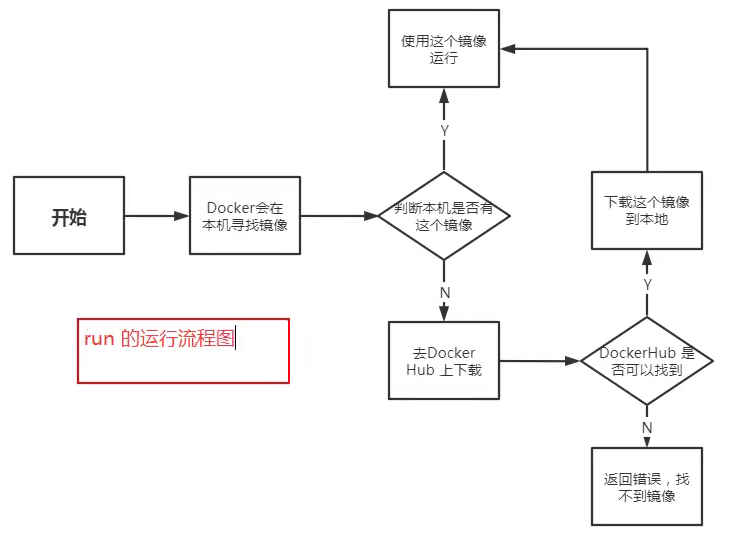
What does Docker do?
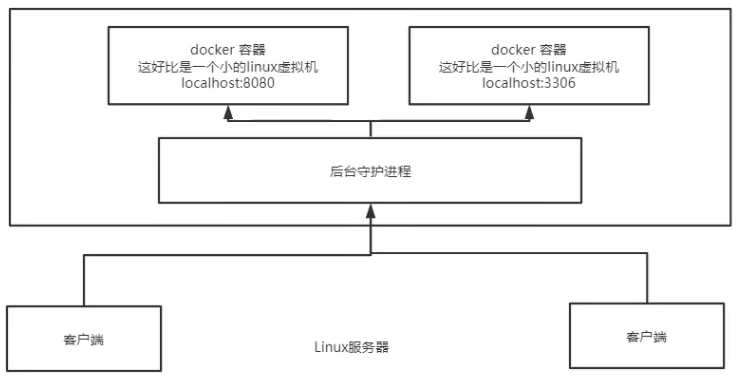
Docker is a client server system. The daemon of docker runs on the host. Access from the client through Socket!
DockerServer will execute this command after receiving the docker client instruction!
Why is Docker faster than VM?
- Docker has fewer abstraction layers than virtual machines.
- docker uses the kernel of the host, and vm requires Guest OS
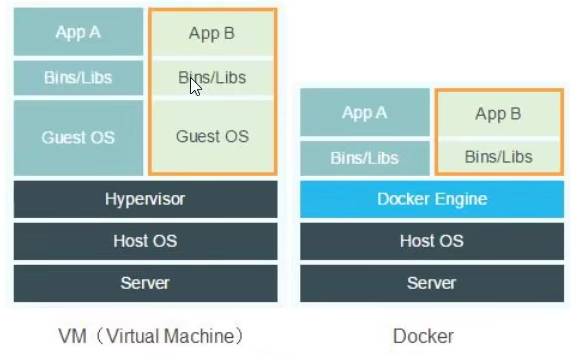
When creating a new container, docker does not need to reload an operating system kernel like a virtual machine to avoid booting. The virtual machine is loaded with GuestOS at the minute level, and docker uses the host operating system. This complex process is omitted, at the second level!

5, Common commands
Help documentation: https://docs.docker.com/reference/
For a detailed description of the command, please see the official help document.
5.1 help command
View version information: docker version
Display system information: docker info
Help command: docker command help
5.2 mirror command
View all images on the host: docker images
Search image: docker search image name
Download Image: docker pull image name
Delete image: docker rmi image name
5.3 container command
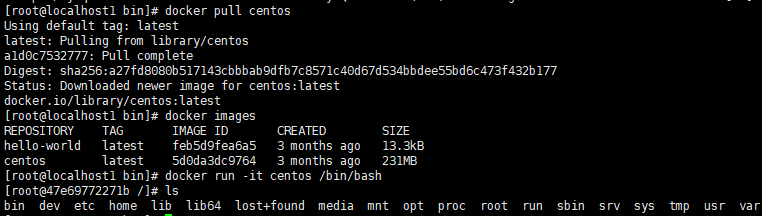
Note: you can create a container only with an image. For linux, download the centos image to test.
docker pull centos
Create a new container and start:
docker run [Optional parameters] image

# Parameter description
--name="Name"     Container name, used to distinguish containers, such as tomcat1 tomcat2
-d                Run in background mode
-it               Run interactively
-p((lowercase)          Specify container port     -p Host port: container port
-P((in words)          Randomly assigned port
Start and enter the container: docker run -it centos /bin/bash
Exit container: exit
List containers in operation: docker ps
Delete container: docker rm container id
Start container: docker start container id
Restart container: docker restart container id
Stop container: docker stop container id
Force stop container: docker kill container id
5.4 other orders
Background start container: docker run -d container name
Common pitfalls: when the docker container runs in the background, there must be a foreground process. When docker finds that there is no application, it will automatically stop. nginx, when the container starts and finds that it does not provide services, it will stop immediately, that is, there is no program.
View logs: docker logs -tf --tail number container name
Viewing container process: docker top container id
View metadata: docker inspect container id
Enter the currently running container and open a new terminal: docker exec -it container id /bin/bash
Enter the currently running container and continue the executing terminal: docker attach container id
Copy files from the container to the host: docker cp container id: path in the container destination host path
6, Installation example
6.1 installation nginx
Step 1: search nginx image
docker search nginx
[root@localhost1 bin]# docker search nginx
NAME                              DESCRIPTION                                     STARS     OFFICIAL   AUTOMATED
nginx                             Official build of Nginx.                        16036     [OK]
jwilder/nginx-proxy               Automated Nginx reverse proxy for docker con...   2104                 [OK]
richarvey/nginx-php-fpm           Container running Nginx + PHP-FPM capable of...   820                  [OK]
jc21/nginx-proxy-manager          Docker container for managing Nginx proxy ho...   299
linuxserver/nginx                 An Nginx container, brought to you by LinuxS...   161
tiangolo/nginx-rtmp               Docker image with Nginx using the nginx-rtmp...   148                  [OK]
jlesage/nginx-proxy-manager       Docker container for Nginx Proxy Manager        147                  [OK]
alfg/nginx-rtmp                   NGINX, nginx-rtmp-module and FFmpeg from sou...   112                  [OK]
nginxdemos/hello                  NGINX webserver that serves a simple page co...   81                   [OK]
privatebin/nginx-fpm-alpine       PrivateBin running on an Nginx, php-fpm & Al...   61                   [OK]
nginx/nginx-ingress               NGINX and  NGINX Plus Ingress Controllers fo...   59
nginxinc/nginx-unprivileged       Unprivileged NGINX Dockerfiles                  56
nginxproxy/nginx-proxy            Automated Nginx reverse proxy for docker con...   32
staticfloat/nginx-certbot         Opinionated setup for automatic TLS certs lo...   25                   [OK]
nginx/nginx-prometheus-exporter   NGINX Prometheus Exporter for NGINX and NGIN...   22
schmunk42/nginx-redirect          A very simple container to redirect HTTP tra...   19                   [OK]
centos/nginx-112-centos7          Platform for running nginx 1.12 or building ...   16
centos/nginx-18-centos7           Platform for running nginx 1.8 or building n...   13
bitwarden/nginx                   The Bitwarden nginx web server acting as a r...   12
flashspys/nginx-static            Super Lightweight Nginx Image                   11                   [OK]
mailu/nginx                       Mailu nginx frontend                            10                   [OK]
webdevops/nginx                   Nginx container                                 9                    [OK]
sophos/nginx-vts-exporter         Simple server that scrapes Nginx vts stats a...   7                    [OK]
ansibleplaybookbundle/nginx-apb   An APB to deploy NGINX                          3                    [OK]
wodby/nginx                       Generic nginx                                   1                    [OK]
You can also search the Docker Hub to see the detailed information.
Step 2: pull nginx
docker pull nginx
[root@localhost1 bin]# docker pull nginx
Using default tag: latest
latest: Pulling from library/nginx
a2abf6c4d29d: Pull complete
f3409a9a9e73: Pull complete
9919a6cbae9c: Pull complete
fc1ce43285d7: Pull complete
1f01ab499216: Pull complete
13cfaf79ff6d: Pull complete
Digest: sha256:366e9f1ddebdb844044c2fafd13b75271a9f620819370f8971220c2b330a9254
Status: Downloaded newer image for nginx:latest
docker.io/library/nginx:latest
Step 3: start nginx
docker run -d --name nginx01 -p 80:80 nginx
-d background operation
– name container naming
-p host port: container internal port
[root@localhost1 bin]# docker run -d --name nginx01 -p 80:80 nginx
bae37dccb8b6f6bf2aca9b9f93ba03703885fa80a50a896dc441834ac38a9a99
Step 4: Test nginx
curl localhost:80
[root@localhost1 bin]# curl localhost:80
<!DOCTYPE html>
<html>
<head>
<title>Welcome to nginx!</title>
<style>
html { color-scheme: light dark; }
body { width: 35em; margin: 0 auto;
font-family: Tahoma, Verdana, Arial, sans-serif; }
</style>
</head>
<body>
<h1>Welcome to nginx!</h1>
<p>If you see this page, the nginx web server is successfully installed and
working. Further configuration is required.</p>

<p>For online documentation and support please refer to
<a href="http://nginx.org/">nginx.org</a>.<br/>
Commercial support is available at
<a href="http://nginx.com/">nginx.com</a>.</p>

<p><em>Thank you for using nginx.</em></p>
</body>
</html>
Step 5: enter the container
docker exec -it nginx01 /bin/bash
[root@localhost1 bin]# docker exec -it nginx01 /bin/bash
root@bae37dccb8b6:/# whereis nginx
nginx: /usr/sbin/nginx /usr/lib/nginx /etc/nginx /usr/share/nginx
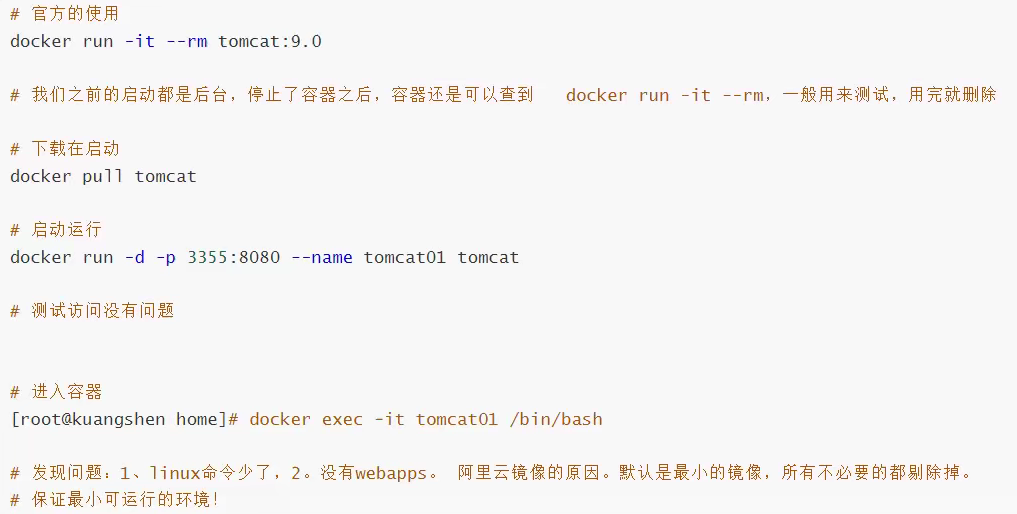
6.2 installing tomcat
Delete after use: start after downloading and delete after closing.
docker run -it --rm tomcat:9.0
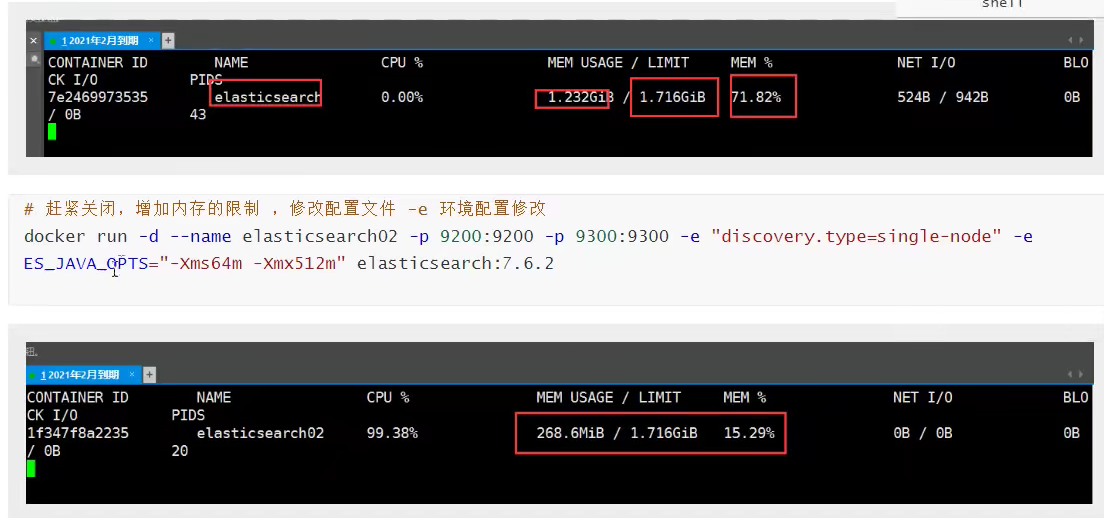
6.3 deployment es
There are many exposed ports, which consume a lot of memory, and the data generally needs to be placed in a secure directory for mounting.

7, Visualization
docker run -d -p 8000:8000 -p 9443:9443 --name portainer \
    --restart=always \
    -v /var/run/docker.sock:/var/run/docker.sock \
    -v portainer_data:/data \
    cr.portainer.io/portainer/portainer-ce:2.9.3
visit: https://ip:9443
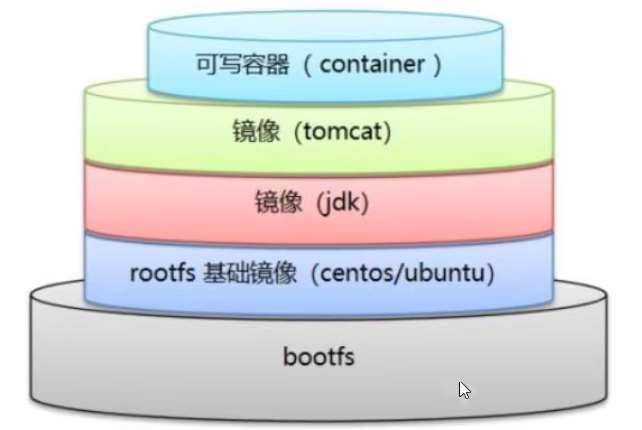
8, Mirror image principle
8.1 image loading principle
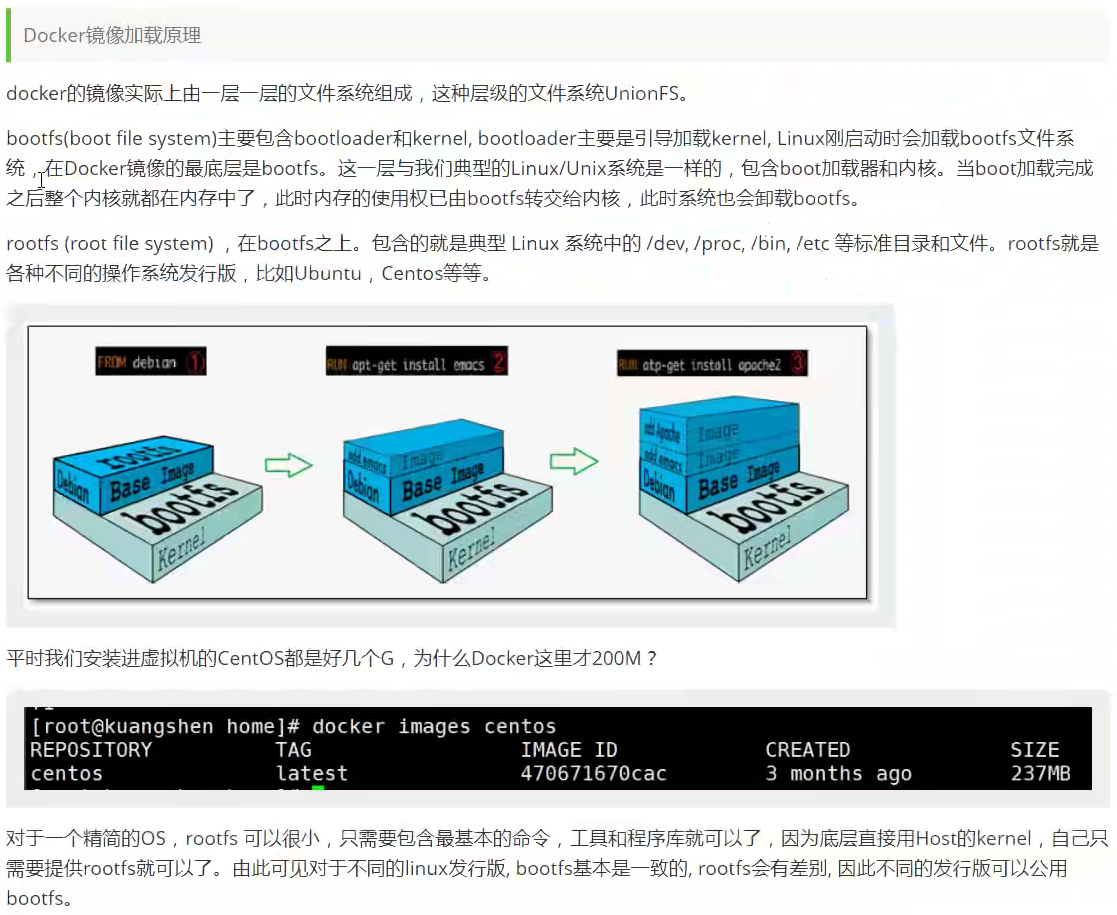
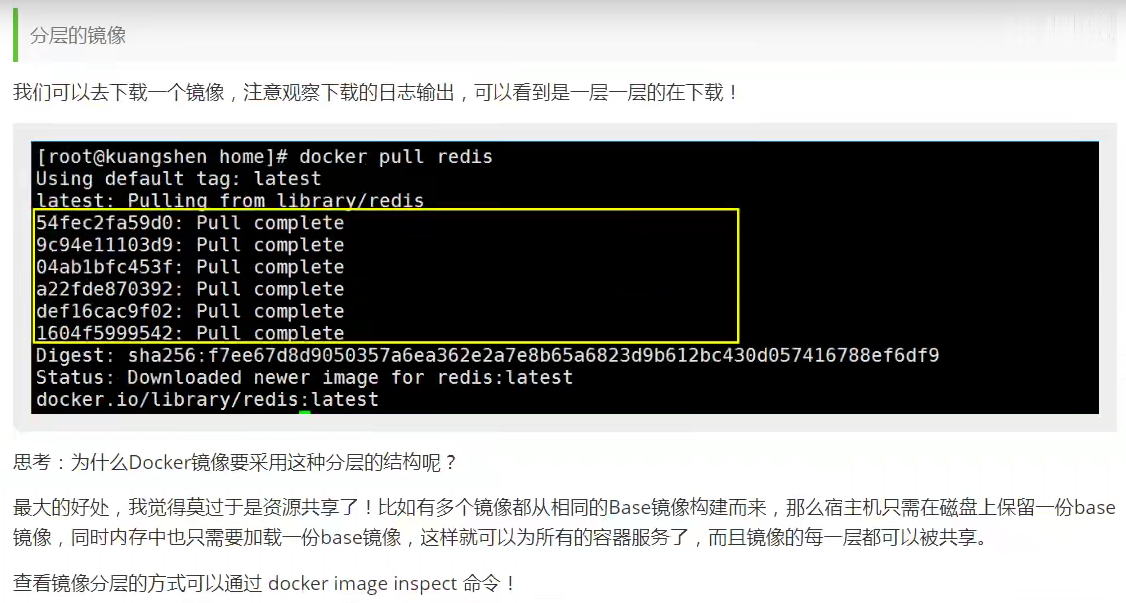
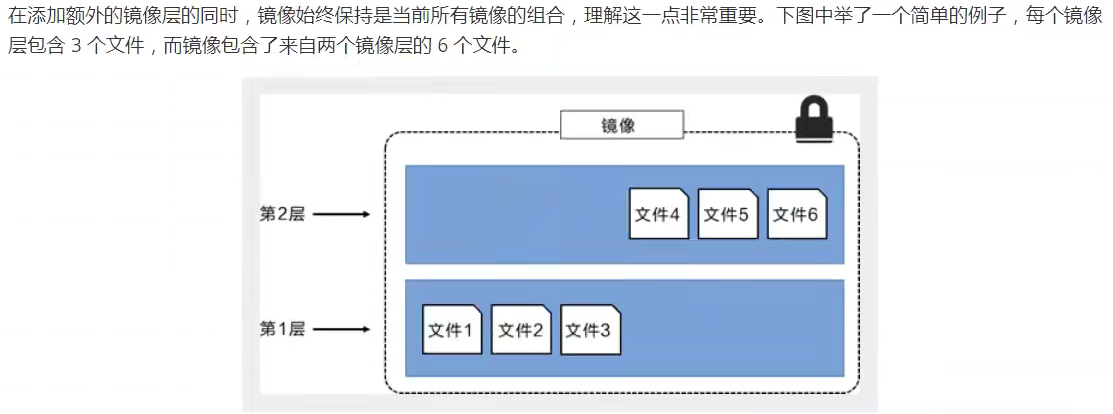
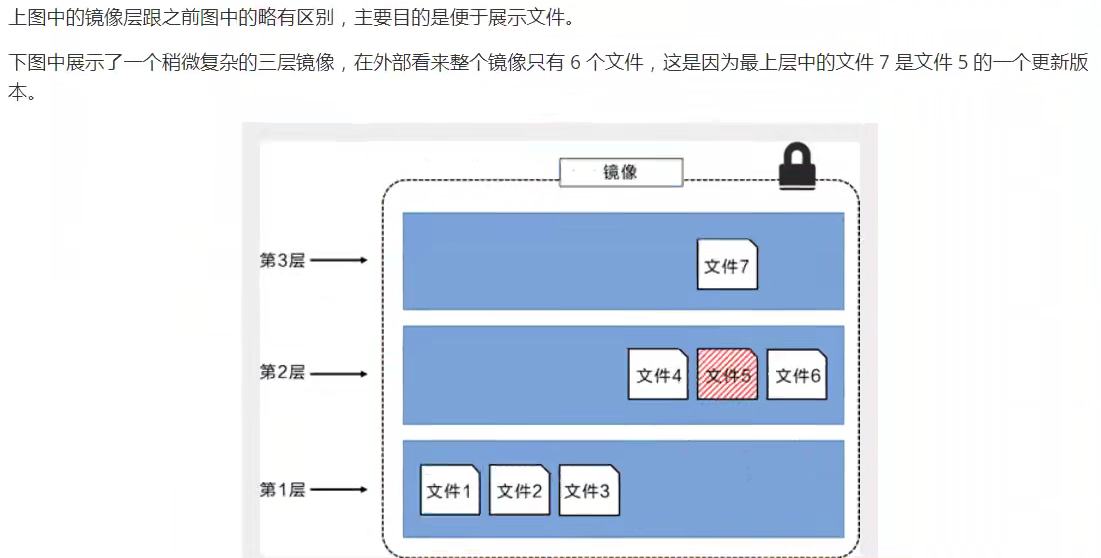
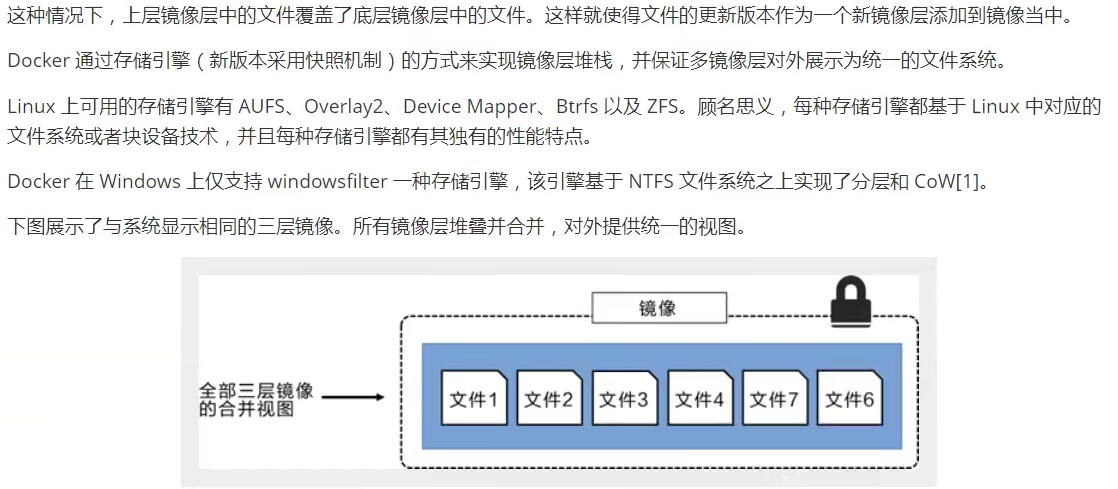
8.2 mirror layering

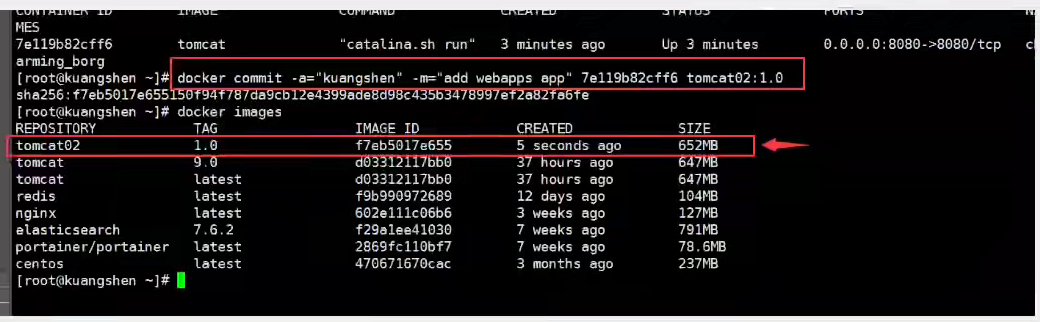
8.3 commit image
The submission container is called a new copy: docker commit
docker commit -m="Description information" -a="author" container id Target image name: [TAG]
1. Start a default tomcat
2. It is found that the default tomcat has no webapps application. The reason for the image is that there are no files under the official image default webapps
3. I copied in the basic files myself
4. Submit the container we have operated as an image through commit! We can use our modified image later. This is our own modified image
9, Container data volume
9.1 principle
Package the application and environment into one image.
If the data is in the container, the data will be lost if we delete the container! Requirement: data can be persisted.
Mysql, delete the container, delete the database and run! Requirement: MySQL data can be stored locally.
There can be a data sharing technology between containers. The data generated in the Docker container is synchronized to the local.
This is volume technology, directory mounting. Mount the directory in our container to Linux.
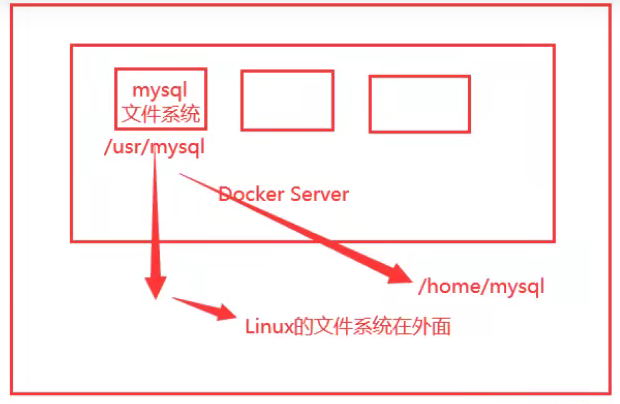
To sum up, data can be shared between containers for persistence and synchronization operations.
When the container is deleted, the data volume mounted locally still exists.
9.2 use
Method 1: directly use the command to mount - v
docker run -it -v Host Directory:In container directory

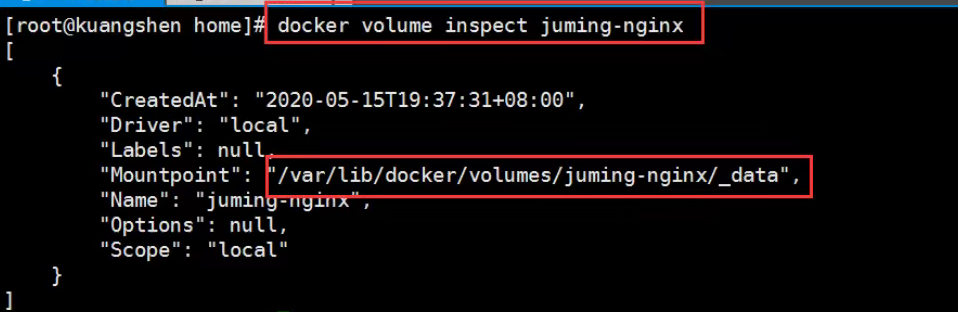
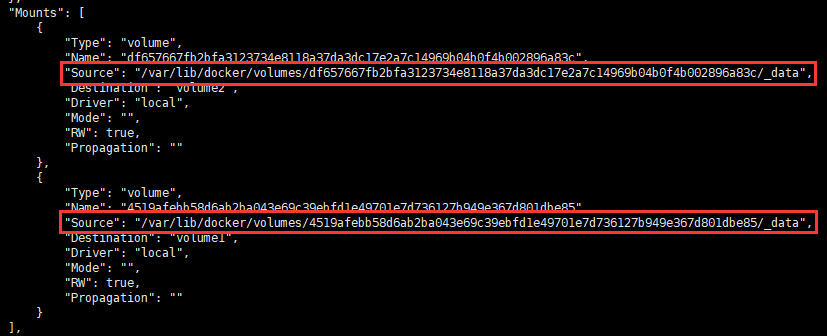
After startup, you can view the following through docker inspect container id:
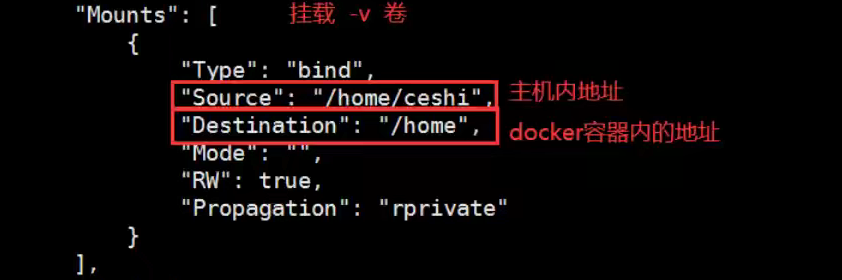
Benefits: we only need to modify locally in the future, and the container will be synchronized automatically.
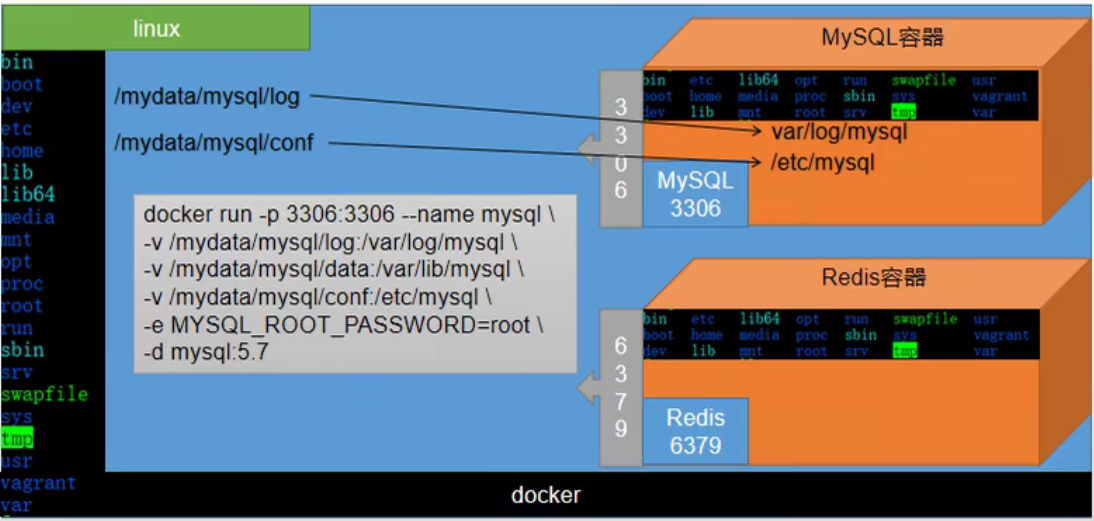
9.3 installing mysql
9.3.1 installation
Step 1: install mysql
docker pull mysql:5.7
Step 2: create an instance and start
docker run -p 3306:3306 --name mysql \
-v /mydata/mysql/log:/var/log/mysql \
-v /mydata/mysql/data:/var/lib/mysql \
-v /mydata/mysql/conf:/etc/mysql \
-e MYSQL_ROOT_PASSWORD=123456 \
-d mysql:5.7
After successful startup, a string of IDS will be returned. Enter docker ps to view the currently running container of docker.
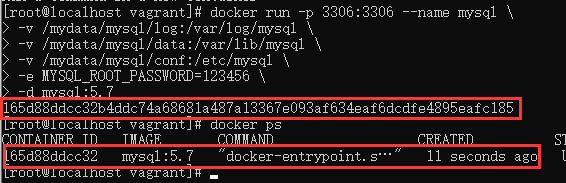
Optional: set automatic startup after startup
sudo docker update mysql --restart=always
9.3.2 description
docker container file mount and port mapping
-
docker run: start the container
-
Each container in docker can be regarded as a complete linux system. Enter the command docker exec -it mysql /bin/bash to enter the container. Enter ls again to view the current directory, which is basically the same as the directory structure of linux. (exit; exit container)

-
-p 3306:3306: in the MySQL container, 3306 is the MySQL port. You need to map the port of the MySQL container to linux, which is equivalent to accessing the 3306 port of linux to access the 3306 port of the MySQL container.
-
--Name: give the container a name.
-
-v: Directory mount.
-
-v /mydata/mysql/log:/var/log/mysql: create the mydata/mysql/log directory under the Linux directory and mount the var/log/mysql directory under the MySql container with it. The resources in the var/log/mysql directory in the MySql container can be viewed in the mydata/mysql/log directory of Linux. One change and the other change at the same time.
9.3.3 modify configuration
Step 1: create a profile
cd /mydata/mysql/conf
vi my.cnf
Step 2: write a configuration file
[client]
default-character-set=utf8

[mysql]
default-character-set=utf8

[mysqld]
init_connect='SET collation_connection = utf8_unicode_ci'
init_connect='SET NAMES utf8'
character-set-server=utf8
collation-server=utf8_unicode_ci
skip-character-set-client-handshake
skip-name-resolve
In vi, right-click to paste.
: wq save exit
Note: if the configuration file is written incorrectly, MySQL cannot be started.
Step 3: restart the mysql container
docker restart mysql
The command to start the MySQL container is: docker start mysql
9.4 named and anonymous mount
Anonymous mount: - v path in container
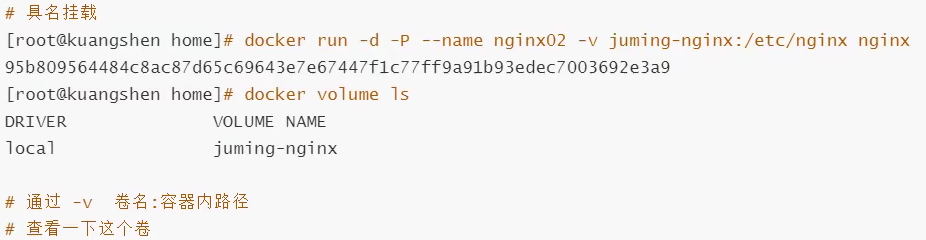
Named mount: - v volume name: path in container
Specified path mount: - v host path (starting with "/"): path within container
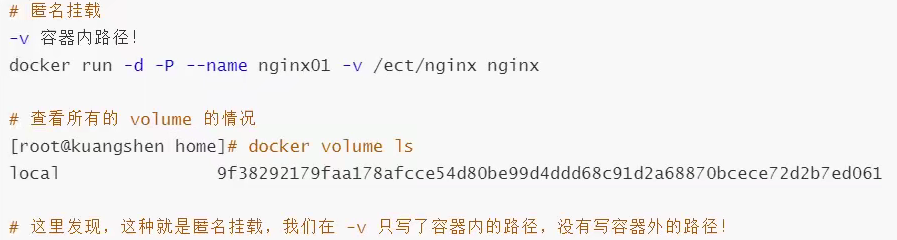
All volumes in the docker container are in / var / lib / docker / volumes / XXXX without a specified directory/_ data
We can easily find one of our volumes through named mount. In most cases, named mount is used.
9.5 getting to know Dockerfile
Dockerfile is the build file used to build the docker image, using the command script.
Through this script, you can generate an image layer by layer. The script commands one by one, and each command is a layer.
Create the script dockerfile1: mount two directories volume1 and volume2 based on centos, output ----- end -----, and enter the directory / bin/bash
FROM centos

VOLUME ["volume1","volume2"]

CMD echo "----end----"

CMD /bin/bash
Generate image through script:
docker build -f dockerfile1 -t my/centos:1.0 .
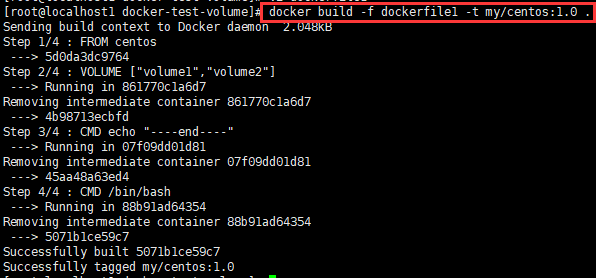
Start mirroring:

There must be a synchronous directory between this volume and the outside, which can be mounted anonymously.
View container metadata: docker inspect container id, you can view the directory of anonymous mount.
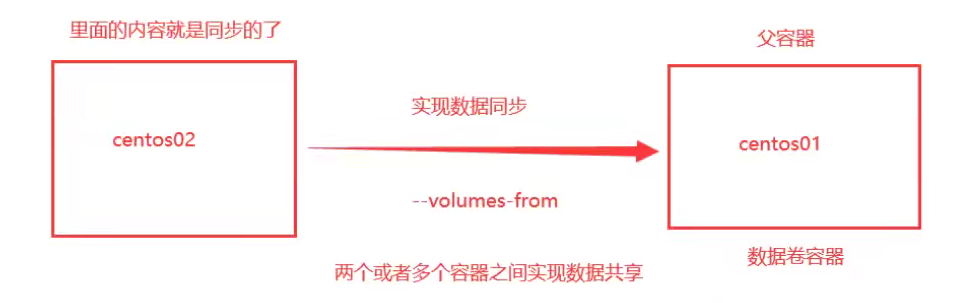
9.6 data volume container
Multiple mysql synchronization data:
Start 2 containers:
Start the first container:
docker run -it --name docker01 image id
[root@localhost1 docker-test-volume]# docker run -it --name docker01 5071b1ce59c7
[root@7e922b7b1c87 /]# ls -l
total 0
lrwxrwxrwx.   1 root root   7 Nov  3  2020 bin -> usr/bin
drwxr-xr-x.   5 root root 360 Dec 31 02:30 dev
drwxr-xr-x.   1 root root  66 Dec 31 02:30 etc
drwxr-xr-x.   2 root root   6 Nov  3  2020 home
lrwxrwxrwx.   1 root root   7 Nov  3  2020 lib -> usr/lib
lrwxrwxrwx.   1 root root   9 Nov  3  2020 lib64 -> usr/lib64
drwx------.   2 root root   6 Sep 15 14:17 lost+found
drwxr-xr-x.   2 root root   6 Nov  3  2020 media
drwxr-xr-x.   2 root root   6 Nov  3  2020 mnt
drwxr-xr-x.   2 root root   6 Nov  3  2020 opt
dr-xr-xr-x. 201 root root   0 Dec 31 02:30 proc
dr-xr-x---.   2 root root 162 Sep 15 14:17 root
drwxr-xr-x.  11 root root 163 Sep 15 14:17 run
lrwxrwxrwx.   1 root root   8 Nov  3  2020 sbin -> usr/sbin
drwxr-xr-x.   2 root root   6 Nov  3  2020 srv
dr-xr-xr-x.  13 root root   0 Dec 20 02:26 sys
drwxrwxrwt.   7 root root 171 Sep 15 14:17 tmp
drwxr-xr-x.  12 root root 144 Sep 15 14:17 usr
drwxr-xr-x.  20 root root 262 Sep 15 14:17 var
drwxr-xr-x.   2 root root   6 Dec 31 02:30 volume1
drwxr-xr-x.   2 root root   6 Dec 31 02:30 volume2
exit
Start the second container:
docker run -it --name docker02 --volumes-from docker01 image id
[root@localhost1 docker-test-volume]# docker run -it --name docker02 --volumes-from docker01 5071b1ce59c7
[root@e1e59623a90a /]# ls -l
total 0
lrwxrwxrwx.   1 root root   7 Nov  3  2020 bin -> usr/bin
drwxr-xr-x.   5 root root 360 Dec 31 02:38 dev
drwxr-xr-x.   1 root root  66 Dec 31 02:38 etc
drwxr-xr-x.   2 root root   6 Nov  3  2020 home
lrwxrwxrwx.   1 root root   7 Nov  3  2020 lib -> usr/lib
lrwxrwxrwx.   1 root root   9 Nov  3  2020 lib64 -> usr/lib64
drwx------.   2 root root   6 Sep 15 14:17 lost+found
drwxr-xr-x.   2 root root   6 Nov  3  2020 media
drwxr-xr-x.   2 root root   6 Nov  3  2020 mnt
drwxr-xr-x.   2 root root   6 Nov  3  2020 opt
dr-xr-xr-x. 203 root root   0 Dec 31 02:38 proc
dr-xr-x---.   2 root root 162 Sep 15 14:17 root
drwxr-xr-x.  11 root root 163 Sep 15 14:17 run
lrwxrwxrwx.   1 root root   8 Nov  3  2020 sbin -> usr/sbin
drwxr-xr-x.   2 root root   6 Nov  3  2020 srv
dr-xr-xr-x.  13 root root   0 Dec 20 02:26 sys
drwxrwxrwt.   7 root root 171 Sep 15 14:17 tmp
drwxr-xr-x.  12 root root 144 Sep 15 14:17 usr
drwxr-xr-x.  20 root root 262 Sep 15 14:17 var
drwxr-xr-x.   2 root root   6 Dec 31 02:30 volume1
drwxr-xr-x.   2 root root   6 Dec 31 02:30 volume2
Add files in volume1 of docker01, and Volume 1 of docker02 will be synchronized.
After deleting the docker01 container, docker02 can still access files.
Two mysql can share data because they are mounted in the same directory, but only one container can be started at the same time.
For the transfer of configuration information between containers, the life cycle of data volume containers continues until there is no container.
Once persisted locally, the data is not deleted.
10, DockerFile
10.1 introduction
The file used to build the docker image, command parameter script.
Construction steps:
- Write dockerfile file
- docker build builds an image
- docker run run image
- docker push publishing images (DockerHub, Alibaba cloud image warehouse)
Official implementation method:
https://hub.docker.com/_/centos

After opening, it is a dockerfile file.
10.2 basic knowledge
1. Each reserved keyword (instruction) must be uppercase
2. Execute from top to bottom
3. # indicates a comment
4. Each instruction creates and commits a new mirror layer.
Dockerfile is development oriented. It is very simple to write a dockerfile file when publishing projects and making images in the future.
DockerFile: a build file that defines all steps and source code
Dockerlpages: the image generated through DockerFile construction, and the product finally released and run. Originally, jar war was used
Docker container: it is the image running to provide the server
10.3 instructions
FROM: basic image. Everything starts FROM here
MAINTAINER: the author of the image, name + email
RUN: Command required for image construction
ADD: copy the file and it will be decompressed automatically
WORKDIR: mirrored working directory
VOLUME: set the VOLUME and mount the host directory
EXPOSE: Specifies the exposed port
CMD: Specifies the command to run when the container is started. Only the last one will take effect and can be replaced
ENTRYPOINT: Specifies the command to run when the container is started. You can append the command
ONBUILD: when building an inherited DockerFile, the ONBUILD instruction will be run to trigger the instruction.
COPY: similar to ADD, COPY files to the image
ENV: setting environment variables during construction
Refer to: https://blog.csdn.net/y472360651/article/details/81289141
10.4 actual combat
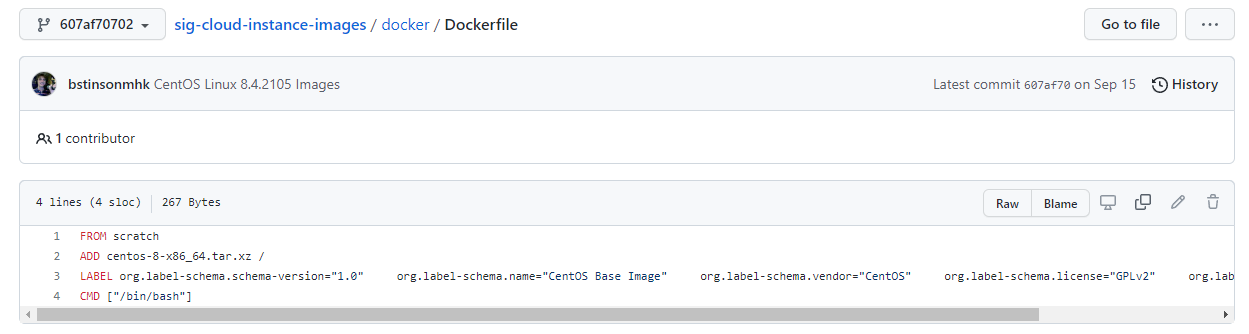
Docker Hub images basically start with the basic image scratch.
...