Docker !
1. Appearance of docker
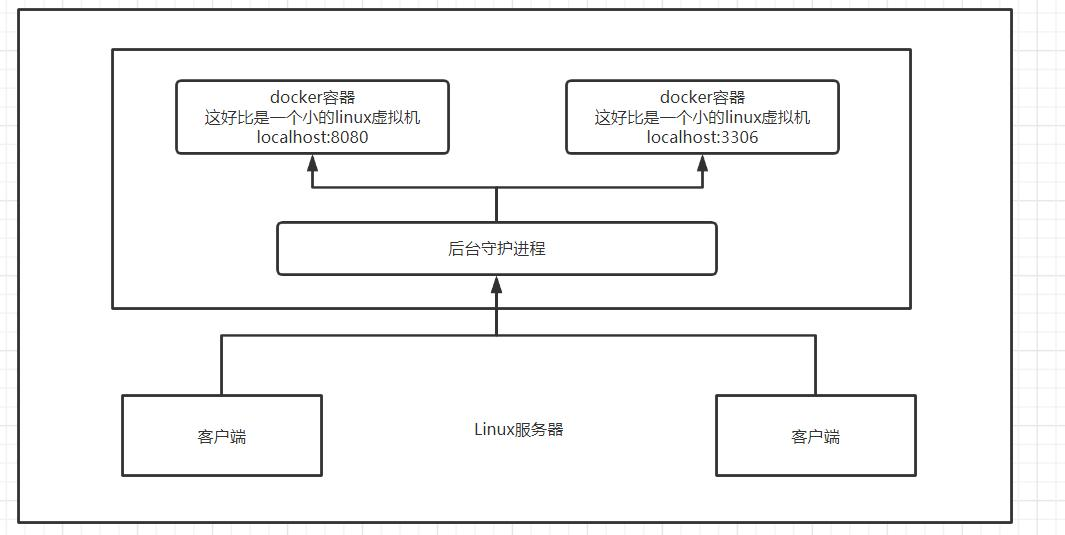
One product: development – launch two sets of environments! Application environment, application configuration!
Development – O & M. Question: I can run on my computer! Service unavailable due to version update! For operation and maintenance, the test is very big?
The environment configuration is very troublesome. Every machine has to deploy the environment (cluster Redis, ES, Hadoop...)! It takes time and effort.
Publish a project (jar + (redis MySQL JDK es)). Can all projects be installed and packaged with the environment!
Previously, Redis MySQL jdk ES Hadoop, an application environment, was configured on the server, which was too cumbersome,
Can not cross platform. Windows development, and finally released to Linux!
Tradition: development jar, operation and maintenance to do!
Now: the development, packaging and deployment are online, and a set of processes are completed!
java – apk -- publishing (app store) -- Zhang San uses apk - available after installation!
Java -- jar (environment) - package the project with the environment (image) - (Docker warehouse: store) – download the image we released - just run it directly!
Docker has proposed solutions to the above problems!
Docker's idea comes from the container!
JRE - multiple applications (Port conflict) - they are all cross!
Isolation: Docker's core idea! Pack and pack! Each box is isolated from each other. Fruit - biochemical weapons
Docker can make full use of the server through the isolation mechanism!
Essence: all technologies are learned because there are some problems that we need to solve!.
2. Docker's history
In 2010, several young people engaged in IT set up a company dotcloud in the United States
Do some pass cloud computing services! LXC related container technology!
They named their technology (container technology) Docker!
When Docker was just born, it didn't attract the attention of the industry! dotCloud can't live!
Open Source
Development source code!
In 2013, Docker was open source!
Docker more and more people have found the advantages of docker! It's popular. Docker will update a version every month!
Docker1.0 was released on April 9, 2014!
Why is Docker so hot? It's very light!
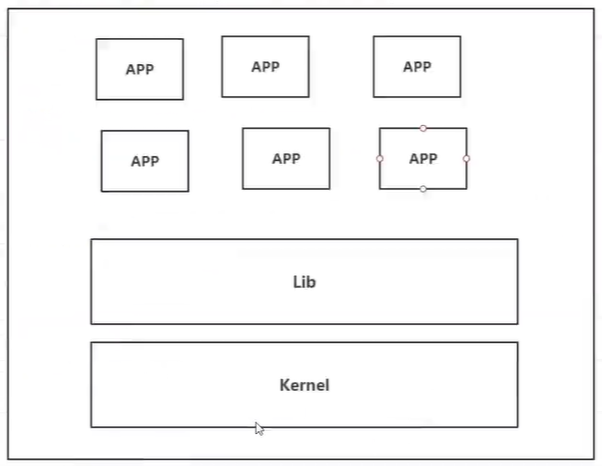
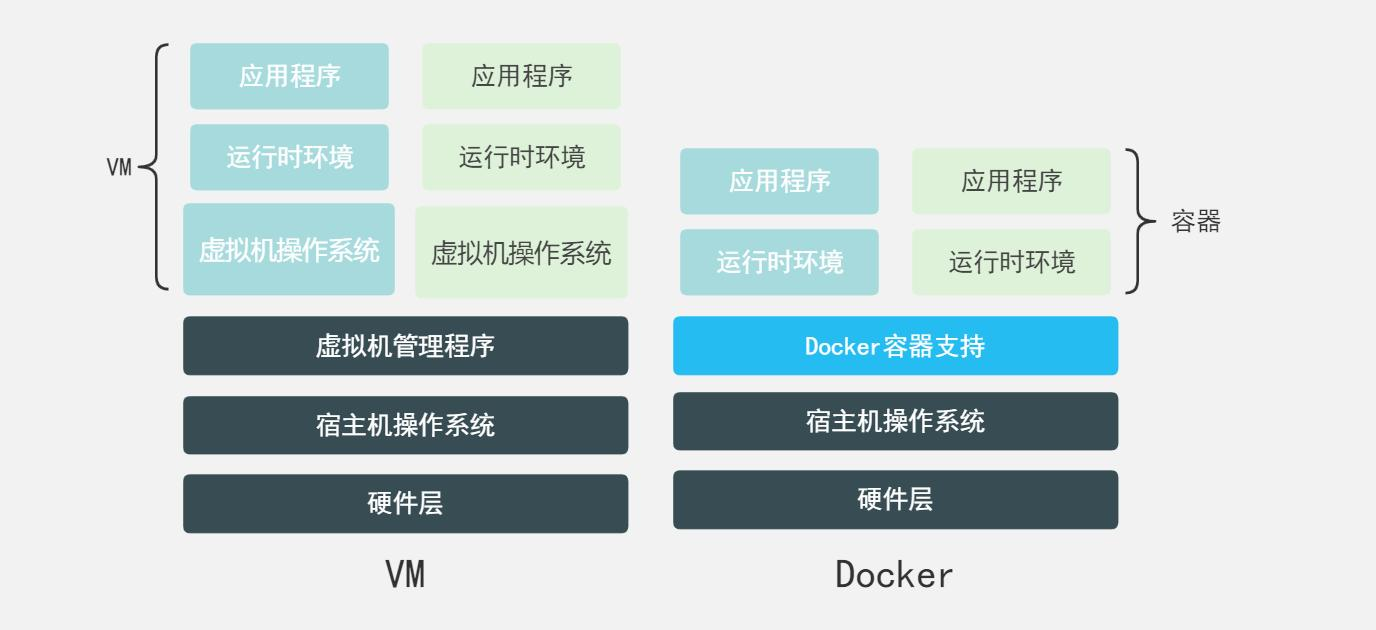
Before container technology came out, we all used virtual machine technology!
Virtual machine: install a VMware in the window. Through this software, we can virtualize one or more computers! Bulky! Virtual machine also belongs to virtualization technology, Docker container technology, and virtualization technology!
vm : linux centos Native image (one computer)!)Isolation, multiple virtual machines need to be started!―How many? G A few minutes
docker:Isolation, mirroring (core environment 4) m + jdk + mysq1)It's very compact. Just run the image!
Small!How many? M KB Second start!
By now, all developers must know Docker!
Talk about Docker
Docker is an open source project based on Go language!
Official website: https://www.docker.com/
Official documents: https://docs.docker.com/
3. Use of docker
Previous virtual machines
Disadvantages of virtual machine technology:
- It takes up a lot of resources
- Redundant steps
- Slow start
Containerization Technology
Containerization technology is not a complete operating system for simulation
Compare Docker and virtual machine technologies:
- The traditional virtual machine virtualizes a set of hardware, runs a complete operating system, and then installs and runs software on this system
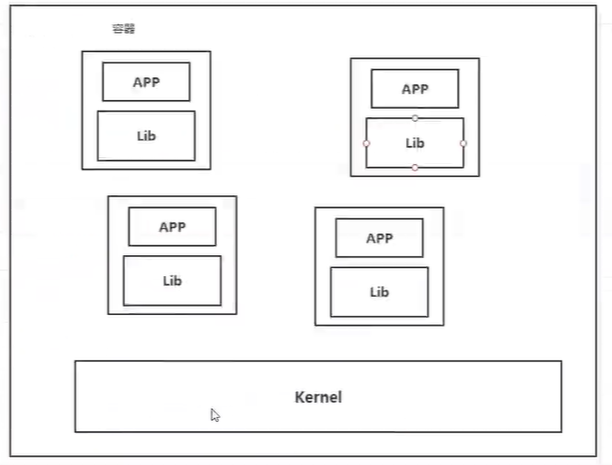
- The applications in the container run directly on the content of the host. The container does not have its own kernel or virtual hardware, so it is lightweight
- Each container is isolated from each other, and each container has its own file system, which does not affect each other.
DevOps (development, operation and maintenance)
Faster delivery and deployment of applications
Traditional: a pile of help documents, installer
Docker: packaging image release test, one click operation
More convenient upgrade and capacity expansion
After using Docker, we deploy the application like building blocks! The project is packaged into an image to expand server A and server B
Simpler system operation and maintenance
After containerization, our development and testing environments are highly consistent. More efficient utilization of computing resources:
Docker is a kernel level virtualization, which can run many container instances on a physical machine! The performance of the server can be squeezed to the extreme.
4. Installation of docker
4.1 basic composition of docker

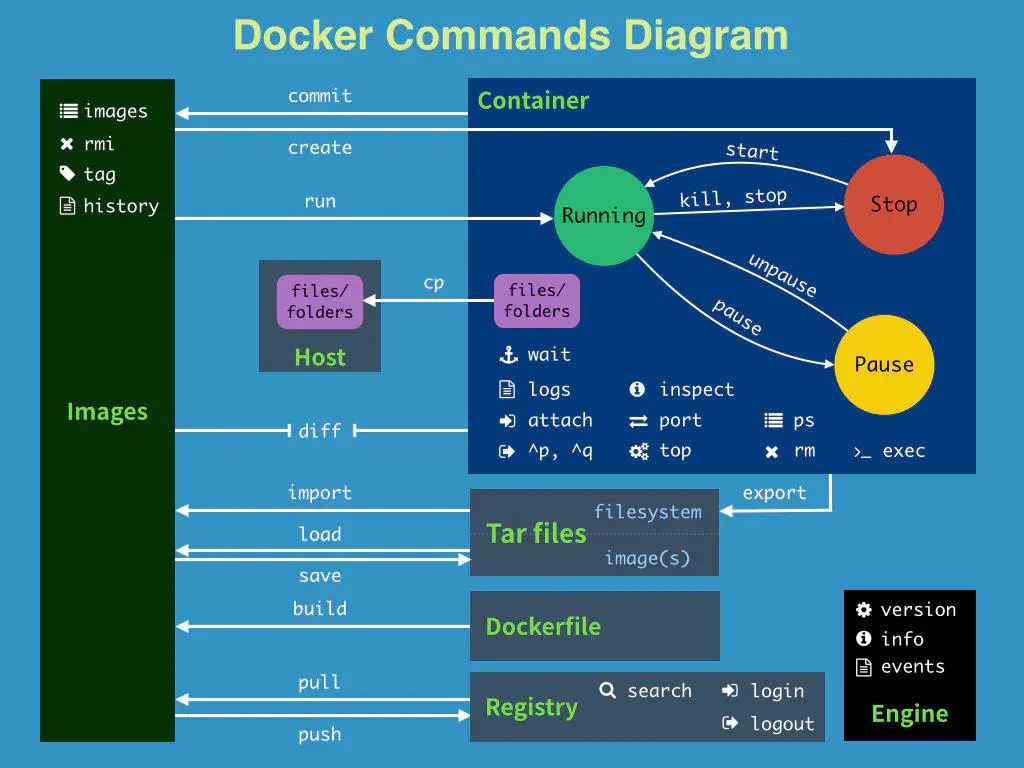
Image:
The image is like a template. You can create container services through the template, and create many containers through the image (the final service or project runs in the container)
Container:
Docker uses container technology to run one or a group of applications independently and create them through image,
Stop, delete, basic command!
At present, this container can be understood as a simple Linux system
repository:
The warehouse is where the image is stored!
The warehouse is divided into public warehouse and private warehouse!
Docker hub (foreign by default)
Alicloud... All have container servers (image acceleration needs to be configured!
4.2 installation of docker
Environmental preparation
- Linux command Basics
- CentOS
- Xshell remote connection
Environment view
# System kernel view
[root@iZbp160rjf7ztq5oshw6m0Z ~]# uname -r
4.18.0-193.14.2.el8_2.x86_64
# System version view
[root@iZbp160rjf7ztq5oshw6m0Z ~]# cat /etc/os-release
NAME="CentOS Linux"
VERSION="8 (Core)"
ID="centos"
ID_LIKE="rhel fedora"
VERSION_ID="8"
PLATFORM_ID="platform:el8"
PRETTY_NAME="CentOS Linux 8 (Core)"
ANSI_COLOR="0;31"
CPE_NAME="cpe:/o:centos:centos:8"
HOME_URL="https://www.centos.org/"
BUG_REPORT_URL="https://bugs.centos.org/"

CENTOS_MANTISBT_PROJECT="CentOS-8"
CENTOS_MANTISBT_PROJECT_VERSION="8"
REDHAT_SUPPORT_PRODUCT="centos"
REDHAT_SUPPORT_PRODUCT_VERSION="8"
install
Follow the official help document
- Uninstall old version
yum remove docker \
                  docker-client \
                  docker-client-latest \
                  docker-common \
                  docker-latest \
                  docker-latest-logrotate \
                  docker-logrotate \
                  docker-engine
- Installation dependency
yum install -y yum-utils
- Set up mirror warehouse
yum-config-manager \
    --add-repo \
    https://download.docker.com/linux/centos/docker-ce.repo
    # The default image is from abroad. The installation is very slow. It is not recommended

yum-config-manager --add-repo http://mirrors.aliyun.com/docker-ce/linux/centos/docker-ce.repo
	# Alibaba cloud image warehouse is used. Alibaba cloud image warehouse is recommended in China
- install
yum install docker-ce docker-ce-cli containerd.io
- Start Docker
systemctl start docker
- Check whether Docker is started successfully
docker version
- Test Hello world
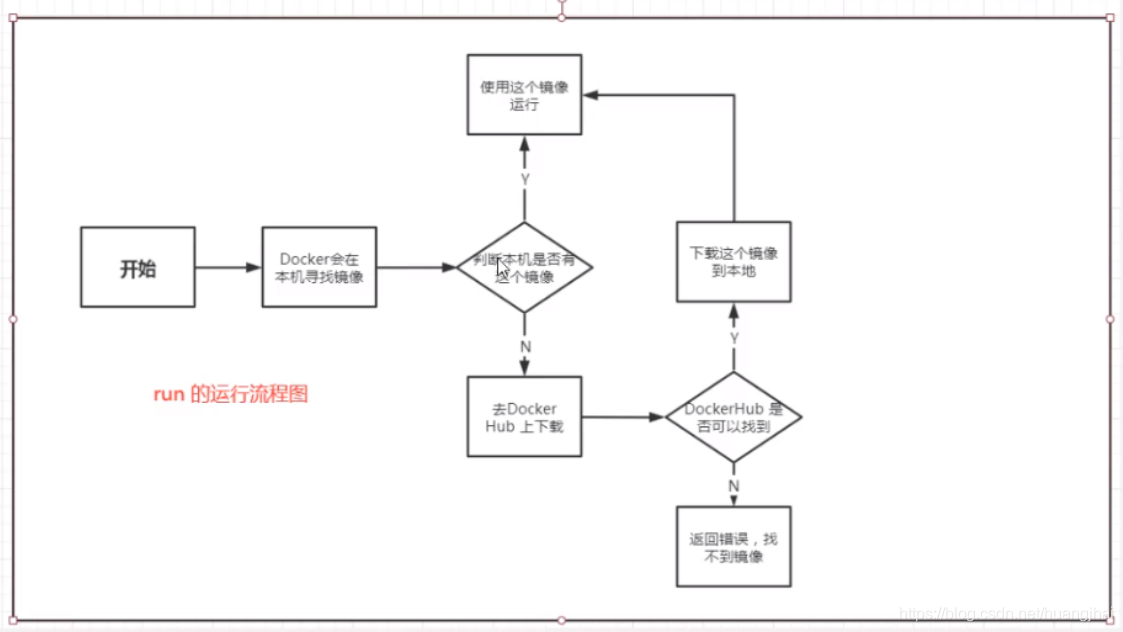
docker run hello-world
# Docker will first find out whether the local machine has this image. If yes, it will run directly. If not, it will try to pull this image
# Here, first pull the image as a local image, and then start it
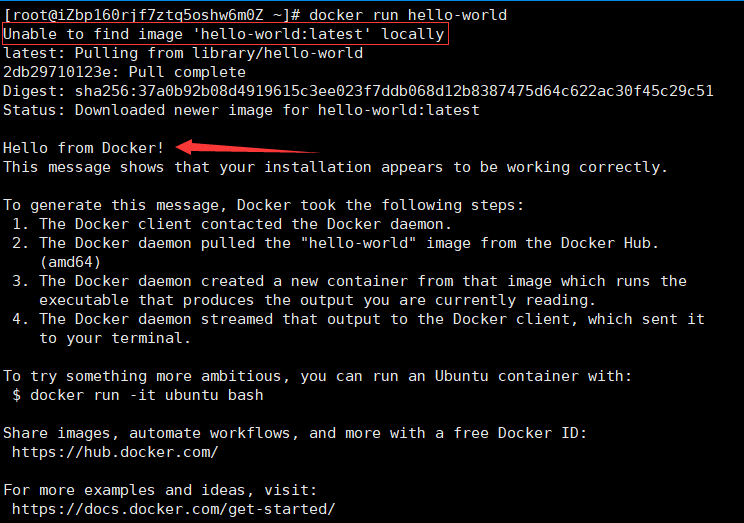
- View the downloaded hello world image
docker images
[root@iZbp160rjf7ztq5oshw6m0Z ~]# docker images
REPOSITORY    TAG       IMAGE ID       CREATED       SIZE
hello-world   latest    feb5d9fea6a5   6 weeks ago   13.3kB
Understanding: uninstalling docker
# 1. Uninstall dependency
yum remove docker-ce docker-ce-cli container.io

# 2. Delete image
rm -rf /var/lib/docker

# /Default working path of var/lib/docker docker
4.3 configuring alicloud image acceleration
- Find alicloud image acceleration
Elastic computing - > container mirroring Service - > mirroring tool - > mirroring accelerator
- Configuration use
Note: the acceleration address of each Alibaba cloud account is different. Please use your own acceleration address
sudo mkdir -p /etc/docker
sudo tee /etc/docker/daemon.json <<-'EOF'
{
  "registry-mirrors": ["https://xxxxxxxx.mirror.aliyuncs.com"]
}
EOF
sudo systemctl daemon-reload
sudo systemctl restart docker
4.4 HelloWorld process
4.5 bottom layer principle
4.5.1 how docker works
Docker is a Client - Server system. The daemon of docker runs on the host. It can be accessed from the client through Socket!
The Docker Server will execute this command after receiving the docker client command!
4.5.2 why is docker faster than VM
-
Docker has fewer abstraction layers than virtual machines
-
docker uses the kernel of the host, and the VM needs the guest OS (guest OS: the system (OS) in the VM)
When Docker creates a new container, it does not need to reload an operating system kernel like a virtual machine, but directly use the operating system of the host, while the virtual machine needs to load the Guest OS.
5. Common commands of docker
5.1 help command
docker version 			# docker version information
docker info			    # docker system information
docker command --help	    # docker help command
Document query: https://docs.docker.com/engine/reference/commandline/docker/
5.2 mirror command
5.2.1 view all images of the machine
docker images
[root@iZbp160rjf7ztq5oshw6m0Z ~]# docker images
REPOSITORY    TAG       IMAGE ID       CREATED       SIZE
hello-world   latest    feb5d9fea6a5   6 weeks ago   13.3kB

# explain
REPOSITORY    	TAG       IMAGE ID       CREATED    SIZE
 Mirrored warehouse source		Mirrored label mirrored id		Creation time	Mirror size

# Optional parameters
-a / --all 		List all mirrors
-q / --quite 	Show only mirrors id
5.2.2 search image
docker search
docker search Image name

# Optional
Options:
  -f, --filter filter   Filter output based on conditions provided
      --format string   Pretty-print search using a Go template
      --limit int       Max number of search results (default 25)
      --no-trunc        Don't truncate output


# Search for mirrors with more than 3000 stars
docker search mysql --filter=STARS=3000
5.2.3 downloading images
docker pull
docker pull image name [: tag]
[root@iZbp160rjf7ztq5oshw6m0Z ~]# docker pull mysql

Using default tag: latest				# Do not specify tag, download the latest version by default
latest: Pulling from library/mysql
b380bbd43752: Pull complete 			# Layered download, the core of docker image - federated file system
f23cbf2ecc5d: Pull complete
30cfc6c29c0a: Pull complete
b38609286cbe: Pull complete
8211d9e66cd6: Pull complete
2313f9eeca4a: Pull complete
7eb487d00da0: Pull complete
4d7421c8152e: Pull complete
77f3d8811a28: Pull complete
cce755338cba: Pull complete
69b753046b9f: Pull complete
b2e64b0ab53c: Pull complete
Digest: sha256:6d7d4524463fe6e2b893ffc2b89543c81dec7ef82fb2020a1b27606666464d87 #autograph
Status: Downloaded newer image for mysql:latest
docker.io/library/mysql:latest #Download real address

# docker pull mysql
# Equivalent to
# docker pull docker.io/library/mysql:latest
Specify version download (version number must exist)
[root@iZbp160rjf7ztq5oshw6m0Z ~]# docker pull mysql:5.7
5.7: Pulling from library/mysql
b380bbd43752: Already exists
f23cbf2ecc5d: Already exists
30cfc6c29c0a: Already exists
b38609286cbe: Already exists
8211d9e66cd6: Already exists
2313f9eeca4a: Already exists
7eb487d00da0: Already exists # We can see the advantages of layering. The same files are common and only different files are downloaded
a71aacf913e7: Pull complete
393153c555df: Pull complete
06628e2290d7: Pull complete
ff2ab8dac9ac: Pull complete
Digest: sha256:2db8bfd2656b51ded5d938abcded8d32ec6181a9eae8dfc7ddf87a656ef97e97
Status: Downloaded newer image for mysql:5.7
docker.io/library/mysql:5.7
5.2.4 deleting images
docker rmi
#1. Delete the specified image id
docker rmi -f  image id
#2. Delete multiple image IDS
docker rmi -f  image id image id image id
#3. Delete all image IDs
docker rmi -f  $(docker images -aq)
5.3 container command
We can only create containers with images. Here we download a centos image to test and learn
5.3.1 pulling image
Pull a CentOS image
docker pull centos
5.3.2 start up container
docker run
docker run [Optional parameters] Image name
# Parameter description
--name="name" Specifies the name of the container
-d Background operation
-it Run interactively and enter the container
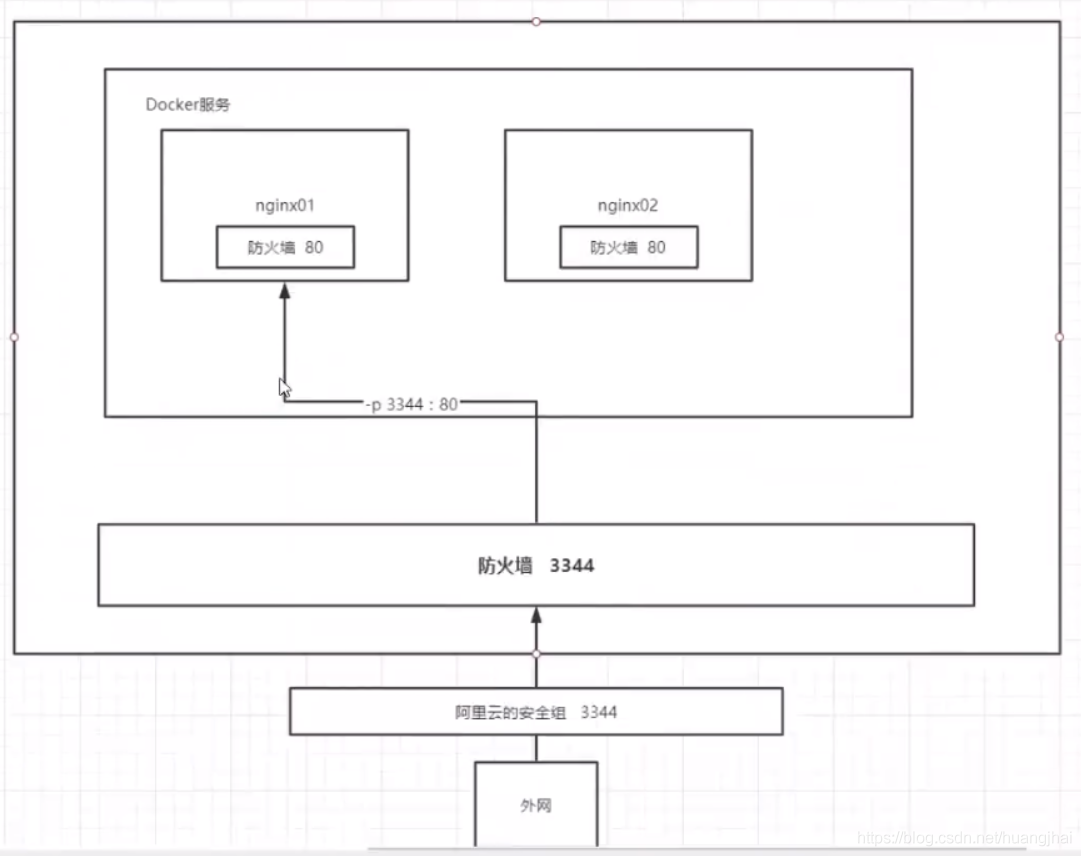
-p Specify the port of the container (four ways)
-p ip:Host port:Container port
-p Host port:Container port
-p Container port
Container port
-P Randomly specify container port
# test
docker run -it centos /bin/bash # Start and enter the container and interact with bash
# centos basic version, many commands are not perfect

5.3.3 exit the container
exit # Exit the container directly and stop operation
Ctrl + P + Q # Exit the container without stopping
5.3.4 viewing containers in operation
docker ps [options]
docker ps [Optional parameters]

# empty 		 Lists currently running containers
# -a 	 	 List all containers
# -n=? 		 List n recently created containers
# -q 	 	 Only container IDs are listed
[root@iZbp160rjf7ztq5oshw6m0Z ~]# docker ps
CONTAINER ID   IMAGE     COMMAND       CREATED         STATUS         PORTS     NAMES
826f7cbb95ee   centos    "/bin/bash"   6 minutes ago   Up 6 minutes             zen_margulis
5.3.5 delete container
docker rm [options]
docker rm container id                 # Delete the specified container. You cannot delete the running container. Force the deletion to use rm -f
docker rm -f $(docker ps -aq)   # Delete all containers
docker ps -a -q|xargs docker rm # Delete all containers
5.3.6 starting and stopping containers
docker start container id          #Start container
docker restart container id        #Restart container
docker stop container id           #Stops the currently running container
docker kill container id           #Force stop of current container
5.4 other common commands
5.4.1 log
docker logs
docker logs [Optional] container id

# Optional
-f : Trace log output

--since :Show all logs for a start time

-t : presentation time stamp

--tail :List only the latest N Container log
5.4.2 pit for background startup
# Command docker run -d image name!

[root@kuangshen/]# docker run -d centos

# Problem: docker ps found centos stopped

# Common pitfalls: when the docker container runs in the background, there must be a foreground process. When docker finds that there is no application, it will automatically stop

# nginx, when the container starts and finds that it does not provide external services, it will stop immediately, that is, there is no program
5.4.3 viewing processes in containers
docker top container id
5.4.4 viewing container metadata
docker inspect [Optional] container id | Container name

# Optional
-f :Specifies the template file for the return value.

-s :Displays the total file size.

--type :Returns for the specified type JSON.
5.4.5 containers running in the background
We usually run the container in the background mode. We need to enter the container and modify some configurations
# docker exec executes commands in a running container
# Exiting this method after connecting does not stop the operation of the container

docker exec -it container id CAMMAND(Assign terminal or execute script)

# docker attach to a running container
# Exiting after connecting will stop the operation of the container

docker attach container id
5.4.6 copying data between container and host
docker cp CONTAINER:SRC_PATH DEST_PATH|-

docker cp SRC_PATH|- CONTAINER:DEST_PATH

# Copy the host / www/runoob directory to the container 96f7f14e99ab's / www directory.
docker cp /www/runoob 96f7f14e99ab:/www/

# Copy the host / www/runoob directory to the container 96f7f14e99ab, and rename the directory www.
docker cp /www/runoob 96f7f14e99ab:/www

# Copy the container 96f7f14e99ab's / www directory to the host's / tmp directory.
docker cp  96f7f14e99ab:/www /tmp/
5.5 summary
For more docker commands, you can go to the rookie textbook to query:
Rookie command Encyclopedia
6. Docker exercise
6.1 deploying Nginx
# 1. Pull the image (to specify the version, you need to search the dockerHub to view the version)
docker pull nginx

# 2. Check whether the image is downloaded successfully
docker images

# 3. Start the container
# Run in the background and use port 2233 to map port 80 of nginx, named nginx -- test
docker run -it -p 2233:80 --name nginx_test nginx

# 4. Local test access
curl localhost:2233

# 5. Extranet test
http://Server public ip:2233
Understanding of port exposure:
6.2 deploying Tomcat
#Official use
docker run -it -rm tomcat:9.0

# We started in the background before. After stopping the container, the container can still find docker run -it --rm, which is generally used for testing and deleted after use

# 1. Download at startup
docker pu1l tomcat
# Start operation
docker run -d -p 2234:8080 --name tomcat_test tomcat

# There are no questions in the test interview

# Enter container
[root@kuangshen home]# docker exec -it tomcat01 /bin/bash
# Problems found:
# 1. 1inux command is missing;
# 2. webapps has nothing. The reason for Alibaba cloud image. The default is the smallest image, and all unnecessary images are eliminated.
# The purpose is to ensure a minimum operational environment!
Question to think about: we will deploy the project in the future. Is it very troublesome if we have to enter the container every time? If only I could provide a mapping path outside the container, webapps, and we would automatically synchronize the project to the inside!
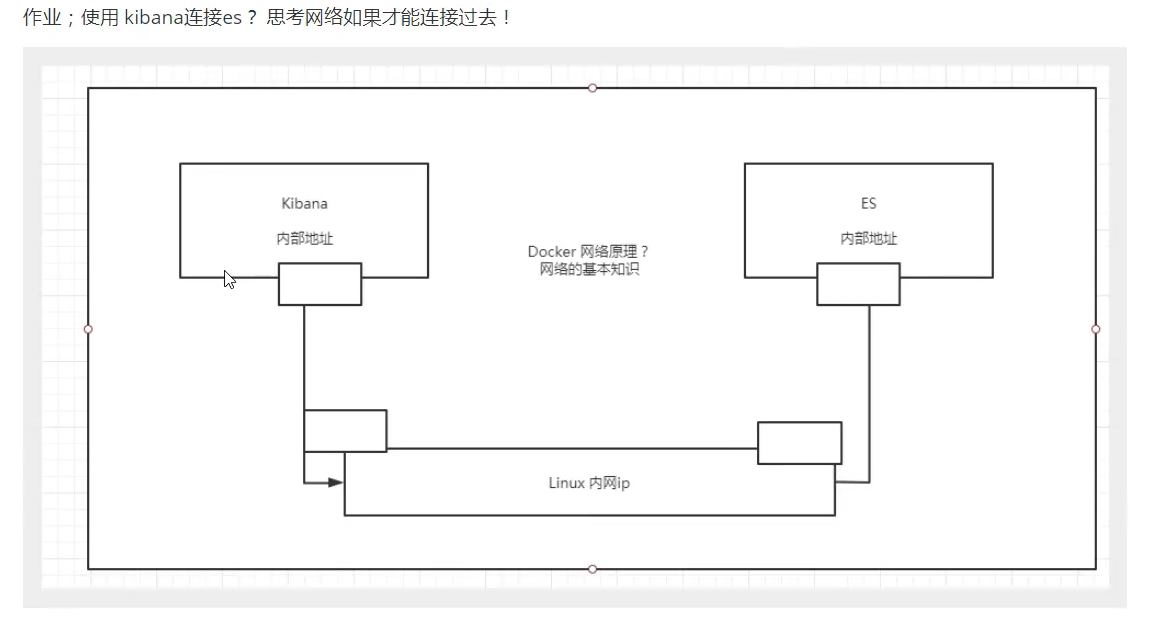
6.3 deployment of ES + Kibana
# es exposed many ports!
# It's very memory intensive
# es data generally needs to be placed in the security directory! mount
# --net somenetwork ? network configuration

# Start elasticsearch
docker run -d --name elasticsearch -p 9200:9200 -p 9300:9300 -e "discovery.type=single-node"elasticsearch:7.6.2

# It's stuck after starting 1inux
# docker stats view cpu status

# The test is successful enough
[root@kuangshen home]# cur1 localhost: 9200
{
    "name" : "7e2469973535",
    "cluster_name" : "docker-cluster"",
    "cluster_uuid"" : ""eJ1FbVtzs91ERQ71EQjoug",
    "version" :{
        "number":"7.6.2 "",
        "build_flavor" : "defau1t"",
        "build_type" : "docker",
        "build_hash" : "ef48eb35cf30adf4db14086e8aabd07ef6fb113f"",
        "build_date" : "2020-03-26T06:34:37.794943z",
        "build_snapshot" : false,
        "lucene_version" : ""8.4.0"",
        "minimum_wire_compatibility_version" : "6.8.0",
        "minimum_index_compatibility_version" : "6.0.0-betal""
    	},
    "tagline" : "You Know.for Search"
}

# es is a memory intensive solution:
# Add '- e ES_JAVA_OPTS="-Xms128m -Xmx512m"'configure the memory size occupied by the virtual machine of ElasticSearch.
reflection:
7. Docker visualization tool
As an understanding, visualization tools are generally not used
- portainer
- Rancher (CI/CD reuse)
7.1 portainer
# Download start
docker run -d -p 8000:8000 -p 9443:9443 --name portainer_test \
    --restart=always \
    -v /var/run/docker.sock:/var/run/docker.sock \
    -v portainer_data:/data \
    portainer/portainer-ce:latest

# Connection registration login
http://Server ip:9443
user: admin
password: asdfghjkl

# Test use
The visualization panel will not be used at ordinary times. Test and play by yourself!
8. Detailed explanation of docker image
8.1 what is mirroring
Image is a lightweight and executable independent software package, which is used to package the software running environment and the software developed based on the running environment. It contains all the contents required to run a software, including code, runtime, library, environment variables and configuration files.
All applications can run directly by directly packaging the docker image!
How to get an image:
- Download from remote warehouse
- Friend copy to you
- Make an image Docker File yourself
8.2 image loading principle
UnionFS (Federated file system)
Union fs (Federated file system): Union file system (Union FS) is a layered, lightweight and high-performance file system. It supports the superposition of file system modifications from one submission to another. At the same time, it can mount different directories into a single virtual file system The union file system is the foundation of Docker image. Images can be inherited through layering. Based on the basic image (without parent image), various specific application images can be made.
Features: multiple file systems can be loaded at the same time, but from the outside, only one file system can be seen. Joint loading will overlay all layers of file systems, so that the final file system will contain all underlying files and directories
Docker image loading principle
The docker image is actually composed of a layer by layer file system, which is called UnionFS
bootfs(boot file system) mainly includes bootloader and kernel. Bootloader is mainly used to boot and load the kernel. Bootfs file system will be loaded when Linux starts up. Bootfs is at the bottom of Docker image. This layer is the same as our typical Linux/Unix system, including boot loader and kernel. After the boot is loaded, the whole kernel is in memory. At this time, the right to use the memory has been transferred from bootfs to the kernel. At this time, the system will also unload bootfs.
rootfs (root file system), above bootfs. It contains standard directories and files such as / dev,/proc, /bin, /etc in a typical Linux system. rootfs is a variety of operating system distributions, such as Ubuntu, CentOS and so on.
Why is the CentOS image of a virtual machine as high as several gigabytes and only a few hundred megabytes in Docker?
For a thin OS, rootfs can be very small. You only need to include the most basic commands, tools and program libraries. Because the underlying layer directly uses the Host kernel, you only need to provide rootfs. It can be seen that bootfs are basically the same for different Linux distributions, and rootfs will be different, so different distributions can share bootfs.
The virtual machine is at the minute level and the container is at the second level!
Hierarchical understanding
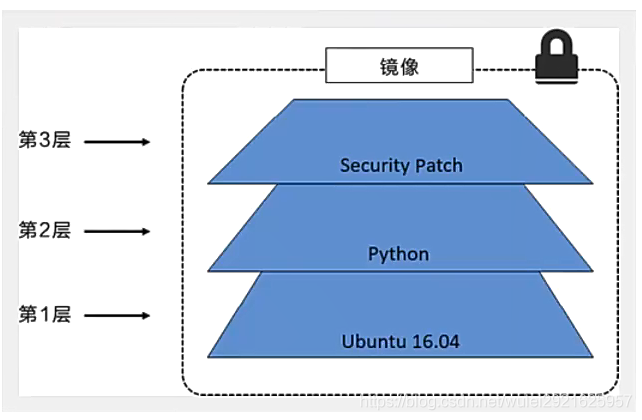
All Docker images start from a basic image layer. When modifying or adding new content, a new image layer will be created above the current image layer.
For a simple example, if you create a new image based on Ubuntu Linux 16.04, this is the first layer of the new image; If a Python package is added to the image, a second image layer will be created above the basic image layer; If you continue to add a security patch, a third mirror layer will be created.
The image currently contains three image layers, as shown in the figure below (this is just a simple example for demonstration).
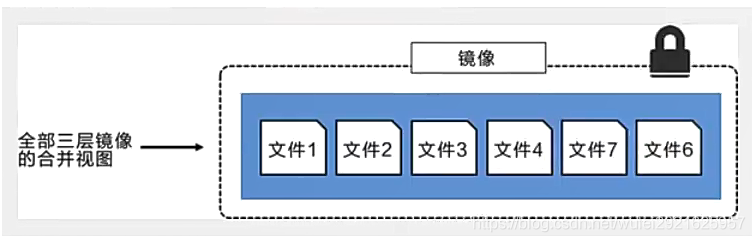
While adding additional image layers, it is very important to understand that the image always remains the combination of all current images. The following figure illustrates a simple example. Each image layer contains 3 files, and the image contains 6 files from two image layers
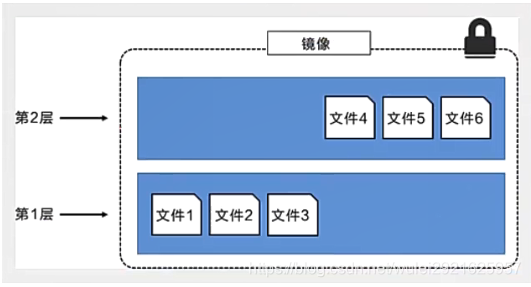
The image layer in the above figure is slightly different from that in the previous figure. The main purpose is to facilitate the display of files.
The following figure shows a slightly complex three-tier image. Externally, there are only 6 files in the entire image, because file 7 in the top layer is an updated version of file 5.
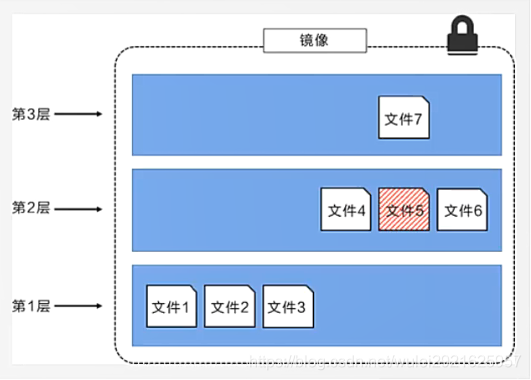
In this case, the files in the upper mirror layer overwrite the files in the lower mirror layer. This allows the updated version of the file to be added to the image as a new image layer.
Docker implements the image layer stack through the storage engine (the new version adopts the snapshot mechanism), and ensures that multiple image layers are displayed as a unified file system.
The storage engines available on Linux are AUFS, Overlay2, Device Mapper, Btrfs and ZFS. As the name suggests, each storage engine is based on the corresponding file system or block device technology in Linux, and each storage engine has its unique performance characteristics.
Docker only supports the windowsiter storage engine on Windows, which implements layering and cow based on NTFS file system [1].
The following figure shows the same three-tier image as the system display. All mirror layers are stacked and merged to provide a unified view.
characteristic
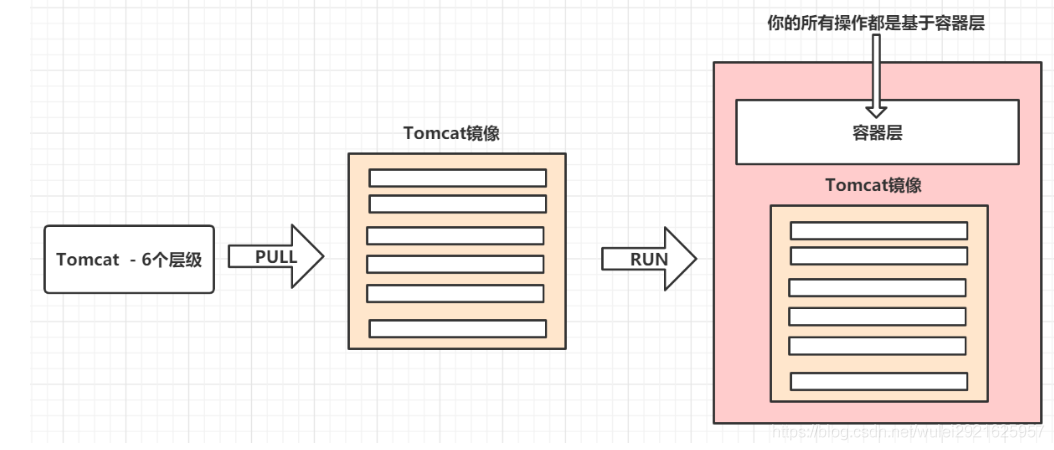
Docker images are only readable. When the container starts, a new writable layer is loaded to the top of the image!
This layer is what we usually call the container layer. What is under the container is called the mirror layer
8.3 commit image
docker commit Submit the container as a new copy

# The command works similarly to git
docker commit -m="Submitted information" -a="author" container ID Target image name[:tag]
Actual combat practice
[root@iZbp160rjf7ztq5oshw6m0Z ~]# docker images
REPOSITORY               TAG       IMAGE ID       CREATED       SIZE
nginx                    latest    04661cdce581   4 days ago    141MB
portainer/portainer-ce   latest    a1c22f3d250f   2 weeks ago   252MB
tomcat                   latest    b0e0b0a92cf9   3 weeks ago   680MB
mysql                    5.7       938b57d64674   3 weeks ago   448MB
hello-world              latest    feb5d9fea6a5   7 weeks ago   13.3kB

# 1. Start a tomcat. I will start the previous tomcat container
[root@iZbp160rjf7ztq5oshw6m0Z ~]# docker ps -a
CONTAINER ID   IMAGE                           COMMAND                  CREATED        STATUS                    PORTS     NAMES
0e118541147c   tomcat                          "catalina.sh run"        2 days ago     Exited (143) 2 days ago             tomcat_test
# 2. The newly launched tomcat has no content accessed through the Internet, because there is nothing in webapps
# This container has been copied from my previous test, so I use it directly
[root@iZbp160rjf7ztq5oshw6m0Z ~]# docker start 0e118541147c

# 3. Submit a new image
[root@iZbp160rjf7ztq5oshw6m0Z ~]# docker commit -a="timmi" -m="add webapps files" 0e118541147c tomcat_commit:1.0
sha256:846c6917d72209b1b196137ac547847bcf133d6edcd21af0ad2531a39458935e

# 4. View the newly submitted image
[root@iZbp160rjf7ztq5oshw6m0Z ~]# docker images
REPOSITORY               TAG       IMAGE ID       CREATED         SIZE
tomcat_commit            1.0       846c6917d722   7 seconds ago   684MB
tomcat                   latest    b0e0b0a92cf9   3 weeks ago     680MB

# 5. Start the image test
[root@iZbp160rjf7ztq5oshw6m0Z ~]# docker run -d -p 8080:8080 tomcat_commit:1.0
# You need to bring Tag when starting here, otherwise you will search the Docker Hub for latest (latest version)
9. Container data volume of docker
9.1 what is a container data volume
Review of docker's concept
Package the application and environment into an image!
Data: if the data is in the container, the data will be lost if we delete the container!
Requirements: data can be persisted
Mysql, delete the container, delete the database and run! Requirement: MySQL data can be stored locally!
There can be a data sharing technology between containers!
Synchronize the data generated in Docker container to the local! This is volume technology! Directory mount, mount the directory in our container to Linux!
Summary: container persistence and synchronization! Data can also be shared between containers
9.2 use of data volume
9.2.1 direct command mount
docker run -v Host Directory:Container directory [][]......

# test
docker run -it -v /home/ceshi:/home centos /bin/bash

# Explanation:
# After successful startup, use the docker inspect container id command to check whether the installation is successful
# View the Value corresponding to Mounts
"Mounts": [
        {
            "Type": "bind",
            "Source": "/home/ceshi",
            "Destination": "/home",
            "mode": "",
            "Rw": "",
            "Propagation": "rprivate"
        }
]
After the mount is successful, it can be modified on the host mount directory, and the container directory will be modified automatically
9.2.2 MySQL mounting practice
Use Docker to pull MySQL version 5.7 and start it later
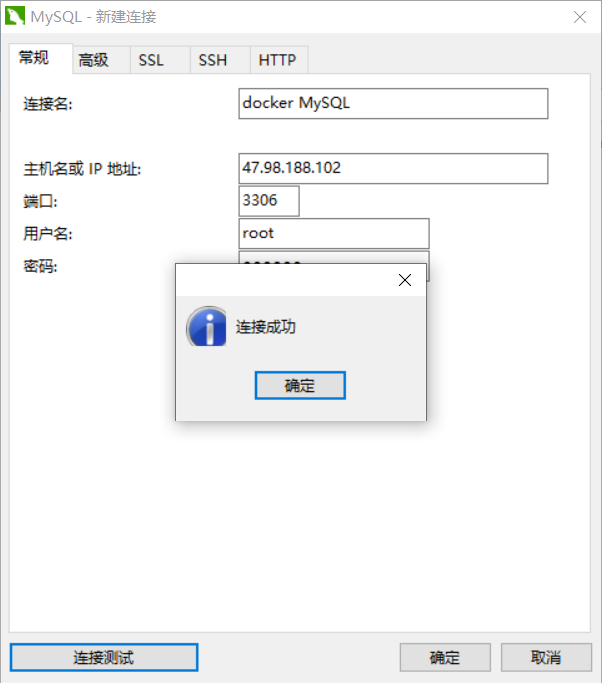
# 1. Start mysql. Note that MySQL needs to be configured with a password. Use - e to configure
[root@iZbp160rjf7ztq5oshw6m0Z ~]# docker run -d -p 3306:3306 \
-v /home/mysql/conf:/etc/mysqlconf.d -v /home/mysql/data:/var/lib/mysql \
-e MYSQL_ROOT_PASSWORD=123456 --name=mysql_test mysql:5.7

# explain
-d Background start
-p Specify port
-v Volume mount, you can mount multiple directories
-e Configuration environment
--name Set container name

# 2. After successful startup, use the third-party database connection software for connection test
# navicat connection is used here
At this time, we delete the MySQL container, and the data mounted locally will still not be lost
Note that the data manually deleted in the host mount directory will also be deleted in the container
9.3 named and anonymous mount
Anonymous mount: do not specify the mount directory of the host, - v is directly followed by the mount directory of the container - v /etc/xxxx
Named mount: the mount directory of the host is not specified, but the container mount directory is named - v name:/etc/xxxx between - v and the container mount directory
View mounted volumes
docker volume [command]

Commands:
  create      Create a data volume
  inspect     View the details of the specified data volume
  ls          View all data volumes
  prune       Delete all unused data volumes
  rm          Delete data volume


[root@iZbp160rjf7ztq5oshw6m0Z ~]# docker volume ls
DRIVER    VOLUME NAME
local     portainer_data

[root@iZbp160rjf7ztq5oshw6m0Z ~]# docker volume inspect portainer_data
[
    {
        "CreatedAt": "2021-11-12T16:44:46+08:00",
        "Driver": "local",
        "Labels": null,
        "Mountpoint": "/var/lib/docker/volumes/portainer_data/_data",
        "Name": "portainer_data",
        "Options": null,
        "Scope": "local"
    }
]
All volumes in the docker container are in / var / lib / docker / volumes / xxxxx if no directory is specified/_ data
We can easily find one of our volumes through named mount. In most cases, anonymous mount is used
expand:
# Read and write permissions can be changed through -v paths in the container: ro, rw
ro: readonly		# read-only
rw: readwrite		# Readable and writable

#Once the permission of the container is set, the content of the container to be mounted by us will be limited!
docker run -d -p --name nginx02 -v juming-nginx:/etc/nginx:ro nginxdocker \
run -d -P --name nginx02 -v juming-nginx:/etc/nginx:rw nginx

# ro: as long as you see the ro, it means that this path can only be operated through the host, and cannot be operated inside the container!
10. Docker File
10.1 getting to know Docker File
Docker File is the build file used to build docker images! Is a command script
Through this command, the script can generate an image. The image is layer by layer. A command in the script is equivalent to one layer!
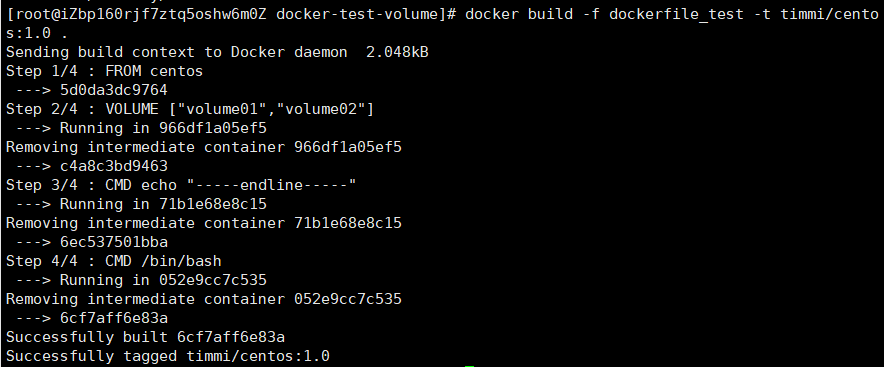
# 1. Create a Docker file with any name, but it is recommended to take Dockerfile
# Because docker will look for this file by default when building the image
# Instruction of script: all uppercase parameters of instruction

FROM centos

VOLUME ["volume01","volume02"]

CMD echo "-----end line-----"

CMD /bin/bash
Use the docker build command to generate an image:
docker build -f dockerfile_test -t timmi/centos:1.0 .

# explain
-f 	dockerfile Path to file
-t 	Specify the image name and version number
. 	Indicates that the build is in the current directory
View mirror:
[root@iZbp160rjf7ztq5oshw6m0Z home]# docker images
REPOSITORY               TAG       IMAGE ID       CREATED          SIZE
timmi/centos             1.0       6cf7aff6e83a   14 minutes ago   231MB
centos                   latest    5d0da3dc9764   8 weeks ago      231MB
To start a self generated image:
docker run -it --rm 6cf7aff6e83a /bin/bash
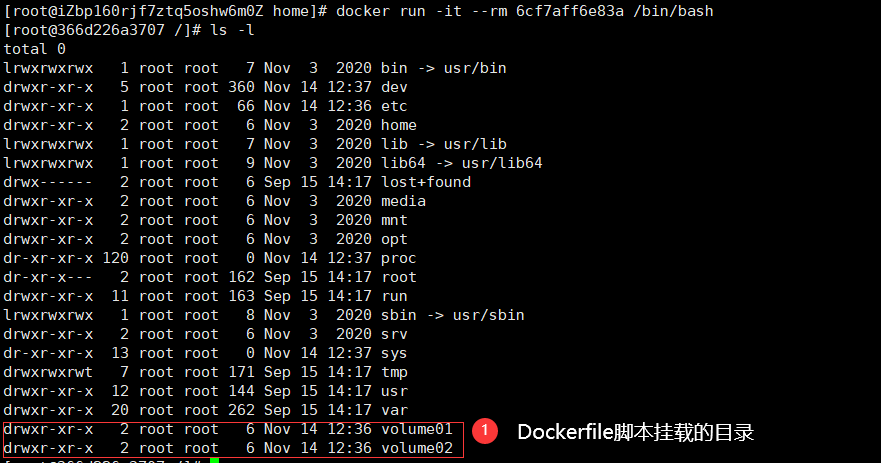
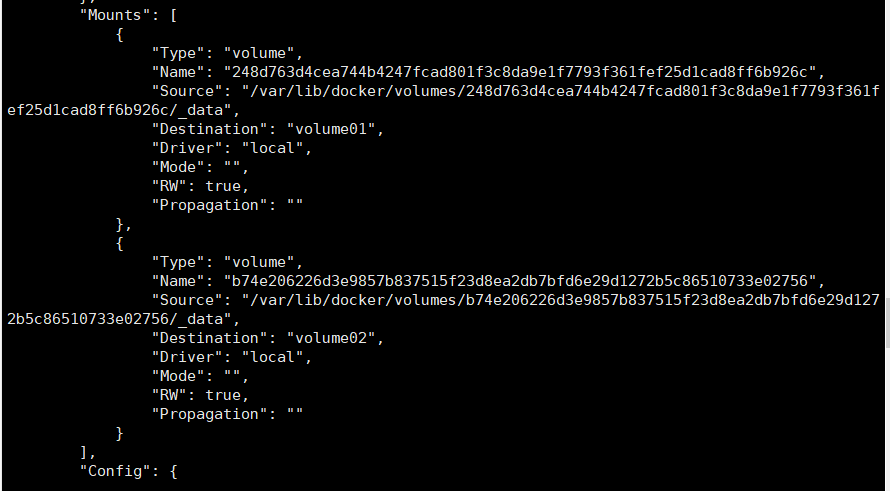
These two mount directories are anonymous. View the host mounted directory through the docker inspect command
Docker File files can be easily and automatically mounted when creating multiple containers. This method is very common
10.2 data volume container
That is, multiple containers share a data volume. Specifically, first create a container (which can be called the parent container) and mount the data volume. Later created containers directly share the mounting of the parent container. This parent container is called the data volume container
# 1. Create a parent container and use it to generate your own image
docker run -it --name centos01 timmi/centos:1.0

# 2. Create sub container
docker run -it --name centos02 --volumes -from centos01 timmi/centos:1.0

# In this way, centos01 and centos02 share the same data volume. Even if the parent container is deleted, the data volume will not become invalid as long as there are containers still using the data volume
For all, multiple MySQL data sharing can be realized
#
docker run -d -p 3306:3306 -v /etc/mysql/conf.d -v /var/lib/mysql \
-e MYSQL_ROOT_PASSWORD=123456 --name mysql_father mysql:5.7

#
docker run docker run -d -p 3310:3306 -e MYSQL_ROOT_PASSWORD=123456 \
--volumes -from mysql_father --name mysql_son mysql:5.7
Conclusion:
For the transfer of configuration information between containers, the life cycle of data volume containers continues until no containers are used.
But once you persist to the local, the local data will not be deleted at this time!
10.3 fully understand Docker file
10.3.1 docker file introduction
Docker file is the file used to build the docker image! Command parameter script!
Construction steps:
- Write a docker file
- docker build builds into an image
- docker run run image
- docker push publishes images (Docker Hub, alicloud image warehouse!)
Many official images are only basic images, and many functions are not available. You need to build and supplement them yourself!
10.3.2 docker file construction
Basics:
- Each reserved keyword (instruction) must be uppercase
- Execute from top to bottom
- #Indicates a comment
- Each instruction will create and submit a new mirror layer!
Docker file is development oriented. If we want to publish projects and mirror them in the future, we need to write a docker file. This file is very simple!
Docker image has gradually become the standard of enterprise delivery, which must be mastered!
Steps: development, deployment, operation and maintenance... Are indispensable!
Docker File: build a file that defines all steps and source code
Docker images: build the generated image through Docker File, and finally release and run the product!
Docker container: a container is an image that runs to provide a server
Docker File instruction
FROM			# Basic mirror image, everything starts from here
MAINTAINER		# Who wrote the mirror, name + email
RUN				# Commands to be run during image construction
ADD				# Add content, for example: add a tomcat image, the tomcat compressed package! The parameter is the compressed package
wORKDIR			# Mirrored working directory
VOLUME			# Mounted directory
EXPOSE			# Exposed port configuration
CMD				# Specify the command to run when the container starts. Only the last one will take effect and can be replaced
ENTRYPOINT		# Specify the command to run when the container starts, and you can append the command
ONBUILD			# When an inherited DockerFile is built, the ONBUILD instruction will be run. Trigger command.
COPY			# Similar to ADD, copy our files to the image
ENV				# Set environment variables during construction!
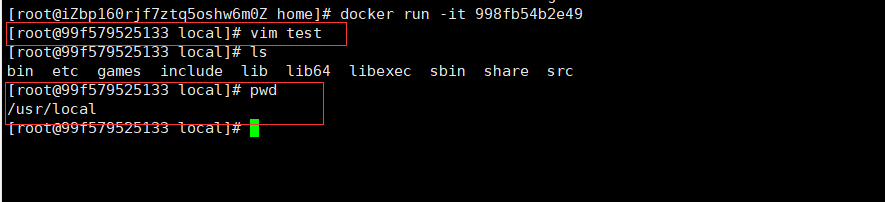
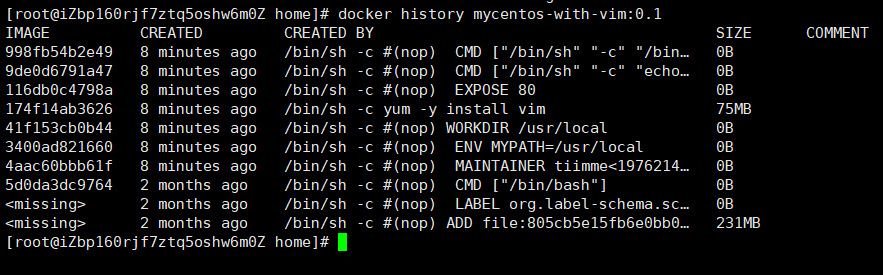
Create your own centos
# 1. Write Docker File
FROM centos
MAINTAINER tiimme<1976214615@qq.com>

ENV MYPATH "/usr/local"
WORKDIR $MYPATH

RUN yum -y install vim

EXPOSE 80

CMD echo $MYPATH
CMD /bin/bash

# 2. Use docker file to build an image
docker build -f mydockerfile-centos -t mycentos-with-vim:0.1 .

# Successfully built 998fb54b2e49
# Successfully tagged mycentos-with-vim:0.1

# 3. Start up test
You can also use the docker history command to view the construction history of the image
Difference between CMD and ENTRYPOINT
CMD				# Specify the command to run when the container starts. Only the last one will take effect and can be replaced
ENTRYPOINT		# Specify the command to run when the container starts, and you can append the command
11. Docker network
11.1 understanding Dokcer0
View Docker0
ifconfig / ip addr
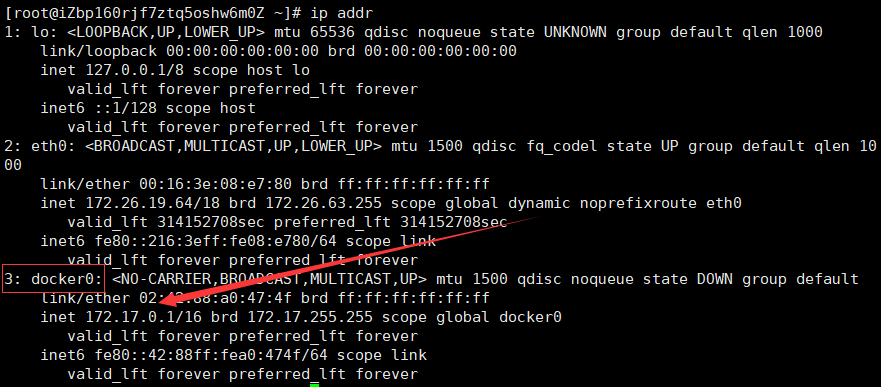
Three networks. Docker0 is the default network card created by docker
Thinking: how does docker handle container network access?
# Start a tomcat test
docker run -d -P--name tomcat01 tomcat

# Check the ip address of the container and find that you will get an ip address when the container starts eth0@if262 ip address, assigned by docker!
docker exec -it tomcat01 ip addr

1: lo:<L0OPBACK ,UP,LOWER_UP> mtu 65536 qdisc noqueue state UNKNOwN group default qlen 1000
link / loopback 00:00:00:00:00:00 brd 00:00:00:00:00:00
inet 127.0.0.1/8 scope host 1o
valid_1ft forever preferred_ift forever
261: eth0@if262:<BROADCAST,MLTICAST,UP ,LOWER_UP> mtu 1500 qdisc noqueue state uP group default
link/ether 02:42:ac:12:00:02 brd ff:ff:ff:ff:ff:ff link-netnsid o
inet 172.18.0.2/16 brd 172.18.255.255 scope global eth0
valid_lft forever preferred_lft forever

# Thinking: 1iunx can you ping through the container?
ping 172.18.0.2

PING 172.18.0.2 (172.18.0.2) 56(84) bytes of data.
64 bytes from 172.18.0.2: icmp_seq=1 tt1=64 time=0.067 ms
64 bytes from 172.18.0.2: icmp_seq=2 tt1=64 time=0.055 ms

# linux can ping through the docker container
principle
Every time we start a docker container, docker will assign an ip to the docker container. As long as we install docker, there will be a network card docker0 bridging mode. The technology used is Veth pair technology!
When ip addr is tested again, it is found that there is an additional network card. This is the network card of the tomcat container started earlier. When we start a tomcat container, we will find that there is another network card
# We found that the network card brought by this container is a pair
# Veth pair is a pair of virtual device interfaces. They all appear in pairs, one connected to the protocol and the other connected to each other
# Because of this feature, evth pair acts as a bridge to connect various virtual network devices
# The connection between openStack, Docker containers and 0VS all use Veth pair technology
Finally, it is feasible to test whether tomcat01 can ping through tomcat02
The network model diagram is as follows:
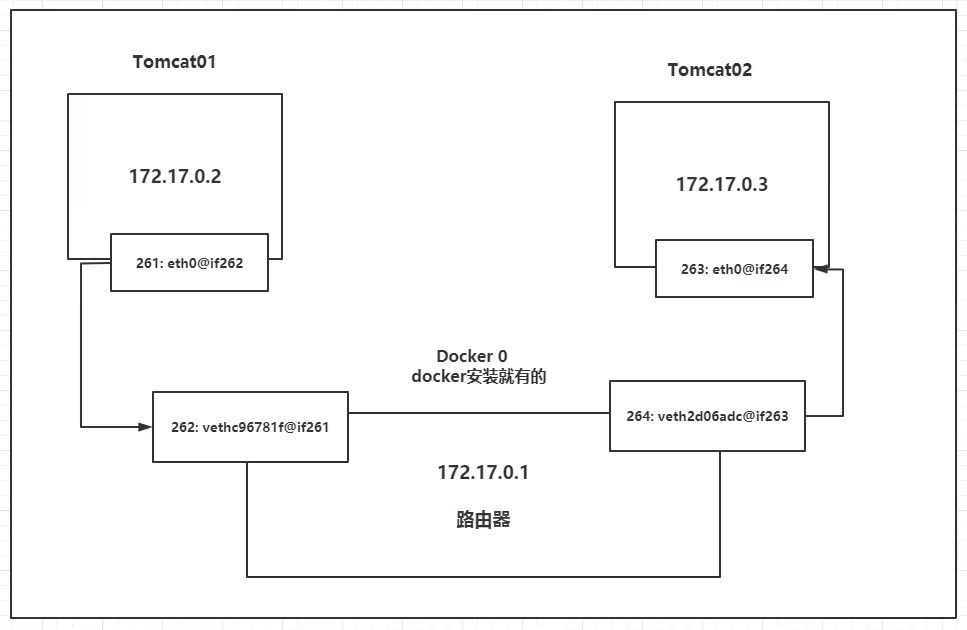
Conclusion: tomcat01 and tomcat02 are a common router, docker0.
When all containers do not specify a network, they are routed by docker0. Docker will assign a default available IP to our containers
Summary
All network interfaces in Docker are virtual. Virtual forwarding efficiency is high! (transfer files via intranet!)
As long as the container is closed, the corresponding bridge pair is gone!
11.2 – link
Thinking: we have written a microservice, database url=ip:, the project will not restart, and the database ip has been replaced. We hope to solve this problem and access the container by name?
# Can I ping directly through the container name?
docker exec -it tomcat02 ping tomcat01
ping: tomcato1: Name or service not known

# How can it be solved?
# Through --1ink, the problem of network connectivity can be solved
docker run -d -p --name tomcat03 --1ink tomcat02 tomcat

# ping again
docker exec -it tomcat03 ping tomcat02

PING tomcat02 (172.18.0.3) 56(84) bytes of data.
64 bytes from tomcat02 (172.18.0.3): icmp_seq=1 tt1=64 time=0.100 ms64 bytes from tomcat02 (172.18.0.3): icmp_seq=2 ttl=64 time=0.066 ms64 bytes from tomcat02 (172.18.0.3): icmp_seq=3 ttl=64 time=0.067 ms

# Can the reverse ping pass?
docker exec -it tomcat02 ping tomcat03
ping: tomcat03: Name or service not known
# Obviously not
Essence exploration:
In fact, this tomcat03 is configured with tomcat02 locally?
# Check the hosts configuration and find it here!
docker exec -it tomcat03 cat /etc/hosts
127.0.0.1	localhost
::1 		localhost ip6-localhost ip6-1oopback
fe00::0 	ip6-localnet
ff00::0 	ip6-mcastprefix
ff02::1 	ip6-al1nodes
ff02::2	 	ip6-a11routers
172.18.0.3 	tomcat02 312857784cd4
172.18.0.4	5ca72d80ebb0
Summary:
- --link is that we added a 172.18.0.3 tomcat02 312857784cd4 in the hosts configuration
- We don't recommend using -- link now when we play Docker!
- Custom network! Not applicable to docker0!
- docker0 problem: it does not support container name connection access!
11.3 custom network
11.3.1 viewing docker network
docker network
docker network ls
Network mode:
- Bridge: bridge mode (docker0 is the default mode, and the custom network also uses this mode)
- None: no network configuration
- Host: share the network with the host
- Container: container network connection (limited and rarely used)
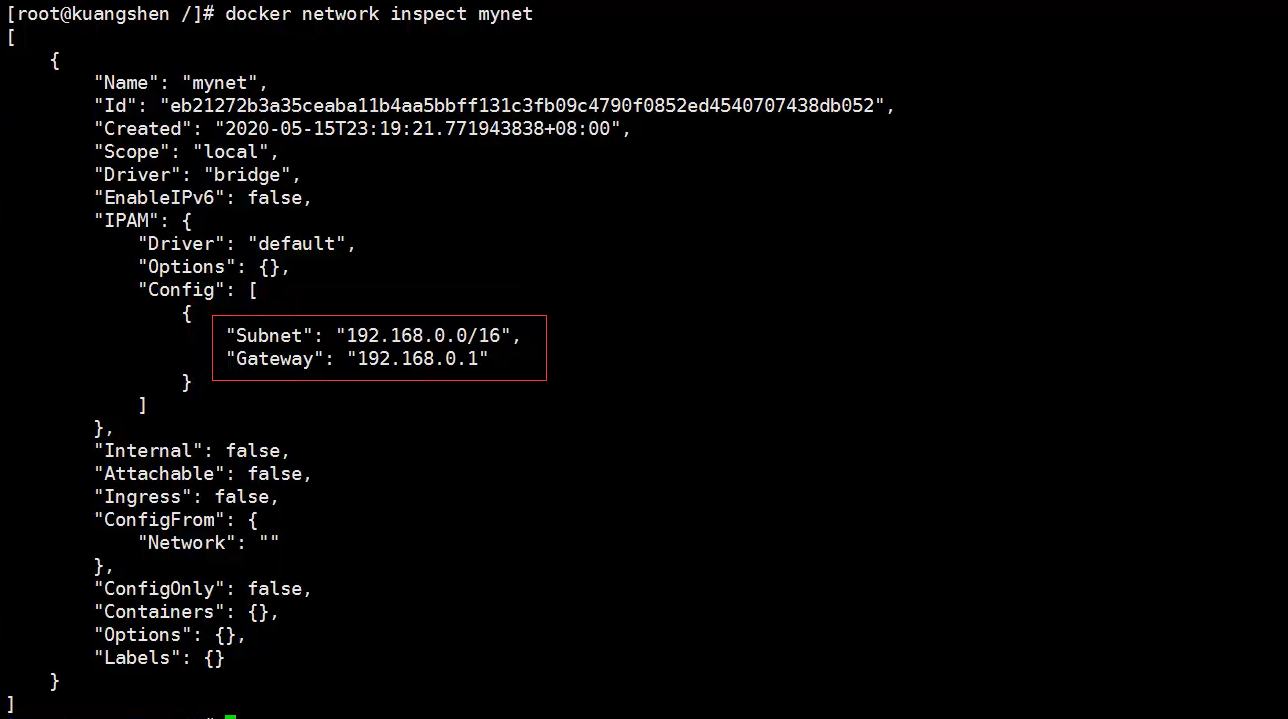
#The command we started directly -- net bridge, and this is our docker0
docker run -d -p --name tomcat01 tomcat
docker run -d -p --name tomcat01 --net bridge tomcat

# docker0 features: by default, the domain name cannot be accessed, - link can get through the connection!

# We can customize a network!
# --driver bridge
#--subnet 192.168.0.0/16
# --gateway 192.168.0.1

docker network create --driver bridge --subnet 192.168.0.0/16 --gateway 192.168.0.1mynet

docker network ls
NETWORKID		NAME					DRIVER	SCOPE
5a008c015cac	bridge					bridge	1ocal
db44649a9bff	composetest_default		bridge	loca1
ae2b6209c2ab	host					host	local
eb21272b3a35	mynet					bridge	local
So far, our own network has been created
Create containers using our own network:
# tomcat01
docker run -d -P--name tomcat-net-01 --net mynet tomcat
19f243d9c95bd771979a5e0bb3033dbf3f9ceacdd34ce231a5d6982573706ca9

# tomca02
docker run -d -P --name tomcat-net-02 --net mynet tomcat
aff29160a5e2ea5594c4950f34cd7c932c8e8cfae54eec979863ae09947bee73

# Check out our network again
docker network inspect mynet
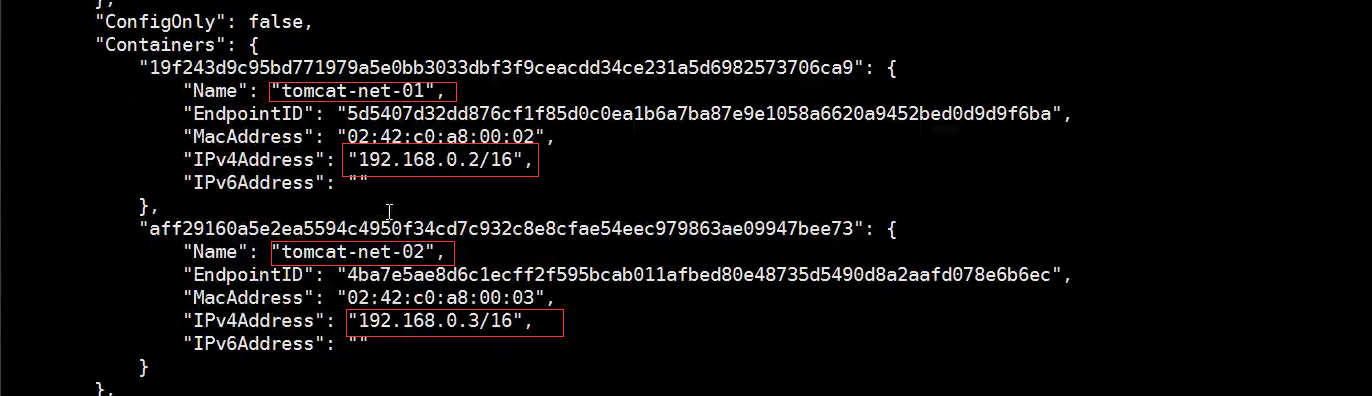
ping test again
# Ping containers via IP
docker exec -it tomcat-net-01 ping 192.168.0.3
PING 192.168.0.3 (192.168.0.3)56(84)bytes of data.
64 bytes from 192.168.0.3: icmp_seq=1 tt1=64 time=0.085 ms
64 bytes from 192.168.0.3: icmp_seq=2 ttl=64 time=0.070 msAc
--- 192.168.0.3 ping statistics ---
2 packets transmitted,2 received,0% packet loss,time 999msrtt min/avg/max/mdev = 0.070/0.077/0.085/0.011 ms

# ping by container name
# Now you can ping the container name without using -- 1ink
docker exec -it tomcat-net-01 ping tomcat-net-02
PING tomcat-net-02 (192.168.0.3)56(84) bytes of data.
64 bytes from tomcat-net-02.mynet (192.168.0.3): icmp_seq=1 ttl=64 time=0.055ms
64 bytes from tomcat-net-02.mynet (192.168.0.3): icmp_seq=2 ttl=64 time=0.063 mS
Our customized network docker s have helped us maintain the corresponding relationship. We recommend that we use the network in this way!
Benefits:
- redis: different clusters use different networks to ensure that the cluster is safe and healthy
- MySQL: different clusters use different networks to ensure that the cluster is safe and healthy
11.4 network connectivity

How to connect tomcat01 with tomcat-net-01?
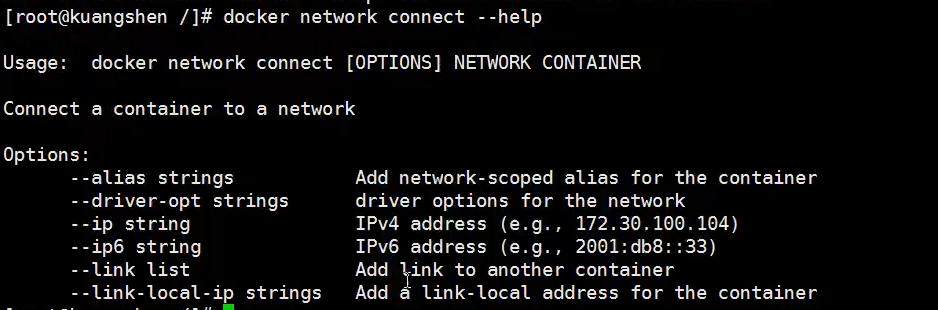
docker network connect
Test:
# Using the docker network connect command
docker network connect mynet tomcat01

# View mynet network details
docker network inspect mynet
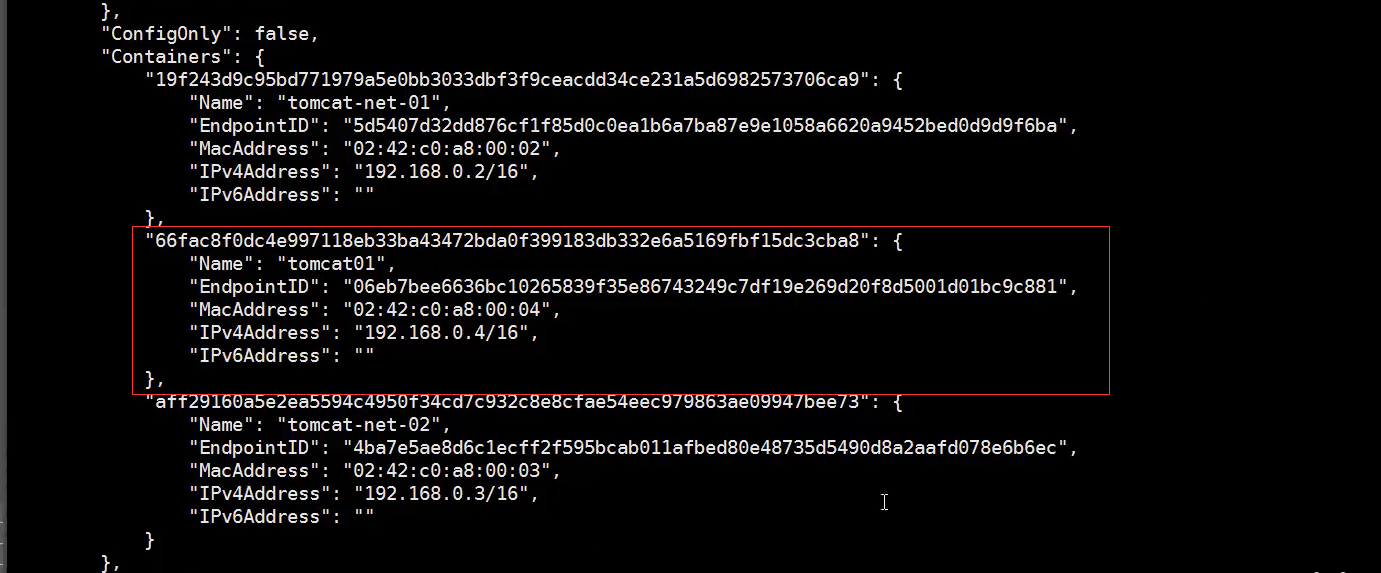
It is found that there is a tomcat01 container in the mynet network. The connection command is to add tomcat01 to the mynet network
This is a container, two ip addresses
**Conclusion: * * if you want to operate containers across networks, you need to use docker network connect to connect!
ping test again
# Ping containers via IP
docker exec -it tomcat-net-01 ping 192.168.0.3
PING 192.168.0.3 (192.168.0.3)56(84)bytes of data.
64 bytes from 192.168.0.3: icmp_seq=1 tt1=64 time=0.085 ms
64 bytes from 192.168.0.3: icmp_seq=2 ttl=64 time=0.070 msAc
--- 192.168.0.3 ping statistics ---
2 packets transmitted,2 received,0% packet loss,time 999msrtt min/avg/max/mdev = 0.070/0.077/0.085/0.011 ms

# ping by container name
# Now you can ping the container name without using -- 1ink
docker exec -it tomcat-net-01 ping tomcat-net-02
PING tomcat-net-02 (192.168.0.3)56(84) bytes of data.
64 bytes from tomcat-net-02.mynet (192.168.0.3): icmp_seq=1 ttl=64 time=0.055ms
64 bytes from tomcat-net-02.mynet (192.168.0.3): icmp_seq=2 ttl=64 time=0.063 mS
Our customized network docker s have helped us maintain the corresponding relationship. We recommend that we use the network in this way!
Benefits:
- redis: different clusters use different networks to ensure that the cluster is safe and healthy
- MySQL: different clusters use different networks to ensure that the cluster is safe and healthy
11.4 network connectivity
How to connect tomcat01 with tomcat-net-01?
docker network connect
Test:
# Using the docker network connect command
docker network connect mynet tomcat01

# View mynet network details
docker network inspect mynet
It is found that there is a tomcat01 container in the mynet network. The connection command is to add tomcat01 to the mynet network
This is a container, two ip addresses
**Conclusion: * * if you want to operate containers across networks, you need to use docker network connect to connect!
12. Learning comprehension
Docker was originally learned to deploy Adachi bot. It's delicious after learning docker! It's easy to use other people's image deployment after learning. However, it's still not clear how to build your own docker image. You can use it daily. You should continue to learn about Docker compose and Docker swarm in the future.