install
1. Before installing Docker engine community on the new host for the first time, you need to set up the Docker warehouse. After that, you can install and update Docker from the warehouse.
https://www.cnblogs.com/caoweixiong/p/12186736.html
yum -y install gcc
yum -y install gcc-c++
Set up warehouse
yum install -y yum-utils \
device-mapper-persistent-data \
lvm2
Use the following command to set up a stable warehouse
yum-config-manager \
--add-repo \
https://mirrors.tuna.tsinghua.edu.cn/docker-ce/linux/centos/docker-ce.repo
Uninstall old version
yum remove docker \
docker-client \
docker-client-latest \
docker-common \
docker-latest \
docker-latest-logrotate \
docker-logrotate \
docker-engine
Install docker engine community
Install the latest: yum -y install docker-ce

Install the specified version:
Lists and sorts the versions available in your repository. This example sorts the results by version number (from high to low)
yum list docker-ce --showduplicates | sort -r
 Install a specific version with its full package name, which is the package name( docker-ce)Add the version string (second column) from the first colon(:)Continue to the first hyphen and use hyphens(-)separate. For example: docker-ce-18.09.1.

[root@rocketmq-nameserver1 ~]# yum list docker-ce.x86_64  --showduplicates | sort -r
Plug in loaded: fastestmirror, langpacks
 Installable packages
 \* updates: mirrors.ustc.edu.cn
Loading mirror speeds from cached hostfile
 \* extras: mirrors.ustc.edu.cn
 \* epel: ftp.riken.jp
docker-ce.x86_64            3:20.10.5-3.el7                     docker-ce-stable
docker-ce.x86_64            3:20.10.4-3.el7                     docker-ce-stable
docker-ce.x86_64            3:20.10.3-3.el7                     docker-ce-stable

yum install docker-ce-<VERSION_STRING> docker-ce-cli-<VERSION_STRING> containerd.io
yum install docker-ce-20.10.5 docker-ce-cli-20.10.5 containerd.io
verification
docker version
Start Docker
systemctl start/stop/status/restart docker
Verify that docker engine community is installed correctly by running the Hello world image
docker run hello-world
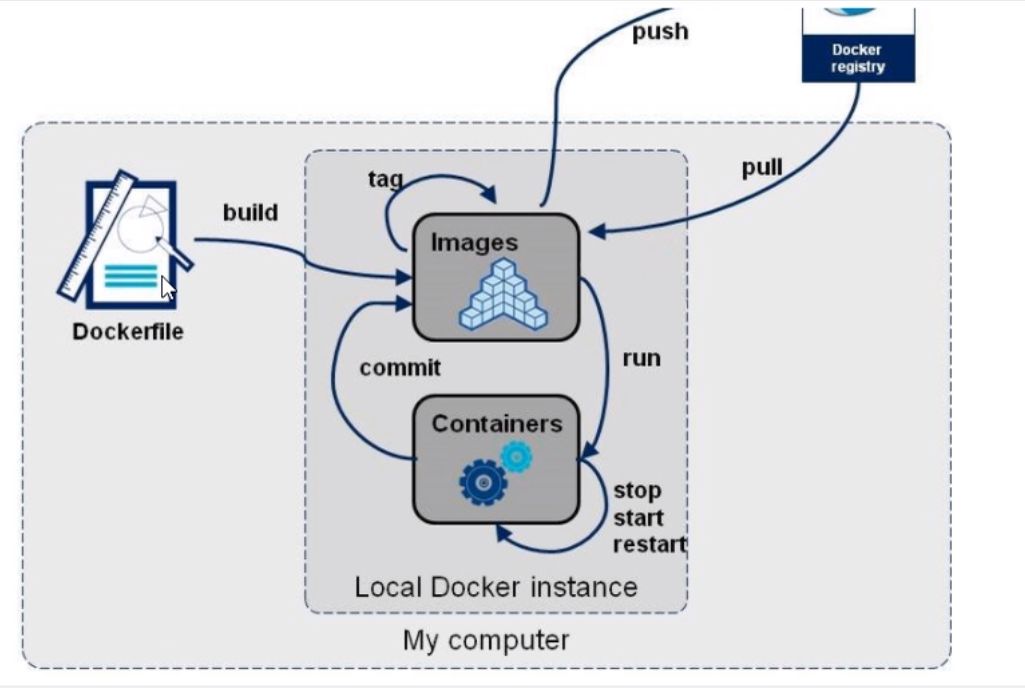
docker architecture
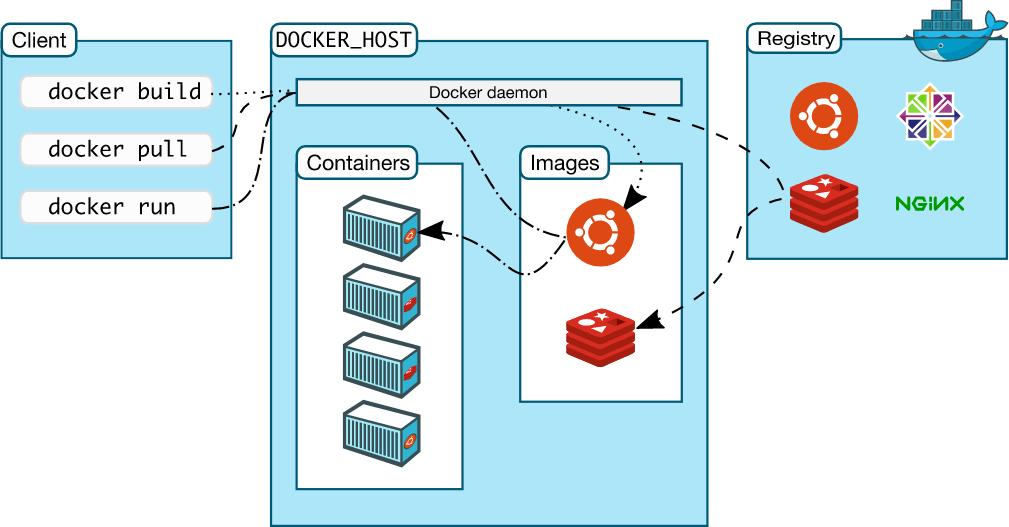
image
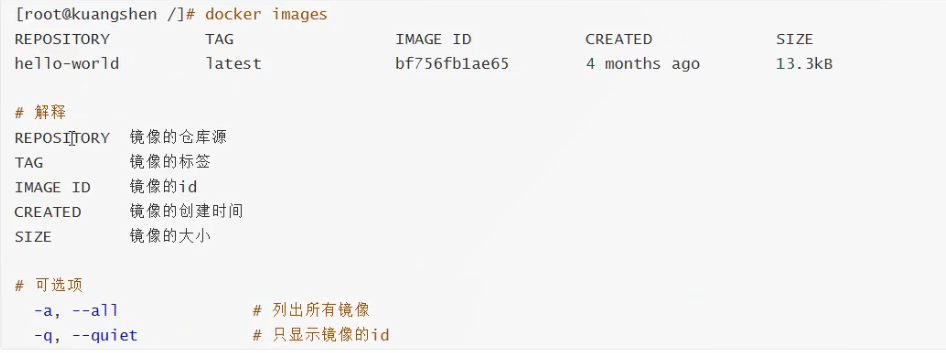
View image:
docker images
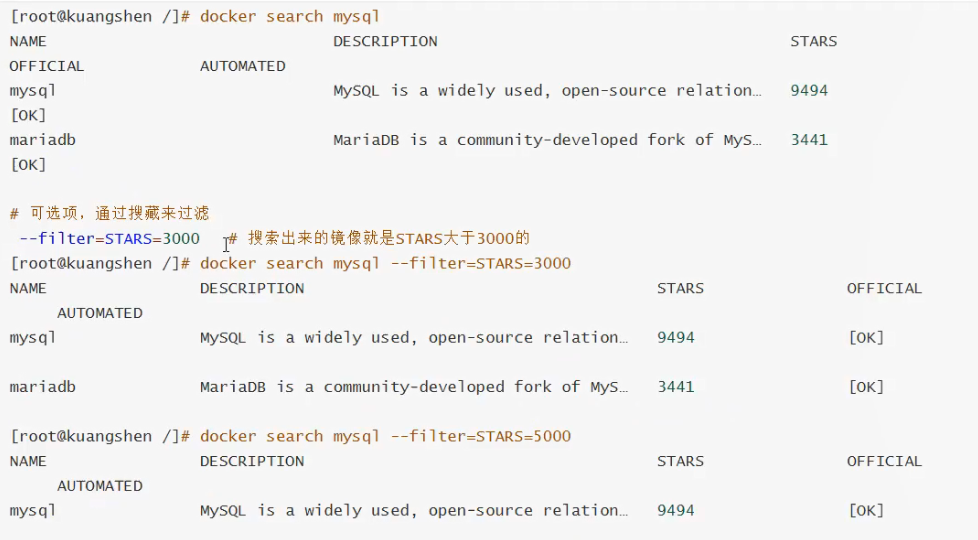
Search for images:
Download Image:
docker pull NAME:[TAG]
To delete a mirror:
docker rmi -f image ID/NAME
Container:
Run container:
docker run [optional parameter] image
-it enters container switching mode
-d background operation
– name the name of the container to run
-p start container port
-p container outer port: container inner port - p 8080:80
docker run -it ubuntu /bin/bash
docker run -itd --name mysql-test -p 3306:3306 -e MYSQL_ROOT_PASSWORD=123456 mysql
List running containers:
docker ps lists the containers that are running
docker ps -a lists the containers used
Exit container:
Exit exit stop
ctrl + P+Q exit without stopping
Delete container:
docker rm container ID
Container operation:
docker start/stop/restart/kill container ID
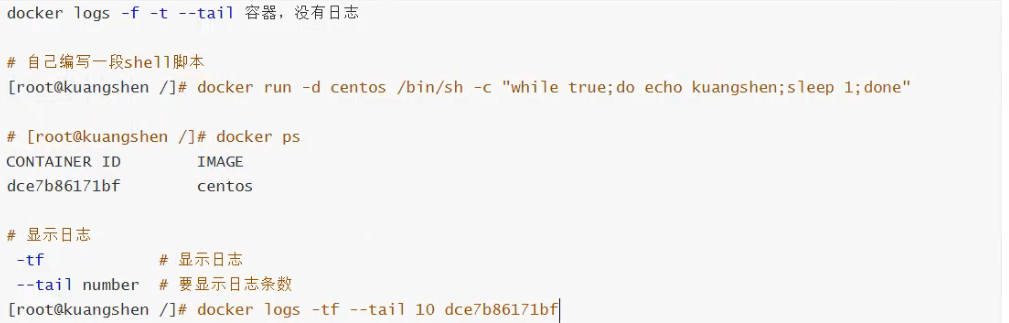
View log:
Enter the running container:
docker exec -it container ID /bin/bash
docker attach container ID
docker installation nginx
#Search image 	 docker search nginx
#Pull image 	 docker pull nginx:latest
#Start mirroring 	 docker run -d --name nginx-test -p 8080:80 nginx
	-d Container in docker Background startup and operation
	--name The name of the container
	-p take docker Port 80 in the host computer is mapped to port 8080 of the host computer
docker installing Tomcat
#download 	 docker pull tomcat:9.0
#start-up 	 docker run --name tomcat-docker -p 3355:8080 -d tomcat
#Enter container docker exec - it Tomcat docker / bin / Bash
	take webapps.dist Renamed webapps
docker installation
download:	docker pull elasticsearch:6.8.15
docker network create somenetwork
 start-up:	docker run -d --name elasticsearch --net somenetwork -p 9200:9200 -p 9300:9300 -e "discovery.type=single-node" -e ES_JAVA_OPTS="-Xms64m -Xmx512m" elasticsearch:6.8.15
	-e Specify parameters
 test:	curl localhost:9200
[root@rocketmq-nameserver1 ~]# curl localhost:9200
{
  "name" : "D2_EXml",
  "cluster_name" : "docker-cluster",
  "cluster_uuid" : "9VHRwjyVQd-kP1D5lxFvhQ",
  "version" : {
    "number" : "6.8.15",
    "build_flavor" : "default",
    "build_type" : "docker",
    "build_hash" : "c9a8c60",
    "build_date" : "2021-03-18T06:33:32.588487Z",
    "build_snapshot" : false,
    "lucene_version" : "7.7.3",
    "minimum_wire_compatibility_version" : "5.6.0",
    "minimum_index_compatibility_version" : "5.0.0"
  },
  "tagline" : "You Know, for Search"
}
Check docker CPU
docker stats
visualization
Download:	docker pull portainer/portainer:alpine
 Start:	docker run -d -p 8088:9000 --restart=always -v /var/run/docker.sock:/var/run/docker.sock --privileged=true portainer/portainer:alpine
 visit:	http://192.168.139.128:8088
docker image explanation
What is mirroring?
Image is a lightweight and executable independent software package, which is used to package the software running environment and the development software based on the running environment. It contains all the contents required to run a software, including code runtime, library, environment traversal and configuration file.
All applications are packaged directly docker Mirror image, you can run directly.
How to get the image:
    Download from remote warehouse
    Copy from friends
    Make your own image DockerFile
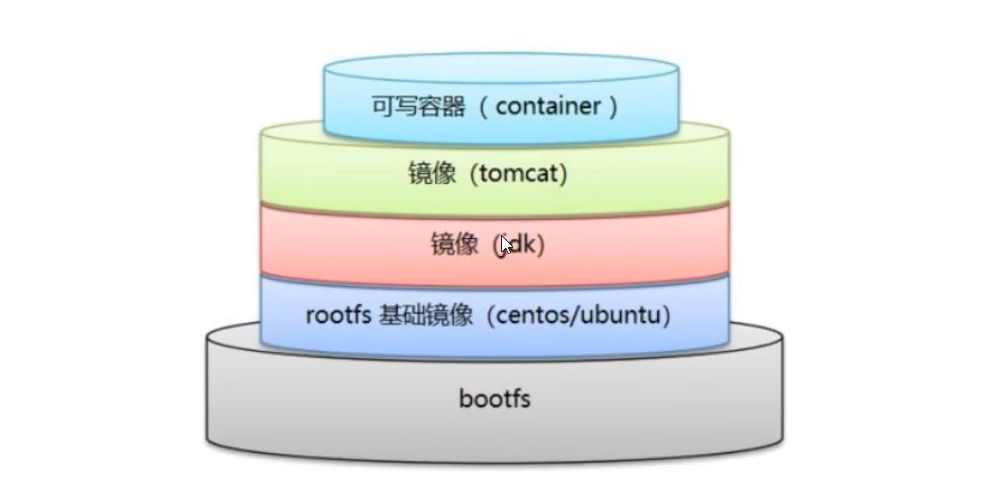
Mirror loading principle
Federated file system UnionFS
[the external chain image transfer fails. The source station may have an anti-theft chain mechanism. It is recommended to save the image and upload it directly (img-m6ttdrhy-1622964932314) (C: \ users \ administrator \ appdata \ roaming \ typora \ typora user images \ 1617960239735. PNG)]
[the external chain image transfer fails. The source station may have an anti-theft chain mechanism. It is recommended to save the image and upload it directly (img-2pjs06nr-1622964932318) (C: \ users \ administrator \ appdata \ roaming \ typora \ typora user images \ 1617960435428. PNG)]
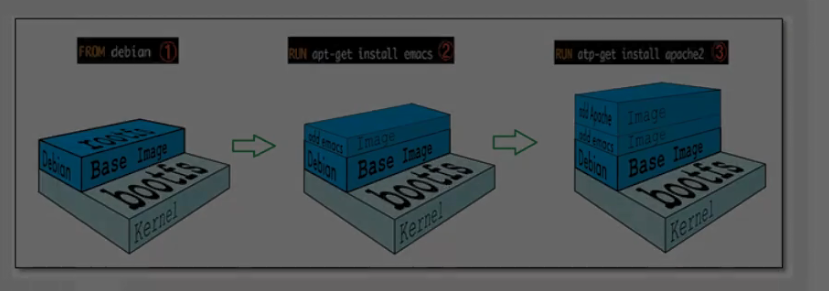
Hierarchical understanding
commit image
docker commit Submit the container as a new copy
docker commit -m="describe" -a="author" container ID Target image name:[TAG]
docker data volume
docker: the application and environment are packaged into an image
If the data is all in the container, then we delete the container and the data will be lost? Data needs to be persistent
Mysql, container deleted! Can MySQL data be stored locally
There is a data sharing technology between containers! The data generated by the docker container is synchronized to the local
This is volume technology, directory mounting. Hang the directory in our container on the Linux file system directory
Using data volumes
Usage 1
Use command: docker run -v Directory outside the container:In container directory

#Case 1
docker run -it -v /home/test:/home ubuntu /bin/bash
#Extended view container details
docker inspect container ID
#Case 2
docker run --name mysql-docker -p 3306:3306 -v /home/mysql/conf:/etc/mysql/conf.d -v /home/mysql/data:/var/lib/mysql -e MYSQL_ROOT_PASSWORD=root -d mysql:8.0
--name Name of the container run
-d Background operation
-p Port mapping
-e Operating parameters
-v Data volume mount
Usage 2
#Anonymous mount
docker run -v Path in container
docker run --name nginx-docker -p 80:80 -v /etc/nginx -d nginx:latest

#Named mount
docker run --name nginx-docker -p 80:80 -v juming-nginx:/etc/nginx -d nginx:latest

#Docker working directory: 	/ var/lib/docker
[root@rocketmq-nameserver1 docker]# ls -l
 Total consumption 20
drwx--x--x.  4 root root  120 4 August 21:40 buildkit
drwx-----x. 10 root root 4096 4 September 21:35 containers
drwx------.  3 root root   22 4 August 21:40 image
drwxr-x---.  3 root root   19 4 August 21:40 network
drwx-----x. 62 root root 8192 4 September 21:35 overlay2
drwx------.  4 root root   32 4 August 21:40 plugins
drwx------.  2 root root    6 4 August 21:40 runtimes
drwx------.  2 root root    6 4 August 21:40 swarm
drwx------.  2 root root    6 4 September 17:00 tmp
drwx------.  2 root root    6 4 August 21:40 trust
drwx-----x.  6 root root 4096 4 September 21:35 volumes

get into volumes/juming-nginx/_data You can see the mounted NGINX catalogue
#Operation of volume
docker volume create/ls/inspect/prune/rm
#View mount
docker volume inspect juming-nginx
[root@rocketmq-nameserver1 _data]# docker volume inspect juming-nginx
[
    {
        "CreatedAt": "2021-04-09T21:35:54+08:00",
        "Driver": "local",
        "Labels": null,
        "Mountpoint": "/var/lib/docker/volumes/juming-nginx/_data",
        "Name": "juming-nginx",
        "Options": null,
        "Scope": "local"
    }
]
extend
docker run --name docker-nginx-test -p 80:80 -v juming-nginx:/etc/nginx:ro -d nginx:latest

docker run --name docker-nginx-test -p 80:80 -v juming-nginx:/etc/nginx:rw -d nginx:latest

ro Read only mount readonly
rw Writable mount
First acquaintance with dockerfile
dockerfile is the file used to build the docker image
1. Create a file called dockerfile
touch dockerfile
2. Edit the file as follows:
FROM centos

VOLUME ["volume01","volume02"]

CMD echo "----end----"
CMD /bin/bash
3. Build
docker build -f /var/lib/docker/docker-volumn-dockfile/dockerfile -t mycentos:1.0 .
extend
Data volume sharing between containers
--volumes-from Container name
docker run --name docker02 --volumes-from docker01 ubuntu:latest
docker02 share docker01 Data volume
Data sharing with multiple MySQL
#mysql3306
docker run -d -p 3306:3306 -v /etc/mysql/conf.d -v /var/lib/mysql -e MYSQL_ROOT_PASSWORD=root --name mysql3306 mysql:8.0
#mysql3307
docker run -d -p 3307:3307 -e MYSQL_ROOT_PASSWORD=root --name mysql3307 --volumes-from mysql3306 mysql:8.0
dockerfile
What is Dockerfile?
dockerfile Use to build docker Mirrored file! Command parameter script

Construction steps:
1,Write a dockerfile file
2,docker build Build a mirror
3,docker run Run mirror
4,docker push Publish image( DockerHub,Alibaba cloud image warehouse)
Customizing images using Dockerfile
Basic knowledge
1,Each reserved word (instruction) must be an uppercase letter
2,The execution sequence is from top to bottom
3,#Indicates a comment
4,Each instruction creates and commits a new mirror layer
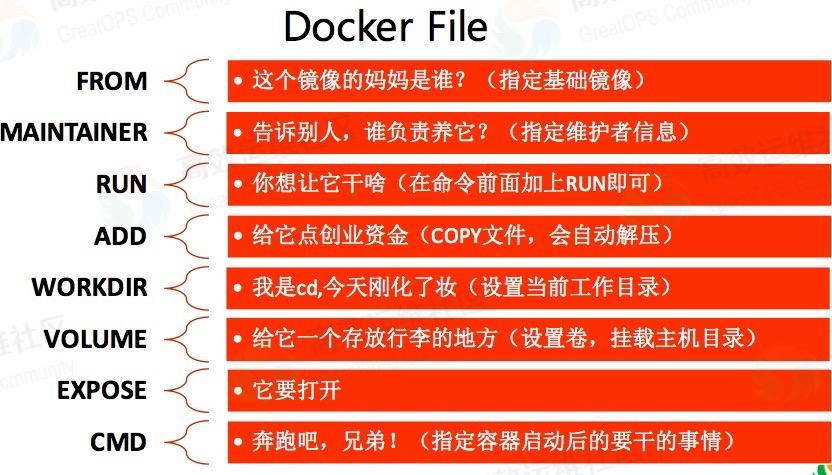
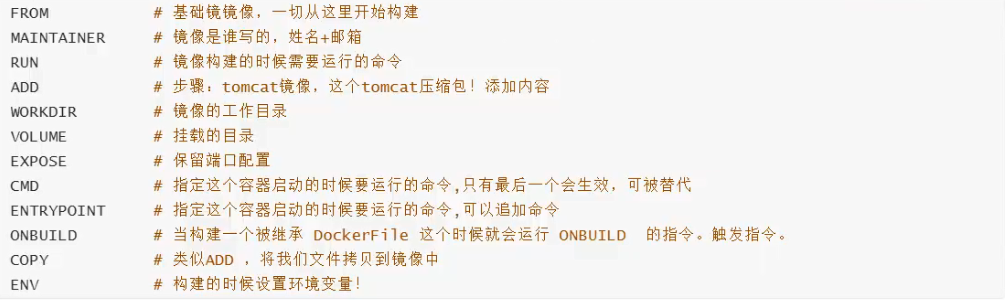
dockerfile instruction
Actual combat: build your own centos
Create file: / usr/local/docker/dockerfile/mycentos file contents are as follows
FROM centos
MAINTAINER XIAOMAO<1585748457@QQ.COM>

ENV MYPATH /usr/local
WORKDIR $MYPATH

RUN yum -y install vim
RUN yum -y install net-tools

EXPOSE 80

CMD echo $MYPATH
CMD echo "------end------"
CMD /bin/bash
Build image
docker build -f /usr/local/docker/dockerfile/mycentos -t mycentos:v1 .
    -f dockerfile file
    -t Image name:label
    . Represents the context path of this execution
Run test: docker run -it mycentos:v1 /bin/bash
Extension: viewing the image build process
docker history b72e45a11ad9[image ID]
Actual combat: building tomcat image with dockerfile
Prepare jdk tomcat compressed package
-rw-rw-r--. 1 xiaomao xiaomao   8340063 3 September 19-22:20 apache-tomcat-7.0.52.tar.gz
-rw-rw-r--. 1 xiaomao xiaomao 195132576 4 October 11:04 jdk-8u251-linux-x64.tar.gz
Write dockerfile file
FROM centos
MAINTAINER XIAOMAO<1585748457@QQ.COM>

COPY readme.txt /usr/local/readme.txt

ADD jdk-8u251-linux-x64.tar.gz /usr/local/
ADD apache-tomcat-7.0.52.tar.gz /usr/local/

RUN yum -y install vim

ENV MYPATH /usr/local
WORKDIR $MYPATH

ENV JAVA_HOME /usr/local/jdk1.8.0_251
ENV CLASSPATH $JAVA_HOME/lib/dt.jar:$JAVA_HOME/lib/tools.jar
ENV CATALINA_HOME /usr/local/apache-tomcat-7.0.52
ENV CATALINA_BASE /usr/local/apache-tomcat-7.0.52
ENV PATH $PATH:$JAVA_HOME/bin:$CATALINA_HOME/lib:$CATALINA_HOME/bin

EXPOSE 8080

CMD /usr/local/apache-tomcat-7.0.52/bin/startup.sh && tail -F /usr/local/apache-tomcat-7.0.52/bin/logs/catalina.out
Build image
docker build -f /usr/local/docker/dockerfile/mytomcat/dockerfile -t mytomcat:v1 .
Run test
docker run -it --name mytomcat-docker mytomcat:v1 /bin/bash
docker run -d --name mytomcat-docker -p 8080:8080 mytomcat:v1

#Enter the container and start tomcat
docker exec -it container ID /bin/bash
Publish image to dockerhub
#Sign in
https://hub.docker.com/signup
#Sign in
docker login -u xiaomao #Enter enter password
#Submit on server
docker push user name/Image name:TAG
docker push xiaomao/mytomcat:v1
Summary
docker network
docker0
How does docker handle network access?
principle
Let's start one docker Container, docker Will give docker Assign a container IP,We just need to install docker,There will be a network card docker0,Bridging mode, using technology is evth-pair Technology, container and network between containers can be relied on ping Yes!


Network topology
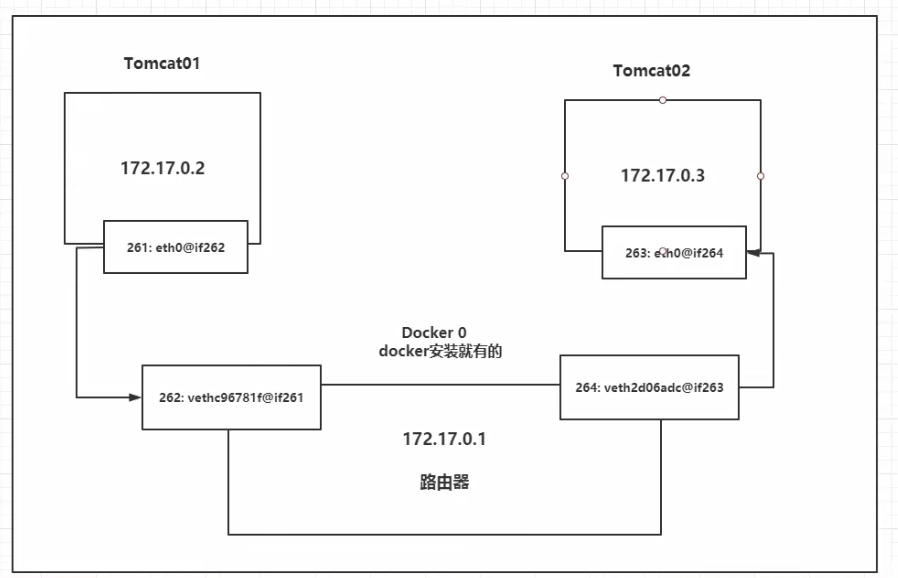
Conclusion: Tomcat01 And Tomcat02 Common route docker0,Container is not specified in IP In some cases, docker0 The container is assigned a IP
–link
Note: the containers communicate by name

#--link to centos01
docker run -itd --name centos03 --link centos01  centos:7 /bin/bash

docker exec -it centos03 ping centos01
 effect:
[root@rocketmq-nameserver1 mytomcat]# docker exec -it centos03 ping centos01
PING centos01 (172.17.0.4) 56(84) bytes of data.
64 bytes from centos01 (172.17.0.4): icmp_seq=1 ttl=64 time=0.124 ms
64 bytes from centos01 (172.17.0.4): icmp_seq=2 ttl=64 time=0.125 ms
64 bytes from centos01 (172.17.0.4): icmp_seq=3 ttl=64 time=0.121 ms

Exploration principle:
[root@rocketmq-nameserver1 mytomcat]# docker exec -it centos03 cat /etc/hosts
127.0.0.1	localhost
::1	localhost ip6-localhost ip6-loopback
fe00::0	ip6-localnet
ff00::0	ip6-mcastprefix
ff02::1	ip6-allnodes
ff02::2	ip6-allrouters
172.17.0.4	centos01 a60e4e0e3f85
172.17.0.7	d7868f031ca9
Docker exec - does it centos01 Ping centos03 Ping work may not
Custom network
View all networks
[root@rocketmq-nameserver1 ~]# docker network ls
NETWORK ID     NAME          DRIVER    SCOPE
757727110f70   bridge        bridge    local
fde3d0a3f717   host          host      local
011b819d9b7a   none          null      local
a9a74af7b18d   somenetwork   bridge    local
Custom network commands
docker network create --driver bridge --subnet 192.168.0.0/16 --gateway 192.168.0.1 mynet
    --driver bridge Network link mode
    --subnet 192.168.0.0/16 Subnet
    --gateway 192.168.0.1 gateway
    mynet Take your own name

effect:
[root@rocketmq-nameserver1 ~]# docker network ls
NETWORK ID     NAME          DRIVER    SCOPE
757727110f70   bridge        bridge    local
fde3d0a3f717   host          host      local
0366e43ca5dc   mynet         bridge    local
011b819d9b7a   none          null      local
a9a74af7b18d   somenetwork   bridge    local

see:
[root@rocketmq-nameserver1 ~]# docker network inspect mynet
[
    {
        "Name": "mynet",
        "Id": "0366e43ca5dce6d063e31dee392150fa2e906533bd405c563d1d259172e69894",
        "Created": "2021-04-10T19:35:17.090781686+08:00",
        "Scope": "local",
        "Driver": "bridge",
        "EnableIPv6": false,
        "IPAM": {
            "Driver": "default",
            "Options": {},
            "Config": [
                {
                    "Subnet": "192.168.0.0/16",
                    "Gateway": "192.168.0.1"
                }
            ]
        },
        "Internal": false,
        "Attachable": false,
        "Ingress": false,
        "ConfigFrom": {
            "Network": ""
        },
        "ConfigOnly": false,
        "Containers": {},
        "Options": {},
        "Labels": {}
    }
]
Start container to specify custom network
docker run  -d -P --name tomcat-net01 --net mynet tomcat:9.0
docker run  -d -P --name tomcat-net02 --net mynet tomcat:9.0
    --net mynet Designated network

Look, there are two more container
[root@rocketmq-nameserver1 ~]# docker network inspect mynet
[
    {
        "Name": "mynet",
        "Id": "0366e43ca5dce6d063e31dee392150fa2e906533bd405c563d1d259172e69894",
        "Created": "2021-04-10T19:35:17.090781686+08:00",
        "Scope": "local",
        "Driver": "bridge",
        "EnableIPv6": false,
        "IPAM": {
            "Driver": "default",
            "Options": {},
            "Config": [
                {
                    "Subnet": "192.168.0.0/16",
                    "Gateway": "192.168.0.1"
                }
            ]
        },
        "Internal": false,
        "Attachable": false,
        "Ingress": false,
        "ConfigFrom": {
            "Network": ""
        },
        "ConfigOnly": false,
        "Containers": {
            "8c2fe224e4b3e1d6dd44e4b1a2e6a4d443339499141e84c7ad26b4a7a8e10430": {
                "Name": "tomcat-net01",
                "EndpointID": "d21b1a34f164b8722fd61037b91e151bb883d5eadbadf44146d8111afbcdc499",
                "MacAddress": "02:42:c0:a8:00:02",
                "IPv4Address": "192.168.0.2/16",
                "IPv6Address": ""
            },
            "a64b99861a42cfa0b16ce0cc3bfd698812700986c8639ddd76bfc47d4c0382c2": {
                "Name": "tomcat-net02",
                "EndpointID": "4c2f200b8eea913c036096d1d5277f0e4b4f707982da14ad2a3194fadbf3f038",
                "MacAddress": "02:42:c0:a8:00:03",
                "IPv4Address": "192.168.0.3/16",
                "IPv6Address": ""
            }
        },
        "Options": {},
        "Labels": {}
    }
]

#ping test
[root@rocketmq-nameserver1 ~]# docker exec -it tomcat-net01 ping tomcat-net02
PING tomcat-net02 (192.168.0.3) 56(84) bytes of data.
64 bytes from tomcat-net02.mynet (192.168.0.3): icmp_seq=1 ttl=64 time=0.144 ms
64 bytes from tomcat-net02.mynet (192.168.0.3): icmp_seq=2 ttl=64 time=0.123 ms

[root@rocketmq-nameserver1 ~]# docker exec -it tomcat-net02 ping tomcat-net01
PING tomcat-net01 (192.168.0.2) 56(84) bytes of data.
64 bytes from tomcat-net01.mynet (192.168.0.2): icmp_seq=1 ttl=64 time=0.040 ms
64 bytes from tomcat-net01.mynet (192.168.0.2): icmp_seq=2 ttl=64 time=0.117 ms
Network connectivity
Connect a container to the network
[root@rocketmq-nameserver1 ~]# docker network connect --help

Usage:  docker network connect [OPTIONS] NETWORK CONTAINER

Connect a container to a network

Options:
      --alias strings           Add network-scoped alias for the container
      --driver-opt strings      driver options for the network
      --ip string               IPv4 address (e.g., 172.30.100.104)
      --ip6 string              IPv6 address (e.g., 2001:db8::33)
      --link list               Add link to another container
      --link-local-ip strings   Add a link-local address for the container
command
docker network connect mynet tomcat01
docker network connect mynet tomcat02

# tomcat01 and tomcat02 are added to mynet
[root@rocketmq-nameserver1 ~]# docker network inspect mynet
[
    {
        "Name": "mynet",
        "Id": "0366e43ca5dce6d063e31dee392150fa2e906533bd405c563d1d259172e69894",
        "Created": "2021-04-10T19:35:17.090781686+08:00",
        "Scope": "local",
        "Driver": "bridge",
        "EnableIPv6": false,
        "IPAM": {
            "Driver": "default",
            "Options": {},
            "Config": [
                {
                    "Subnet": "192.168.0.0/16",
                    "Gateway": "192.168.0.1"
                }
            ]
        },
        "Internal": false,
        "Attachable": false,
        "Ingress": false,
        "ConfigFrom": {
            "Network": ""
        },
        "ConfigOnly": false,
        "Containers": {
            "81a23b5a50cdf716d94c2eba6e2dad7c2371a56bc1c9c6bb3351041d538c4043": {
                "Name": "tomcat02",
                "EndpointID": "acd00d79f587fe12153ef1a03c9313a4c5267b9df52c2b35a4ef292c92b7570b",
                "MacAddress": "02:42:c0:a8:00:05",
                "IPv4Address": "192.168.0.5/16",
                "IPv6Address": ""
            },
            "8c2fe224e4b3e1d6dd44e4b1a2e6a4d443339499141e84c7ad26b4a7a8e10430": {
                "Name": "tomcat-net01",
                "EndpointID": "d21b1a34f164b8722fd61037b91e151bb883d5eadbadf44146d8111afbcdc499",
                "MacAddress": "02:42:c0:a8:00:02",
                "IPv4Address": "192.168.0.2/16",
                "IPv6Address": ""
            },
            "a64b99861a42cfa0b16ce0cc3bfd698812700986c8639ddd76bfc47d4c0382c2": {
                "Name": "tomcat-net02",
                "EndpointID": "4c2f200b8eea913c036096d1d5277f0e4b4f707982da14ad2a3194fadbf3f038",
                "MacAddress": "02:42:c0:a8:00:03",
                "IPv4Address": "192.168.0.3/16",
                "IPv6Address": ""
            },
            "f178421a32c960467146bc527b01772d8b60cc4ae41cc50510487496114abdd1": {
                "Name": "tomcat01",
                "EndpointID": "c62afddf7689d5ddd95ecb05c3ac00592f718a3dfdce1f220e25645e64789bdf",
                "MacAddress": "02:42:c0:a8:00:04",
                "IPv4Address": "192.168.0.4/16",
                "IPv6Address": ""
            }
        },
        "Options": {},
        "Labels": {}
    }
]

#test
[root@rocketmq-nameserver1 ~]# docker exec -it tomcat01 ping tomcat-net01
PING tomcat-net01 (192.168.0.2) 56(84) bytes of data.
64 bytes from tomcat-net01.mynet (192.168.0.2): icmp_seq=1 ttl=64 time=0.064 ms
64 bytes from tomcat-net01.mynet (192.168.0.2): icmp_seq=2 ttl=64 time=0.137 ms

[root@rocketmq-nameserver1 ~]# docker exec -it tomcat01 ping tomcat02
PING tomcat02 (192.168.0.5) 56(84) bytes of data.
64 bytes from tomcat02.mynet (192.168.0.5): icmp_seq=1 ttl=64 time=0.041 ms
64 bytes from tomcat02.mynet (192.168.0.5): icmp_seq=2 ttl=64 time=0.126 ms
Actual combat: Redis cluster
Create network
docker network create --driver bridge --subnet 192.169.0.0/16 --gateway 192.169.0.1 redis
Create 6 Redis configuration files through script
for port in $(seq 1 6);\
do \
mkdir -p /mydata/redis/node-${port}/conf
touch /mydata/redis/node-${port}/conf/redis.conf
cat << EOF >/mydata/redis/node-${port}/conf/redis.conf
port 6379
bind 0.0.0.0
cluster-enabled yes
cluster-config-file nodes.conf
cluster-announce-ip 192.169.0.1${port}
cluster-announce-port 6379
cluster-announce-bus-port 16379
appendonly yes
EOF
done
Start 6 Redis
docker run -p 6371:6379 -p 16371:16379 --name redis-1 \
-v /mydata/redis/node-1/data:/data \
-v /mydata/redis/node-1/conf/redis.conf:/etc/redis/redis.conf \
-d \
--net redis \
--ip 192.169.0.11 \
redis:latest redis-server /etc/redis/redis.conf

docker run -p 6372:6379 -p 16372:16379 --name redis-2 \
-v /mydata/redis/node-2/data:/data \
-v /mydata/redis/node-2/conf/redis.conf:/etc/redis/redis.conf \
-d \
--net redis \
--ip 192.169.0.12 \
redis:latest redis-server /etc/redis/redis.conf

docker run -p 6373:6379 -p 16373:16379 --name redis-3 \
-v /mydata/redis/node-3/data:/data \
-v /mydata/redis/node-3/conf/redis.conf:/etc/redis/redis.conf \
-d \
--net redis \
--ip 192.169.0.13 \
redis:latest redis-server /etc/redis/redis.conf

docker run -p 6374:6379 -p 16374:16379 --name redis-4 \
-v /mydata/redis/node-4/data:/data \
-v /mydata/redis/node-4/conf/redis.conf:/etc/redis/redis.conf \
-d \
--net redis \
--ip 192.169.0.14 \
redis:latest redis-server /etc/redis/redis.conf

docker run -p 6375:6379 -p 16375:16379 --name redis-5 \
-v /mydata/redis/node-5/data:/data \
-v /mydata/redis/node-5/conf/redis.conf:/etc/redis/redis.conf \
-d \
--net redis \
--ip 192.169.0.15 \
redis:latest redis-server /etc/redis/redis.conf

docker run -p 6376:6379 -p 16376:16379 --name redis-6 \
-v /mydata/redis/node-6/data:/data \
-v /mydata/redis/node-6/conf/redis.conf:/etc/redis/redis.conf \
-d \
--net redis \
--ip 192.169.0.16 \
redis:latest redis-server /etc/redis/redis.conf
Create a cluster and enter any node to create a cluster
docker exec -it container ID /bin/sh

redis-cli --cluster create 192.169.0.11:6379 192.169.0.12:6379 192.169.0.13:6379 192.169.0.14:6379 192.169.0.15:6379 192.169.0.16:6379 --cluster-replicas 1
View cluster
cluster info
cluster nodes
Actual combat: springboot microservice packaging docker image
step
1,structure springboot project
2,Packaged application
3,to write dockerfile
FROM openjdk:8u282-slim-buster

COPY *.jar /app.jar

CMD ["--server.port=8080"]

EXPOSE 8080

ENTRYPOINT ["java","-jar","/app.jar"]
4,Build image
docker build -t springboot-docker-web:1.0.0 .
5,Publish run
docker run -d --name springboot-docker -p 8080:8080  springboot-docker-web:1.0.0
6,test
curl http://localhost:8080/sayHello
docker Compose
brief introduction
Too many microservices, manual build,run trouble
docker compose To easily manage containers and define and run multiple containers
 Official profile:
Compose Is used to define and run multiple containers Docker Application tools. adopt Compose,You can use YML File to configure all services required by the application. Then, using a command, you can YML Create and start all services in the configuration file.
Three steps for Compose:
use Dockerfile Define the environment of the application.
use docker-compose.yml Define the services that make up the application so that they can run together in an isolated environment.
Finally, execute docker-compose up Command to start and run the entire application.
Compose installation
1,Linux In fact, we can start from Github Download its binary package to use. The latest version address is: https://github.com/docker/compose/releases.
Run the following command to download Docker Compose Current stable version of:
curl -L "https://github.com/docker/compose/releases/download/1.24.1/docker-compose-$(uname -s)-$(uname -m)" -o /usr/local/bin/docker-compose
 To install a different version of Compose,Please replace 1.24.1.
2,Apply executable permissions to binaries:
chmod +x /usr/local/bin/docker-compose
3,To create a soft chain:
ln -s /usr/local/bin/docker-compose /usr/bin/docker-compose
4,Test for successful installation:
docker-compose --version
use
1,Ready to create a test directory:
mkdir composetest
cd composetest
 Create a test directory named app.py And copy and paste the following:
//-----------
import time

import redis
from flask import Flask

app = Flask(__name__)
cache = redis.Redis(host='redis', port=6379)


def get_hit_count():
    retries = 5
    while True:
        try:
            return cache.incr('hits')
        except redis.exceptions.ConnectionError as exc:
            if retries == 0:
                raise exc
            retries -= 1
            time.sleep(0.5)


@app.route('/')
def hello():
    count = get_hit_count()
    return 'Hello World! I have been seen {} times.\n'.format(count)
//-----------
In this example, redis Is on the application network redis The hostname of the container, which uses port 6379.
stay composetest Create another directory named requirements.txt The contents of the document are as follows:
//-----------
flask
redis
//-----------

2,establish Dockerfile File, in composetest Directory, create a file named Dockerfile,The contents are as follows:
//------------
FROM python:3.7-alpine
WORKDIR /code
ENV FLASK_APP app.py
ENV FLASK_RUN_HOST 0.0.0.0
RUN apk add --no-cache gcc musl-dev linux-headers
COPY requirements.txt requirements.txt
RUN pip install -r requirements.txt
COPY . .
CMD ["flask", "run"]
//------------

3,establish docker-compose.yml,Create a test directory named docker-compose.yml And paste the following:
//------------
# yaml configuration
version: '3'
services:
  web:
    build: .
    ports:
     - "5000:5000"
  redis:
    image: "redis:alpine"
//------------
Should Compose The file defines two services: web and redis.
web: Should web Service usage from Dockerfile Images built in the current directory. It then binds the container and host to the exposed port 5000. This sample service uses Flask Web The default port of the server is 5000.
redis: Should redis Service usage Docker Hub Public Redis Image.

4,use Compose Command to build and run your application. In the test directory, execute the following command to start the application:
docker-compose up
 If you want to execute the service in the background, you can add -d Parameters:
docker-compose up -d
yaml configuration instruction reference: https://www.runoob.com/docker/docker-compose.html
Build a blog: https://docs.docker.com/compose/wordpress/
version: '3'

services:
  db:
    image: mysql:5.7
    volumes:
      - db_data:/var/lib/mysql
    restart: always
    environment:
      MYSQL_ROOT_PASSWORD: somewordpress
      MYSQL_DATABASE: wordpress
      MYSQL_USER: wordpress
      MYSQL_PASSWORD: wordpress

  wordpress:
    depends_on:
      - db
    image: wordpress:latest
    ports:
      - "8000:80"
    restart: always
    environment:
      WORDPRESS_DB_HOST: db:3306
      WORDPRESS_DB_USER: wordpress
      WORDPRESS_DB_PASSWORD: wordpress
      WORDPRESS_DB_NAME: wordpress
volumes:
  db_data: {}
Actual combat: write your own micro service online
1,Write project and join Redis
2,to write Dockerfile,Reference“ springboot Microservice packaging docker Mirror
3,to write docker-compose
4,implement docker-compose up -d
docker Swarm
brief introduction
Docker Swarm yes Docker Cluster management tools. It will Docker Transform host pool into a single virtual Docker host. Docker Swarm Provides standard Docker API,All that has been associated with Docker Daemon communication tools can be used Swarm Easily scale to multiple hosts.
Supported tools include but are not limited to the following:
Dokku
Docker Compose
Docker Machine
Jenkins
principle
As shown in the figure below, swarm The cluster consists of management nodes( manager)And work nodes( work node)Composition.
swarm mananger: Be responsible for the management of the whole cluster, including cluster configuration, service management and other cluster related work.
work node: That is, in the figure available node,It is mainly responsible for running corresponding services to perform tasks( task).
initialization
[root@iZ7xv2ybh1v2we7h6q4ih9Z ~]# docker swarm init --advertise-addr 172.21.72.136
Swarm initialized: current node (6dzqmqs8ohp8l4o8lxjkh3e24) is now a manager.

To add a worker to this swarm, run the following command:

    docker swarm join --token SWMTKN-1-4iwry4d9d7cv20s5oiwggigu6u3k76c2n58bppuu27bsh85hod-11x3ulpevbkw7t9n28ho85y11 172.21.72.136:2377

To add a manager to this swarm, run 'docker swarm join-token manager' and follow the instructions.
Get token
docker swarm join-token manager #Join management node
docker swarm join-token worker	#Join work node
experience
[root@iZ7xv2ybh1v2we7h6q4ih9Z ~]# docker service --help

Usage:  docker service COMMAND

Manage services

Commands:
  create      Create a new service
  inspect     Display detailed information on one or more services
  logs        Fetch the logs of a service or task
  ls          List services
  ps          List the tasks of one or more services
  rm          Remove one or more services
  rollback    Revert changes to a service's configuration
  scale       Scale one or multiple replicated services
  update      Update a service
docker service create -p 80:80 --name nginx-test nginx:latest #Create service
docker service update --replicas 3 nginx-test #Modify service
hp8l4o8lxjkh3e24) is now a manager.
To add a worker to this swarm, run the following command:
docker swarm join --token SWMTKN-1-4iwry4d9d7cv20s5oiwggigu6u3k76c2n58bppuu27bsh85hod-11x3ulpevbkw7t9n28ho85y11 172.21.72.136:2377
To add a manager to this swarm, run 'docker swarm join-token manager' and follow the instructions.
> Get token
Docker swarm join token manager # joins the management node
Docker swarm join token worker # join the work node
> experience
[root@iZ7xv2ybh1v2we7h6q4ih9Z ~]# docker service --help
Usage: docker service COMMAND
Manage services
Commands:
create Create a new service
inspect Display detailed information on one or more services
logs Fetch the logs of a service or task
ls List services
ps List the tasks of one or more services
rm Remove one or more services
rollback Revert changes to a service's configuration
scale Scale one or multiple replicated services
update Update a service
Docker service create - P 80:80 -- name nginx test nginx: latest # create service
Docker service update -- replicas 3 nginx test # modify service