1, Overview
The code development process will contact several environments: development environment, test environment and production environment, involving development, testing and operation and maintenance. In the process of code delivery, we often encounter the problem of software cross environment migration, which is well solved by Docker.
docker is a container technology that solves the problem of software migration across environments
Docker architecture
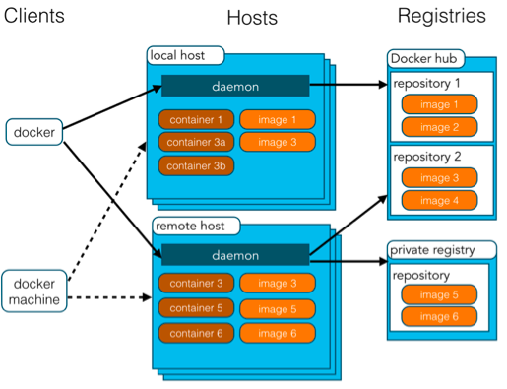
Docker s are divided into images, containers, and repositories. The relationship between image and Container is like a class and object in object-oriented programming. Image is a static definition, and Container is the entity of image runtime. Containers can be created, started, stopped, deleted, paused, and so on. The warehouse is used to store images.
2, Docker container related commands
one Docker service related commands
- Start docker service
systemctl start docker
- Stop docker service:
systemctl stop docker
- Restart docker service:
systemctl restart docker
- View docker service status:
systemctl status docker
- Set startup to start docker service
systemctl enable docker
two Docker image related commands
- View mirror: view all local mirrors
docker images
docker images –q # View the id of the image used
- Search image: find the desired image from the network
docker search Image name
- Pull image: download the image from the Docker warehouse to the local. The image name format is name: version number. If the version number is not specified, it is the latest version. If you don't know the image version, you can go to the docker hub to search for the corresponding image.
docker pull Image name
- Delete mirror: deletes the local mirror
docker rmi image id # Deletes the specified local mirror
docker rmi `docker images -q`  # Delete all local mirrors
three Docker container related commands
- View container
docker ps # View running containers
docker ps –a # View all containers
- Create and start the container
docker run parameter
docker run -it --name=c1 centos:7 /bin/bash
Parameter Description:
- -i: Keep the container running. Usually used with - t. After adding the IT parameters, the container will automatically enter the container after it is created. After exiting the container, the container will automatically close.
- -t: Reassign a pseudo input terminal to the container, usually in conjunction with - i.
- -d: Run the container in daemon (background) mode. To create a container to run in the background, you need to use docker exec to enter the container. After exiting, the container will not close.
- -Containers created by it are generally called interactive containers,
- -The container created by id is generally called a guard container
- --Name: name the created container.
- Enter container
docker exec parameter # Exit the container and the container will not close
docker exec -it c2 /bin/bash
- Stop container
docker stop Container name
- Start container
docker start Container name
- Delete container: if the container is running, the deletion fails. You need to stop the container to delete it
docker rm Container name
- View container information
docker inspect Container name
3, Data volume of Docker container
1. Concept of data volume
A data volume is a directory or file in the host. When the container directory and the data volume directory are bound, the other party's modifications will be synchronized immediately. A data volume can be mounted by multiple containers at the same time, and a container can also be mounted by multiple data volumes
2. Function of data volume
Container data persistence, indirect communication between external machines and containers, data exchange between containers
3. Configure data volumes
- When creating a boot container, use the – v parameter to set the data volume
docker run ... –v Host Directory(file):In container directory(file) ...
docker run -it --name=c1 -v /root/data:/root/datacontainer centos:7
- matters needing attention:
1. The directory must be an absolute path
2. If the directory does not exist, it will be created automatically
3. Multiple data volumes can be mounted (multiple -v)
4. Data volume container
There are two methods for data exchange among multiple containers: 1. Multiple containers mount the same data volume; 2. Data volume container
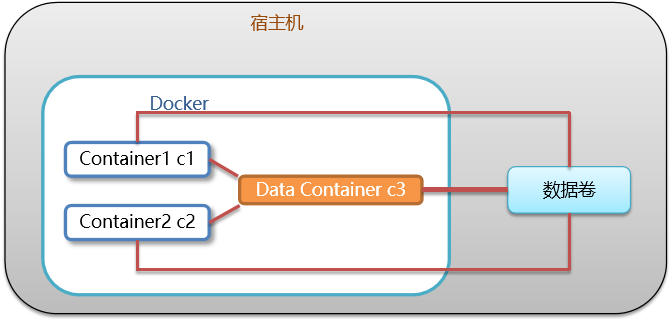
Configuring data volume containers
- Create a boot c3 data volume container and set the data volume using the – v parameter
# /bin/bash is the command to execute at startup
docker run –it --name=c3 –v /volume centos:7 /bin/bash
- Create the boot c1 c2 container and set the data volume with the – - volumes from parameter
docker run –it --name=c1 --volumes-from c3 centos:7 /bin/bash
docker run –it --name=c2 --volumes-from c3 centos:7 /bin/bash
4, Docker application deployment (take MySQL deployment as an example)
- The network service in the container cannot communicate directly with the external machine
- External machines and host computers can communicate directly
- Host and container can communicate directly
- When the network service in the container needs to be accessed by an external machine, the port providing the service in the container can be mapped to the port of the host. The external machine accesses the port of the host, thus indirectly accessing the service of the container.
- This operation is called port mapping

Simplify application installation: using Docker to deploy applications can make application installation simpler, and there is no need to install a series of dependent environments, which are packaged in the image file.
Docker deployment MySQL
1. Search mysql image
docker search mysql
2. Pull mysql image
docker pull mysql:5.6
three Create container and set port mapping and directory mapping
# Create a mysql directory under the / root directory to store mysql data information
mkdir ~/mysql
cd ~/mysql

docker run -id \
-p 3307:3306 \
--name=c_mysql \
-v $PWD/conf:/etc/mysql/conf.d \
-v $PWD/logs:/logs \
-v $PWD/data:/var/lib/mysql \
-e MYSQL_ROOT_PASSWORD=123456 \
mysql:5.6
Parameter description
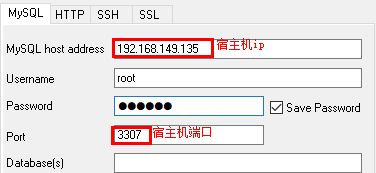
- -p 3307:3306: map the 3306 port of the container to the 3307 port of the host.
- -v $PWD/conf:/etc/mysql/conf.d: Mount conf/my.cnf in the current directory of the host to / etc/mysql/my.cnf in the container. configure directory
- -v $PWD/logs:/logs: mount the logs directory under the current directory of the host to / logs of the container. Log directory
- -v $PWD/data:/var/lib/mysql: mount the data directory under the current directory of the host to / var/lib/mysql of the container. Data directory
- -e MYSQL_ROOT_PASSWORD=123456: initialize the password of the root user.
4. Enter the container and operate mysql
docker exec –it c_mysql /bin/bash
five Connect mysql in the container using an external machine
5, Dockerfile
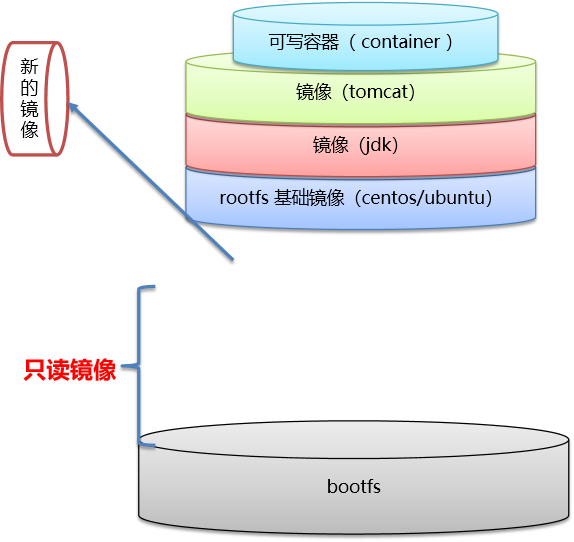
1. Docker image principle
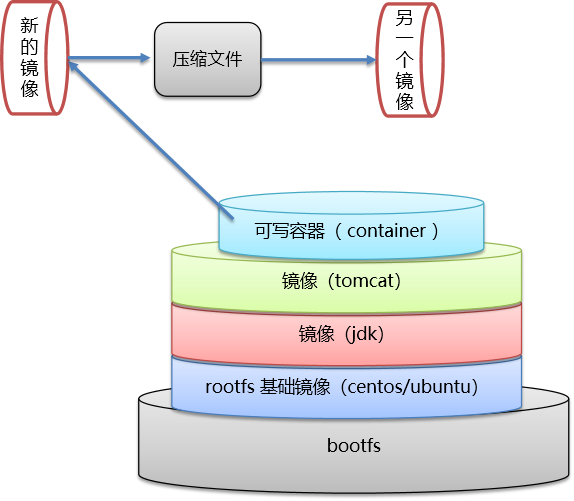
The Docker image is superimposed by special file systems. The bottom end is bootfs, and the bootfs of the host machine are used. The second layer is the root file system rootfs, called base image. Then, other image files can be superimposed upward. The unified file system technology can integrate different layers into a file system, providing a unified perspective for these layers, which hides the existence of multiple layers. From the user's point of view, there is only one file system. One image can be placed on top of another. The image below is called the parent image, and the bottom image becomes the base image. When the container is started from an image, Docker will load a read-write file system as the container at the top level
2. Image making
Method 1: convert container to image
- Container to mirror
docker commit container id Image name:Version number
- Convert the image file into a compressed file for easy transmission
docker save -o Compressed file name image name:Version number
- Load image and restore to container
docker load –i Compressed file name
Method 2: dockerfile
3. dockerfile
Dockerfile is a text file containing instructions. Each instruction builds a layer. Based on the basic image, a new image is finally built. For developers: it can provide a completely consistent development environment for the development team; For testers: you can directly take the image built during development or build a new image through dockerfile file to start working; For operation and maintenance personnel: seamless migration of applications can be realized during deployment
Case: define dockerfile and publish springboot project
- Define parent image: FROM java:8
- Define author information: MAINTAINER itheima < itheima@itcast.cn >
- Add the jar package to the container: ADD springboot.jar app.jar
- Define the command that the container starts to execute: CMD java – jar app.jar
- Build an image through dockerfile: docker bulid – f dockerfile file path – t image name: version
6, Docker service orchestration
Manage containers in batches according to certain business rules to reduce the workload of maintenance, including:
- Build image from dockerfile or pull image from dockerhub
- To create multiple container s
- To manage these container s (start stop delete)
Docker Compose is a tool for arranging multi container distributed deployment. It provides command set to manage the complete development cycle of container applications, including service construction, start and stop. Use steps:
- Using Dockerfile to define running environment image
- Use docker-compose.yml to define the services that make up the application
- Run docker compose up to start the application
Use docker compose to organize nginx+springboot projects:
- Create docker compose directory
mkdir ~/docker-compose
cd ~/docker-compose
- Write the docker-compose.yml file
version: '3'
services:
  nginx:
   image: nginx
   ports:
    - 80:80
   links:
    - app
   volumes:
    - ./nginx/conf.d:/etc/nginx/conf.d
  app:
    image: app
    expose:
- "8080"- Create the. / nginx/conf.d directory
mkdir -p ./nginx/conf.d
- Write the itheima.conf file in the. / nginx/conf.d directory
server {
    listen 80;
    access_log off;

    location / {
        proxy_pass http://app:8080;
    }

}- Use docker compose to start the container under the ~ / docker compose directory
docker-compose up
- Test access
http://192.168.149.135/hello
7, Docker private warehouse
Build your own private warehouse to store and manage your own images
one Construction of private warehouse
# 1. Pull private warehouse image
docker pull registry
# 2. Start private warehouse container
docker run -id --name=registry -p 5000:5000 registry
# 3. Open the browser and enter the address http: / / private warehouse server ip:5000/v2/_catalog, see {"repositories": []} indicates that the private warehouse is successfully built
# 4. Modify daemon.json
vim /etc/docker/daemon.json
# Add a key to the above file, save and exit. This step is used to make docker trust the private warehouse address; Note: change the ip address of the private warehouse server to the real ip address of your own private warehouse server
{"insecure-registries":["Private warehouse server ip:5000"]}
# 5. Restart docker service
systemctl restart docker
docker start registry
2. Upload the image to the private warehouse
# 1. Image marked as private warehouse
docker tag centos:7 Private warehouse server IP:5000/centos:7

# 2. Upload image of tag
docker push Private warehouse server IP:5000/centos:7
3. Pull the image from the private warehouse
#Pull image
docker pull Private warehouse server ip:5000/centos:7