Docker learning
- Docker overview
- Docker installation
- Docker command
- Mirror command
- Container command
- Operation command
- Docker image
- Container data volume
- DockerFile
- Docker network principle
- IDEA integration Docker
- Docker Compose
- Docker Swarm
- CI\CD jenkins
Docker overview
Why does Docker appear?
One product: Development - Online two sets of environments! Application environment, application configuration!
The traditional development mode is that developers develop applications and deploy the environment through operation and maintenance. This model will bring a problem that the program can run on the developer's computer, but the program cannot run elsewhere. The program cannot execute normally due to the problem of environmental conflict
Docker's solution is:
- Docker's thought model comes from container
- In multiple applications (Port conflict) – it used to be cross
- Isolation: the core idea of Docker! Packing! Each box is isolated from each other
- Docker can utilize the server to the isolation mechanism through the isolation mechanism
Essence: all technologies are learned because there are some problems that we need to solve
Docker history
In 2010, several young people engaged in IT set up a company dotcloud in the United States
Do some pass cloud computing services! LXC related container technology!
They named their technology (container technology) Docker in time!
Docker didn't attract the attention of the industry when it was just born! dotCloud, you can't live!
In 2013, Docker will be open source!
Docker more and more people have found the advantages of docker. Docker updates its version every month
Docker1, April 9, 2014 0 publish
Why is Docker so hot? Very light!
Before container technology came out, we all used virtual machine technology!
Virtual machine: install a Vmware in the window. Through this software, we can virtual one or more computers! But it's bulky!
Virtual machine also belongs to virtualization technology. Docker container technology is also a virtualization technology!
vm, Linux centos The native image (one computer) is isolated, and multiple virtual machines need to be started! How many? G A few minutes
docker,Isolation, mirroring (core environment) m + jdk + mysql)Very light, just run the image! Small! How many? M KB Seconds start!
Up to now, all developers must go back to Docker
Talk about Docker
Docker is developed based on GO language! Open source project!
Official website: https://www.docker.com/
[the external chain image transfer fails. The source station may have an anti-theft chain mechanism. It is recommended to save the image and upload it directly (img-yu7kymwd-1623469059437)( https://raw.githubusercontent.com/zhusli2013you/image/master/data/image-20210514095514860.png )]
Warehouse address: https://hub.docker.com/
What can Docker do
Virtual machine technology
[the external link image transfer fails. The source station may have an anti-theft chain mechanism. It is recommended to save the image and upload it directly (img-6bcuoftx-1623469059440)( https://raw.githubusercontent.com/zhusli2013you/image/master/data/20210514114532.png )]
Disadvantages of virtual machine technology:
- It takes up a lot of resources
- Redundant steps
- Slow start
Containerization Technology
Containerization technology is not a simulation of an operating system that plays this game
[the external chain picture transfer fails. The source station may have an anti-theft chain mechanism. It is recommended to save the picture and upload it directly (img-lgbzz7zl-1623469059443)( https://raw.githubusercontent.com/zhusli2013you/image/master/data/20210514115007.png )]
Compare the difference between Docker and virtual machine technology
- The traditional virtual machine virtualizes a piece of hardware, runs a complete operating system, and then installs and runs software on this system
- The applications in the container run directly inside the host computer. The container does not have its own kernel or virtual hardware, so it is much lighter
- Each container is isolated from each other, and each container has its own file system, which complements each other
DevOps (development, operation and maintenance)
Faster delivery and deployment of applications
Traditional: a pile of help documents, installers
Docker: packaging image release test, one click operation
More convenient upgrade and capacity expansion
After using Docker, we deploy applications just like building blocks!
The project is packaged as an image to expand server A! Server B!
Simpler system operation and maintenance
After containerization, our development and testing environments are highly consistent
More efficient utilization of computing resources
Docker is kernel level virtualization, which can run many container instances on a physical machine! The performance of the server can be compressed to the extreme.
Docker installation
Docker NOUN
Mirror (image)
docker's net absorption is like a template, which can be used to create container services. Tomcat image = = = > Run = = = > tomcat01 container (providing server). Through this image, multiple containers can be created (the final service running or project running is in the container)
container
Docker uses container technology to run one or a group of applications independently and create them through image.
Start, stop, delete, basic command!
At present, this container can be understood as a simple Linux system
repository
The warehouse is where the image is stored!
Warehouses are divided into public warehouses and private warehouses
Docker Hub (all foreign by default)
Both Alibaba cloud and Huawei cloud have container servers (configured with image acceleration)
Install Docker
Environmental preparation
- Need a little Linux foundation
- centos7
- Use Xshell to connect to the server
# The system kernel is above 3.10
[root@iZwz94tkn42l6pe1uu1mqiZ ~]# uname -r
3.10.0-1160.24.1.el7.x86_64
#
[root@iZwz94tkn42l6pe1uu1mqiZ ~]# cat /etc/os-release
NAME="CentOS Linux"
VERSION="7 (Core)"
ID="centos"
ID_LIKE="rhel fedora"
VERSION_ID="7"
PRETTY_NAME="CentOS Linux 7 (Core)"
ANSI_COLOR="0;31"
CPE_NAME="cpe:/o:centos:centos:7"
HOME_URL="https://www.centos.org/"
BUG_REPORT_URL="https://bugs.centos.org/"

CENTOS_MANTISBT_PROJECT="CentOS-7"
CENTOS_MANTISBT_PROJECT_VERSION="7"
REDHAT_SUPPORT_PRODUCT="centos"
REDHAT_SUPPORT_PRODUCT_VERSION="7"
install
Help documentation
- Install gcc related environment
yum -y install gcc
yum -y install gcc-c++
- Uninstall the old docker installation package
yum remove docker \
                  docker-client \
                  docker-client-latest \
                  docker-common \
                  docker-latest \
                  docker-latest-logrotate \
                  docker-logrotate \
                  docker-engine
- Required installation package
yum install -y yum-utils
- Set the warehouse of the image
yum-config-manager \
    --add-repo \
    https://download.docker.com/linux/centos/docker-ce.repo # defaults to foreign

yum-config-manager \
    --add-repo \
    http://mirrors.aliyun.com/docker-ce/linux/centos/docker-ce.repo # alicloud address
- Update yum package index
yum makecache fast
- Install Docker related content Docker CE community version Docker EE enterprise version
yum install -y docker-ce docker-ce-cli containerd.io
- Start Docker
systemctl start docker
- Use Docker version to check whether the installation is successful
[root@iZwz94tkn42l6pe1uu1mqiZ ~]# docker version
Client: Docker Engine - Community
 Version:           20.10.6
 API version:       1.41
 Go version:        go1.13.15
 Git commit:        370c289
 Built:             Fri Apr  9 22:45:33 2021
 OS/Arch:           linux/amd64
 Context:           default
 Experimental:      true

Server: Docker Engine - Community
 Engine:
  Version:          20.10.6
  API version:      1.41 (minimum version 1.12)
  Go version:       go1.13.15
  Git commit:       8728dd2
  Built:            Fri Apr  9 22:43:57 2021
  OS/Arch:          linux/amd64
  Experimental:     false
 containerd:
  Version:          1.4.4
  GitCommit:        05f951a3781f4f2c1911b05e61c160e9c30eaa8e
 runc:
  Version:          1.0.0-rc93
  GitCommit:        12644e614e25b05da6fd08a38ffa0cfe1903fdec
 docker-init:
  Version:          0.19.0
  GitCommit:        de40ad0
- Testing the Hello world program
docker run hello-world
- Check whether the downloaded Hello world image exists
docker images
- Uninstall Docker
 # 1. Uninstall dependency
 yum remove docker-ce docker-ce-cli containerd.io

 # 2. Delete resources
 rm -rf /var/lib/docker
 rm -rf /var/lib/containerd
Alibaba cloud image acceleration
- Log in to Alibaba cloud official website
- From the container image service of elastic computing in the product (used by Alibaba cloud intranet)
run execution process
[the external chain picture transfer fails. The source station may have an anti-theft chain mechanism. It is recommended to save the picture and upload it directly (IMG oudgwvpm-1623469059448)( https://raw.githubusercontent.com/zhusli2013you/image/master/data/ Unnamed file jpg)]
Underlying principle
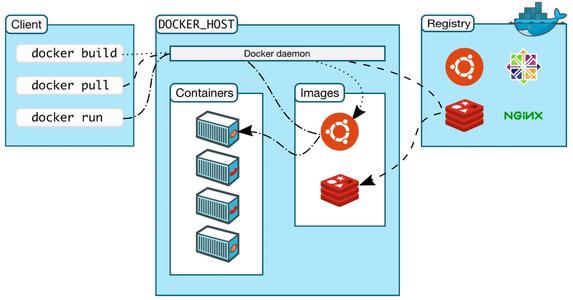
How does Docker work?
Docker is a system with client server structure. The daemon of docker runs on the host. Access from the client through Socket!
DockerServer will execute this command after receiving the docker client instruction!
[external chain picture transfer failed. The source station may have anti-theft chain mechanism. It is recommended to save the picture and upload it directly (img-7prkyquk-1623469059450)( https://raw.githubusercontent.com/zhusli2013you/image/master/data/ Unnamed file (1)] jpg)
Why is Docker faster than VM
- There are fewer abstract layers than virtual dockers
- Docker uses the kernel of the host, and the VM needs the Guest OS
Therefore, when creating a new container, Docker does not need to reload an operating system kernel like the virtual machine to avoid booting. The virtual machine loads the Guest OS and starts at the minute level, while Docker uses the operating system of the host, omitting this complex process and starting at the second level.
Common commands of Docker
Help command
docker version		 # Display the version information of docker
docker info			 # Displays the system information of docker, including the number of images and containers
docker command --help	#Omnipotent command
Address of help document: https://docs.docker.com/reference/
Mirror command
docker images view images on all local hosts
[root@iZwz94tkn42l6pe1uu1mqiZ ~]# docker images
REPOSITORY    TAG       IMAGE ID       CREATED        SIZE
hello-world   latest    d1165f221234   2 months ago   13.3kB

REPOSITORY  Mirrored warehouse source
TAG         Mirrored label
IMAGE ID    mirrored  ID
CREATED     Creation time of image
SIZE        Mirror size

-a, --all             List all mirrors
-q, --quiet           Show only mirrored ID
docker search command
[root@iZwz94tkn42l6pe1uu1mqiZ ~]# docker search mysql
NAME                              DESCRIPTION                                     STARS     OFFICIAL   AUTOMATED
mysql                             MySQL is a widely used, open-source relation...   10873     [OK]
mariadb                           MariaDB Server is a high performing open sou...   4099      [OK]
mysql/mysql-server                Optimized MySQL Server Docker images. Create...   806                  [OK]
percona                           Percona Server is a fork of the MySQL relati...   536       [OK]
docker pull Download Image
# Download Image dockerpull image name [: tag]
[root@iZwz94tkn42l6pe1uu1mqiZ ~]# docker pull mysql
Using default tag: latest  # If you do not write tag, the default is latest
latest: Pulling from library/mysql
69692152171a: Pull complete  # Layered download, the core federated file system of docker image
1651b0be3df3: Pull complete
951da7386bc8: Pull complete
0f86c95aa242: Pull complete
37ba2d8bd4fe: Pull complete
6d278bb05e94: Pull complete
497efbd93a3e: Pull complete
f7fddf10c2c2: Pull complete
16415d159dfb: Pull complete
0e530ffc6b73: Pull complete
b0a4a1a77178: Pull complete
cd90f92aa9ef: Pull complete
Digest: sha256:d50098d7fcb25b1fcb24e2d3247cae3fc55815d64fec640dc395840f8fa80969
Status: Downloaded newer image for mysql:latest
docker.io/library/mysql:latest # What an address

docker pull mysql
docker pull docker.io/library/mysql:latest
# The above two commands are the same

# Mirror of the specified version
[root@iZwz94tkn42l6pe1uu1mqiZ ~]# docker pull mysql:5.7
5.7: Pulling from library/mysql
69692152171a: Already exists
1651b0be3df3: Already exists
951da7386bc8: Already exists
0f86c95aa242: Already exists
37ba2d8bd4fe: Already exists
6d278bb05e94: Already exists
497efbd93a3e: Already exists
a023ae82eef5: Pull complete
e76c35f20ee7: Pull complete
e887524d2ef9: Pull complete
ccb65627e1c3: Pull complete
Digest: sha256:a682e3c78fc5bd941e9db080b4796c75f69a28a8cad65677c23f7a9f18ba21fa
Status: Downloaded newer image for mysql:5.7
docker.io/library/mysql:5.7
docker rmi delete image
# Deletes the specified image
docker rmi -f image ID

# Delete multiple mirrors
docker rmi -f image ID image ID image ID

# Delete all mirrors
docker rmi -f $(docker images -aq)
Container command
Note: we can create a container only after we use the image. For Linux, download a centos image to test
docker pull centos
Create a new container and start
docker run [Optional parameters] image
# Parameter description
--name="Name" Container name Tomcat01 Tomcat02 Used to distinguish containers
-d 		      Run in background mode
-it           Run in interactive mode and enter the container to view the content
-P            Specify the port of the container -P 8080:8080
	-P ip:Host port:Container port
	-P Host port:Container port
	-P Container port
	Container port
-p            Randomly assigned port


# Start and enter the container
[root@iZwz94tkn42l6pe1uu1mqiZ ~]# docker run -it centos /bin/bash
[root@a05ab38c8636 /]# ls # Check the centos in the container. The basic version. Many commands are not perfect
bin  dev  etc  home  lib  lib64  lost+found  media  mnt  opt  proc  root  run  sbin  srv  sys  tmp  usr  var

# Start NGINX instance
[root@iZwz94tkn42l6pe1uu1mqiZ ~]# docker run -d -p 3344:80 --name nginx02 nginx
bc6810eee3480b464733575829a48b4d9a7e573697dc25f74934db0598ed989b


# Exit from container
[root@a05ab38c8636 /]# exit
exit
List all running containers
# docker ps command

-a # Accumulate currently running containers + historically running containers
-n=? # Recently created containers
-q # Displays only the number of the container

[root@iZwz94tkn42l6pe1uu1mqiZ ~]# docker ps
CONTAINER ID   IMAGE     COMMAND   CREATED   STATUS    PORTS     NAMES
[root@iZwz94tkn42l6pe1uu1mqiZ ~]# docker ps -a
CONTAINER ID   IMAGE         COMMAND       CREATED         STATUS                      PORTS     NAMES
a05ab38c8636   centos        "/bin/bash"   3 minutes ago   Exited (0) 51 seconds ago             hopeful_darwin
3059f7efd070   hello-world   "/hello"      2 hours ago     Exited (0) 2 hours ago                vigilant_rubin
[root@iZwz94tkn42l6pe1uu1mqiZ ~]#
Exit container
exit # Direct container stop and exit
Ctrl + p + q # The container does not stop exiting
Delete container
docker rm container ID   # Delete the specified container. You cannot delete the running container. If you want to force the deletion, rm -f
docker rm -r $(docker ps -aq) # Delete all containers
docker ps -a -q|xargs docker rm # Delete all containers
Start and stop container operation
docker start container ID   # Start container
docker restart container ID # Restart container
docker stop container ID    # Stop the currently running container
docker kill container ID    # Stop the current container
Other commonly used commands
Background startup container
# Command docker run -d name
docker run -d centos
In the common pit, if the docker container runs in the background, there must be a foreground process. If docker finds that there is no application, it will automatically stop
NGINX, after the container starts, if it finds that it does not provide services, it will stop immediately
view log
docker logs -f -t --tail container

# Show log
-tf #Show log
--tial number # Number of logs to display
docker logs -tf --tail 10 300e315adb2f
View process information in the container
# docker top container ID

[root@iZwz94tkn42l6pe1uu1mqiZ ~]# docker top 3565dac1ec32
UID            PID              PPID             C                STIME               TTY
root          13848             13828            0                15:59               ?
root           13921            13848            0                15:59               ?
View the metadata of the image
# docker inspect container ID

[root@iZwz94tkn42l6pe1uu1mqiZ ~]# docker inspect 3565dac1ec32
[
    {
        "Id": "3565dac1ec32c34dbcdc651c538238e36a52e53fef729da7876aca893c5ae8c7",
        "Created": "2021-05-14T07:59:30.176021788Z",
        "Path": "/bin/sh",
        "Args": [
            "-c",
            "while true;do echo aa; sleep 1; done"
        ],
        "State": {
            "Status": "running",
            "Running": true,
            "Paused": false,
            "Restarting": false,
            "OOMKilled": false,
            "Dead": false,
            "Pid": 13848,
            "ExitCode": 0,
            "Error": "",
            "StartedAt": "2021-05-14T07:59:30.553009964Z",
            "FinishedAt": "0001-01-01T00:00:00Z"
        },
        "Image": "sha256:300e315adb2f96afe5f0b2780b87f28ae95231fe3bdd1e16b9ba606307728f55",
        "ResolvConfPath": "/var/lib/docker/containers/3565dac1ec32c34dbcdc651c538238e36a52e53fef729da7876aca893c5ae8c7/resolv.conf",
        "HostnamePath": "/var/lib/docker/containers/3565dac1ec32c34dbcdc651c538238e36a52e53fef729da7876aca893c5ae8c7/hostname",
        "HostsPath": "/var/lib/docker/containers/3565dac1ec32c34dbcdc651c538238e36a52e53fef729da7876aca893c5ae8c7/hosts",
        "LogPath": "/var/lib/docker/containers/3565dac1ec32c34dbcdc651c538238e36a52e53fef729da7876aca893c5ae8c7/3565dac1ec32c34dbcdc651c538238e36a52e53fef729da7876aca893c5ae8c7-json.log",
        "Name": "/peaceful_einstein",
        "RestartCount": 0,
        "Driver": "overlay2",
        "Platform": "linux",
        "MountLabel": "",
        "ProcessLabel": "",
        "AppArmorProfile": "",
        "ExecIDs": null,
        "HostConfig": {
            "Binds": null,
            "ContainerIDFile": "",
            "LogConfig": {
                "Type": "json-file",
                "Config": {}
            },
            "NetworkMode": "default",
            "PortBindings": {},
            "RestartPolicy": {
                "Name": "no",
                "MaximumRetryCount": 0
            },
            "AutoRemove": false,
            "VolumeDriver": "",
            "VolumesFrom": null,
            "CapAdd": null,
            "CapDrop": null,
            "CgroupnsMode": "host",
            "Dns": [],
            "DnsOptions": [],
            "DnsSearch": [],
            "ExtraHosts": null,
            "GroupAdd": null,
            "IpcMode": "private",
            "Cgroup": "",
            "Links": null,
            "OomScoreAdj": 0,
            "PidMode": "",
            "Privileged": false,
            "PublishAllPorts": false,
            "ReadonlyRootfs": false,
            "SecurityOpt": null,
            "UTSMode": "",
            "UsernsMode": "",
            "ShmSize": 67108864,
            "Runtime": "runc",
            "ConsoleSize": [
                0,
                0
            ],
            "Isolation": "",
            "CpuShares": 0,
            "Memory": 0,
            "NanoCpus": 0,
            "CgroupParent": "",
            "BlkioWeight": 0,
            "BlkioWeightDevice": [],
            "BlkioDeviceReadBps": null,
            "BlkioDeviceWriteBps": null,
            "BlkioDeviceReadIOps": null,
            "BlkioDeviceWriteIOps": null,
            "CpuPeriod": 0,
            "CpuQuota": 0,
            "CpuRealtimePeriod": 0,
            "CpuRealtimeRuntime": 0,
            "CpusetCpus": "",
            "CpusetMems": "",
            "Devices": [],
            "DeviceCgroupRules": null,
            "DeviceRequests": null,
            "KernelMemory": 0,
            "KernelMemoryTCP": 0,
            "MemoryReservation": 0,
            "MemorySwap": 0,
            "MemorySwappiness": null,
            "OomKillDisable": false,
            "PidsLimit": null,
            "Ulimits": null,
            "CpuCount": 0,
            "CpuPercent": 0,
            "IOMaximumIOps": 0,
            "IOMaximumBandwidth": 0,
            "MaskedPaths": [
                "/proc/asound",
                "/proc/acpi",
                "/proc/kcore",
                "/proc/keys",
                "/proc/latency_stats",
                "/proc/timer_list",
                "/proc/timer_stats",
                "/proc/sched_debug",
                "/proc/scsi",
                "/sys/firmware"
            ],
            "ReadonlyPaths": [
                "/proc/bus",
                "/proc/fs",
                "/proc/irq",
                "/proc/sys",
                "/proc/sysrq-trigger"
            ]
        },
        "GraphDriver": {
            "Data": {
                "LowerDir": "/var/lib/docker/overlay2/da103020cf947821a9b717c70b556c0b2658ddc3e14af9585242965f1038c7b6-init/diff:/var/lib/docker/overlay2/7ae992f7b556a66ecbc14cc40e0df81da30ac28feffa45999a4e389d0e68bfed/diff",
                "MergedDir": "/var/lib/docker/overlay2/da103020cf947821a9b717c70b556c0b2658ddc3e14af9585242965f1038c7b6/merged",
                "UpperDir": "/var/lib/docker/overlay2/da103020cf947821a9b717c70b556c0b2658ddc3e14af9585242965f1038c7b6/diff",
                "WorkDir": "/var/lib/docker/overlay2/da103020cf947821a9b717c70b556c0b2658ddc3e14af9585242965f1038c7b6/work"
            },
            "Name": "overlay2"
        },
        "Mounts": [],
        "Config": {
            "Hostname": "3565dac1ec32",
            "Domainname": "",
            "User": "",
            "AttachStdin": false,
            "AttachStdout": false,
            "AttachStderr": false,
            "Tty": false,
            "OpenStdin": false,
            "StdinOnce": false,
            "Env": [
                "PATH=/usr/local/sbin:/usr/local/bin:/usr/sbin:/usr/bin:/sbin:/bin"
            ],
            "Cmd": [
                "/bin/sh",
                "-c",
                "while true;do echo aa; sleep 1; done"
            ],
            "Image": "centos",
            "Volumes": null,
            "WorkingDir": "",
            "Entrypoint": null,
            "OnBuild": null,
            "Labels": {
                "org.label-schema.build-date": "20201204",
                "org.label-schema.license": "GPLv2",
                "org.label-schema.name": "CentOS Base Image",
                "org.label-schema.schema-version": "1.0",
                "org.label-schema.vendor": "CentOS"
            }
        },
        "NetworkSettings": {
            "Bridge": "",
            "SandboxID": "dca9b4cec16049ee9eea3ef3f69832c54a4bbe5e07bc92d1716f07924b748dbd",
            "HairpinMode": false,
            "LinkLocalIPv6Address": "",
            "LinkLocalIPv6PrefixLen": 0,
            "Ports": {},
            "SandboxKey": "/var/run/docker/netns/dca9b4cec160",
            "SecondaryIPAddresses": null,
            "SecondaryIPv6Addresses": null,
            "EndpointID": "9b128f7836259194f4ef26a30d52141755432956388c6b8f69916a593f6bc808",
            "Gateway": "172.17.0.1",
            "GlobalIPv6Address": "",
            "GlobalIPv6PrefixLen": 0,
            "IPAddress": "172.17.0.2",
            "IPPrefixLen": 16,
            "IPv6Gateway": "",
            "MacAddress": "02:42:ac:11:00:02",
            "Networks": {
                "bridge": {
                    "IPAMConfig": null,
                    "Links": null,
                    "Aliases": null,
                    "NetworkID": "83e597ad26efff30e939cf0d4300ea418aae59880a638c6153cec986c5d663dc",
                    "EndpointID": "9b128f7836259194f4ef26a30d52141755432956388c6b8f69916a593f6bc808",
                    "Gateway": "172.17.0.1",
                    "IPAddress": "172.17.0.2",
                    "IPPrefixLen": 16,
                    "IPv6Gateway": "",
                    "GlobalIPv6Address": "",
                    "GlobalIPv6PrefixLen": 0,
                    "MacAddress": "02:42:ac:11:00:02",
                    "DriverOpts": null
                }
            }
        }
    }
]
Enter the currently running container
# We usually use the background mode to run the container. We need to enter the container and modify some configurations

docker exec -it container ID /bin/bash

docker attach container ID

# docker exec    # After entering the container, open a new terminal, which can be operated inside (commonly used)
# docker attach  # Entering the terminal where the container is executing will not start a new process
Copy files from the container to the host
# docker cp container ID: the address of the container file and the address of the host

docker cp 4d9d244f926f:/home/aa.java /home
visualization
- Portal (use this first)
docker run -d -p 8088:9000 --restart=always -v /var/run/docker.sock:/var/run/docker.sock --privileged=true portainer/portainer
- Rancher(CI\CD)
What portal
Docker graphical interface management tool! Provide a background panel for us to operate
docker run -d -p 8088:9000 --restart=always -v /var/run/docker.sock:/var/run/docker.sock --privileged=true portainer/portainer
Access test: Internet: 8088
Docker image explanation
What is mirroring
Image is a lightweight and executable independent software package, which is used to package software running environment and software developed based on environment. It contains all the contents required to run a software, including code, runtime, library, environment variables and configuration files
All applications can run directly by directly packaging Docker images
How to get the image
- Download from remote warehouse
- With a copy for you
- Make an image DockerFile by yourself
Docker image loading principle
UnionFS (Federated file system)
This is the layer upon layer we see when downloading
Union fs (Federated file system): Union file system (Union FS) is a layered, lightweight and high-performance file system. It supports the modification of the file system. It can be superimposed layer by layer as a submission. At the same time, different directories can be mounted into a single virtual file system. The union file system is the foundation of Docker image. Images can be inherited through layering (there is no parent image), and various specific application images can be made
Features: multiple file systems can be loaded at the same time, but from the outside, only one file system can be seen. Joint loading will overlay all layers of file systems, so that the final file system will contain all underlying files and directories
Docker image loading principle
The image of Docker is actually composed of a layer by layer file system, which is called UnionFS
Bootfs (boot file system) mainly includes bootloader and kernel. Bootloader is mainly used to boot and load the kernel. Bootfs file system will be loaded when Linux starts up. Bootfs is the lowest layer of Docker image. This layer is the same as our typical Linux/Unix system, including that the whole kernel is in memory after boot loading, At this time, the right to use the memory has been transferred from bootfs to the kernel. At this time, the system will also uninstall bootfs
rootfs (root file system), above bootfs. It contains standard directories and files such as / dev,/proc,/bin,/etc in a typical Linux system. rootfs is the distribution of various operating systems, such as Ubuntu, centos and so on
Usually, the centos system we install into the virtual machine has several GB. Why is docker only 200MB
For a streamlined OS, rootfs can be very small. It only needs to contain the most basic commands, tools and program libraries. Because the underlying layer directly uses host and kernel, its own value needs rootfs. Therefore, for different Linux distributions, bootfs is basically the same, and rootfs will be different. Therefore, different distributions can share bootfs
The virtual machine is in minutes and the container is in seconds
Hierarchical understanding
Tiered mirroring
We can download an image and pay attention to the log output of the download. We can see that it is downloading layer by layer!
[root@iZwz94tkn42l6pe1uu1mqiZ ~]# docker pull redis
Using default tag: latest
latest: Pulling from library/redis
69692152171a: Already exists
a4a46f2fd7e0: Pull complete
bcdf6fddc3bd: Pull complete
b7e9b50900cc: Pull complete
5f3030c50d85: Pull complete
63dae8e0776c: Pull complete
Digest: sha256:365eddf64356169aa0cbfbeaf928eb80762de3cc364402e7653532bcec912973
Status: Downloaded newer image for redis:latest
docker.io/library/redis:latest
Why does Docker adopt this hierarchical structure
The biggest benefit is resource sharing! For example, if multiple images are built from the same base image, the host only needs to keep one base image on the disk, and only one base image needs to be loaded in the memory, so that it can serve all containers, and each layer of the image can be shared separately
You can view the image hierarchy through the docker image inspect command
[root@iZwz94tkn42l6pe1uu1mqiZ ~]# docker image inspect redis
[
    {
        "Id": "sha256:bc8d70f9ef6cae366eb6423fcb4699597c5a6b99126f3ced35b6b9d6d134375b",
        "RepoTags": [
            "redis:latest"
        ],
        "RepoDigests": [
            "redis@sha256:365eddf64356169aa0cbfbeaf928eb80762de3cc364402e7653532bcec912973"
        ],
        "Parent": "",
        "Comment": "",
        "Created": "2021-05-12T19:07:40.989268815Z",
        "Container": "7f80d5e2c33e07cfd43daf9e5b15825833a69ff09cf999c562b325c5f2b1a177",
        "ContainerConfig": {
            "Hostname": "7f80d5e2c33e",
            "Domainname": "",
            "User": "",
            "AttachStdin": false,
            "AttachStdout": false,
            "AttachStderr": false,
            "ExposedPorts": {
                "6379/tcp": {}
            },
            "Tty": false,
            "OpenStdin": false,
            "StdinOnce": false,
            "Env": [
                "PATH=/usr/local/sbin:/usr/local/bin:/usr/sbin:/usr/bin:/sbin:/bin",
                "GOSU_VERSION=1.12",
                "REDIS_VERSION=6.2.3",
                "REDIS_DOWNLOAD_URL=http://download.redis.io/releases/redis-6.2.3.tar.gz",
                "REDIS_DOWNLOAD_SHA=98ed7d532b5e9671f5df0825bb71f0f37483a16546364049384c63db8764512b"
            ],
            "Cmd": [
                "/bin/sh",
                "-c",
                "#(nop) ",
                "CMD [\"redis-server\"]"
            ],
            "Image": "sha256:c55155952d103fdae7acc2a5d613050c83fed8710409072bf456ed45ac1f9ee5",
            "Volumes": {
                "/data": {}
            },
            "WorkingDir": "/data",
            "Entrypoint": [
                "docker-entrypoint.sh"
            ],
            "OnBuild": null,
            "Labels": {}
        },
        "DockerVersion": "19.03.12",
        "Author": "",
        "Config": {
            "Hostname": "",
            "Domainname": "",
            "User": "",
            "AttachStdin": false,
            "AttachStdout": false,
            "AttachStderr": false,
            "ExposedPorts": {
                "6379/tcp": {}
            },
            "Tty": false,
            "OpenStdin": false,
            "StdinOnce": false,
            "Env": [
                "PATH=/usr/local/sbin:/usr/local/bin:/usr/sbin:/usr/bin:/sbin:/bin",
                "GOSU_VERSION=1.12",
                "REDIS_VERSION=6.2.3",
                "REDIS_DOWNLOAD_URL=http://download.redis.io/releases/redis-6.2.3.tar.gz",
                "REDIS_DOWNLOAD_SHA=98ed7d532b5e9671f5df0825bb71f0f37483a16546364049384c63db8764512b"
            ],
            "Cmd": [
                "redis-server"
            ],
            "Image": "sha256:c55155952d103fdae7acc2a5d613050c83fed8710409072bf456ed45ac1f9ee5",
            "Volumes": {
                "/data": {}
            },
            "WorkingDir": "/data",
            "Entrypoint": [
                "docker-entrypoint.sh"
            ],
            "OnBuild": null,
            "Labels": null
        },
        "Architecture": "amd64",
        "Os": "linux",
        "Size": 105384748,
        "VirtualSize": 105384748,
        "GraphDriver": {
            "Data": {
                "LowerDir": "/var/lib/docker/overlay2/a3d262fe90e54560c0b13f2cb515d554c056dcf660af5ffa87802e91b9a73eb8/diff:/var/lib/docker/overlay2/ac6227ff51b65b18a0cac529ad1318d43d01fc39d14f5b45b34f4326e961cc87/diff:/var/lib/docker/overlay2/fae797250cd99c97520e32ffd7e8c08c9092a60f1b3a5c5dd308b64b4aa33c4f/diff:/var/lib/docker/overlay2/987c2f138efbd62bb4e7998112459177a0840c003fa8d208ad3bb2e2c94f0f04/diff:/var/lib/docker/overlay2/11a41b7bf24ea9dbd4b6a309aae1c5fdc6c484de958fa076a48b8e585caa83de/diff",
                "MergedDir": "/var/lib/docker/overlay2/f881db1dd4a4f465829fbaa43a77f4f078e22e1d16bebed707490cd80d0c7650/merged",
                "UpperDir": "/var/lib/docker/overlay2/f881db1dd4a4f465829fbaa43a77f4f078e22e1d16bebed707490cd80d0c7650/diff",
                "WorkDir": "/var/lib/docker/overlay2/f881db1dd4a4f465829fbaa43a77f4f078e22e1d16bebed707490cd80d0c7650/work"
            },
            "Name": "overlay2"
        },
        "RootFS": {
            "Type": "layers",
            "Layers": [
                "sha256:02c055ef67f5904019f43a41ea5f099996d8e7633749b6e606c400526b2c4b33",
                "sha256:ec5652c3523d96657d66169c0eb71b572ff065711c705a15ec02f60a21c212c3",
                "sha256:76d3e24d63f60e6a73af70be15959eb4021dd7a5a09da6925037d3b4a1673fca",
                "sha256:f281464c05be6822b95403339e2b7744fd1664e88ee9d118c7e89436ab094d58",
                "sha256:7fde79e38c038ef46904196710861e2c556363d723b8f8bf9b00369944d36aec",
                "sha256:6d4185a1708b677241d83683283c76703e788e41a2341b7c1bf4dbf12aebab45"
            ]
        },
        "Metadata": {
            "LastTagTime": "0001-01-01T00:00:00Z"
        }
    }
]
understand:
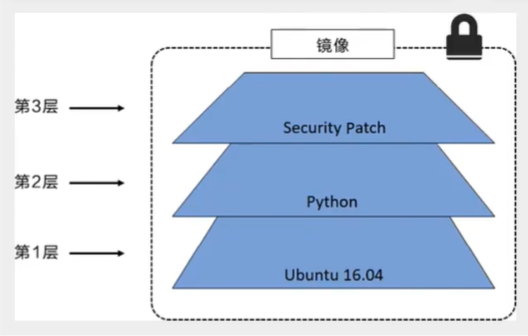
All Docker images start from a basic image layer. When new content is added or added, a new image layer will be created above the current image layer.
For a simple example, if you create a new image based on Ubuntu Linux 16.04, this is the first layer of the new image; If you add a Python package to the image.
The image currently contains three image layers, as shown in the figure below (this is just a simple example for demonstration)
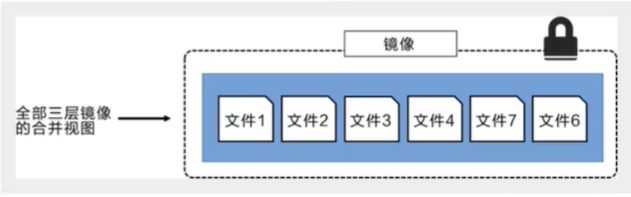
It is important to understand that while adding additional mirror layers, the mirror remains the combination of all current mirrors. A simple example is shown in the figure below. Each image layer contains three files, while the image contains six files from the image layer
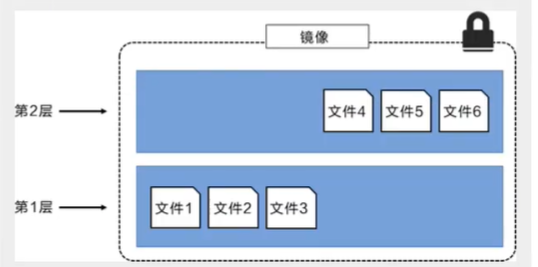
The image layer in the above figure is slightly different from the previous one. The main purpose is to facilitate the display of files
The following figure shows a slightly complex three-tier image. Externally, the entire image has only six files, because the top-level file 7 is an updated version of file 5.
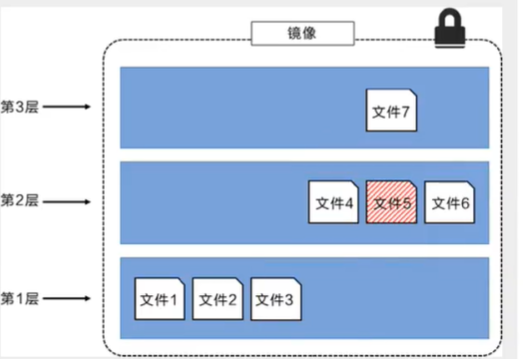
In this case, the files in the upper image layer overwrite the files in the lower image layer. In this way, the updated version of the file is added to the image as a new image layer
Docker implements the image layer stack through the storage engine (the new version adopts the snapshot mechanism), and ensures that multiple image layers are displayed as the same file system
Available storage engines on Linux include AUFS, Overlay2, Device Mapper, Btrfs and ZFS. As the name suggests, each storage engine is based on the corresponding file system or block device technology in Linux, and each storage engine has its unique performance characteristics
Docker only supports a Windows filter storage engine on windows, which implements layering and cow based on NTFS file system [1]
The following figure shows the same three-tier image as the system display. All mirror layers are stacked and merged to provide a unified view
characteristic
Docker images are read-only. When the container starts, a new writable layer is loaded to the top of the image!
This layer is what we call the container layer. All under the container are called the mirror layer!
commit image
docker commit The commit container is called a new copy

docker commit -m="Description information submitted" -a="author" container ID Target image name:[tag]
Container data volume
What is a container data volume
The concept of docker
Package the application and environment into an image!
data If all the data is in the container, the data will be lost if we delete the container! Requirement: data can be persistent
For MySQL, deleting the container is equivalent to deleting the database. Requirement: MySQL data can be stored locally!
There can be a data sharing technology between containers! Synchronize the data generated in Docker container to the local!
This is volume technology. To put it bluntly, it is the mounting of directories. Mount the directories in our container onto Linux!
To sum up, it is for the persistence and synchronization of containers! Data can also be shared between containers
Using data volumes
Method 1: directly use the command to mount - v
docker run -it -v Host Directory:In container directory

# Mount static HTML file of NGINX
[root@iZwz94tkn42l6pe1uu1mqiZ home]# docker run -d --name nginx -p 3344:80 -v /home/:/usr/share/nginx/html nginx
7c49e254e17291c5c364af967329677b933015bace6911a8e048e355de8534b2
Benefits: we only need to modify locally in the future, and the container will be automatically synchronized!
Actual combat: install MySQL
Thinking: data persistence of MySQL
# Get image
[root@iZwz94tkn42l6pe1uu1mqiZ ~]# docker pull mysql:5.7

# To run the container, you need to mount the data
# When installing and starting MySQL, you should note that you need to configure the password
# Official test: docker run -- name some MySQL - e MySQL_ ROOT_ PASSWORD=my-secret-pw -d mysql:tag

-d      Background operation
-p      Port mapping
-v      Volume mount
-e      Environment configuration
--name  Container name
[root@iZwz94tkn42l6pe1uu1mqiZ ~]# docker run -d -p 3310:3306 -v /home/mysql/conf:/etc/mysql/conf.d -v /home/mysql/data:/var/lib/mysql -e MYSQL_ROOT_PASSWORD=123456 --name mysql01 mysql:5.7
Named mount and anonymous mount
Anonymous mount
-v Path in container!
[root@iZwz94tkn42l6pe1uu1mqiZ ~]# docker run -d -p --name nginx01 -v /etc/nginx nginx

# Check the volume that is said to exist
[root@iZwz94tkn42l6pe1uu1mqiZ ~]# docker volume ls
DRIVER    VOLUME NAME
local     50e376e28038ef4d45c9c7b61be2fa85984577973cc150dc84ad1d9cae07425d

This is anonymous mount. We're here -v Only the path inside the container is written, not the path outside the container!
Named mount
[root@iZwz94tkn42l6pe1uu1mqiZ ~]# docker run -d -P --name nginx01 -v juming-nginx:/etc/nginx nginx
64dc774d7bb835447e0911327f54fc3c1761a4075dd5749d9b6f31592e02486c

[root@iZwz94tkn42l6pe1uu1mqiZ ~]# docker volume ls
DRIVER    VOLUME NAME
local     juming-nginx

# Pass -v volume name: path in container
# Take a look at this volume
[root@iZwz94tkn42l6pe1uu1mqiZ ~]# docker volume inspect juming-nginx
[
    {
        "CreatedAt": "2021-05-15T09:41:07+08:00",
        "Driver": "local",
        "Labels": null,
        "Mountpoint": "/var/lib/docker/volumes/juming-nginx/_data",
        "Name": "juming-nginx",
        "Options": null,
        "Scope": "local"
    }
]
All volumes in the Docker container are in / var / lib / Docker / volumes / xxx without a specified directory/_ data
We can easily find one of our volumes through named mount, which is used in most cases
# How to determine whether it is a named mount or an anonymous mount or a specified path mount
-v Path in container        # Anonymous mount
-v Volume name:Path in container    # Named mount
-v /Path to the host:Path in container # Specified path crash
expand:
# Change the read / write permission through - v container: ro | rw

ro readonly  # read-only
rw readwrite # Readable and writable

# Once the permission of the container is set, the container will limit the content we mount
docker run -d -P --name nginx01 -v juming-nginx:/etc/nginx:ro nginx
docker run -d -P --name nginx01 -v juming-nginx:/etc/nginx:rw nginx

# As long as ro sees ro, it means that this path can only be operated by the host, and it cannot be operated in the container
Initial Dockerfile
Dockerfile is the build file used to build the docker image! Command script
Through this script, you can generate an image. The image is layer by layer. The script commands one by one, and each command is a layer!
# Create a dockerfile with a random name. Dockerfile is recommended
# Content instruction (uppercase) parameter in file
FROM centos

VOLUME ["volume01","volume02"]

CMD echo "-------end-------"

CMD /bin/bash
# Each command here is a layer of image
[root@iZwz94tkn42l6pe1uu1mqiZ ~]# docker build -f dockerfile1 -t aa/centos:1.0 .
Sending build context to Docker daemon  57.34kB
Step 1/4 : FROM centos
latest: Pulling from library/centos
7a0437f04f83: Pull complete
Digest: sha256:5528e8b1b1719d34604c87e11dcd1c0a20bedf46e83b5632cdeac91b8c04efc1
Status: Downloaded newer image for centos:latest
 ---> 300e315adb2f
Step 2/4 : VOLUME ["volume01","volume02"]
 ---> Running in e729d405d7e1
Removing intermediate container e729d405d7e1
 ---> 9cb7e78cee19
Step 3/4 : CMD echo "-------end-------"
 ---> Running in a92b012924fc
Removing intermediate container a92b012924fc
 ---> df21671f4490
Step 4/4 : CMD /bin/bash
 ---> Running in 070dcd4c32ce
Removing intermediate container 070dcd4c32ce
 ---> 9a0c5e69eca5
Successfully built 9a0c5e69eca5
Successfully tagged aa/centos:1.0
Start your own container
[root@iZwz94tkn42l6pe1uu1mqiZ ~]# docker run -it 9a0c5e69eca5 /bin/bash
[root@9b26d4a1598d /]# ls -l
total 56
lrwxrwxrwx  1 root root    7 Nov  3  2020 bin -> usr/bin
drwxr-xr-x  5 root root  360 May 15 02:16 dev
drwxr-xr-x  1 root root 4096 May 15 02:16 etc
drwxr-xr-x  2 root root 4096 Nov  3  2020 home
lrwxrwxrwx  1 root root    7 Nov  3  2020 lib -> usr/lib
lrwxrwxrwx  1 root root    9 Nov  3  2020 lib64 -> usr/lib64
drwx------  2 root root 4096 Dec  4 17:37 lost+found
drwxr-xr-x  2 root root 4096 Nov  3  2020 media
drwxr-xr-x  2 root root 4096 Nov  3  2020 mnt
drwxr-xr-x  2 root root 4096 Nov  3  2020 opt
dr-xr-xr-x 93 root root    0 May 15 02:16 proc
dr-xr-x---  2 root root 4096 Dec  4 17:37 root
drwxr-xr-x 11 root root 4096 Dec  4 17:37 run
lrwxrwxrwx  1 root root    8 Nov  3  2020 sbin -> usr/sbin
drwxr-xr-x  2 root root 4096 Nov  3  2020 srv
dr-xr-xr-x 13 root root    0 May 15 02:16 sys
drwxrwxrwt  7 root root 4096 Dec  4 17:37 tmp
drwxr-xr-x 12 root root 4096 Dec  4 17:37 usr
drwxr-xr-x 20 root root 4096 Dec  4 17:37 var
drwxr-xr-x  2 root root 4096 May 15 02:16 volume01
drwxr-xr-x  2 root root 4096 May 15 02:16 volume02
drwxr-xr-x  2 root root 4096 May 15 02:16 volume01
drwxr-xr-x  2 root root 4096 May 15 02:16 volume02
This volume must have a synchronized directory with the outside
FROM centos
VOLUME ["volume01","volume02"] # Anonymous mount
CMD echo "-------end-------"
CMD /bin/bash
Check the path of the volume mount
docker inspect container ID
"Mounts": [
            {
                "Type": "volume",
                "Name": "b002d80bb17e6729578528ae73d124664d45f3619e1ae3baa2aef0b1eae28ab7",
                "Source": "/var/lib/docker/volumes/b002d80bb17e6729578528ae73d124664d45f3619e1ae3baa2aef0b1eae28ab7/_data",
                "Destination": "volume02",
                "Driver": "local",
                "Mode": "",
                "RW": true,
                "Propagation": ""
            },
            {
                "Type": "volume",
                "Name": "7a6846ab080bf2e6b0ffb9117a2b50819dc76b396f66843a48f3efc0a31d1106",
                "Source": "/var/lib/docker/volumes/7a6846ab080bf2e6b0ffb9117a2b50819dc76b396f66843a48f3efc0a31d1106/_data",
                "Destination": "volume01",
                "Driver": "local",
                "Mode": "",
                "RW": true,
                "Propagation": ""
            }
        ],
Data volume container
[the external chain picture transfer fails. The source station may have an anti-theft chain mechanism. It is recommended to save the picture and upload it directly (img-jhyqxzr5-1623469059452)( https://raw.githubusercontent.com/zhusli2013you/image/master/data/1621049134.jpg )]
# Start three containers and start through the image we just wrote

[root@iZwz94tkn42l6pe1uu1mqiZ ~]# docker run -it --name docker01 9a0c5e69eca5
[root@39b85ea978ac /]# ls
bin  etc   lib	  lost+found  mnt  proc  run   srv  tmp  var	   volume02
dev  home  lib64  media       opt  root  sbin  sys  usr  volume01

[root@iZwz94tkn42l6pe1uu1mqiZ ~]# docker run -it --volumes-from docker01 --name docker02 9a0c5e69eca5
[root@39b85ea978ac /]# ls
bin  etc   lib	  lost+found  mnt  proc  run   srv  tmp  var	   volume02
dev  home  lib64  media       opt  root  sbin  sys  usr  volume01

[root@iZwz94tkn42l6pe1uu1mqiZ ~]# docker run -it --volumes-from docker01 --name docker03 9a0c5e69eca5
[root@39b85ea978ac /]# ls
bin  etc   lib	  lost+found  mnt  proc  run   srv  tmp  var	   volume02
dev  home  lib64  media       opt  root  sbin  sys  usr  volume01
# Test: you can which pot of docker01 is on the conference and check whether docke02 and docker03 can still access this file
# The test is still accessible
Multiple MySQL synchronization data
docker run -d -p 3310:3306 -v /home/mysql/conf:/etc/mysql/conf.d -v /home/mysql/data:/var/lib/mysql -e MYSQL_ROOT_PASSWORD=123456 --name mysql01 mysql:5.7

docker run -d -p 3310:3306 -v /home/mysql/conf:/etc/mysql/conf.d -v /home/mysql/data:/var/lib/mysql -e MYSQL_ROOT_PASSWORD=123456 --volumes-from mysql01 --name mysql01 mysql:5.7

docker run -d -p 3310:3306 -v /home/mysql/conf:/etc/mysql/conf.d -v /home/mysql/data:/var/lib/mysql -e MYSQL_ROOT_PASSWORD=123456 --volumes-from mysql01 --name mysql01 mysql:5.7
Conclusion:
For the transfer of configuration information between containers, the life cycle of data volume containers continues until no containers are used
But once you persist to the local, the local data will not be deleted at this time
Dockerfile
Dockerfile introduction
dockerfile is a file used to build a docker image! Command parameter script!
Construction steps:
- Write a dockerfile file
- docker build is called an image
- docker run run image
- docker push publishing images (DockerHub, Alibaba cloud image warehouse)
Dockerfile construction process
Basic knowledge
-
Each reserved keyword (instruction) must be uppercase
-
Execute from top to bottom
-
#Indicates a comment
-
Each instruction will create a new mirror layer and submit it!

Dockerfile is development oriented. If we want to release the project in the future and make an image, we need to write a dockerfile file. This file is very simple!
Docker image has gradually become the delivery standard of enterprises, which must be mastered!
Steps: development, deployment, operation and maintenance
DockerFile: a build file that defines all the steps and is equivalent to the source code
DockerImages: images generated through DockerFile construction, and products finally released and run
Docker container: a container is an image that runs to provide a server
DockerFile instruction
| instructions | notes |
|---|---|
| FROM | Basic image, everything starts from here |
| MAINTAINER | Who wrote the image, name + email |
| RUN | Commands to run during image construction |
| ADD | Step, Tomcat image, this Tomcat compressed package! Add content |
| WORKDIR | Mirrored working directory |
| VOLUME | Mounted directory |
| EXPOSE | Exposed port configuration |
| CMD | When this command is made, only one container can be started |
| ENTRYPOINT | Specify the command to run when the container is started, and you can append the command |
| ONBUILD | When an inherited DockerFile is built, the ONBUILD instruction will be run to trigger the instruction |
| COPY | Similar to ADD, we copy our files to the image |
| ENV | Setting environment variables during construction |
[the external chain image transfer fails. The source station may have an anti-theft chain mechanism. It is recommended to save the image and upload it directly (img-a96ooqhv-1623469059455)( https://raw.githubusercontent.com/zhusli2013you/image/master/data/20210515121616.png )]
Lists the history of changes made locally
# docker history image ID
[root@iZwz94tkn42l6pe1uu1mqiZ ~]# docker history 9a0c5e69eca5
IMAGE          CREATED        CREATED BY                                      SIZE      COMMENT
9a0c5e69eca5   3 hours ago    /bin/sh -c #(nop)  CMD ["/bin/sh" "-c" "/bin...   0B
df21671f4490   3 hours ago    /bin/sh -c #(nop)  CMD ["/bin/sh" "-c" "echo...   0B
9cb7e78cee19   3 hours ago    /bin/sh -c #(nop)  VOLUME [volume01 volume02]   0B
300e315adb2f   5 months ago   /bin/sh -c #(nop)  CMD ["/bin/bash"]            0B
<missing>      5 months ago   /bin/sh -c #(nop)  LABEL org.label-schema.sc...   0B
<missing>      5 months ago   /bin/sh -c #(nop) ADD file:bd7a2aed6ede423b7...   209MB
Difference between CMD and ENTRYPOINT
CMD         # Make the command to run when the container starts. Only the last one will take effect and can be replaced
ENTRYPOINT  # Specify the command to run when the container is started, and you can append the command
CMD
# Write dockerfile file
FROM centos
CMD ["ls", "-a"]

# Build image
[root@iZwz94tkn42l6pe1uu1mqiZ ~]# docker build -f cmd-test -t cmdtest .

# run and find that our ls -a has taken effect
[root@iZwz94tkn42l6pe1uu1mqiZ ~]# docker run df0caba05a52
.
..
.dockerenv
bin
dev
etc
home
lib
lib64
lost+found

# Append a command - l, expecting ls -al
[root@iZwz94tkn42l6pe1uu1mqiZ ~]# docker run df0caba05a52 -l
docker: Error response from daemon: OCI runtime create failed: container_linux.go:367: starting container process caused: exec: "-l": executable file not found in $PATH: unknown.

# In the case of CMD, - l replaces the command of ["ls", "-a"], - l is not a command, so an error is reported
ENTRYPOINT
# Write dockerfile file
FROM centos
ENTRYPOINT ["ls", "-a"]

# Build image
[root@iZwz94tkn42l6pe1uu1mqiZ ~]# docker build -f dockerfile-cmd-entorypoint -t entrypoint-text .

# run and find that our ls -a has taken effect
[root@iZwz94tkn42l6pe1uu1mqiZ ~]# docker run 5aa6363fa5f1
.
..
.dockerenv
bin
dev
etc
home
lib
lib64
lost+found

# We append a command directly after our ENTRYPOINT command
[root@iZwz94tkn42l6pe1uu1mqiZ ~]# docker run 5aa6363fa5f1 -l
total 56
drwxr-xr-x  1 root root 4096 May 15 05:47 .
drwxr-xr-x  1 root root 4096 May 15 05:47 ..
-rwxr-xr-x  1 root root    0 May 15 05:47 .dockerenv
lrwxrwxrwx  1 root root    7 Nov  3  2020 bin -> usr/bin
drwxr-xr-x  5 root root  340 May 15 05:47 dev
drwxr-xr-x  1 root root 4096 May 15 05:47 etc
drwxr-xr-x  2 root root 4096 Nov  3  2020 home
lrwxrwxrwx  1 root root    7 Nov  3  2020 lib -> usr/lib
Many commands in DockerFile are very similar. We need to understand their differences. Our best learning is to compare them and test the effect!
Practice: Tomcat image
-
Prepare image files, Tomcat compressed package and JDK compressed package
[root@iZwz94tkn42l6pe1uu1mqiZ sort]# ls -al
total 200732
drwxr-xr-x  2 root root      4096 May 15 14:16 .
dr-xr-x---. 7 root root      4096 May 15 14:07 ..
-rw-r--r--  1 root root  11496577 May  9 02:06 apache-tomcat-9.0.46.tar.gz
-rw-r--r--  1 root root 194042837 May 15 14:16 jdk-8u202-linux-x64.tar.gz
-
Write a Dockerfile file, which is officially named Dockerfile. build will automatically find this file, so you don't need to specify - f
FROM centos
MAINTAINER scarecrow<3020139699@qq.com>
COPY readme.txt /usr/local/readme.txt

ADD jdk-8u202-linux-x64.tar.gz /usr/local/
ADD apache-tomcat-9.0.46.tar.gz /usr/local/

RUN yum -y install vim

ENV MYPATH /usr/local
WORKDIR $MYPATH

ENV JAVA_HOME /usr/local/jdk1.8.0_202
ENV CLASSPATH $JAVA_HOME/lib/dt.jar:$JAVA_HOME/lib/tools.jar
ENV CATALINA_HOME /usr/local/apache-tomcat-9.0.46
ENV CATALINA_BASH /usr/local/apache-tomcat-9.0.46
ENV PATH $PATH:$JAVA_HOME/bin:$CATALINA_HOME/lib;$CATALINA_HOME/bin

EXPOSE 8080

CMD /usr/local/apache-tomcat-9.0.46/bin/startup.sh && tail -F /usr/local/apache-tomcat-9.0.46/bin/logs/catalina.out
-
Build image
docker build -t diytomcat .
We need to master the preparation of Dockerfile for future development steps! Everything after us is published and run using Docker image!
Publish your own image
DockerHub
-
Address: https://hub.docker.com/ You need to have your own account
-
Submit your own image on our server
[root@iZwz94tkn42l6pe1uu1mqiZ sort]# docker login --help Usage: docker login [OPTIONS] [SERVER] Log in to a Docker registry. If no server is specified, the default is defined by the daemon. Options: -p, --password string Password --password-stdin Take the password from stdin -u, --username string Username -
After logging in, you can submit the image, which is a one-step docker push
# docker push author name / image name: tag tag

# Examples
docker push daocaoren/diytomcat:1.0
-
Docker network
Understand Docker0
[the external chain image transfer fails. The source station may have an anti-theft chain mechanism. It is recommended to save the image and upload it directly (img-kkazf1dg-1623469059456)( https://raw.githubusercontent.com/zhusli2013you/image/master/data/20210515163733.png )]
Three networks represent three different environments
# How does docker handle container network access?
[root@iZwz94tkn42l6pe1uu1mqiZ ~]# docker run -d -P --name tomcat01 tomcat

# View the internal network address ip addr of the container

[root@iZwz94tkn42l6pe1uu1mqiZ ~]# docker exec -it tomcat01 ip addr
1: lo: <LOOPBACK,UP,LOWER_UP> mtu 65536 qdisc noqueue state UNKNOWN group default qlen 1000
    link/loopback 00:00:00:00:00:00 brd 00:00:00:00:00:00
    inet 127.0.0.1/8 scope host lo
       valid_lft forever preferred_lft forever
70: eth0@if71: <BROADCAST,MULTICAST,UP,LOWER_UP> mtu 1500 qdisc noqueue state UP group default
    link/ether 02:42:ac:11:00:02 brd ff:ff:ff:ff:ff:ff link-netnsid 0
    inet 172.17.0.2/16 brd 172.17.255.255 scope global eth0
       valid_lft forever preferred_lft forever

# Can Linux ping through the container
[root@iZwz94tkn42l6pe1uu1mqiZ ~]# ping 172.17.0.2
PING 172.17.0.2 (172.17.0.2) 56(84) bytes of data.
64 bytes from 172.17.0.2: icmp_seq=1 ttl=64 time=0.090 ms
64 bytes from 172.17.0.2: icmp_seq=2 ttl=64 time=0.061 ms
# Linux can ping through the inside of the docker container
principle
-
Every time we start a docker container, docker will assign an IP to the docker container. As long as we install docker, there will be a network card docker0 bridging mode, using evth pair technology
[the external chain image transfer fails. The source station may have an anti-theft chain mechanism. It is recommended to save the image and upload it directly (IMG zecvovgk-1623469059457)( https://raw.githubusercontent.com/zhusli2013you/image/master/data/20210515165024.png )]
[the external chain picture transfer fails. The source station may have an anti-theft chain mechanism. It is recommended to save the picture and upload it directly (img-9uzpqnoh-1623469059458)( https://raw.githubusercontent.com/zhusli2013you/image/master/data/20210515165217.png )]
We found that this container brings the network, which is a pair
Evth pair is a pair of virtual device interfaces. They all appear in pairs. One end is connected to the protocol and the other end is connected to each other
Because of this feature, evth pair acts as a bridge to link various virtual network devices
The connection between OpenC and OVS containers is used
-
Test whether different containers can be ping ed
[root@iZwz94tkn42l6pe1uu1mqiZ ~]# docker exec -it tomcat01 ping 172.17.0.3

# Conclusion: containers can ping each other
[the external chain picture transfer fails. The source station may have an anti-theft chain mechanism. It is recommended to save the picture and upload it directly (img-rqszqkcv-1623469059460)( https://raw.githubusercontent.com/zhusli2013you/image/master/data/1621049135.jpg )]
Conclusion:
All the different containers share a common router, docker0
When all containers do not specify a network, they are routed by docker0. Docker will assign a default available IP to our containers
Summary:
Docker uses the Linux bridge, and the host is a docker container bridge docker0
[the external chain image transfer fails. The source station may have an anti-theft chain mechanism. It is recommended to save the image and upload it directly (IMG fuoktyjv-1623469059461)( https://raw.githubusercontent.com/zhusli2013you/image/master/data/1621049136.jpg )]
All network interfaces in Docker are virtual, and the virtual sending efficiency is high (transmitting files through intranet)
As long as the container is deleted, the corresponding network is gone
–link
Think about a scenario. We write a microservice, database url=ip. The project does not restart and the database IP is replaced. We hope to solve this problem and use the name to access the container?
[root@iZwz94tkn42l6pe1uu1mqiZ ~]# docker exec -it tomcat02 ping comcat01
ping: comcat01: Name or service not known

# How to solve this problem
# This problem can be solved through -- link
[root@iZwz94tkn42l6pe1uu1mqiZ ~]# docker run -d -P --name tomcat03 --link tomcat02 tomcat
d64b68844a1da24ef8c3195dd3e6c06a0a2e183b4b5a3e68c02ad0eaa3ea5452
[root@iZwz94tkn42l6pe1uu1mqiZ ~]# docker exec -it tomcat03 ping tomcat02
PING tomcat02 (172.17.0.3) 56(84) bytes of data.
64 bytes from tomcat02 (172.17.0.3): icmp_seq=1 ttl=64 time=0.122 ms
64 bytes from tomcat02 (172.17.0.3): icmp_seq=2 ttl=64 time=0.096 ms
--link actually adds an address resolution to the host file
Not recommended
The default docker0 does not support container name connection access
Custom network
View all docker networks
[root@iZwz94tkn42l6pe1uu1mqiZ ~]# docker network ls
NETWORK ID     NAME      DRIVER    SCOPE
83e597ad26ef   bridge    bridge    local
c126af0d2f76   host      host      local
83f0315e65a6   none      null      local
Network mode
| Network NOUN | explain |
|---|---|
| bridge | Bridge docker (by default, self created also uses bridge mode) |
| none | Do not configure network |
| host | Share network with host |
| container | Network connectivity in the container (less used, very limited) |
test
# The command we started directly -- net bridge is our docker0 here
docker run -d -P --name tomcat01 tomcat
docker run -d -P --name tomcat01 --net bridge tomcat

# docker0 features: the default domain name cannot be accessed -- link can get through the link
We can customize a network
# --driver bridging
# --subnet address
# --Gateway gateway

[root@iZwz94tkn42l6pe1uu1mqiZ ~]# docker network create --driver bridge --subnet 192.168.0.0/16 --gateway 192.168.0.1 mynet
d4c462502c5eb5b9dac22f19e323920ac979f2acc773bb094afc311786bc69d9
[root@iZwz94tkn42l6pe1uu1mqiZ ~]# docker network ls
NETWORK ID     NAME      DRIVER    SCOPE
83e597ad26ef   bridge    bridge    local
c126af0d2f76   host      host      local
d4c462502c5e   mynet     bridge    local
83f0315e65a6   none      null      local
Our own network
[root@iZwz94tkn42l6pe1uu1mqiZ ~]# docker network inspect mynet
[
    {
        "Name": "mynet",
        "Id": "d4c462502c5eb5b9dac22f19e323920ac979f2acc773bb094afc311786bc69d9",
        "Created": "2021-05-15T17:54:19.860356594+08:00",
        "Scope": "local",
        "Driver": "bridge",
        "EnableIPv6": false,
        "IPAM": {
            "Driver": "default",
            "Options": {},
            "Config": [
                {
                    "Subnet": "192.168.0.0/16",
                    "Gateway": "192.168.0.1"
                }
            ]
        },
        "Internal": false,
        "Attachable": false,
        "Ingress": false,
        "ConfigFrom": {
            "Network": ""
        },
        "ConfigOnly": false,
        "Containers": {},
        "Options": {},
        "Labels": {}
    }
]
[root@iZwz94tkn42l6pe1uu1mqiZ ~]# docker network inspect mynet
[
    {
        "Name": "mynet",
        "Id": "d4c462502c5eb5b9dac22f19e323920ac979f2acc773bb094afc311786bc69d9",
        "Created": "2021-05-15T17:54:19.860356594+08:00",
        "Scope": "local",
        "Driver": "bridge",
        "EnableIPv6": false,
        "IPAM": {
            "Driver": "default",
            "Options": {},
            "Config": [
                {
                    "Subnet": "192.168.0.0/16",
                    "Gateway": "192.168.0.1"
                }
            ]
        },
        "Internal": false,
        "Attachable": false,
        "Ingress": false,
        "ConfigFrom": {
            "Network": ""
        },
        "ConfigOnly": false,
        "Containers": {
            "1f8a1a02d2fdec9aef59ae85fa4a9fa8b87ce53967be2be108c9b40a991088c2": {
                "Name": "tomcat01",
                "EndpointID": "eb29f2cd24ec1df8f35edf049a60316da7bbed9c2b1c54b63b20b74befeb0eac",
                "MacAddress": "02:42:c0:a8:00:02",
                "IPv4Address": "192.168.0.2/16",
                "IPv6Address": ""
            },
            "ec2aeb7840d203896373189036a909e424ff1d4a3d4069a37afb6042a9d3abc2": {
                "Name": "tomcat02",
                "EndpointID": "bb2164e0e5dcaa171e7ebecf4df69d2fabdf17997629e785d53c6e290a1d2aae",
                "MacAddress": "02:42:c0:a8:00:03",
                "IPv4Address": "192.168.0.3/16",
                "IPv6Address": ""
            }
        },
        "Options": {},
        "Labels": {}
    }
]
Our customized network docker s have helped us maintain the corresponding relationship. We recommend that we use the network in this way
[root@iZwz94tkn42l6pe1uu1mqiZ ~]# docker exec -it tomcat01 ping 192.168.0.3
PING 192.168.0.3 (192.168.0.3) 56(84) bytes of data.
64 bytes from 192.168.0.3: icmp_seq=1 ttl=64 time=0.124 ms
64 bytes from 192.168.0.3: icmp_seq=2 ttl=64 time=0.077 ms
^C
--- 192.168.0.3 ping statistics ---
2 packets transmitted, 2 received, 0% packet loss, time 1000ms
rtt min/avg/max/mdev = 0.077/0.100/0.124/0.025 ms
[root@iZwz94tkn42l6pe1uu1mqiZ ~]# docker exec -it tomcat01 ping tomcat02
PING tomcat02 (192.168.0.3) 56(84) bytes of data.
64 bytes from tomcat02.mynet (192.168.0.3): icmp_seq=1 ttl=64 time=0.058 ms
64 bytes from tomcat02.mynet (192.168.0.3): icmp_seq=2 ttl=64 time=0.082 ms
64 bytes from tomcat02.mynet (192.168.0.3): icmp_seq=3 ttl=64 time=0.096 ms
^C
--- tomcat02 ping statistics ---
3 packets transmitted, 3 received, 0% packet loss, time 2ms
rtt min/avg/max/mdev = 0.058/0.078/0.096/0.018 ms
Network connectivity
[the external chain picture transfer fails. The source station may have an anti-theft chain mechanism. It is recommended to save the picture and upload it directly (img-zvjggetr-1623469059463)( https://raw.githubusercontent.com/zhusli2013you/image/master/data/20210515180852.png )]
[the external chain image transfer fails. The source station may have an anti-theft chain mechanism. It is recommended to save the image and upload it directly (img-y4pzdmar-1623469059465)( https://raw.githubusercontent.com/zhusli2013you/image/master/data/20210515181001.png )]
Test to get through Tomcat01 to mynet
# Add a tomcat01 to mynet's network
[root@iZwz94tkn42l6pe1uu1mqiZ ~]# docker network connect mynet tomcat01

# Check the network of mynet and find that the container of tomcat01 is directly added to the network
[root@iZwz94tkn42l6pe1uu1mqiZ ~]# docker network inspect mynet
[
    {
        "Name": "mynet",
        "Id": "d4c462502c5eb5b9dac22f19e323920ac979f2acc773bb094afc311786bc69d9",
        "Created": "2021-05-15T17:54:19.860356594+08:00",
        "Scope": "local",
        "Driver": "bridge",
        "EnableIPv6": false,
        "IPAM": {
            "Driver": "default",
            "Options": {},
            "Config": [
                {
                    "Subnet": "192.168.0.0/16",
                    "Gateway": "192.168.0.1"
                }
            ]
        },
        "Internal": false,
        "Attachable": false,
        "Ingress": false,
        "ConfigFrom": {
            "Network": ""
        },
        "ConfigOnly": false,
        "Containers": {
            "650e741fac935b4163eb8a005c326855a881c377d87679fa453e74139c399d0d": {
                "Name": "tomcat-net-01",
                "EndpointID": "3821c1b908f2029b648bc3c78d660201245bf28bbdc6dda3ea86a1f4dc9296ef",
                "MacAddress": "02:42:c0:a8:00:02",
                "IPv4Address": "192.168.0.2/16",
                "IPv6Address": ""
            },
            "d41c1e63421c3df4e983b5817109c0c4e8775ddf7505b381c9866b85fb01e645": {
                "Name": "tomcat01",
                "EndpointID": "405c3c313f44c0d7258bb1f757bcc9453fcb3a319d01d2e42bd1530bacbe947e",
                "MacAddress": "02:42:c0:a8:00:03",
                "IPv4Address": "192.168.0.3/16",
                "IPv6Address": ""
            }
        },
        "Options": {},
        "Labels": {}
    }
]

# Test whether it can ping
[root@iZwz94tkn42l6pe1uu1mqiZ ~]# docker exec -it tomcat-net-01 ping tomcat01
PING tomcat01 (192.168.0.3) 56(84) bytes of data.
64 bytes from tomcat01.mynet (192.168.0.3): icmp_seq=1 ttl=64 time=0.079 ms
64 bytes from tomcat01.mynet (192.168.0.3): icmp_seq=2 ttl=64 time=0.093 ms
Redis cluster
# Create network
[root@iZwz94tkn42l6pe1uu1mqiZ ~]# docker network create redis --driver bridge --subnet 172.38.0.0/16

# Create six Redis configurations through shell script
for port in $(seq 1 6); \
do \
mkdir -p /mydata/redis/node-${port}.conf
touch /mydata/redis/node-${port}/conf/redis.conf
cat << EOF >/mydata/redis/node-${port}/conf/redis.conf
port 6379
bind 0.0.0.0
cluster-enabled yes
cluster-node-timeout 5000
cluster-announce-ip 172.38.0.1${port}
cluster-announce-port 6379
cluster-announce-bus-port 16379
appendonly yes
EOF
done

# Start the container through a shell script
for port in $(seq 1 6); \
do \
docker run -p 637${port}:6379 -p 1637${port}:16379 --name redis-${port} -v /mydata/redis/node-${port}/data:/data -v /mydata/redsi/node-${port}/conf/redis.conf:/etc/redis/redis.conf -d --net redis --ip 172.38.0.1${port} redis redis-server /etc/redis/redis.conf
done
Enterprise practice
Docker Compose
brief introduction
Docker
DockerFile build run manual operation, single container
Microservices. 100 micro services! Dependencies.
Docker Compose to easily and efficiently manage containers. Define multiple containers to run
Three steps
Using Compose is basically a three-step process:
- Define your app's environment with a Dockerfile so it can be reproduced anywhere.
- Dockerfile ensures that our project can run anywhere
- Define the services that make up your app in docker-compose.yml so they can be run together in an isolated environment.
- services what is a service
- docker-compose. How to write this file
- Run docker compose up and the Docker compose command starts and runs your entire app. You can alternatively run docker-compose up using the docker-compose binary.
- Start project
Function: batch container arrangement
Compose is an official open source project of Docker and needs to be installed
Dockerfile lets programs run anywhere. web services, Redis, MySQL, NGINX and other containers
Compose
version: "3.9"
services:
  web:
    build: .
    ports:
      - "5000:5000"
    volumes:
      - .:/code
      - logvolume01:/var/log
    links:
      - redis
  redis:
    image: redis
volumes:
  logvolume01: {}
Compose: an important concept
- services: container. Application (web, Redis, mysql...)
- project.
Install Compose
download
curl -L "https://github.com/docker/compose/releases/download/1.29.1/docker-compose-$(uname -s)-$(uname -m)" -o /usr/local/bin/docker-compose

curl -L https://get.daocloud.io/docker/compose/releases/download/1.29.2/docker-compose-`uname -s`-`uname -m` > /usr/local/bin/docker-compose
to grant authorization
sudo chmod +x /usr/local/bin/docker-compose
experience
Official example: https://docs.docker.com/compose/gettingstarted/
step 1
mkdir composetest
cd composetest
Create app Py file
import time

import redis
from flask import Flask

app = Flask(__name__)
cache = redis.Redis(host='redis', port=6379)

def get_hit_count():
    retries = 5
    while True:
        try:
            return cache.incr('hits')
        except redis.exceptions.ConnectionError as exc:
            if retries == 0:
                raise exc
            retries -= 1
            time.sleep(0.5)

@app.route('/')
def hello():
    count = get_hit_count()
    return 'Hello World! I have been seen {} times.\n'.format(count)
Create requirements Txt file
flask
redis
Step 2: create Dockerfile file
# syntax=docker/dockerfile:1
FROM python:3.7-alpine
WORKDIR /code
ENV FLASK_APP=app.py
ENV FLASK_RUN_HOST=0.0.0.0
RUN apk add --no-cache gcc musl-dev linux-headers
COPY requirements.txt requirements.txt
RUN pip install -r requirements.txt
EXPOSE 5000
COPY . .
CMD ["python", "app.py"]
step3: create docker compose YML file
version: "3.9"
services:
  web:
    build: .
    ports:
      - "5000:5000"
  redis:
    image: "redis:alpine"
Step 4: building applications
docker-compose up
technological process:
- Create network
- Execute docker compose yaml
- Start service
Docker-compose.yaml
Creating composetest_web_1 ... done
Creating composetest_redis_1 ... done
Default service name file name_ Service name_ num
There may be multiple servers and clusters in the future
Network rules
[the external chain image transfer fails. The source station may have an anti-theft chain mechanism. It is recommended to save the image and upload it directly (IMG dwkluhth-1623469059466)( https://raw.githubusercontent.com/zhusli2013you/image/master/data/20210515224839.png )]
For example: 10 services = > items (the contents of the items are all under the same network. You can access the domain name)
For example: mysql:3306
All 10 container instances are MySQL
[the external chain image transfer fails. The source station may have an anti-theft chain mechanism. It is recommended to save the image and upload it directly (img-bhfye1ea-1623469059468)( https://raw.githubusercontent.com/zhusli2013you/image/master/data/20210515225226.png )]
If we are in the same network, we can access it directly through the domain name
Stop: docker compose down
Docker summary
- Docker image. Run = > container
- DockerFile build image (service packaging)
- Docker compose startup project (choreography, multiple microservice environments)
- Docker network
yaml rule
docker-compose.yaml is the core
Official website address: https://docs.docker.com/compose/compose-file/compose-file-v3/
version: "" # edition
services: # service
  Service 1: web
  Service 2: Redis
Project dependent startup sequence
[the external chain picture transfer fails. The source station may have an anti-theft chain mechanism. It is recommended to save the picture and upload it directly (img-s05cwzs8-1623469059469)( https://raw.githubusercontent.com/zhusli2013you/image/master/data/20210515231207.png )]
The project is to be redeployed and packaged
docker-compose up --build #Redeploy packaging
Docker Swarm
Purchase server
4 Alibaba cloud servers. It is recommended to use the pay as you go, 1-core 2G configuration
Working mode
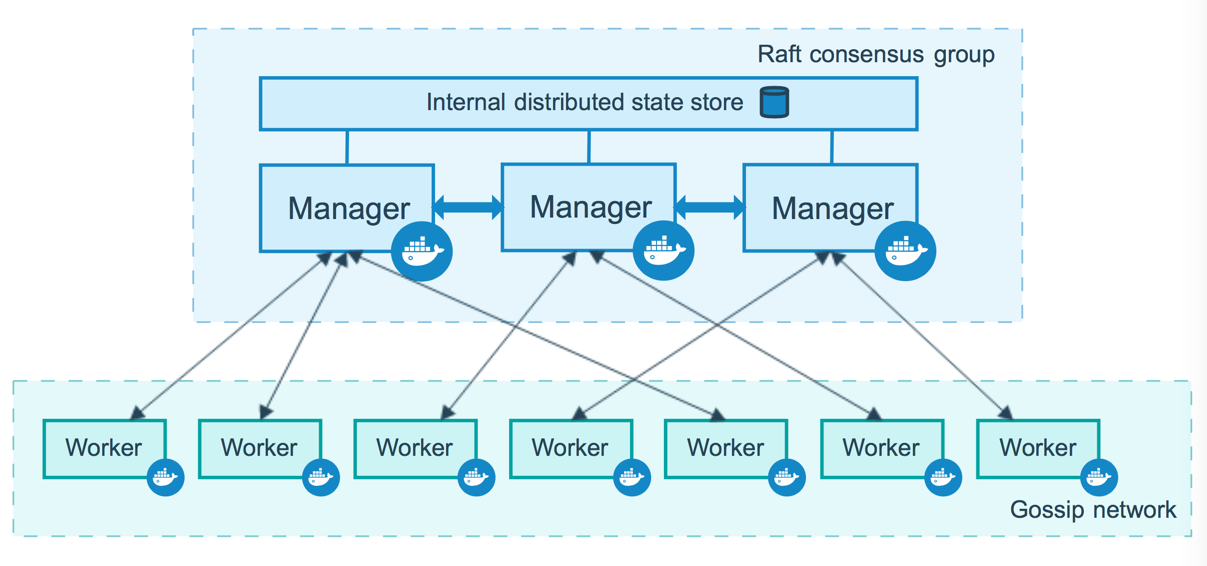
Docker Engine 1.12 introduces swarm mode that enables you to create a cluster of one or more Docker Engines called a swarm. A swarm consists of one or more nodes: physical or virtual machines running Docker Engine 1.12 or later in swarm mode.
There are two types of nodes: managers and workers.
If you haven't already, read through the swarm mode overview and key concepts.
Build clusters
docker swarm --help
[root@iZ2vc1rk4i9i8i1z7q92wxZ ~]# docker swarm --help

Usage:  docker swarm COMMAND

Manage Swarm

Commands:
  ca          Display and rotate the root CA
  init        Initialize a swarm
  join        Join a swarm as a node and/or manager
  join-token  Manage join tokens
  leave       Leave the swarm
  unlock      Unlock swarm
  unlock-key  Manage the unlock key
  update      Update the swarm

Run 'docker swarm COMMAND --help' for more information on a command.
Initialize node
docker swarm init
[the external chain image transfer fails. The source station may have anti-theft chain mechanism. It is recommended to save the image and upload it directly (img-cjj3fy4q-1623469059472)( https://raw.githubusercontent.com/zhusli2013you/image/master/data/20210516093222.png )]
docker swarm join join join a node
# Get token
docker swarm join-token manager # Role 1
docker swarm join-token worker  # Role 2
Join a node worker
# Generate a worker node by token
# docker swarm join-token worker
[root@iZ2vc1rk4i9i8i1z7q92wzZ ~]# docker swarm join --token SWMTKN-1-3xy7x0ygn751grv4ierl11c3ktq1v6y41744vaukkco88x608r-15fufl7g1kjuyhgk5f8h7pngt 172.22.9.93:2377
This node joined a swarm as a worker.
Join a node manager
[root@iZ2vc1rk4i9i8i1z7q92wxZ ~]# docker swarm join --token SWMTKN-1-3xy7x0ygn751grv4ierl11c3ktq1v6y41744vaukkco88x608r-9eqp8d46za5gx07bnri6aci0g 172.22.9.93:2377
This node joined a swarm as a manager.
Cluster nodes should ensure that the number of manager nodes is singular, at least 3
Raft protocol
Ensure that most nodes survive before they can be used. High Availability!
Currently, there are two manager nodes. When a server is shut down, an error is reported directly
[root@iZ2vc1rk4i9i8i1z7q92wxZ ~]# docker node ls
Error response from daemon: rpc error: code = DeadlineExceeded desc = context deadline exceeded
After restarting the manager node server, the cluster re elects a new leader
leader before reselection
[the external link image transfer fails. The source station may have an anti-theft chain mechanism. It is recommended to save the image and upload it directly (img-atzkn3do-1623469059473)( https://raw.githubusercontent.com/zhusli2013you/image/master/data/20210516102003.png )]
leader after reselection
[external link image transfer failed. The source station may have anti-theft chain mechanism. It is recommended to save the image and upload it directly (img-tfwiwhar-1623469059475)( https://raw.githubusercontent.com/zhusli2013you/image/master/data/20210516101818.png )]
After removing a worker node, the cluster service continues to survive
[the external chain image transfer fails. The source station may have an anti-theft chain mechanism. It is recommended to save the image and upload it directly (IMG goyspexq-1623469059476)( https://raw.githubusercontent.com/zhusli2013you/image/master/data/20210516102221.png )]
[the external chain picture transfer fails. The source station may have an anti-theft chain mechanism. It is recommended to save the picture and upload it directly (img-yijwz5pl-1623469059477)( https://raw.githubusercontent.com/zhusli2013you/image/master/data/20210516102305.png )]
We can add the removed worker node to the manager node. At this time, we already have three manager management nodes
[external chain picture transfer failed. The source station may have anti-theft chain mechanism. It is recommended to save the picture and upload it directly (img-zl0shq5r-1623469059479)( https://raw.githubusercontent.com/zhusli2013you/image/master/data/20210516102512.png )]
[the external chain image transfer fails. The source station may have an anti-theft chain mechanism. It is recommended to save the image and upload it directly (img-lzolnaef-1623469059480)( https://raw.githubusercontent.com/zhusli2013you/image/master/data/20210516102546.png )]
Using Swarm
Elasticity, expansion and contraction, group entry
Say goodbye to docker run later
Docker compose up start a project, stand-alone
Cluster: swarm docker service
Container = > Service
Container = > Service = > replica
Container = > Service = > replica (open 10 Redis containers at the same time)
experience
[the external chain image transfer fails. The source station may have an anti-theft chain mechanism. It is recommended to save the image and upload it directly (img-xr9ea7nb-1623469059481)( https://raw.githubusercontent.com/zhusli2013you/image/master/data/20210516103705.png )]
Grayscale release = Canary release
Create service
[the external chain image transfer fails. The source station may have an anti-theft chain mechanism. It is recommended to save the image and upload it directly (img-fpi4sxjx-1623469059483)( https://raw.githubusercontent.com/zhusli2013you/image/master/data/20210516103938.png )]
docker run # Vessel start-up without expansion and contraction vessel
docker service # Service, with expansion and contraction container and rolling update

Update service quantity
[external chain picture transfer failed. The source station may have anti-theft chain mechanism. It is recommended to save the picture and upload it directly (img-2fjv7zvv-1623469059485)( https://raw.githubusercontent.com/zhusli2013you/image/master/data/20210516104645.png )]
Concept summary
swarm
For cluster management and arrangement, docker can initialize a swarm cluster, and other nodes can join (management and workers)
Node
It is a docker node. Multiple nodes form a network cluster (management and workers)
Service
Tasks can be run in the management node or work node. The core
Task
Commands in container
CI\CD Jenkins