Reproduced from original document address: https://www.cnblogs.com/javalbb/p/12690862.html
Uninstall old version
sudo yum remove docker \
                  docker-client \
                  docker-client-latest \
                  docker-common \
                  docker-latest \
                  docker-latest-logrotate \
                  docker-logrotate \
                  docker-engine
Package to install docker
sudo yum install -y yum-utils
Tell Linux the Docker installation address
sudo yum-config-manager \
    --add-repo \
    https://download.docker.com/linux/centos/docker-ce.repo
Install Docker engine, client and container
sudo yum install docker-ce docker-ce-cli containerd.io
Start
sudo systemctl start docker
View version
docker -v
Set startup and self startup
systemctl enable docker
Configure Alibaba cloud image acceleration (CnetOS): https://cr.console.aliyun.com/cn-hangzhou/instances/mirrors
create folder
sudo mkdir -p /etc/docker
Configure mirror accelerator address
sudo tee /etc/docker/daemon.json <<-'EOF'
{
  "registry-mirrors": ["https://You need to log in to alicloud to get it com"]
}
EOF
Restart the background thread of docker
sudo systemctl daemon-reload
Restart the docker service
sudo systemctl restart docker
docker installing mysql
Download (version 5.7, other versions refer to docker hub)
docker pull mysql:5.7
View images in docker
docker images
Create an instance and start
docker run -p 3306:3306 --name mysql \
-v /mydata/mysql/log:/var/log/mysql \
-v /mydata/mysql/data:/var/lib/mysql \
-v /mydata/mysql/conf:/etc/mysql \
-e MYSQL_ROOT_PASSWORD=root \
-d mysql:5.7
Create mysql configuration file
vi /mydata/mysql/conf/my.cnf
Write configuration information
[client]
default-character-set=utf8

[mysql]
default-character-set=utf8

[mysqld]
init_connect='SET collation_connection = utf8_unicode_ci'
init_connect='SET NAMES utf8'
character-set-server=utf8
collation-server=utf8_unicode_ci
skip-character-set-client-handshake
skip-name-resolve
Restart mysql container
docker restart mysql
Enter the MySQL container and view the file directory (a complete Linux directory) where is MySQL: view the relevant location of MySQL
[root@localhost ~]# docker exec -it mysql /bin/bash
root@68dd321e9343:/# ls
bin boot dev docker-entrypoint-initdb.d entrypoint.sh etc home lib lib64 media mnt opt proc root run sbin srv sys tmp usr var

root@68dd321e9343:/# whereis mysql
mysql: /usr/bin/mysql /usr/lib/mysql /etc/mysql /usr/share/mysql
root@68dd321e9343:/#
docker installs redis
Download Image (latest)
docker pull redis
Create directory structure
mkdir -p /mydata/redis/conf
create profile
touch /mydata/redis/conf/redis.conf
Install redis (and mount the configuration file)
docker run -p 6379:6379 --name redis -v /mydata/redis/data:/data \
-v /mydata/redis/conf/redis.conf:/etc/redis/redis.conf \
-d redis redis-server /etc/redis/redis.conf
redis connected to docker
docker exec -it redis redis-cli
Test redis (exit: exit)
127.0.0.1:6379> set a b
OK
127.0.0.1:6379> get a
"b"
127.0.0.1:6379> exit
Restart redis
docker restart redis
Modify redis configuration file (set persistence)
appendonly yes
Set the container to start when docker starts
docker update mysql --restart=always
docker update redis --restart=always
docker installation nginx
First, cd to the mydata folder and create a folder
mkdir nginx
Download and launch
docker run -p 80:80 --name nginx -d nginx:1.10
Copy the configuration file in the container to the current nginx directory (note that our location is under the mydata folder at this time)
docker container cp nginx:/etc/nginx .
Stop the nginx container and delete the nginx image
docker stop nginx
docker rm nginx
Rename the nginx folder to conf
mv nginx conf
Create the nginx folder again
mkdir nginx
Move conf to nginx
mv conf nginx/
Create the docker instance again
docker run -p 80:80 --name nginx \
-v /mydata/nginx/html:/usr/share/nginx/html \
-v /mydata/nginx/logs:/var/log/nginx \
-v /mydata/nginx/conf:/etc/nginx \
-d nginx:1.1.0
Set startup
docker update nginx --restart=always
visit http://http://30.37.112.250/
Access the HTML folder by default, and create index.html under the HTML folder HTML and write < H1 > Hello < / H1 >, and you can access it again
Create the folder es under the html folder, and test. In the ES folder Text, write Zhang San
Page access http://30.37.112.250/es/test.text To access
docker installs nacos (this is made by referring to the blog. It can be used. The download image is more than 700 megabytes)
download
docker pull nacos/nacos-server
Run (use standalone mode, open port 8848, and map configuration files and log directories)
docker run -d -p 8848:8848 -e MODE=standalone -v /opt/nacos/init.d:/home/nacos/init.d -v /opt/nacos/logs:/home/nacos/logs --restart always --name nacos nacos/nacos-server
Page access http: / / your ip address: 8848/nacos User name: nacos password: nacos
Advanced part
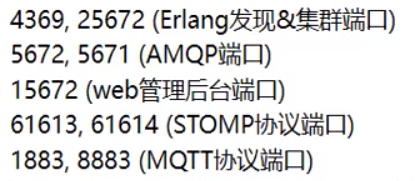
docker installing RabbitMQ
docker run -d --name rabbitmq -p 5671:5671 -p 5672:5672 -p 4369:4369 -p 25672:25672 -p 15671:15671 -p 15672:15672 rabbitmq:management
Appendix:
Command line completion plug-in
yum install bash-completion
If it is found that the docker cannot be completed, execute the following naming
source /usr/share/bash-completion/bash_completion
View the resources used by the docker container (CPU and memory occupied)
docker stats
ctrl+c exit
Software Baidu cloud disk address
JVM plug-in unit Visual GC
 Link: https://pan.baidu.com/s/1yu5cv3ZSMQIg9m1iW5w84Q
Extraction code: qkui

nacos-server
 Link: https://pan.baidu.com/s/1Ee_uzJ5sZWGQdU0C3Y4eZA
Extraction code: 87 b0
With Baidu cloud link and docker to install nacos, you don't need to see it below
Registry nacos (download address)
https://github.com/alibaba/nacos/releases
(the registration center can't download, use ip proxy) free proxy website
https://www.kuaidaili.com/free/
https://www.kuaidaili.com/free/inha/
http://www.66ip.cn/5.html
https://www.xicidaili.com/wt/