After understanding the basic principles and contents of Docker, we will officially start learning Docker. This chapter mainly introduces the image and container of Docker.
Part I review: introduction suggestions and basic principles of Docker Xiaobai. Next Preview: environment variables, data volumes, etc.
Now, let's start learning!
image
principle
If only the operating system attribute of Docker container is considered, then image = lightweight operating system installation package.
If the application software attribute of Docker container needs to be considered, the image = (lightweight operating system + application) installation package
For example: MySQL image = Virtual Linux operating system + MySQL
How does the image come into being?
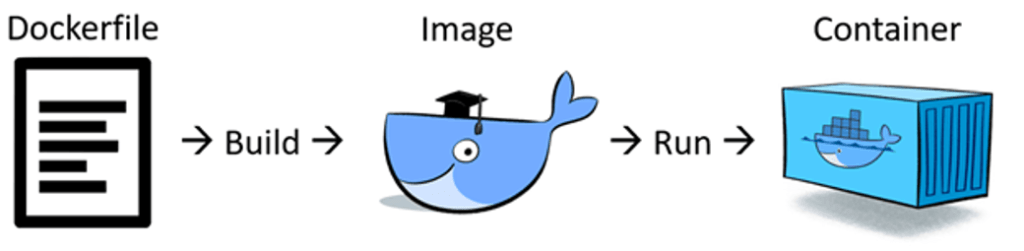
The user writes a Dockerfile and build s this file to generate an image.
Is a mirror a file?
Logically, an image can be simply understood as a file, but it is actually a combination of multiple layers of files.
Therefore, although the image is not a separate file, it can be exported as a compressed file:
# Export the image into a tarball file
docker save image

# Load a tarball image file
docker load image
Where are the images stored?
When running the container, Docker will look for whether to mirror the file from the / var/lib/docker/image directory.
If there is no image file, Docker will try to get the image from Dockerhub image warehouse (opens new window) Download to the local, and then run.
Warehouse
As we all know, DockerHub is the world's largest image warehouse officially operated by Docker.
In fact, in addition to DockerHub, there are many ways to build a warehouse:
Self built warehouse
Support self built warehouse. General cloud providers provide image warehouse services for customers to store their own private images.
Accelerated warehouse
If downloading an image from Dockerhub is very slow, you need to modify the warehouse address in the following ways:
Select or obtain your favorite domestic image warehouse (acceleration address)
#1 Docker Chinese community
https://registry.docker-cn.com

#2. Netease warehouse
http://hub-mirror.c.163.com

#3 Tencent warehouse
https://mirror.ccs.tencentyun.com

#4 Alibaba cloud warehouse
https://f53jxx8r.mirror.aliyuncs.com
The above Alibaba cloud warehouse acceleration address is for reference only. It is recommended to log in to the console and start from the background Get (opens new window) obtain
Modify / etc / docker / daemon JSON file (can be added if there is no one), insert the following value
{
  "registry-mirrors": ["https://f53jxx8r.mirror.aliyuncs.com"]
}
Effective after service restart
sudo systemctl daemon-reload
sudo systemctl restart docker
Docker supports configuring multiple warehouse addresses, similar to:
{
  "registry-mirrors": ["https://registry.docker-cn.com","https://f53jxx8r.mirror.aliyuncs.com","https://docker.mirrors.ustc.edu.cn","http://hub-mirror.c.163.com"]
}
container
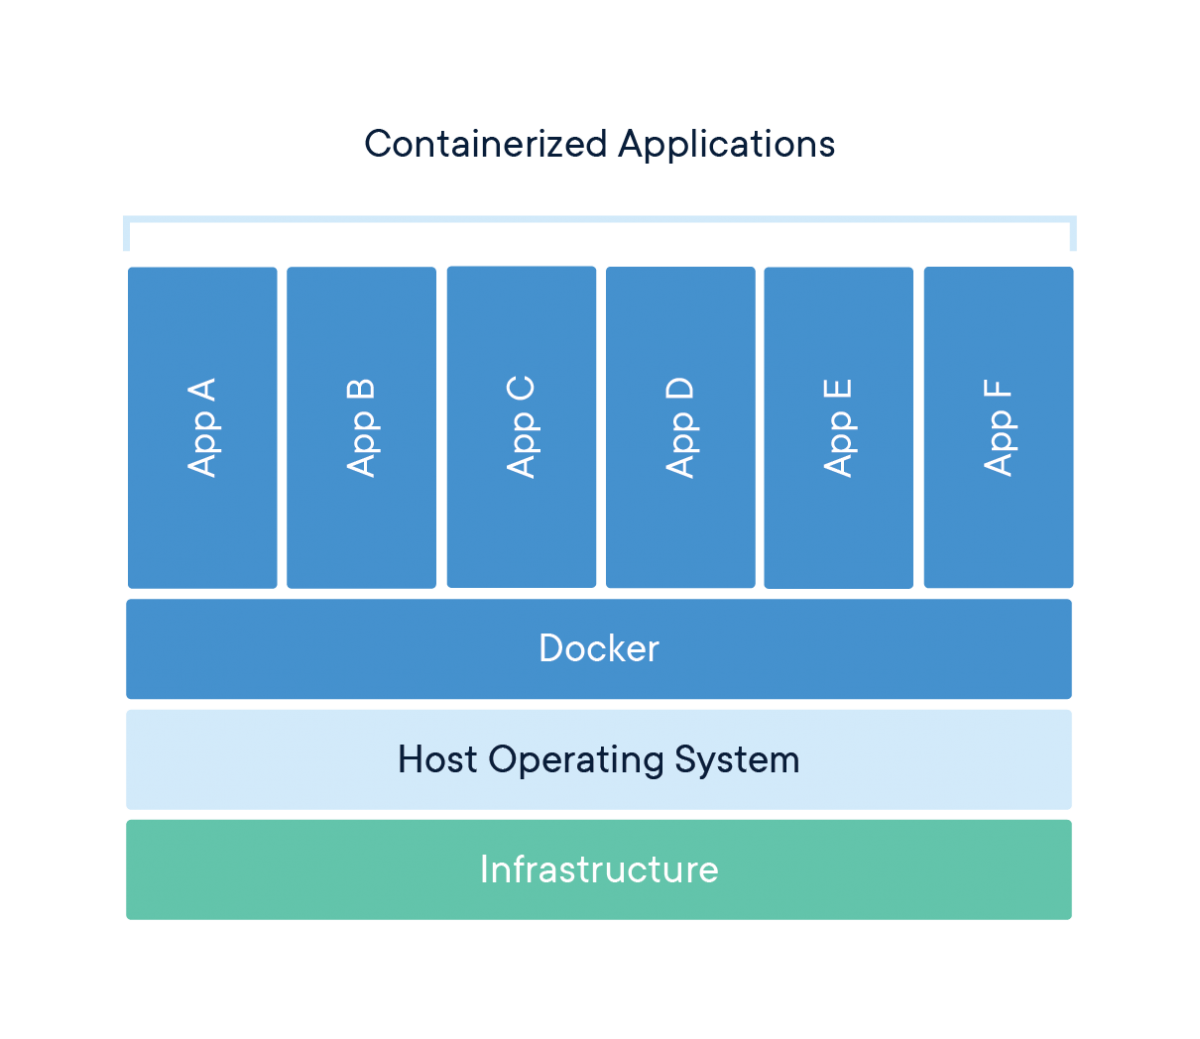
Container is the most important component of Docker. It has been mentioned many times above that container is a lightweight virtual machine.
Run container
Run the container through the docker run command. Its usage and parameters are as follows( Details (opens new window)).
Usage:  docker run [OPTIONS] IMAGE [COMMAND] [ARG...]

Run a command in a new container

Options:
      --add-host list                  Add a custom host-to-IP mapping (host:ip)
  -a, --attach list                    Attach to STDIN, STDOUT or STDERR
      --blkio-weight uint16            Block IO (relative weight), between 10 and 1000, or 0 to disable (default 0)
      --blkio-weight-device list       Block IO weight (relative device weight) (default [])
      --cap-add list                   Add Linux capabilities
      --cap-drop list                  Drop Linux capabilities
      --cgroup-parent string           Optional parent cgroup for the container
      --cgroupns string                Cgroup namespace to use (host|private)
                                       'host':    Run the container in the Docker host's cgroup namespace
                                       'private': Run the container in its own private cgroup namespace
                                       '':        Use the cgroup namespace as configured by the
                                                  default-cgroupns-mode option on the daemon (default)
      --cidfile string                 Write the container ID to the file
      --cpu-period int                 Limit CPU CFS (Completely Fair Scheduler) period
      --cpu-quota int                  Limit CPU CFS (Completely Fair Scheduler) quota
      --cpu-rt-period int              Limit CPU real-time period in microseconds
      --cpu-rt-runtime int             Limit CPU real-time runtime in microseconds
  -c, --cpu-shares int                 CPU shares (relative weight)
      --cpus decimal                   Number of CPUs
      --cpuset-cpus string             CPUs in which to allow execution (0-3, 0,1)
      --cpuset-mems string             MEMs in which to allow execution (0-3, 0,1)
  -d, --detach                         Run container in background and print container ID
      --detach-keys string             Override the key sequence for detaching a container
      --device list                    Add a host device to the container
      --device-cgroup-rule list        Add a rule to the cgroup allowed devices list
      --device-read-bps list           Limit read rate (bytes per second) from a device (default [])
      --device-read-iops list          Limit read rate (IO per second) from a device (default [])
      --device-write-bps list          Limit write rate (bytes per second) to a device (default [])
      --device-write-iops list         Limit write rate (IO per second) to a device (default [])
      --disable-content-trust          Skip image verification (default true)
      --dns list                       Set custom DNS servers
      --dns-option list                Set DNS options
      --dns-search list                Set custom DNS search domains
      --domainname string              Container NIS domain name
      --entrypoint string              Overwrite the default ENTRYPOINT of the image
  -e, --env list                       Set environment variables
      --env-file list                  Read in a file of environment variables
      --expose list                    Expose a port or a range of ports
      --gpus gpu-request               GPU devices to add to the container ('all' to pass all GPUs)
      --group-add list                 Add additional groups to join
      --health-cmd string              Command to run to check health
      --health-interval duration       Time between running the check (ms|s|m|h) (default 0s)
      --health-retries int             Consecutive failures needed to report unhealthy
      --health-start-period duration   Start period for the container to initialize before starting health-retries countdown (ms|s|m|h) (default 0s)
      --health-timeout duration        Maximum time to allow one check to run (ms|s|m|h) (default 0s)
      --help                           Print usage
  -h, --hostname string                Container host name
      --init                           Run an init inside the container that forwards signals and reaps processes
  -i, --interactive                    Keep STDIN open even if not attached
      --ip string                      IPv4 address (e.g., 172.30.100.104)
      --ip6 string                     IPv6 address (e.g., 2001:db8::33)
      --ipc string                     IPC mode to use
      --isolation string               Container isolation technology
      --kernel-memory bytes            Kernel memory limit
  -l, --label list                     Set meta data on a container
      --label-file list                Read in a line delimited file of labels
      --link list                      Add link to another container
      --link-local-ip list             Container IPv4/IPv6 link-local addresses
      --log-driver string              Logging driver for the container
      --log-opt list                   Log driver options
      --mac-address string             Container MAC address (e.g., 92:d0:c6:0a:29:33)
  -m, --memory bytes                   Memory limit
      --memory-reservation bytes       Memory soft limit
      --memory-swap bytes              Swap limit equal to memory plus swap: '-1' to enable unlimited swap
      --memory-swappiness int          Tune container memory swappiness (0 to 100) (default -1)
      --mount mount                    Attach a filesystem mount to the container
      --name string                    Assign a name to the container
      --network network                Connect a container to a network
      --network-alias list             Add network-scoped alias for the container
      --no-healthcheck                 Disable any container-specified HEALTHCHECK
      --oom-kill-disable               Disable OOM Killer
      --oom-score-adj int              Tune host's OOM preferences (-1000 to 1000)
      --pid string                     PID namespace to use
      --pids-limit int                 Tune container pids limit (set -1 for unlimited)
      --platform string                Set platform if server is multi-platform capable
      --privileged                     Give extended privileges to this container
  -p, --publish list                   Publish a container's port(s) to the host
  -P, --publish-all                    Publish all exposed ports to random ports
      --pull string                    Pull image before running ("always"|"missing"|"never") (default "missing")
      --read-only                      Mount the container's root filesystem as read only
      --restart string                 Restart policy to apply when a container exits (default "no")
      --rm                             Automatically remove the container when it exits
      --runtime string                 Runtime to use for this container
      --security-opt list              Security Options
      --shm-size bytes                 Size of /dev/shm
      --sig-proxy                      Proxy received signals to the process (default true)
      --stop-signal string             Signal to stop a container (default "SIGTERM")
      --stop-timeout int               Timeout (in seconds) to stop a container
      --storage-opt list               Storage driver options for the container
      --sysctl map                     Sysctl options (default map[])
      --tmpfs list                     Mount a tmpfs directory
  -t, --tty                            Allocate a pseudo-TTY
      --ulimit ulimit                  Ulimit options (default [])
  -u, --user string                    Username or UID (format: <name|uid>[:<group|gid>])
      --userns string                  User namespace to use
      --uts string                     UTS namespace to use
  -v, --volume list                    Bind mount a volume
      --volume-driver string           Optional volume driver for the container
      --volumes-from list              Mount volumes from the specified container(s)
  -w, --workdir string                 Working directory inside the container
Let's introduce how to run a container through a simple example:
Find a Docker image, for example: MySQL(opens new window)
Run the following command to start a MySQL container
docker run --name mysql -e MYSQL_ROOT_PASSWORD=123456 -d mysql:tag
After the container runs successfully, run the following commands to start using MySQL client commands
docker exec -it mysql mysql -uroot -p123456
In the above example, we complete the following work:
- Find the solution to run the container through the image page
- Run a container
- Enter a container
create mirror
The principle of Docker shows that the kernel of the container has some invariable files shared by Docker images, and the other part is variable files.
Therefore, containers can also be easily converted into images. The specific operations are as follows:
Run the docker ps command to get the ID number of the container
Export containers as compressed files
# Export container to tarball file
docker export -o mysql-`date +%Y%m%d`.tar f9fc8627b7fe

# see file
ls mysql-`date +%Y%m%d`.tar
Convert compressed files to images
docker import mysql-20210416.tar mysql-test
Run the docker image ls command to view the image that has just been converted successfully
 $ docker image ls
 REPOSITORY                                                    TAG              IMAGE ID       CREATED         SIZE
 mysql-test                                                    latest           05cb947f5572   5 seconds ago   209MB
Functionally speaking, docker export is equivalent to commit + save. First commit the container into an image, and then save it into a file.
The second part: environment variables, data volumes, etc. I look forward to your continuing study with Xiao Jiu~
This paper consists of Websoft9 Original release, reprint, please indicate the source.