Dockerfile constructed by Docker image
The most common way to build images in Docker is to use dockerfile. Dockerfile is a text file used to build an image. The text content contains instructions and instructions required to build an image one by one. Official documents: https://docs.docker.com/engine/reference/builder/
Introduction part
-
What is Dockerfile?
- Dockerfile is a build file used to build Docker images. It is a script composed of a series of commands and parameters
- Build image by instruction
-
The instruction, the image operator and the basic information of the container are divided into four parts.
-
Steps to build Dockerfile
- Write Dockerfile file
- Docker build image
- docker run create container
-
Precautions for Dockfile files
- Docker runs the instructions of Dockerfile FROM top to bottom. In order to specify the base image, the first instruction must be FROM.
- Each reserved word instruction must be in uppercase and be followed by at least one parameter
- The instructions are executed from top to bottom
- Each instruction can be # annotated
- Each instruction creates a new mirror layer and commits the mirror
-
Reserved word instruction of dockerfile
- Main reserved instructions:
- FROM
- RUN
- ADD
- COPY
- WORKDIR
- CMD
Generally, the above reserved word instructions can be used to complete the desired functions of the container. All fields are as follows.
- Main reserved instructions:
| instructions | meaning |
|---|---|
| FROM | Specify the base image, which must be the first command |
| MAINTAINER | Maintainer information |
| RUN | Command executed when building image docker build |
| ADD | Add local files to the container, and tar files will be automatically decompressed (network compressed resources will not be decompressed) |
| COPY | The function is similar to ADD, but it will not automatically decompress files or access network resources |
| CMD | If there are multiple commands that will be executed when docker run s, only the last one will take effect. |
| LABEL | Used to add metadata to the image |
| ENV | Setting environment variables |
| EXPOSE | Specify the port for external interaction |
| VOLUME | Used to specify the persistent directory |
| WORKDIR | Working directory, similar to cd command |
| ARG | Specifies the variables passed to the build runtime |
| ONBUILD | Used to set the mirror trigger |
2, Detailed explanation of reserved word instruction of Dockerfile
1.FROM
- The basic (dependent) image is the image on which the current image to be created is based
- The basic syntax is as follows:
FROM <image>
FROM <image>:<tag>
FROM <image>@<digest>
Example:
	FROM mysql:5.6
# Note: tag or digest are optional. If these two values are not used, the latest version of the basic image will be used

If it is not based on any image, it is written as follows: FROM scratch. Official description: scratch An image is an empty image that can be used to build busybox And other ultra-small images can be said to really build their own images from scratch.
2.MAINTAINER
- Indicate the image maintainer and its contact information (generally e-mail address). The official instructions are outdated and LABEL is recommended.
Format:
	MAINTAINER <name>
Example:
    MAINTAINER Jasper Xu MAINTAINER sorex@163.com
    MAINTAINER Jasper Xu <sorex@163.com>
3.LABEL
- Syntax: label < key > = < value > < key > = < value > < key > = < value >
- The function is to specify a LABEL for the image or add metadata for the image. You can also use LABEL to specify the mirror author.
🔰Example: metadata
LABEL version="1.0" description="This is a Web The server" by="IT record"

🔰Note: use "LABEL" When specifying metadata, a "LABEL" When the metadata is different, you can specify one or more spaces to separate the metadata. It is recommended to pass all metadata through one "LABEL" Directive to avoid generating too many intermediate images LABEL
Example 2
maintainer="http://blog.taoxiaoxin.club/"
4.RUN
- Commands to run when building containers
# RUN is used to execute commands in the image container. There can be multiple runs in a Dockerfile file, which has the following two command execution methods:
shell implement
	Format: RUN <command>
exec implement
	Format: RUN ["executable", "param1", "param2"]
	Example:
		 RUN ["executable", "param1", "param2"]
		 RUN apk update RUN ["/etc/execfile", "arg1", "arg1"]
Note: RUN The intermediate image created by the instruction will be cached and used in the next build. If you do not want to use these cache images, you can specify them at build time--no-cache Parameters, such as: docker build --no-cache
5.EXPOSE
- Expose the listening port of the container to the outside. You can specify whether the port listens to TCP or UDP. If no protocol is specified, it defaults to TCP.
🍉Format:
EXPOSE <port> [<port>...]
🔰Example:
EXPOSE 80 443
EXPOSE 8080
EXPOSE 11211/tcp 11211/udp

🔰Note:"EXPOSE" The port of the container is not allowed to access the host. If you want to have a mapping relationship between the container and the port of the host, you need to" docker run" Pass when running container"-p" To publish these ports, or through"-P" Parameters to publish" EXPOSE" All ports exported,
6.WORKDIR
- Specify the working directory of the terminal by default after the container is created, that is, the foothold. Set the working directory for RUN, CMD, ENTRYPOINT, COPY AND and AND.
🍉Format:
WORKDIR /path/to/workdir
🔰Example:
WORKDIR /a (At this time, the working directory is/a)
WORKDIR b (At this time, the working directory is/a/b)
WORKDIR c (At this time, the working directory is/a/b/c)

🔰Note: passed "WORKDIR" After setting the working directory,"Dockerfile" Subsequent commands in RUN,CMD,ENTRYPOINT,ADD,COPY And other commands will be executed in this directory. in use "docker run" When you run the container, you can"-w" Parameter overrides the working directory set at build time
7.ENV
- Used to set environment variables during image building
🍉Format:
ENV <key> <value>
#Everything after < key > will be regarded as part of its < value >, so only one variable can be set at a time
ENV <key>=<value> ...
#Multiple variables can be set, and each variable is a key value pair of "< key > = < value >". If < key > contains spaces, you can use \ to escape or mark with ""; In addition, backslashes can also be used for continuation
🔰Example:
ENV myName John Doe
ENV myDog Rex The Dog
ENV myCat=fluffy
8.ADD
- Copy the files in the host directory to the image (tar compressed package will be decompressed automatically). src can be a local file or a local compressed file, and the compressed file will be decompressed automatically. It can also be a url. If src is written as a url, ADD is similar to wget command, and then it is automatically downloaded and decompressed.
🍉format:
ADD <src>... <dest>
ADD ["<src>",... "<dest>"]  # Used to support paths with spaces
🔰Example:
ADD hom* /mydir/            # Add all files starting with "hom"
ADD hom?.txt /mydir/        # ?  Replace a single character, for example: "home.txt"
ADD test relativeDir/       # Add "test" to 'workdir' / relativedir/
ADD test /absoluteDir/      # Add "test" to / absoluteDir/
9.COPY
- Similar to ADD, copy local files to the image (not automatically decompressed)
Instruction: COPY
 Function Description: copy files to the image.
Syntax: COPY < src>... < dest>|["< src>",... "< dest>"]
Tip: instruction logic and ADD Very similar, same Docker Daemon Will look for files or directories from the compilation directory, dest Is the absolute path in the mirror or relative to WORKDIR The path of the.
10.VOLUME
- For directory mount
🍉Format:
VOLUME ["/path/to/dir"]
🔰Example:
VOLUME ["/data"]
VOLUME ["/var/www", "/var/log/apache2", "/etc/apache2"]

🔰Note: a volume can exist in a specified directory of one or more containers, which can bypass the federated file system and has the following functions:
1. Volumes can be shared and reused between containers
2. Containers do not have to share volumes with other containers
3. Changes to the volume take effect immediately
4. Modifications to the volume have no effect on the mirror
5. The volume exists until no container is using it
11.CMD (this instruction should be placed at the end)
- Specifies the command to run when the container starts
🍉Format:
CMD ["executable","param1","param2"] (Executable document, priority)
CMD ["param1","param2"] (Set ENTRYPOINT,Directly call ENTRYPOINT Add parameter)
CMD command param1 param2 (implement shell Internal command)
🔰Example:
CMD echo "This is a test." | wc -w
CMD ["/usr/bin/wc","--help"]

🔰Note: "CMD" differ "RUN","CMD" Used to specify the command to be executed when the container starts, and "RUN" Specifies the command to be executed when the image is built
12.ONBUILD
- Used to set the mirror trigger
🍉Format:
ONBUILD [INSTRUCTION]
🔰Example:
ONBUILD ADD . /app/src
ONBUILD RUN /usr/local/bin/python-build --dir /app/src

🔰Note: when the constructed image is used as the basic image of other images, the trigger in the image will be triggered
3, Build image
After the Dockerfile file is written, you need to use the docker build command to build the image.
The docker build command is used to create an image using Dockerfile.
# Create an image using the Dockerfile of the current directory
docker build -t mycentos:7 .
# Create an image from the location of the -f Dockerfile file
docker build -f /usr/local/dockerfile/Dockerfile -t mycentos:7 .
- -f: Specify the Dockerfile path to use;
- --tag, -t: the name and label of an image. You can set multiple labels for an image in a single build.
About understand
When we use the docker build command to build an image, we often see that there will be one at the end of the command number. What exactly does it mean?
Many people think it is used to specify the location of Dockerfile, but in fact, the - f parameter is used to specify the path of Dockerfile What is the number used for?
Docker is divided into docker engine (server daemon) and client tools when running. We use various docker commands every day. In fact, we are using client tools to interact with docker engine.
When we use the docker build command to build the image, the construction process is actually completed in the Docker engine, not in the native environment. If some ADD and other instructions are used in Dockerfile to operate files, how can Docker engine get these files?
Here is a concept of image construction context. When constructing, the user specifies the context path when constructing the image, and docker build will package and upload all the files under this path to the Docker engine. After expanding these contents in the engine, the files in the context can be obtained.
Take chestnuts for example: the jdk file of my host computer is in the / root directory and the Dockerfile file is in the / usr/local/dockerfile directory. The contents of the file are as follows:
ADD jdk-11.0.6_linux-x64_bin.tar.gz /usr/local/java
Then the command when building an image should be written as follows:
docker build -f /usr/local/dockerfile/Dockerfile -t mycentos:7 /root
Another example: my host jdk file and Dockerfile file are in / usr/local/dockerfile directory. The file contents are as follows:
ADD jdk-11.0.6_linux-x64_bin.tar.gz /usr/local/java
Then the command for building an image reads as follows:
docker build -f /usr/local/dockerfile/Dockerfile -t mycentos:7 .
4, Dockerfile practice
Next, we use the basic image centos:7. After installing jdk and tomcat in the image, we make it a new image mycentos:7.
Create a directory.
mkdir -p /usr/local/dockerfile
Write Dockerfile file.
vi Dockerfile
Dockerfile file contents are as follows:
# Indicates that the new image is from centos:7 basic image
FROM centos:7
# The author information is declared through the image label
LABEL maintainer="mrhelloworld.com"
# Set working directory
WORKDIR /usr/local
# Create the specified directory after the new image is successfully built
RUN mkdir -p /usr/local/java && mkdir -p /usr/local/tomcat
# Copy the file to the image and unzip it
ADD jdk-11.0.6_linux-x64_bin.tar.gz /usr/local/java
ADD apache-tomcat-9.0.37.tar.gz /usr/local/tomcat
# Expose the 8080 listening port when the container is running to the outside
EXPOSE 8080
# Set Java in container_ Home environment variable
ENV JAVA_HOME /usr/local/java/jdk-11.0.6/
ENV PATH $PATH:$JAVA_HOME/bin
# Start tomcat when starting the container
CMD ["/usr/local/tomcat/apache-tomcat-9.0.37/bin/catalina.sh", "run"]
Build a mirror.
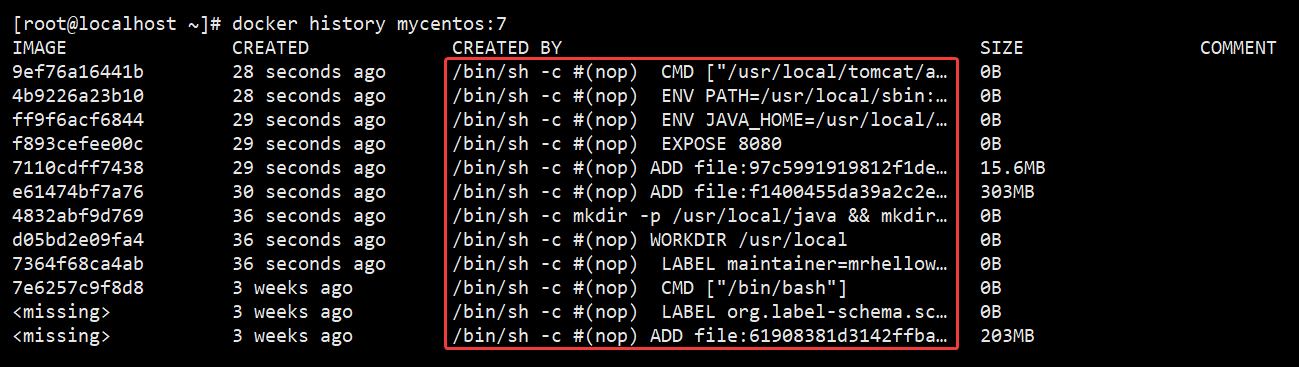
[root@localhost ~]# docker build -f /usr/local/dockerfile/Dockerfile -t mycentos:7 /root/
Sending build context to Docker daemon  191.4MB
Step 1/10 : FROM centos:7
 ---> 7e6257c9f8d8
Step 2/10 : LABEL maintainer="mrhelloworld.com"
 ---> Running in 3f18aa4f3fb2
Removing intermediate container 3f18aa4f3fb2
 ---> 7364f68ca4ab
Step 3/10 : WORKDIR /usr/local
 ---> Running in d9889152cfc4
Removing intermediate container d9889152cfc4
 ---> d05bd2e09fa4
Step 4/10 : RUN mkdir -p /usr/local/java && mkdir -p /usr/local/tomcat
 ---> Running in 3bcd6ef78350
Removing intermediate container 3bcd6ef78350
 ---> 4832abf9d769
Step 5/10 : ADD jdk-11.0.6_linux-x64_bin.tar.gz /usr/local/java
 ---> e61474bf7a76
Step 6/10 : ADD apache-tomcat-9.0.37.tar.gz /usr/local/tomcat
 ---> 7110cdff7438
Step 7/10 : EXPOSE 8080
 ---> Running in a4731c1cf77d
Removing intermediate container a4731c1cf77d
 ---> f893cefee00c
Step 8/10 : ENV JAVA_HOME /usr/local/java/jdk-11.0.6/
 ---> Running in f0cb08f390db
Removing intermediate container f0cb08f390db
 ---> ff9f6acf6844
Step 9/10 : ENV PATH $PATH:$JAVA_HOME/bin
 ---> Running in eae88cf841d0
Removing intermediate container eae88cf841d0
 ---> 4b9226a23b10
Step 10/10 : CMD ["/usr/local/tomcat/apache-tomcat-9.0.37/bin/catalina.sh", "run"]
 ---> Running in ccf481045906
Removing intermediate container ccf481045906
 ---> 9ef76a16441b
Successfully built 9ef76a16441b
Successfully tagged mycentos:7
5, Mirror construction history
docker history Image name:label|ID
docker history mycentos:7
6, Create a container using the built image
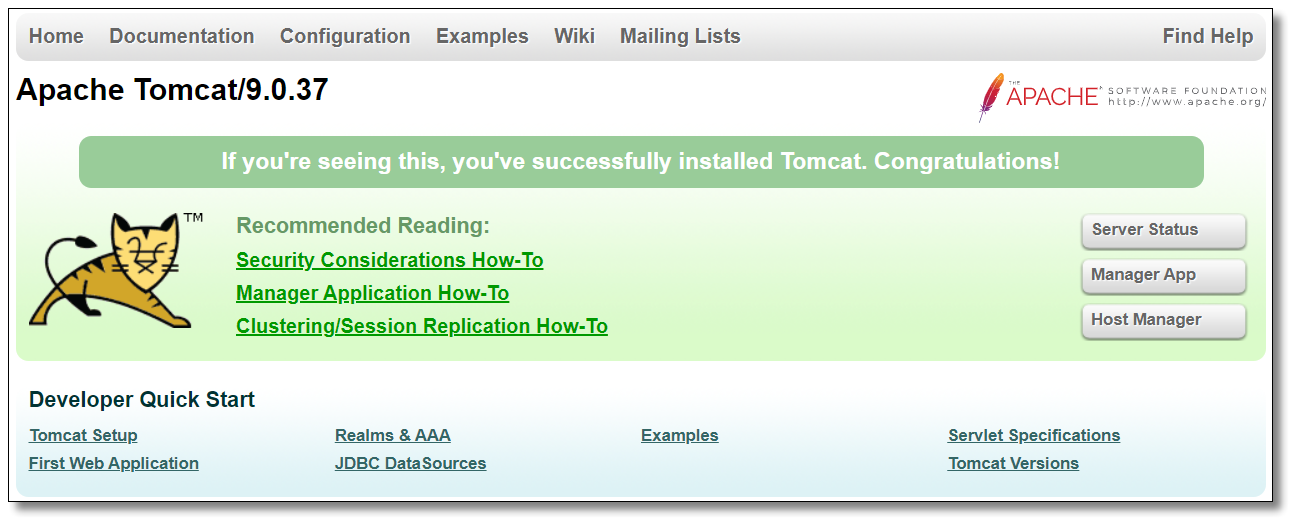
# Create container
docker run -di --name mycentos7 -p 8080:8080 mycentos:7
# Enter container
docker exec -it mycentos7 /bin/bash
# Test java environment variables
[root@dcae87df010b /]# java -version
java version "11.0.6" 2020-01-14 LTS
Java(TM) SE Runtime Environment 18.9 (build 11.0.6+8-LTS)
Java HotSpot(TM) 64-Bit Server VM 18.9 (build 11.0.6+8-LTS, mixed mode)
# visit http://192.168.10.10:8080/ See the page description environment OK!
7, Dockerfile training
1. Deploy nginx services using centos7 as the basic image
- First create an nginx Repo file
# vim nginx.repo
'''Document content
[nginx-stable]
name=nginx stable repo
baseurl=http://nginx.org/packages/centos/$releasever/$basearch/
gpgcheck=1
enabled=1
gpgkey=https://nginx.org/keys/nginx_signing.key
module_hotfixes=true

[nginx-mainline]
name=nginx mainline repo
baseurl=http://nginx.org/packages/mainline/centos/$releasever/$basearch/
gpgcheck=1
enabled=0
gpgkey=https://nginx.org/keys/nginx_signing.key
module_hotfixes=true
'''
- Write Dockerfile file
[root@shawn ~]# vim Dockerfile

# Specify the underlying mirror (dependent mirror)
FROM centos:7

# Execute a command
RUN yum install -y yum-utils

# Add local files to container
ADD nginx.repo /etc/yum.repos.d/nginx.repo

# Update YUM cache
RUN yum makecache

# Installing nginx
RUN yum install -y nginx

# Make the default command for container startup
CMD nginx -g 'daemon off;'
- Build image
[root@shawn ~]# docker build -t install/nginx:v1 .
- View the image you just built, and then the instance container
[root@shawn ~]# docker images
[root@shawn ~]# docker run -dit install/nginx:v1 sh
- View the container just out of the instance and enter it
[root@shawn ~]# docker exec -it 94f8e35f3357 bash
- Check whether nginx is successfully deployed
[root@shawn ~]# crul 127.0.0.1 # The html code indicates that the deployment is successful
2. Compile and install nginx service in container
- Edit Dockerfile file
[root@shawn ~]# vim Dockerfile
'''Document content
# Specify the underlying mirror (dependent mirror)
FROM centos:7

# Execute command
RUN yum install yum-utils wget zlib zlib-devel pcre pcre-devel make gcc gcc-c++
RUN cd /opt && wget http://nginx.org/download/nginx-1.18.0.tar.gz && tar -xvf nginx.1.18.0/ && cd nginx-1.18.0/ && ./configure && make && make install

# Specifies the default working directory to enter the container
WORKDIR /usr/local/nginx/sbin

# Specifies that the container starts the default command
CMD ./nginx -g 'daemon off;'
'''
- Build image
[root@shawn ~]# docker build -t yuan/install/nginx:v2 .
- Check whether the build is successful, and the instance out of the container
[root@shawn ~]# docker images
[root@shawn ~]# docker run -dit --name yuan_nginx yuan/install/nginx:v2 sh
- Check whether the container starts successfully and test nginx
[root@shawn ~]# docker exec yuan_nginx crul 127.0.0.1 # The html code indicates that the deployment is successful
3. Build a service with Centos as the dependent image and install Django
- First, build a Dockerfile file
[root@shawn ~]#vim Dockerfile
# Specify base mirror
FROM centos:7
# Run command
RUN yum makecache && yum update -y && yum install -y python3 && pip3 install django
# Copy local files to container
COPY shawn /root/
# Specify the working directory to enter into the container
WORKDIR /root/
# Specifies the exposed port
EXPOSE 8080
# Run command
CMD cd ./shawn && python3 manage.py runserver 0.0.0.0:8080
- Construction of file shawn
Install on host Django
django-admin startproject shawn  #Create a "Shawn" project
cd ./shawn  #Enter directory
django-admin startapp application  #Start project
cd ./shawn
vim setting.cong  #Modify profile '*' proxy
cd .. #sign out
- Build image
[root@shawn ~]#docker build -t test333:v1 .
- View and instantiate the container using the image
[root@shawn ~]#docker images
[root@shawn ~]#docker run -dit --name test001 -p 9999:8080 test333:v1 sh
- View the newly opened container and enter the container to start the Django service
[root@shawn ~]#docker exec -it test001 bash
[root@80f1315c030c ~]# python3 manage.py runserver 0.0.0.0:8080
Watching for file changes with StatReloader
Performing system checks...

System check identified no issues (0 silenced).
December 04, 2020 - 06:50:19
Django version 3.1.4, using settings 'lingxiu.settings'
Starting development server at http://0.0.0.0:8080/
Quit the server with CONTROL-C.
- Use the browser to verify

3. Build a python dependent image and install the Django service
- Edit Dockerfile file
[root@shawn ~]# vim Dockerfile
'''Document content
# Specify dependent mirror
FROM python:3.6

# Set author
MAINTAINER Shawn

# Execute command
RUN /usr/local/bin/python -m pip install --upgrade pip
RUN pip3 install django==2.2.2

# Copy file
COPY app /root/

# Set working directory
WORKDIR /root/

# Execute command
CMD cd ./app && python3 manage.py runserver 0.0.0.0:7777
- Construction of file app
Install on host Django
django-admin startproject app  #Create an "app" project
cd ./app  #Enter directory
django-admin startapp application  #Start project
cd ./app
vim setting.cong  #Modify profile '*' proxy
cd .. #sign out
- Build image
[root@shawn ~]#docker build -t jjjj .
- View and instantiate the container using the image
[root@shawn ~]#docker images
[root@shawn ~]#docker run -dit --name jjjjtest -p 4444:7777 jjjj:latest sh
- View the newly opened container and enter the container to start the Django service
[root@shawn ~]#docker exec -it jjjtest bash
root@b85f93fcc114:~# python3 manage.py runserver 0.0.0.0:7777
Watching for file changes with StatReloader
Performing system checks...

System check identified no issues (0 silenced).
December 04, 2020 - 10:17:51
Django version 2.2.2, using settings 'app.settings'
Starting development server at http://0.0.0.0:7777/
Quit the server with CONTROL-C.
- Use the browser to check

4. Use NGINX to proxy Django
- First build a Django service, and the steps are the same as the previous example
- Changed the exposed port
🎅to write "Dockerfile" file
[root@shawn DjangoDocker]#vim Dockerfile
'''Document content
# Mirror dependency assignment
FROM pyhton:3.6

# Install Django
RUN /usr/local/bin/python -m pip install --upgrade pip
RUN pip3 install django==2.2.2

# COPY file
COPY app /root/

# assign work directory
WORKDIR /root/

# Run command
CMD cd ./app && python3 manage.py runserver 0.0.0.0:8080
'''
[root@shawn DjangoDocker]#ls
app  Dockerfile  # These two files, "app", were built in the previous example

🎅Build image,And view
[root@shawn DjangoDocker]#docker build -t python_django:v6 .
[root@shawn DjangoDocker]#docker images

🎅Instance out container,And view
[root@shawn DjangoDocker]#docker run -dit --name p_d_test1 -p 8888:8080 python_django:v6 sh
6906ff9e3ec0f9d583eb27890d82c79deff4358a43e5f1ec768a702547d020bf
[root@shawn DjangoDocker]#docker ps

🎅Into the container,Open service,Retest
[root@shawn DjangoDocker]#docker exec -it p_d_test1 bash
root@6906ff9e3ec0:~# python3 manage.py runserver 0.0.0.0:8080
[root@shawn DjangoDocker]#curl 127.0.0.1:8888
- Then write nginx service and proxy configuration
🎅to write "nginx.repo" file
[root@shawn NginxDocker]#vim nginx.repo
'''Document content(The official website can be copied)
[nginx-stable]
name=nginx stable repo
baseurl=http://nginx.org/packages/centos/$releasever/$basearch/
gpgcheck=1
enabled=1
gpgkey=https://nginx.org/keys/nginx_signing.key
module_hotfixes=true

[nginx-mainline]
name=nginx mainline repo
baseurl=http://nginx.org/packages/mainline/centos/$releasever/$basearch/
gpgcheck=1
enabled=0
gpgkey=https://nginx.org/keys/nginx_signing.key
module_hotfixes=true
'''

🎅to write "default.conf" file(agent"Django"to configure)
[root@shawn NginxDocker]#vim default.conf
'''Document content
server {
        listen 80;
        server_name www.py16zxl.com;

        location / {
        # Here is the access address and port (mapping port) of Django service
        proxy_pass http://192.168.13.234:8888/;
        index index.html index.htm index.jsp;
        }
}
'''

🎅to write "Dockerfile" file
[root@shawn NginxDocker]#vim Dockerfile
'''Document content
# Specify dependency
FROM centos:7

# Designated author
MAINTAINER shawn

# Installation dependency
RUN yum install -y yum-utils gcc gcc-c++ pcre pcre-devel zlib zlib-devel make wget

## Source installation nginx1 eighteen
# RUN wget http://nginx.org/download/nginx-1.18.0.tar.gz && tar -xvf nginx-1.18.0.tar.gz && cd nginx.1.18.0 && ./configure --prefix="/usr/local/nginx-1.18.0" && make && make install

# Copy NGINX configuration file
COPY nginx.repo /etc/yum.repos.d/

# Update yum package index
RUN yum makecache fast

# Install nginx using yum or up2date
RUN yum install -y nginx

# Specifies the exposed port
EXPOSE 8000

# Copy nginx default configuration file
COPY default.conf /etc/nginx/conf.d/

# Command to run the container
CMD /usr/local/nginx-1.18.0/sbin/nginx -g 'daemon off;'
'''

🎅Currently required files
[root@shawn NginxDocker]#ls
default.conf  Dockerfile  nginx.repo

🎅Start building images,And view
[root@shawn NginxDocker]#docker build -t nginx_d:v7 .
[root@shawn NginxDocker]#docker images

🎅Instantiate container,And view
[root@shawn NginxDocker]#docker run -dit --name nginx_d -p 80:80 nginx_d:v7 sh
[root@shawn NginxDocker]#docker ps

🎅Enter container,open "nginx" service,And verify
[root@shawn NginxDocker]#docker exec -it nginx_d bash
[root@51f54c1d5abb /]#nginx
[root@shawn NginxDocker]#curl 127.0.0.1:80
# It is found that you can also access the Django page by visiting nginx
