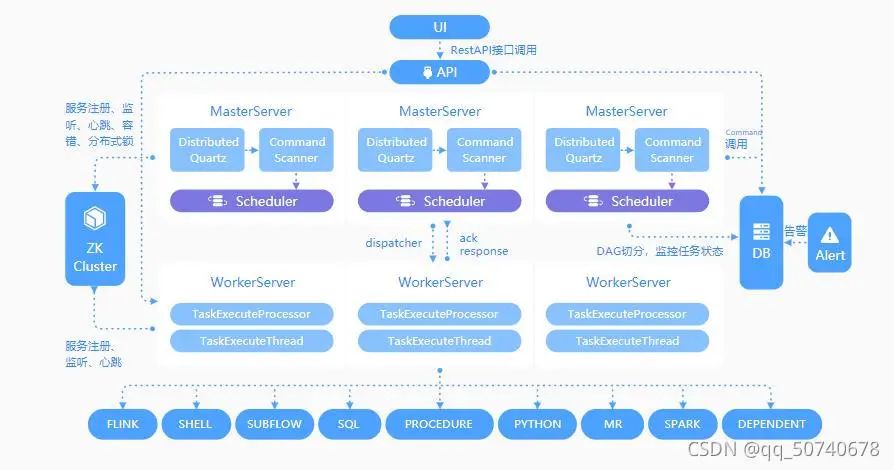
Dolphin scheduler architecture diagram
catalogue
1, Supplement
2, Deployment process
1. Download binary tar.gz package
2. Create deployment user and grant directory operation permission
3.ssh security free configuration
4. Database initialization
5. Modify operating parameters
6. One click deployment
7. Log in to the system
If you are not familiar with dolphin scheduler, you can refer to:
- Introduction and design principle of scheduling system Apache dolphin scheduler
- Dolphin scheduler distributed job management platform
1, Supplement
Install psmisc:
apt-get install psmisc
2, Deployment process
1. Download binary tar.gz package
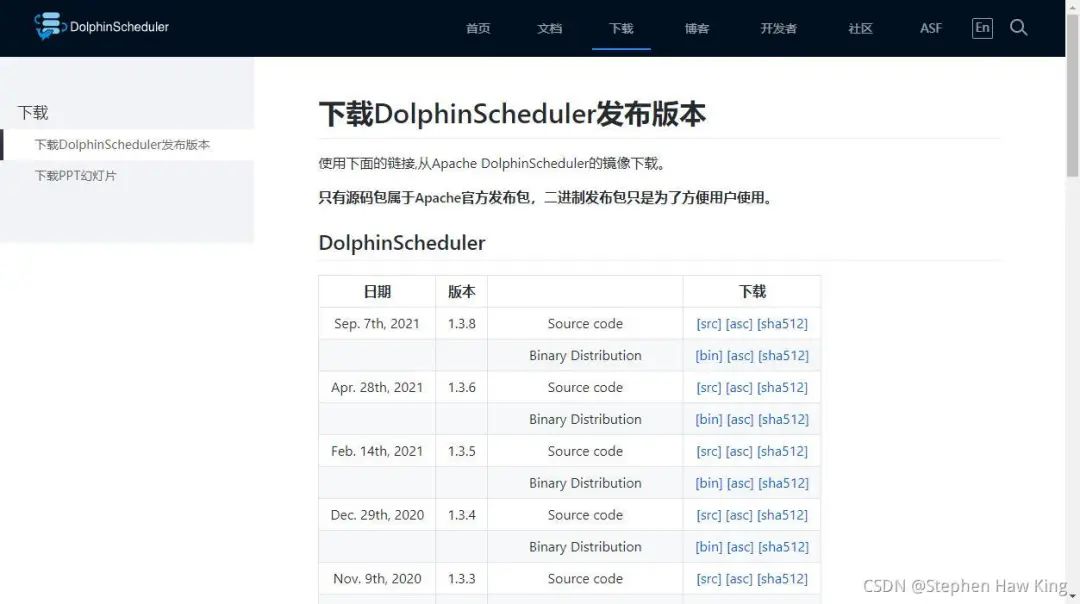
Download the latest version of back-end installation package to the server deployment directory. For example, create / opt / Dolphin scheduler as the installation deployment directory. The download address is: https://dlcdn.apache.org/dolphinscheduler/1.3.8/apache-dolphinscheduler-1.3.8-src.tar.gz After downloading, upload the tar package to this directory
Note: the bin file should be downloaded here
decompression
# Create a deployment directory. Please do not create high permission directories such as / root and / home
mkdir -p /opt/dolphinscheduler
cd /opt/dolphinscheduler

# decompression
tar -zxvf apache-dolphinscheduler-1.3.8-bin.tar.gz

#rename
mv apache-dolphinscheduler-1.3.8-bin  dolphinscheduler-bin
The author created the dolphin scheduler folder in / usr/local, uploaded and unzipped the installation package. Then rename the package to dolphin scheduler bin.
mkdir dolphinscheduler
cd dolphinscheduler

# decompression
tar -zxvf apache-dolphinscheduler-1.3.8-bin.tar.gz -C

#rename
mv apache-dolphinscheduler-1.3.8-bin  dolphinscheduler-bin
Attached:
View virtual machine ip address
ifconfig
The value followed by inet is the ip address
Then connect the virtual machine with filezilla and transfer the files
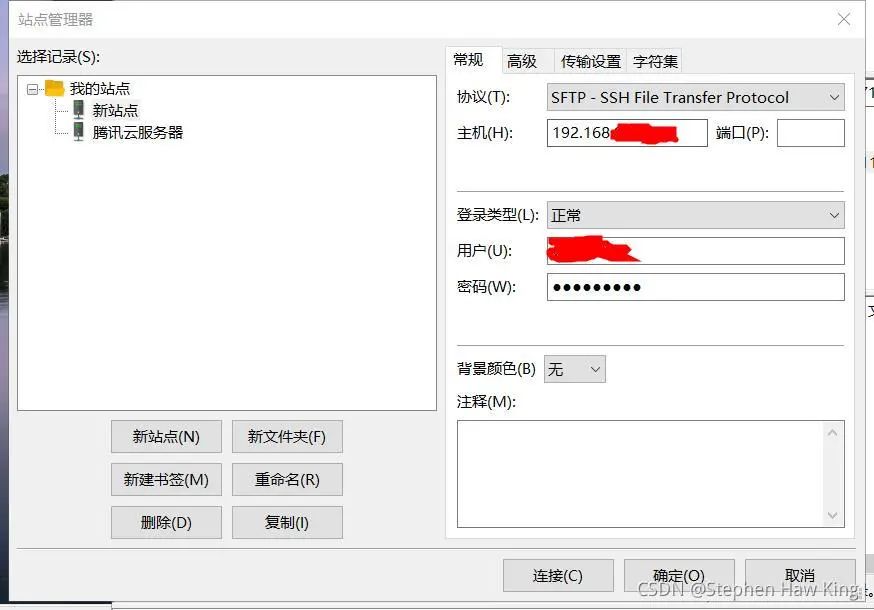
The host number is the result of the query just now. The protocol selects SFTP instead of the default FTP, and the user name is the user name of the virtual machine system instead of the terminal user of the linux terminal.
After the connection is successful, you can see the linux file directory and transfer the files by dragging.
The author encountered permission problems here:
filezilla reported an error:
command:    put "C:\Users\86136\Desktop\apache-dolphinscheduler-1.3.8-src.tar.gz" "apache-dolphinscheduler-1.3.8-src.tar.gz"
error:    /usr/local/dolphinscheduler/apache-dolphinscheduler-1.3.8-src.tar.gz: open for write: permission denied
 error:    File transfer failed
Authorize on virtual machine
sudo chmod 777 /usr/local/dolphinscheduler
Retransmit, problem solved.
In fact, directly dragging files into the virtual machine interface after installing filezilla can also realize file transfer, but as far as the author is concerned, this operation can occasionally succeed, but it often leads to system crash.
2. Create deployment user and grant directory operation permission
- Create deployment users, and be sure to configure sudo password free. Take creating a dolphin scheduler user as an example
# root login is required to create users
useradd dolphinscheduler

# Add password
echo "dolphinscheduler" | passwd --stdin dolphinscheduler

# Configure sudo security free
sed -i '$adolphinscheduler  ALL=(ALL)  NOPASSWD: NOPASSWD: ALL' /etc/sudoers
sed -i 's/Defaults    requirett/#Defaults    requirett/g' /etc/sudoers

# Modify the directory permissions so that the deployment user has operation permissions on the dolphin scheduler bin directory
chown -R dolphinscheduler:dolphinscheduler dolphinscheduler-bin
be careful:
- Because the task execution service implements multi tenant running jobs by sudo - u {linux user} switching different linux users, the deployment user needs sudo permission and is secret free. If beginners don't understand it, they can ignore it for the time being
- If you find the line "Defaults requirett" in the / etc/sudoers file, please also comment it out
- If resource upload is used, the deployment user needs to be assigned the permission to operate the local file system or HDFS or MinIO
Pit:
echo "dolphinscheduler" | passwd --stdin dolphinscheduler
This step will report an error. The passwd command in linux does not have the syntax of -- stdin
Should use
echo "dolphinscheduler:123456" | chpasswd
Modify the user dolphin scheduler password to 123456
In addition, the five instructions did not prompt success when they were run successfully for the first time.
3.ssh security free configuration
- Switch to the deployment user and configure ssh native password free login
su dolphinscheduler

ssh-keygen -t rsa -P '' -f ~/.ssh/id_rsa
cat ~/.ssh/id_rsa.pub >> ~/.ssh/authorized_keys
chmod 600 ~/.ssh/authorized_keys
Note: after normal setting, the dolphin scheduler user does not need to enter a password when executing the command ssh localhost
Pit: an error could not create directory '/ home / Dolphin scheduler /. SSH will be reported when running here
You need to create the dolphin scheduler directory under / home as root, and then create the. ssh directory in the dolphin scheduler,
Then switch back to dolphin scheduler user execution. In addition, you may need to authorize these directories.
4. Database initialization
- After entering the database, the default database is PostgreSQL. If MySQL is selected, you need to add the MySQL connector Java driver package to the lib directory of dolphin scheduler
MySQL connector java download website: MySQL:: Download connector / J
Pay attention to switching and downloading the linux version and pay attention to the corresponding version number.
The corresponding version here is mainly the ubuntu version rather than the linux version.
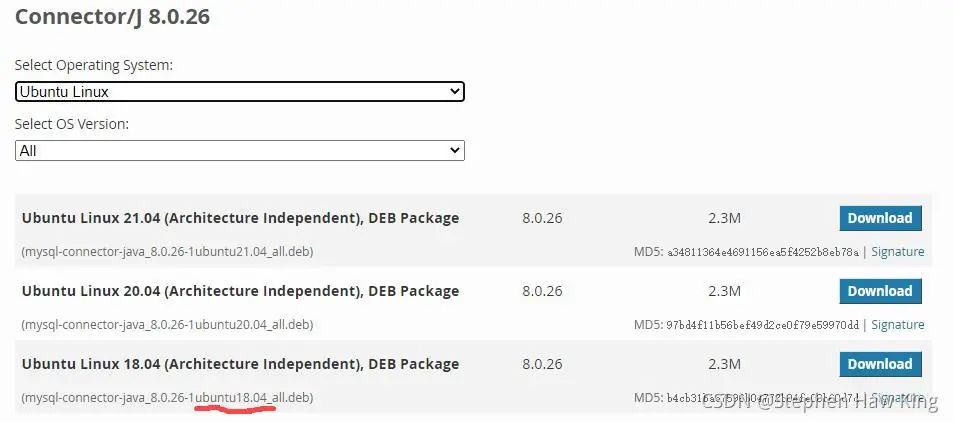
To view the ubuntu version:
cat /proc/version
The results are as follows:

Version 18.04 used by the author
After downloading, unzip it in the lib directory of dolphin scheduler
However, the author encountered a problem here. The result of decompressing the downloaded file seems unconventional, and it is impossible to simply tar unpack
The solution is to decompress it in windows, and then open the decompressed package. There is mysql-connector-java-8.0.26.jar we need in. / usr/share/java. Take it out and transfer it to the lib folder of linux.
Then execute the following instructions to enter the database:
#service mysql start
service mysql start

#Sign in
mysql -uroot -p
- Another problem is encountered here. Running service mysql start reports an error. Failed to start mysql.service: Unit mysql.service not found
- resolvent:
#Query whether mysql exists under / etc/init.d /. If there is no result, it means it does not exist
ll /etc/init.d/ | grep mysql

#Query the location of mysql.server
find / -name mysql.server

#Copy mysql.server, where / usr/local/mysql / is the author's MySQL installation directory
cp /usr/local/mysql/support-files/mysql.server /etc/init.d/mysql
- After entering the database command line window, execute the database initialization command and set the access account and password. Note: {user} and {password} need to be replaced with specific database user name and password
mysql> CREATE DATABASE dolphinscheduler DEFAULT CHARACTER SET utf8 DEFAULT COLLATE utf8_general_ci;
   mysql> GRANT ALL PRIVILEGES ON dolphinscheduler.* TO '{user}'@'%' IDENTIFIED BY '{password}';
   mysql> GRANT ALL PRIVILEGES ON dolphinscheduler.* TO '{user}'@'localhost' IDENTIFIED BY '{password}';
   mysql> flush privileges;
Note: if you need to view the user and password in mysql, you can use the following code
SELECT User, Host, Password FROM mysql.user;
Create tables and import basic data
Exit SQL first (press Ctrl+c)
Next, modify the following configuration in datasource.properties under the conf directory
cd /usr/local/dolphinscheduler/dolphinscheduler-bin

vi conf/datasource.properties
- If MySQL is selected, please comment (use '#') out the PostgreSQL related configuration (the same is true for the reverse). You also need to manually add the [MySQL connector Java driver jar] package to the lib directory. Here, Download MySQL connector java-5.1.47.jar, and then correctly configure the database connection related information
- Prompt: switch to the English input method, enter i to enter the modification state, press the direction key to change the cursor position, press Esc to exit the insertion state after completion, and then enter: wq save and exit q can be used to exit without saving.
  # postgre
  # spring.datasource.driver-class-name=org.postgresql.Driver
  # spring.datasource.url=jdbc:postgresql://localhost:5432/dolphinscheduler
  # mysql
  spring.datasource.driver-class-name=com.mysql.jdbc.Driver
  spring.datasource.url=jdbc:mysql://XXX: 3306 / Dolphin scheduler? Useunicode = true & characterencoding = UTF-8 & allowmultiqueries = true # if you need to modify the ip, you can modify the local localhost
  spring.datasource.username=xxx      # It needs to be modified to the above {user} value
  spring.datasource.password=xxx      # It needs to be modified to the above {password} value
- First comment out the code related to PostgreSQL, and then pay attention to modifying xxx here
- After modifying and saving, execute the script for creating tables and importing basic data under the script directory
sh script/create-dolphinscheduler.sh
Note: if the above script prompts an error of "/ bin/java: No such file or directory", please configure Java under / etc/profile_ Home and PATH variables
I happen to encounter similar problems here:
script/create-dolphinscheduler.sh: 37: script/create-dolphinscheduler.sh: /bin/java: not found
Let's follow the prompts to enter the profile file in the / etc folder for editing:
vi /etc/profile
Add the following code at the bottom:
JAVA_HOME=/usr/lib/jvm/java-8-openjdk-amd64
JRE_HOME=/usr/lib/jvm/java-8-openjdk-amd64/jre
PATH=$JAVA_HOME/bin:$JRE_HOME/bin:$PATH
CLASSPATH=.:$JAVA_HOME/lib/dt.jar:$JAVA_HOME/lib/tools.jar:$JRE_HOME/lib
export JAVA_HOME JRE_HOME PATH CLASSPATH
Of course, it may need to be modified due to the location and version of each person's jdk. If you used npm to install the jdk, it is likely that the jdk will be installed in the / usr/lib/jvm directory The java file address we need is: / usr/lib/jvm/java-8-openjdk-amd64/bin/java (it may be slightly different here)
: wq save exit.
Then type the following code:
source /etc/profile   //Make changes effective immediately
echo $JAVA_HOME //View Java_ Value of home
javac -version
The first article makes the settings effective, and the second and third articles verify whether the configuration is successful.
5. Modify operating parameters
- Modify the dolphin scheduler in the / usr / local / Dolphin scheduler / Dolphin scheduler bin / conf / env directory_ Env.sh environment variable (take / opt/soft as an example)
vi /usr/local/dolphinscheduler/dolphinscheduler-bin/conf/env/dolphinscheduler_env.sh
Note export SPARK_HOME1=/opt/soft/spark1
export DATAX_HOME=/opt/soft/datax/bin/datax plus. py
export HADOOP_HOME=/opt/soft/hadoop
export HADOOP_CONF_DIR=/opt/soft/hadoop/etc/hadoop
# export SPARK_HOME1=/opt/soft/spark1
export SPARK_HOME2=/opt/soft/spark2
export PYTHON_HOME=/opt/soft/python
export JAVA_HOME=/opt/soft/java
export HIVE_HOME=/opt/soft/hive
export FLINK_HOME=/opt/soft/flink
export DATAX_HOME=/opt/soft/datax/bin/datax.py
export PATH=$HADOOP_HOME/bin:$SPARK_HOME2/bin:$PYTHON_HOME:$JAVA_HOME/bin:$HIVE_HOME/bin:$FLINK_HOME/bin:$DATAX_HOME:$PATH
Note: this step is very important, such as JAVA_HOME and PATH must be configured, and those not used can be ignored or commented out; If the dolphin scheduler is not found_ Env.sh, run ls -a
- Link the jdk to / usr/bin/java (still take JAVA_HOME=/opt/soft/java as an example)
sudo ln -s /opt/soft/java/bin/java /usr/bin/java
- Modify the one click deployment configuration file conf / config / install_ For the parameters in config.conf, pay special attention to the configuration of the following parameters
vim /usr/local/dolphinscheduler/dolphinscheduler-bin/conf/config/install_config.conf
# Fill in mysql or postgresql here
dbtype="mysql"

# Database connection address
dbhost="localhost:3306"

# Database name
dbname="dolphinscheduler"

# The database user name needs to be modified to the specific value of {user} set above
username="xxx"

# If there are special characters in the database password, please use \ escape. It needs to be modified to the specific value of {password} set above
password="xxx"

# Zookeeper address: localhost:2181. Remember to bring the 2181 port
zkQuorum="localhost:2181"

# The directory where the DS is installed, such as: / opt / soft / Dolphin scheduler, is different from the current directory
installPath="/opt/soft/dolphinscheduler"

# Which user deployment to use, use the user created in Section 3
deployUser="dolphinscheduler"

# Mail configuration, taking qq mailbox as an example
# Mail protocol
mailProtocol="SMTP"

# Mail service address
mailServerHost="smtp.qq.com"

# Mail service port
mailServerPort="25"

# mailSender and mailUser can be configured the same
# sender
mailSender="xxx@qq.com"

# Sending user
mailUser="xxx@qq.com"

# Mailbox password
mailPassword="xxx"

# The mailbox of TLS protocol is set to true, otherwise it is set to false
starttlsEnable="true"

# The mailbox with SSL protocol enabled is configured as true, otherwise it is false. Note: starttlsEnable and sslEnable cannot be true at the same time
sslEnable="false"

# For the mail service address value, refer to mailServerHost above
sslTrust="smtp.qq.com"

# Where to upload resource files such as sql used in business can be set: HDFS,S3,NONE. If a single machine wants to use the local file system, please configure it as HDFS, because HDFS supports the local file system; If the resource upload function is not required, select NONE. One important point: using a local file system does not require hadoop deployment
resourceStorageType="HDFS"

# Here, take saving to the local file system as an example
# Note: if you want to upload to HDFS and HA is enabled for NameNode, you need to put the hadoop configuration files core-site.xml and hdfs-site.xml into the conf directory. In this example, you need to put them under / opt / Dolphin scheduler / conf and configure the namenode cluster name; If the NameNode is not ha, modify it to a specific ip or host name
defaultFS="file:///Data / Dolphin scheduler "#hdfs: / / {specific ip / hostname}: 8020

# If Yarn is not used, keep the following default values; if the ResourceManager is HA, configure it as the primary and standby ip or hostname of the ResourceManager node, such as "192.168.xx.xx,192.168.xx.xx"; if it is a single ResourceManager, configure yarnHaIps = ""
# Note: it depends on the tasks executed by yarn. In order to ensure the successful judgment of execution results, it is necessary to ensure the correct configuration of yarn information
yarnHaIps="192.168.xx.xx,192.168.xx.xx"

# If the ResourceManager is HA or does not use Yarn, keep the default value; if it is a single ResourceManager, configure the real ResourceManager host name or ip
singleYarnIp="yarnIp1"

# The resource upload root path supports HDFS and S3. Since HDFS supports the local file system, it is necessary to ensure that the local folder exists and has read-write permissions
resourceUploadPath="/data/dolphinscheduler"

# User with permission to create resourceUploadPath
hdfsRootUser="hdfs"

# Configure api server port
apiServerPort="12345"

# On which machines to deploy DS services, localhost is selected locally
ips="localhost"

# ssh port, default 22
sshPort="22"

# On which machine is the master service deployed
masters="localhost"

# The machine on which the worker service is deployed, and specify which worker group the worker belongs to. The default in the following example is the group name
workers="localhost:default"

# On which machine is the alarm service deployed
alertServer="localhost"

# On which machine is the backend api service deployed
apiServers="localhost"
Note: if you intend to use the content center function, execute the following command:
sudo mkdir /data/dolphinscheduler
sudo chown -R dolphinscheduler:dolphinscheduler /data/dolphinscheduler
6. One click deployment
- Switch to the deployment user and execute the one click deployment script
sh install.sh
Note: for the first deployment, the following information appears 5 times in step 3 of step 3 of the operation. This information can be ignored
sh: bin/dolphinscheduler-daemon.sh: No such file or directory
- Run error: install.sh: 22: install.sh: Source: not found 1.replace file install.sh: 28: install.sh: [[: not found install.sh: 34: [: ==: unexpected operator 2.create directory 3.scp resources /usr/local/dolphinscheduler/dolphinscheduler-bin/script/scp-hosts.sh: 21: /usr/local/dolphinscheduler/dolphinscheduler-bin/script/scp-hosts.sh: source: not found /usr/local/dolphinscheduler/dolphinscheduler-bin/script/scp-hosts.sh: 24: /usr/local/dolphinscheduler/dolphinscheduler-bin/sc ript/scp-hosts.sh: [[: not found /usr/local/dolphinscheduler/dolphinscheduler-bin/script/scp-hosts.sh: 29: /usr/local/dolphinscheduler/dolphinscheduler-bin/script/scp-hosts.sh: Syntax error: "(" unexpected scp copy failed to exit
Reason: by default, dash is used as the shell, but sh is the command of bash shell.
Solution:
dpkg-reconfigure dash(need root Permissions)
Select in the interface no
 Rerun ls -l /bin/sh Post display/bin/sh -> bash
- Run the sh command again
- After the script is completed, the following five services will be started, using
jps
Command to check whether the service is started (jps comes with JDK)
- If the display contains:
MasterServer         ----- master service
    WorkerServer         ----- worker service
    LoggerServer         ----- logger service
    ApiApplicationServer ----- api service
    AlertServer          ----- alert service
If the above services are started normally, the automatic deployment is successful
After the deployment is successful, you can view the logs, which are stored in the logs folder
/usr/dolphinscheduler/logs
logs/
    ├── dolphinscheduler-alert-server.log
    ├── dolphinscheduler-master-server.log
    |- dolphinscheduler-worker-server.log
    |- dolphinscheduler-api-server.log
    |- dolphinscheduler-logger-server.log
7. Log in to the system
Access front-end page address, interface ip (self modified) http://192.168.xx.xx:12345/dolphinscheduler
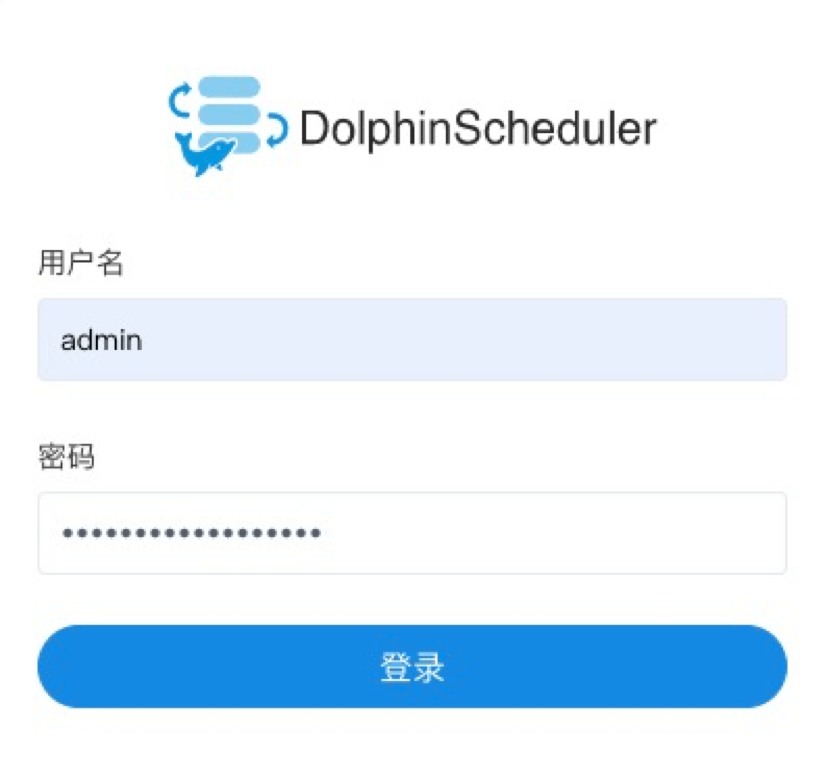
The deployment is completed and the interface is successfully entered.
Recommended reference documents:
Official website:
https://dolphinscheduler.apache.org/zh-cn/
Official website tutorial: https://www.bilibili.com/video/BV1d64y1s7eZ
You can refer to the original link here: https://blog.csdn.net/qq_50740678/article/details/120615253