catalogue
Imitation Taobao closed QR code case
Show or hide text box contents
Password verification information box
Baidu skin changing effect case
Form select all deselect all cases
tab column switching (key cases)
Modify style properties
-
Modify the size, color, position and other styles of elements through JS
-
element.style: inline style operation
-
element.className: class name style operation
Inline style operation
- The style in JS adopts hump naming method. For example, fontSize and backgroundColor
- JS modifies the style operation to generate inline styles. The css weight of inline styles is relatively high
    <style>
        div {
            width: 250px;
            height: 250px;
            background-color: aquamarine;
        }
    </style>
<body>
<div></div>
<script>
var div = document.querySelector('div');
var flag = 0;
div.onclick = function() {
if (flag == 0) {
// The attributes in div.style adopt hump naming method
// And the assignment of inline style operation is not ':' in style, but '=
this.style.backgroundColor = 'darkcyan';
this.style.width = '200px';
this.style.height = '200px';
flag = 1;
} else {
this.style.backgroundColor = 'red';
this.style.width = '250px';
this.style.height = '250px';
flag = 0;
}
}
</script>
</body>Imitation Taobao closed QR code case
- Core idea: use the display and hiding of styles to complete
- display: none; Hide elements; display: block; Display element
    <style>
        .box {
            position: relative;
            width: 88px;
            height: 88px;
            border: 1px solid #ccc;
            margin: 100px auto;
            font-size: 12px;
            text-align: center;
            color: #f40;
        }

        .box img {
            width: 60px;
            margin-top: 5px;
        }

        .close-btn {
            position: absolute;
            top: -1px;
            left: -16px;
            width: 14px;
            height: 14px;
            border: 1px solid #ccc;
            line-height: 14px;
            font-family: Arial, Helvetica, sans-serif;
            cursor: pointer;
        }
    </style>
<body>
<div class="box">
Taobao QR code
<img src="images/tao.png" alt="">
<i class="close-btn">×</i>
</div>
<script>
// var box = document.getElementsByClassName('box');
// The above statement cannot be used for event processing
var box = document.querySelector('.box');
var img = document.querySelector('img');
var btn = document.querySelector('.close-btn');
btn.onclick = function() {
// this refers to the caller btn of the event function
box.style.display = 'none';
}
</script>
</body>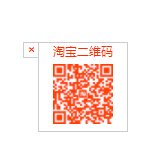
Circular sprite diagram case
- Use the for loop to set the sprite background of a group of elements
case analysis
- First of all, the arrangement of Sprite pictures is regular
- Core idea: use the for loop to modify the background position of the sprite picture
    <style>
        * {
            margin: 0;
            padding: 0;
        }

        li {
            list-style: none;
        }

        .box {
            width: 250px;
            margin: 100px auto;
        }

        .box li {
            float: left;
            width: 24px;
            height: 24px;
            background-color: darkcyan;
            margin: 15px;
            background: url(images/sprite.png) no-repeat;
        }
    </style>
<script>
var box = document.querySelector('.box');
var lis = document.querySelectorAll('li');
for (var i = 0; i < lis.length; i++) {
var index = i * 44;
lis[i].style.backgroundPosition = '0 -' + index + 'px';
}
</script>
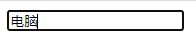
Show or hide text box contents
- When the mouse clicks the text box, the default text inside is hidden
- When the mouse leaves the text box, the text inside is displayed
case analysis
- First, the form needs two new events to get the focus onfocus and lose the focus onblur
- If you get focus, judge whether the form content is the default text. If yes, clear the form content
- If the focus is lost, judge whether the form content is empty. If it is blank, the form content will be changed to the default text
<body>
    <input type="text" value="mobile phone">
    <script>
        var text = document.querySelector('input');
        // Register event to get focus event onfocus
        text.onfocus = function() {
            // console.log('Get focus');
            if (this.value === 'mobile phone') {
                this.value = '';
            }
            // Get focus, text color darkens
            this.style.color = 'black';

        }

        // Registration event lost focus event onblur
        text.onblur = function() {
            // console.log('lose focus');
            // The judgment condition in if () is congruent
            if (this.value === '') {
                // The condition is true and the execution statement is assignment
                this.value = 'mobile phone';
            }
            // Lose focus, text color becomes lighter
            this.style.color = '#999';
        }
    </script>
</body>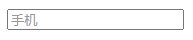
Class name style operation
- element.className
be careful
- If the style is changed a lot, you can change the element style by operating the class name
- Class is a reserved word, so className is often used to manipulate the element class name attribute
- className will directly change the class name of the element and overwrite the original class name
- If you want to keep the original class name, you can use the multi class name selector
-
this.className = 'original class name =' changed class name ';
    <style>
        div {
            width: 100px;
            height: 100px;
            background-color: darkkhaki;
        }

        .change {
            text-align: center;
            line-height: 100px;
            background-color: darkcyan;
            color: #fff;
            font-size: 20px;
            margin-top: 100px;
        }
    </style>
<body>
<div class="first">Text content</div>
<script>
// Use element Style get modify element style
// It is used when there are few styles to modify or the function is simple
var text = document.querySelector('div');
text.onclick = function() {
// this.style.textAlign = 'center';
// this.style.lineHeight = '100px';
// this.style.backgroundColor = 'darkcyan';
// this.style.color = '#fff';
// this.style.fontSize = '20px';
// this.style.marginTop = '100px';
// Change the style of an element by modifying its className
// It is used when there are many styles to be modified or the functions to be implemented are complex
// Change the class name of the current element to change
this.className = 'change';
// If you want to keep the original class name, use the multi class name selector
this.className = 'first change';
}
</script>
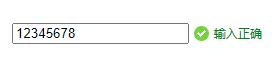
</body>Password box authentication information
case analysis
- The first event to judge is that the form loses focus onblur
- If the input conforms to the format, the correct information will be prompted, and the icon will change to a small green icon
- If the input is not 6 to 16 bits, an error message will be prompted, and the icon will change to a small red icon
- Because there are many styles changing inside, the style is modified by className
    <style>
        div {
            width: 600px;
            margin: 100px auto;
        }

        .message {
            display: inline-block;
            font-size: 12px;
            color: #999;
            background: url(images/mess.png) no-repeat left center;
            padding-left: 20px;
        }

        .wrong {
            color: red;
            background-image: url('images/wrong.png');
        }

        .right {
            color: green;
            background-image: url('images/right.png');
        }
    </style>
<body>
<div class="register">
<input type="text" class="ipt">
<p class="message">Please enter 6~16 Bit cipher</p>
</div>
<script>
var ipt = document.querySelector('.ipt');
var message = document.querySelector('.message');
ipt.onblur = function() {
// According to the length of the value in the form, IPT value. length
if (ipt.value.length < 6 || ipt.value.length > 16) {
// Cannot directly message className = 'wrong'; Because you also need some styles in message
message.className = 'message wrong';
message.innerHTML = 'Output error, please enter 6~16 Bit character';
} else {
message.className = 'message right';
message.innerHTML = 'Correct input'
}
}
</script>
</body>

Operation element summary
- Operation elements are the core content of DOM
- The following properties are read-write
- If you give these attributes a value, the assignment operation is implemented
Operation element content
- innerText
- innerHTML
Common element attributes of operation
- src, href, title, alt, etc
Action form element properties
- type, value, disabled, etc
Action element style properties
- element.style
- className
practice
- User name display hidden content
- Jingdong closes advertising
- Sina drop-down menu
- Switch lamp case
Exclusive thought (algorithm)
- Let a group of buttons bind click events
In the same group of tags, if you want an element to implement a certain style, you need to use the exclusive algorithm of the loop:
- Clear all elements (kill everyone)
- Add a style to the current element (leave yourself)
- Note that the order cannot be reversed. Kill everyone first, and then set yourself
<body>
    <button>Button 1</button>
    <button>Button 2</button>
    <button>Button 3</button>
    <button>Button 4</button>
    <button>Button 5</button>
    <script>
        // Get all button elements
        var btns = document.getElementsByTagName('button');
        // btns gets a pseudo array, in which each element btn[i]
        for (var i = 0; i < btns.length; i++) {
            btns[i].onclick = function() {
                // 1. Remove all button styles before clicking the button
                for (var i = 0; i < btns.length; i++) {
                    btns[i].style.backgroundColor = '';
                }
                // 2. Then add a style to the current button
                this.style.backgroundColor = 'darkcyan';
            }
        }
    </script>
</body>

Baidu skin changing effect case
case analysis
- Register events for a set of elements
- Register click events for four small pictures using circular registration
- When a picture is clicked, the background of the page is changed to the current picture
- Core algorithm: take out the path of the current picture and make the background for the body
    <style>
        * {
            margin: 0;
            padding: 0;
        }

        body {
            background: url(images/1.jpg) no-repeat center top;
        }

        li {
            list-style: none;
        }

        .baidu {
            margin: 100px auto;
            background-color: #fff;
            width: 410px;
            padding-top: 3px;
        }

        .baidu li {
            float: left;
            margin: 0 1px;
            cursor: pointer;
        }

        .baidu img {
            width: 100px;
        }
    </style>
<body>
<ul class="baidu">
<li><img src="images/1.jpg" alt=""></li>
<li><img src="images/2.jpg" alt=""></li>
<li><img src="images/3.jpg" alt=""></li>
<li><img src="images/4.jpg" alt=""></li>
</ul>
<script>
// Get element
var imgs = document.querySelector('.baidu').querySelectorAll('img');
for (var i = 0; i < imgs.length; i++) {
imgs[i].onclick = function() {
// Click the image path this src
// Give this path to body
document.body.style.backgroundImage = 'url(' + this.src + ')';
}
}
</script>
</body>

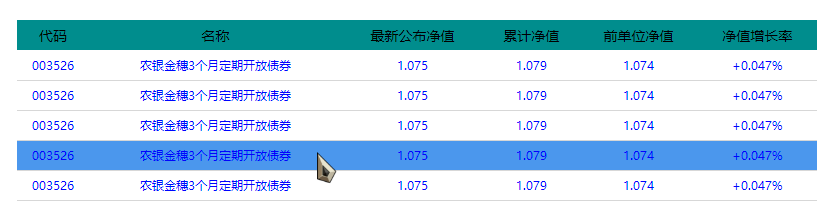
Table interlaced color effect
case analysis
- New mouse event: the mouse passes onmouseover and the mouse leaves onmouseout
- Core idea: when the mouse passes through the tr line, the current line changes the background color; The mouse leaves and restores the original background color
- Note: the color of the first line (the line in thead) does not need to be changed; Therefore, the rows in tbody are obtained
    <script>
        // Get the element and get all the rows in tbody
        var trs = document.querySelector('tbody').querySelectorAll('tr');
        // Register events using a loop
        for (var i = 0; i < trs.length; i++) {
            // Mouse over event
            trs[i].onmouseover = function() {
                    this.className = 'bgc';
                }
                // Mouse off event onmouseout
            trs[i].onmouseout = function() {
                this.className = '';
            }
        }
    </script>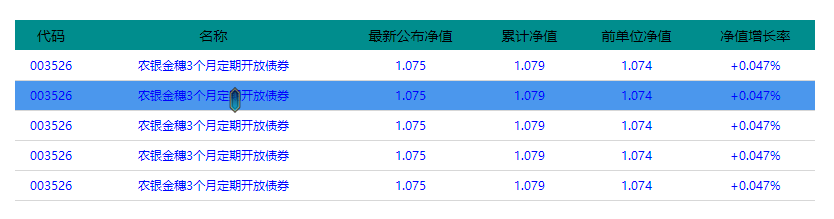
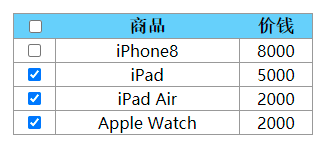
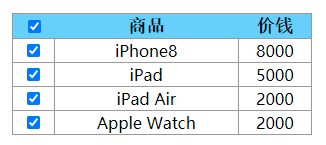
Form select all deselect all cases
case analysis
- Select all and deselect all: make the checked attribute (selected status) of the following check box follow the select all button
- All the check boxes below need to be selected, and all the check boxes above can be selected: bind click events to all the check boxes below; Each time you click, you should cycle to check whether all the check boxes below are selected or not; If one is not selected, select all above will not be selected
    <script>
        // Select all and deselect all
        // Get element
        var j_cbAll = document.getElementById('j_cbAll');
        var j_tbs = document.getElementById('j_tb').querySelectorAll('input');
        // Registration event
        j_cbAll.onclick = function() {
            // this.checked;  You can get the selected status of the current check box
            // If selected, true; false if unchecked
            for (var i = 0; i < j_tbs.length; i++) {
                j_tbs[i].checked = this.checked;
            }
        }

        // All the check boxes below need to be selected before all the check boxes above can be selected
        for (var i = 0; i < j_tbs.length; i++) {
            j_tbs[i].onclick = function() {
                // flag controls whether the select all box is selected
                var flag = true;
                // Each time you click the check box below, you need to cycle to check whether all four check boxes are selected
                for (var i = 0; i < j_tbs.length; i++) {
                    // If any check box is not selected, the checked all check box is false
                    if (!j_tbs[i].checked) {
                        // j_cbAll.checked = false;
                        flag = false;
                        break; // Jump out of the for loop. As long as one is not selected, the rest will not continue the loop
                    }
                }
                j_cbAll.checked = flag;
            }
        }
</script> 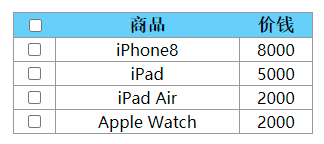
Actions for custom attributes
Get property value
- element. attribute
- element.getAttribute('attribute ');
difference
- element. Attribute: get the built-in attribute value (the attribute of the element itself)
- element.getAttribute('attribute ');: It mainly obtains custom attributes (standard) and attributes added by programmers
<body>
    <!-- div Is an element, id and index All for div Attribute of element -->
    <div id="demo" index="1"></div>
    <script>
        var div = document.querySelector('div');
        // Gets the attribute value of the element
        // 1.element. attribute
        console.log(div.id); // demo
        // 2.element getAttribute('attribute ') attribute
        // Attributes added by programmers, such as index
        console.log(div.getAttribute('index'));  // 1
    </script>
</body>
Set attribute value
- element. Attribute = 'value'
- element.setAttribute('attribute ',' value ');
difference
- element. Properties: setting built-in property values
- element.setAttribute('attribute ');: Mainly set custom properties (standard)
<body>
    <!-- div As element element,id and index All for div Attribute of element -->
    <div id="demo" index="1" class="nav"></div>
    <script>
        // Set attribute value
        // 1.element. Attribute = 'attribute value';
        div.id = 'test';
        div.className = 'navs';
        // element.setAttribute('attribute ',' attribute value ');
        // Mainly for custom attributes
        div.setAttribute('index', 0);
        // Class is special. Note that 'attribute' = class, not className
        div.setAttribute('class', 'nava');
        // <div id="test" index="0" class="nava"></div>
    </script>
</body>
Remove Attribute
- element.removeAttribute('attribute ');
<body>
    <!-- div As element element,id and index All for div Attribute of element -->
    <div id="demo" index="1" class="nav"></div>
    <script>
        // Remove Attribute
        // element.removeAttribute('attribute ');
        div.removeAttribute('index');
        // <div id="test" class="nava"></div>
    </script>
</body>
tab column switching (key cases)
- When the mouse clicks the corresponding tab above, the content below will change
case analysis
- The tab switch has two large modules
- In the module tab above, click one, the background color of the current tab will change to red, and the others will remain unchanged (exclusive thought). The method of modifying the class name
- The contents of the following modules will change with the tabs above. Therefore, the following module changes should be written to the click event
- Rule: the display contents of the following modules correspond to the tabs above one by one
- Core idea: to tab_ Add a custom attribute to all li in the list, and the attribute value starts from 0
- When we click tab_ A li in the list, let the tab_ The contents corresponding to the serial number in con are displayed, and the rest are hidden (exclusive thought)
<body>
    <div class="tab">
        <div class="tab_list">
            <ul>
                <li class="current">Product introduction</li>
                <li>Specifications and packaging</li>
                <li>After sales guarantee</li>
                <li>Commodity evaluation(5000+)</li>
                <li>Mobile community</li>
            </ul>
        </div>
        <div class="tab_con">
            <div class="item">Content of product introduction module</div>
            <div class="item">Specification and packaging module content</div>
            <div class="item">Content of after sales guarantee module</div>
            <div class="item">Commodity evaluation(5000+)Module content</div>
            <div class="item">Mobile community module content</div>
        </div>
    </div>
    <script>
        // Get element
        var tab_list = document.querySelector('.tab_list');
        var lis = tab_list.querySelectorAll('li');
        var items = document.querySelectorAll('.item');
        // for loop binding click event
        for (var i = 0; i < lis.length; i++) {
            // Set the index number for li at the beginning
            lis[i].setAttribute("index", i);
            lis[i].onclick = function() {
                // Kill everyone
                for (var i = 0; i < lis.length; i++) {
                    lis[i].className = '';
                }
                // Set yourself
                this.className = 'current';

                // The following module contents are displayed
                var index = this.getAttribute('index');
                // Kill everyone
                for (var i = 0; i < items.length; i++) {
                    items[i].style.display = 'none';
                }

                items[index].style.display = 'block';
            }
        }
    </script>
</body> 

H5 custom attributes
Custom attribute purpose: save and use data
- Some data can be saved directly to the page rather than to the database
- The custom attribute is obtained through getAttribute('attribute ')
- However, some custom attributes are easy to cause ambiguity, and it is not easy to judge whether they are built-in attributes or custom attributes of elements
- H5 added custom attribute
Set H5 custom properties
- H5 specifies that all attributes with data - as the attribute name and assigned value are user-defined attributes
- For example, < div data index = "1" > < / div >
- Or use JS settings
- element.setAttribute('data-index', 2)
Get H5 custom attribute
- Compatibility acquisition: element getAttribute('data-index');
- H5 new element dataset. Index or element dataset['index']. IE11 began to support
<body>
    <div getTime="20" data-index="0"></div>
    <script>
        var div = document.querySelector('div');
        // Get the custom attribute through getAttribute()
        console.log(div.getAttribute('getTime'));

        // Set custom properties
        // Set custom attributes through setAttribute()
        div.setAttribute('data-time', 20);

        // Get H5 custom attribute
        // 1. Get custom attributes for compatibility
        console.log(div.getAttribute('data-index'));
        // 2.H5 new method for obtaining custom attributes
        // Only properties starting with data - can be obtained
        console.log(div.dataset.index);
        console.log(div.dataset['index']);

        // dataset is a collection containing all custom attributes starting with data
        console.log(div.dataset); // DOMStringMap {index: "0", time: "20"}

        // If the new attribute name is multiple characters and more than two '-' or '' Similar character connection
        // Use dataset When obtaining attributes, characters should be removed and obtained by hump naming method
        div.setAttribute('data-list-name', 'age');
        console.log(div.dataset.listName);
        console.log(div.dataset['listName']);
    </script>
</body>
summary
There are two ways to get a custom attribute of an element
1. element.getAttribute('attribute ')
- Good compatibility
2. element.dataset.index or element dataset['index']
- IE11 began to support
- Only custom attributes beginning with data - can be obtained
- dataset is a collection that holds all the custom attributes of the element starting with data -
- When the new attribute name is multiple characters and more than two '' Or '-' and other similar characters, such as data list name
- When using dataset to get elements, attribute names should remove these connectors and use hump naming