Hello, everyone, this is OAK China. I'm assistant Jun. The content shared in this issue comes from a column written by the CEO of OpenCV, which was first published in oakchina Official website.
This is the first article in the OAK intelligent depth camera programming column. Both OAK-D and OAK-D-Lite are 3D Artificial Intelligence cameras.
OpenCV CEO introduces you to OAK intelligent depth camera
| see OAK-D | see OAK-D-Lite |
|---|
What is 3D Artificial Intelligence?
3D AI enables computer vision to make synchronous decisions based on the following two senses:
- Visual recognition perception: This is the ability of artificial intelligence to "see" and "explain" the things around it visually. For example, the RGB camera of OAK-D is connected with the processor NPU of the neural network built in the camera to accelerate the neural network and detect objects such as a cat, a person or a car in the scene seen by the camera.
- Deep positioning perception: This is the ability of artificial intelligence to understand the spatial coordinate position and physical size of objects.
The idea of 3D artificial intelligence is inspired by human vision. We use our eyes to understand our surroundings and things. In addition, we use our eyes (stereo vision) to perceive how far things are from us.
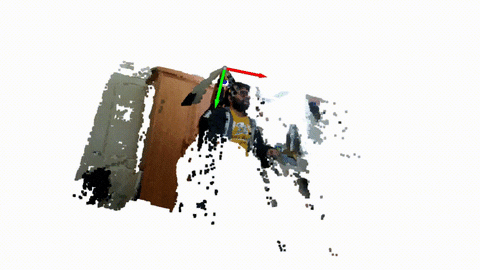
RGB-D depth and point cloud example of OAK( click View code)
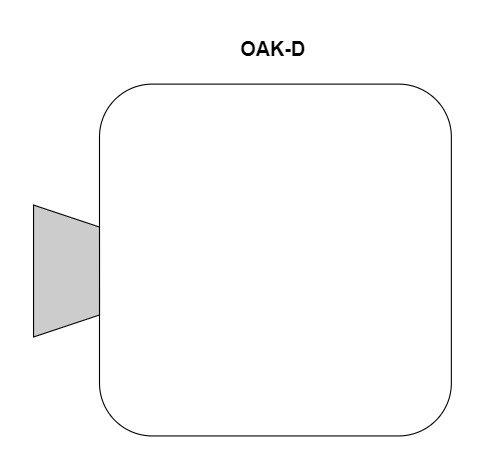
OAK-D and OAK-D-Lite are 3D AI cameras
The OAK-D and OAK-D-Lite of OpenCV include the following important components:
- 4K RGB camera: the RGB camera placed in the center can capture 4k pictures with high resolution. Usually, this kind of camera is used for visual recognition.
- Stereo depth camera: This is a system composed of two cameras ("stereo" refers to two), which is used for depth space computing and perception, and can also be used for visual recognition (3D neural network reasoning).
- Intel Myriad ™ X VPU: This is the "brain" of OAK. It is a powerful processor, which can run various mainstream neural networks such as yolo v4, Yolo V5 and Yolo X. at the same time, it can create a depth map in real time from the stereo image, internally fuse the recognition results and depth calculation results, and obtain the type and coordinate position of the object through the API interface.
Application of OAK-D and OAK-D-Lite
OAK-D is being widely used in various fields in 2021 OpenCV AI competition In, you can see many applications.
You can Programming Education,Neonatal intelligent monitoring,Assistive technology for the disabled,AR/VR,Warehouse inspection using UAV,Intelligent agriculture,Sports analysis,Retail machine People, even Advertising robot See the figure of OAK in.
You can also do this in Indiegogo crowd-funding See more awesome projects made with OAK-D and OAK-D-Lite on the page.
Excited? Want to learn how to program with OAK device? Please look down.
catalogue
- Comparison between OAK-D and OAK-D-Lite
- Install DepthAI
- DepthAI pipeline and acquisition of left depth camera data
- Create a complete depth vision pipeline
- output
- ending
1. Comparison between oak-d and OAK-D-Lite
In terms of function, the two cameras are almost the same. You can use OAK-D-Lite to do almost everything that OAK-D can do. Beginners should not notice much difference, but the two cameras do have some parameter differences. OAK-D-Lite is fashionable in appearance, lighter and cheaper, and the OAK-D function is slightly more comprehensive. In 2022, we will launch OAK-D-Pro camera with structured light and TOF sensor. Please look forward to it.
| Characteristics / specifications | OAK-D | OAK-D-Lite |
|---|---|---|
| RGB camera | 12 megapixels, 4k, up to 60fps | 13 megapixels, 4k, up to 60fps |
| Black and white camera | 1280x800p, 120fps, global shutter | 640x480p, 120fps, global shutter |
| IMU | √ | × |
| USB-C, power socket | √,√ | √,× |
| VPU | Myriad-X, 4T computing power | Myriad-X, 4T computing power |
OpenCV AI Kit View products on sale > >
2. Install DepthAI
OAK Windows quick start
The best thing about using OAK-D or OAK-D-Lite is that it has no dependence on external hardware or software, because it integrates hardware, firmware and software, and the experience is extremely smooth. DepthAI can be regarded as API (Application Programming Interface), through which we program OAK-D. It's cross platform, so you don't have to worry about incompatibility with your operating system. Next, let's continue to install the API by starting the terminal or Powershell. If your network signal is good, this process should only take 30 seconds.
git clone https://github.com/luxonis/depthai.git
cd depthai
python3 install_requirements.py
python3 depthai_demo.py
You can also follow this Document > > To operate
3.DepthAI pipeline and acquisition of left depth camera data
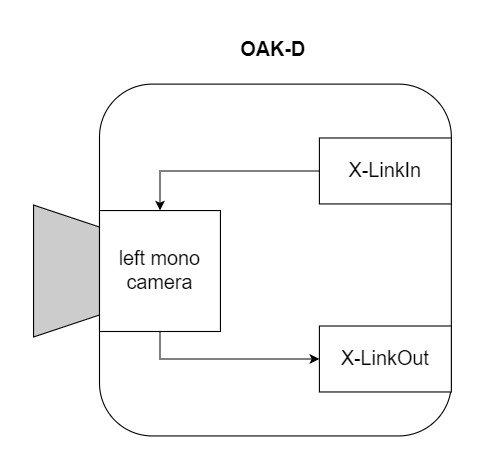
Node is a unit module with various functions, and pipeline is a data flow channel connecting various nodes. Let's understand the DepthAI pipeline through the following illustration, in which we show what happens inside the camera when a given command is executed. This is a very simple pipeline. Through this pipeline, we can capture the picture from the camera on the left.
OpenCV CEO teaches you to use OAK (I)
1) Create pipe
Here, we instantiate the pipe object.
import depthai as dai
pipeline = dai.Pipeline()
2) Create camera node
Through the following code, we create a single camera node. It doesn't have any functions yet. It just recognizes a single camera.
mono = pipeline.createMonoCamera()

3) Select camera
To access the camera, for example, if we want to access the camera on the left, we need to select it and use SetBoardSocket. It also internally creates an input node X-Link, which is a mechanism for the camera to communicate with the host (computer).
mono.setBoardSocket(dai.CameraBoardSocket.LEFT)

4) Create an XLinkOut node and get the frame
To get the output, we need to create an X-LinkOut node. The camera can have several other outputs, such as the data stream from the right camera, or the data stream from the RGB camera, or other outputs that we don't need to care about right now. In this case, it is named "Left" so that it does not conflict with other outputs. Finally, we connect the output of a single black-and-white camera as input to the X-LinkOut node.
xout = pipeline.createXLinkOut()
xout.setStreamName("left")
mono.out.link(xout.input)
The above command is just to prepare the device. It doesn't really handle anything. All commands are run inside the host. You can think of it as a preprocessing step. Through the following code snippet, we transfer the pipeline from the host to the OAK.
Now, we can get the output frame from the X-LinkOut node. Note that the output of the X-LinkOut node is not a single frame. In fact, it creates a sequence that can store multiple frames. This may be useful for some applications that require multiple frames, such as video coding. But in our example, we don't need multiple frames. So now let's leave it as the default single frame. As you can see, the sequence uses the method of specifying the stream GetOutputQueue.
Next, we query the sequence to extract frames. At this time, the frame diagram is transmitted from the device to the host. Frame map belongs to Depthai.ImgFrame This category can have several types. To make OpenCV easy to use, we use GetCvFrame, which returns images as a numpy array. Our basic pipeline is over.
with dai.Device(pipeline) as device:
queue = device.getOutputQueue(name="left")
frame = queue.get()
imOut = frame.getCvFrame()
Now let's build a complete pipeline for the left and right cameras. We will use the output from the left and right black-and-white cameras to display side-by-side views and merged views.
4. Create a complete depth vision pipeline

Although the DepthAI library supports both Python and C + +, C + + is not a stable version. Therefore, in this article, we will focus on python.
Import library
import cv2
import depthai as dai
import numpy as np
Function of extracting frame
It queries the frame from the sequence, transmits it to the host, and converts the frame into a numpy array.
def getFrame(queue):
# Get frame from queue
frame = queue.get()
# Convert frame to OpenCV format and return
return frame.getCvFrame()
Function to select black and white camera
Here, create a camera node for the pipe. Then, we use setResolution. The setResolution has the following properties to choose from.
- 700_P(1280x720 p)
- 800_P(1280x800 P)
- 400_P(640×400 p)
- 480_P(640×480 p)
In our example, we set the resolution to 640x400 p. By using the isLeft Boolean value, the board socket is set to LEFT or RIGHT.
def getMonoCamera(pipeline, isLeft):
  # Configure mono camera
  mono = pipeline.createMonoCamera()

  # Set Camera Resolution
    mono.setResolution(dai.MonoCameraProperties.SensorResolution.THE_400_P)
  if isLeft:
      # Get left camera
      mono.setBoardSocket(dai.CameraBoardSocket.LEFT)
  else :
      # Get right camera
      mono.setBoardSocket(dai.CameraBoardSocket.RIGHT)
  return mono
Main function
Pipes and cameras
We first create the pipe and set up the left and right cameras. The predefined function GetMonoCamera creates an X-Linkin node internally and returns a single shot output. The output of the camera is then bound to the X-LinkOut node.
if __name__ == '__main__':
   pipeline = dai.Pipeline()

    # Set up left and right cameras
    monoLeft = getMonoCamera(pipeline, isLeft = True)
    monoRight = getMonoCamera(pipeline, isLeft = False)

    # Set output Xlink for left camera
    xoutLeft = pipeline.createXLinkOut()
    xoutLeft.setStreamName("left")

    # Set output Xlink for right camera
    xoutRight = pipeline.createXLinkOut()
    xoutRight.setStreamName("right")

    # Attach cameras to output Xlink
    monoLeft.out.link(xoutLeft.input)
    monoRight.out.link(xoutRight.input)
Transfer pipes to equipment
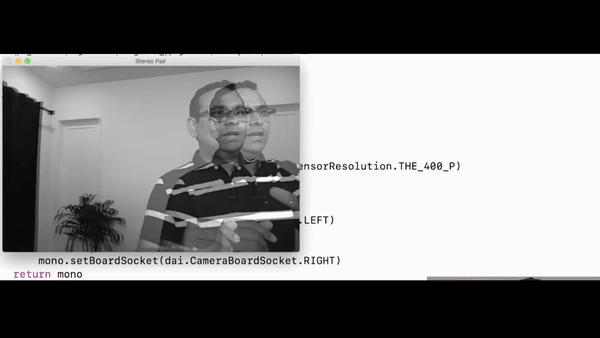
Once installed, we transfer the pipeline to the device (camera), and the sequence of left and right cameras output is defined by their respective names. The frame capacity is set to maxSize, which in this case is only a single frame. We also created a named window for later use to display the output. This sideBySide is a Boolean value used to switch the camera view (side-by-side or merge views).
with dai.Device(pipeline) as device:
    # Get output queues.
    leftQueue = device.getOutputQueue(name="left", maxSize=1)
    rightQueue = device.getOutputQueue(name="right", maxSize=1)

    # Set display window name
    cv2.namedWindow("Stereo Pair")
    # Variable used to toggle between side by side view and one
    frame view.
    sideBySide = True
Main cycle
So far, we have created a pipeline to link the camera output to the X-LinkOut node and get the sequence. Now it's time to query the frames and convert them to the numpy array format available to OpenCV through the predefined getFrame. For side-by-side views, frames are connected horizontally with the help of numpy. Hstack function. For overlapping output, we only increase the frame by reducing the intensity by 2 times.
Keyboard input q breaks the cycle and t switches the display (side-by-side view and merged view).
while True:
    # Get left frame
    leftFrame = getFrame(leftQueue)
    # Get right frame
    rightFrame = getFrame(rightQueue)

    if sideBySide:
        # Show side by side view
        imOut = np.hstack((leftFrame, rightFrame))
    else :
        # Show overlapping frames
        imOut = np.uint8(leftFrame/2 + rightFrame/2)

    # Display output image
    cv2.imshow("Stereo Pair", imOut)

    # Check for keyboard input
    key = cv2.waitKey(1)
    if key == ord('q'):
        # Quit when q is pressed
        break
    elif key == ord('t'):
        # Toggle display when t is pressed
        sideBySide = not sideBySide
5. Output

6. Conclusion
This concludes the introduction of OpenCV AI Kit with Depth. I hope you like this easy reading and know how to use OAK-D. In the next article, we will introduce how to get the pipeline of depth map from OAK-D.
reference
oakchina Chinese document
DepthAI documentation
OpenCV store
Kickstart page
OAK China |Track new developments in AI technology and products
official account |OAK visual artificial intelligence development
Click here "Add wechat friends (note the purpose)
Stamp "+ follow" for the latest information ↗↗