catalogue
1. Installation package preparation and upload
5.2. Create database, table and query
5.3. Accessed via navicat remote tools
6. Doris one click start stop script
0. Links to related articles
Summary of articles on basic knowledge points of big data
1. Installation package preparation and upload
Upload the installation package compiled by doris. Refer to doris compilation for reference Doris (1) of MPP database: Doris compilation Bowen, in doris0.15 installation package There are compiled installation packages in, which can be downloaded by yourself.
The installation address is: / opt/module/doris
2. FE deployment
- The configuration file is conf / Fe conf. Note: meta_dir is the metadata storage location. The default value is ${doris_home} / Doris meta. The directory needs to be created manually.
- fe. java in conf_ By default, the maximum java heap memory of opts is 4GB. It is recommended that the production environment be adjusted to more than 8G.
Note: it is strongly recommended to specify the directory separately for the production environment, rather than put it under the Doris installation directory. It is better to use a separate disk (if there is SSD), and the default configuration can be used for the test development environment
# Metadata storage path created
mkdir /opt/module/doris/doris-meta

# Enter the fe directory of doris and edit fe Conf configuration file, set metadata path
vim /opt/module/doris/fe/conf/fe.conf

# In Fe The conf file is about 42 lines. Modify the meta_ The value of dir is the metadata path configured above
meta_dir = /opt/module/doris/doris-meta

# Put Fe Distribute conf files to other machines
xsync /opt/module/doris/fe/conf/fe.conf
3. BE deployment
-
Copy the be deployment file to all nodes to be deployed, and copy the be folder under the output generated by source code compilation to the specified deployment path of the node of be.
-
Modify the configuration of all BE
Modify be / conf / be conf. It is mainly used to configure storage_root_path: data storage directory. By default, under be/storage, you need to create the directory manually. Semicolons of English status are used between multiple paths; Separate (do not add;) after the last directory. You can distinguish the media of the storage directory through the path, HDD or SSD. You can add capacity limits at the end of each path, separated by English status commas.
3.1. Example 1:
Note: if it is an SSD disk, it should be added after the directory SSD and HDD disks are added after the directory HDD
storage_root_path=/home/disk1/doris.HDD,50;/home/disk2/doris.SSD,10;/home/disk2/doris
explain
- /home/disk1/doris.HDD,50, indicates that the storage limit is 50GB, HDD;
- /home/disk2/doris.SSD,10, storage limited to 10GB, SSD;
- /home/disk2/doris, the storage limit is the maximum disk capacity, and the default is HDD
3.2. Example 2:
*** root_ You can specify medium in the path parameter
storage_root_path=/home/disk1/doris,medium:hdd,capacity:50;/home/disk2/doris,medium:ssd,capacity:50
explain
- ***
- /home/disk2/doris,medium:ssd,capacity:50, indicating that the storage limit is 50GB, SSD;
3.3. Other matters
1. BE webserver_port configuration
If be is deployed in hadoop cluster, please adjust be Web server in conf_ Port = 8040 to avoid port conflict.
2. Add all BE nodes in FE
BE nodes need to BE added in FE before they can join the cluster. You can use MySQL client( Download MySQL 5.7 (opens new window) )Connect to FE:
./mysql-client -h host -P port -uroot
Where host is the ip address of the node where FE is located; Port is FE / conf / FE Query in conf_ port; The default is to use the root account and log in without password.
After logging in, execute the following command to add each BE:
# Where host is the ip address of the node where BE is located; Port is BE / conf / BE Heartbeat in conf_ service_ port.

ALTER SYSTEM ADD BACKEND "host:port";
3.4. Start BE
sh bin/start_be.sh --daemon
The BE process will start and execute in the background. The logs are stored in the be/log / directory by default. If startup fails, you can check be/log / BE Log or be/log / BE Out to view the error message.
3.5. View BE status
Use MySQL client to connect to FE and execute "SHOW PROC '/backends'; Check the operation of BE. If everything is normal, the "isAlive" column should BE "true".
3.6. Configuration command
# User data storage path created be (multiple configurations can be created)
mkdir /opt/module/doris/doris_storage1
mkdir /opt/module/doris/doris_storage2

# Enter the be directory of doris and edit be Conf configuration file, set the storage data path
# storage_root_path configuration storage directory, which can be used; To specify multiple directories. Each directory can be followed by a comma. The default size is GB
vim /opt/module/doris/be/conf/be.conf

# In be The conf file is about 40 lines. Modify the storage_ root_ The value of path is the data storage path created above
storage_root_path = /opt/module/doris/doris_storage1,10;/opt/module/doris/doris_storage2

# Will be Distribute conf files to other machines
xsync /opt/module/doris/be/conf/be.conf
4. Launch and view Doris
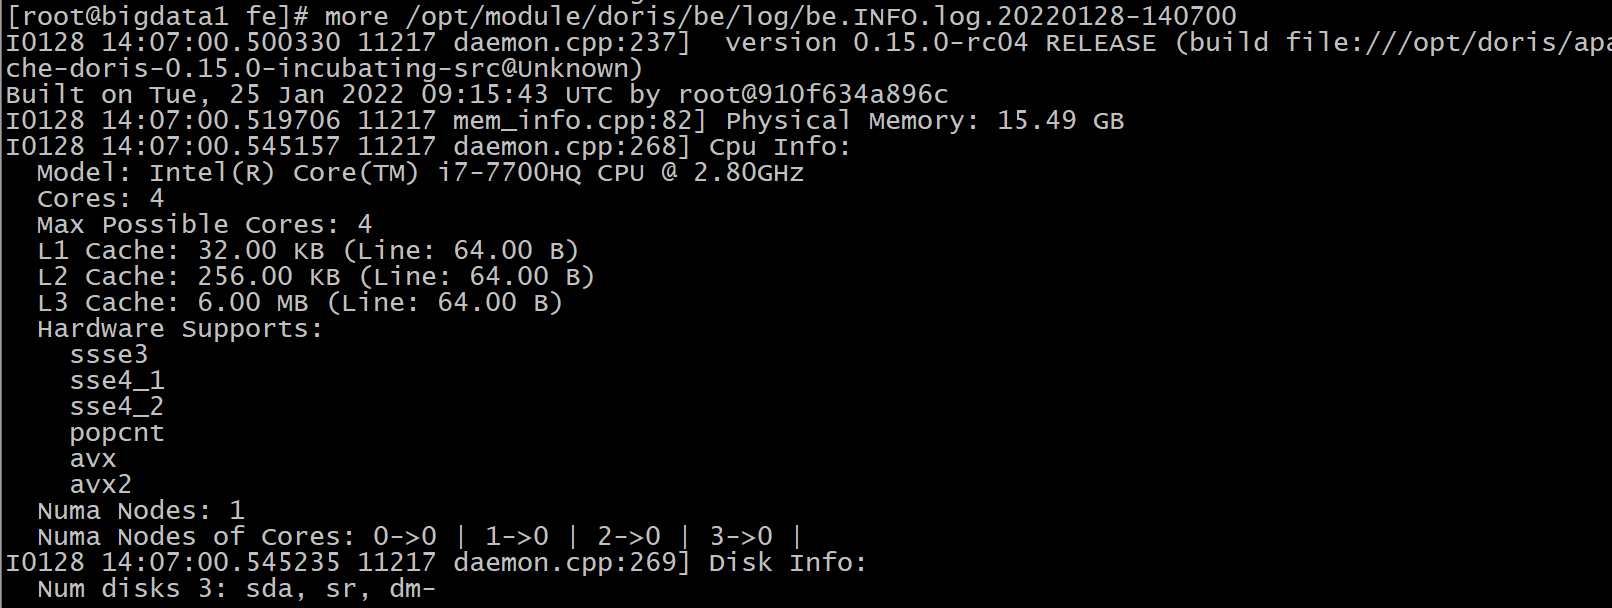
# Start fe (all machines) using background daemon
sh /opt/module/doris/fe/bin/start_fe.sh --daemon

# Start be (all machines) using background daemon
sh /opt/module/doris/be/bin/start_be.sh --daemon

# Use jps to see if fe is started (all machines)
jps

# Use ps -ef | grep be to see if be starts (all machines)
ps -ef | grep be

# You can go to be's log directory to view be's startup log (all machines)
more /opt/module/doris/be/log/be.INFO.log.20220128-140700
1. Use the background guard to start fe and be

2. Check whether fe and be are started

3. Check the startup log of be. If it fails, it is convenient for troubleshooting
5. Use Doris
5.1. Log in and load BE
# Use the MySQL client to enter the Doris command line page (if there is no MySQL client, please install it yourself)
mysql -hbigdata1 -P 9030 -uroot

# You don't need a password when you first enter. Change the root account password
set password = password('123456');

# Add the be node, and the port is heartbeat on be_ service_ Port, default 9050
ALTER SYSTEM ADD BACKEND "bigdata1:9050";
ALTER SYSTEM ADD BACKEND "bigdata2:9050";
ALTER SYSTEM ADD BACKEND "bigdata3:9050";

# Check the be node status through the mysql client. Live must be true
mysql> SHOW PROC '/backends';
+-----------+-----------------+----------------+----------+---------------+--------+----------+----------+---------------------+---------------------+-------+----------------------+-----------------------+-----------+------------------+---------------+---------------+---------+----------------+--------------------------+--------+---------------------+--------------------------------------------------------------------------------+
| BackendId | Cluster         | IP             | HostName | HeartbeatPort | BePort | HttpPort | BrpcPort | LastStartTime       | LastHeartbeat       | Alive | SystemDecommissioned | ClusterDecommissioned | TabletNum | DataUsedCapacity | AvailCapacity | TotalCapacity | UsedPct | MaxDiskUsedPct | Tag                      | ErrMsg | Version             | Status                                                                         |
+-----------+-----------------+----------------+----------+---------------+--------+----------+----------+---------------------+---------------------+-------+----------------------+-----------------------+-----------+------------------+---------------+---------------+---------+----------------+--------------------------+--------+---------------------+--------------------------------------------------------------------------------+
| 11001     | default_cluster | 192.168.12.131 | bigdata1 | 9050          | 9060   | 8040     | 8060     | 2022-01-28 14:07:02 | 2022-01-28 14:19:48 | true  | false                | false                 | 0         | 0.000            | 59.965 GB     | 99.951 GB     | 40.01 % | 40.01 %        | {"location" : "default"} |        | 0.15.0-rc04-Unknown | {"lastSuccessReportTabletsTime":"2022-01-28 14:19:21","lastStreamLoadTime":-1} |
| 11002     | default_cluster | 192.168.12.132 | bigdata2 | 9050          | 9060   | 8040     | 8060     | 2022-01-28 14:07:03 | 2022-01-28 14:19:48 | true  | false                | false                 | 0         | 0.000            | 75.833 GB     | 99.951 GB     | 24.13 % | 24.13 %        | {"location" : "default"} |        | 0.15.0-rc04-Unknown | {"lastSuccessReportTabletsTime":"2022-01-28 14:19:20","lastStreamLoadTime":-1} |
| 11003     | default_cluster | 192.168.12.133 | bigdata3 | 9050          | 9060   | 8040     | 8060     | 2022-01-28 14:07:02 | 2022-01-28 14:19:48 | true  | false                | false                 | 0         | 0.000            | 75.819 GB     | 99.951 GB     | 24.14 % | 24.14 %        | {"location" : "default"} |        | 0.15.0-rc04-Unknown | {"lastSuccessReportTabletsTime":"2022-01-28 14:19:24","lastStreamLoadTime":-1} |
+-----------+-----------------+----------------+----------+---------------+--------+----------+----------+---------------------+---------------------+-------+----------------------+-----------------------+-----------+------------------+---------------+---------------+---------+----------------+--------------------------+--------+---------------------+--------------------------------------------------------------------------------+
3 rows in set (0.02 sec)
5.2. Create database, table and query
# Create database
create database test;
# Switch database
use test;
# Create table
CREATE TABLE student
(
id INT,
name VARCHAR(50),
age INT,
count BIGINT SUM DEFAULT '0'
)
AGGREGATE KEY (id,name,age)
DISTRIBUTED BY HASH(id) buckets 10
PROPERTIES("replication_num" = "1");
# insert data
insert into student values(1, 'Zhang San', 10, 1),(2, 'Li Si', 20, 2);
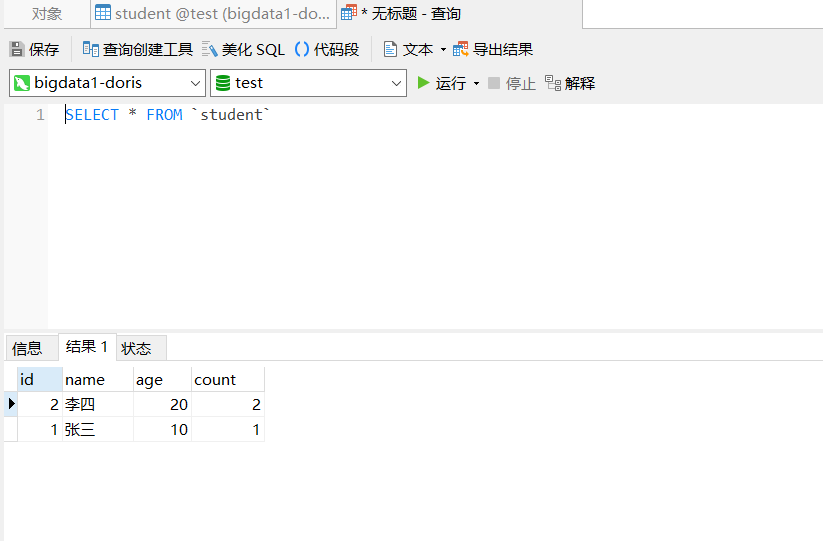
# Query results
mysql> select * from student;
+------+--------+------+-------+
| id | name | age | count |
+------+--------+------+-------+
| 2 | Li Si | 20 | 2 |
| 1 | Zhang San | 10 | 1 |
+------+--------+------+-------+
2 rows in set (0.07 sec)
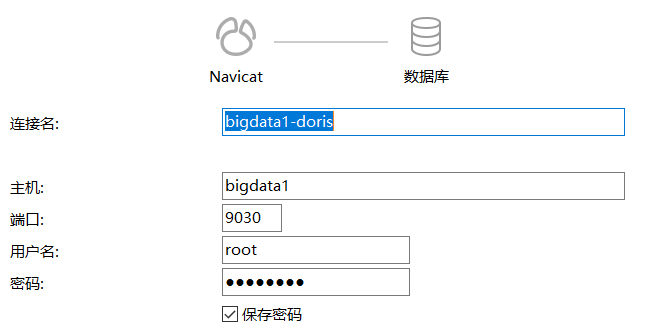
5.3. Accessed via navicat remote tools
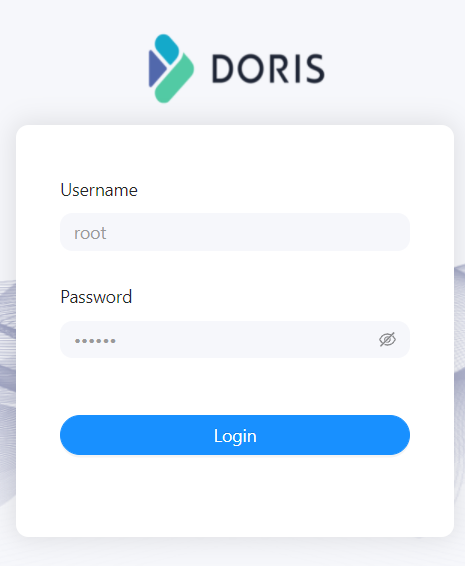
5.4. Access through web pages
Access url: http://bigdata1:8030/login
Login account: root
Login password: the password of root modified above (here is 123456)
6. Doris one click start stop script
#!/bin/bash

if [ "$1" = "start" ] ;then
        sh /opt/module/doris/fe/bin/start_fe.sh --daemon
        sh /opt/module/doris/be/bin/start_be.sh --daemon
        ssh bigdata2 "sh /opt/module/doris/fe/bin/start_fe.sh --daemon"
        ssh bigdata2 "sh /opt/module/doris/be/bin/start_be.sh --daemon"
        ssh bigdata3 "sh /opt/module/doris/fe/bin/start_fe.sh --daemon"
        ssh bigdata3 "sh /opt/module/doris/be/bin/start_be.sh --daemon"
fi

if [ "$1" = "stop" ] ;then
        sh /opt/module/doris/fe/bin/stop_fe.sh --daemon
        sh /opt/module/doris/be/bin/stop_be.sh --daemon
        ssh bigdata2 "sh /opt/module/doris/fe/bin/stop_fe.sh"
        ssh bigdata2 "sh /opt/module/doris/be/bin/stop_be.sh --daemon"
        ssh bigdata3 "sh /opt/module/doris/fe/bin/stop_fe.sh --daemon"
        ssh bigdata3 "sh /opt/module/doris/be/bin/stop_be.sh --daemon"
fi
Note: Doris series of blog posts are written through the learning records of Doris official website, in which personal understanding is added. If there are deficiencies, please understand ☺☺☺
Note: links to other related articles go here - > Summary of articles on basic knowledge points of big data