- From the official English website https://redis.io/download Or Chinese official website http://redis.cn/ Download Redis installation package
- After downloading, double-click to open VMware Workstation Pro, select the virtual machine CentOS 7 to use, click "open this virtual machine", and enter the root user and the corresponding password
- After downloading, use "Xshell 6 or Xftp 6 to connect to CentOS 7 virtual machine"
- Enter the local directory under the usr directory under the root directory through the following command. This directory is specially used to store some local shared resources
cd /usr/local/ - Use the following command to view the directory structure under the current directory. Note that these are two lowercase L. don't write it wrong
ll
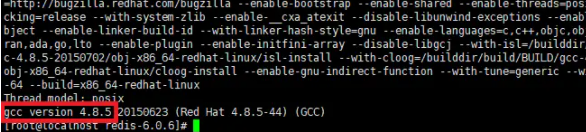
- Enter the following command to check whether gcc is installed in the system. Because redis is developed in C language, you must first confirm whether gcc environment is installed before installation
gcc -v

As shown in the above figure, gcc is not installed, and the version number of gcc will be displayed when gcc is installed
- If gcc is not installed, please enter the following command, and skip this step if it is installed
yum install gcc-c++ -y
Then look at the gcc version.
gcc -v
The version of gcc is 4.8.5, which is lower than 5.3. You need to enter the following command to upgrade the gcc version
yum -y install centos-release-scl && yum -y install devtoolset-9-gcc devtoolset-9-gcc-c++ devtoolset-9-binutils && scl enable devtoolset-9 bash
From the figure above, we can see that the gcc version has been upgraded to 9.3.1
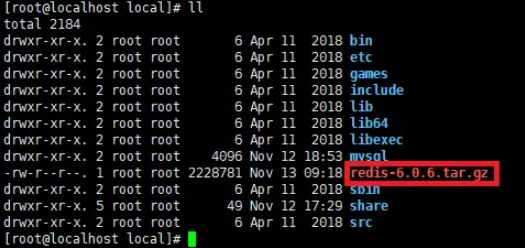
8. After installing the gcc environment, we upload the previously downloaded redis installation package to the local directory
- We can view the local directory by entering the following command in Xshell 6
ll
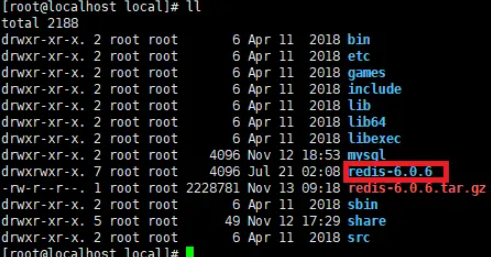
- Unzip the redis installation package with the following command
tar -zxvf redis-6.0.6.tar.gz
- Enter the following command to check the local directory to see if the decompression is successful
ll
- Enter the following command, switch the cd to the redis decompression directory, and execute the compilation
cd redis-6.0.6
make
-
If Hint: It's a good idea to run 'make test' appears as shown in the following figure 😉 ", indicating successful compilation

-
After successful compilation, enter the src directory and execute the following commands:
cd src
make install PREFIX=/usr/local/redis
- Start service:
(1) Foreground start
Enter the / usr/local/redis/conf directory and enter the following command to start
cd /usr/local/redis-6.0.6/src
./redis-server
(2) Background start
1) Enter / usr/local/redis, where there is a bin file to store the executable file. Create a new conf directory in / usr/local/redis to store the redis configuration file, and add the redis in / usr/local/redis-6.0.6 Copy conf to / usr/local/redis/conf
cd /usr/local/redis
mkdir conf
cp /usr/local/redis-6.0.6/redis.conf /usr/local/redis/conf/
2) Enter the conf directory and enter the following command to view redis Is the conf copied successfully
cd conf
ll
As shown in the figure above, redis Config copied successfully
3) Enter the following command to view redis Conf file
vi redis.conf
Press the "i" key to enter the editing mode, change the daemon no to daemon yes, press the "ESC" key to exit, and press ": wq!" Save and exit
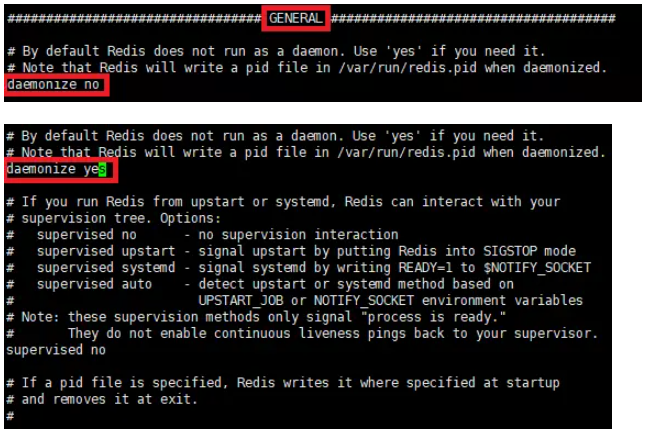
Note: enter redis If the conf file cannot be found and the daemon no is not found, don't worry. This is because all the files are not displayed. Press the down key to continuously display them
4) Enter the following command to start in the background
/usr/local/redis/bin/redis-server /usr/local/redis/conf/redis.conf
- Set startup
(1) Enter the following command to view redis server
vi /etc/systemd/system/redis.service
Press the "i" key to enter the editing mode, enter the following code, press the "ESC" key to exit the editing mode, and enter ": wq!" Command save and exit
[Unit]
Description=redis-server
After=network.target

[Service]
Type=forking
ExecStart=/usr/local/redis/bin/redis-server /usr/local/redis/conf/redis.conf
PrivateTmp=true

[Install]
WantedBy=multi-user.target
Note: ExecStart is configured as its own path
(2) Enter the following command to set startup
systemctl daemon-reload
systemctl start redis.service
systemctl enable redis.service
- Create redis command soft connection
ln -s /usr/local/redis/bin/redis-cli /usr/bin/redis
Thus, a redis file is created in the / usr/bin / directory
- Test redis
redis
ping
If the above situation occurs, it means that the redis soft connection is successfully created. After entering redis, you can start redis in the background
Note: generally, pressing Ctrl+C will exit, either after testing redis or after the foreground starts the redis program
- Common redis commands are as follows
systemctl start redis.service    #Start redis service
systemctl stop redis.service     #Stop redis service
systemctl restart redis.service  #Restart the service
systemctl status redis.service   #View the current status of the service
systemctl enable redis.service   #Set startup and self startup
systemctl disable redis.service  #Stop startup self startup
be careful:
(1) Setting redis startup self start, stop startup self start and stop redis service can only be executed when redis has been started. If it fails to start the redis service and enter the "systemctl start redis.service" command, the connection will be rejected. Redis can only be successfully started through foreground start or background start statements, generally background start, After all, we can use the terminal to input other commands later. The background startup commands are as follows:
/usr/local/redis/bin/redis-server /usr/local/redis/conf/redis.conf
(2) Background startup means that the virtual machine will fail when it is rebooted. You can only restart the redis service and cannot start it automatically. It needs to be set. Please see the previous detailed explanation of this step for the specific steps.