Introduction to Drone
Drone It is an extensible continuous integration engine based on Docker container technology. It is written in GO language and can be used for automatic testing, construction and even release. Each build is executed in a temporary Docker container, which enables developers to fully control their build environment and ensure isolation. Compared with the common Jenkins, the reason for choosing Drone is that it is very concise and not as complex as Jenkins. At the same time, it has the ability to meet basic needs and provides many practical applications plug-in unit E.g. git, Email, etc.
Drone official address: https://www.drone.io/
Drone open source address: https://github.com/harness/drone
HTTP servers are deployed internally by the company. HTTPS deployment is detailed in another big man's article: https://www.cnblogs.com/yan7/p/15881087.html
Drone version 2.9.1
Gitea version 1.17.6
Docker version 20.10.12
Harbor version 1.10.10
Warehouse project NET5
Drone CI-Gitea
Drone official document There are many Git warehouses supported in:

In this example, gitea, which is lighter than Gitlab, is also selected. The demo version of gitea is 1.17.6. Gitea deployment is not the focus of this article. Please move to other articles.
Create OAuth2 key
After logging into Gitea, click the avatar in the upper right corner to select settings (if there is no setting option, administrator permission is required):

Then select the application, create the OAuth2 application at the bottom, and fill in the name and redirection URI:
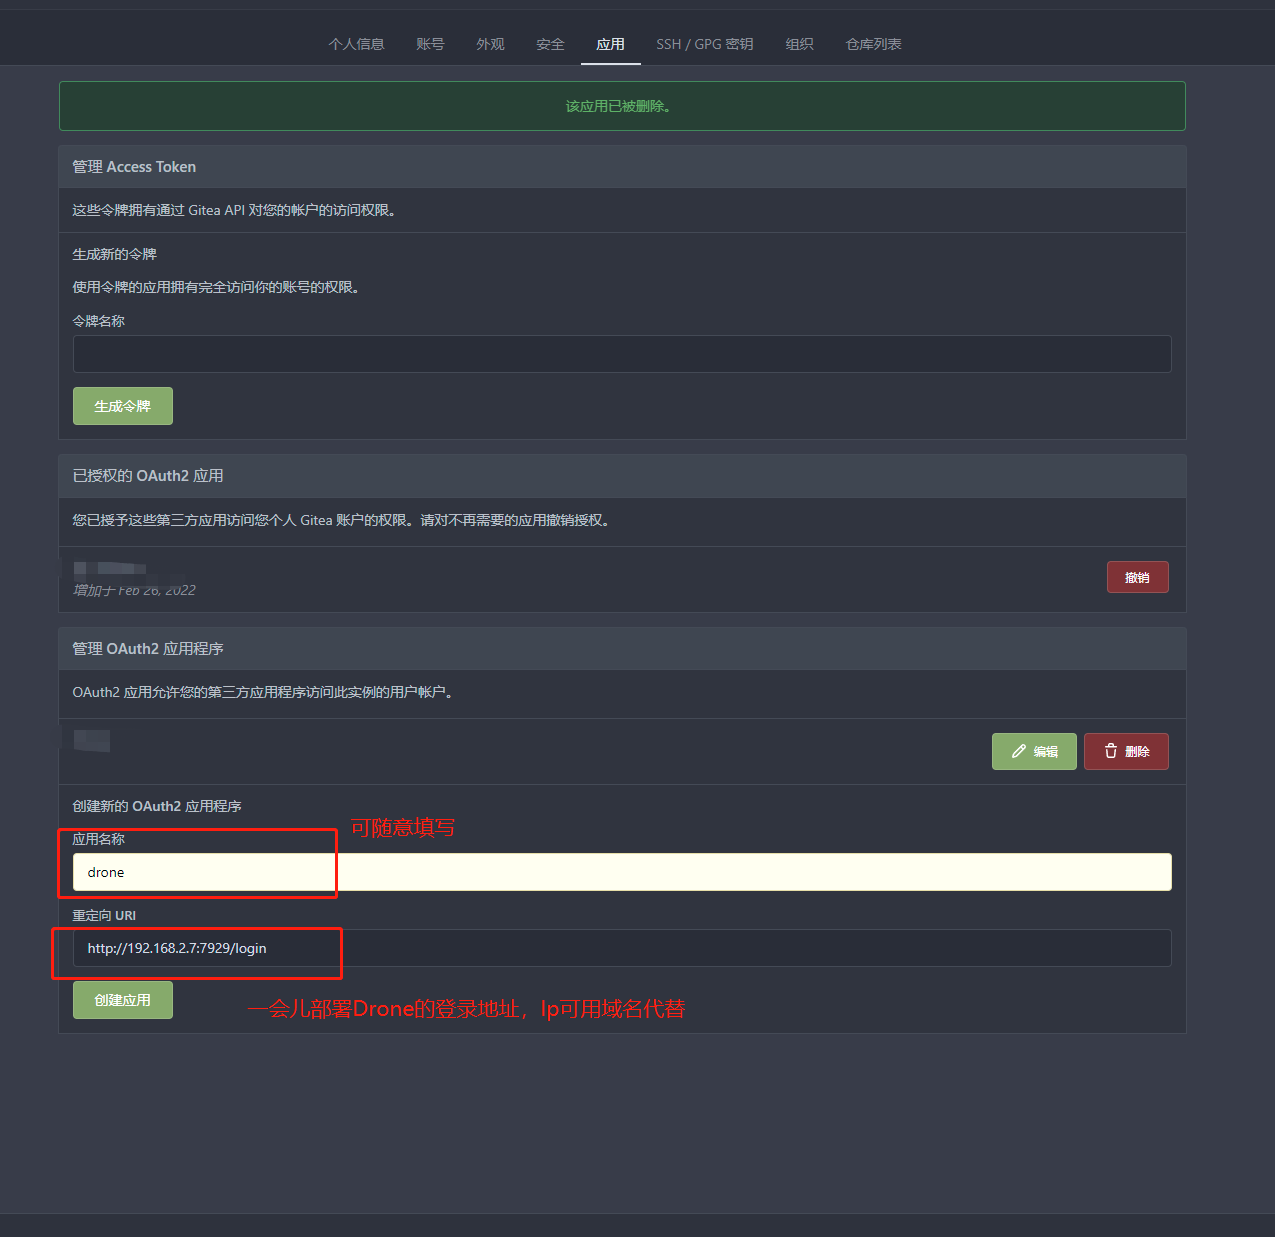
After clicking Create, you will jump to this page to remember the client ID and client key, which will be used later when deploying Drone. The client key will be displayed as * when exiting this page, so you especially need to remember the client key, and then click save.

Docker compose deployment
The Drone data store uses sqlite database by default. It also supports postgres and MySql
It is strongly recommended to use postgres instead of mysql in the official documents. Some operations are not optimized in mysql. https://docs.drone.io/server/storage/database/
PS: supports postgres9 6 and later, mysql:5.6 and later
DockerCompose.yml:
# Before executing DockerCompose, you need to create a docker network create drone
version: '3.9'
# Create custom network
networks:
  drone:
    name: drone
    driver: bridge
services:
  # Drone's database service
  db:
    # The name and version number of the pulled image
    image: postgres:latest
    # Container name
    container_name: drone_db
    # The container starts with Docker startup
    restart: always
    # Join the drone network
    networks:
      - drone
    # Port mapping, left host port: right container internal port
    ports:
      - '7931:5432'
    environment:
      - POSTGRES_USER=drone # PGSQL default user
      - POSTGRES_PASSWORD=drone # PGSQL default password
      - POSTGRES_DB=drone # PGSQL default database
    volumes:
      # Data persistence is attached to the host. The host path on the left: the path in the container on the right
      - /volumes/drone/db:/var/lib/postgresql/data
  # Drone Server service
  server:
    image: drone/drone:2.9.1 # At present, the latest version of drone is 2.9.1
    container_name: drone_server
    # The container starts with Docker startup
    restart: always
    # Join the drone network
    networks:
      - drone
    # Port mapping, left host port: right container internal port
    ports:
      - '7929:80'
    environment:
      - DRONE_SERVER_PROTO=http # Access protocol, create webHooks and redirect
      - DRONE_SERVER_HOST=192.168.2.7:7929 # Host name, create webHooks and redirect
      # The key to communicate with the drone runner can be generated using openssl in the server (Linux)
      - DRONE_RPC_SECRET=e1ad8a7f3dbc68ca9c21bcc949335009
      # Set the administrator account. The username and Gitea account names should be consistent
      - DRONE_USER_CREATE=username:young,admin:true
      - DRONE_DATABASE_DRIVER=postgres # Database type
      - DRONE_DATABASE_DATASOURCE=postgres://drone:drone@db/drone?sslmode=disable # database connection
      - DRONE_GIT_ALWAYS_AUTH=true # Pull code using oauth authentication information
      - DRONE_GITEA_SERVER=http://192.168.2.7:3000 # gitea server address
      - DRONE_GITEA_CLIENT_ID=2c921d85-e40e-41f8-90e0-c77c383786b5 # gitea client Id the client Id of OAuth2 just created
      - DRONE_GITEA_CLIENT_SECRET=ZVZoRWK6jR5mqgAIm6sB5VX6C2LPK1sYKv4hQWyTdULu # gitea client key the client key of OAuth2 just created
      - DRONE_GITEA_SKIP_VERIFY=false # tls authentication when gitea links are disabled

    volumes:
     # Data persistence is attached to the host. The host path on the left: the path in the container on the right
      - /volumes/drone/server:/data
      - /var/run/docker.sock:/var/run/docker.sock
     # Dependent container
    depends_on:
      - db
  # Drone Docker Runner
  runner:
    image: drone/drone-runner-docker:1.8.0 # At present, the latest version of drone runner docker is 1.8.0
    container_name: drone_runner
    restart: always
    networks:
      - drone # Join the drone network
    ports:
      - '7930:3000'
    environment:
      # name
      - DRONE_RUNNER_NAME=docker-runner
      - DRONE_RUNNER_CAPACITY=10 # Limit the number of concurrent pipes that the runner can execute. The default is 2
      - DRONE_RPC_PROTO=http # Access the drone server protocol
      - DRONE_RPC_HOST=server # Access the address of the drone server
      # The key to communicate with the drone server needs to be connected with the drone server above_ RPC_ Same as the secret value
      - DRONE_RPC_SECRET=e1ad8a7f3dbc68ca9c21bcc949335009
      - DRONE_UI_USERNAME=admin # UI user account of Drone Runner
      - DRONE_UI_PASSWORD=qwe123 # The UI user password of the Drone Runner
    volumes:
      - '/var/run/docker.sock:/var/run/docker.sock'
    depends_on:
      - server
Save the above file name: drone docker compose yml
Docker compose execution command:
docker-compose -f drone-docker-compose.yml up -d
# -f dockerfile file name. When the - f parameter is not used, the default is docker compose yml
# -d start and run the container in the background
If no error is reported, the docker will start successfully. Use the container to check the container status:

The display is in running status.
Activate repository after successful deployment
After successful deployment, visit the page of port 7929:
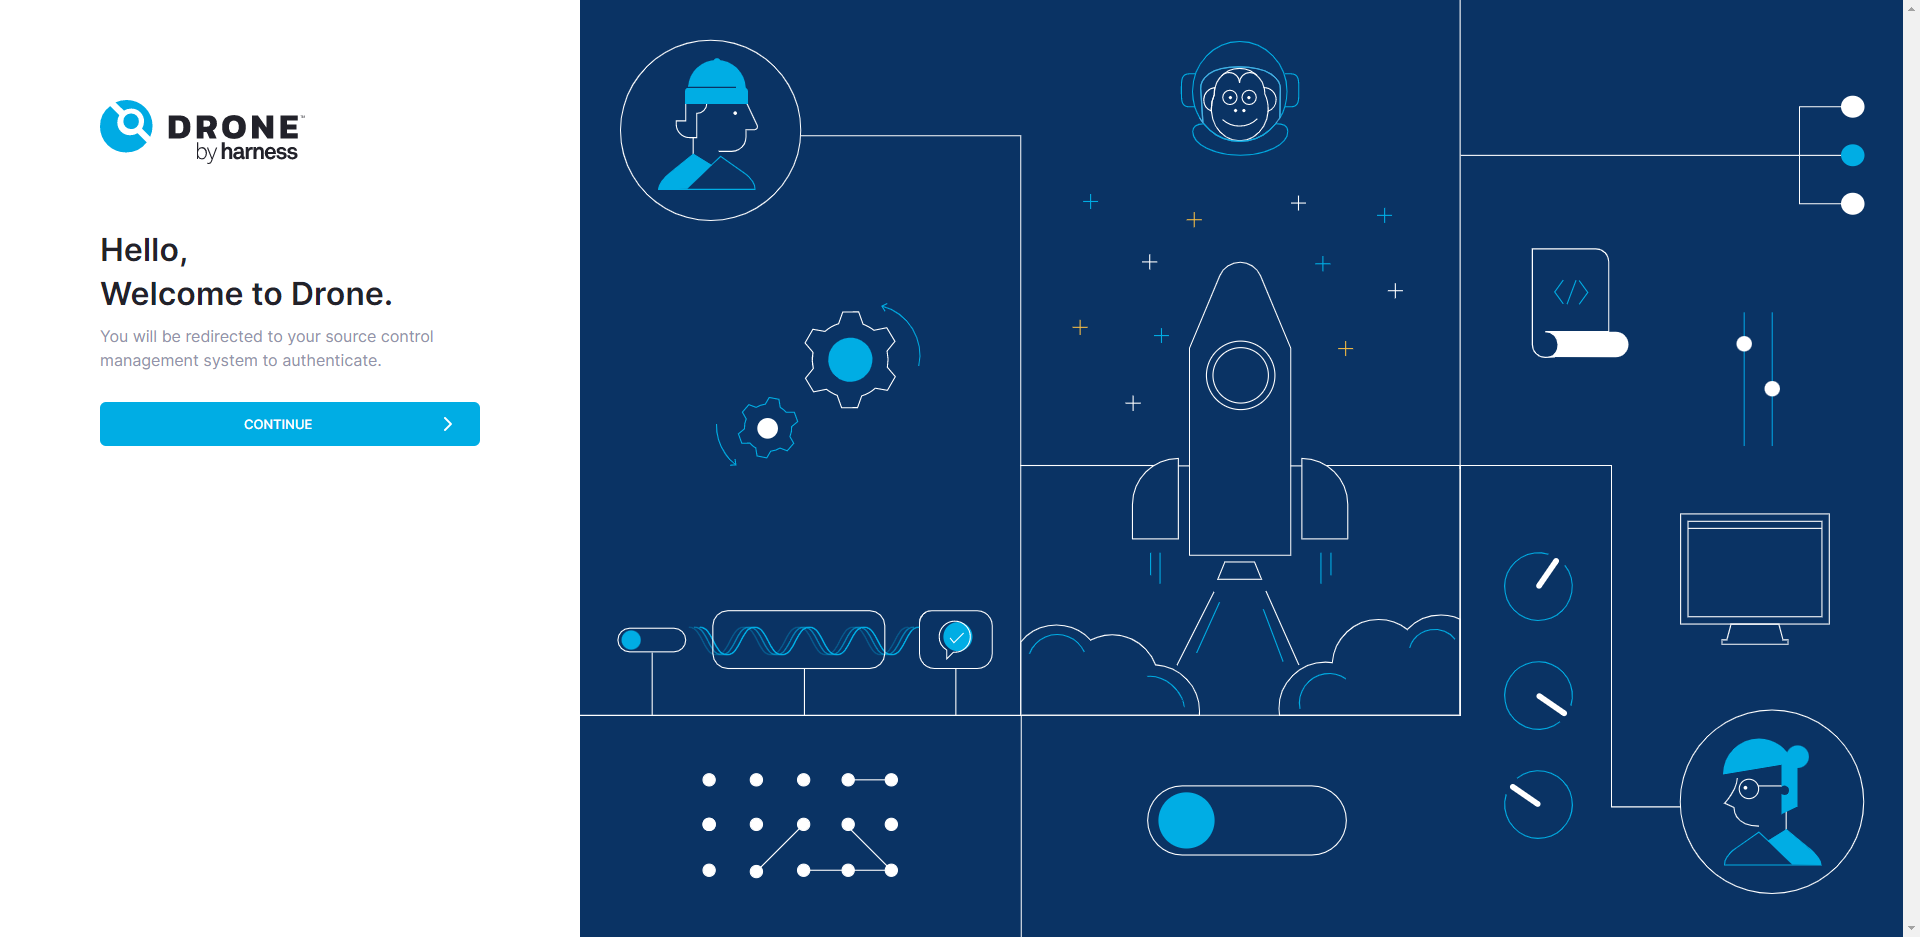
Clicking Continue will automatically jump to Gitea's authorization page:
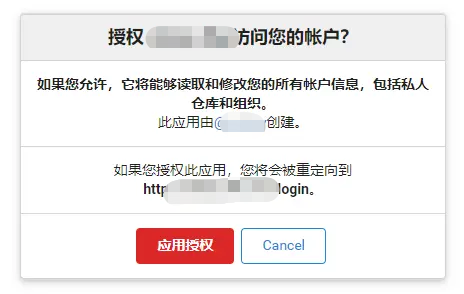
If your browser doesn't log in to Gitea, it will let you log in first:

After logging in and authorizing, we will jump to the page of Drone. We only need to authorize once. In the future, when we log in to Gitea, we will directly enter Drone.
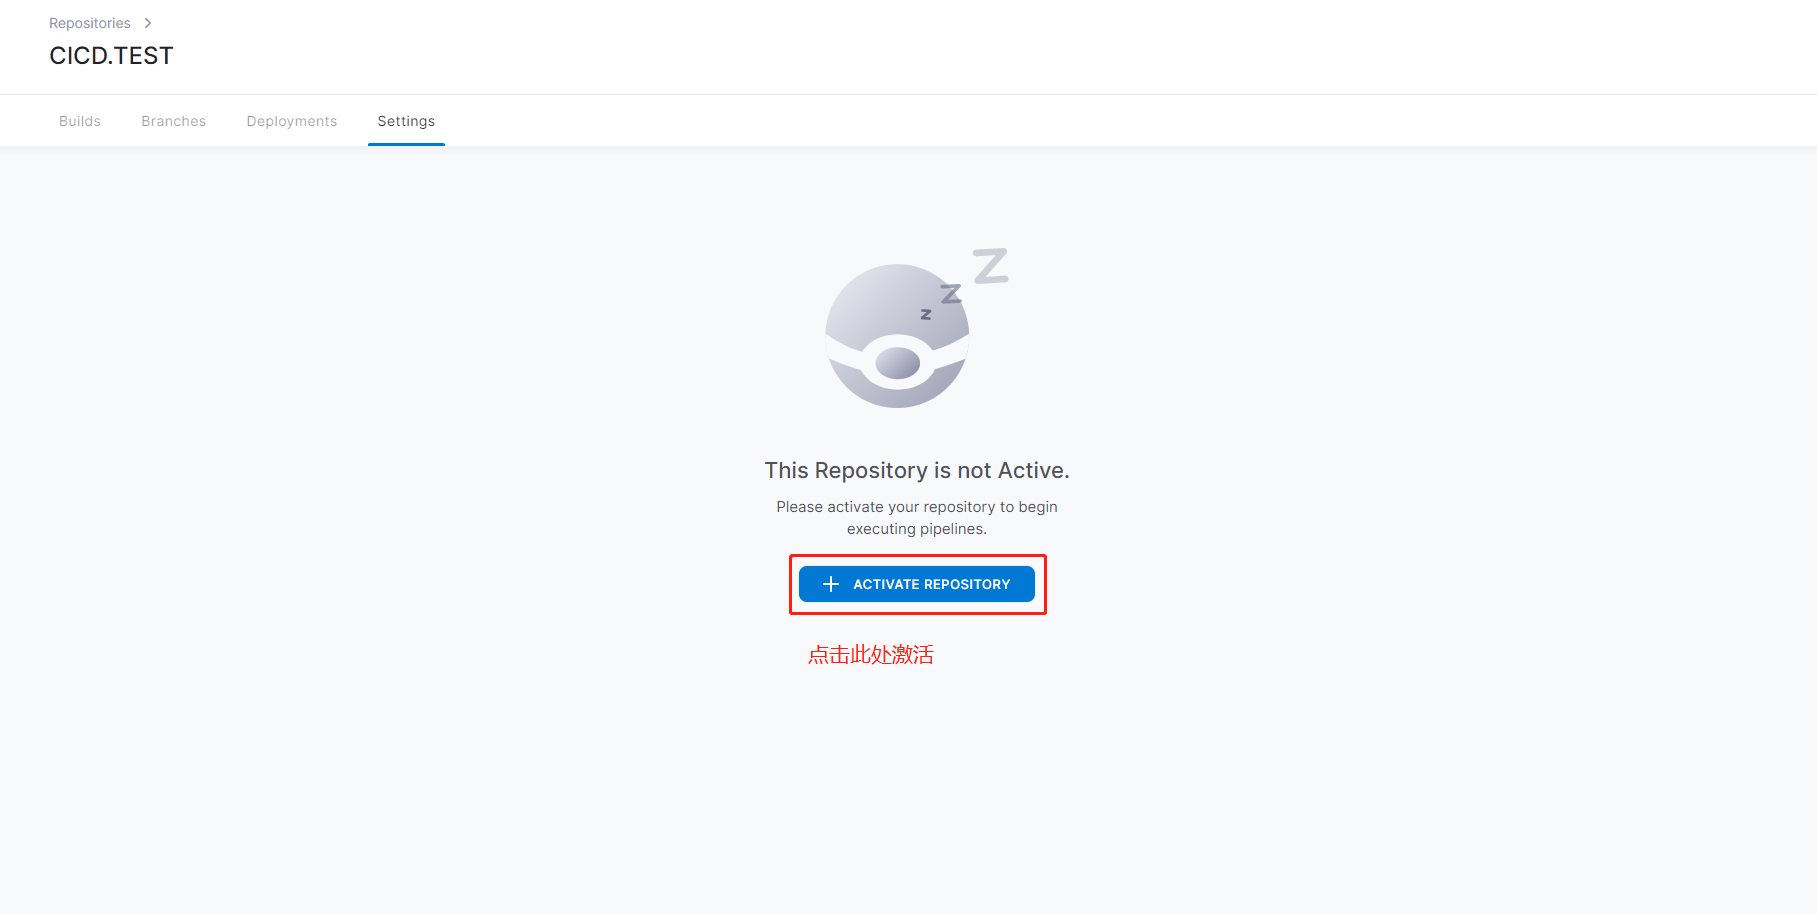
After entering Drone, you will see the inactive warehouse, select the warehouse to be activated, and then click to activate it:
After successful activation, go back to Gitea to check the activated warehouse, and you will see that the warehouse has automatically configured WebHook:
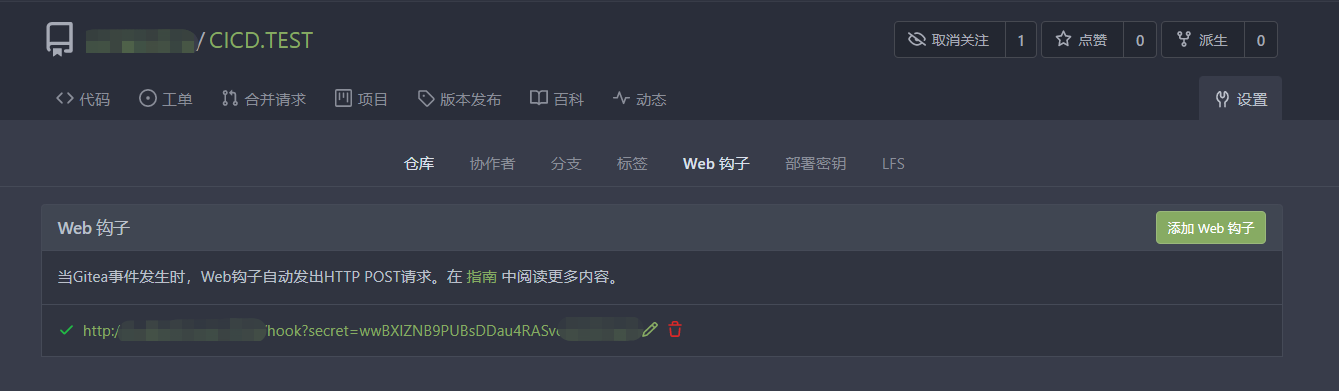
Click the hook, go in and find the test push. Click the test push. If the following green appears, the hook will be OK:

Small Tips:
If it is red and the corresponding content of HTTP contains context deadline exceeded (client. Timeout exceeded while awarding headers), please check whether there is one in the root directory of your warehouse drone.yml configuration file, I just put this configuration file in the wrong place and stuck it for most of the day...
Here, our Drone is installed. After activating the warehouse, we push a commit to the warehouse, and Gitea will send a message to inform Drone to build it automatically!
Configure automatic build of Drone
Drone supports different pipeline configurations in different environments. Here I use Docker Pipelines. Simply put, each step of drone's operation is carried out in a temporary drone container. The container will be automatically destroyed after operation, and the current working directory will be shared between containers.
I use the private image warehouse Harbor here. For the construction article of Harbor, click here.
Drone profile drone.yml as follows:
kind: pipeline # The default is pipeline
type: docker
name: deployment # Build file name

steps: # Array structure, pipelined construction steps
# Step 1 build
- name: build  # Because drone supports writing multiple construction tasks at the same time, you need to give this task a name
  pull: if-not-exists # If the image does not exist, pull it to avoid downloading it again every time
  image: mcr.microsoft.com/dotnet/sdk:5.0 #	Which docker image does this step run in? The image must exist in the docker hub. You can https://hub.docker.com/_/microsoft-dotnet-sdk View the corresponding version number
  commands:  # During the construction process, the commands that will be executed in turn. If the command exit code is not 0, the construction of this construction will be terminated
  - dotnet restore # Project reconstruction
  - dotnet build -c Release #Project build
  - echo ========Project generated successfully======== # output
# Step 2 push the image to Harbor
- name: publish 2 harbor
  pull: if-not-exists # If the image does not exist, pull it to avoid downloading it again every time
  image: plugins/docker
  settings:
    dockerfile: Demo/Dockerfile  # Location of Dockerfile in the project
    tags: latest # Generate a mirrored Tag tag
    insecure: true	# Is it unsafe
    registry: 192.168.2.7:8088	# Private image warehouse address
    repo: 192.168.2.7:8088/zhjs/drone-ci-demo   #Warehouse address / Harbor project name / user-defined image name
    username:
     # Read the user name from the secret space in the drone warehouse configuration
      from_secret: docker_username
    password:
    # Read the password from the secret space in the drone warehouse configuration
      from_secret: docker_password
# Step 3 use ssh to access the host, remove the image and run the deployment
- name: deploy
  pull: if-not-exists # If the image does not exist, pull it to avoid downloading it again every time
  image: appleboy/drone-ssh
  settings:
   # Host address to be deployed
    host: 192.168.2.7
   # Host ssh port
    port: 22
    # Host login user name
    username: root
    password:
    # Read the password from the secret space in the drone warehouse configuration
      from_secret: ssh_pwd
    script:
      - echo =========Pause and delete old containers========
      - docker stop drone-ci-demo-1 && docker rm drone-ci-demo-1
      - docker stop drone-ci-demo-2 && docker rm drone-ci-demo-2
      - echo =========Delete old mirror=============
      - docker rmi 192.168.2.7:8088/zhjs/drone-ci-demo:latest
      - echo ========from harbor Pull the latest image========
      - docker pull 192.168.2.7:8088/zhjs/drone-ci-demo:latest
      - echo ===============Run mirror==========
      - docker run --name drone-ci-demo-1 -p 5555:80 -d 192.168.2.7:8088/zhjs/drone-ci-demo:latest
      - docker run --name drone-ci-demo-2 -p 5556:80 -d 192.168.2.7:8088/zhjs/drone-ci-demo:latest
      - echo ========Deployment successful========
  # Step 4: after the deployment is completed, email notification will be sent
- name: notify
  pull: if-not-exists # If the image does not exist, pull it to avoid downloading it again every time
  image: drillster/drone-email
  settings:
    recipients_only: true # Only send to the specified mail recipient, not to the pipeline creator by default
    host: smtp.qq.com      #SMTP server, such as SMTP qq. com
    port: 465   #SMTP service port, such as QQ mailbox port 465
    subject: "Drone Build Complete!"  # Email subject content
    username:   #Mailbox user name
      from_secret: qqmail_username
    password:   #Mailbox password
      from_secret: qqmail_pwd
    from:
      from_secret: qqmail_username
    recipients:   #addressee
      from_secret: email_recipients  #  Format: xxxx,xxxx
  when:    #conditions for execution
    status:
    - success
    - changed
    - failure
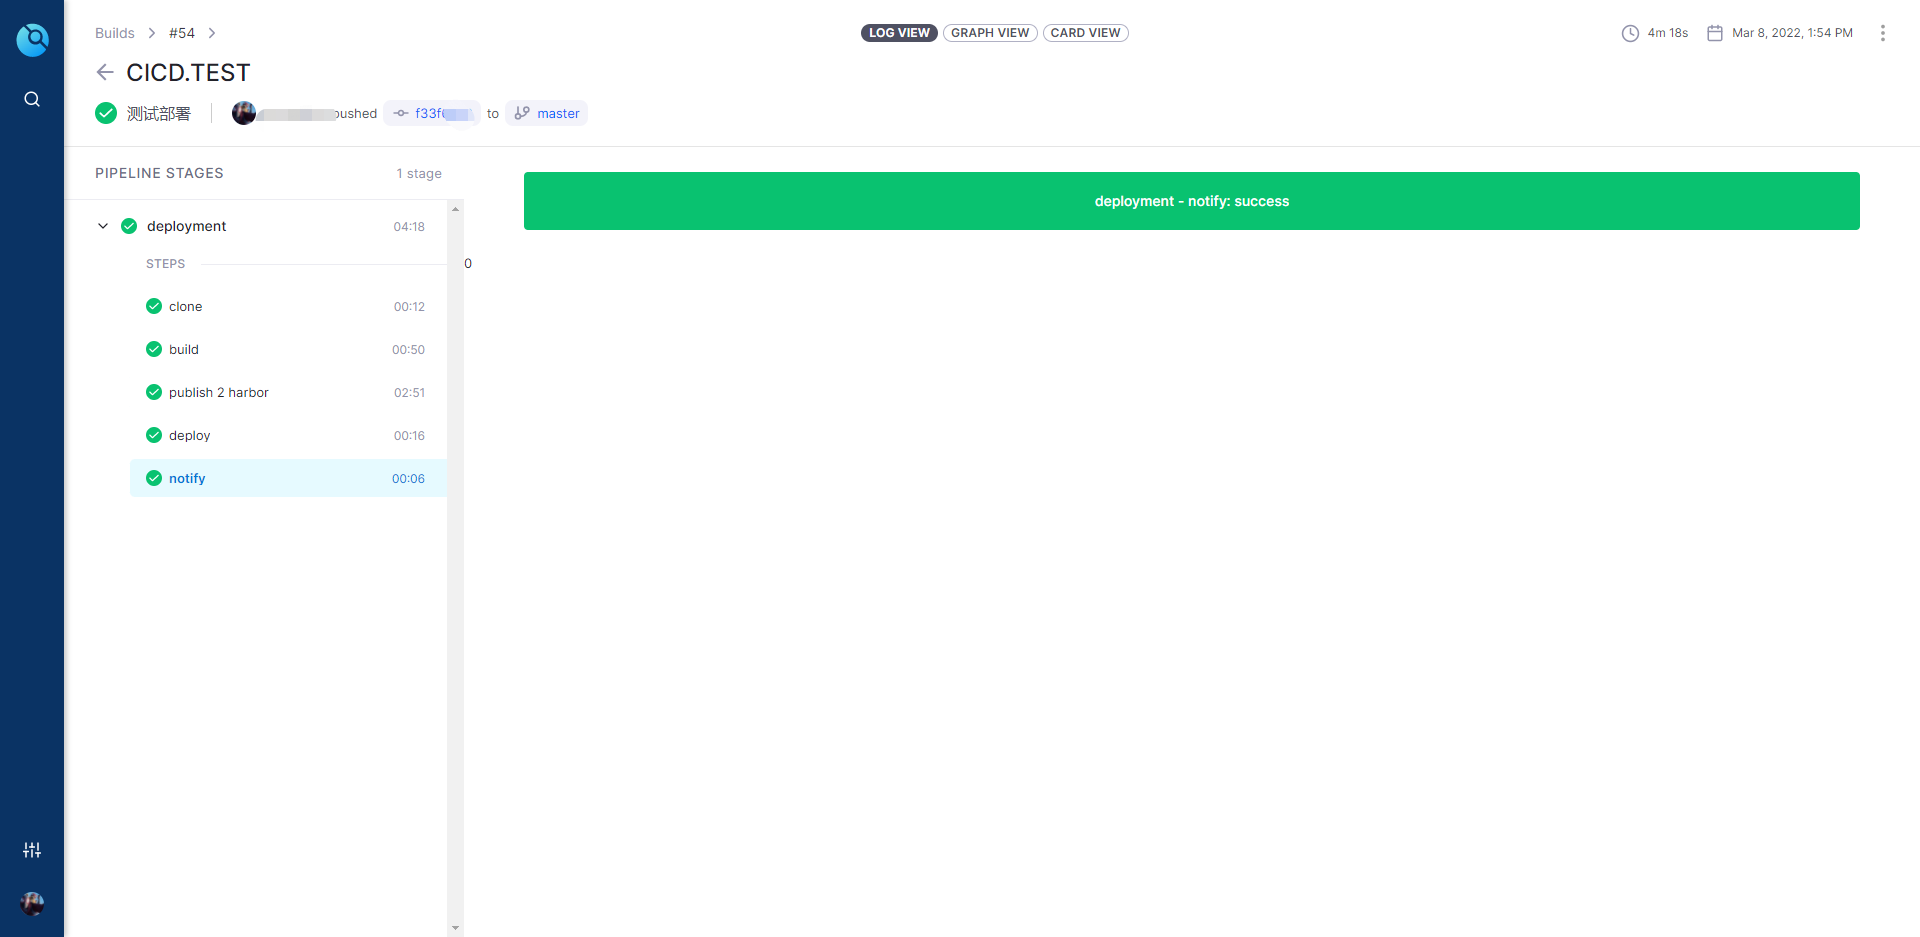
After the file is written, push the code git into the warehouse, Gitea will notify drane to deploy, and drane will find it Drone. The YML configuration file will be built according to the steps in the configuration file. During deployment, you can view the deployment of each step in Drone

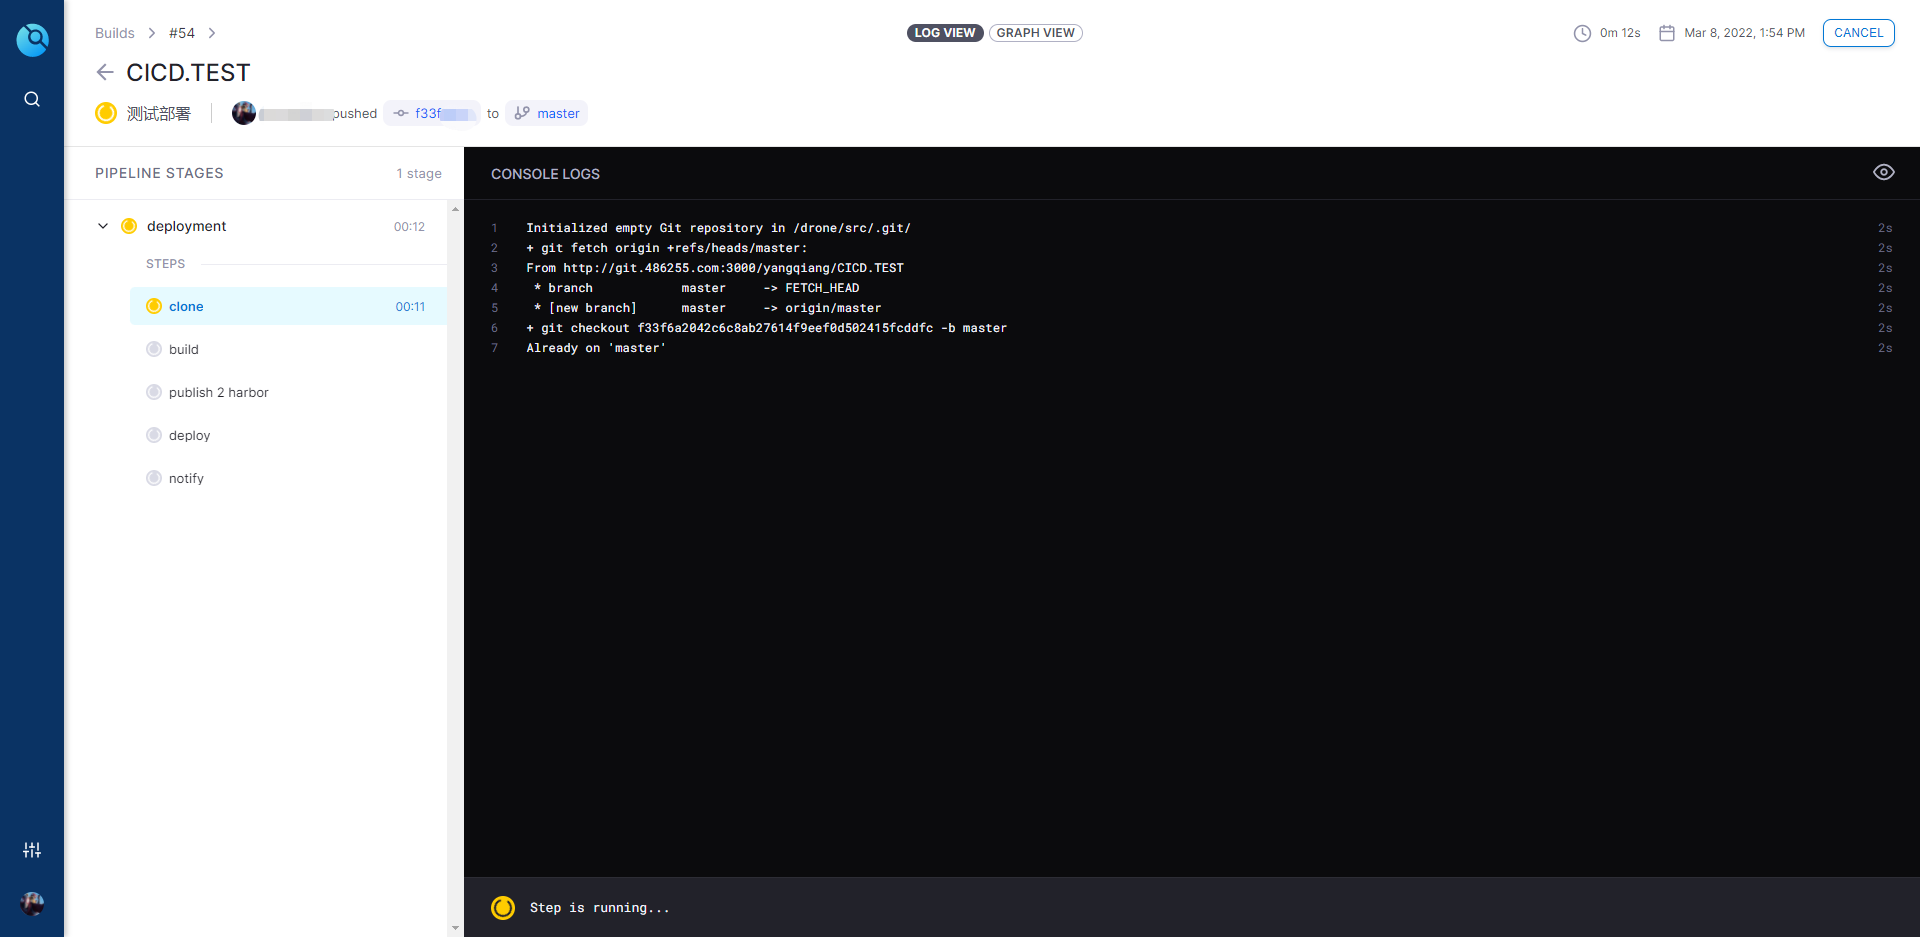
The speed of the first deployment may be slightly slow, and the final deployment is successful. Figure:

Conclusion: for small teams, the overall situation is completely acceptable. Once the automatic deployment is configured, all the compilation / testing / packaging / deployment work will be handed over to Drone, and we just need to focus on our code writing!