Official documents: https://help.aliyun.com/document_detail/31920.html
Maybe I'm too delicious. Many things written in the official documents feel incomplete or hard to find. Follow these steps to better understand and practice success.
1, Open sub user
2, Set various permissions
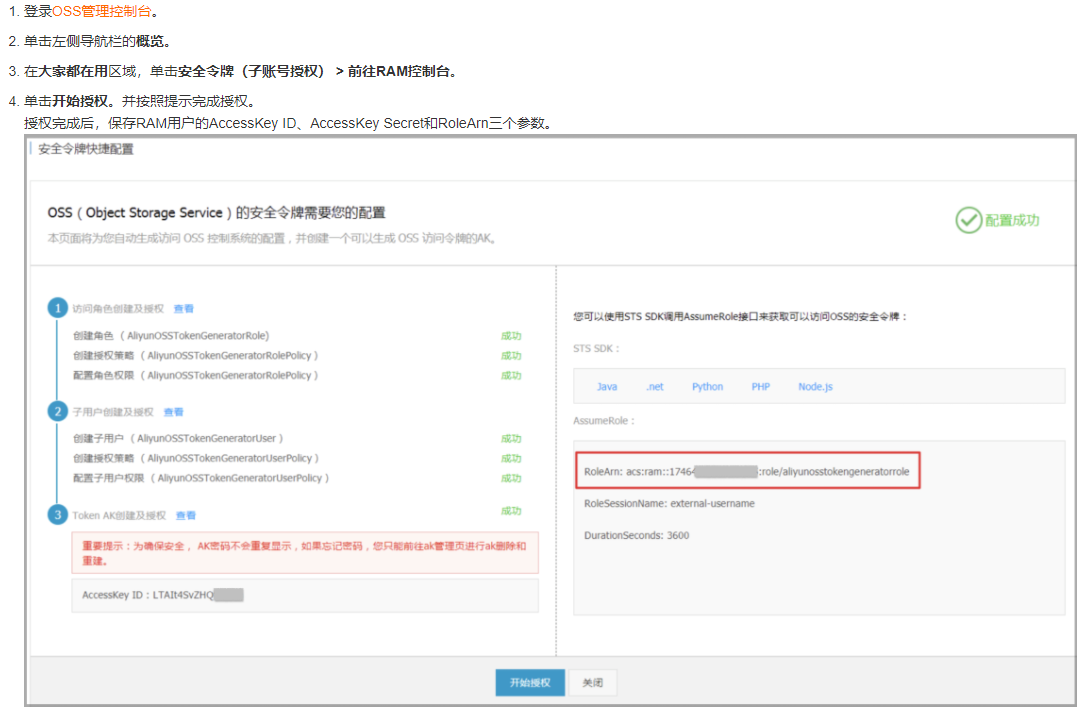
file: Access OSS Using STS temporary access credentials
After the sub-user is opened, this document understands the temporary access principle of STS
get into RAM console
1. Create RAM user
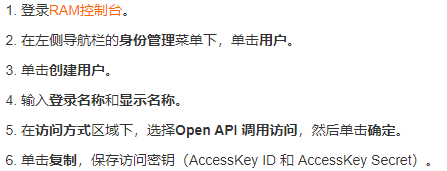
The access key must be saved and can only be seen when it is created
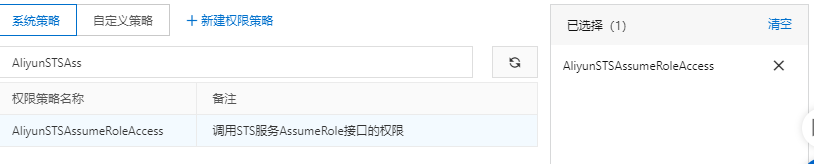
2. Add STS Service permissions for RAM users
- Click Add permission to the right of the created RAM user.
- On the add permission page, select aliyuntsassumeroleaccess permission.
3. Create a role for obtaining temporary access credentials (for authorizing RAM users)
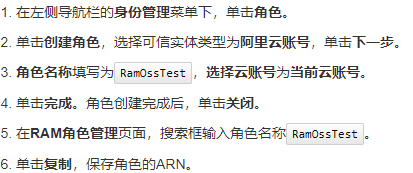
The role name should be given by itself, preferably with a specific meaning. Save ARN
4. Authorize the role to upload files
Create a custom permission policy for uploading files
- In the left navigation bar, under the permission management menu, click permission policy management.
- Click Create permission policy
- On the new user-defined permission policy page, fill in the policy name as RamTestPolicy [it is better to save the role name, so the meaning is more clear], select the script configuration for the configuration mode, and assign the role in the policy content to the directory exampledir under the target storage space examplebucket [this is the bucket you want to upload] [this is the folder where you allow this role to upload data and save] the permission to upload files.
{
   "Version": "1",
   "Statement": [
    {
          "Effect": "Allow",
          "Action": [
            "oss:PutObject"
          ],
          "Resource": [
            "acs:oss:*:*:examplebucket/exampledir",
            "acs:oss:*:*:examplebucket/exampledir/*"
          ]
    }
   ]
}
- Click OK
After creating a custom permission, grant this custom permission to the role
- In the left navigation bar, under the identity management menu, click roles.
- On the role page, find the target RAM role RamOssTest [role name you just created].
- Click Add permissions to the right of RAM role RamOssTest.
- In the custom policy tab under the add permission page, select the created custom permission policy RamTestPolicy.
- Click OK.
Note: the above customized policy only allows the role to upload files. It can only be uploaded to the exampledir folder in the examplebucket. If the subsequent address is not this folder, a permission error will be reported: You have no right to access this object because of bucket acl
You can also configure other more and more detailed permissions, such as: RAM Policy common examples
3, Obtain temporary access credentials and develop server-side interface
In document They have their own native server interfaces in various languages,
Because we also do web development, we have written an interface ourselves, and the development framework uses spring boot [in fact, it is the same as SSM, but the configuration is simpler]
Interface code according to Official documents Changed.
Server interface code:
@RestController //The common Controller returns the response body in json format, that is, @ ResponseBody
public class OssController {

    @Autowired
    OSS ossClient;
	//Take the values of accessId, sts_endpoint, accessKeySecret and roleArn from the configuration file
    @Value("${spring.cloud.alicloud.access-key}")
    private String accessId;
    @Value("${sts_endpoint}")
    private String sts_endpoint;
    @Value("${roleArn}")
    private String roleArn;
    @Value("${roleSessionName}")
    private String roleSessionName;
    @Value("${spring.cloud.alicloud.secret-key:}")
    private String accessKeySecret;

    /**
     * Get temporary access credentials
     * @return
     */
    @RequestMapping("/oss/sts")
    public R sts(){
        // The user-defined role session name is used to distinguish different tokens. For example, it can be filled in as SessionTest.
        String roleSessionName = "SessionTest";

        String policy = "{\n" +
                "    \"Version\": \"1\", \n" +
                "    \"Statement\": [\n" +
                "        {\n" +
                "            \"Action\": [\n" +
                "                \"oss:PutObject\"\n" +
                "            ], \n" +
                "            \"Resource\": [\n" +
                "                \"acs:oss:*:*:sleep-monitor/*\" \n" +
                "            ], \n" +
                "            \"Effect\": \"Allow\"\n" +
                "        }\n" +
                "    ]\n" +
                "}";
        Map<String, Object> respMap = null;
        try {
            // Regionid indicates the region ID of RAM. Taking East China 1 (Hangzhou) region as an example, the regionid is filled in as CN Hangzhou. You can also keep the default value, which is an empty string ("").
            String regionId = "cn-beijing";
            // Add an endpoint.
            DefaultProfile.addEndpoint(regionId, "Sts", sts_endpoint);
            // Construct the default profile.
            IClientProfile profile = DefaultProfile.getProfile(regionId, accessId, accessKeySecret);
            // Construct client.
            DefaultAcsClient client = new DefaultAcsClient(profile);
            final AssumeRoleRequest request = new AssumeRoleRequest();
            request.setSysMethod(MethodType.POST);
            request.setRoleArn(roleArn);
            request.setRoleSessionName(roleSessionName);
            request.setPolicy(policy); // If the policy is empty, the user will get all permissions under this role.
            request.setDurationSeconds(3600L); // Set the validity time of temporary access credentials to 3600 seconds.
            final AssumeRoleResponse response = client.getAcsResponse(request);
            respMap = new HashMap<>();
            System.out.println("Expiration: " + response.getCredentials().getExpiration());
            System.out.println("Access Key Id: " + response.getCredentials().getAccessKeyId());
            System.out.println("Access Key Secret: " + response.getCredentials().getAccessKeySecret());
            System.out.println("Security Token: " + response.getCredentials().getSecurityToken());
            System.out.println("RequestId: " + response.getRequestId());

            respMap.put("Expiration",response.getCredentials().getExpiration());
            respMap.put("AccessKeyId",response.getCredentials().getAccessKeyId());
            respMap.put("AccessKeySecret",response.getCredentials().getAccessKeySecret());
            respMap.put("SecurityToken",response.getCredentials().getSecurityToken());
            respMap.put("RequestId",response.getCredentials().getAccessKeyId());
            respMap.put("StatusCode",200);

            return R.ok(respMap);

        } catch (ClientException e) {
            System.out.println("Failed: ");
            System.out.println("Error code: " + e.getErrCode());
            System.out.println("Error message: " + e.getErrMsg());
            System.out.println("RequestId: " + e.getRequestId());
            return R.error().put("data",e);
        }
    }
}
No matter which way the server is written, the following json data must be returned correctly,
Including StatusCode, AccessKeyId, AccessKeySecret, SecurityToken and Expiration
{
    "StatusCode":200,
    "AccessKeyId":"STS.3p***dgagdasdg",
    "AccessKeySecret":"rpnwO9***tGdrddgsR2YrTtI",
	"SecurityToken":"CAES+wMIARKAAZhjH0EUOIhJMQBMjRywXq7MQ/cjLYg80Aho1ek0Jm63XMhr9Oc5s˙∂˙∂3qaPer8p1YaX1NTDiCFZWFkvlHf1pQhuxfKBc+mRR9KAbHUefqH+rdjZqjTF7p2m1wJXP8S6k+G2MpHrUe6TYBkJ43GhhTVFMuM3BZajY3VjZWOXBIODRIR1FKZjIiEjMzMzE0MjY0NzM5MTE4NjkxMSoLY2xpZGSSDgSDGAGESGTETqOio6c2RrLWRlbW8vKgoUYWNzOm9zczoqOio6c2RrLWRlbW9KEDExNDg5MzAxMDcyNDY4MThSBTI2ODQyWg9Bc3N1bWVkUm9sZVVzZXJgAGoSMzMzMTQyNjQ3MzkxMTg2OTExcglzZGstZGVtbzI=",
   	"Expiration":"2017-12-12T07:49:09Z"
}
Run the server, test and access your service address to see if you can correctly return json data

4, Upload files from Android phones to alicloud OSS
First, you need to introduce oss dependencies: file
- You can add the following directly in the Android Studio environment:
implementation 'com.aliyun.dpa:oss-android-sdk:2.9.10'
- You can also import jar packages
Import the three jar packages aliyun-oss-sdk-android-2.9.5.jar, okhttp-3.x.x.jar and okio-1.x.x.jar into the libs directory.
Download of jar package Baidu online disk:
Link: https://pan.baidu.com/s/1Odc6kDM2_6rlbjo3s_aepA
Extraction code: lyg6
[when I directly added dependencies in the build.gradle file, there was a conflict between dependencies and okhttp jar packages, so I chose the second method]
Direct code:
    private void uploadFileTest() {

        if (HttpUtil.isNetworkAvailable(requireActivity())) {//Determine whether there is a network
            String endpoint = "oss-cn-beijing.aliyuncs.com";
            String buckName = "sleep-monitor";
            String stsServer = RequestCallback.baseAddress + "api/thirdparty/oss/sts";//Address of the requested sts
            // It is recommended to use OSSAuthCredentialsProvider. When the token expires, it can be updated in time.
            OSSCredentialProvider credentialProvider = new OSSAuthCredentialsProvider(stsServer);
//            //If the configuration class is not set, there will be a default configuration.
//            ClientConfiguration conf = new ClientConfiguration();
//            conf.setConnectionTimeout(15 * 1000); / / connection timeout, 15 seconds by default.
//            conf.setSocketTimeout(15 * 1000); // socket timeout, 15 seconds by default.
//            conf.setMaxConcurrentRequest(5); / / maximum concurrent requests, 5 by default.
//            conf.setMaxErrorRetry(2); / / the maximum number of retries after failure. The default is 2.
            OSS oss = new OSSClient(MyApplication.getAppContext(), endpoint, credentialProvider);
            File[] files = MyApplication.getAppContext().getExternalFilesDirs(null);//Get the internal storage location under the application file
            File file = new File(files[0],"20211013 EEG packet loss test 20211013191115.csv");//Files to upload
            //The second variable is the uploaded folder, which must be the folder written in the previous custom permission
            PutObjectRequest put = new PutObjectRequest(buckName, "sleep APP/APP test.txt", String.valueOf(file));
            try {
                Log.d(TAG,"Start uploading...");
                PutObjectResult putResult = oss.putObject(put);
                Log.d(TAG,"PutObject: UploadSuccess");
                Log.d(TAG,"ETag:" + putResult.getETag());
                Log.d(TAG,"RequestId:" + putResult.getRequestId());
            } catch (ClientException e) {
                // Client exceptions, such as network exceptions.
                Log.e(TAG,"Client exception:" + e);
                e.printStackTrace();
            } catch (ServiceException e) {
                // Server exception.
                Log.e(TAG,"RequestId:" + e.getRequestId());
                Log.e(TAG,"ErrorCode:"+ e.getErrorCode());
                Log.e(TAG,"HostId:"+ e.getHostId());
                Log.e(TAG,"RawMessage:"+ e.getRawMessage());
            }
        } else {
            ToastUtil.showShortToast(MyApplication.getAppContext().getResources().getString(R.string.network_enable));
        }
    }