1. Element basic usage
1.1 introduction to Element
-
Element: website rapid prototyping tool. Is it hungry? A set of Vue based website component library provided by the front-end development team of the company.
-
Vue is required before using Element.
-
Components: components that make up a web page, such as hyperlinks, buttons, pictures, tables, and so on~
-
Element official website: https://element.eleme.cn/#/zh-CN
-
Self completion button

-
Button provided by Element

1.2. Element quick start
-
Development steps
-
Download the Element core library.
-
Import Element style file.
-
Introduce the Vue core js file.
-
Import the Element core js file.
-
Write button labels.
-
Load elements through Vue core objects.
#Guide library
a. Import the component library (put the data / element / element UI into the webapp path)
b. Create a JS directory under webapp and import vue.js
c. Introduce vue and elementUI related files in the html to use elementUI
-
-
code implementation
<!DOCTYPE html>
<html lang="en">
<head>
    <meta charset="UTF-8">
    <meta name="viewport" content="width=device-width, initial-scale=1.0">
    <title>quick get start</title>

    <!--
        1. stay html Declaration introduction vue.js
        2. stay html Declaration introduction element Some documents required
    -->
    <script src="../js/vue.js"></script>

    <!-- Import style
        1). Online edition
        2). Local version
     -->
   <!-- <link rel="stylesheet" href="https://unpkg.com/element-ui/lib/theme-chalk/index.css">-->

     <link rel="stylesheet" href="../element-ui/lib/theme-chalk/index.css">
    <!-- Import component library -->
 <!--   <script src="https://unpkg.com/element-ui/lib/index.js"></script>  -->
    <script src="../element-ui/lib/index.js"></script>

</head>
<body>
    <input type="button" value="Native button">
    <button>Native button 2</button>
    <br>
    <!--
       TODO:  elementUI Components must be placed in vue In view of
       1. Pay attention to the specification first : elementUI be based on vue
       2. Copy the document according to the prototype
       3. Adjust the details
    -->
    <div id="div">
        <br>
        <el-row>
            <el-button>Default button</el-button>
            <el-button type="primary">Main button</el-button>
            <el-button type="success">Success button</el-button>
            <el-button type="info">Information button</el-button>
            <el-button type="warning">Warning button</el-button>
            <el-button type="danger">Danger button</el-button>
        </el-row>
        <br>
        <el-row>
            <el-button plain>Plain button</el-button>
            <el-button type="primary" plain>Main button</el-button>
            <el-button type="success" plain>Success button</el-button>
            <el-button type="info" plain>Information button</el-button>
            <el-button type="warning" plain>Warning button</el-button>
            <el-button type="danger" plain>Danger button</el-button>
        </el-row>
        <br>
        <el-row>
            <el-button round>Fillet button</el-button>
            <el-button type="primary" round>Main button</el-button>
            <el-button type="success" round>Success button</el-button>
            <el-button type="info" round>Information button</el-button>
            <el-button type="warning" round>Warning button</el-button>
            <el-button type="danger" round>Danger button</el-button>
        </el-row>
        <br>
        <el-row>
            <el-button icon="el-icon-platform-eleme" circle size="mini"></el-button>
            <el-button type="primary" icon="el-icon-edit" circle></el-button>
            <el-button type="success" icon="el-icon-check" circle></el-button>
            <el-button type="info" icon="el-icon-message" circle></el-button>
            <el-button type="warning" icon="el-icon-star-off" circle></el-button>
            <el-button type="danger" icon="el-icon-delete" circle></el-button>
        </el-row>
    </div>
</body>
<script>
    new Vue({
        el:"#div"
    });
</script>
</html>
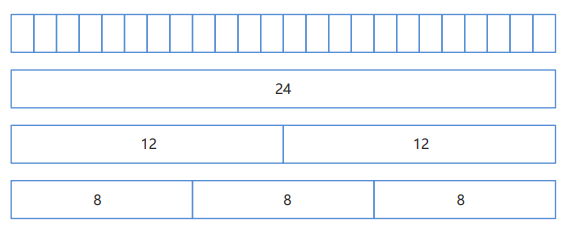
1.3 foundation layout
Divide the page into up to 24 parts and cut them freely.
-
code implementation
<!DOCTYPE html>
<html lang="en">
<head>
    <meta charset="UTF-8">
    <meta name="viewport" content="width=device-width, initial-scale=1.0">
    <title>Basic layout</title>
    <link rel="stylesheet" href="../element-ui/lib/theme-chalk/index.css">
    <script src="../js/vue.js"></script>
    <script src="../element-ui/lib/index.js"></script>
    <style>
        .el-row {
            /* Line spacing is 20px */
            margin-bottom: 20px;
        }
        .bg-purple-dark {
            background: red;
        }
        .bg-purple {
            background: blue;
        }
        .bg-purple-light {
            background: green;
        }
        .grid-content {
            /* Frame roundness */
            border-radius: 4px;
            /* The row height is 36px */
            min-height: 36px;
        }
    </style>
</head>
<body>
    <div id="div">
        <el-row>
            <el-col :span="24"><div class="grid-content bg-purple-dark"></div></el-col>
        </el-row>
        <el-row>
            <el-col :span="12"><div class="grid-content bg-purple"></div></el-col>
            <el-col :span="12"><div class="grid-content bg-purple-light"></div></el-col>
        </el-row>
        <el-row>
            <el-col :span="8"><div class="grid-content bg-purple"></div></el-col>
            <el-col :span="8"><div class="grid-content bg-purple-light"></div></el-col>
            <el-col :span="8"><div class="grid-content bg-purple"></div></el-col>
        </el-row>
        <el-row>
            <el-col :span="6"><div class="grid-content bg-purple"></div></el-col>
            <el-col :span="6"><div class="grid-content bg-purple-light"></div></el-col>
            <el-col :span="6"><div class="grid-content bg-purple"></div></el-col>
            <el-col :span="6"><div class="grid-content bg-purple-light"></div></el-col>
        </el-row>
        <el-row>
            <el-col :span="4"><div class="grid-content bg-purple"></div></el-col>
            <el-col :span="4"><div class="grid-content bg-purple-light"></div></el-col>
            <el-col :span="4"><div class="grid-content bg-purple"></div></el-col>
            <el-col :span="4"><div class="grid-content bg-purple-light"></div></el-col>
            <el-col :span="4"><div class="grid-content bg-purple"></div></el-col>
            <el-col :span="4"><div class="grid-content bg-purple-light"></div></el-col>
        </el-row>

    </div>
</body>
<script>
    new Vue({
        el:"#div"
    });
</script>
</html>
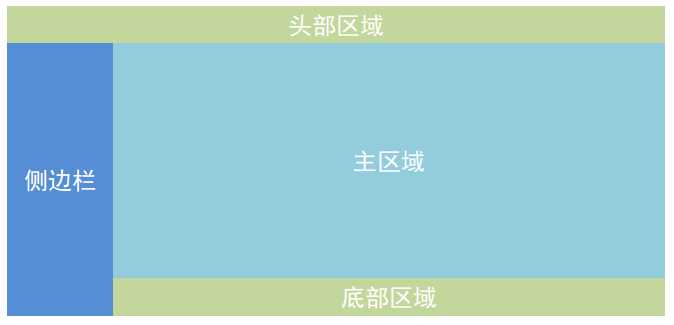
1.4 container layout
Divide the page into header area, sidebar area, main area and bottom area.
The container component used for layout is convenient to quickly build the basic structure of the page:

<el-container>: Outer container. When a child element contains <el-header> or <el-footer> When, all child elements will be arranged vertically up and down, otherwise they will be arranged horizontally left and right.

<el-header>: Top bar container.

<el-aside>: Sidebar container.

<el-main>: Main area containers.

<el-footer>: Bottom bar container.

The above components use flex Layout, please determine whether the target browser is compatible before use. In addition,<el-container> The child element of can only be the last four, and the parent element of the last four can only be <el-container>.
-
code implementation
<!DOCTYPE html>
<html lang="en">
<head>
    <meta charset="UTF-8">
    <meta name="viewport" content="width=device-width, initial-scale=1.0">
    <title>Container layout</title>
    <link rel="stylesheet" href="element-ui/lib/theme-chalk/index.css">
    <script src="js/vue.js"></script>
    <script src="element-ui/lib/index.js"></script>
    <style>
        .el-header, .el-footer {
            background-color: #d18e66;
            color: #333;
            text-align: center;
            height: 100px;
        }
        .el-aside {
            background-color: #55e658;
            color: #333;
            text-align: center;
            height: 580px;
        }
        .el-main {
            background-color: #5fb1f3;
            color: #333;
            text-align: center;
            height: 520px;
        }
    </style>
</head>
<body>
    <div id="div">
        <el-container>
            <el-header>Head area</el-header>
            <el-container>
              <el-aside width="200px">Sidebar area</el-aside>
              <el-container>
                <el-main>Main area</el-main>
                <el-footer>Bottom area</el-footer>
              </el-container>
            </el-container>
          </el-container>
    </div>
</body>
<script>
    new Vue({
        el:"#div"
    });
</script>
</html>
1.5 form components
It is composed of input box, drop-down list, radio box, multi box and other controls to collect, verify and submit data.
-
code implementation
<!DOCTYPE html>
<html lang="en">
<head>
    <meta charset="UTF-8">
    <meta name="viewport" content="width=device-width, initial-scale=1.0">
    <title>Form component</title>
    <link rel="stylesheet" href="../element-ui/lib/theme-chalk/index.css">
    <script src="../js/vue.js"></script>
    <script src="../element-ui/lib/index.js"></script>
</head>
<body>
    <div id="div">
        <!--
            el-form Label properties
                1. model: Form data object (namely data Property name in)
                2. rules : Form validation rules
                3. ref : Represents a reference

           el-form-item Label properties
                1. label : String before specifying options
                2. prop : attribute (namely data Properties in form objects in)
        -->
        <el-form :model="ruleForm" :rules="rules" ref="ruleForm" label-width="100px" class="demo-ruleForm">
            <el-form-item label="Activity name" prop="name">
                <el-input v-model="ruleForm.name"></el-input>
            </el-form-item>
            <el-form-item label="zone of action" prop="region">
                <el-select v-model="ruleForm.region" placeholder="Please select an active area">
                    <el-option label="Region I" value="shanghai"></el-option>
                    <el-option label="Region II" value="beijing"></el-option>
                </el-select>
            </el-form-item>
            <el-form-item label="Activity time" required>
                <el-col :span="11">
                    <el-form-item prop="date1">
                        <el-date-picker type="date" placeholder="Select date" v-model="ruleForm.date1" style="width: 100%;"></el-date-picker>
                    </el-form-item>
                </el-col>
                <el-col class="line" :span="2">-</el-col>
                <el-col :span="11">
                    <el-form-item prop="date2">
                        <el-time-picker placeholder="Select time" v-model="ruleForm.date2" style="width: 100%;"></el-time-picker>
                    </el-form-item>
                </el-col>
            </el-form-item>
            <el-form-item label="Instant delivery" prop="delivery">
                <el-switch v-model="ruleForm.delivery"></el-switch>
            </el-form-item>
            <el-form-item label="Activity nature" prop="type">
                <el-checkbox-group v-model="ruleForm.type">
                    <el-checkbox label="delicious food/Restaurant online activities" name="type"></el-checkbox>
                    <el-checkbox label="Earth pushing activity" name="type"></el-checkbox>
                    <el-checkbox label="Offline theme activities" name="type"></el-checkbox>
                    <el-checkbox label="Pure brand exposure" name="type"></el-checkbox>
                </el-checkbox-group>
            </el-form-item>
            <el-form-item label="Special resources" prop="resource">
                <el-radio-group v-model="ruleForm.resource">
                    <el-radio label="Online brand sponsor"></el-radio>
                    <el-radio label="Offline venues are free"></el-radio>
                </el-radio-group>
            </el-form-item>
            <el-form-item label="Activity form" prop="desc">
                <el-input type="textarea" v-model="ruleForm.desc"></el-input>
            </el-form-item>
            <el-form-item>
                <!--
                    Click event TODO:
                -->
                <el-button type="primary" @click="submitForm('ruleForm')">Create now</el-button>
                <el-button @click="resetForm('ruleForm')">Reset</el-button>
            </el-form-item>
        </el-form>
    </div>
</body>
<script>
    new Vue({
        el:"#div",
        data() {
            return {
                ruleForm: {
                    name: '',
                    region: '',
                    date1: '',
                    date2: '',
                    delivery: false,
                    type: [],
                    resource: '',
                    desc: ''
                },
                rules: {
                    name: [
                        { required: true, message: 'Please enter the activity name', trigger: 'blur' },
                        { min: 3, max: 5, message: 'The length is between 3 and 5 characters', trigger: 'blur' }
                    ],
                    region: [
                        { required: true, message: 'Please select an active area', trigger: 'change' }
                    ],
                    date1: [
                        { type: 'date', required: true, message: 'Please select a date', trigger: 'change' }
                    ],
                    date2: [
                        { type: 'date', required: true, message: 'Please select a time', trigger: 'change' }
                    ],
                    type: [
                        { type: 'array', required: true, message: 'Please select at least one activity property', trigger: 'change' }
                    ],
                    resource: [
                        { required: true, message: 'Please select an active resource', trigger: 'change' }
                    ],
                    desc: [
                        { required: true, message: 'Please fill in the activity form', trigger: 'blur' }
                    ]
                }
            };
        },
        methods: {
            submitForm(formName) {

                // forName = "ruleForm" is actually a ref attribute
                //this.$refs[formName] finds the form, which is actually similar to document.getElementById("ruleForm")
                //The form object calls the validate function: verify
                //Each item in the form will be verified. Only when the verification passes, can valid be true
                this.$refs[formName].validate((valid) => {
                    if (valid) {
                        alert('submit!');
                    } else {
                        console.log('error submit!!');
                        return false;
                    }
                });
            },
            resetForm(formName) {
                //Restore all options in the form to their default values
                this.$refs[formName].resetFields();
            }
        }
    });

  /*  let obj = {
        data : {
            "name" : "zs",
            "age" : 18
        },
        data2(){
            return {
                "name" : "ls",
                "age" : 19
            }
        }
    }
    console.log(obj.data);
    console.log(obj.data2());*/
</script>

</html>
1.6 table components
It is used to display multiple pieces of data with similar structure. You can edit, delete or other user-defined operations on the data.
-
code implementation
<!DOCTYPE html>
<html lang="en">
<head>
    <meta charset="UTF-8">
    <meta name="viewport" content="width=device-width, initial-scale=1.0">
    <title>Table component</title>
    <link rel="stylesheet" href="../element-ui/lib/theme-chalk/index.css">
    <script src="../js/vue.js"></script>
    <script src="../element-ui/lib/index.js"></script>
</head>
<body>
    <div id="div">
        <template>
            <!--
            el-table
                1. data attribute : Need to specify Vue Medium data attribute
                    The property value is an array
                    How many elements does the array have,The table displays several rows
                2. el-table-column Sub label
                    We don't need to write a line,We just need to write the data of each line
                    1). label The column name is specified
                    2). prop : Specifies the properties of the objects in the array
            -->
            <el-table
                    :data="tableData"
                    stripe
                    border
                    style="width: 100%">
                <el-table-column
                        prop="date"
                        label="date"
                        width="240">
                </el-table-column>
                <el-table-column
                        prop="name"
                        label="full name"
                        width="180">
                </el-table-column>
                <el-table-column
                        prop="address"
                        label="address">
                </el-table-column>
            </el-table>
        </template>
    </div>
</body>
<script>
    new Vue({
        el:"#div",
        data() {
            return {
                tableData: [{
                    date: '2016-05-02',
                    name: 'Wang Xiaohu',
                    address: 'Lane 1518, Jinshajiang Road, Putuo District, Shanghai'
                }, {
                    date: '2016-05-04',
                    name: 'Wang Xiaohu',
                    address: 'Lane 1517, Jinshajiang Road, Putuo District, Shanghai'
                }, {
                    date: '2016-05-01',
                    name: 'Wang Xiaohu',
                    address: 'Lane 1519, Jinshajiang Road, Putuo District, Shanghai'
                }, {
                    date: '2016-05-03',
                    name: 'Wang Xiaohu',
                    address: 'Lane 1516, Jinshajiang Road, Putuo District, Shanghai'
                }]
            }
        }
    });
</script>
</html>
1.7 top navigation bar assembly

-
code implementation
<!DOCTYPE html>
<html lang="en">
<head>
    <meta charset="UTF-8">
    <meta name="viewport" content="width=device-width, initial-scale=1.0">
    <title>Top navigation bar</title>
    <link rel="stylesheet" href="../element-ui/lib/theme-chalk/index.css">
    <script src="../js/vue.js"></script>
    <script src="../element-ui/lib/index.js"></script>
</head>
<body>
    <div id="div">
        <!--
            The navigation menu defaults to vertical mode mode Property to change the navigation menu to horizontal mode.
            In addition, in the menu submenu Component can generate secondary menus.
            Menu It also provides background-color,text-color and active-text-color,
            It is used to set the background color of the menu, the text color of the menu and the text color of the currently active menu respectively.

            el_menu label
                1. mode : horizontal level/ vertical vertical(default)
                2. default-active : Default activation(Select)
                    There is one for each menu option index Indexes

                3.  @select : Event binding (choice)

                4. Sub label
                    1). el-menu-item General menu
                    2). el-submenu Submenu (Allow submenu)

                    disabled : Disable (Not clickable)
        -->
        <el-menu
                :default-active="activeIndex2"
                class="el-menu-demo"
                mode="horizontal"
                @select="handleSelect"
                background-color="#545c64"
                text-color="#fff"
                active-text-color="#ffd04b">
            <el-menu-item index="1">Processing center</el-menu-item>
            <el-menu-item index="5">Management Center</el-menu-item>
            <el-submenu index="2">
                <template slot="title">My workbench</template>
                <el-menu-item index="2-1">Option 1</el-menu-item>
                <el-menu-item index="2-2">Option 2</el-menu-item>
                <el-menu-item index="2-3">Option 3</el-menu-item>
                <el-submenu index="2-4">
                    <template slot="title">Option 4</template>
                    <el-menu-item index="2-4-1">Option 1</el-menu-item>
                    <el-menu-item index="2-4-2">Option 2</el-menu-item>
                    <el-menu-item index="2-4-3">Option 3</el-menu-item>
                </el-submenu>
            </el-submenu>
            <el-menu-item index="3" disabled>Message center</el-menu-item>
            <el-menu-item index="4"><a href="https://www.ele.me" target="_ Blank "> order management < / a > < / El menu item >
        </el-menu>
    </div>
</body>
<script>
    new Vue({
        el:"#div",
        data() {
            return {
                activeIndex: '1',
                activeIndex2: '5'
            };
        },
        methods: {
            /*
            *   key : Is the selected menu index
            *   keyPath : Is the selected menu path
            *
            *   We can judge which menu is selected through these two attributes, and then execute the corresponding logic
            * */
            handleSelect(key, keyPath) {
                console.log(key, keyPath);
            }
        }
    });
</script>
</html>
1.8 side navigation bar assembly

-
code implementation
<!DOCTYPE html>
<html lang="en">
<head>
    <meta charset="UTF-8">
    <meta name="viewport" content="width=device-width, initial-scale=1.0">
    <title>Side navigation bar</title>
    <link rel="stylesheet" href="../element-ui/lib/theme-chalk/index.css">
    <script src="../js/vue.js"></script>
    <script src="../element-ui/lib/index.js"></script>
</head>
<body>
    <div id="div">
      <!--
        el-menu label
        0. @select: Options that do not contain submenus are selected
        1. @open : Option open event with submenu
        2.  @close : Option close event with submenu
      -->
      <el-col :span="12">
        <h5>Custom color</h5>
        <el-menu
                mode="vertical"
                default-active="2"
                class="el-menu-vertical-demo"
                @select="handleSelect"
                @open="handleOpen"
                @close="handleClose"
                background-color="#545c64"
                text-color="#fff"
                active-text-color="#ffd04b">
          <el-submenu index="1">
            <template slot="title">
              <i class="el-icon-location"></i>
              <span>Navigation one</span>
            </template>
            <el-menu-item-group>
              <template slot="title">Group I</template>
              <el-menu-item index="1-1">Option 1</el-menu-item>
              <el-menu-item index="1-2">Option 2</el-menu-item>
            </el-menu-item-group>
            <el-menu-item-group title="Group 2">
              <el-menu-item index="1-3">Option 3</el-menu-item>
            </el-menu-item-group>
            <el-submenu index="1-4">
              <template slot="title">Option 4</template>
              <el-menu-item index="1-4-1">Option 1</el-menu-item>
            </el-submenu>
          </el-submenu>
          <el-menu-item index="2">
            <i class="el-icon-menu"></i>
            <span slot="title">Navigation II</span>
          </el-menu-item>
          <el-menu-item index="3" disabled>
            <i class="el-icon-document"></i>
            <span slot="title">Navigation III</span>
          </el-menu-item>
          <el-menu-item index="4">
            <i class="el-icon-setting"></i>
            <span slot="title">Navigation IV</span>
          </el-menu-item>
        </el-menu>
      </el-col>

    </div>
</body>
<script>
    new Vue({
        el:"#div",
        methods: {
            handleOpen(key, keyPath) {
                console.log("open" + key, keyPath);
            },
            handleClose(key, keyPath) {
                console.log("close:" +key, keyPath);
            },
            handleSelect(key, keyPath) {
                console.log("select:" + key, keyPath);
            }
        }
    });
</script>
</html>
1.9 summary
- Element: website rapid prototyping tool. It is a Vue based desktop component library for developers, designers and product managers.
- Vue is required before using Element.
- Use steps
1. Download the Element core library.
2. Import Element style file.
3. Import Vue core js file.
4. Import the Element core js file.
5. Write web pages with common components. - Common components
The basic components of a web page are layout, buttons, tables, forms, etc~~~
Common components do not need to be remembered, but only need to be copied and used in the Element official website.
2. Interface case student list
2.1 case effect and analysis
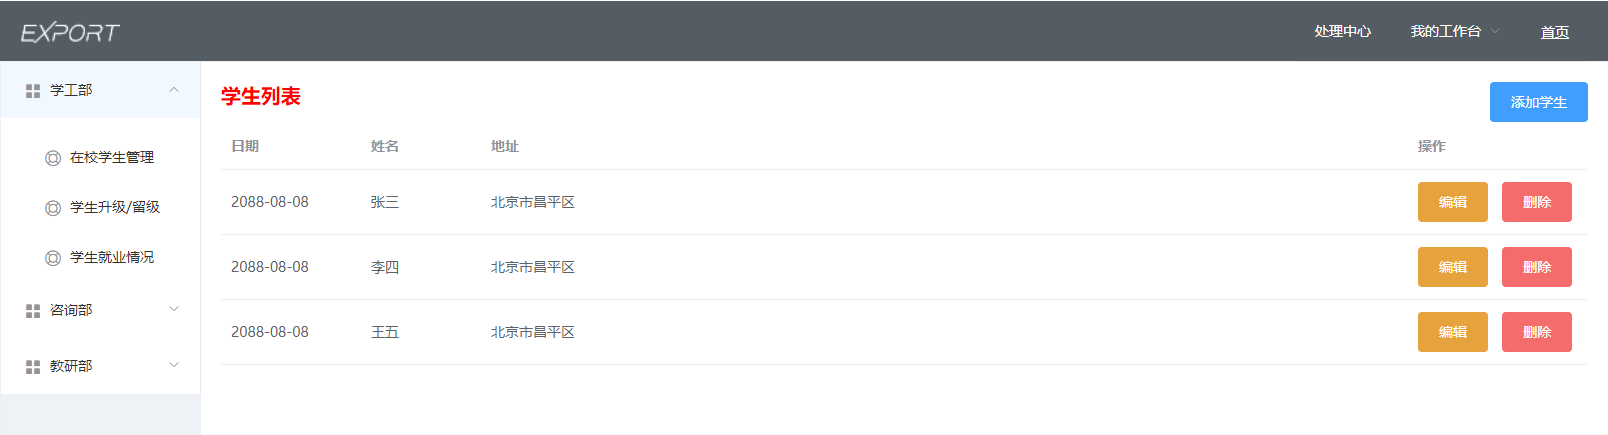
2.2 realization of head area
-
Realization idea
- The head effect is achieved.
- Sidebar and main area effects are achieved.
-
code implementation
<!DOCTYPE html>
<html lang="en">
<head>
    <meta charset="UTF-8">
    <meta name="viewport" content="width=device-width, initial-scale=1.0">
    <title>Student list</title>
    <link rel="stylesheet" href="element-ui/lib/theme-chalk/index.css">
    <script src="js/vue.js"></script>
    <script src="element-ui/lib/index.js"></script>
    <style>
      .el-header{
        background-color: #545c64;
      }
      .header-img{
        width: 100px;
        margin-top: 20px;
      }
    </style>
</head>
<body>
  <div id="div">
    <el-container>
      <!-- head -->
      <el-header class="el-header">
        <el-container>
          <div>
            <el-image src="img/export.png" class="header-img"></el-image>
          </div>
          <el-menu
            :default-active="activeIndex2"
            mode="horizontal"
            @select="handleSelect"
            background-color="#545c64"
            text-color="white"
            active-text-color="#ffd04b"
            style="margin-left: auto;">
            <el-menu-item index="1">Processing center</el-menu-item>
            <el-submenu index="2">
              <template slot="title">My workbench</template>
              <el-menu-item index="2-1">Option 1</el-menu-item>
              <el-menu-item index="2-2">Option 2</el-menu-item>
              <el-menu-item index="2-3">Option 3</el-menu-item>
            </el-submenu>
            <el-menu-item index="3"><a href="Student list.html" target="_self">home page</a></el-menu-item>
          </el-menu>
        </el-container>
      </el-header>
    </el-container>
  </div>
</body>
<script>
    new Vue({
        el:"#div"
    });
</script>
</html>
2.3 realization of sidebar area
<!-- Sidebar area -->
<el-container style="height: 580px; border: 1px solid #eee">
    <el-aside width="200px" style="background-color: rgb(238, 241, 246)">
        <el-menu :default-openeds="['1']">
            <el-submenu index="1">
                <template slot="title"><i class="el-icon-menu"></i>School Work Department</template>
                <el-menu-item-group>
                    <el-menu-item index="1-1"><i class="el-icon-help"></i>Student management in school</el-menu-item>
                    <el-menu-item index="1-2"><i class="el-icon-help"></i>Student upgrade/Repeat a grade</el-menu-item>
                    <el-menu-item index="1-3"><i class="el-icon-help"></i>Student employment</el-menu-item>
                </el-menu-item-group>
            </el-submenu>
            <el-submenu index="2">
                <template slot="title"><i class="el-icon-menu"></i>Consulting Department</template>
                <el-menu-item-group>
                    <el-menu-item index="2-1"><i class="el-icon-help"></i>Intentional student management</el-menu-item>
                    <el-menu-item index="2-2"><i class="el-icon-help"></i>Management of unregistered students</el-menu-item>
                    <el-menu-item index="2-3"><i class="el-icon-help"></i>Registered student management</el-menu-item>
                </el-menu-item-group>
            </el-submenu>
            <el-submenu index="3">
                <template slot="title"><i class="el-icon-menu"></i>Teaching and Research Department</template>
                <el-menu-item-group>
                    <el-menu-item index="3-1"><i class="el-icon-help"></i>Existing course management</el-menu-item>
                    <el-menu-item index="3-2"><i class="el-icon-help"></i>Developing course management</el-menu-item>
                    <el-menu-item index="3-3"><i class="el-icon-help"></i>New technology curriculum management</el-menu-item>
                </el-menu-item-group>
            </el-submenu>
        </el-menu>
    </el-aside>

</el-container>
2.4 realization of main area
The main area and the sidebar area are placed together
<!-- Main area -->
<el-container>
    <el-main>
        <b style="color: red;font-size: 20px;">Student list</b>
        <div style="float:right">
            <el-button type="primary">Add student</el-button>
        </div>
        <el-table :data="tableData">
            <el-table-column prop="date" label="date" width="140">
            </el-table-column>
            <el-table-column prop="name" label="full name" width="120">
            </el-table-column>
            <el-table-column prop="address" label="address">
            </el-table-column>
            <el-table-column
                             label="operation"
                             width="180">
                <el-button type="warning">edit</el-button>
                <el-button type="danger">delete</el-button>
            </el-table-column>
        </el-table>
    </el-main>
</el-container>
Define data in vue
<script>
    new Vue({
        el:"#div",
        data:{
          tableData:[
            {
              date:"2088-08-08",
              name:"Zhang San",
              address:"Changping District, Beijing"
            },{
              date:"2088-08-08",
              name:"Li Si",
              address:"Changping District, Beijing"
            },{
              date:"2088-08-08",
              name:"Wang Wu",
              address:"Changping District, Beijing"
            },
          ]
        }
    });
</script>
3. Comprehensive case student management system
3.1 introduction to effect environment


3.2. Realization of login function
-
Environment construction
- Extract the original project of student management system from the materials of the day and import it.
-
code implementation
html code
onSubmit(formName) { // Bind validation function for form this.$refs[formName].validate((valid) => { //Only when the verification is passed, can the valid be true, can the data be submitted and the request be initiated if (valid) { //Request the server to complete the login function TODO: let url = "userServlet" let param = `username=${this.form.username}&password=${this.form.password}` console.log(param); axios.post(url,param).then(resp=>{ console.log(resp.data);// If the login is successful, return true if(resp.data){ location.href = "index.html" }else{ // alert("user name does not exist or password error") /* * success Success green * info Information gray * warning Warning yellow * error Error red * */ this.$message.error("The user name does not exist or the password is incorrect") } }) } else { return false; } }); }-
java code
- UserServlet.java
package com.itheima.controller; import com.itheima.bean.User; import com.itheima.service.UserService; import com.itheima.service.impl.UserServiceImpl; import javax.servlet.ServletException; import javax.servlet.annotation.WebServlet; import javax.servlet.http.HttpServlet; import javax.servlet.http.HttpServletRequest; import javax.servlet.http.HttpServletResponse; import java.io.IOException; import java.util.List; @WebServlet("/userServlet") public class UserServlet extends HttpServlet { private UserService service = new UserServiceImpl(); @Override protected void doGet(HttpServletRequest req, HttpServletResponse resp) throws ServletException, IOException { //Set request and response encoding req.setCharacterEncoding("UTF-8"); resp.setContentType("text/html;charset=UTF-8"); //1. Get request parameters String username = req.getParameter("username"); String password = req.getParameter("password"); //2. Encapsulate User objects User user = new User(username,password); //3. Call the login method of the business layer List<User> list = service.login(user); //4. Judge whether the query result is found if(list.size() != 0) { //Save the user name into the session domain req.getSession().setAttribute("username",username); //Respond to client true resp.getWriter().write("true"); }else { //Respond to client false resp.getWriter().write("false"); } } @Override protected void doPost(HttpServletRequest req, HttpServletResponse resp) throws ServletException, IOException { doGet(req,resp); } }- UserService.java
package com.itheima.service; import com.itheima.bean.User; import com.itheima.dao.UserMapper; import com.itheima.util.SqlSessionUtil; import org.apache.ibatis.io.Resources; import org.apache.ibatis.session.SqlSession; import org.apache.ibatis.session.SqlSessionFactory; import org.apache.ibatis.session.SqlSessionFactoryBuilder; import java.io.IOException; import java.io.InputStream; import java.util.List; public class UserService { public List<User> login(User user) { SqlSession sqlSession = SqlSessionUtil.getSession(); UserMapper mapper = sqlSession.getMapper(UserMapper.class); List<User> list = mapper.login(user); sqlSession.close(); return list; } }- UserMapper.java
package com.itheima.dao;

import com.itheima.bean.User;
import org.apache.ibatis.annotations.Select;

import java.util.List;

public interface UserMapper {
    /*
        Login method
     */
    @Select("SELECT * FROM user WHERE username=#{username} AND password=#{password}")
    public abstract List<User> login(User user);
}
-
3.3 implementation of paging query function
#analysis:
1. index.html sidebar (School student management options)
	Click call findAll function  -> Modify data -> View update(stuList.html)

2. When we click on the sidebar "Student management in school" When, stuList Will be loaded into index.html Main area of, And because stuList contain Vue, Vue The lifecycle starts

3. vue life cycle
	created : (data Load well,The view is not ready yet)
		Called selectByPage function

4. 	selectByPage function
	1). Request address
		before : Add, delete, modify and query each function corresponds to one Servlet,It's too redundant
		demand : Write one for each module Servlet(At the same time, the addition, deletion, modification and query of this module are processed)
		realization : Message distribution
			a. XxServlet sure Xx All requests under the module, Execute the corresponding logic according to the request suffix
			b. XxServlet Virtual path for   /Xx/*	  (Directory matching)
				Get the requested address, Cut string,obtain query or delete
			c. front end Xx Module initiated request,The requested address directory is Xx start
				Xx/query :  Xx Module query
				Xx/delete : Xx Module deletion
-
code implementation
-
html code
<!--
        Paging component
          @size-change:  Function triggered when the number of entries per page is changed
          @current-change: Function triggered when page number is changed
          current-page : Default page number
          :page-sizes: The value displayed in the number of entries per page selection box
          :page-size : Default number of entries per page
          layout:  Layout of paging components
              total(Total number), sizes(Number of entries per page), prev((previous page), pager(All page numbers), next(next page), jumper(Jump page)
          :total: Total number
    -->
    <el-pagination
            @size-change="handleSizeChange"
            @current-change="handleCurrentChange"
            :current-page="pagination.currentPage"
            :page-sizes="[3,5,8]"
            :page-size="pagination.pageSize"
            layout="total, sizes, prev, pager, next, jumper"
            :total="pagination.total">
    </el-pagination>
-
<script>
new Vue({
el:"#div",
data:{
dialogTableVisible4add: false, //Add window display status
dialogTableVisible4edit: false, //Edit window display status
formData:{},//Add form data
editFormData: {},//Edit form data
tableData:[],//Tabular data
pagination: {
currentPage: 1, //Current page
pageSize: 5, //Number of displays per page
total: 0 //Total number
},
rules: {
number: [
{required: true, message: 'Please enter student number', trigger: 'blur'},
{min: 2, max: 10, message: 'The length is between 2 and 10 characters', trigger: 'blur'}
],
name: [
{required: true, message: 'Please enter your name', trigger: 'blur'},
{min: 2, max: 10, message: 'The length is between 2 and 10 characters', trigger: 'blur'}
],
birthday: [
{required: true, message: 'Please select a date', trigger: 'change'}
],
address: [
{required: true, message: 'Please enter the address', trigger: 'blur'},
{min: 2, max: 200, message: 'The length is between 2 and 200 characters', trigger: 'blur'}
],
}
},
methods:{
//TODO: paging query
selectByPage(){
//TODO: initiate a request to load paging data
let url = "student/selectByPage"
let param = this.pagination
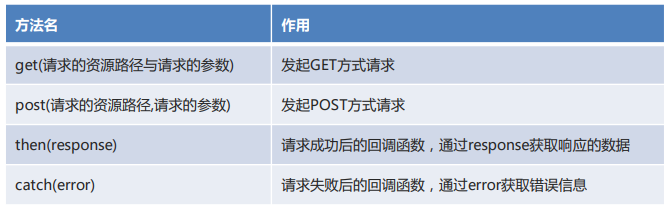
axios.post(url,param).then(resp=>{
// console.log(resp.data);
if (resp.data.flag) {
// Specifies the total number of records
this.pagination.total = resp.data.result.total; //Set total number
// Perform paging display of data
this.tableData = resp.data.result.rows;//Tabular data
} else {
this.$message.error(resp.data.message);
}
})
},
//Function executed when changing the number of entries per page
handleSizeChange(pageSize) {
//Modify parameters of paging query
this.pagination.pageSize = pageSize;
//Re execute query
this.selectByPage();
},
//Function executed when changing page number
handleCurrentChange(pageNum) {
//Modify parameters of paging query
this.pagination.currentPage = pageNum;
//Re execute query
this.selectByPage();
},
showAddStu() {
//Pop up window
this.dialogTableVisible4add = true;
},
resetForm(addForm) {
//Two way binding, the input data is assigned to formData, and the formData data is cleared
this.formData = {};
//Clear the verification data of the form
this.$refs[addForm].resetFields();
},
showEditStu(row) {
//1. Pop up window
this.dialogTableVisible4edit = true;
//2. Display form data
this.editFormData = {
number:row.number,
name:row.name,
birthday:row.birthday,
address:row.address,
}
}
},
created(){
//Paging query TODO:
this.selectByPage();
}
});
</script>
-
java code
- 1. Create StudentServlet.java
package com.itheima.web; import com.itheima.pojo.po.Student; import com.itheima.pojo.vo.PageBean; import com.itheima.pojo.vo.Pagination; import com.itheima.pojo.vo.Result; import com.itheima.service.StudentService; import com.itheima.util.BaseController; import javax.servlet.ServletException; import javax.servlet.annotation.WebServlet; import javax.servlet.http.HttpServlet; import javax.servlet.http.HttpServletRequest; import javax.servlet.http.HttpServletResponse; import java.io.IOException; import java.util.Map; @WebServlet("/student/*") public class StudentServlet extends HttpServlet { private StudentService service = new StudentService(); @Override protected void doPost(HttpServletRequest req, HttpServletResponse resp) throws ServletException, IOException { doGet(req,resp); } @Override protected void doGet(HttpServletRequest request, HttpServletResponse response) throws ServletException, IOException { //Set request and response encoding request.setCharacterEncoding("UTF-8"); response.setContentType("text/html;charset=UTF-8"); //Set request and response encoding request.setCharacterEncoding("UTF-8"); response.setContentType("text/html;charset=UTF-8"); //1.Get method name String url = request.getRequestURI(); int lastIndex = url.lastIndexOf('/'); String method = url.substring(lastIndex + 1,url.length()); if(method.equals("selectByPage")) { //Paging query function selectByPage(request,response); }else if(method.equals("addStu")) { //Add data function addStu(request,response); } else if(method.equals("updateStu")) { //Modify data function updateStu(request,response); } else if(method.equals("deleteStu")) { //Delete data function deleteStu(request,response); } } /* Paging query function */ private void selectByPage(HttpServletRequest req, HttpServletResponse resp) throws IOException { //Get request parameters try{ Pagination pagination = BaseController.parseJSON2Object(req, Pagination.class); //Call the query method of the business layer PageBean page = service.selectByPage(pagination); // int i = 1/0; //Response to client BaseController.printResult(resp,new Result(true,"query was successful!",page)); } catch (RuntimeException e) { e.printStackTrace(); BaseController.printResult(resp, new Result(false, "Query failed!")); } } }- 2. Create StudentService.java
package com.itheima.service; import com.itheima.pojo.po.Student; import com.itheima.pojo.vo.PageBean; import com.itheima.dao.StudentMapper; import com.itheima.pojo.vo.Pagination; import com.itheima.util.SqlSessionUtil; import org.apache.ibatis.session.SqlSession; import java.util.List; /* Student business layer implementation class */ public class StudentService{ public PageBean selectByPage(Pagination pagination) { //1. Request parameter processing Integer currentPage = pagination.getCurrentPage(); Integer pageSize = pagination.getPageSize(); // Code robustness considerations: prevent errors that occur when the front end does not pass parameters if(currentPage == null){ currentPage = 1; } if(pageSize == null){ pageSize = 5; } //2. Query database int index = (currentPage -1) * pageSize; // Paging query initial index SqlSession session = SqlSessionUtil.getSession();//Automatic commit StudentMapper mapper = session.getMapper(StudentMapper.class); // Query the contact data displayed on each page (with conditions) List<Student> list = mapper.findStudentByPage(index,pageSize); // Total number of contacts queried (with conditions) int sum = mapper.findStudentSum(); session.close(); //3. Encapsulate PageBean PageBean bean = new PageBean(list,sum); return bean; } }- 3. Create StudentMapper.java
/*
    Student persistence layer interface
 */
public interface StudentMapper {
    /*
        Paging query
    * */
    @Select("SELECT * FROM student LIMIT #{index},#{count}")
    List<Student> findStudentByPage(@Param("index") int index, @Param("count")int count);
    /*
    *   Total queries
    * */
    @Select("SELECT count(*) FROM student")
    int findStudentSum();
}
3.4 realization of adding function
1. Add student button
		 <el-button  @click="showAddStu">Add student</el-button>
2. showAddStu
		dialogTableVisible4add: false  -> true

3.  Add user's pop-up (dialog)
	:visible.sync Controls whether pop ups are displayed (true display,false hide)
	When the pop-up box is used up,The data of the form in the pop-up box will be cleared
<el-dialog title="Add student information" :visible.sync="dialogTableVisible4add" @close="resetForm('addForm')">

4. add button
	   <el-button type="primary" @click="addStu()">add to</el-button>
-
code implementation
-
html code
Add "add function" code in stuList.html
//TODO: add student addStu(){ let url = "student/addStu" let param = this.formData axios.post(url, param).then(response => { if (response.data.flag) { this.$message.success(response.data.message); // Success prompt pop-up box this.dialogTableVisible4add = false; //Hide pop ups } else { this.$message.error(response.data.message); // Failure prompt pop-up box } }).finally(() => { //After the successful response, execute the query and refresh the page this.selectByPage(); }); }, -
java code
- 1. Add the "add function" code - addStu in StudentServlet.java
/* *1,Direct copy will report an error *2,This line of code needs to be added to the "doGet" method *3,Add the judgment of "addStu" method name */ else if(method.equals("addStu")) { //Add data function addStu(req,resp); } ============================================================================= /* Add data function */ private void addStu(HttpServletRequest req, HttpServletResponse resp) throws IOException { try{ //Get the request parameters and encapsulate the Student object Student stu = BaseController.parseJSON2Object(req, Student.class); //Call the add method of the business layer service.addStu(stu); BaseController.printResult(resp,new Result(true,"Added successfully!")); } catch (RuntimeException e) { e.printStackTrace(); BaseController.printResult(resp, new Result(false, "Add failed!")); } }- 2. Add "add function" - addStu in StudentService.java
/* Add data method */ public void addStu(Student stu) { SqlSession sqlSession = SqlSessionUtil.getSession(); StudentMapper mapper = sqlSession.getMapper(StudentMapper.class); mapper.addStu(stu); sqlSession.close(); }- 4. Add "add function" - addStu in StudentMapper.java
    /*
        Add data method
     */
    @Insert("INSERT INTO student VALUES (#{number},#{name},#{birthday},#{address})")
    public abstract void addStu(Student stu);
-
3.5 realization of modification function
# Data echo analysis
1. Edit button

	<template slot-scope="props">
              <el-button type="warning" @click="showEditStu(props.row)">edit</el-button>

     When the click event of this button is triggered,call showEditStu function , parameter props.row Represents all data in this row
    {number : "hm001" , name : "Zhang San" , birthday : "1995-01-01",address : "Hangzhou"}

2. Click event of Edit button
		showEditStu(row) {
                //1. Pop up window
                this.dialogTableVisible4edit = true;

                //2. Display form data
                this.editFormData = row
            }

      editFormData Data binding with edit box
-
code implementation
-
html code
Add "modify function" code in stuList.html
//TODO: modify student updateStu(){ let url = "student/updateStu" let param = this.editFormData axios.post(url, param).then(response => { if (response.data.flag) { this.$message.success(response.data.message); // Success prompt pop-up box this.dialogTableVisible4edit = false; //Hide pop ups } else { this.$message.error(response.data.message); // Failure prompt pop-up box } }).finally(() => { //After the successful response, execute the query and refresh the page this.selectByPage(); }); }, -
java code
- 1. Add "modification function" - updatestau in StudentServlet.java
/* *1,Direct copy will report an error *2,This line of code needs to be added to the "doGet" method *3,Add the judgment of "updatestau" method name */ else if(method.equals("updateStu")) { //Add data function updateStu(req,resp); } ================================================================================== /* Modify data function */ private void updateStu(HttpServletRequest req, HttpServletResponse resp) throws IOException { try{ //Get the request parameters and encapsulate the Student object Student stu = BaseController.parseJSON2Object(req, Student.class); //Call the add method of the business layer service.updateStu(stu); BaseController.printResult(resp,new Result(true,"Modified successfully!")); } catch (RuntimeException e) { e.printStackTrace(); BaseController.printResult(resp, new Result(false, "Modification failed!")); } }- 2. Add "modification function" - updatestau in StudentService.java
/* Modify data method */ public void updateStu(Student stu) { SqlSession sqlSession = SqlSessionUtil.getSession(); StudentMapper mapper = sqlSession.getMapper(StudentMapper.class); mapper.updateStu(stu); sqlSession.close(); }- 3. "Modification function" - updatestau is added in StudentMapper.java
/*
        Modify data method
     */
    @Update("UPDATE student SET name=#{name},birthday=#{birthday},address=#{address} WHERE number=#{number}")
    public abstract void updateStu(Student stu);
-
3.6 implementation of deletion function
-
code implementation
-
html code
Add "delete function" code in stuList.html
//TODO: delete student deleteStu(row){ var result = confirm("Are you sure you want to delete" + row.number + "Do you?"); if(result){ let url = `student/deleteStu?number=${row.number}` axios.get(url).then(response => { if (response.data.flag) { this.$message.success(response.data.message); } else { this.$message.error(response.data.message); } }).finally(() => { this.selectByPage(); }); } }, -
java code
- 1. Add "delete function" in StudentServlet.java-
/* *1,Direct copy will report an error *2,This line of code needs to be added to the "doGet" method *3,Add the judgment of "deleteStu" method name */ else if(method.equals("deleteStu")) { //Add data function deleteStu(req,resp); } ================================================================================== /* Delete data function */ private void deleteStu(HttpServletRequest req, HttpServletResponse resp) throws IOException { try{ //1. Get request parameters String number = req.getParameter("number"); //2. Call the deletion method of the business layer service.deleteStu(number); // 3 response BaseController.printResult(resp, new Result(true, "Delete succeeded!")); } catch (RuntimeException e) { e.printStackTrace(); BaseController.printResult(resp, new Result(false, "Deletion failed! reason:" + e.getMessage())); } }- 2. Add "delete function" in StudentService.java-
/* Delete data method */ public void deleteStu(String number) { SqlSession sqlSession = SqlSessionUtil.getSession(); StudentMapper mapper = sqlSession.getMapper(StudentMapper.class); mapper.deleteStu(number); sqlSession.close(); }- 4. Add "delete function" in StudentMapper.java-
    /*
        Delete data method
     */
    @Delete("DELETE FROM student WHERE number=#{number}")
    public abstract void deleteStu(String number);
-
-
java code
- 1. Add "delete function" in StudentServlet.java-
/* *1,Direct copy will report an error *2,This line of code needs to be added to the "doGet" method *3,Add the judgment of "deleteStu" method name */ else if(method.equals("deleteStu")) { //Add data function deleteStu(req,resp); } ================================================================================== /* Delete data function */ private void deleteStu(HttpServletRequest req, HttpServletResponse resp) throws IOException { try{ //1. Get request parameters String number = req.getParameter("number"); //2. Call the deletion method of the business layer service.deleteStu(number); // 3 response BaseController.printResult(resp, new Result(true, "Delete succeeded!")); } catch (RuntimeException e) { e.printStackTrace(); BaseController.printResult(resp, new Result(false, "Deletion failed! reason:" + e.getMessage())); } }- 2. Add "delete function" in StudentService.java-
/* Delete data method */ public void deleteStu(String number) { SqlSession sqlSession = SqlSessionUtil.getSession(); StudentMapper mapper = sqlSession.getMapper(StudentMapper.class); mapper.deleteStu(number); sqlSession.close(); }- 4. Add "delete function" in StudentMapper.java-
    /*
        Delete data method
     */
    @Delete("DELETE FROM student WHERE number=#{number}")
    public abstract void deleteStu(String number);


resources:
https://download.csdn.net/download/weixin_51297617/29203487