Upload upload is a common feature in front-end development, and Element component libraries commonly used in Vue development also provide very useful upload components.
Upload upload is a common feature in front-end development, and Element component libraries commonly used in Vue development also provide very useful upload components.
Basic Usage
Code:
<el-upload :action="uploadActionUrl">
    <el-button size="small" type="primary">Click Upload</el-button>
</el-upload>
It goes without saying that action is the back-end interface to perform the upload drive and el-button is the button to trigger the upload.
Number of uploaded files
First, set whether you can select multiple files to upload at the same time. This is also a property, add multiple.In addition, the el-upload component provides the limit property to set the maximum number of files that can be uploaded, beyond which the selected files will not be uploaded.: The on-exceed binding method is to handle actions that exceed the quantity.The code is as follows:
<el-upload
    :action="uploadActionUrl"
    multiple
    :limit="3"
    :on-exceed="handleExceed">
    <el-button size="small" type="primary">Click Upload</el-button>
</el-upload>
Upload format and size limit
If you need to restrict the format of the uploaded file, you need to add the accept attribute, which uses the same attribute directly. The value of the accept attribute can be accept="image/gif, image/jpeg, text/plain, application/pdf", and so on.For prompts in file format, slot can be used.The code is as follows:
<el-upload
    :action="uploadActionUrl"
    accept="image/jpeg,image/gif,image/png"
    multiple
    :limit="3"
    :on-exceed="handleExceed">
    <el-button size="small" type="primary">Click Upload</el-button>
    <div slot="tip" class="el-upload__tip">Please upload a picture format file</div>
</el-upload>
Note that this is only a format restriction when selecting files. In fact, users can click on the "All Files" option to upload other formats.If you need to check again when uploading, choose the method you want to check by: before-upload, which hook binds the appropriate method, code as follows:
<el-upload
    :action="uploadActionUrl"
    accept="image/jpeg,image/gif,image/png"
    :before-upload="onBeforeUpload"
    multiple
    :limit="3"
    :on-exceed="handleExceed">
    <el-button size="small" type="primary">Click Upload</el-button>
    <div slot="tip" class="el-upload__tip">Please upload a picture format file</div>
</el-upload>
...
    onBeforeUpload(file)
    {
      const isIMAGE = file.type === 'image/jpeg'||'image/gif'||'image/png';
      const isLt1M = file.size / 1024 / 1024 < 1;

      if (!isIMAGE) {
        this.$message.error('Upload file can only be in picture format!');
      }
      if (!isLt1M) {
        this.$message.error('Upload file size cannot exceed 1 MB!');
      }
      return isIMAGE && isLt1M;
    }
While restricting the file format, check the file size here.
Various hooks during uploading
Here is a description of carrying the official network directly, as shown in the figure: Display list of uploaded files
This function can be said to be very powerful, can clearly display the list of uploaded files, and can be easily deleted to upload new files.
Code:
<el-upload
    :action="uploadActionUrl"
    accept="image/jpeg,image/gif,image/png"
    multiple
    :limit="3"
    :on-exceed="handleExceed"
    :on-error="uploadError"
    :on-success="uploadSuccess"
    :on-remove="onRemoveTxt"
    :before-upload="onBeforeUpload"
    :file-list="files">
    <el-button size="small" type="primary">Click Upload</el-button>
    <div slot="tip" class="el-upload__tip">Please upload a picture format file</div>
</el-upload>
The current method is to add the property file-list="files", where files are bound array objects and are initially empty.
The effect is as follows:
Submit data when uploading
Uploading a file also requires submitting data to the back-end interface, which uses the data attribute.
<el-upload
    :action="uploadActionUrl"
    accept="image/jpeg,image/gif,image/png"
    :data="uploadData"
    multiple
    :limit="3"
    :on-exceed="handleExceed"
    :on-error="uploadError"
    :on-success="uploadSuccess"
    :on-remove="onRemoveTxt"
    :before-upload="onBeforeUpload"
    :file-list="files">
    <el-button size="small" type="primary">Click Upload</el-button>
    <div slot="tip" class="el-upload__tip">Please upload a picture format file</div>
</el-upload>
...
uploadData: {
    dataType: "0",
    oldFilePath:""
}
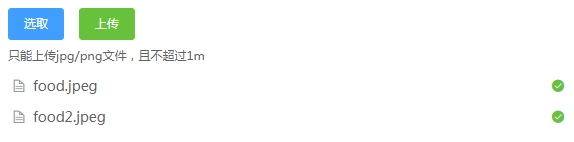
Separate selection from upload
Sometimes we need to separate the selection from the upload, such as uploading pictures, first submitting the selected files to the front, and then submitting the base64 content to the background.
The code is as follows:
<el-upload
  action=""
  accept="image/jpeg,image/png"
  :on-change="onUploadChange"
  :auto-upload="false"
  :show-file-list="false">
    <el-button slot="trigger" size="small" type="primary">Selection</el-button>
    <el-button style="margin-left: 10px;" size="small" type="success" @click="submitUpload">upload</el-button>
    <div slot="tip" class="el-upload__tip">Only upload jpg/png File, and cannot exceed 1 m</div>
</el-upload>
...
  submitUpload()
  {
    console.log("submit")
  },
  onUploadChange(file)
  {
    const isIMAGE = (file.raw.type === 'image/jpeg' || file.raw.type === 'image/png');
    const isLt1M = file.size / 1024 / 1024 < 1;

    if (!isIMAGE) {
      this.$message.error('Only upload jpg/png picture!');
      return false;
    }
    if (!isLt1M) {
      this.$message.error('Upload file size cannot exceed 1 MB!');
      return false;
    }
    var reader = new FileReader();
    reader.readAsDataURL(file.raw);
    reader.onload = function(e){
        console.log(this.result)//base64 data for pictures
    }
  }
The effect is as follows: