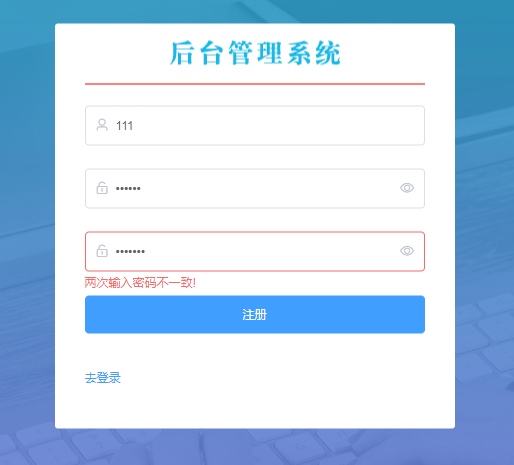
Basic layout of registered components
Based on the element UI component library, the DOM structure of the registration form is rendered:
1. Static label + style
- < El form > < / El form > a set of form labels
- < El form item > < / El form item > there are several items and groups of < El form item >
- < El input / > is created under each item
- < El form label width = "80" > you can modify the width of the form;
- < El input prefix icon = "El icon user" / > add a prefix icon to input;
- < El input / > bind show password to the input box to display the inscription;
2. Collect form data (v-model)
- < El input V-model = "regform. Username" / > bind data;
<template>
  <!-- Overall box of registration page -->
  <div class="register-container">
    <!-- Registered box -->
    <div class="register-box">
      <!-- Title box -->
      <div class="title-box"></div>
      <div class="haha"></div>
      <!-- Registered form area -->
      <el-form label-width="80">
        <el-form-item>
          <el-input
            prefix-icon="el-icon-user"
            placeholder="Please enter the account number"
            v-model="regForm.username"
          />
        </el-form-item>
        <el-form-item >
          <el-input
            prefix-icon="el-icon-unlock"
            placeholder="Please input a password"
            v-model="regForm.password"
            show-password
          />
        </el-form-item>
        <el-form-item >
          <el-input
            prefix-icon="el-icon-unlock"
            placeholder="Please confirm the password"
            v-model="regForm.repassword"
            show-password
          />
        </el-form-item>
        <el-form-item>
          <el-button type="primary">register</el-button>
        </el-form-item>
        <el-form-item>
          <el-link type="primary">Go login</el-link>
        </el-form-item>
      </el-form>
    </div>
  </div>
</template>

<script>
export default {
//After writing a name, you can find the component Register in the vue panel;
  name: "Register",
  data() {
    return {
      regForm: {
        username: "",
        password: "",
        repassword: "",
      },
      regFormRules: {
       };
    };
  },
};
</script>

<style lang="less" scoped>
.register-container {
//To import the file or directory under src into the style, you need to change @ into - @ (js file @ is OK)
  background: url("~@/assets/images/login_bg.jpg") center;
  background-size: cover;
  height: 100%;

  .register-box {
    width: 400px;
    height: 405px;
    background-color: #fff;
    border-radius: 3px;
    position: absolute;
    left: 50%;
    top: 50%;
    transform: translate(-50%, -50%);
    padding: 0 30px;
    box-sizing: border-box;

    .title-box {
      height: 60px;
      background: url("~@/assets/images/login_title.png") center no-repeat;
    }

    .el-button {
      width: 100%;
    }
    .haha {
      height: 1px;
      background-color: red;
      margin-bottom: 20px;
    }
  }
}
</style>
Verify form data
1. Verification form input specification
(1) Bind model and rules attributes to El form, and declare rules in data
 <el-form
        :model="regForm"
        :rules="regFormRules"
        label-width="80"
      >
(2) Bind the prop attribute to each El form -- item to represent the field that needs to be verified at present
(consistent with the statement in data)
<el-form-item prop='username'>
(3) Bind v-model (object. Attribute) to each El input
<el-input
            prefix-icon="el-icon-user"
            placeholder="Please enter the account number"
            v-model="regForm.username"
          />
(4) declare (register) the verification rules of the registration form in data (), which is consistent with the background interface.
- Declare form data
regForm: {
        username: "",
        password: "",
        repassword: "",
},- Declare form rules
regFormRules: {
        username: [
          // When losing focus: "please enter user name" is displayed; Check length;
          { required: true, message: "enter one user name", trigger: "blur" },
          // Custom verification rules:
          {
            pattern: /^[a-z\d]{1,10}$/i,
            message: "The user name consists of numbers and letters, with a length of 1-10",
            trigger: "blur",
          },
        ],
        password: [
          { required: true, message: "Please input a password", trigger: "blur" },
          {
            pattern: /^\S{6,15}$/i,
            message: "The password needs to be 6-15 Bit non empty word composition",
            trigger: "blur",
          },
        ],
        repassword: [
          { required: true, message: "Please enter the password again", trigger: "blur" },
          {
            pattern: /^\S{6,15}$/i,
            message: "The password needs to be 6-15 Bit non empty word composition",
            trigger: "blur",
          },
        ],
      },
2. Verify whether the two passwords are consistent
(1) In the data function, a verification function is defined before return, and then called in the repassword to be verified
//Custom confirmation password, value of current field, callback callback function
//https://element.eleme.cn/#/zh-CN/component/form replication

    var validatePass2 = (rule, value, callback) => {
      if (value === "") {
        callback(new Error("Please enter the password again"));
      } else if (value !== this.regForm.password) {
        callback(new Error("The two passwords are inconsistent!"));
      } else {
        //Calling callback without passing a value indicates that the verification has passed
        callback();
      }
    };

***************************************************
Note that the position is
data(){
(Put the above code here!!!)
return
}
(2) Define a new object in the repassword of the defined regFormRules and call it
// Confirm that the password must be consistent with the original password. Call the function defined above
{ validator: validatePass2, trigger: "blur" },


**************Complete as follows. Don't put it in the wrong position**************************
repassword: [
          { required: true, message: "Please enter the password again", trigger: "blur" },
          {
            pattern: /^\S{6,15}$/i,
            message: "The password needs to be confirmed by 6-15 Bit non empty word composition",
            trigger: "blur",
          },
          // Confirm that the password must be consistent with the original password. Call the function defined above
          { validator: validatePass2, trigger: "blur" },
        ],
Bottom verification
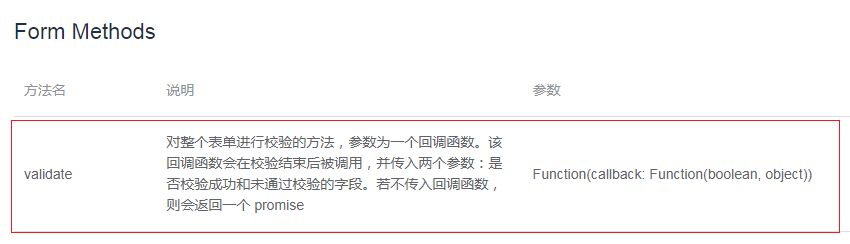
In short: it can verify the bottom of the form. Using the validata method, you will get a Boolean value. Only all of them comply with the rules and return true.
Ref --- > once you get the Dom tag, you can operate it and use its methods.
<el-form
        :model="regForm"
        :rules="regFormRules"
        ref="regFormReg"
        label-width="80"
      >
Send an event to listen for form submission. Add a click event @ click="handleReg" to the submit button;
<el-button type="primary" @click="handleReg">register</el-button>
Define in methods, call the validata method, and verify the form.
  methods: {
    handleReg() {
      // Bottom verification
      this.$refs.regFormReg.validate((valid) => {
        //valid: true all passed the verification; Otherwise, it will not pass the verification
        //Send a request after verification; Otherwise, return directly
        if (!valid) return;
        console.log("The verification is successful and meets the specification. Send a registration request");
      });
    },
  },
If the verification is passed, send the request
1. Create a new file Src / API / register js
2. In Src / API / register JS defines the registered interface function (it is very consistent with the background interface)
- Import the encapsulated request function (request is the default export, export on demand)
- Define registered interface functions
- Export on demand
//1. Import the encapsulated request function (request is the default export, export on demand)
import request from '@/utils/request';
//2. Define the registered interface function
// Whoever uses it in the future can directly call the reqAPI
const reqAPI = (regForm)=>{
    //request is the promise instance of the result returned in the background. You need to return
    // The arrow function requires return unless the braces after the arrow are removed
    return request({
            method: "POST",
            url:"/api/reg",
    // Data is an object. Set register > index The value in the regForm object in data() in Vue is passed to the background
    // After definition, go to register > index The interface is called in Vue, and the request is sent.
            data: regForm
    // It can also be written as data:{...regForm}, expand the value in the object and pass it
    })
}

//3. Export on demand
export {reqAPI}
3. Import regAPI interface function -- import on demand (src/Register/index.vue)
import { reqAPI } from "@/api/register.js";
4. Send a request (src/Register/index.vue) after the background verification is passed
-
Send a request after verification; Otherwise, return directly
 methods: {
    handleReg() {
      // Bottom verification
      this.$refs.regFormReg.validate((valid) => {
        //valid: true all passed the verification; Otherwise, it will not pass the verification
        //Send a request after verification; Otherwise, return directly
        if (!valid) return;
        console.log("The verification is successful and meets the specification. Send a registration request");
        }
      }
    }
5. The purpose of async+await is to simplify the writing of then, which can be replaced by async+await
- await waits asynchronously (axiox is asynchronous) to get data
- Use the await keyword in front of the interface function. The function near the await keyword must be decorated with async
- To use await, you must add a modifier async to the method name and the nearest function
- (currently the most recent callback function) - -- > async(valid)
 methods: {
    handleReg() {
      // Bottom verification
      this.$refs.regFormReg.validate(async(valid) => {
        if (!valid) return;
        await reqAPI(this.regForm).then((resp) => {
            console.log("Look what you got", resp);
           });
        }
      }
    }
6. Call the interface function to obtain the background data and deconstruct the assignment
methods: {
    handleReg() {
      // Bottom verification
      this.$refs.regFormReg.validate(async (valid) => {
        if (!valid) return;
        // Call the interface function to obtain the background data
        //const, take it The value of then((resp), the internal secondary deconstruction gets code and message
        const {
          data: { code, message },
        } = await reqAPI(this.regForm);
      });
    },
  },
7. Receive the results returned by the background and judge according to the code, О Success, 1 loss
methods: {
    handleReg() {
      // Bottom verification
      this.$refs.regFormReg.validate(async (valid) => {
        if (!valid) return;
        const {
          data: { code, message },
        } = await reqAPI(this.regForm);
        if (code === 0) {
          // Successful, give a pop-up prompt of successful registration
          // $message comes with element
          this.$message.success(message);
          //Then automatically return to the login page and navigate declaratively
          this.$router.push("/login");
        } else {
          // Failed, pop-up prompt failed
          this.$message.warning(message);
        }
      });
    },
  },
5. Go to the login page
this.$router.push("/login");Note: Src / login / index The Vue must generate a file structure internally, otherwise the < template > will not be found, resulting in an error.