Element UI simple learning + add, delete, modify and check based on springboot
Sample demonstration
Springngbooy + Vue realizes simple addition, deletion, modification and query (simple separation of front and rear ends)
How to launch our vue ui
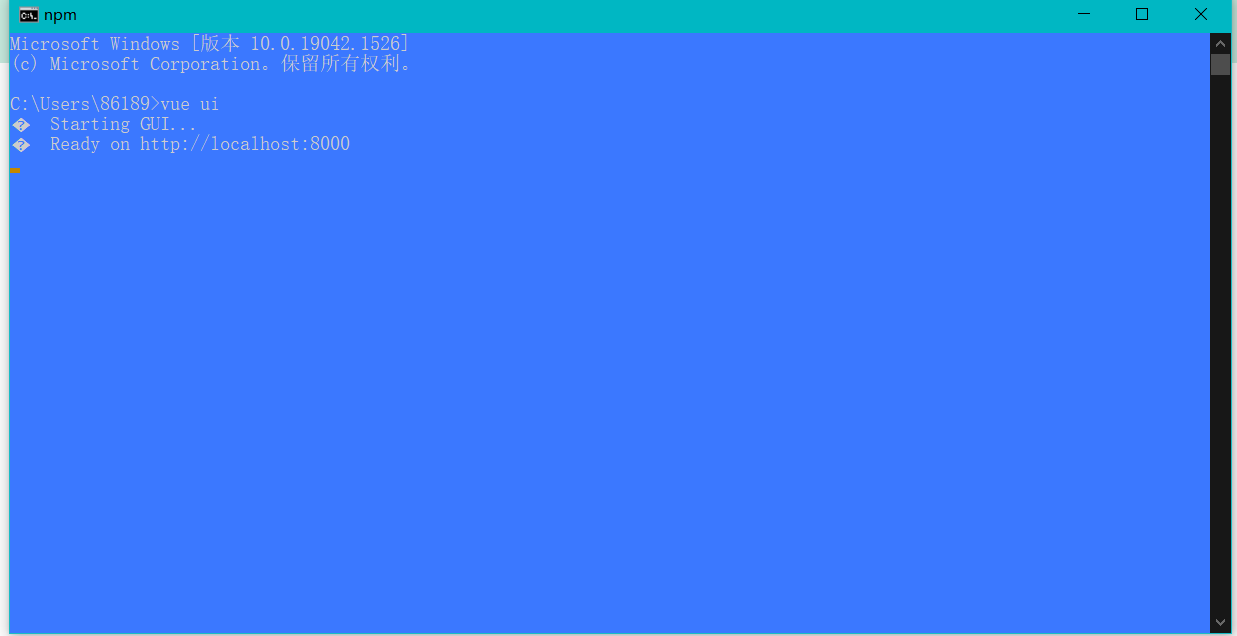
Our element ui created here is designed
We are graphical
ui (graphical interface) (execute our vue ui, which we want to create)
The first thing we do is to create a vue project
After creation, we will install the plug-in of our element ui
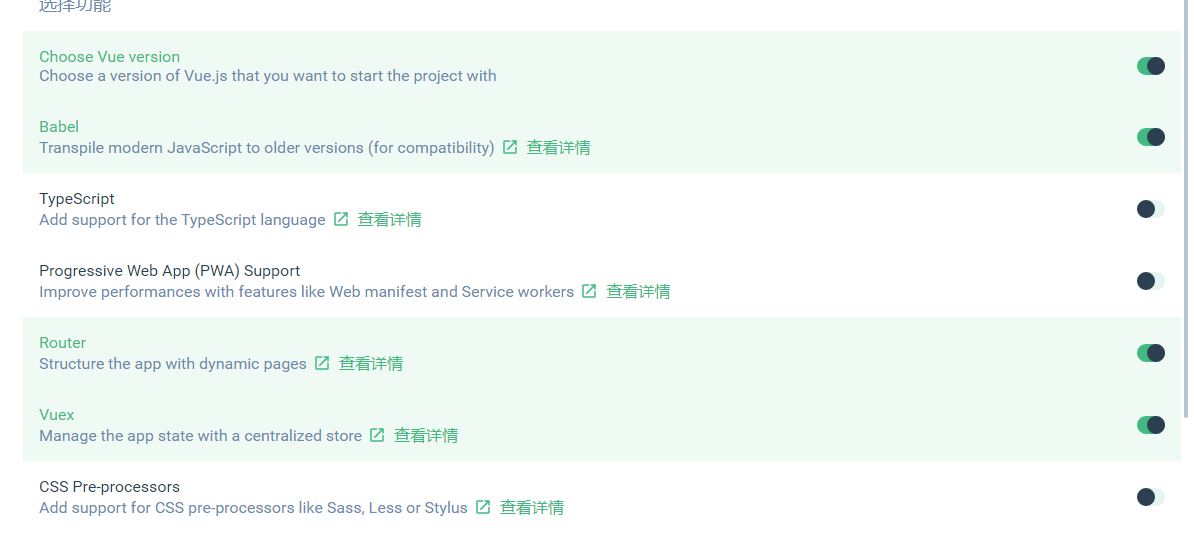
This is the plug-in we want to choose
But what we want to delete is the format, which is to format our code. Is this very important
This is still more important
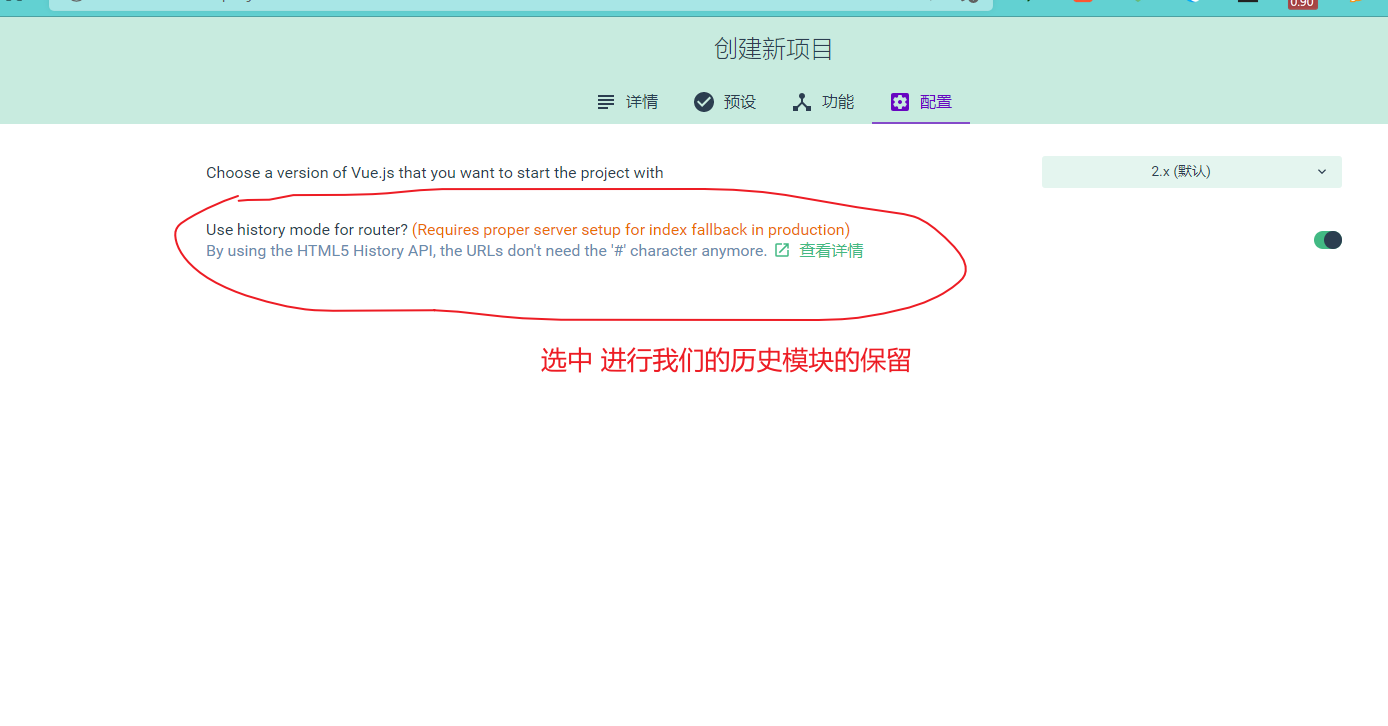
Start history module
Effect after creation

Then one of our element ui plug-ins has been installed, so we can directly install the plug-ins
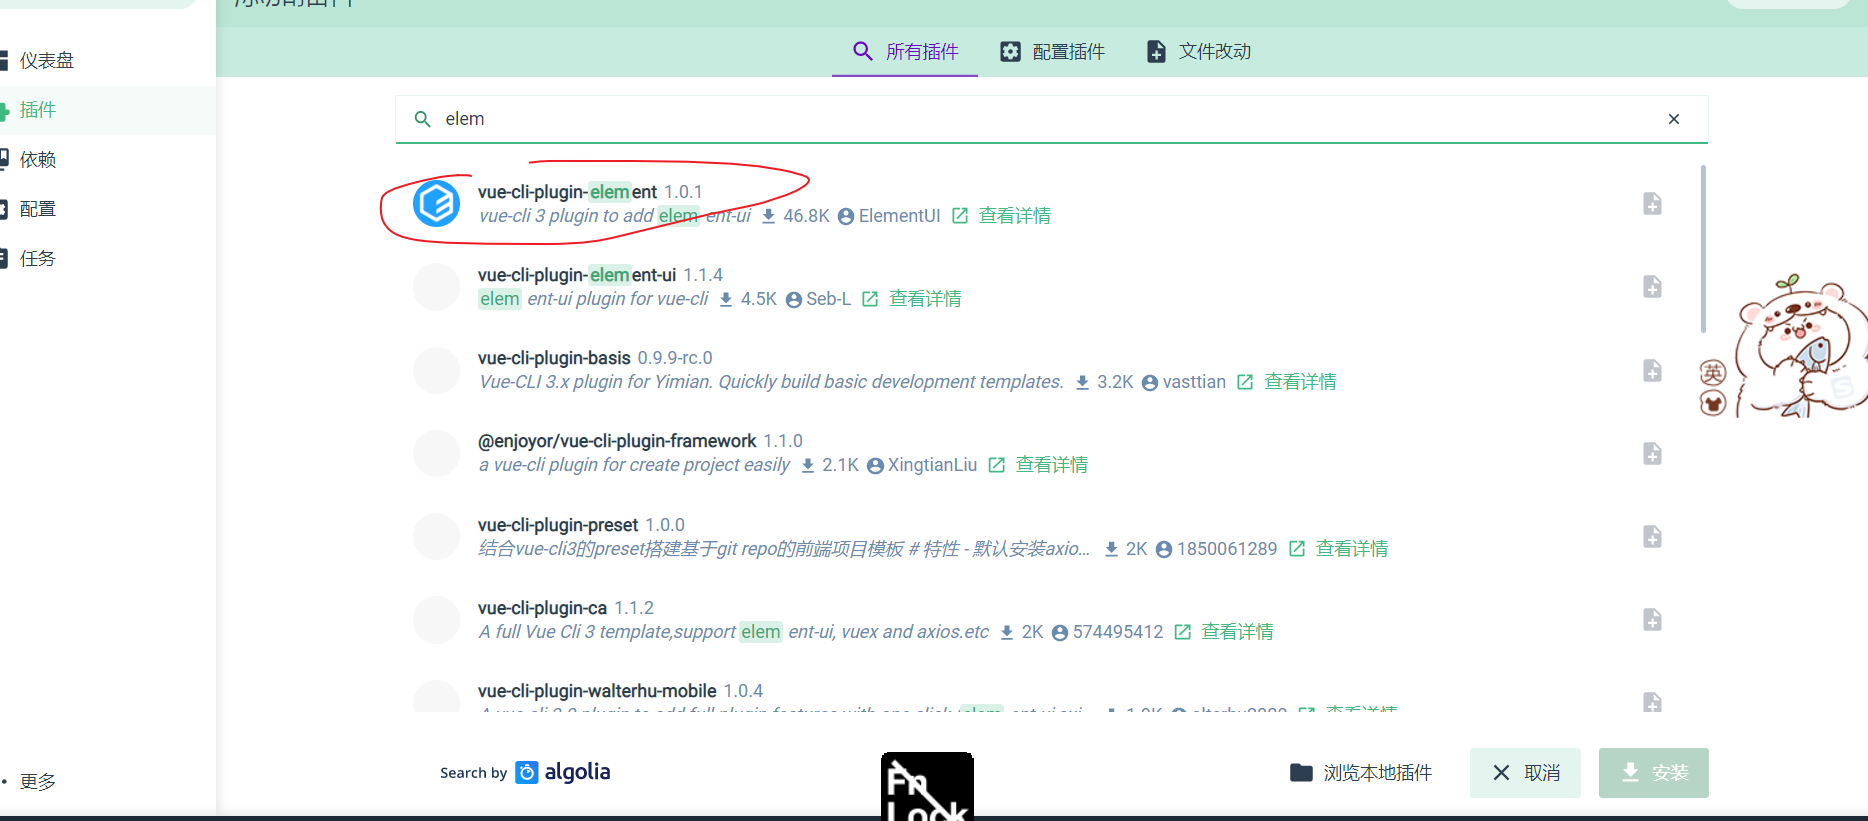
Just search directly and install it
Just install it
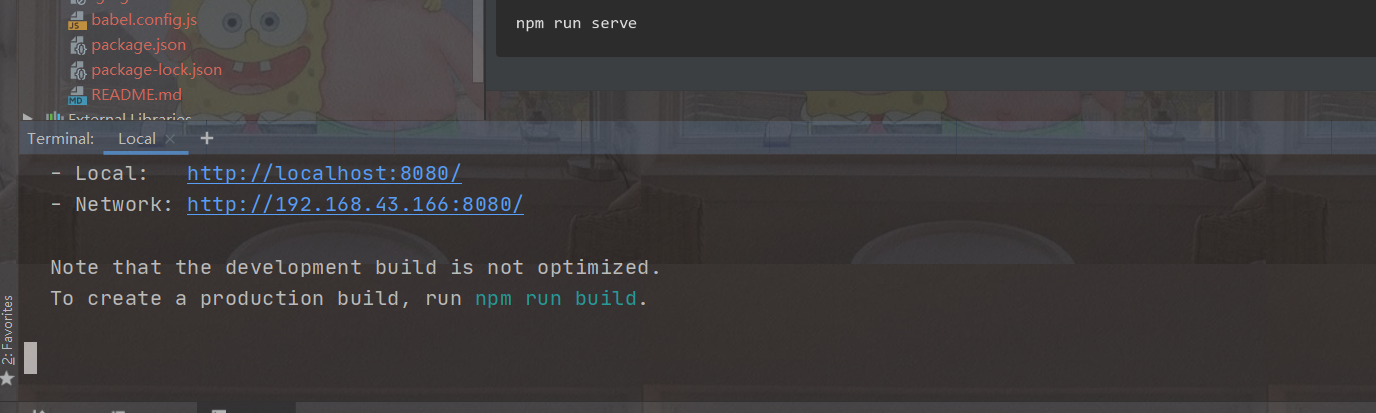
Next, start the project
We directly open our vue in our idea (that is, the vue project we just created), and then use the idea
Just open it
Then we can directly run our commands in the idea integrated console
npm run serve
The following picture is the effect of our successful operation
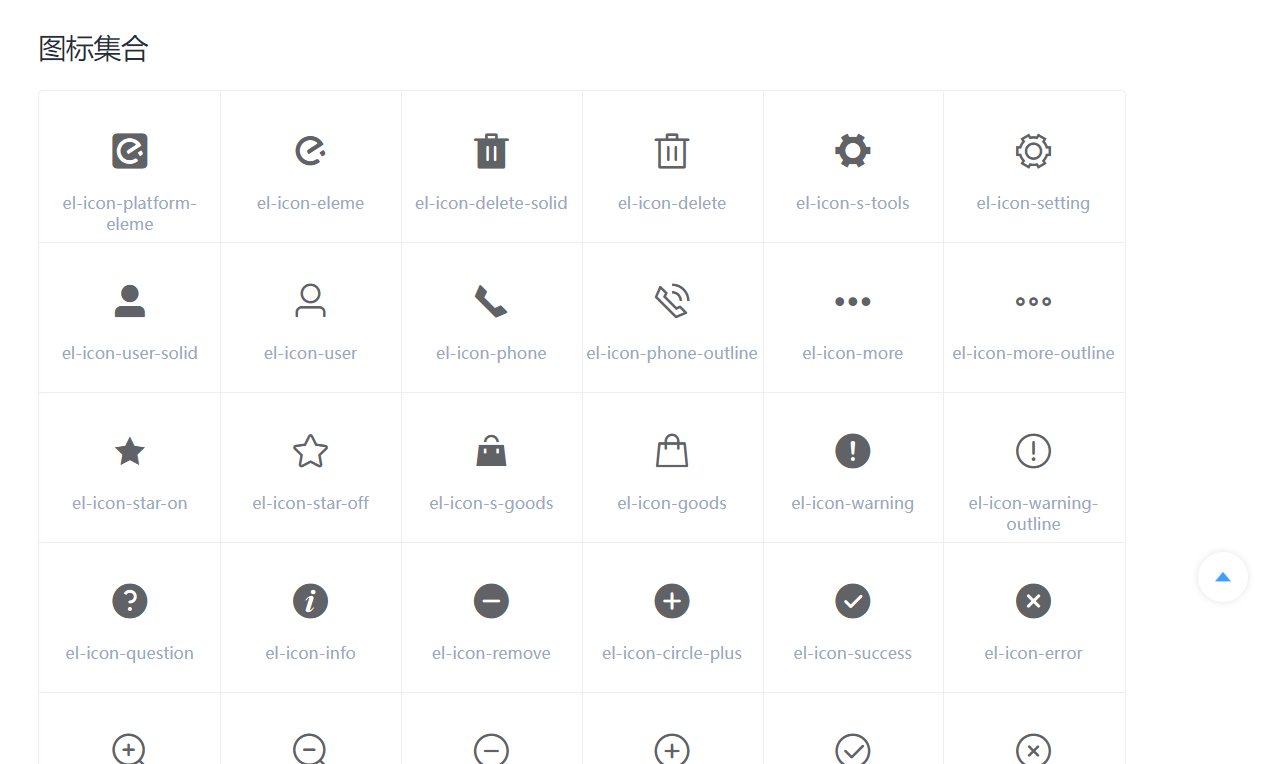
Element - icon provided by UI
That is, a set of commonly used icon components
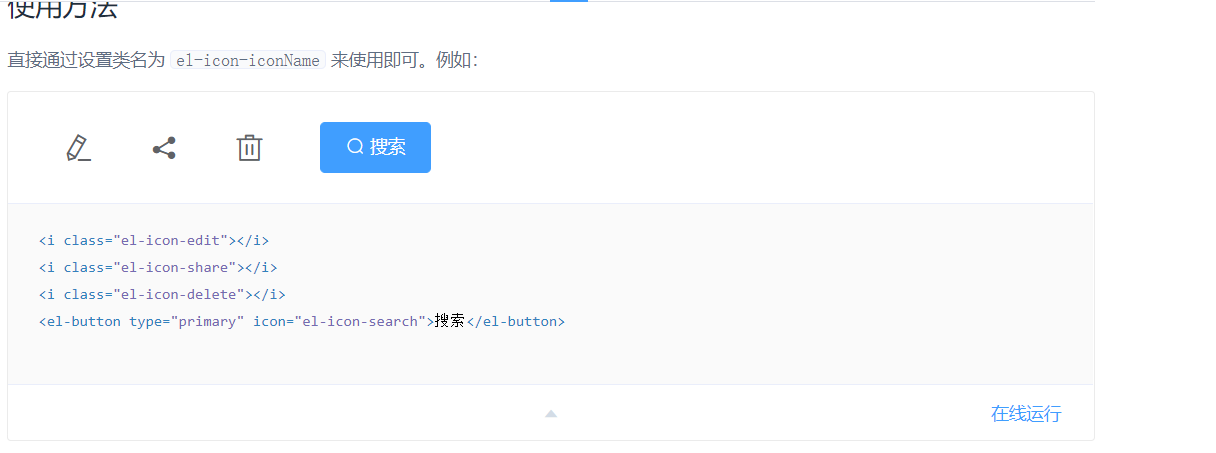
It's very simple. We just modify the class name we want
Let's just use their labels
Button button in element ui
This is also a group of commonly used operation buttons
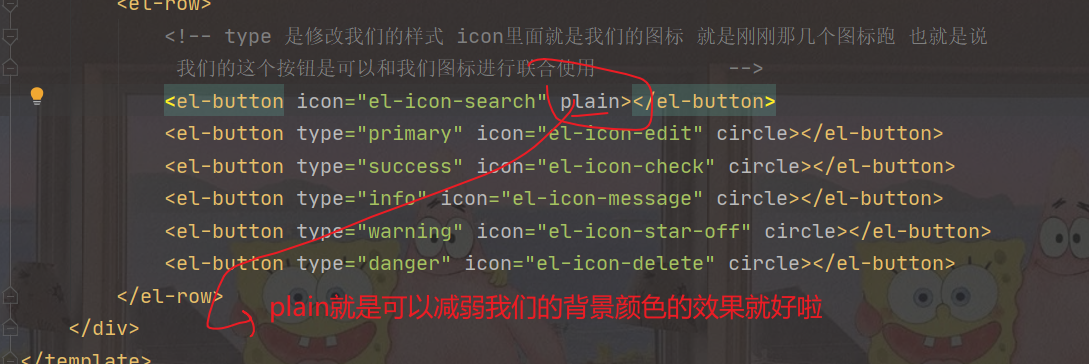
This is the style processing we want to carry out. What we can see is such rounded corners and the weakening of our background
These effects can be superimposed. Both plain and round can be superimposed, and better results can be achieved through our superposition processing
Circle is to set our button directly as a circle, which is directly as a circle

There is also a click event that binds us
That is, we can set whether our icon can be clicked or not
Set our disabled

The loading attribute can set the loading effect for the button
<el-button type="success" icon="el-icon-check" circle @click="test()" :loading="loading"></el-button>
Here is to bind our button attribute to our button. When we click this button, we will bind our load attribute,
We bound our load properties with our values,
//Here is the packaging processing for our code. For example, our test and our settimeout are to set our timing switch
<script>
    export default {
        name: "test",
        methods: {
            test() {
                this.loading = true
                setTimeout(()=>{
                    this.loading=false
                },3000)
            }
        },
        data() {
            return {
                loading: false
            }
        }
    }
</script>
Size sets the size of our pictures. Instead of setting pixels, we set our minus big or something

Here, we can set our to process from large to small to realize our data
Use of element UI hyperlinks
Use of link
File hyperlinks
We take the El linked tag
After setting, we can directly use this tag to process some data

When we set our target attribute to him and set its target attribute to blank, an empty page will open by default
Similarly, we can set our disabled attribute to our tag, which cannot be clicked.
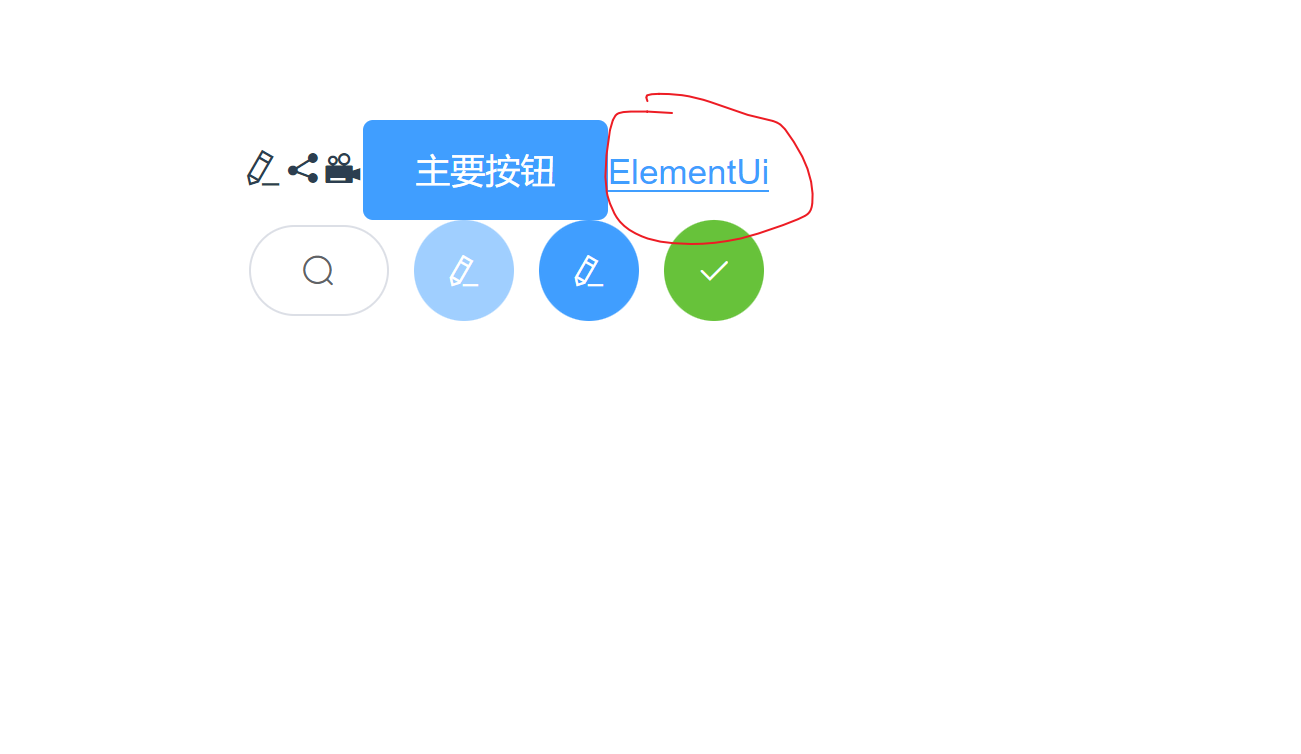
underline
This is an operation to set our underline
We directly bind the attributes
This icon can also set icons for our text hyperlinks


Let's just modify it directly in this label
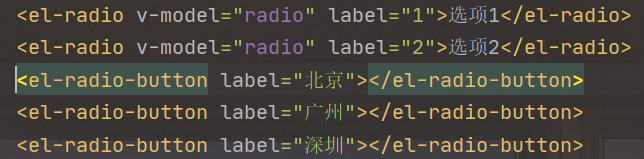
Radio radio box usage
The label adopted is El radio
Bind data through v-model and bind data objects. label represents the value of our radio box
Just write the text directly in the label
 <el-radio v-model="radio" label="1">Alternative</el-radio>
  <el-radio v-model="radio" label="2">Alternative</el-radio>

One is a button and the other is a check box. There are two options here
CheckBox
Checkbox
What this takes is
El checkbox label
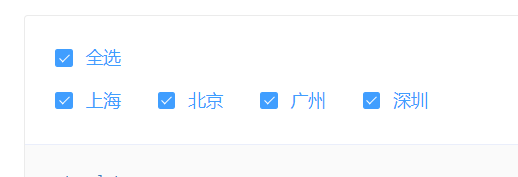
Source code analysis: in fact, it is a better understanding of the process of circular operation on an array
<template>
    <el-checkbox :indeterminate="isIndeterminate" v-model="checkAll" @change="handleCheckAllChange">Select all</el-checkbox>
    <div style="margin: 15px 0;"></div>
    <el-checkbox-group v-model="checkedCities" @change="handleCheckedCitiesChange">
        <el-checkbox v-for="city in cities" :label="city" :key="city">{{city}}</el-checkbox>
    </el-checkbox-group>
</template>

<script>
    const cityOptions = ['Shanghai', 'Beijing', 'Guangzhou', 'Shenzhen'];
    export default {
        name: "testCheckbox",
        data() {
            return {
                checkAll: false,
                checkedCities: ['Shanghai', 'Beijing'],
                cities: cityOptions,
                isIndeterminate: true
            };
        },
        methods: {
            handleCheckAllChange(val) {
                this.checkedCities = val ? cityOptions : [];
                this.isIndeterminate = false;
            },
            handleCheckedCitiesChange(value) {
                //If we are not sure what some data is, we can print it out
                //What we can do here is
                //alert(value) / / here is the data processing we want to print out, which is very important
                let checkedCount = value.length;
                this.checkAll = checkedCount === this.cities.length;
                this.isIndeterminate = checkedCount > 0 && checkedCount < this.cities.length;
            }
        }


    }


</script>

<style scoped>

</style>
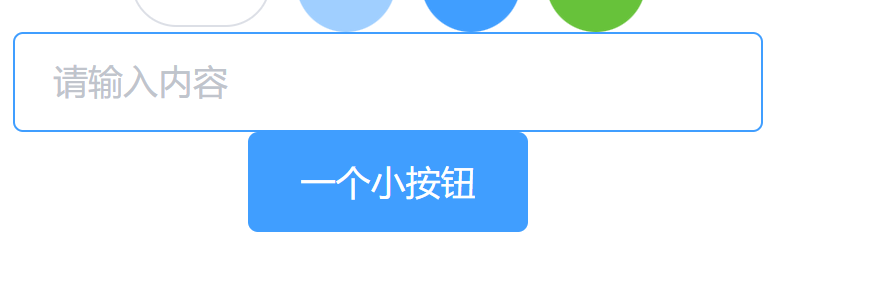
Input input box
Controlled components
    <el-input v-model="input" placeholder="Please enter the content"
            ></el-input>
            <el-button type="primary"@click="click()">A small button</el-button>
We can set our attribute by modifying the attribute large/medium of our input box through our size attribute
How to modify the size of our input box
As for the modification size of this input box, because this is an add-on component, it does not provide us with the modification of this width, so if we want to modify it
The following methods can be adopted for actual operation
     <div style="width: 300px">
            <el-row>
                <el-input v-model="input" placeholder="Please enter the content"
                ></el-input>
                <el-button type="primary" @click="click()">A small button</el-button>
            </el-row>
        </div>
This attribute is achieved by modifying the style of div tags nested outside us
The show password property can be switched
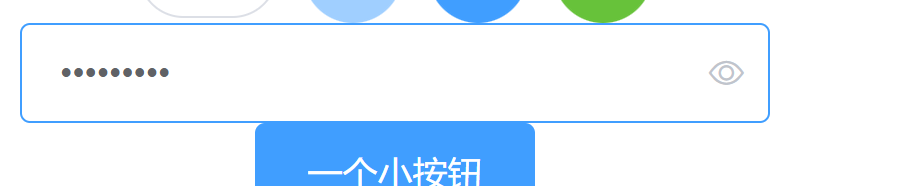
After adding our show password attribute, we can hide our password
You can switch by yourself
We can also set up our pictures
Add our picture (icon) to our input component
Prefix icon and our suffix icon are used to set the icon at the top
Display effect:


One of the data here is our maximum length limit, and the other is our maximum length
Use of select drop-down box
The first is the effect

el-select/el-option
We use our v-model to bind our data
Then we use our label to display our text
Value is the value of our current option
<template>
  <el-select v-model="value" placeholder="Please select">
    <el-option
     //Perform a for loop to traverse and render our data entry
     //Take something from our array
      v-for="item in options"
      :key="item.value"
      :label="item.label"
      :value="item.value">
    </el-option>
  </el-select>
</template>

<script>
  export default {
    data() {
      return {
        options: [{
          value: 'Option 1',
          label: 'Golden cake'
        }, {
          value: 'Option 2',
          label: 'double-layer steamed milk custard'
        }, {
          value: 'Option 3',
          label: 'Oyster omelet'
        }, {
          value: 'Option 4',
          label: 'dragon whiskers noodles'
        }, {
          value: 'Option 5',
          label: 'Beijing Roast Duck'
        }],
        value: ''
      }
    }
  }
</script>
Use of Switch components
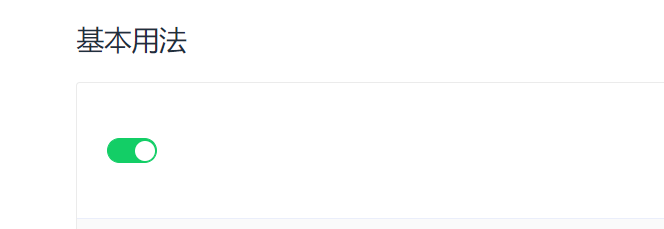
This represents the switching processing of our two groups of relatively opposite events
We use El switch to process our data
We still use v-model to bind our data
Switch switch is adopted
Using our Boolean type for our switch processing is that our TRUE represents on and FALSE represents off
We can carry out actual operation and processing in the data of our Switch
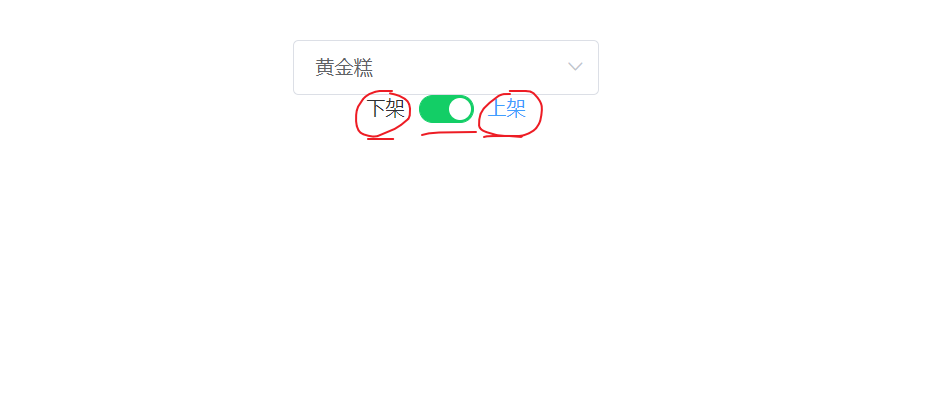
<el-switch
        v-model="value1"
        active-color="#13ce66"
        active-text="Put on the shelf"
        inactive-color="#ff4949"
            inactive-text="Off the shelf">
    <!--We can change the value of this color, which is determined by ourselves. It depends on our own operation. How to operate this is more important-->
</el-switch>
This active text = "on the shelf" represents the changes we make when we move our Switch to our left, and then what is our text content when we move our Switch to our right
Upload our files in upload
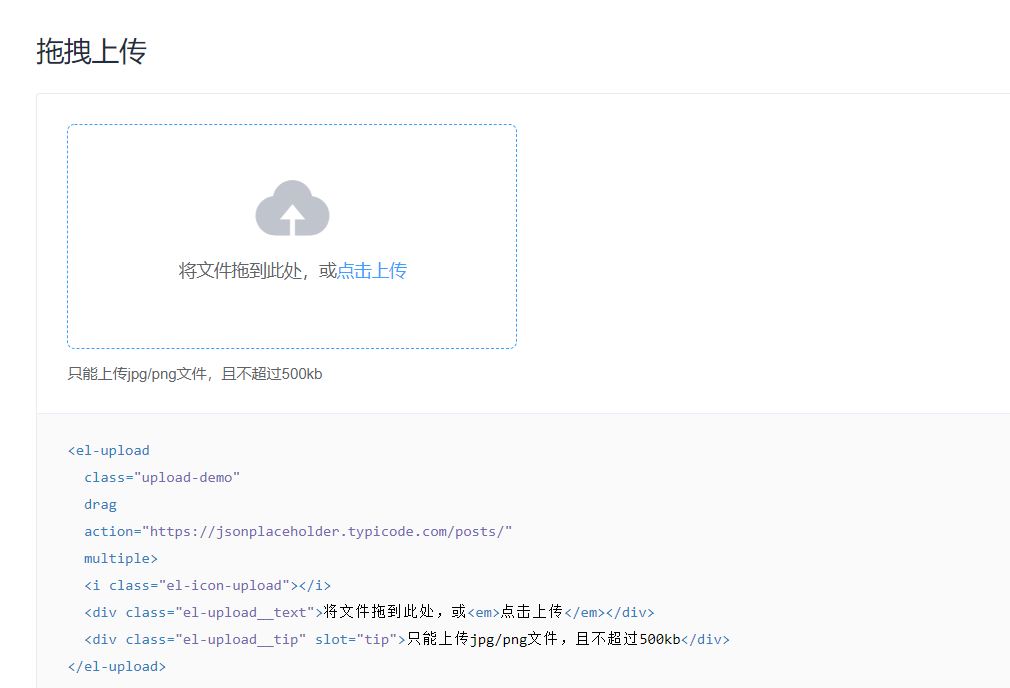
Here we choose a more beautiful code for our actual operation
In this way, we can actually drag our data here directly
Here is our code
<el-upload
  class="upload-demo"
  drag
  action="https://jsonplaceholder.typicode.com/posts/"
           //This is the interface of our backend request
  multiple>
  <i class="el-icon-upload"></i>
  <div class="el-upload__text">Drag the file here, or<em>Click upload</em></div>
  <div class="el-upload__tip" slot="tip">Upload only jpg/png Documents, and no more than 500 kb</div>
</el-upload>
action is our back-end interface. It will transfer our data to our back-end through this interface
At the back end, we use springboot+easyExcel data for parsing
Our idea is to put our Excel table into our drag box, and then we analyze our data from the background

    <dependency>
            <groupId>com.alibaba</groupId>
            <artifactId>easyexcel</artifactId>
            <version>2.2.6</version>
        </dependency>
This is the dependency we added in the pom file
2. Create a class to map Excel files
That is, the attributes of the class correspond to this
@Data
public class ExcelVo {
    //This is our entity class
    @ExcelProperty("number")
    private Integer id;//By adding our annotation to this, we can map our data with the data in Excel
    @ExcelProperty("full name")
    private String name;
    @ExcelProperty("Gender")
    private String gender;
    @ExcelProperty("Age")
    private String age;
    @ExcelProperty("class")
    private String classes;

}
Then we create an Excelservice to implement our business logic
The following is what our service layer does
package com.example.test.excelService;

import com.alibaba.excel.EasyExcel;
import com.alibaba.excel.context.AnalysisContext;
import com.alibaba.excel.event.AnalysisEventListener;
import com.example.test.entity.ExcelVo;
import org.springframework.stereotype.Service;

import java.io.InputStream;
import java.util.ArrayList;
import java.util.List;

/**
 * @author yt1105
 * @version 1.0
 */
@Service
public class ExcelServiceImpl implements ExcelService {
    @Override
    public List<ExcelVo> list(InputStream inputStream) {
        List<ExcelVo> list = new ArrayList<>();
        EasyExcel.read(inputStream).
                head(ExcelVo.class).sheet().
                registerReadListener(new AnalysisEventListener<ExcelVo>
                        () {
                    @Override
                    public void invoke(ExcelVo excelVo, AnalysisContext analysisContext) {
                        list.add(excelVo);//This function will parse the data in our Excel into one of our entity classes every time
                        //Anything we put in
                    }
                    @Override
                    public void doAfterAllAnalysed(AnalysisContext analysisContext) {
                        System.out.println("Data analysis completed");
                    }
                }).doRead();
        return list;
    }
}
Create controller Excelcontroller
Receive the front-end request and call Excelservice for data analysis
package com.example.test.ExcelController;

import com.example.test.entity.ExcelVo;
import com.example.test.excelService.ExcelService;
import org.springframework.beans.factory.annotation.Autowired;
import org.springframework.web.bind.annotation.PostMapping;
import org.springframework.web.bind.annotation.RequestMapping;
import org.springframework.web.bind.annotation.RequestParam;
import org.springframework.web.bind.annotation.RestController;
import org.springframework.web.multipart.MultipartFile;

import java.io.IOException;
import java.util.List;

/**
 * @author yt1105
 * @version 1.0
 */
@RestController
@RequestMapping("/excel")
public class controller {
    @Autowired
    private ExcelService excelService;

    @PostMapping("/import")
    public String importDate(@RequestParam("file") MultipartFile file) {
        try {
            List<ExcelVo> list = this.excelService.list(file.getInputStream());
            for (ExcelVo excelvo : list
            ) {
                System.out.println(excelvo);

            }
        } catch (IOException e) {
            return "fail";
        }
        return "success";
    }
}
The problem is that there is no way to put the front-end data into the back-end
The uploaded data cannot be uploaded
Further solutions are needed
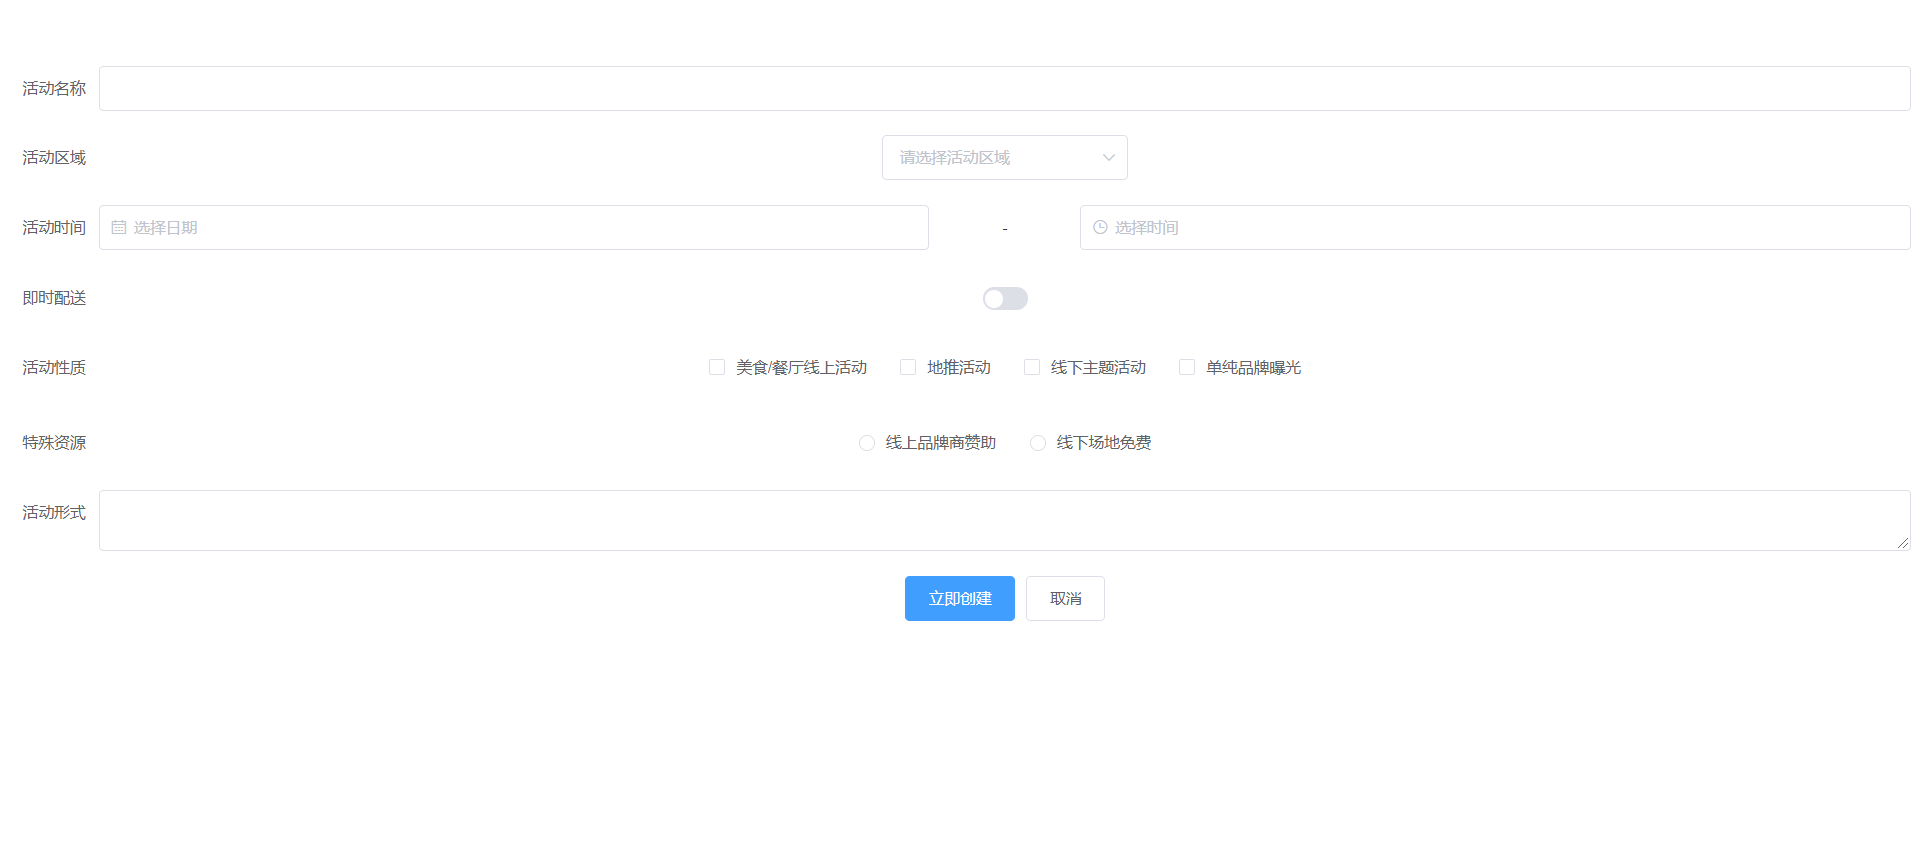
Form form
In the Form component, each Form field is composed of a Form item component. Various types of Form controls can be placed in the Form field, including Input, Select, Checkbox, Radio, Switch, DatePicker and TimePicker
Various types of form controls can be placed in form fields.
What we learned before can be embedded into our form.
The value of the whole form field is directly bound to the vue object
This is the effect of our demonstration
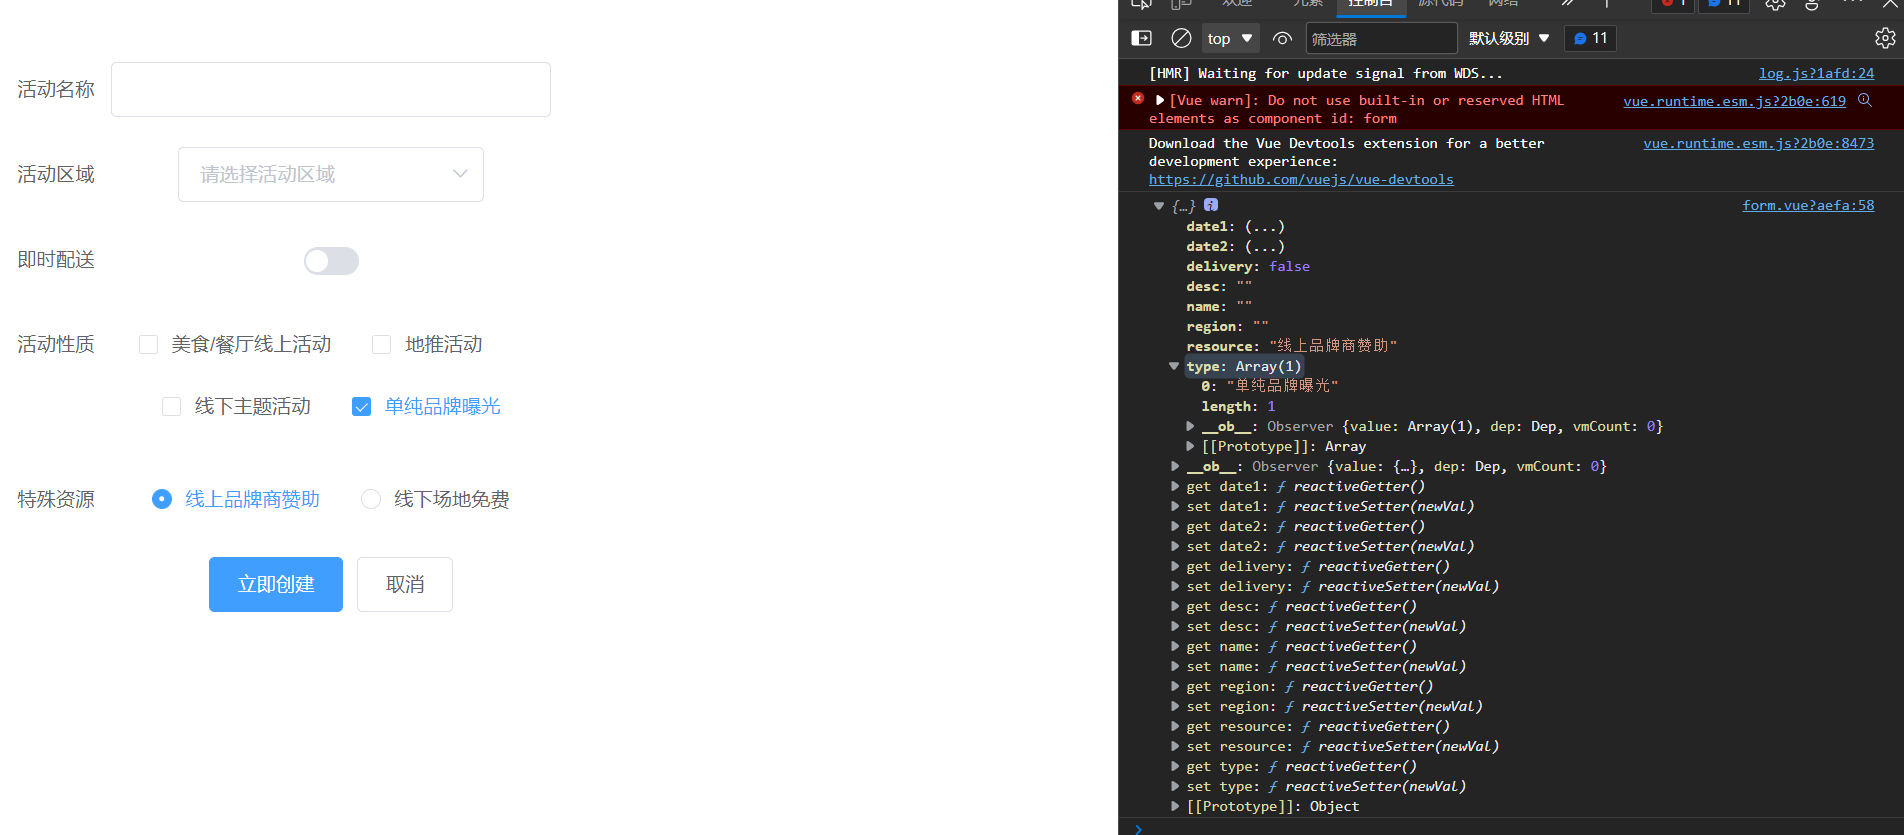
What we can see is that our data is encapsulated in our form
What we can use directly is the data we want to pass to the background
This can also be said to be our data binding
data verification
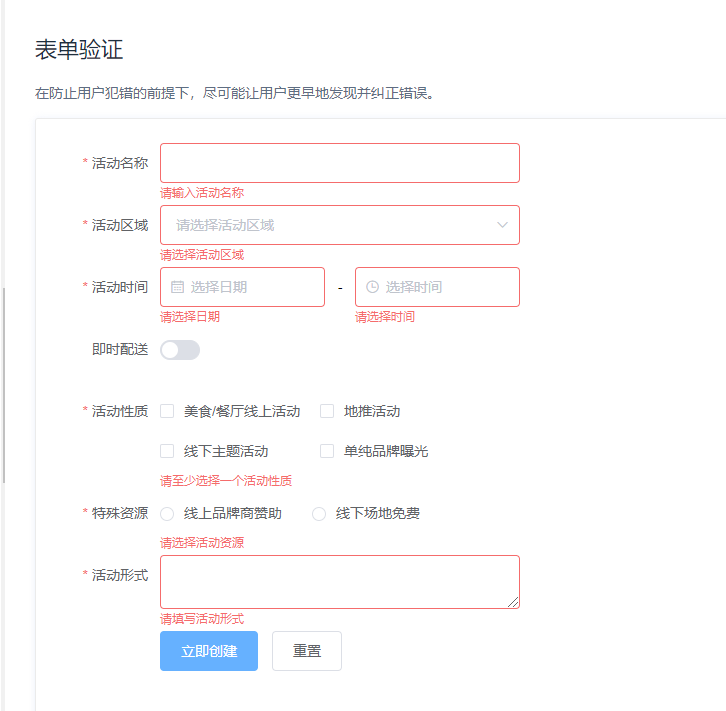
This is a problem we often encounter in our development process later, so it is also a problem we need to master frequently,
So we can further process the data we need
Because once we don't input our data accurately, we will report an error
Here is our data verification code
User defined data verification (that is, we decide how to verify the mailbox)
We can define our regular expressions for verification
We use our regular expression for verification
          var checkEmail = (
                rule, value, callback
            ) => {
                const mailReg = /^(?![0-9]+$)(?![a-zA-Z]+$)(?!([^(0-9a-zA-Z)]|[\(\)])+$)([^(0-9a-zA-Z)]|[\(\)]|[a-zA-Z]|[0-9]){6,}$/
                if (!value) {
                    return callback(new Error("Mailbox cannot be empty"))
                }
                setTimeout(() => {
                    if (mailReg.test(value)) {
                        callback();
                    } else {
                        callback(new Error("Please enter the correct format"))
                    }
                }, 100)
            };
Add, delete, modify and query (combined with component crud)
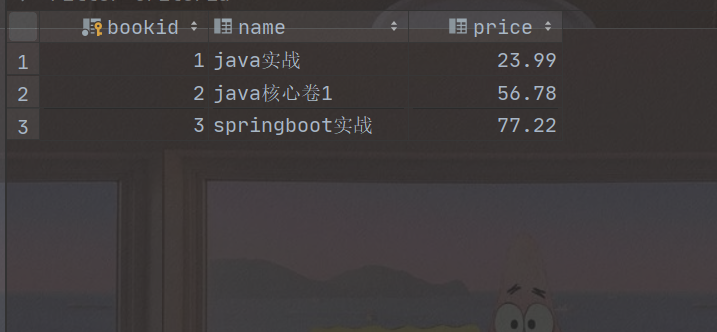
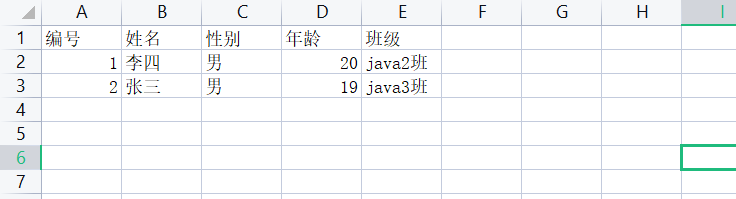
This is our data sheet
We do the so-called addition, deletion, modification and query on the data of our table
Let's write out our back-end interface first
<dependency>
            <groupId>com.baomidou</groupId>
            <artifactId>mybatis-plus-boot-starter</artifactId>
            <version>3.4.2</version>
        </dependency>
        <dependency>
            <groupId>com.baomidou</groupId>
            <artifactId>mybatis-plus-generator</artifactId>
            <version>3.4.1</version>
        </dependency>
        <dependency>
            <groupId>org.apache.velocity</groupId>
            <artifactId>velocity</artifactId>
            <version>1.6.2</version>
        </dependency>
One is its own dependence
One is code generation
Automatically generate back-end code through mybaits plus
This code automatic generator is easy to use
package com.example.test;

import com.baomidou.mybatisplus.annotation.DbType;
import com.baomidou.mybatisplus.generator.AutoGenerator;
import com.baomidou.mybatisplus.generator.config.DataSourceConfig;
import com.baomidou.mybatisplus.generator.config.GlobalConfig;
import com.baomidou.mybatisplus.generator.config.PackageConfig;
import com.baomidou.mybatisplus.generator.config.StrategyConfig;
import com.baomidou.mybatisplus.generator.config.rules.NamingStrategy;

/**
 * @author yt1105
 * @version 1.0
 */
public class Main {
    public static void main(String[] args) {
        AutoGenerator autoGenerator = new AutoGenerator();
        //data source
        DataSourceConfig dataSourceConfig = new DataSourceConfig();
        //The latter is equivalent to passing parameters to our data
        dataSourceConfig.setDbType(DbType.MYSQL);//This is to configure our mysql attributes
        dataSourceConfig.setDriverName("com.mysql.cj.jdbc.Driver");
        dataSourceConfig.setUrl("jdbc:mysql://localhost:3306/yt01?serverTimezone=Asia/Shanghai");
        dataSourceConfig.setUsername("root");
        dataSourceConfig.setPassword("root");
        autoGenerator.setDataSource(dataSourceConfig);

        //Global configuration
        GlobalConfig globalConfig = new GlobalConfig();
        globalConfig.setOutputDir(System.getProperty("user.dir") + "/src/main/java");
        globalConfig.setAuthor("yt");
        globalConfig.setOpen(false);//Setting whether to open our code is to open the resource manager. We don't need to open it
        //Package configuration
        PackageConfig packageConfig = new PackageConfig();
        packageConfig.setParent("com.yt");
        packageConfig.setEntity("entity");
        packageConfig.setMapper("mapper");
        packageConfig.setService("service");
        packageConfig.setServiceImpl("service.impl");
        packageConfig.setController("controller");
        autoGenerator.setPackageInfo(packageConfig);
        //Policy configuration
        StrategyConfig strategyConfig = new StrategyConfig();
        strategyConfig.setInclude("temp");
        strategyConfig.setNaming(NamingStrategy.underline_to_camel);
        strategyConfig.setNaming(NamingStrategy.underline_to_camel);
        strategyConfig.setEntityLombokModel(true);
        autoGenerator.setStrategy(strategyConfig);//Join our configuration processing
        autoGenerator.execute();

    }
}
This is showing success
We successfully displayed our data on a page
Similarly, you still need to configure the data in your own yml file
server:
  port: 8081
spring:
  datasource:
    driver-class-name: com.mysql.cj.jdbc.Driver
    url: jdbc:mysql://localhost:3306/yt01?serverTimezone=Asia/Shanghai
    username: root
    password: root
  thymeleaf:
    cache: false
mybatis-plus:
  configuration:
    map-underscore-to-camel-case: true
  mapper-locations: classpath:mapper/*.xml
Because we can directly use the code given to us by others
We can write controller directly
Front end code writing
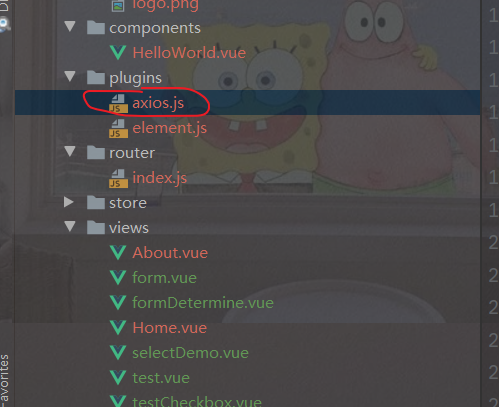
1. We need an axios plug-in
Select the first item to install the oek directly
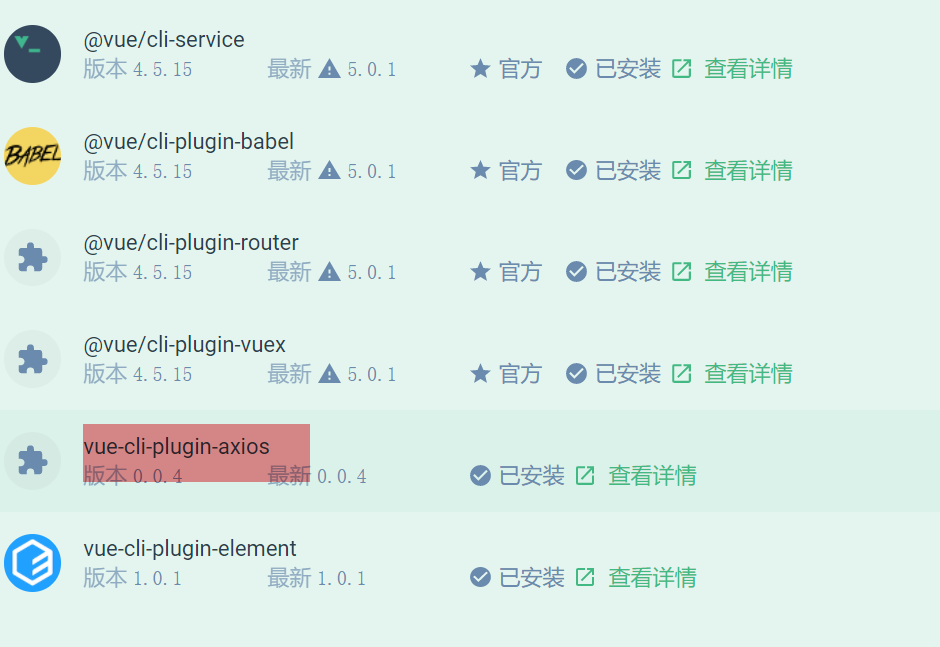
The operation is basically the same as that of installing the element ui before us
1. Data display
We just need to replace our fake data with the data in our data
What do you mean? Our current data can't be modified dynamically
But we can
However, the so-called cross domain problem will occur in the process of our front and back-end interaction
What do you mean, let's take a look, that is
The first thing we met
Our backend code
Front end domain name
(http://localhost:8080/index01)
Obviously, we can see that the two port numbers are different, so this is also the focus of our solution
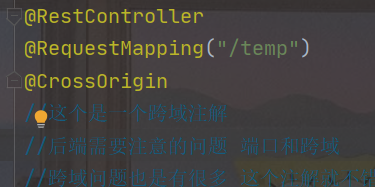
Add cross domain annotation in our background to solve our cross domain problems
This is a back-end operation. Of course, there are still front-end operations, but we won't solve them one by one here
Just talk about this method, OK
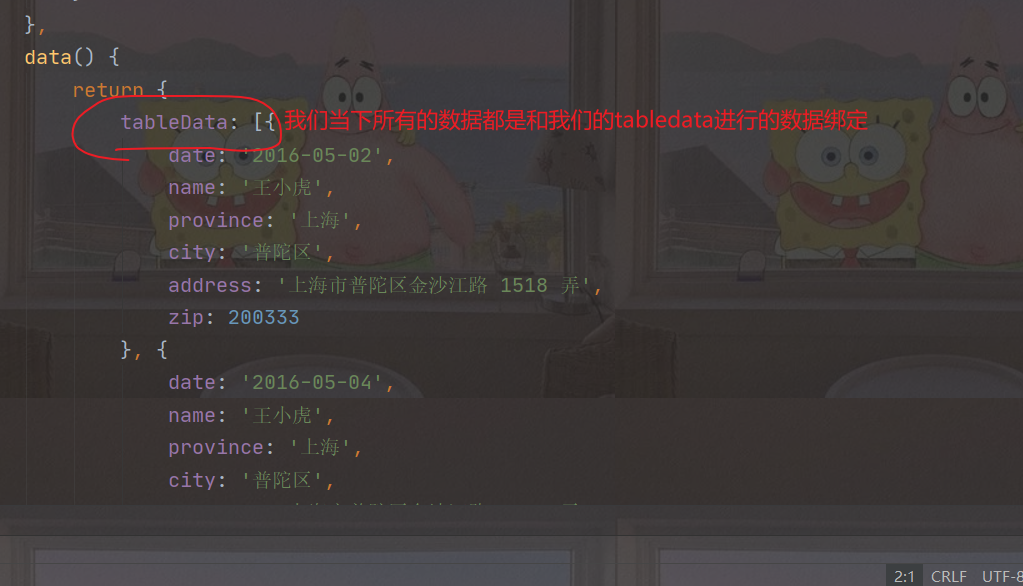
This is our data
<template>
<el-table
:data="tableData"
border
style="width: 800px">
<el-table-column
fixed
prop="bookid"
label="number"
width="150">
</el-table-column>
<el-table-column
prop="name"
label="title"
width="150">
</el-table-column>
<el-table-column
prop="price"
label="Price"
width="250">
</el-table-column>
<el-table-column
fixed="right"
label="operation"
width="200">
<template slot-scope="scope">
<el-button
size="mini"
@click="handleEdit(scope.$index, scope.row)">edit
</el-button>
<el-button
size="mini"
type="danger"
@click="handleDelete(scope.$index, scope.row)">delete
</el-button>
</template>
</el-table-column>
</el-table>
</template>
<script>
export default {
name: "index01",
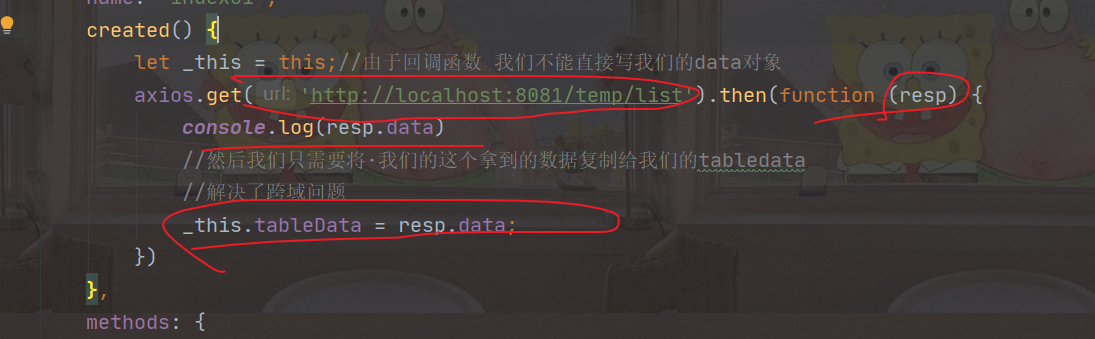
created() {
let _this = this;//Because of the callback function, we can't write our data object directly
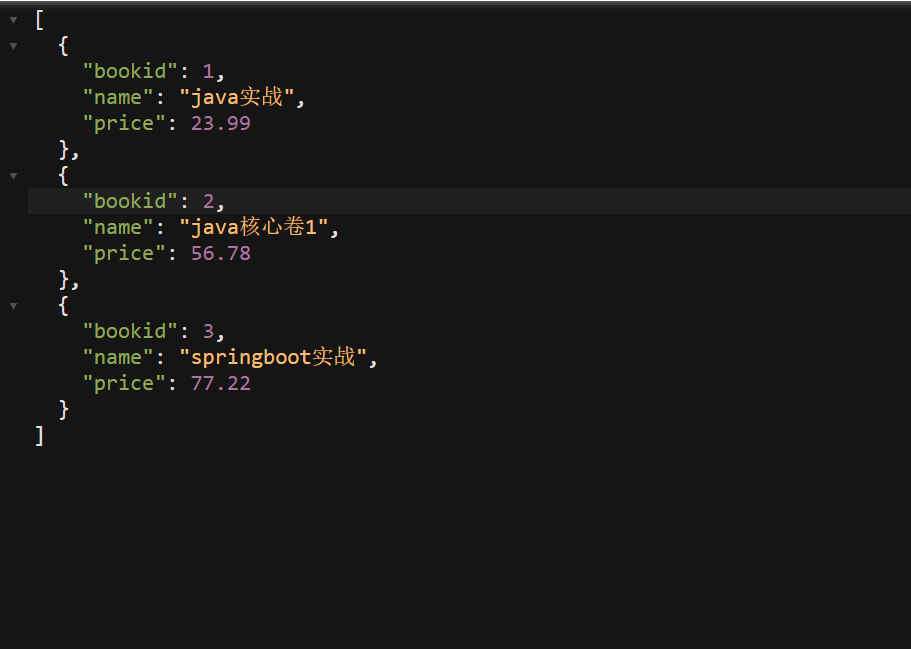
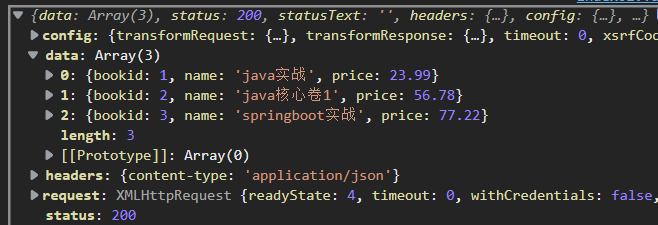
axios.get('http://localhost:8081/temp/list').then(function (resp) {
console.log(resp.data)
//Then we just need to copy the data we get to our tabledata
//Solved the cross domain problem
_this.tableData = resp.data;//Here, our data can be mapped one by one
})
},
methods: {
handleClick(row) {
console.log(row);
}
},
data() {
return {
tableData: ''
//Here, we can directly set our tabledata to null, because we can't use this data at all. We transfer our data dynamically
}
}
}
</script>
<style scoped>
</style>
Delete data
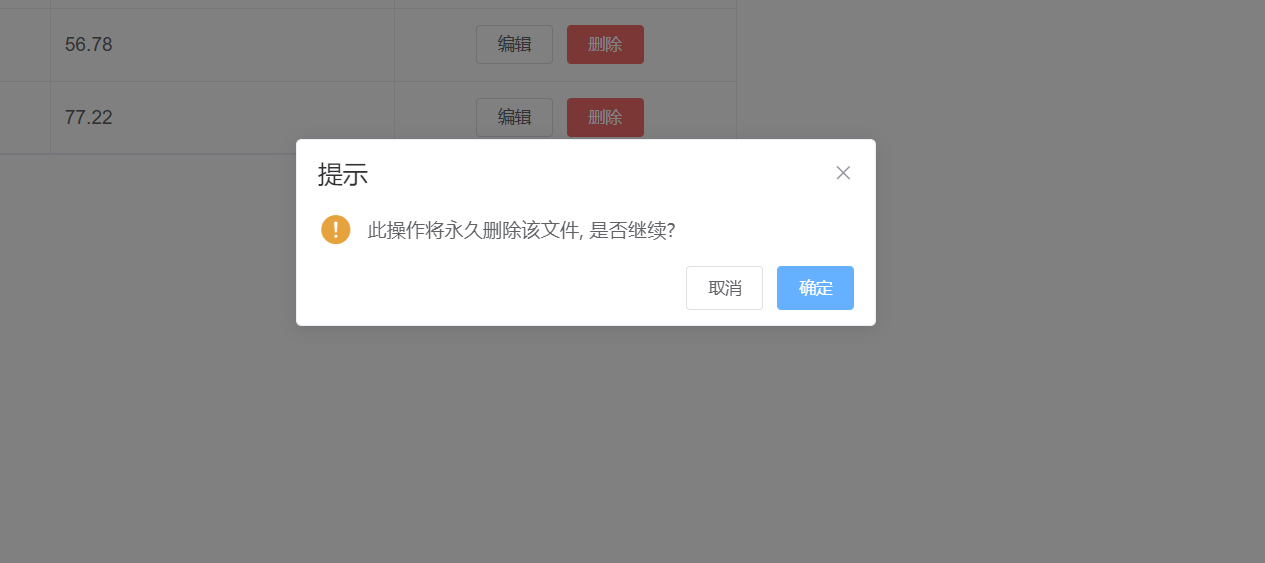
This is a function of pop-up window designed by element ui. We can use this code directly
    handleClick(row) {
                let _this=this;
                console.log(row);
            },handleDelete(row){
                this.$confirm('This operation will be permanently deleted'+row.name+', Continue?', 'Tips', {
                    confirmButtonText: 'determine',
                    cancelButtonText: 'cancel',
                    type: 'warning'
                }).then(() => {
                   axios.delete('http://localhost:8081/temp/delete/'+row.bookid).then(function (resp) {
                        if (resp.data){
                            _this.$alert('<'+row.name+'>', 'Tips', {
                                confirmButtonText: 'determine',
                                callback: action => {
                                 location.reload();
                                 //If our data is loaded successfully, we can just reload our page
                                }
                            });
                        }
                   })
                }).catch(() => {
                    this.$message({
                        type: 'info',
                        message: 'Deletion cancelled'
                    });
                });
            }
This is our deletion code, which is bound
modify
Code demonstration
One of our echoes is our findbyid
When we click our Edit button, we will jump to a new page
Where do we do the new editing
We can use the interface provided to us by the back end, and then we can carry out the operation of callback function to obtain the data we want
Then render the front end accordingly
The key is to pay attention to how to deal with the problem of cross domain
Here I take the way of adding annotations to the back end to deal with our cross domain problems.
To delete data is to call our back-end interface and pass in the id you want to delete
As for how the back-end works, we don't need to worry about how to realize the bottom layer, that is, the front-end doesn't need to know how the back-end operates our database. At the same time, due to the mybaits plus in our back-end, we can directly use the encapsulated code, but in the actual development, we can't rely too much on these things. We should use it rationally.
As for the front-end code, I feel that it is very miscellaneous and there are many things. I need to layout and bind some data,
Then, through request routing, layout routing and page Jump, the front-end students need to operate these things.
It is very important to be proficient in using axios and know the principle behind it.

The feeling for me is
The operation of the front-end students is to call the data passed by the back-end students, and then render the data,
Then you can do some pop-up processing, which is to deal with what to do after obtaining the data. These are the front-end students. For example, what events will be triggered after clicking this button, and then deal with the subsequent things according to the specific needs.
            }).catch(() => {
                this.$message({
                    type: 'info',
                    message: 'Deletion cancelled'
                });
            });
        }
This is our deletion code, which is bound